
从原生web组件到框架组件源码(一)
温馨提醒,当你觉得看我写的很乱的时候,就对了,那是因为我查阅了大量的资料提取出来的,因为有点东西不太理解,所以你会感觉有的部分重复了,也不是重复,只是后面对前面的内容进行梳理了一些,需要耐心的看到最后

自定义元素
我们发现自定义元素总是有破折号的Q,<my-component> 或 <bacon-cheese>
因为浏览器供应商已承诺不创建其名称中包含短划线的新内置元素,以防止冲突
<app-element></app-element>
<element></element>

  const appElement = document.querySelector('app-element');
  console.log(appElement.constructor.name);
  //  HTMLElement类型的
  const element=document.querySelector('element')
  console.log(element.constructor.name);
  // HTMLUnknownElement
上面两个自定义元素,我们通过constructor.name 知道HTML 元素类型
<app-element>实际上是一个自定义元素, 他基于HTMLElement 上标记的基本数据类型<element>数据类型HTMLUnknownElement, 是一个无效的HTML元素,浏览器并不知道它是什么元素
class MyComponent extends HTMLElement {
  connectedCallback() {
    this.innerHTML = `<h1>Hello world</h1>`;
  }
}

customElements.define('my-component', MyComponent);

<my-component></my-component>
customElements
引用customElements ,将返回浏览器加载自定义元素的全局记录,类似于注册表
| 方法 | 描述 |
|---|---|
customElement.define(``name,class(function)) |
在页面上定义一个自定义元素。 |
customElement.get(``name) |
获取已定义的自定义元素的类。 |
customElement.whenDefined(``name) |
带回 定义自定义元素时。 |
customElement.upgrade(``node) |
允许您手动更新自定义元素。 |
我们通过customElements.define() 定义自定义元素
获取自定义元素
class AppElement extends HTMLElement {
  /* ... */
}
customElements.define("app-element", AppElement);

customElements.get("app-element") === AppElement; // true
.get() 获得所请求的自定义元素的类
特定的操作
  customElements.define('my-counter', MyCounter);
  customElements.whenDefined('my-counter').then(()=>{
    console.log('xxx');
  })
简单的理解,我们在自定义元素 初始化后,进行的一些操作
更新操作
customElements.upgrade
// 创建一个自定义元素
const element = document.createElement("app-element");
// 我们把这个自定义元素定义好
class AppElement extends HTMLElement { /* ... */ }
customElements.define("app-element", AppElement);
console.log(element.constructor === HTMLElement); // true
  //我们更新下这个元素,他已经从 HTMLElement=>AppElement
  customElements.upgrade(element)
  ae.constructor === HTMLElement;   // false
  ae.constructor === AppElement;    // true
我们在.createElement() 定义前,他是HTMLElment类型,但是upgrade更新后,他就是AppElement ,
所以有必要进行手动更新
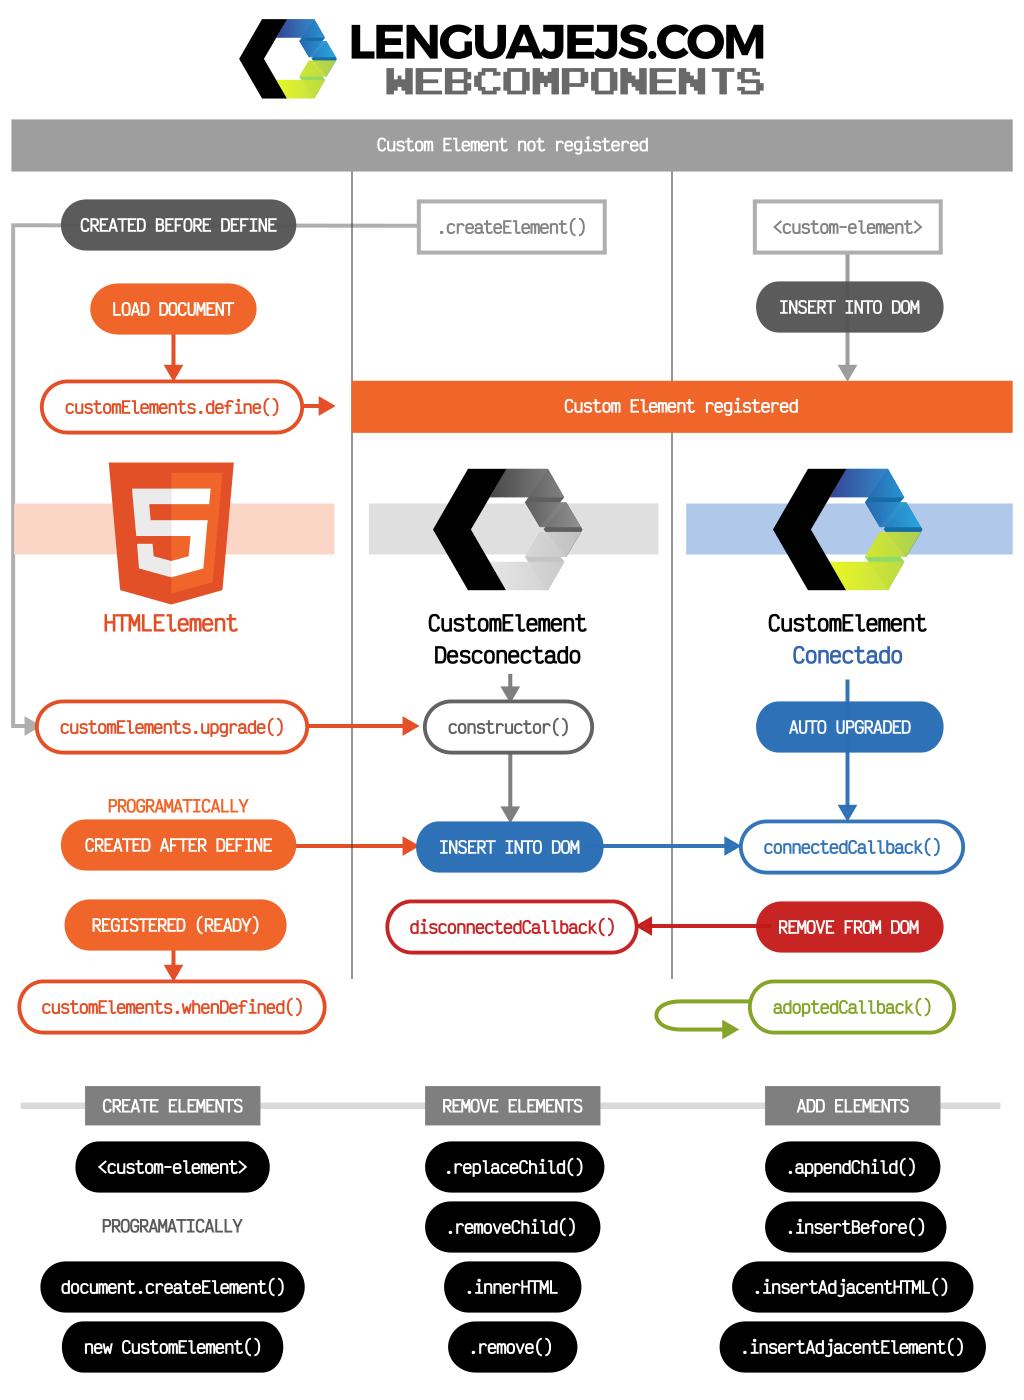
自定义元素的生命周期
connectedCallback() 是从元素的分离constructor 出来的
connectedCallback通过用于讲内容添加到元素
影子DOM
影子dom的特点
<div class="element">
  #shadow-root
    <div class="inner-element">
      ...
    </div>
</div>
shadowRootInit
element.attachShadow(shadowRootInit);
shadowRootInit设置
{mode:'open'}
element.shadowRoot // 返回一个ShadownRoot对象
root元素可以从js外部访问根节点
{mode:'closed'}
element.shadowRoot // null
拒绝js外部返回关闭的shadow
<slot> 包含文档内容的内容
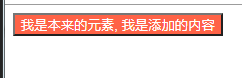
<div id="example">我是本来的元素,</div>
<script>
  let example = document.getElementById('example');
  let shadowRoots = example.attachShadow({mode: 'open'});
  shadowRoots.innerHTML = `<style>
button {
  background: tomato;
  color: white;
}
</style>
<button id="button"><slot></slot> 我是添加的内容</button>`;
</script>
HMTL模板
template 元素是HTML流中可以标记重复使用的代码模块,但是这些模块不能立即呈现
<template id="books">
<li><span class="title"></span> — <span class="author"></span></li>
</template>
<ul id="contents"></ul>
<script>
const books = [
{ title: 'The Great Gatsby', author: 'F. Scott Fitzgerald' },
{ title: 'A Farewell to Arms', author: 'Ernest Hemingway' },
{ title: 'Catch 22', author: 'Joseph Heller' }
];
const fragment=document.querySelector('#books')
const contents = document.querySelector('#contents');
books.forEach(book=>{
// 创建内容实例
const instance=document.importNode(fragment.content,true)
instance.querySelector('.title').innerText=book.title;
instance.querySelector('.author').innerText=book.author;
// 添加到dom上
contents.appendChild(instance)
})
</script>
我们发现我们使用模板的时候,我们需要把javascript
// 拿到 <template></template> 标签
const template = document.querySelector('template');
const node = document.importNode(template.content, true);
document.body.appendChild(node);
使用document.importNode 允许我们在多个位置重用相同模板内容的实例
webComponent 在项目的使用
新建一个最小的基点
class AppElement extends HTMLElement {

  constructor() {
    super();
  }

}

customElements.define("app-element", AppElement);
我们命令的时候要养成一个良好的习惯,文件通过与类命名AppElement.js
在文档中加载组件javascript 文件
<script src="/components/AppElement.js"></script>
这样我们就可以在html添加这个组件
<app-element></app-element>
或者我们用js的形式添加
const appElement = document.createElement("app-element");
document.body.appendChild(appElement);
或者我们放在一个根文件中
<script type="module" src="/js/index.js"></script>
这样我们就可以在index.js中使用
import "./components/AppElement.js";
组件属性
我们可以在constructor 添加属性或者成员
class AppElement extends HTMLElement {
    #role='devel'
  constructor() {
    super();
    this.name = "Manz";
    this.life = 5;
  	this.#role='js Devel'
  }
	test(){

	}
	#provateTest(){

	}
}
也可以添加私有属性和方法
执行方法
上面我们在自定义元素内部写了一些方法
<app-element onClick="this.test()"></app-element>
我们发现他会执行public公共类型的方法,私有方法只能在类内部执行
对于自身而且创建就执行静态方法,默认的情况的其实this可以不写因为默认调用的就是内部的方法
生命周期
| 特性 | 描述 |
|---|---|
constructor() |
已创建一个特定的自定义元素,该元素已在注册表中定义。 |
connectedCallback() |
在自定义元素已连接到HTML文档的DOM。! |
disconnectedCallback() |
在自定义元素已从HTML文档的DOM断开。! |
adoptedCallback() |
该自定义元素被移动到一个新文件(常见于iframes)。 |
attributeChangedCallback() |
自定义元素的观察属性已被修改。 |
我们可以通过document.createElement 或new AppElement() 手动创建元素
不要忘记写super(),因为我要扩展到HTMLElement
     // 调用dom时候执行
    connectedCallback() {
      this.textContent='ddd'
    }
    // 删除dom时候执行
    disconnectedCallback(){
      console.log(333);
    }
我们发现在操作dom的时候connectedCallback一些方法
在删除了dom的时候,会调用disconnectedCallback
adoptedCallback() 自定义元素移动一个新文件(这个我暂时不清楚),不太清楚现实的用意在哪
变更检测
可以使用HTML元素的属性
| 方法 | 描述 | 返回值 |
|---|---|---|
| .hasAttributes() | 元素有属性吗? | boolean |
| .getAttributeNames() | 返回一个array属性的小写属性值 | Array |
| .hasAttribute(name) | 查询某个name是否存在 | boolean |
| .getAttribute(name) | 返回name的属性值,不存在返回null | string |
| .removeAttribute(name) | 删除属性name | |
| .setAttribute(name,value) | 将属性设置name-value | |
| .toggleAttribute(name,[boolean]) | 如果存在则删除,不存在则添加 | boolean |
| 特性 | 描述 |
|---|---|
static get observedAttributes() |
观察属性以通知更改。 |
attributeChangedCallback(``name,``old,``now) |
它会关闭,当他们改变。 |
class AppElement extends HTMLElement {

  static get observedAttributes() {
    return ["value", "isEnabled"];
  }

    attributeChangedCallback(name, old, now) {
      console.log(` ${name} ------ ${old} ---- ${now}.`);
    }
}
static getter observedAttributes()返回我们要观察的属性名称
每当我们的属性修改的时候,都会调用attributeChangedCallback() 方法
属性名称name,之前的old 值和当前的值now
每当属性的修改都会调用这个函数
写一个类似vue的完整版实例
<div id="templates"></div>
<template id="templateOne">
  <style>
    .aaa{
      color:red;
      font-size: 12px;
    }
  </style>
  <div class="aaa">12211212</div>
  <button onClick="clickDown()">Click</button>
  <script>
    function clickDown(){
      alert(1)
    }
  </script>
</template>

<script>
  let template=document.querySelector('#templateOne')
  let content=document.querySelector('#templates')
  content.appendChild(
    document.importNode(template.content,true)
  )
</script>
自定义组件的完整样例
<my-counter></my-counter>
<script>
  const template = document.createElement('template');
  template.innerHTML = `
  <style>
    * {
      font-size: 200%;
    }

    span {
      width: 4rem;
      display: inline-block;
      text-align: center;
    }

    button {
      width: 4rem;
      height: 4rem;
      border: none;
      border-radius: 10px;
      background-color: seagreen;
      color: white;
    }
  </style>
  <button id="dec">-</button>
  <span id="count"></span>
  <button id="inc">+</button>`;

  class MyCounter extends HTMLElement {
    constructor() {
      super();
      this.count = 0;
      this.attachShadow({ mode: 'open' });
    }

    connectedCallback() {
      this.shadowRoot.appendChild(template.content.cloneNode(true));
      this.shadowRoot.getElementById('inc').onclick = () => this.inc();
      this.shadowRoot.getElementById('dec').onclick = () => this.dec();
      this.update(this.count);
    }

    inc() {
      this.update(++this.count);
    }

    dec() {
      this.update(--this.count);
    }

    update(count) {
      this.shadowRoot.getElementById('count').innerHTML = count;
    }
  }

  customElements.define('my-counter', MyCounter);
</script>
决定自己的高度的是你的态度,而不是你的才能
记得我们是终身初学者和学习者
总有一天我也能成为大佬


 浙公网安备 33010602011771号