
原生技巧篇

pointer-event
css 指针事件属性
.aaa{
    // 停止鼠标事件
    pointer-events:none;
	//
}
值
SVG
all:当指针位于填充或笔触上方时,该元素是目标。
stroke:当指针在笔划上时,该元素是目标。
fill:当指针位于填充上时,该元素是目标。
visible:当指针位于填充或笔触上并且填充或笔触设置为visible时,该元素是目标,而不管填充或笔划的值如何。
visiblePainted:当指针位于填充或笔触上时,该元素是目标,并且该填充或笔触被设置为visible,并且设置为非空。
visibleFill:指针位于填充上并且填充被设置为visible时,该元素是目标,而与填充的值无关。
visibleStroke:指针在笔划上并且该笔划设置为visible时,该元素是目标,而与笔划的值无关。
target 和 currentTarget的区别
<div className="aaa" onClick={this.clickDodo}>
                    <span>xxx</span>
            </div>

 clickDodo(e){
        e.target.classList.add('ccc');
     //  e.currentTarget.classList.add('ccc');
    }
我们会发现当点击span 的时候,会给span添加class
Event.target 和 event.currentTarget 都是对一个触发事件的对象的引用. 不同之处在于
Event.target
Event.target 对触发事件的对象的引用(即它标识事件发生的元素)
event.currentTarget
event.currentTarget 当事件遍历DOM时,标识事件的当前目标。它总是引用事件处理程序附加到的元素
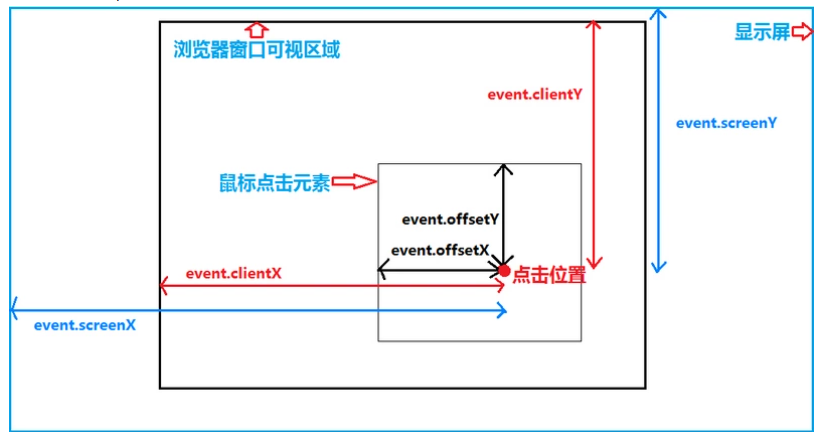
screenX/Y,clientX/Y,pageX/Y 区别
client
可见区域的位置
pageX/Y
整个渲染页面的位置(包括滚动隐藏的部分)
screenX/Y
是显示器距离浏览器的距离
数组迭代 of
let arr = ['a', 'b', 'c'];
for (let [index,item] of arr.entries()) {
  console.log(index,item);
}
// 0 a
// 1 b
// 2 c
类数组迭代
function sum() {
  for (let item of arguments) {
    console.log(item);
  }
}
sum(1,2,3,4)
// 1
// 2
// 3
// 4
字符串迭代
迭代DOM集合
[...'abc']
[... document.querySelectorAll('a')]
字符串的问题
normalize()一种Unicode正规形式将当前字符串正规化所以思考,字符串安全吗?
const str1 = 'afé';
const str2 = 'afé';

console.log(str1 === str2); //false
console.log(str1.normalize()===str2.normalize()); //true
base
使用
<base>标记使所有链接在新选项中打开<head> <meta charset="UTF-8"> <title>Title</title> <base target="_blank"> </head> <body> <a href="https://www.baidu.com">百度</a> // 默认新选项打开 </body> </html>
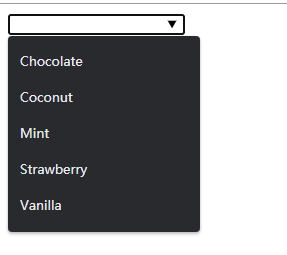
datalist
自定义输入下拉列表
<input list="ice-cream" name="ice-choice">
<datalist id="ice-cream">
    <option value="Chocolate">
    <option value="Coconut">
    <option value="Mint">
    <option value="Strawberry">
    <option value="Vanilla">
</datalist>
面向对象编程
链接到其他对象的对象(OLOO)
const Human = {
  init(firstName, lastName) {
    this.firstName = firstName;
    this.lastName = lastName;
    return this
  }
};

//const a = Object.create(Human);
//a.init('a', 'b');
//console.log(a.firstName);
//console.log(a.lastName);
const a = Object.create(Human).init('a', 'b');
console.log(a.firstName);
console.log(a.lastName);
给一个函数原型添加多个方法
Object.assign(Human.prototype, {
  method1() {
  },
  method2() {
  }
})
私有变量
在js中,在变量前面加下划线
class Car {
  _fuel = 11;

  constructor() {
  }
  getFuel () {
    return this._fuel
  }

  setFuel (value) {
    this._fuel = value
    // Caps fuel at 100 liters
    if (value > 100) this._fuel = 100
  }
}
使用
getFuel和setFuel获取或者设置属性但是通常来说也仍然也是一个公共变量
const car = new Car()
console.log(car.getFuel()) // 50

car._fuel = 3000
console.log(car.getFuel()) // 3000
真正的私有变量
class Car {
  #fuel = 50
}
class Car {
  #fuel = 50

  getFuel () {
    return this.#fuel
  }

  setFuel (value) {
    this.#fuel = value
    if (value > 100) this.#fuel = 100
  }
}

const car = new Car()
console.log(car.getFuel()) // 50

car.setFuel(3000)
console.log(car.getFuel()) // 100
不过我喜欢这种
class Car {
  #fuel = 50

  get fuel () {
    return this.#fuel
  }

  set fuel (value) {
    this.#fuel = value
    if (value > 100) this.#fuel = 100
  }
}

const car = new Car()
console.log(car.fuel) // 50

car.fuel = 3000
console.log(car.fuel) // 100
私有变量2
function Car() {
  let fuel = 50;
  return {
    get fuel() {
      return fuel;
    },
    set fuel(value) {
      fuel = value;
    }
  }
}

let a = new Car();
console.log(a.fuel);//50
a.fuel = 10;
console.log(a.fuel);// 10
继承的使用
class Human {
  constructor(firstName, lastName) {
    this.firstName = firstName;
    this.lastName = lastName;
  }

  sayHello() {
    console.log(`hello,I'm ${this.firstName}`);
  }
}
class Developer extends Human{
  code(thing){
    console.log(`${this.firstName} coded${thing}`);
  }
  sayHello() {
    super.sayHello();
    console.log('developer');
  }
}

let b=new Developer('ssss','bbbb');
b.sayHello();
// hello,I'm ssss
// developer
不用class使用
function Human(firstName, lastName) {
  return {
    firstName,
    lastName,
    sayHello(){
      console.log(`hello,${this.firstName}`);
    }
  }
}

function Developer(firstName, lastName) {
  const human = new Human(firstName, lastName);
  return Object.assign({},human,{
    code(thing) {
      console.log(`${this.firstName} coded ${thing}`);
    },
    sayHello() {
      human.sayHello();
      console.log('xxxx');
    }
  })
}
事件监听器的this问题
class Counter () {
  // ...

  constructor (counter) {
    // ...
    this.buttonElement.addEventListener('click', this.increaseCount.bind(this))
  }

  // ...
}
响应式
文件的形式
不同视口尺寸的样式表
<head>
  <!--所有-->
  <link rel="stylesheet" href="./test1.css" media="all">
  <!--屏幕至少大于900px-->
  <link rel="stylesheet" href="./test2.css" media="(min-width:900px)">
  <!--屏幕至少大于1200px-->
  <link rel="stylesheet" href="./test3.css" media="(min-width:900px)">
  <!--用于打印的配置颜色-->
 <link rel="stylesheet" href="./test2.css" media="print">
</head>
引入文件
<style>
    /* 所有屏幕适用 */
    @import url("style.css") screen;
    /* 打印 */
    @import url("print.css") print;
    /*至少小于800px*/
    @import url('./test2.css') screen and (max-width: 800px);
	/* 用于手机纵向*/
	@import url('landscape.css') screen and (orientation: portrait);
</style>
内联
  <!--至少小于800px-->
  <style media="all and (max-width:800px)">
      body {
        background-color: #ff6259;
      }
  </style>
行内
 <style>
   /* 小于600px*/
    @media screen and (max-width: 600px) {
           body{
             background-color: #ff6708;
           }
    }
   /* 大于600px小于1000px*/
   @media screen and (min-width: 600px) and (max-width: 1000px) {
      body{
        background-color: #ff00b0;
      }
    }
   /*小于1000px*/
    @media screen and (min-width: 1000px) {
      body{
        background-color: #004aff;
      }
    }
  </style>
js的操作
 const mediaQ=window.matchMedia('(min-width:1000px)');
       if (mediaQ.matches) {
         console.log('屏幕大于1000px');
       }

可以使用`resize` 进行事件监听(以前使用window.innerWidth或者window.innerHeight 进行触发)
决定自己的高度的是你的态度,而不是你的才能
记得我们是终身初学者和学习者
总有一天我也能成为大佬


 浙公网安备 33010602011771号