怎么确保在第一个请求成功后再执行下一个请求?
要确保在第一个请求成功后再执行下一个请求,你可以使用 Axios 库的 Promise 链式调用或 async/await 语法。下面是两种方法的示例:
一、使用 Promise 链式调用:
axios.get('/api/first')
  .then(response1 => {
    // 第一个请求成功后的处理逻辑
    return axios.get('/api/second');
  })
  .then(response2 => {
    // 第二个请求成功后的处理逻辑
    console.log('第二个请求成功');
  })
  .catch(error => {
    // 错误处理逻辑
    console.error('请求发生错误', error);
  });
在上述示例中,首先发起第一个请求,当第一个请求成功后,通过 .then() 方法返回一个新的 Promise 实例,继续发起第二个请求。当第二个请求成功后,进入第二个 .then() 回调函数中进行处理。
二、使用 async/await 语法:
async function makeRequests() {
  try {
    const response1 = await axios.get('/api/first');
    // 第一个请求成功后的处理逻辑

    const response2 = await axios.get('/api/second');
    // 第二个请求成功后的处理逻辑
    console.log('第二个请求成功');
  } catch (error) {
    // 错误处理逻辑
    console.error('请求发生错误', error);
  }
}

makeRequests();
在上述示例中,我们定义了一个异步函数 makeRequests(),使用 async 关键字标记该函数。在函数内部,我们使用 await 关键字等待请求的返回结果,当请求成功后,继续执行下一行代码。如果任何请求发生错误,会进入 catch 块中进行错误处理。、
三、应用
后端代码:
订单表:
<mapper namespace="com.example.mobanxiongservice.dao.OrderDao">
    <!--  添加订单  -->
    <insert id="addOrder">
        insert into `Order`(UserID,OrderStatus)
        values(#{UserID},#{OrderStatus});
    </insert>

    <!--  查询最新的一条记录  -->
    <select id="selectOrder" resultType="Order">
        SELECT * FROM `Order` ORDER BY OrderID DESC LIMIT 1;
    </select>

</mapper>
订单详情表:
<mapper namespace="com.example.mobanxiongservice.dao.OrderItemDao">
    <!--  添加订单详情  -->
    <insert id="addOrderItem">
        insert into OrderItem(OrderID,ProductID,Quantity,UnitPrice)
        values(#{OrderID},#{ProductID},#{Quantity},#{UnitPrice});
    </insert>

</mapper>
前端代码:
// 支付并生成订单
function payment() {
    /**
     * 首先:添加订单表的数据,然后添加订单详情表的数据,
     * 请注意:一定要先确保订单表添加成功后才能添加订单详情表
     * 怎么实现 —— 链式调用
    */

    showConfirmDialog({
        title: '提交订单',
        message:
            '您确定要提交订单吗?',
    }).then(() => {
        // 订单表需要的东西
        const orderData = { userID: uid, orderStatus: 2 }

        postapi("http://localhost:8080/addOrder", orderData).then(res => {
            return getapi("http://localhost:8080/selectOrder")
        }).then(res2 => {
            // 订单详情表需要的东西
            const orderItemData = {
                orderID: res2.data[0].orderID,
                productID: shoppingData.value[0]?.product.productID,
                quantity: shoppingData.value[0]?.quantity,
                unitPrice: (shoppingData.value[0]?.product.price * shoppingData.value[0]?.quantity)
            }

            postapi("http://localhost:8080/addOrderItem", orderItemData).then(res3 => {
                if (res3.code == 1) {
                    showNotify({ type: 'success', message: '支付成功!' });
                    setTimeout(() => {
                        $router.push({ path: '/home' });
                    }, 3000);
                }
            })
        })
    })
}
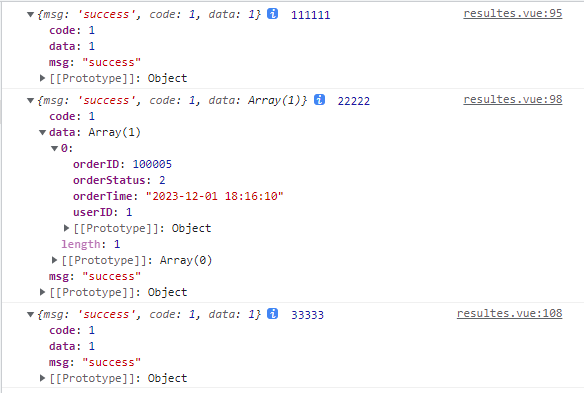
res1 与 res2 与 res3 的输出结果如下:

 浙公网安备 33010602011771号