

33.2.NIO
4.1概述【理解】
-
BIO
Blocking IO,阻塞型IO
-
NIO
No Blocking IO,非阻塞型IO
-
阻塞IO的弊端
在等待的过程中,什么事也做不了
-
非阻塞IO的好处
不需要一直等待,当一切就绪了再去做
4.2NIO与BIO的区别【理解】
-
区别一
BIO是阻塞的,NIO是非阻塞的
-
区别二
BIO是面向流的,NIO是面向缓冲区的
BIO中数据传输是单向的,NIO中的缓冲区是双向的
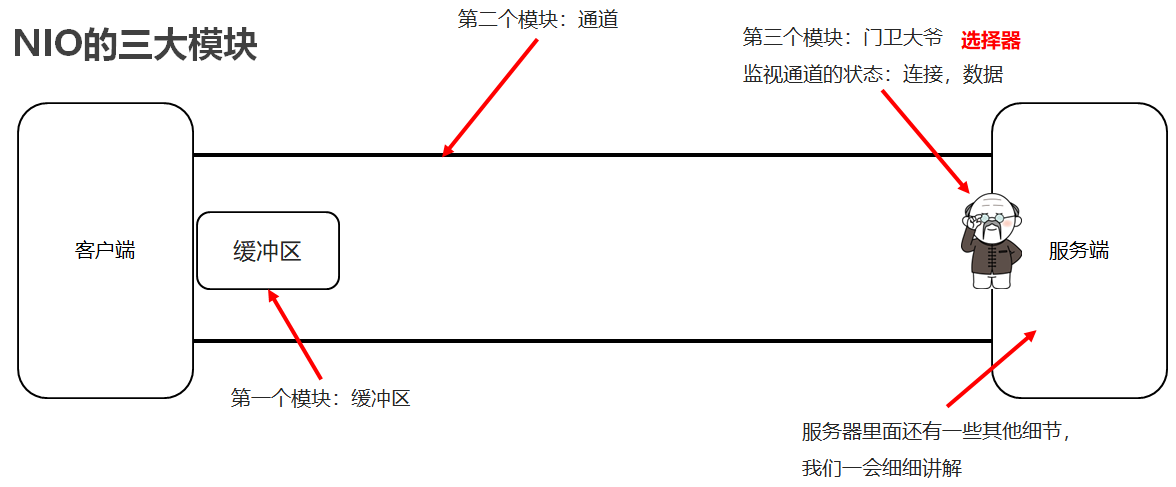
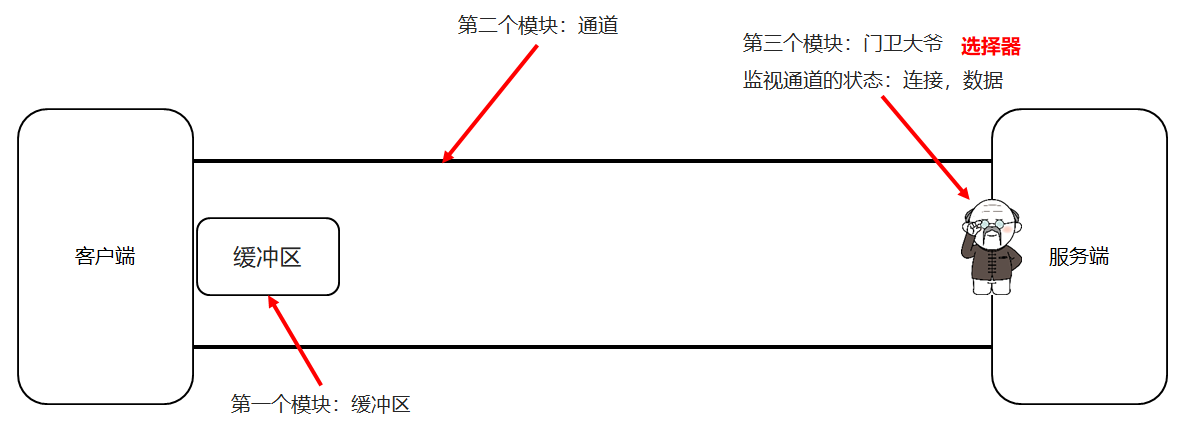
4.3NIO三大模块【理解】
-
缓冲区
用来存储数据
-
通道
用来建立连接和传输数据
-
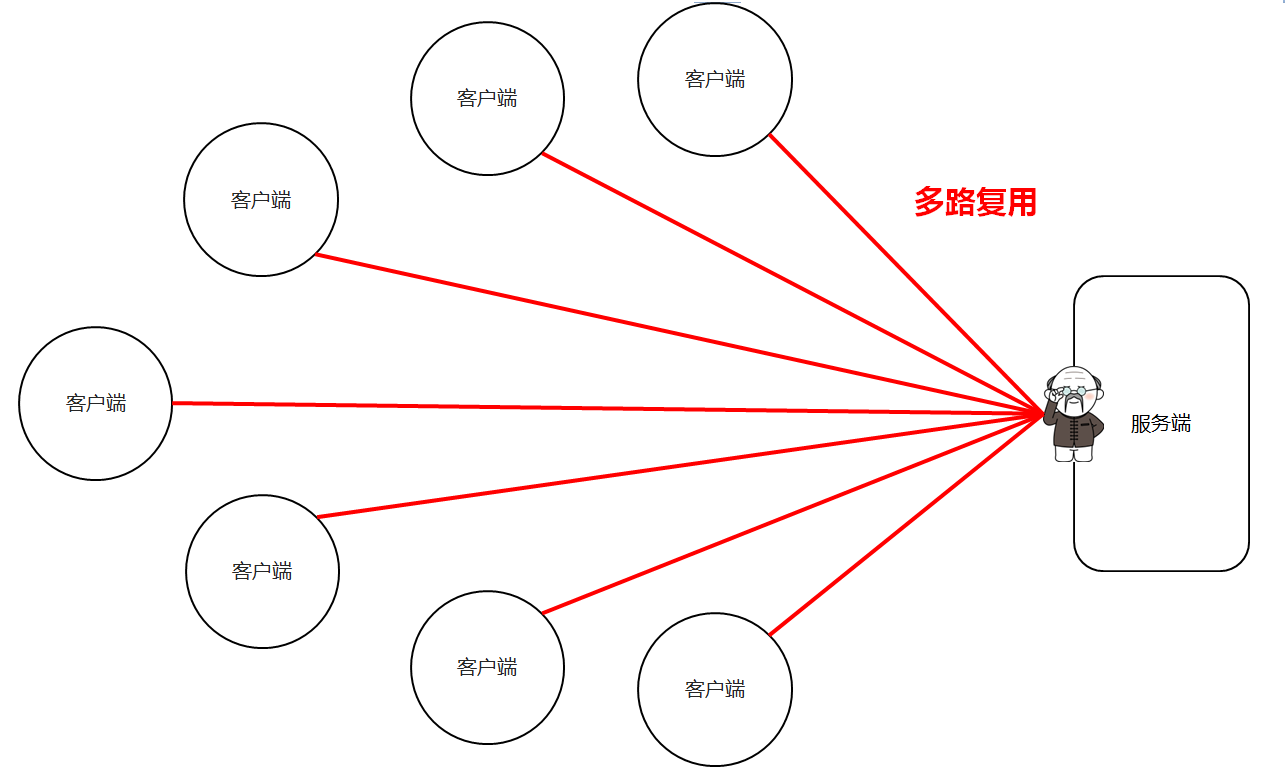
选择器
监视通道状态
4.4NIO创建缓冲区对象【应用】
缓冲区其实就是一个数组
-
方法介绍
方法名 说明 static ByteBuffer allocate(长度) 创建byte类型的缓冲区 static ByteBuffer wrap(byte[] array) 创建一个有内容的byte类型缓冲区 -
代码示例
package com.itheima.mynio;

import java.nio.ByteBuffer;

public class CreateByteBufferDemo1 {
    public static void main(String[] args) {
        //method1();
        //method2();
        method3();
    }

    public static void method3() {
        ByteBuffer byteBuffer3 = ByteBuffer.wrap("aaa".getBytes());
        for (int i = 0; i < 3; i++) {
            System.out.println(byteBuffer3.get());
        }
    }

    public static void method2() {
        byte [] bytes={97,98,99};
        ByteBuffer byteBuffer2 = ByteBuffer.wrap(bytes);
        //缓冲区的长度3
        //缓冲区的内容就是字节数组的内容
        for (int i = 0; i < 3; i++) {
            System.out.println(byteBuffer2.get());
        }
    }

    public static void method1() {
        ByteBuffer byteBuffer1=ByteBuffer.allocate(5);
        //get
        for (int i = 0; i < 5; i++) {
            System.out.println(byteBuffer1.get());
        }
        System.out.println(byteBuffer1.get());
    }
}
4.5NIO缓冲区添加数据【应用】
缓冲区其实就是一个数组
两个功能:
读/写
问:我要把数据写到缓冲区中 使用缓冲读的功能
我要把缓冲区的数据读出来并打印 使用缓冲写的功能
- 如何用写?何时用读?
- 必须站在缓冲区的角度思考问题。
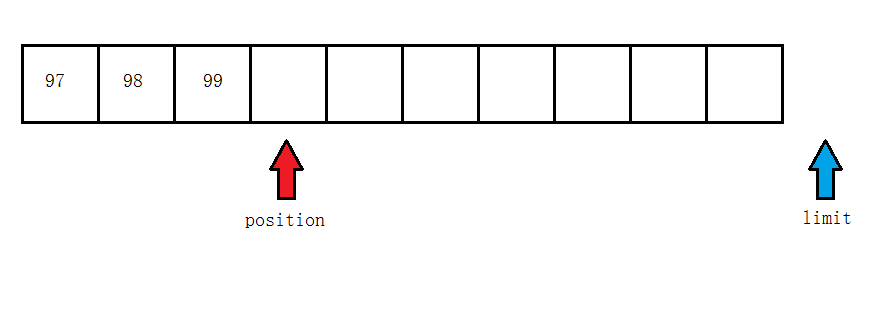
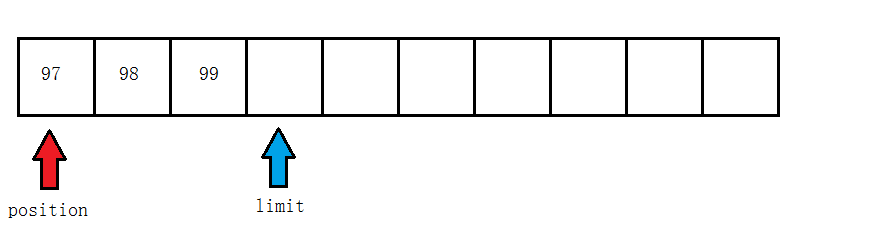
- capacity:容量(长度)
- limit:界限(最多能读/写到哪里)
- posotion:位置(读/写哪个索引)
存三个字节
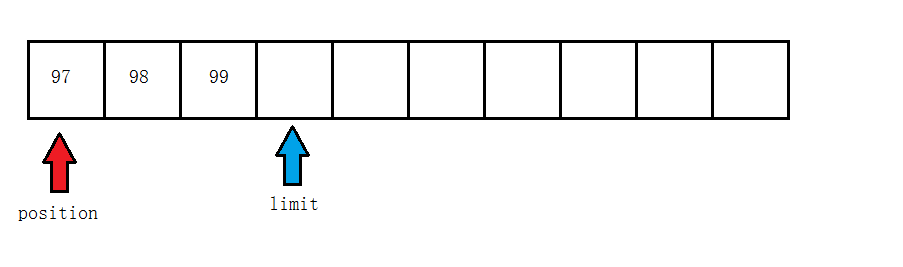
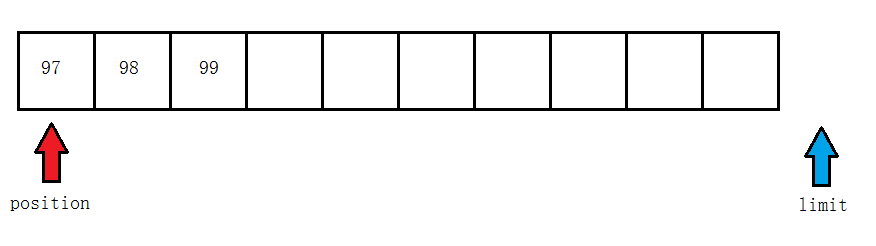
调用flip方法
读一个字节后

读第一个数组后
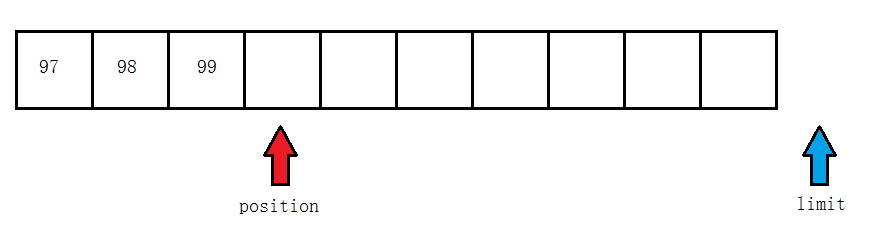
调用rewind后
调用clear后
-
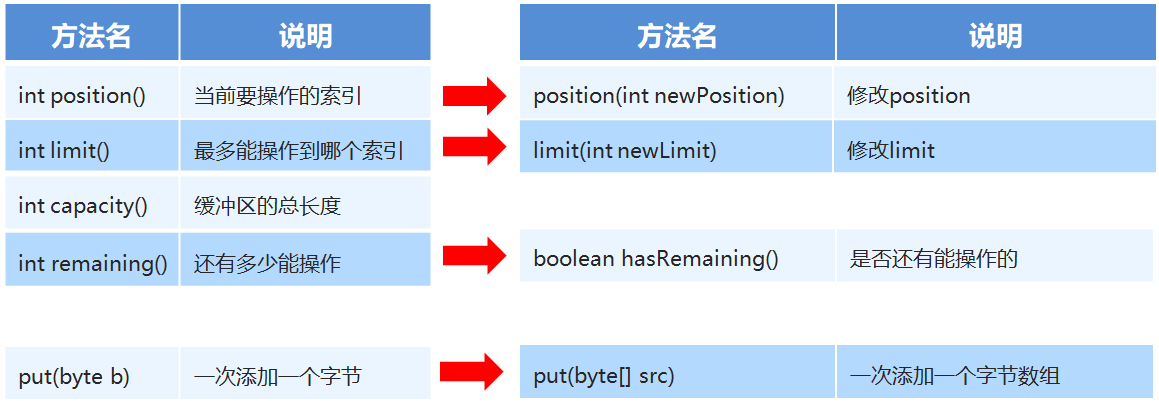
方法介绍
-
![]()
package com.itheima.mynio;

import java.nio.ByteBuffer;

public class ByteBufferDemo2 {
    public static void main(String[] args) {
        //        int position()		  当前要操作的索引
        //        int limit() 		  最多能操作到哪个索引
        //        int capacity()		  缓冲区的总长度
        ByteBuffer byteBuffer = ByteBuffer.allocate(10);
        System.out.println(byteBuffer.position());
        System.out.println(byteBuffer.limit());
        System.out.println(byteBuffer.capacity());


        //        put(byte b)		  一次添加一个字节
//        byteBuffer.put((byte) 97);
//        System.out.println(byteBuffer.position());
//        System.out.println(byteBuffer.limit());
//        System.out.println(byteBuffer.capacity());
        //        put(byte[] src)		 一次添加一个字节数组
//        byteBuffer.put("aaa".getBytes());
//        System.out.println(byteBuffer.position());
//        System.out.println(byteBuffer.limit());
//        System.out.println(byteBuffer.capacity());


//                position(int newPosition) 修改position
//        byteBuffer.position(1);
        //        limit(int newLimit)	  修改limit
//        byteBuffer.limit(5);
//        System.out.println(byteBuffer.position());
//        System.out.println(byteBuffer.limit());
//        System.out.println(byteBuffer.capacity());
        //        int remaining()		  还有多少能操作
        byteBuffer.put("0123456789".getBytes());
        System.out.println(byteBuffer.remaining());//10
        System.out.println(byteBuffer.hasRemaining());//true
        //        boolean hasRemaining()	  是否还有能操作的
    }

}
4.6NIO缓冲区获取数据【应用】
-
方法介绍
方法名 介绍 flip() get() 读一个字节 get(byte[] dst) 读多个字节 get(int index) 读指定索引的字节 rewind() 将position设置为0,可以重复读 clear() 数据读写完毕(读->写) array() 将缓冲区转换成字节数组返回 -
代码示例
package com.itheima.mynio;

import java.nio.ByteBuffer;

public class ByteBufferDemo3 {
    public static void main(String[] args) {
        ByteBuffer byteBuffer=ByteBuffer.allocate(10);
        byteBuffer.put("abc".getBytes());
        //flip()	切换读写模式(写->读)
        byteBuffer.flip();
        //get()	读一个字节
//        while(byteBuffer.position()!=byteBuffer.limit()){
//            System.out.println((char) byteBuffer.get());
//        }
        for (int i = 0; i < byteBuffer.limit(); i++) {
            System.out.println((char) byteBuffer.get());
        }
        //get(byte[] dst)	读多个字节
//        byte []bytes=new byte[byteBuffer.limit()];
//        byteBuffer.get(bytes);
//        System.out.println(new String(bytes));
//
//
//        //get(int index)	读指定索引的字节
//        System.out.println((char) byteBuffer.get(0));

        //rewind()	将position设置为0,可以重复读
//        byteBuffer.rewind();
//        for (int i = 0; i < byteBuffer.limit(); i++) {
//            System.out.println((char) byteBuffer.get());
//        }

        //clear()	数据读写完毕(读->写)
        byteBuffer.clear();
        byteBuffer.put("qqq".getBytes());

        //array()	将缓冲区转换成字节数组返回
        byte[] bytes = byteBuffer.array();
        System.out.println(new String(bytes));

    }


}
4.7小结【理解】
-
需求:我要把数据写到缓冲区中。
数据是从外面进入到缓冲区的,所以缓冲区在做读数据的操作。
-
需求:我要把数据从缓冲区中读出来。
数据是从缓冲区里面到外面的。所以缓冲区在做写数据的操作。
-
capacity:容量(长度) limit: 界限(最多能读/写到哪里) posotion:位置(读/写哪个索引)
-
获取缓冲区里面数据之前,需要调用flip方法
-
再次写数据之前,需要调用clear方法,
但是数据还未消失,等再次写入数据,被覆盖了才会消失。
1.NIO
1.1 NIO通道客户端【应用】
客户端通道----------连接服务端
------------传递缓冲区---------------传递数据
服务端通道-----------建立连接
-
客户端实现步骤
-
打开通道---------------SocketChannel
-
指定IP和端口号--------InetSocketAddress
-
写出数据-------------------------write
-
释放资源----------------------释放资源
-
-
示例代码
package com.itheima.mynio2;

import java.io.IOException;
import java.net.InetSocketAddress;
import java.nio.ByteBuffer;
import java.nio.channels.SocketChannel;

public class NIOClient {
    public static void main(String[] args) throws IOException {
        //1. 打开通道
        SocketChannel socketChannel = SocketChannel.open();


        //2. 指定IP和端口号
        socketChannel.connect(new InetSocketAddress("127.0.0.1",10000));

        //3. 写出数据
        ByteBuffer byteBuffer = ByteBuffer.wrap("hello".getBytes());
        socketChannel.write(byteBuffer);
        //4. 释放资源
        socketChannel.close();
    }
}
1.2 NIO通道服务端【应用】
-
NIO通道
-
服务端通道
只负责建立建立,不负责传递数据
-
客户端通道
建立建立并将数据传递给服务端
-
缓冲区
客户端发送的数据都在缓冲区中
-
服务端通道内部创建出来的客户端通道
相当于客户端通道的延伸用来传递数据
-
-
服务端实现步骤
-
打开一个服务端通道
-
绑定对应的端口号
-
通道默认是阻塞的,需要设置为非阻塞
-
此时没有门卫大爷,所以需要经常看一下有没有连接发过来没?
-
如果有客户端来连接了,则在服务端通道内部,再创建一个客户端通道,相当于是客户端通道的延伸
-
获取客户端传递过来的数据,并把数据放在byteBuffer1这个缓冲区中
- 服务端创建一个空的缓冲区装数据并输出
-
给客户端回写数据
-
释放资源
-
-
示例代码
package com.itheima.mynio2;

import java.io.IOException;
import java.net.InetSocketAddress;
import java.nio.ByteBuffer;
import java.nio.channels.SocketChannel;

public class NIOClient {
    public static void main(String[] args) throws IOException {
        //1. 打开通道
        SocketChannel socketChannel = SocketChannel.open();


        //2. 指定IP和端口号
        socketChannel.connect(new InetSocketAddress("127.0.0.1",10000));

        //3. 写出数据
        ByteBuffer byteBuffer = ByteBuffer.wrap("一点汗毛献辞".getBytes());
        socketChannel.write(byteBuffer);
        //4. 释放资源
        socketChannel.close();
    }
}
1.3 NIO通道练习【应用】
需求:利用NIO的非阻塞通道与缓冲区完成下面的需求
客户端发送数据给服务端
服务端接收后回写一个数据给客户端
-
客户端
-
实现步骤
-
打开通道
-
指定IP和端口号
-
写出数据
-
读取服务器写回的数据
-
释放资源
-
-
示例代码
-
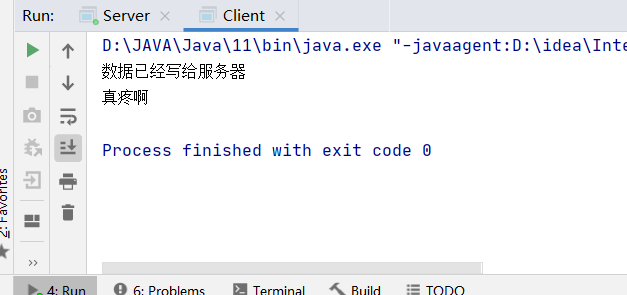
Client
package com.itheima.mynio3;

import java.io.IOException;
import java.net.InetSocketAddress;
import java.nio.ByteBuffer;
import java.nio.channels.SocketChannel;

public class Client {
    public static void main(String[] args) throws IOException {
        SocketChannel socketChannel = SocketChannel.open();

        socketChannel.connect(new InetSocketAddress("127.0.0.1",10001));

        ByteBuffer byteBuffer1 = ByteBuffer.wrap("吃俺老孙一棒".getBytes());
        socketChannel.write(byteBuffer1);

        System.out.println("数据已经写给服务器");
        socketChannel.shutdownOutput();

        ByteBuffer byteBuffer2 = ByteBuffer.allocate(1024);
        int len;
        while((len=socketChannel.read(byteBuffer2))!=-1){
            byteBuffer2.flip();
            System.out.println(new String(byteBuffer2.array(),0,len));
            byteBuffer2.clear();
        }
        socketChannel.close();
    }
}
Server
package com.itheima.mynio3;

import java.io.IOException;
import java.net.InetSocketAddress;
import java.nio.ByteBuffer;
import java.nio.channels.ServerSocketChannel;
import java.nio.channels.SocketChannel;

public class Server {
    public static void main(String[] args) throws IOException {
        ServerSocketChannel serverSocketChannel=ServerSocketChannel.open();

        serverSocketChannel.bind(new InetSocketAddress(10001));

        serverSocketChannel.configureBlocking(false);
        while(true){
            SocketChannel socketChannel = serverSocketChannel.accept();
            if (socketChannel != null) {
                System.out.println("此时有客户端来连接了");

                //获取客户端传递过来的数据,并把数据放在byteBuffer1这个缓冲区
                ByteBuffer byteBuffer1 = ByteBuffer.allocate(1024);
                //socketChannel.read(byteBuffer1);
                int len;
                //针对于缓冲区来讲
                    //如果 从添加数据---->获取数据 flip
                    //如果 从获取数据---->添加数据 clear
                while((len=socketChannel.read(byteBuffer1))!=-1){
                    byteBuffer1.flip();
                    System.out.println(new String(byteBuffer1.array(),0,len));
                    byteBuffer1.clear();
                }
                System.out.println("接收数据完毕,准备开始往客户端回写数据");
                ByteBuffer byteBuffer2 = ByteBuffer.wrap("真疼啊".getBytes());
                socketChannel.write(byteBuffer2);

                socketChannel.close();
            }
        }

    }
}

1.4 NIO通道练习优化【应用】
-
存在问题
服务端内部获取的客户端通道在读取时,如果读取不到结束标记就会一直阻塞
-
解决方案
- 1.给一个结束标记
-
        //结束标记
// socketChannel.shutdownOutput(); -
2.将服务端内部获取的客户端通道设置为非阻塞的
-
示例代码
Client
package com.itheima.mynio3;

import java.io.IOException;
import java.net.InetSocketAddress;
import java.nio.ByteBuffer;
import java.nio.channels.SocketChannel;

public class Client {
    public static void main(String[] args) throws IOException {
        SocketChannel socketChannel = SocketChannel.open();

        socketChannel.connect(new InetSocketAddress("127.0.0.1",10001));

        ByteBuffer byteBuffer1 = ByteBuffer.wrap("吃俺老孙一棒".getBytes());
        socketChannel.write(byteBuffer1);

        System.out.println("数据已经写给服务器");
        //结束标记
//        socketChannel.shutdownOutput();

        ByteBuffer byteBuffer2 = ByteBuffer.allocate(1024);
        int len;
        while((len=socketChannel.read(byteBuffer2))!=-1){
            System.out.println("客户端接收回写数据");
            byteBuffer2.flip();
            System.out.println(new String(byteBuffer2.array(),0,len));
            byteBuffer2.clear();
        }
        socketChannel.close();
    }
}
Server
package com.itheima.mynio3;

import java.io.IOException;
import java.net.InetSocketAddress;
import java.nio.ByteBuffer;
import java.nio.channels.ServerSocketChannel;
import java.nio.channels.SocketChannel;

public class Server {
    public static void main(String[] args) throws IOException {
        ServerSocketChannel serverSocketChannel=ServerSocketChannel.open();

        serverSocketChannel.bind(new InetSocketAddress(10001));

        serverSocketChannel.configureBlocking(false);
        while(true){
            SocketChannel socketChannel = serverSocketChannel.accept();
            if (socketChannel != null) {
                System.out.println("此时有客户端来连接了");
                //把延伸端的非阻塞关闭 !!!!!!
                socketChannel.configureBlocking(false);

                //获取客户端传递过来的数据,并把数据放在byteBuffer1这个缓冲区
                ByteBuffer byteBuffer1 = ByteBuffer.allocate(1024);
                //socketChannel.read(byteBuffer1);
                int len;
                //针对于缓冲区来讲
                    //如果 从添加数据---->获取数据 flip
                    //如果 从获取数据---->添加数据 clear
                while((len=socketChannel.read(byteBuffer1))>0){
                    System.out.println("服务端接收发送数据");
                    byteBuffer1.flip();
                    System.out.println(new String(byteBuffer1.array(),0,len));
                    byteBuffer1.clear();
                }
                System.out.println("接收数据完毕,准备开始往客户端回写数据");
                ByteBuffer byteBuffer2 = ByteBuffer.wrap("真疼啊".getBytes());
                socketChannel.write(byteBuffer2);

                socketChannel.close();
            }
        }

    }
}
1.5NIO选择器【理解】
-
概述
选择器可以监视通道的状态,多路复用
-
Selector
选择器对象
-
SelectionKey
绑定的通道后返回的key
-
SelectableChannel
能使用选择器的通道
-
SocketChannel
-
-
1.6NIO选择器改写服务端【应用】
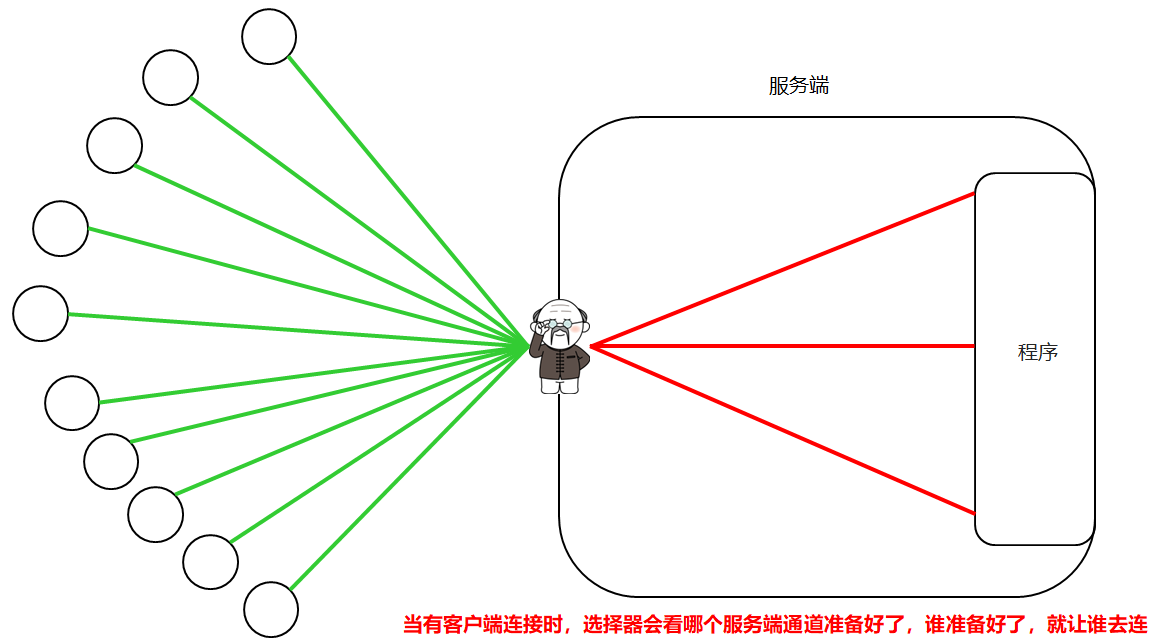
当有客户端连接时,选择器会看哪个服务端通道准备好了,谁准备好了,就让谁去连
-
实现步骤
-
打开一个服务端通道(open)
-
绑定对应的端口号
-
通道默认是阻塞的,需要设置为非阻塞
-
打开一个选择器(门卫大爷) 以上步骤中,服务端通道和门卫大爷还没有任何关系
-
将选择器绑定服务端通道,并监视服务端是否准备好
-
如果有客户端来连接了,大爷会遍历所有的服务端通道,谁准备好了,就让谁来连接 连接后,在服务端通道内部,再创建一个客户端延伸通道
-
如果客户端把数据传递过来了,大爷会遍历所有的延伸通道,谁准备好了,谁去接收数据
-
选择器监视客户端通道
选择器监视服务端通道
选择器监视客户端延伸通道
Client
package com.itheima.mynio5;

import java.io.IOException;
import java.net.InetSocketAddress;
import java.nio.ByteBuffer;
import java.nio.channels.SocketChannel;

public class Client {
    public static void main(String[] args) throws IOException {
        SocketChannel socketChannel = SocketChannel.open();

        socketChannel.connect(new InetSocketAddress("127.0.0.1",10001));

        ByteBuffer byteBuffer1 = ByteBuffer.wrap("吃俺老孙一棒".getBytes());
        socketChannel.write(byteBuffer1);

        System.out.println("数据已经写给服务器");
        //结束标记
//        socketChannel.shutdownOutput();

        ByteBuffer byteBuffer2 = ByteBuffer.allocate(1024);
        int len;
        while((len=socketChannel.read(byteBuffer2))!=-1){
            System.out.println("客户端接收回写数据");
            byteBuffer2.flip();
            System.out.println(new String(byteBuffer2.array(),0,len));
            byteBuffer2.clear();
        }
        socketChannel.close();
    }
}
Server
package com.itheima.mynio5;

import jdk.swing.interop.SwingInterOpUtils;

import java.io.IOException;
import java.net.InetSocketAddress;
import java.nio.ByteBuffer;
import java.nio.channels.*;
import java.util.Iterator;
import java.util.Set;

public class Server {
    public static void main(String[] args) throws IOException {
        //1.打开服务端通道
        ServerSocketChannel serverSocketChannel=ServerSocketChannel.open();
        //2.让这个通道绑定一个端口
        serverSocketChannel.bind(new InetSocketAddress(10001));
        //3.设置通道为非阻塞状态
        serverSocketChannel.configureBlocking(false);
        //4.打开一个选择器
        //selector    ---选择器
        //SelectionKey  ----绑定通道后返回的令牌
        //SelectableChannel ---可以使用选择器的通道
        Selector selector = Selector.open();
        //5.绑定选择器和服务端通道
        serverSocketChannel.register(selector, SelectionKey.OP_ACCEPT);


        while(true){
            //6.选择器会监视客户端通道的状态
            //返回值就表示此时有多少个客户端来连接。
            int count = selector.select();
            if (count != 0) {
                System.out.println("有客户端来连接了");
                //7.会遍历所有的服务端通道,看谁准备好了,谁准备好了,就让谁去连接
                //获取所有服务端通道的令牌,并将它们放到一个集合中,将集合返回
                Set<SelectionKey> selectionKeys = selector.selectedKeys();
                Iterator<SelectionKey> iterator = selectionKeys.iterator();
                while (iterator.hasNext()){
                    //selectionKey 依次表示每一个服务端通道的令牌
                    SelectionKey selectionKey = iterator.next();
                    if (selectionKey.isAcceptable()) {
                        //可以通过令牌来获取到了一个已经就绪的服务器通道
                        ServerSocketChannel ssc = (ServerSocketChannel) selectionKey.channel();
                        //客户端的延伸通道
                        SocketChannel socketChannel = ssc.accept();
                        //将客户端的延伸通道设置为非阻塞
                        socketChannel.configureBlocking(false);
                        socketChannel.register(selector,SelectionKey.OP_READ);
                        //当客户端来连接的时候,所有的步骤已经全部执行完毕
                    }else if (selectionKey.isReadable()){
                        //当前通道已经做好了读取的准备(延伸通道)
                        SocketChannel socketChannel = (SocketChannel) selectionKey.channel();

                        ByteBuffer byteBuffer1 = ByteBuffer.allocate(1024);
                        int len;
                        while((len=socketChannel.read(byteBuffer1))>0){
                            byteBuffer1.flip();
                            System.out.println(new String(byteBuffer1.array(),0,len));
                            byteBuffer1.clear();
                        }
                        //给客户端的回写数据
                        socketChannel.write(ByteBuffer.wrap("好疼啊!".getBytes()));
                        socketChannel.close();
                    }
                    iterator.remove();
                }

            }
        }
    }
}
2.HTTP协议
非阻塞的HTTP服务器
非阻塞的服务器:就是刚刚写的NIO服务器
HTTP:互联网传输数据的一种规则
超文本传输协议(关于超文本的概念JavaWeb在进行学习),是建立在TCP/IP协议基础上,是网络应用层的协议。
由请求和响应构成,是一个标准的客户端和服务器模型
是互联网传输数据的一种规则
是基于TCP/IP协议
由请求和响应组成
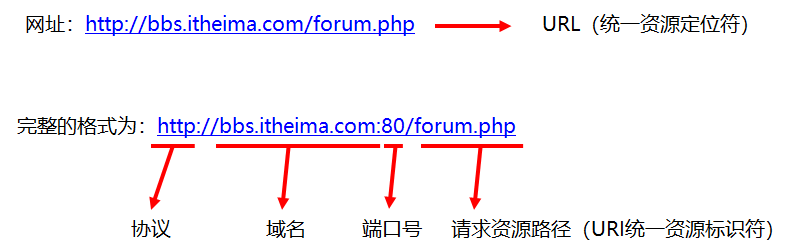
2.2URL【理解】
-
概述
统一资源定位符,常见的如http://bbs.itheima.com/forum.php
-
详解
2.3抓包工具的使用【应用】
-
使用步骤
-
在谷歌浏览器网页中按F12 或者网页空白处右键,点击检查,可以调出工具
-
点击network,进入到查看网络相关信息界面
-
这时在浏览器中发起请求,进行访问,工具中就会显示出请求和响应相关的信息
-
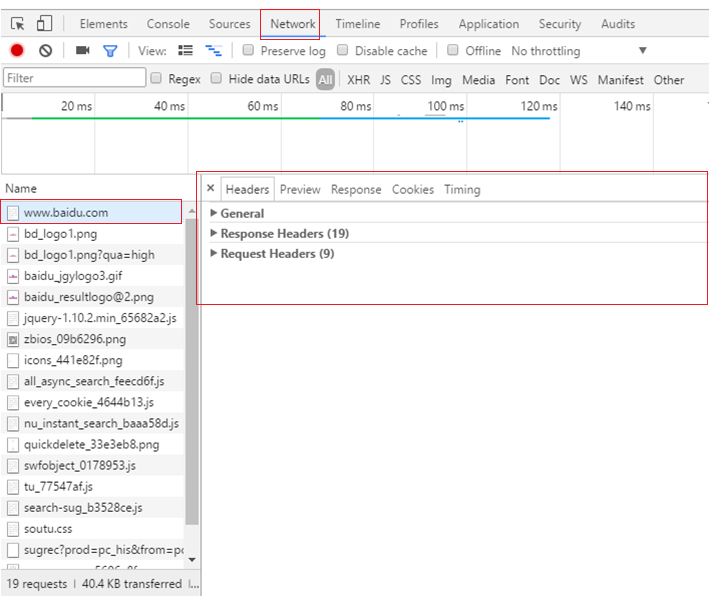
Request Headers 请求数据
Response Headers 响应数据
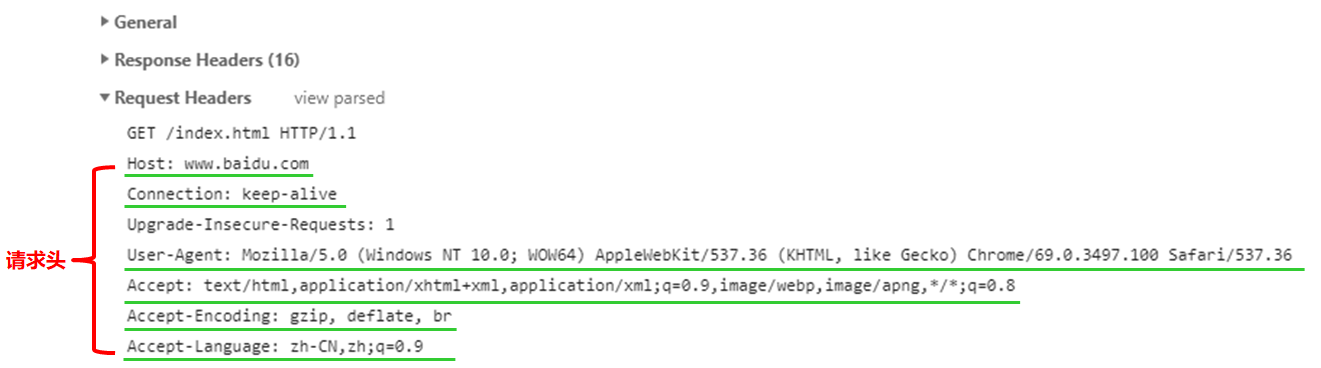
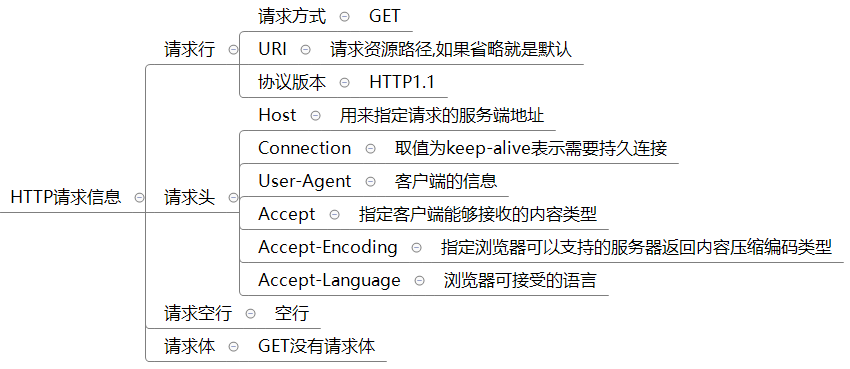
2.4请求信息【理解】
Request Headers 请求
-
组成
-
请求行
-
请求头
-
请求空行
-
请求体
-
-
请求行
-
格式
-

GET /index.html HTTP/1.1
使用GET方式请求数据是没有请求体的
-
GET,POST,HEAD,PUT,DELETE,CONNECT,OPTIONS,TRACE,PATCH
其中用的比较多的是GET和POST
-
URI
![]()
-
HTTP1.0: 每次请求和响应都需要建立一个单独的连接
-
-

-
Host: 用来指定请求的服务端地址
-
Connection: 取值为keep-alive表示需要持久连接
-
User-Agent: 客户端的信息
-
Accept: 指定客户端能够接收的内容类型
-
Accept-Encoding: 指定浏览器可以支持的服务器返回内容压缩编码类型
-
小结
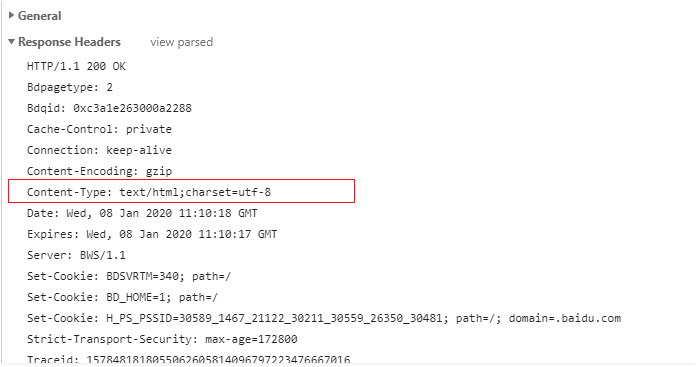
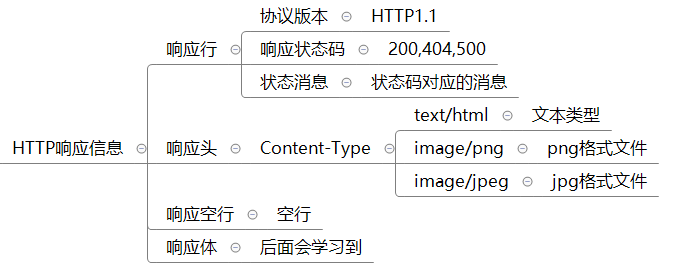
2.5响应信息【理解】
-
组成
-
响应行
-
响应头
-
响应空行
-
响应体
-
-
响应行
-
格式
-

Http/1.1 200 OK
-
-
-
HTTP1.0: 每次请求和响应都需要建立一个单独的连接
-
HTTP1.1: 支持长连接
-
-
响应状态码
-
1xx: 指示信息(表示请求已接收,继续处理)
-
2xx: 成功(表示请求已被成功接收、理解、接受)
-
3xx: 请求重定向(要完成请求必须进行更进一步的操作)
-
4xx: 客户端错误(请求有语法错误或请求无法实现)
-
5xx: 服务器端错误(服务器未能实现合法的请求)
-
-
状态信息
-
200 ok
-
404 Not Found
-
500 Internal Server Error
-
-
-
响应头
- 响应头名称 冒号 空格 响应头值 回车符 换行符
-
-
响应头名称
-
Content-Type: 告诉客户端实际返回内容的网络媒体类型(互联网媒体类型,也叫做MIME类型)
-
-
响应头值
-
text/html ----> 文本类型
-
image/png ----> png格式文件
-
-
-
小结
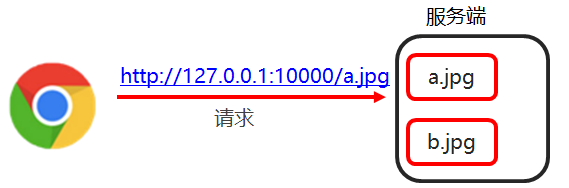
3.HTTP服务器
3.1需求【理解】
-
编写服务器端代码,实现可以解析浏览器的请求,给浏览器响应数据
-
实现步骤
-
编写HttpServer类,实现可以接收浏览器发出的请求
-
其中获取连接的代码可以单独抽取到一个类中
-
-
代码实现
服务端代码HttpServer
package com.itheima.mynio6;

import java.io.IOException;
import java.net.InetSocketAddress;
import java.nio.ByteBuffer;
import java.nio.channels.SelectionKey;
import java.nio.channels.Selector;
import java.nio.channels.ServerSocketChannel;
import java.nio.channels.SocketChannel;
import java.util.Iterator;
import java.util.Set;

public class HttpServer {
    public static void main(String[] args) throws IOException {
        //1.打开服务端通道
        ServerSocketChannel serverSocketChannel=ServerSocketChannel.open();
        //2.让这个通道绑定一个端口
        serverSocketChannel.bind(new InetSocketAddress(10001));
        //3.设置通道为非阻塞状态
        serverSocketChannel.configureBlocking(false);
        //4.打开一个选择器
        //selector    ---选择器
        //SelectionKey  ----绑定通道后返回的令牌
        //SelectableChannel ---可以使用选择器的通道
        Selector selector = Selector.open();
        //5.绑定选择器和服务端通道
        serverSocketChannel.register(selector, SelectionKey.OP_ACCEPT);


        while(true){
            //6.选择器会监视客户端通道的状态
            //返回值就表示此时有多少个客户端来连接。
            int count = selector.select();
            if (count != 0) {
                System.out.println("有客户端来连接了");
                //7.会遍历所有的服务端通道,看谁准备好了,谁准备好了,就让谁去连接
                //获取所有服务端通道的令牌,并将它们放到一个集合中,将集合返回
                Set<SelectionKey> selectionKeys = selector.selectedKeys();
                Iterator<SelectionKey> iterator = selectionKeys.iterator();
                while (iterator.hasNext()){
                    //selectionKey 依次表示每一个服务端通道的令牌
                    SelectionKey selectionKey = iterator.next();
                    if (selectionKey.isAcceptable()) {
                       //获取连接
                        AcceptHandler acceptHandler=new AcceptHandler();
                        acceptHandler.connSocketChannel(selectionKey);
                        //当客户端来连接的时候,所有的步骤已经全部执行完毕
                    }else if (selectionKey.isReadable()){
                        //当前通道已经做好了读取的准备(延伸通道)
                        SocketChannel socketChannel = (SocketChannel) selectionKey.channel();
                        StringBuilder sb=new StringBuilder();
                        //创建缓冲区
                        ByteBuffer byteBuffer1 = ByteBuffer.allocate(1024);
                        int len;
                        //循环读取
                        while((len=socketChannel.read(byteBuffer1))>0){
                            byteBuffer1.flip();
                            sb.append(new String(byteBuffer1.array(),0,len));
                            //System.out.println(new String(byteBuffer1.array(),0,len));
                            byteBuffer1.clear();
                        }
                        System.out.println(sb);
                        //给客户端的回写数据
                        socketChannel.write(ByteBuffer.wrap("好疼啊!".getBytes()));
                        socketChannel.close();
                    }
                    iterator.remove();
                }

            }
        }
    }
}
// 将获取连接的代码抽取到这个类中
package com.itheima.mynio6;

import java.io.IOException;
import java.nio.channels.SelectionKey;
import java.nio.channels.ServerSocketChannel;
import java.nio.channels.SocketChannel;

/*
* 接受连接的任务处理类
*
* */
public class AcceptHandler {
    public SocketChannel connSocketChannel(SelectionKey selectionKey){
        try {
            //可以通过令牌来获取到了一个已经就绪的服务器通道
            ServerSocketChannel ssc = (ServerSocketChannel) selectionKey.channel();
            //客户端的延伸通道
            SocketChannel socketChannel = ssc.accept();
            //将客户端的延伸通道设置为非阻塞
            socketChannel.configureBlocking(false);
            //把socketChannel注册到选择器上
            socketChannel.register(selectionKey.selector(), SelectionKey.OP_READ);
            return socketChannel;
        } catch (IOException e) {
            e.printStackTrace();
        }
        return null;
    }
}
3.3获取请求信息并解析【理解】
-
实现步骤
-
将请求信息封装到HttpRequest类中
-
在类中定义方法,实现获取请求信息并解析
-
-
代码实现
HttpRequest
package com.itheima.mynio6;

import javax.naming.ldap.PagedResultsControl;
import java.io.IOException;
import java.nio.ByteBuffer;
import java.nio.channels.SelectionKey;
import java.nio.channels.SocketChannel;
import java.util.HashMap;
import java.util.Hashtable;

/*
* 用来封装请求数据的类
* */
public class HttpRequest {
    private String method;//请求方式
    private String requestURI;//请求的URI
    private String version;//http的协议版本

    private HashMap<String,String> hm=new HashMap<>();//所有的请求头

    //parse ----获取请求数据,并解析
    public void parse(SelectionKey selectionKey){
        try {
            //当前通道已经做好了读取的准备(延伸通道)
            SocketChannel socketChannel = (SocketChannel) selectionKey.channel();
            StringBuilder sb=new StringBuilder();
            //创建缓冲区
            ByteBuffer byteBuffer1 = ByteBuffer.allocate(1024);
            int len;
            //循环读取
            while((len=socketChannel.read(byteBuffer1))>0){
                byteBuffer1.flip();
                sb.append(new String(byteBuffer1.array(),0,len));
                //System.out.println(new String(byteBuffer1.array(),0,len));
                byteBuffer1.clear();
            }
            //System.out.println(sb);
            parseHttpRequest(sb);
        } catch (IOException e) {
            e.printStackTrace();
        }

    }
    //解析http请求协议中的数据
    private void parseHttpRequest(StringBuilder sb) {
        //1.需要把StringBuilder先变成一个字符串
        String httpRequeststr=sb.toString();
        //2.获取每一行数据
        String[] split = httpRequeststr.split("\r\n");
        //3.获取请求行
        String httpRequestLine = split[0];//GET / HTTP/1.1
        //4.再按照空格进行切割,得到请求行中的三部分
        String[] httpRequestInfo = httpRequestLine.split(" ");
        this.method=httpRequestInfo[0];
        this.requestURI=httpRequestInfo[1];
        this.version=httpRequestInfo[2];
        //5.操作每一个请求头
        for (int i = 1; i < split.length; i++) {
            String httpRequestHeaderInfo = split[i];
            String[] httpRequestHeaderInfoArr = httpRequestHeaderInfo.split(": ");
            hm.put(httpRequestHeaderInfoArr[0],httpRequestHeaderInfoArr[1]);
        }
    }


    public String getMethod() {
        return method;
    }

    public void setMethod(String method) {
        this.method = method;
    }

    public String getRequestURI() {
        return requestURI;
    }

    public void setRequestURI(String requestURI) {
        this.requestURI = requestURI;
    }

    public String getVersion() {
        return version;
    }

    public void setVersion(String version) {
        this.version = version;
    }

    public HashMap<String, String> getHm() {
        return hm;
    }

    public void setHm(HashMap<String, String> hm) {
        this.hm = hm;
    }

    @Override
    public String toString() {
        return "HttpRequest{" +
                "method='" + method + '\'' +
                ", requestURI='" + requestURI + '\'' +
                ", version='" + version + '\'' +
                ", hm=" + hm +
                '}';
    }
}
3.4给浏览器响应数据【理解】
-
实现步骤
-
将响应信息封装HttpResponse类中
-
定义方法,封装响应信息,给浏览器响应数据
-
-
代码实现
package com.itheima.mynio6;

import java.io.IOException;
import java.net.Socket;
import java.nio.ByteBuffer;
import java.nio.channels.SelectableChannel;
import java.nio.channels.SelectionKey;
import java.nio.channels.SocketChannel;
import java.util.HashMap;
import java.util.Map;
import java.util.Set;

public class HttpResponse {
    private String version;//协议版本
    private String status;//响应状态码
    private String desc;//状态码的描述信息

    //响应头数据
    private HashMap<String,String> hm=new HashMap<>();
    private HttpRequest httpRequest;//我们后面要根据请求的信息,来进行一些判断

    //给浏览器响应数据的方法
    public  void sendstaticResource(SelectionKey selectionKey){
        //1.给相应行赋值
        this.version="HTTP/1.1";
        this.status="200";
        this.desc="ok";
        //2.将响应行拼接成一个单独的字符串 //HTTP/1.1 200 ok
        String responseLine=this.version+" "+this.status+" "+this.desc+"\r\n";
        //3.给响应头赋值
        hm.put("Content-Type","text/html;charset=UTF-8");
        //4.将所有的响应头拼接成一个单独的字符串
        StringBuilder sb=new StringBuilder();
        Set<Map.Entry<String, String>> entries = hm.entrySet();
        for (Map.Entry<String, String> entry : entries) {
            sb.append(entry.getKey()).append(": ").append(entry.getValue()).append("\r\n");

        }
        //5.响应空行
        String emptyLine="\r\n";
        //6.相应行,响应头,相应空行拼接成一个大的字符串
        String reponseLineStr=responseLine+sb.toString()+emptyLine;
        try {
            //7.将上面三个写给浏览器
            SocketChannel socketchannel = (SocketChannel)selectionKey.channel();
            ByteBuffer byteBuffer1 = ByteBuffer.wrap(reponseLineStr.getBytes());
            socketchannel.write(byteBuffer1);
            //8.单独操作响应体
            //因为在以后的响应体不一定是一个字符串
            //有可能是一个文件,所以单独操作
            String s="哎呀妈呀";
            ByteBuffer byteBuffer2=ByteBuffer.wrap(s.getBytes());
            socketchannel.write(byteBuffer2);
            //9.释放资源
            socketchannel.close();
        } catch (IOException e) {
            e.printStackTrace();
        }
    }

    public String getVersion() {
        return version;
    }

    public void setVersion(String version) {
        this.version = version;
    }

    public String getStatus() {
        return status;
    }

    public void setStatus(String status) {
        this.status = status;
    }

    public String getDesc() {
        return desc;
    }

    public void setDesc(String desc) {
        this.desc = desc;
    }

    public HashMap<String, String> getHm() {
        return hm;
    }

    public void setHm(HashMap<String, String> hm) {
        this.hm = hm;
    }

    public HttpRequest getHttpRequest() {
        return httpRequest;
    }

    public void setHttpRequest(HttpRequest httpRequest) {
        this.httpRequest = httpRequest;
    }

    @Override
    public String toString() {
        return "HttpResponse{" +
                "version='" + version + '\'' +
                ", status='" + status + '\'' +
                ", desc='" + desc + '\'' +
                ", hm=" + hm +
                ", httpRequest=" + httpRequest +
                '}';
    }
}
3.5代码优化【理解】
-
实现步骤
-
根据请求资源路径不同,响应不同的数据
-
服务端健壮性处理
-
访问不存在的资源处理
-
-
代码实现
/*
* 接受连接的任务处理类
*
package com.itheima.mynio9;

import java.io.IOException;
import java.nio.channels.SelectionKey;
import java.nio.channels.ServerSocketChannel;
import java.nio.channels.SocketChannel;

/*
* 接受连接的任务处理类
*
* */
public class AcceptHandler {
    public SocketChannel connSocketChannel(SelectionKey selectionKey){
        try {
            //可以通过令牌来获取到了一个已经就绪的服务器通道
            ServerSocketChannel ssc = (ServerSocketChannel) selectionKey.channel();
            //客户端的延伸通道
            SocketChannel socketChannel = ssc.accept();
            //将客户端的延伸通道设置为非阻塞
            socketChannel.configureBlocking(false);
            //把socketChannel注册到选择器上
            socketChannel.register(selectionKey.selector(), SelectionKey.OP_READ);
            return socketChannel;
        } catch (IOException e) {
            e.printStackTrace();
        }
        return null;
    }
}
HttpResponse
package com.itheima.mynio9;

import org.apache.commons.io.IOUtils;

import java.io.File;
import java.io.FileInputStream;
import java.io.IOException;
import java.nio.ByteBuffer;
import java.nio.channels.SelectionKey;
import java.nio.channels.SocketChannel;
import java.util.HashMap;
import java.util.Map;
import java.util.Set;

public class HttpResponse {
    private String version; //协议版本
    private String status;  //响应状态码
    private String desc;    //状态码的描述信息

    //响应头数据
    private HashMap<String, String> hm = new HashMap<>();

    private HttpRequest httpRequest;  //我们后面要根据请求的数据,来进行一些判断

    //给浏览器响应数据的方法
    public void sendStaticResource(SelectionKey selectionKey) {
        //1.给响应行赋值
        this.version = "HTTP/1.1";
        this.status = "200";
        this.desc = "ok";

        //3.给响应头赋值
        //先获取浏览器请求的URI
        String requestURI = this.getHttpRequest().getRequestURI();
        if(requestURI != null){

            File file = new File(WEB_APP_PATH + requestURI);
            //判断这个路径是否存在
            if(!file.exists()){
                this.status = "404";
                this.desc = "NOT FOUNG";
            }

            if("200".equals(this.status)){
                if("/".equals(requestURI)){
                    hm.put("Content-Type", "text/html;charset=UTF-8");
                }else if("/favicon.ico".equals(requestURI)){
                    hm.put("Content-Type", "image/x-icon");
                }else if("/a.txt".equals(requestURI)){
                    hm.put("Content-Type", "text/html;charset=UTF-8");
                }else if("/1.jpg".equals(requestURI)){
                    hm.put("Content-Type", "image/jpeg");
                }else if("/1.png".equals(requestURI)){
                    hm.put("Content-Type", "image/png");
                }
            }else{
                hm.put("Content-Type", "text/html;charset=UTF-8");
            }

        }

        //2.将响应行拼接成一个单独的字符串 // HTTP/1.1 200 ok
        String responseLine = this.version + " " + this.status + " " + this.desc + "\r\n";

        //4.将所有的响应头拼接成一个单独的字符串
        StringBuilder sb = new StringBuilder();
        Set<Map.Entry<String, String>> entries = hm.entrySet();
        for (Map.Entry<String, String> entry : entries) {
            sb.append(entry.getKey()).append(": ").append(entry.getValue()).append("\r\n");
        }

        //5.响应空行
        String emptyLine = "\r\n";

        //6.响应行,响应头,响应空行拼接成一个大字符串
        String responseLineStr = responseLine + sb.toString() + emptyLine;

        try {
            //7.将上面三个写给浏览器
            SocketChannel socketChannel = (SocketChannel) selectionKey.channel();
            ByteBuffer byteBuffer1 = ByteBuffer.wrap(responseLineStr.getBytes());
            socketChannel.write(byteBuffer1);

            //8.单独操作响应体
            //因为在以后响应体不一定是一个字符串
            //有可能是一个文件,所以单独操作
            // String s = "哎哟,妈呀,终于写完了.";
            byte [] bytes = getContent();
            ByteBuffer byteBuffer2 = ByteBuffer.wrap(bytes);
            socketChannel.write(byteBuffer2);

            //9.释放资源
            socketChannel.close();
        } catch (IOException e) {
            e.printStackTrace();
        }
    }

    public static final String WEB_APP_PATH = "internetmodel\\webapp";
    private byte[] getContent() {
        try {
            //1.获取浏览器请求的URI
            String requestURI = this.getHttpRequest().getRequestURI();
            if(requestURI != null){

                if("200".equals(this.status)){
                    //2.判断一下请求的URI,根据不同的URI来响应不同的东西
                    if("/".equals(requestURI)){
                        String s = "哎哟,妈呀,终于写完了.";
                        return s.getBytes();
                    }else/* if("/favicon.ico".equals(requestURI))*/{
                        //获取一个ico文件
                        FileInputStream fis = new FileInputStream(WEB_APP_PATH + requestURI);
                        //把ico文件变成一个字节数组返回
                        return IOUtils.toByteArray(fis);
                    }
                }else{
                    return "访问的资源不存在".getBytes();
                }
            }
        } catch (IOException e) {
            e.printStackTrace();
        }
        return new byte[0];
    }

    public String getVersion() {
        return version;
    }

    public void setVersion(String version) {
        this.version = version;
    }

    public String getStatus() {
        return status;
    }

    public void setStatus(String status) {
        this.status = status;
    }

    public String getDesc() {
        return desc;
    }

    public void setDesc(String desc) {
        this.desc = desc;
    }

    public HashMap<String, String> getHm() {
        return hm;
    }

    public void setHm(HashMap<String, String> hm) {
        this.hm = hm;
    }

    public HttpRequest getHttpRequest() {
        return httpRequest;
    }

    public void setHttpRequest(HttpRequest httpRequest) {
        this.httpRequest = httpRequest;
    }

    @Override
    public String toString() {
        return "HttpResponse{" +
                "version='" + version + '\'' +
                ", status='" + status + '\'' +
                ", desc='" + desc + '\'' +
                ", hm=" + hm +
                ", httpRequest=" + httpRequest +
                '}';
    }
}
HttpServer
package com.itheima.mynio9;

import java.io.IOException;
import java.net.InetSocketAddress;
import java.nio.channels.SelectionKey;
import java.nio.channels.Selector;
import java.nio.channels.ServerSocketChannel;
import java.util.Iterator;
import java.util.Set;

public class HttpServer {
    public static void main(String[] args) throws IOException {
        //1.打开服务端通道
        ServerSocketChannel serverSocketChannel = ServerSocketChannel.open();
        //2.让这个通道绑定一个端口
        serverSocketChannel.bind(new InetSocketAddress(10000));
        //3.设置通道为非阻塞
        serverSocketChannel.configureBlocking(false);
        //4.打开一个选择器
        Selector selector = Selector.open();
        //5.绑定选择器和服务端通道
        serverSocketChannel.register(selector,SelectionKey.OP_ACCEPT);

        while(true){
            //6.选择器会监视通道的状态.
            int count = selector.select();
            if(count != 0){
                //7.会遍历所有的服务端通道.看谁准备好了,谁准备好了,就让谁去连接.
                //获取所有服务端通道的令牌,并将它们都放到一个集合中,将集合返回.
                Set<SelectionKey> selectionKeys = selector.selectedKeys();
                Iterator<SelectionKey> iterator = selectionKeys.iterator();
                while(iterator.hasNext()){
                    //selectionKey 依次表示每一个服务端通道的令牌
                    SelectionKey selectionKey = iterator.next();
                    if(selectionKey.isAcceptable()){
                        //获取连接
                        AcceptHandler acceptHandler = new AcceptHandler();
                        acceptHandler.connSocketChannel(selectionKey);

                    }else if(selectionKey.isReadable()){
                        //读取数据
                        HttpRequest httpRequest = new HttpRequest();
                        httpRequest.parse(selectionKey);
                        System.out.println("http请求的数据为 ---->" + httpRequest);

                        if(httpRequest.getRequestURI() == null || "".equals(httpRequest.getRequestURI())){
                            selectionKey.channel();
                            continue;
                        }
                        System.out.println("...数据解析完毕,准备响应数据....");

                        //响应数据
                        HttpResponse httpResponse = new HttpResponse();
                        httpResponse.setHttpRequest(httpRequest);
                        httpResponse.sendStaticResource(selectionKey);
                    }
                    //任务处理完毕以后,将SelectionKey从集合中移除
                    iterator.remove();
                }
            }
        }
    }
}
------------恢复内容结束------------

 浙公网安备 33010602011771号