Spring Amqp 五种工作模式
么是AMQP?
amqp(高级消息队列协议)是一种协议,类似http协议
amqp协议规定了,消息生产者和mq及消息消费者和mq通信的标准
什么是Spring AMQP?
Spring基于amqp协议定义的一套API规范(spring-amqp),并且由rabbitmq官方对这一套规范进行了实现(spring-rabbit);
SpringAMQP是基于RabbitMQ封装的一套模板,并且还利用SpringBoot对其实现了自动装配,使用起来非常方便。
SpringAMQP提供了三个功能
自动声明队列、交换机及其绑定关系
基于注解的监听器模式,异步接收消息
封装了RabbitTemplate工具,用于发送消息
工作模式
1.简单工作模式
2.工作队列模式
3.发布订阅模式
4.路由模式
5.通配符模式
模式使用如下:
1.简单工作模式
工作流程图:
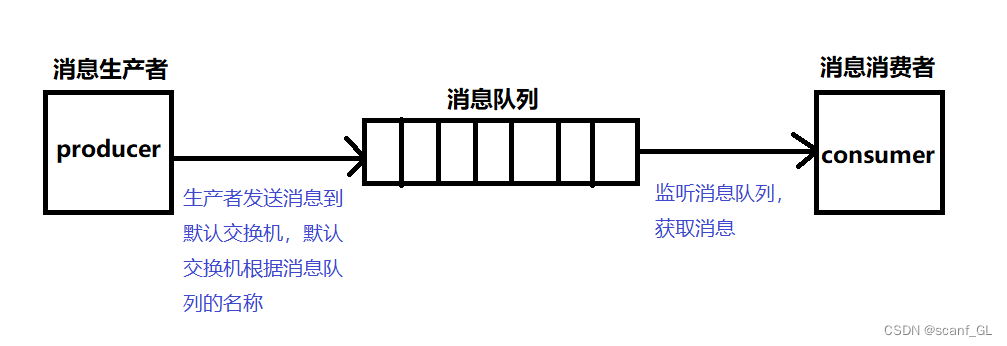
模式特点:生产者发送消息到默认交换机,默认交换机根据消息队列的名称,将消息转发到指定队列。
消费者监听消息队列,获取消息。
项目结构
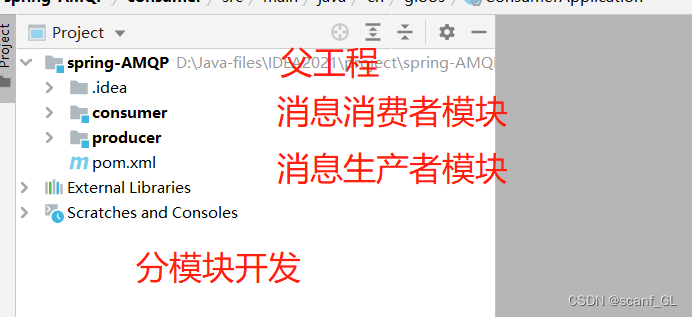
1.父工程的pom.xml
<parent>
<groupId>org.springframework.boot</groupId>
<artifactId>spring-boot-starter-parent</artifactId>
<version>2.3.9.RELEASE</version>
<relativePath/>
</parent>
<properties>
<project.build.sourceEncoding>UTF-8</project.build.sourceEncoding>
<project.reporting.outputEncoding>UTF-8</project.reporting.outputEncoding>
<java.version>1.8</java.version>
</properties>
<dependencies>
<dependency>
<groupId>org.projectlombok</groupId>
<artifactId>lombok</artifactId>
</dependency>
</dependencies>
2. 消息生产者模块
2.1.消息生产者模块pom.xml,application.yml配置,并编写启动类
<dependencies>
<dependency>
<groupId>org.springframework.boot</groupId>
<artifactId>spring-boot-starter-web</artifactId>
</dependency>
<dependency>
<groupId>org.springframework.boot</groupId>
<artifactId>spring-boot-starter-test</artifactId>
<scope>test</scope>
</dependency>
<!--AMQP依赖,包含RabbitMQ-->
<dependency>
<groupId>org.springframework.boot</groupId>
<artifactId>spring-boot-starter-amqp</artifactId>
</dependency>
</dependencies>
application.yml配置
server:
port: 8081
spring:
rabbitmq:
# 主机名
host: 192.168.220.131
# 端口
port: 5672
# 用户名和密码
username: guest
password: guest
# 虚拟主机
virtual-host: /
2.2.编写消息生产者的Controller方法,当访问sendMessage的方法时,向消息队列中发送hello world
@RestController
@RequestMapping("/producer")
public class ProducerController {
@Autowired
private RabbitTemplate rabbitTemplate;
@GetMapping("/sendMessage")
public String sendMessage() {
//RabbitTemplate实现消息发送
//参数一:默认的交换机空字符串
//参数二:路由到那个消息队列
//参数三:发送的消息内容
rabbitTemplate.convertAndSend("","simple.queue","hello world");
return "success";
}
}
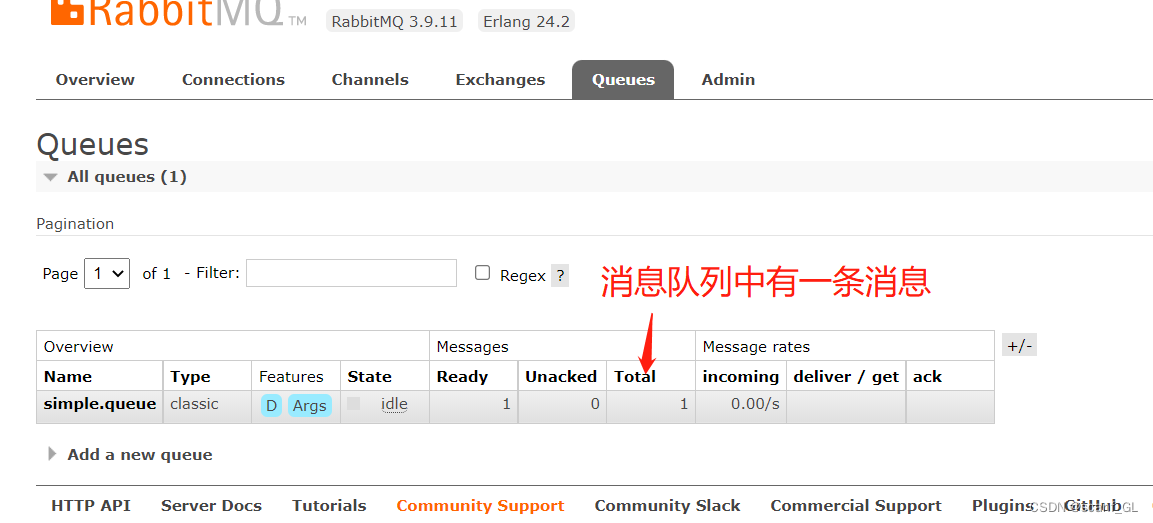
2.3.启动生产者服务,查看RabbitMQ中是否把消息存储到队列中,以及访问Controller方法是否成功
3.消息消费者
3.1.消息消费者模块pom.xml,application.yml配置,并编写启动类
代码和消息生产者的一样,但是application.yml记得修改一下端口
3.2.编写消息消费者的监听,监听消息队列,获取消息
@Component
@Slf4j
public class SimpleQueueLisener {
//监听那个队列
@RabbitListener(queues = "simple.queue")
public void receiveMessage(String message) {
//由于对消息不做如何操作,在日志打印一下
log.info("接受到的消息是--->{}",message);
}
}
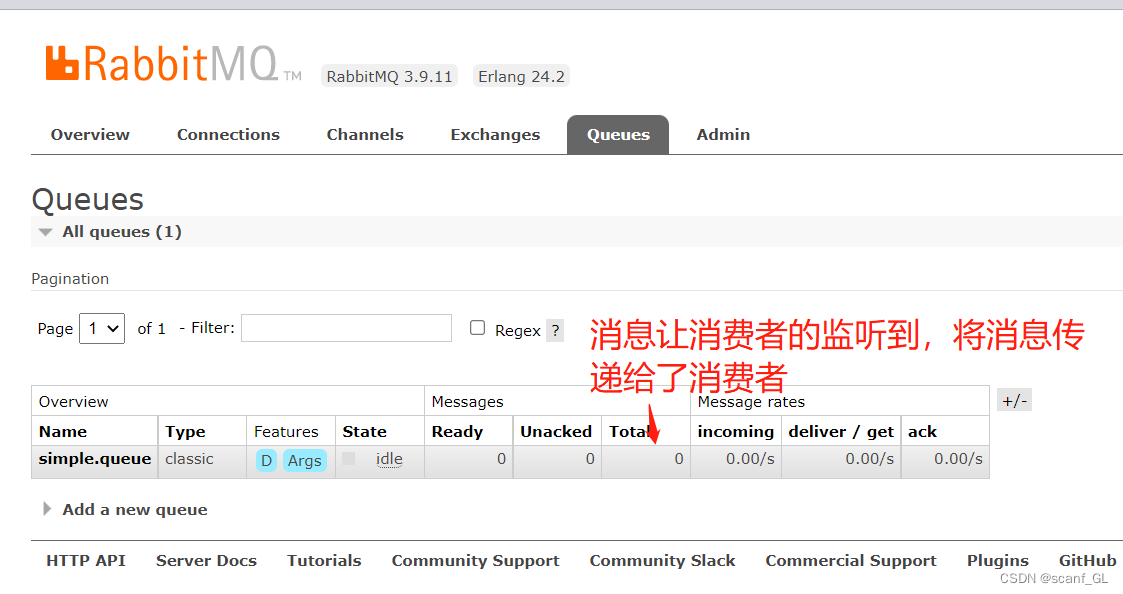
2.3.启动消费者服务,查看RabbitMQ中消息是否被取出,打印到控制台
2.工作队列模式
工作流程图:
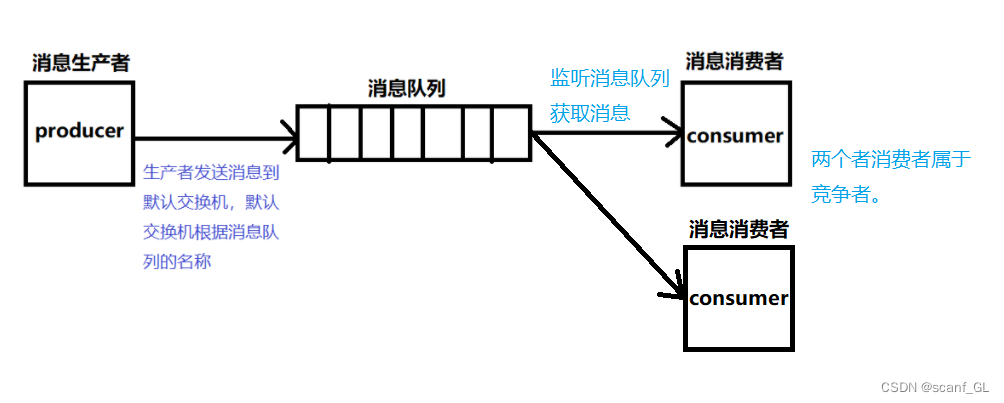
在简单模式的项目结构上,多启动一个消息消费者的主启动类。多个消费者去监听同一个消息队列。
当消息队列数据过多时,一个消费者无法跟上生产者的效率,很可能出现故障,如果还有一个消费者同时去抢消息,那么效率就会很快。
3.发布订阅模式(Fanout:广播,将消息交给所有绑定到交换机的队列 )
工作流程图:
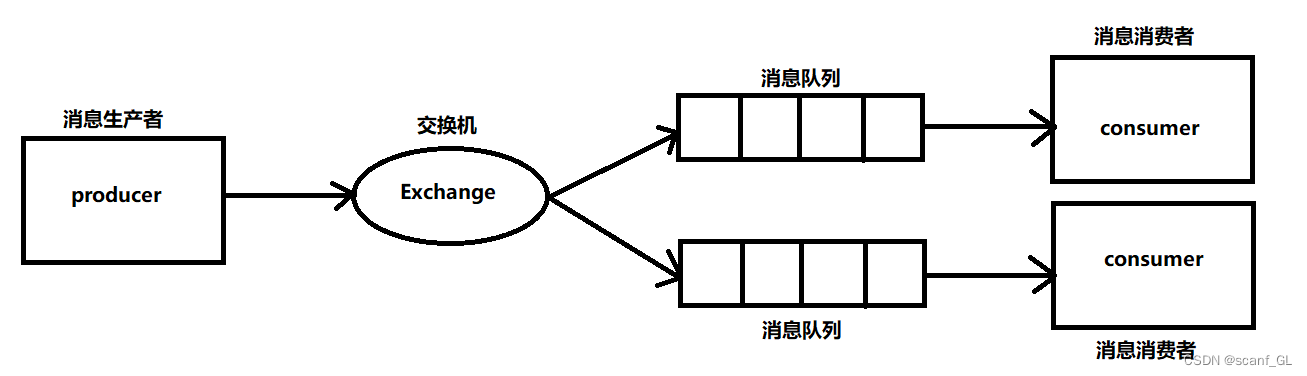
1.生产者发送消息到某个交换机(不能是默认交换机)
2.由交换机将消息转发给绑定它的所有消息队列
3.消费者可以从每一个消息队列中获取消息
1.项目结构同上一样
2.消息生产者模块(该配置类要在消息消费者来一份,由于部署不知道先是生产者还是消费者,防止消费者启动没有交换机和消息队列)
2.1.编写一个Config类,创建交换机,消息队列,并绑定交换机和消息队列
//配置类
@Configuration
public class FanoutConfig {
/**
* 创建交换机
*/
@Bean
public Exchange createFanoutExchange(){
//参数一:交换机名称
//参数二:是否支持持久化
//参数三:是否自动删除
return new FanoutExchange("exchange",true,false);
//构建者模式创建交换机
//return ExchangeBuilder.fanoutExchange("exchange").durable(true).build();
}
/**
*创建队列fqueue1
*/
@Bean
public Queue createFQueue1(){
return QueueBuilder.durable("fqueue1").build();
//队列名字,是否支持持久化
//return new Queue("fqueue1",true);
}
/**
*创建队列fqueue2
*/
@Bean
public Queue createFQueue2(){
return QueueBuilder.durable("fqueue2").build();
//队列名字,是否支持持久化
//return new Queue("fqueue1",true);
}
/**
*绑定交换机和队列
*/
public Binding bindFqueuelToExchange(@Qualifier("createFanoutExchange") Exchange exchange,
@Qualifier("createFQueue1") Queue queue){
//将队列1于交换机绑定,with是路由规则是绑定所有
return BindingBuilder.bind(queue).to(exchange).with("").noargs();
}
/**
*绑定交换机和队列
*/
public Binding bindFqueue2ToExchange(@Qualifier("createFanoutExchange") Exchange exchange,
@Qualifier("createFQueue2") Queue queue){
//将队列2于交换机绑定,with是路由规则是绑定所有
return BindingBuilder.bind(queue).to(exchange).with("").noargs();
}
}
2.2.编写Controller方法向交换机发送消息
@GetMapping("/hh")
public String sendMm(){
//将消息发送到exchange交换机,路由:路由到所有,默认为"",消息是:你好呀!
rabbitTemplate.convertAndSend("exchange","","你好呀!");
return "OK";
}
3.消息消费者模块
3.1.创建一个C1模块,编写监听,监听消息
@Component
@Slf4j
public class C1Lisener {
//监听那个队列
@RabbitListener(queues = "fqueue1")
public void receiveMessage(String message) {
//由于对消息不做如何操作,在日志打印一下
log.info("接受到的消息是--->{}",message);
}
}
3.2.创建一个C2模块,编写监听,监听消息
@Component
@Slf4j
public class C1Lisener {
//监听那个队列
@RabbitListener(queues = "fqueue2")
public void receiveMessage(String message) {
//由于对消息不做如何操作,在日志打印一下
log.info("接受到的消息是--->{}",message);
}
}
4.查看控制台,消息是否被监听到
4.路由模式(directExchange)
工作流程图:
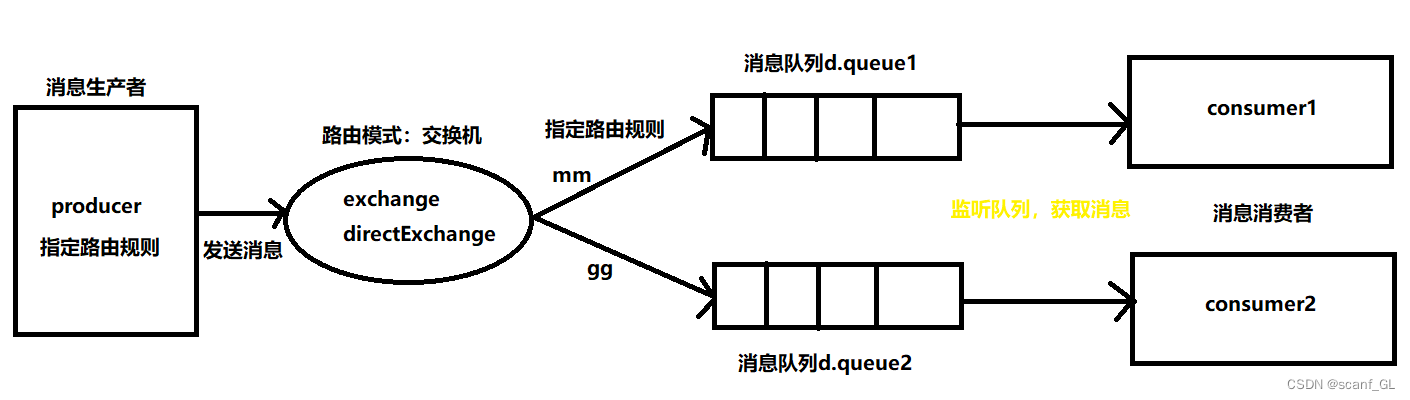
1.生产者发送消息时,需指定交换机名称(directExchange),还要指定路由规则,然后发送到交换机
2.交换机事先通过不同的路由规则和消息队列进行绑定,当交换机拿到消息后,通过路由规则路由到指定队列
3.消费者通过监听获取消息
1.项目结构同上一样
2.消息生产者模块(该配置类要在消息消费者来一份,由于部署不知道先是生产者还是消费者,防止消费者启动没有交换机和消息队列)
2.1.编写一个Config类,创建交换机,消息队列,并绑定交换机和消息队列
@Configuration
public class DirectConfig {
/**
* 创建交换机
*/
@Bean
public Exchange createDirect(){
return ExchangeBuilder.directExchange("dirct.exchange").durable(true).build();
}
/**
* 创建队列
*/
@Bean
public Queue Dqueue1(){
return QueueBuilder.durable("d.queue1").build();
}
/**
* 创建队列
*/
@Bean
public Queue Dqueue2(){
return QueueBuilder.durable("d.queue2").build();
}
/**
* 绑定
*/
@Bean
public Binding bindDQueue1ToExchange(@Qualifier("createDirect") Exchange exchange,
@Qualifier("Dqueue1") Queue queue){
return BindingBuilder.bind(queue).to(exchange).with("mm").noargs();
}
/**
* 绑定
*/
@Bean
public Binding bindDQueue2ToExchange(@Qualifier("createDirect") Exchange exchange,
@Qualifier("Dqueue2") Queue queue){
return BindingBuilder.bind(queue).to(exchange).with("gg").noargs();
}
}
2.2.编写Controller方法向交换机发送消息
@GetMapping("/mm")
public String sendMm(){
rabbitTemplate.convertAndSend("dirct.exchange","mm","大美女");
return "OK";
}
@GetMapping("/gg")
public String sendDm(){
rabbitTemplate.convertAndSend("dirct.exchange","gg","大哥哥");
return "OK OK";
3.消息消费者模块
3.1.创建一个C1模块,编写监听,监听消息
@Component
@Slf4j
public class C1Lisener {
//监听那个队列
@RabbitListener(queues = "d.queue1")
public void receiveMessage(String message) {
//由于对消息不做如何操作,在日志打印一下
log.info("接受到的消息是--->{}",message);
}
}
3.2.创建一个C2模块,编写监听,监听消息
@Component
@Slf4j
public class C2Lisener {
//监听那个队列
@RabbitListener(queues = "d.queue2")
public void receiveMessage(String message) {
//由于对消息不做如何操作,在日志打印一下
log.info("接受到的消息是--->{}",message);
}
}
4.查看控制台,消息是否被监听到
5.通配符模式(topicExchange),和路由模式非常像,路由规则不同
工作流程图:
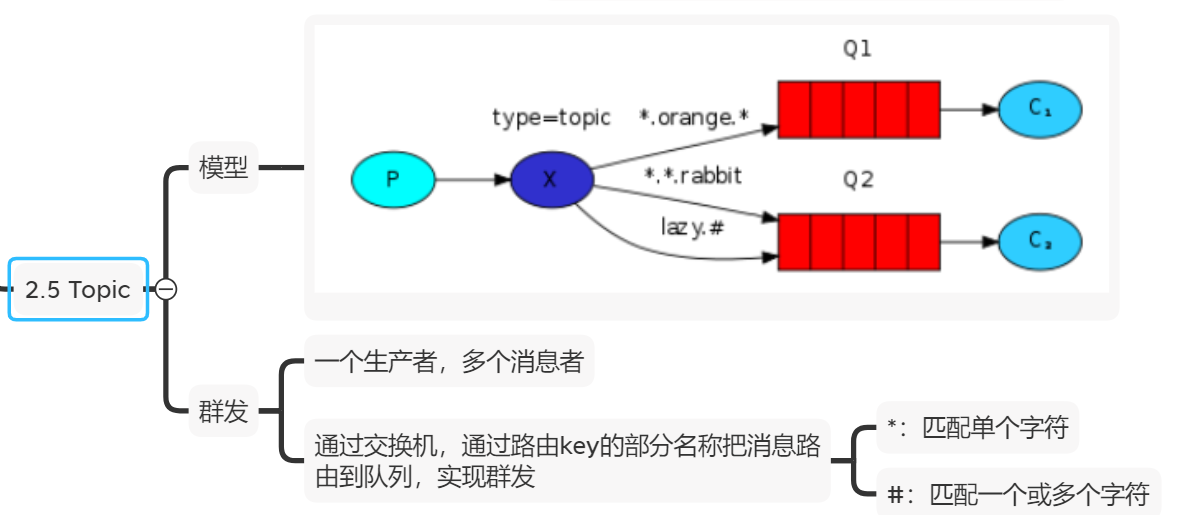
1.生产者发送消息时,需指定交换机名称(topicExchange),还要指定路由规则,然后发送到交换机
通配模式的路由规则:
#:统配0~多个单词,单词之间用.分隔
*:统配一个任意单词
2.交换机事先通过不同的路由规则和消息队列进行绑定,当交换机拿到消息后,通过路由规则路由到指定队列
3.消费者通过监听获取消息
1.项目结构同上一样
2.消息生产者模块(该配置类要在消息消费者来一份,由于部署不知道先是生产者还是消费者,防止消费者启动没有交换机和消息队列)
2.1.编写一个Config类,创建交换机,消息队列,并绑定交换机和消息队列
@Configuration
public class TopicConfig {
/**
* 创建交换机
*/
@Bean
public Exchange topicExchange(){
return ExchangeBuilder.topicExchange("topic.exchange").durable(true).build();
}
/**
* 创建消息队列
*/
@Bean
public Queue queue1(){
return QueueBuilder.durable("t.queue1").build();
}
@Bean
public Queue queue2(){
return QueueBuilder.durable("t.queue2").build();
}
/**
* 绑定交换机和消息队列
*/
@Bean
public Binding bindQ1ToTopic(@Qualifier("topicExchange") Exchange exchange,
@Qualifier("queue1") Queue queue){
return BindingBuilder.bind(queue).to(exchange).with("*.gao.*").noargs();
}
/**
* 绑定交换机和消息队列
*/
@Bean
public Binding bindQ2ToTopic(@Qualifier("topicExchange") Exchange exchange,
@Qualifier("queue2") Queue queue){
return BindingBuilder.bind(queue).to(exchange).with("da.#").noargs();
}
}
2.2.编写Controller方法向交换机发送消息
@GetMapping("/hh")
public String send1(){
//指定交换机的名称
//通配符模式的路由规则
//消息内容
rabbitTemplate.convertAndSend("topic.exchange","da.gao.aaa","这人牛逼");
return "GLgoodMan";
}
@GetMapping("/dd")
public String send2(){
rabbitTemplate.convertAndSend("topic.exchange","da.hh","hhhhh");
return "hellow";
}
3.消息消费者模块
3.1.创建一个C2模块,编写监听,监听消息
@Component
@Slf4j
public class TopLisener {
@RabbitListener(queues = "t.queue1")
public void receiveMessage(String message){
//由于对消息不做如何操作,在日志打印一下
log.info("接受到的消息是--->{}",message);
}
}
3.2.创建一个C2模块,编写监听,监听消息
@Component
@Slf4j
public class TopLisener {
@RabbitListener(queues = "t.queue2")
public void receiveMessage(String message){
//由于对消息不做如何操作,在日志打印一下
log.info("接受到的消息是--->{}",message);
}
}
4.查看控制台,消息是否被监听到
本文部分资料来源网上,用于做学习笔记.
posted on 2023-09-15 19:17 face-world 阅读(241) 评论(0) 收藏 举报


 浙公网安备 33010602011771号