
c# GDI画图 双缓冲画图分析
双缓冲绘图分析
1、Windows 绘图原理
我们在 Windows 环境下看到各种元素,如菜单、按钮、窗口、图像,从根本上说,都是“画”出来的。这时的屏幕,就相当于一块黑板,而 Windows 下的各种 GDI 要素,如画笔、画刷等,就相当于彩色粉笔了。我们在黑板上手工画图时,是一笔一划的,电脑亦然。只不过电脑的速度比手工快的太多,所以在我们看起来好像所有的图形文字都是同时出现的。
2、普通绘图方式的局限
上述绘图方式我们暂且称之为普通绘图方式吧。虽然这种方式能满足相当一部分的绘图需要,但是当要绘制的对象太复杂,尤其是含有位图时,电脑便力不从心了。这时的画面会显示的很慢,对于运动的画面,会给人“卡”住了的感觉,总之一个字:不爽。
3、解决之道:双缓冲
双缓冲的原理可以这样形象的理解:把电脑屏幕看作一块黑板。首先我们在内存环境中建立一个“虚拟“的黑板,然后在这块黑板上绘制复杂的图形,等图形全部绘制完毕的时候,再一次性的把内存中绘制好的图形“拷贝”到另一块黑板(屏幕)上。采取这种方法可以提高绘图速度,极大的改善绘图效果。
实现过程如下:
1、在内存中创建与画布一致的缓冲区
2、在缓冲区画图
3、将缓冲区位图拷贝到当前画布上
4、释放内存缓冲区
绘图示例:
Winform应用程序中添加一个新的窗体;窗体中放置三个timer 分别使用原始画图模式、bitmap双缓画图模式、BufferedGraphicsContext双缓冲画图模式,Timer的Inteval设置为10;另外的三组按钮分别控制timer的开关;
引用的命名空间:
using System.Drawing;
using System.Drawing.Drawing2D;


DateTime t1 = DateTime.Now;
            Graphics g = this.CreateGraphics();
            LinearGradientBrush brush;
            if (flag)
            {
                brush = new LinearGradientBrush(new PointF(0.0f, 0.0f), new PointF(700.0f, 300.0f), Color.Blue, Color.Red);
                flag = false;
            }
            else
            {
                brush = new LinearGradientBrush(new PointF(0.0f, 0.0f), new PointF(400.0f, 300.0f), Color.Blue, Color.Red);
                flag = true;
            }
            for (int i = 0; i < 60; i++)
            {
                for (int j = 0; j < 60; j++)
                {
                    g.FillEllipse(brush, j * 10, i * 10, 10, 10);
                }
            }

            DateTime t2 = DateTime.Now;
            TimeSpan ts = t2 - t1;
            float per = 1000 / ts.Milliseconds;
            label1.Text = "速度:" + per.ToString() + "帧/s";
 DateTime t1 = DateTime.Now;
            Bitmap bmp = new Bitmap(600, 600);
            Graphics g = Graphics.FromImage(bmp);
            g.SmoothingMode = SmoothingMode.HighQuality;//画面呈现质量
            g.PixelOffsetMode = PixelOffsetMode.HighQuality;//像素偏移模式
            LinearGradientBrush brush;
            if (flag)
            {
                brush = new LinearGradientBrush(new PointF(0.0f, 0.0f), new PointF(700.0f, 300.0f), Color.Blue, Color.Red);
                flag = false;
            }
            else
            {
                brush = new LinearGradientBrush(new PointF(0.0f, 0.0f), new PointF(400.0f, 300.0f), Color.Blue, Color.Red);
                flag = true;
            }
            for (int i = 0; i < 60; i++)
            {
                for (int j = 0; j < 60; j++)
                {
                    g.FillEllipse(brush, j * 10, i * 10, 10, 10);
                }
            }
            this.CreateGraphics().DrawImage(bmp, 0, 0);//把画布贴到画面上
            DateTime t2 = DateTime.Now;
            TimeSpan ts = t2 - t1;
            float per = 1000 / ts.Milliseconds;
            label2.Text = "速度:" + per.ToString() + "帧/s";
绘图过程:
1、在内存中建立一块“虚拟画布”:
Bitmap bmp = new Bitmap(600, 600);
2、获取这块内存画布的Graphics引用:
Graphics g = Graphics.FromImage(bmp);
3、在这块内存画布上绘图:
g.FillEllipse(brush, 100, 100, 100, 100);
4、将内存画布画到窗口中
this.CreateGraphics().DrawImage(bmp, 0, 0);
 DateTime t1 = DateTime.Now;
            BufferedGraphicsContext current = BufferedGraphicsManager.Current;//提供创建图形缓冲区的方法
            BufferedGraphics bg;
            bg = current.Allocate(this.CreateGraphics(), this.DisplayRectangle);
            Graphics g = bg.Graphics;
            LinearGradientBrush brush;
            if (flag)
            {
                brush = new LinearGradientBrush(new PointF(0.0f, 0.0f), new PointF(700.0f, 300.0f), Color.Blue, Color.Red);
                flag = false;
            }
            else
            {
                brush = new LinearGradientBrush(new PointF(0.0f, 0.0f), new PointF(400.0f, 300.0f), Color.Blue, Color.Red);
                flag = true;
            }
            for (int i = 0; i < 60; i++)
            {
                for (int j = 0; j < 60; j++)
                {
                    g.FillEllipse(brush, j * 10, i * 10, 10, 10);
                }
            }

            bg.Render();
            bg.Dispose();
            DateTime t2 = DateTime.Now;
            TimeSpan ts = t2 - t1;
            float per = 1000 / ts.Milliseconds;
            label3.Text = "速度:" + per.ToString() + "帧/s";
绘图过程:
1、获得对 BufferedGraphicsContext 类的实例的引用。
2、通过调用 BufferedGraphicsContext.Allocate 方法创建 BufferedGraphics 类的实例。
3、通过设臵 BufferedGraphics.Graphics 属性将图形绘制到图形缓冲区。
4、当完成所有图形缓冲区中的绘制操作时,可调用
BufferedGraphics.Render 方法将缓冲区的内容呈现到与该缓冲区关联的绘图图面或者指定的绘图图面。
5、完成呈现图形之后,对 BufferedGraphics 实例调用释放系统资源的 Dispose 方法。
绘图效果:
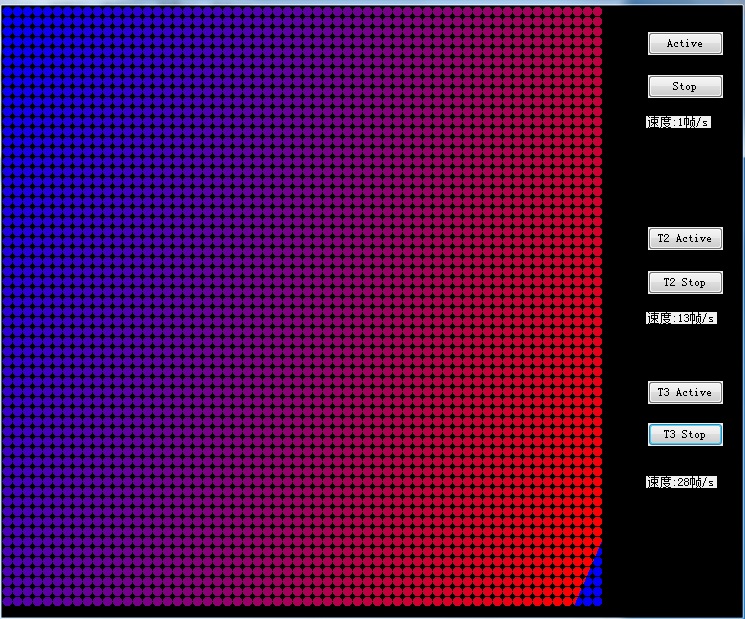
上述的例子中可以看出
基本的画图模式中会明显的感觉到画面从上到下依次刷新,刷新speed为1~2帧/s 图像刷新速度很慢
使用Bitmap绘图模式 看到的画面是在不停的闪烁,刷新speed为13~14帧/s 图像刷新速度加快很多
使用BufferedGraphicsContext双缓冲模式 看到画面闪烁更快,刷新speed为27~28帧/s 图像刷新速度最快
其他绘图注意点:
inform中让pictureBox 显示的图片旋转
img.RotateFlip(RotateFlipType.Rotate90FlipNone);
顺时针旋转90度 RotateFlipType.Rotate90FlipNone
逆时针旋转90度 RotateFlipType.Rotate270FlipNone
水平翻转 RotateFlipType.Rotate180FlipY
垂直翻转 RotateFlipType.Rotate180FlipX
>>GraphicsPath 将相邻的点连接成线
Graphics g = this.CreateGraphics();
System.Drawing.Drawing2D.GraphicsPath path = new System.Drawing.Drawing2D.GraphicsPath();
            for (int i = 0; i < lstPoint.Count - 1; i++)
            {
                path.AddLine(new Point(lstPoint[i], dicPoint[lstPoint[i]]), new Point(lstPoint[i + 1], dicPoint[lstPoint[i + 1]]));//示例中添加的是前后两个点位的x、y坐标
            }
            SolidBrush brush=new SolidBrush (c_Line);
            g.DrawPath(new Pen(brush), path);
>>Graphics.DrawCurve可以将两条直线的连接部位做平滑处理
Graphics g = this.CreateGraphics();
Point[] array_Point = new Point[lstPoint.Count];
            for (int i = 0; i < lstPoint.Count; i++)
            {
                array_Point[i].X = lstPoint[i];
                array_Point[i].Y = dicPoint[lstPoint[i]];
            }
            SolidBrush brush=new SolidBrush (c_Line);
            g.DrawCurve(new Pen(brush), array_Point);
>>GDI绘制正弦曲线
  void DrawSine()
        {
            //为了方便查看效果,在这里我定义了一个常量。
            //它在定义数组的长度和for循环中都要用到。
            const int size = 500;

            double[] x = new double[size];

            Graphics graphics = this.CreateGraphics();
            Pen pen = new Pen(Color.Teal);

            //画正弦曲线的横轴间距参数。建议所用的值应该是 正数且是2的倍数。
            //在这里采用2。
            int val = 2;

            float temp = 0.0f;

            //把画布下移100。为什么要这样做,只要你把这一句给注释掉,运行一下代码,
            //你就会明白是为什么?
            graphics.TranslateTransform(0, 100);

            for (int i = 0; i < size; i++)
            {
                //改变32,实现正弦曲线宽度的变化。
                //改100,实现正弦曲线高度的变化。
                x[i] = Math.Sin(2 * Math.PI * i / 32) * 100;

                graphics.DrawLine(pen, i * val, temp, i * val + val / 2, (float)x[i]);
                temp = (float)x[i];
            }
        }
>>GDI绘制线性渐变(使用LinearGradientBrush画刷)
Graphics g = this.panel1.CreateGraphics();
            Pen pen = new Pen(Color.Red, 3);
            g.DrawEllipse(pen, 50, 50, 100, 100);
            Rectangle rect=new Rectangle (50,50,100,100);
            LinearGradientBrush brush = new LinearGradientBrush(rect, Color.Blue, Color.Green, LinearGradientMode.BackwardDiagonal);
            g.FillEllipse(brush, rect);
>>GDI实现多色线性渐变(使用LinearGradientBrush画刷)
Graphics g = this.panel2.CreateGraphics();
            g.Clear(Color.White);

            //定义渐变颜色数组
            Color[] colors =
           {
               Color.Blue,
               Color.Green,
               Color.Blue
           };

            float[] positions =
           {
               0.0f,
               0.5f,
               1.0f
           };

            //定义ColorBlend对象
            ColorBlend colorBlend = new ColorBlend(3);
            colorBlend.Colors = colors;
            colorBlend.Positions = positions;

            Rectangle rect = new Rectangle(0, 0, 100, 100);
            //定义线型渐变画刷
            using (LinearGradientBrush lBrush = new LinearGradientBrush(rect, Color.White, Color.Black, LinearGradientMode.Horizontal))
            {

                //设置渐变画刷的多色渐变信息
                lBrush.InterpolationColors = colorBlend;

                g.FillRectangle(lBrush, rect);
            }
>>GDI实现路径渐变(使用PathGradientBrush画刷)
private void button1_Click(object sender, EventArgs e)
        {
            Draw(pictureBox1.Handle, new Point(10, 10), new Size(100, 100));
        }


        private void Draw(IntPtr winHandle, Point location, Size size)
        {
            Graphics g = Graphics.FromHwnd(winHandle);
            GraphicsPath gp = new GraphicsPath();
            Rectangle rec = new Rectangle(location, size);
          //  gp.AddRectangle(rec);
            gp.AddEllipse(rec);
            Color[] surroundColor = new Color[] { Color.LightGreen };
            PathGradientBrush pb = new PathGradientBrush(gp);
            pb.CenterColor = Color.Red;
            pb.SurroundColors = surroundColor;
            g.FillPath(pb, gp);
        }
更多关于GDI颜色渐变的使用: https://msdn.microsoft.com/zh-cn/library/s6fxh562%28v=vs.110%29.aspx

 浙公网安备 33010602011771号