nexus 搭建 maven 私服
本机环境
Win 8 JDK 7 Maven 3.2 Nexus 2.11版本选择
http://www.sonatype.org/nexus/archivednexus 2.6 及 2.6+ 版本要求 jdk 1.7 或 1.7+ 版本(jdk 1.6 请选择 nexus 2.5 及 以下版本)。根据你现有的环境来选择合适的版本。
这里选择 nexus-2.11.0 (如果无法打开下载, 可将新标签页地址栏中的地址复制到迅雷等下载工具中进行下载)。
下载得到 nexus-2.11.0-bundle.zip 压缩包。解压缩里面的 nexus-2.11.0-02 目录,如我的 E:\setup\dev\servers\nexus, 最终得到
的目录结构为 E:\setup\dev\servers\nexus\nexus-2.11.0-02。
配置 nexus 环境
NEXUS_HOME = E:\setup\dev\servers\nexus\nexus-2.11.0-02Path = .;%NEXUS_HOME%\bin
安装 nexus 服务
如果你所使用的是 Win8 操作系统,以下操作需要管理员权限。在命令行中执行 nexus install(Win8 系统组合键为 Ctrl + X, A):C:\WINDOWS\system32>nexus install
wrapper | nexus installed.
wrapper | nexus installed.
启动 nexus
在命令行中执行 nexus start:C:\WINDOWS\system32>nexus start
wrapper | Starting the nexus service...
wrapper | Waiting to start...
wrapper | Waiting to start...
wrapper | Waiting to start...
wrapper | nexus started.
页面访问的入口地址:http://localhost:8081/nexuswrapper | Starting the nexus service...
wrapper | Waiting to start...
wrapper | Waiting to start...
wrapper | Waiting to start...
wrapper | nexus started.
登录 nexus
默认的管理员账号是:admin, 密码是:admin123停止 nexus
在命令行中执行 nexus stop:C:\Users\fanlychie>nexus stop
wrapper | Stopping the nexus service...
wrapper | Waiting to stop...
wrapper | nexus stopped.
wrapper | Stopping the nexus service...
wrapper | Waiting to stop...
wrapper | nexus stopped.
修改 nexus 账号密码
先停止 nexus,打开 %NEXUS_HOME%\sonatype-work\nexus\conf\security.xml,修改即可。
nexus 的密码采用 SHA1 加密算法 ( 在线加密工具 ),将加密后的 SHA1 串(小写)拷贝覆盖原来的。重启 nexus:nexus restart 。
nexus 的密码采用 SHA1 加密算法 ( 在线加密工具 ),将加密后的 SHA1 串(小写)拷贝覆盖原来的。重启 nexus:nexus restart 。
<user>
<id>admin</id>
<firstName>Administrator</firstName>
<lastName>User</lastName>
<password>2899441143e28aee7287e8da3d7211258f5edbd3</password>
<status>active</status>
<email>fanlychie@yeah.net</email>
</user>
<id>admin</id>
<firstName>Administrator</firstName>
<lastName>User</lastName>
<password>2899441143e28aee7287e8da3d7211258f5edbd3</password>
<status>active</status>
<email>fanlychie@yeah.net</email>
</user>
修改 nexus 端口
打开 %NEXUS_HOME%\nexus-2.11.0-02\conf\nexus.properties, 修改 application-port 的值。重启 nexus:nexus restart 。application-port=8081
application-host=0.0.0.0
nexus-webapp=${bundleBasedir}/nexus
nexus-webapp-context-path=/nexus
application-host=0.0.0.0
nexus-webapp=${bundleBasedir}/nexus
nexus-webapp-context-path=/nexus
仓库类型
打开 Views/Repositories --> Repositories 视图
nexus 仓库分为 4 种,group(仓库组)、hosted(宿主仓库)、proxy(代理仓库)、virtual(虚拟仓库)。
我们自己开发的构件通常是发布到 hosted 仓库,proxy 用来代理远程的公共仓库,一个 group 可以包含多个 hosted/proxy 仓库。
仓库组
打开 Views/Repositories --> Repositories --> Public Repositories --> Configuration 视图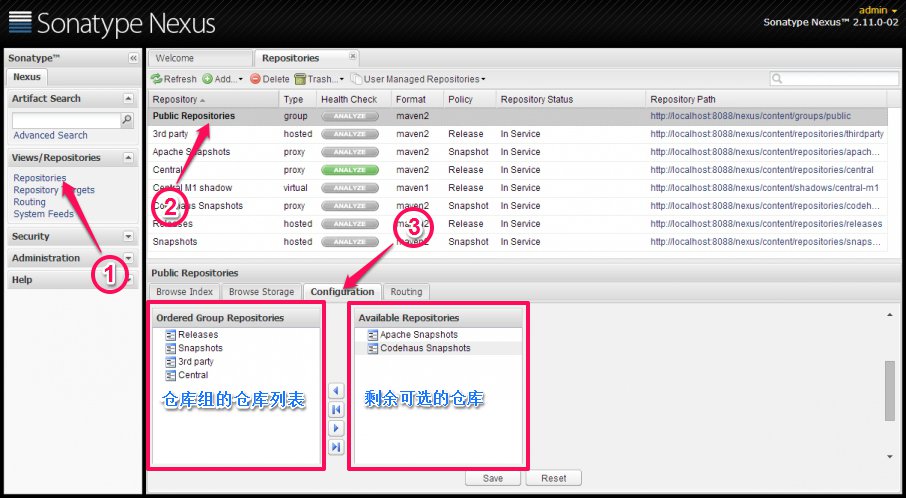
Configuration 栏的左边是仓库组仓库列表,右边是当前可选的仓库,可以从右边挑选合适的仓库加入到左边的仓库组,点击 Save 保存即可。
一个仓库组通常包含了多个仓库,仓库组中的仓库列表的顺序决定了构件下载时遍历的仓库的先后次序,因此,建议将远程中央仓库(Central)放
到仓库组的最后一项。
maven settings.xml 配置
在 settings.xml 配置文件中添加如下配置:<servers>
<server>
<id>releases</id>
<username>admin</username>
<password>admin123</password>
</server>
<server>
<id>snapshots</id>
<username>admin</username>
<password>admin123</password>
</server>
<server>
<id>thirdparty</id>
<username>admin</username>
<password>admin123</password>
</server>
</servers>
<mirrors>
<mirror>
<id>nexus</id>
<mirrorOf>*</mirrorOf>
<name>nexus public repositories</name>
<url>http://127.0.0.1:8088/nexus/content/groups/public</url>
</mirror>
</mirrors>
<server>
<id>releases</id>
<username>admin</username>
<password>admin123</password>
</server>
<server>
<id>snapshots</id>
<username>admin</username>
<password>admin123</password>
</server>
<server>
<id>thirdparty</id>
<username>admin</username>
<password>admin123</password>
</server>
</servers>
<mirrors>
<mirror>
<id>nexus</id>
<mirrorOf>*</mirrorOf>
<name>nexus public repositories</name>
<url>http://127.0.0.1:8088/nexus/content/groups/public</url>
</mirror>
</mirrors>
<server> 节点配置服务的账户密码,用于发布构件时进行身份和权限的认证。<mirror> 节点用于镜像的配置,具体用法参考 maven 镜像配置
发布构件
在 nexus 中找到如下的视图页面: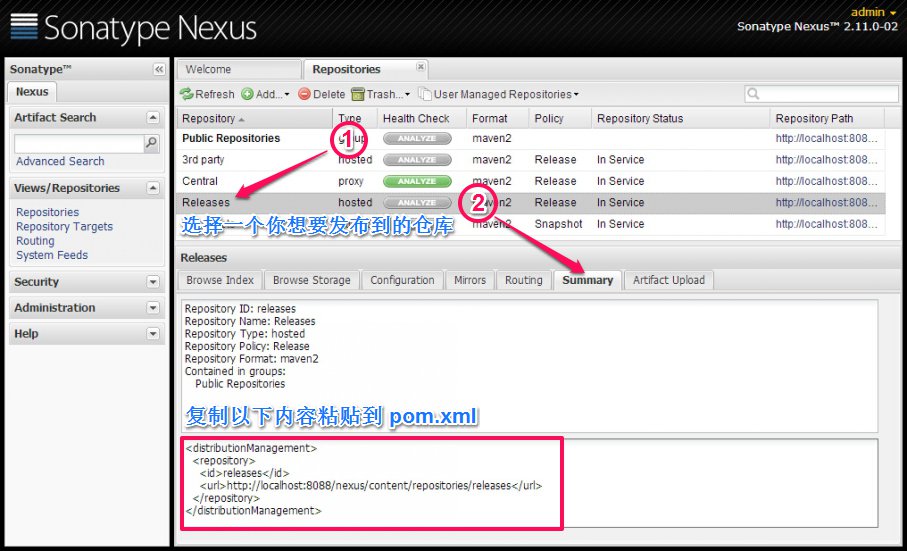
复制以上的配置,粘贴到你的 pom.xml 配置文件中:
<project xmlns="http://maven.apache.org/POM/4.0.0" xmlns:xsi="http://www.w3.org/2001/XMLSchema-instance"
xsi:schemaLocation="http://maven.apache.org/POM/4.0.0 http://maven.apache.org/xsd/maven-4.0.0.xsd">
<modelVersion>4.0.0</modelVersion>
<groupId>org.fanlychie</groupId>
<artifactId>proj</artifactId>
<version>1.0.0</version>
<packaging>jar</packaging>
<name>proj</name>
<url>http://maven.apache.org</url>
<distributionManagement>
<repository>
<id>releases</id>
<url>http://localhost:8088/nexus/content/repositories/releases</url>
</repository>
</distributionManagement>
</project>
这里需要注意的是,repository 节点的 id 需与 settings.xml 中配置的 server 节点的 id 相同,如果不相同,修改任意一方都可以,只xsi:schemaLocation="http://maven.apache.org/POM/4.0.0 http://maven.apache.org/xsd/maven-4.0.0.xsd">
<modelVersion>4.0.0</modelVersion>
<groupId>org.fanlychie</groupId>
<artifactId>proj</artifactId>
<version>1.0.0</version>
<packaging>jar</packaging>
<name>proj</name>
<url>http://maven.apache.org</url>
<distributionManagement>
<repository>
<id>releases</id>
<url>http://localhost:8088/nexus/content/repositories/releases</url>
</repository>
</distributionManagement>
</project>
要让它们保持一致即可,否则,发布构件的时候会报 401,ReasonPhrase:Unauthorized 的错误,原因是无法认证用户的身份。
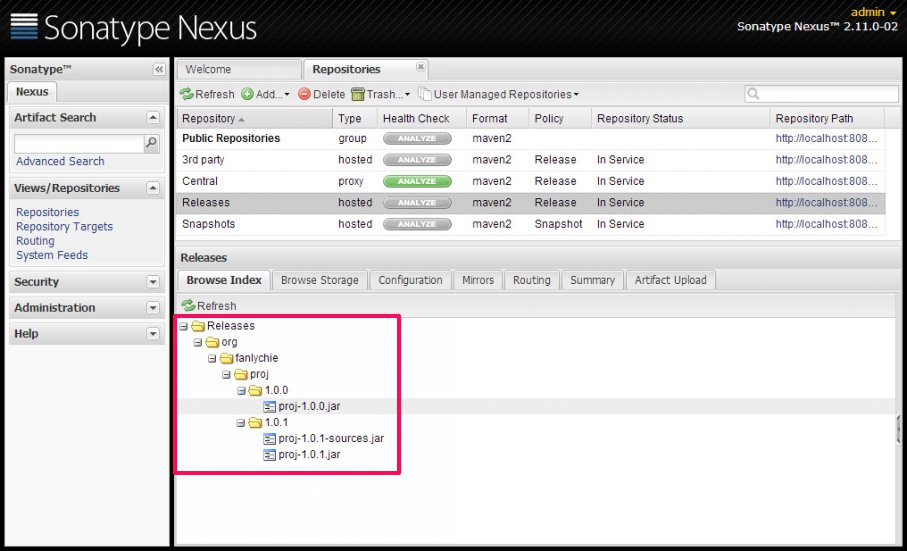
右键项目,Run As --> Maven build...,在 Goals 栏输入 deploy 或在命令行(cmd)执行 mvn deploy,在控制台若能看到
BUILD SUCCESS,表明构件发布成功。你可以在 nexus 的 Releases 仓库中找到这个构件:

发布构件的时候,如果想把源码也一起发布出去(执行 mvn dependency:sources 可获得源码),配置如下:
<project xmlns="http://maven.apache.org/POM/4.0.0" xmlns:xsi="http://www.w3.org/2001/XMLSchema-instance"
xsi:schemaLocation="http://maven.apache.org/POM/4.0.0 http://maven.apache.org/xsd/maven-4.0.0.xsd">
<modelVersion>4.0.0</modelVersion>
<groupId>org.fanlychie</groupId>
<artifactId>proj</artifactId>
<version>1.0.1</version>
<packaging>jar</packaging>
<name>proj</name>
<url>http://maven.apache.org</url>
<distributionManagement>
<repository>
<id>releases</id>
<url>http://localhost:8088/nexus/content/repositories/releases</url>
</repository>
</distributionManagement>
<build>
<plugins>
<plugin>
<groupId>org.apache.maven.plugins</groupId>
<artifactId>maven-source-plugin</artifactId>
<version>2.4</version>
<executions>
<execution>
<id>attach-sources</id>
<phase>install</phase>
<goals>
<goal>jar-no-fork</goal>
</goals>
</execution>
</executions>
</plugin>
</plugins>
</build>
</project>
同一个构件是不允许发布两次的,先修改一下构件的版本,然后 deploy,结果如图: xsi:schemaLocation="http://maven.apache.org/POM/4.0.0 http://maven.apache.org/xsd/maven-4.0.0.xsd">
<modelVersion>4.0.0</modelVersion>
<groupId>org.fanlychie</groupId>
<artifactId>proj</artifactId>
<version>1.0.1</version>
<packaging>jar</packaging>
<name>proj</name>
<url>http://maven.apache.org</url>
<distributionManagement>
<repository>
<id>releases</id>
<url>http://localhost:8088/nexus/content/repositories/releases</url>
</repository>
</distributionManagement>
<build>
<plugins>
<plugin>
<groupId>org.apache.maven.plugins</groupId>
<artifactId>maven-source-plugin</artifactId>
<version>2.4</version>
<executions>
<execution>
<id>attach-sources</id>
<phase>install</phase>
<goals>
<goal>jar-no-fork</goal>
</goals>
</execution>
</executions>
</plugin>
</plugins>
</build>
</project>
发布快照
快照用于区分稳定与不稳定的构件(发布的版本就是稳定的,快照版本是不稳定的)。构件的升级通常会带来许多的不稳定性,需要不断的修复,快照可以避免由于升级带来的不稳定性迫使的不停的升级版本号,最终造成版本号的泛滥的问题。快照允许重新发布,而不需要变更构件的版本号。
在 nexus 中找到如下的视图页面:
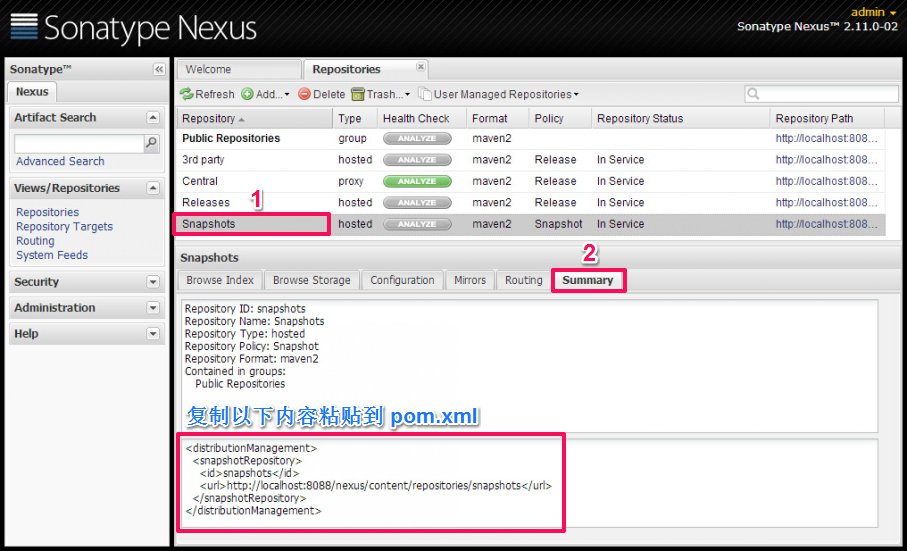
复制以上的配置,粘贴到你的 pom.xml 配置文件中:
<project xmlns="http://maven.apache.org/POM/4.0.0" xmlns:xsi="http://www.w3.org/2001/XMLSchema-instance"
xsi:schemaLocation="http://maven.apache.org/POM/4.0.0 http://maven.apache.org/xsd/maven-4.0.0.xsd">
<modelVersion>4.0.0</modelVersion>
<groupId>org.fanlychie</groupId>
<artifactId>proj</artifactId>
<version>2.0.0-SNAPSHOT</version>
<packaging>jar</packaging>
<name>proj</name>
<url>http://maven.apache.org</url>
<distributionManagement>
<repository>
<id>releases</id>
<url>http://localhost:8088/nexus/content/repositories/releases</url>
</repository>
<snapshotRepository>
<id>snapshots</id>
<url>http://localhost:8088/nexus/content/repositories/snapshots</url>
</snapshotRepository>
</distributionManagement>
<build>
<plugins>
<plugin>
<groupId>org.apache.maven.plugins</groupId>
<artifactId>maven-source-plugin</artifactId>
<version>2.4</version>
<executions>
<execution>
<id>attach-sources</id>
<phase>install</phase>
<goals>
<goal>jar-no-fork</goal>
</goals>
</execution>
</executions>
</plugin>
</plugins>
</build>
</project>
版本号含有 SNAPSHOT 的构件将发布到 Snapshots 仓库,否则,将发布到 Releases 仓库。执行发布命令:mvn deploy,结果如图: xsi:schemaLocation="http://maven.apache.org/POM/4.0.0 http://maven.apache.org/xsd/maven-4.0.0.xsd">
<modelVersion>4.0.0</modelVersion>
<groupId>org.fanlychie</groupId>
<artifactId>proj</artifactId>
<version>2.0.0-SNAPSHOT</version>
<packaging>jar</packaging>
<name>proj</name>
<url>http://maven.apache.org</url>
<distributionManagement>
<repository>
<id>releases</id>
<url>http://localhost:8088/nexus/content/repositories/releases</url>
</repository>
<snapshotRepository>
<id>snapshots</id>
<url>http://localhost:8088/nexus/content/repositories/snapshots</url>
</snapshotRepository>
</distributionManagement>
<build>
<plugins>
<plugin>
<groupId>org.apache.maven.plugins</groupId>
<artifactId>maven-source-plugin</artifactId>
<version>2.4</version>
<executions>
<execution>
<id>attach-sources</id>
<phase>install</phase>
<goals>
<goal>jar-no-fork</goal>
</goals>
</execution>
</executions>
</plugin>
</plugins>
</build>
</project>

发布第三方构件
步骤见下图的标注: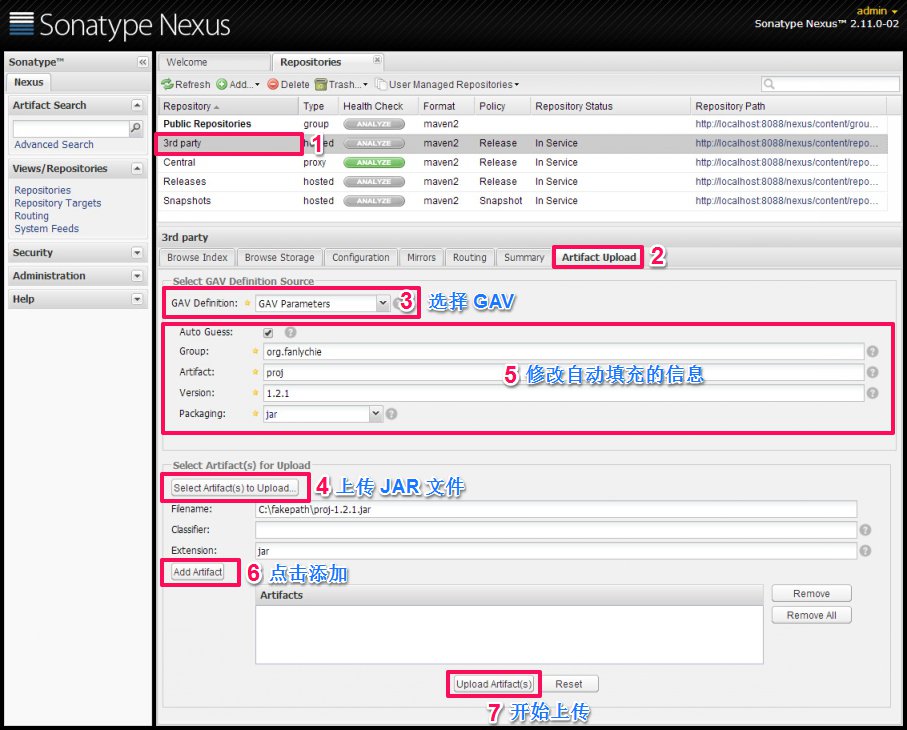
命令行方式发布:
mvn deploy:deploy-file -DgroupId=自定义groupId -DartifactId=自定义artifactId -Dversion=版本号 -Dpackaging=jar
-Dfile=JAR文件的路径 -Durl=http://127.0.0.1:8088/nexus/content/repositories/thirdparty -DrepositoryId=thirdparty
-Dfile=JAR文件的路径 -Durl=http://127.0.0.1:8088/nexus/content/repositories/thirdparty -DrepositoryId=thirdparty
远程索引
在 nexus 中找到如下的视图页面: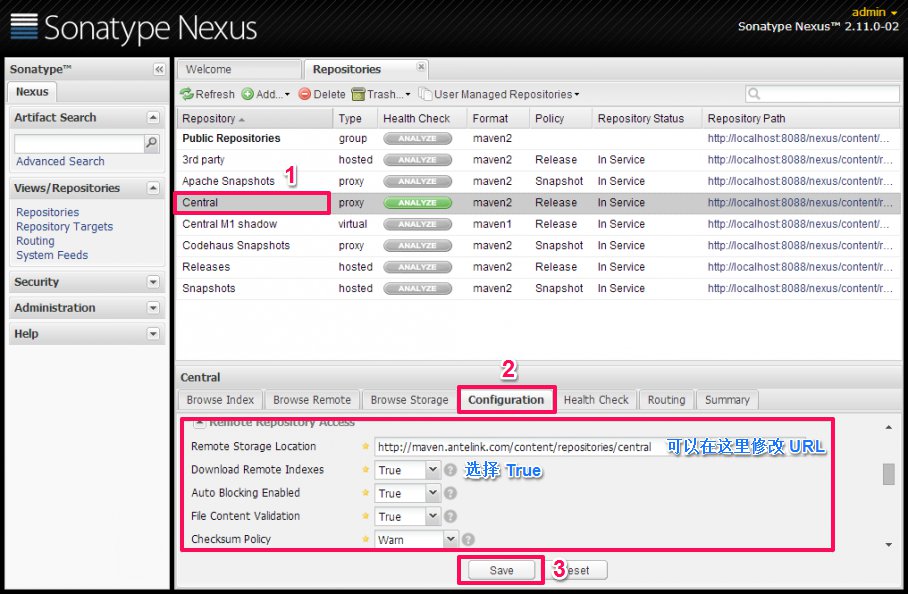
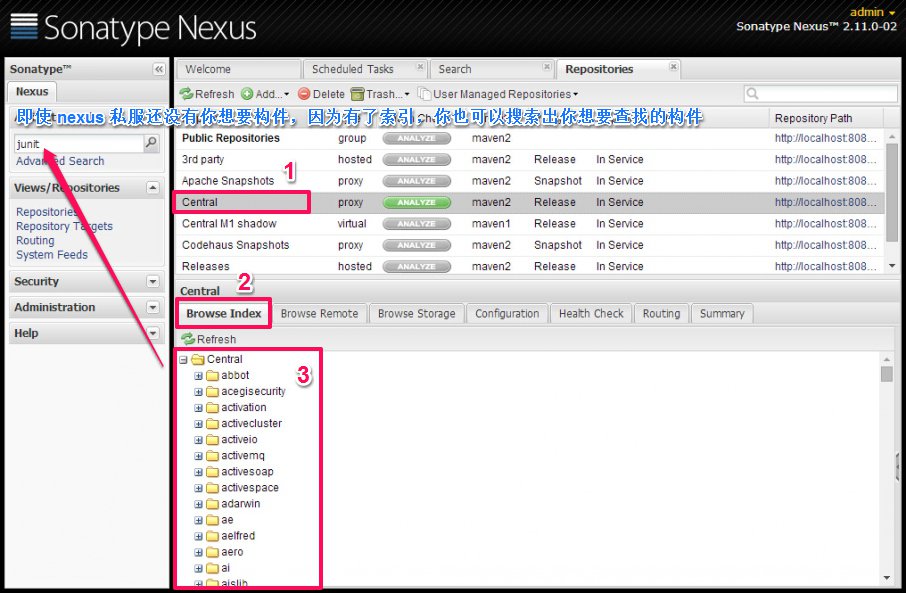
保存之后,在左侧面板中选择 Administration --> Scheduled Tasks,如下图:

可以看到这里有一个 Repair Repositories Index 任务,任务完成之后会自动从面板中移除,点击左上角的 Refresh 按钮来查看。任务完成
之后回到 Repositories 面板,选择 Central 仓库右键,选择 Update Index,再回到 Scheduled Tasks 面板,可以看到有一个 Update
Repositories Index 任务,这个任务花时较长,任务完成之后,回到 Repositories 面板,在 Browse Index 中可以看到从远程仓库下载回
来的索引文件,有了索引,即使 nexus 私服还没有你想要构件,你也可以搜索出你想要查找的构件。

 浙公网安备 33010602011771号