路由器配置——RIP路由
一、实验目的:用rip路由实现全网互通
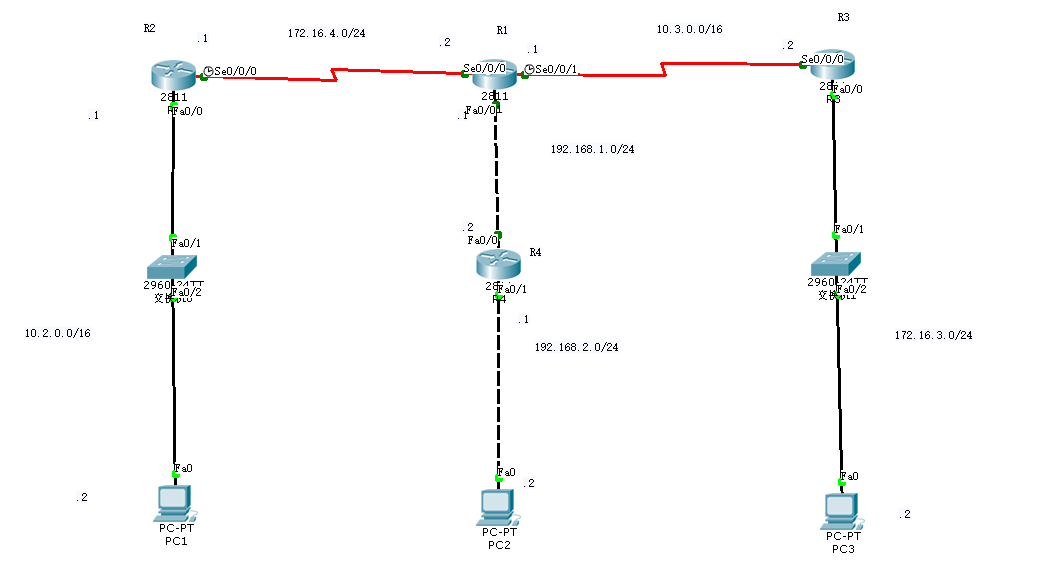
二、拓扑图:
三、具体步骤配置
(1)R1路由器配置
Router>enable --进入特权模式
Router#configure terminal --进入全局配置模式
Enter configuration commands, one per line. End with CNTL/Z.
Router(config)#hostname R1 --修改路由器名为R1
R1(config)#interface f0/0 --进入端口
R1(config-if)#ip address 192.168.1.1 255.255.255.0 --为端口配置ip地址
R1(config-if)#no shutdown --激活端口
R1(config-if)#interface s0/0/0 --进入端口
R1(config-if)#ip address 172.16.4.2 255.255.255.0 --为端口配置ip地址
R1(config-if)#clock rate 64000 --配置时钟同步速率
This command applies only to DCE interfaces
R1(config-if)#no shutdown --激活端口
%LINK-5-CHANGED: Interface Serial0/0/0, changed state to down
R1(config-if)#interface s0/0/1 --进入端口
R1(config-if)#ip address 10.3.0.1 255.255.255.0 --为端口配置ip地址
R1(config-if)#clock rate 64000 --配置时钟同步速率
R1(config-if)#no shutdown --激活端口
%LINK-5-CHANGED: Interface Serial0/0/1, changed state to down
R1(config-if)#exit --返回上一级
R1(config)#route rip --开启rip协议
R1(config-router)#version 2 --版本2
R1(config-router)#no auto-summary --关闭自动汇总
R1(config-router)#network 172.16.0.0 --添加直连网段到rip
R1(config-router)#network 10.0.0.0
R1(config-router)#network 192.168.1.0
R1(config-router)#end --返回特权模式
(2)R2路由器配置
Router>enable --进入特权模式
Router#configure terminal --进入全局配置模式
Enter configuration commands, one per line. End with CNTL/Z.
Router(config)#hostname R2 --修改路由器名为R2
R2(config)#interface f0/0 --进入端口
R2(config-if)#ip address 10.2.0.1 255.255.0.0 --为端口配置ip地址
R2(config-if)#no shutdown --激活端口
R2(config-if)#interface s0/0/0 --进入端口
R2(config-if)#ip address 172.16.4.1 255.255.255.0 --为端口配置ip地址
R2(config-if)#no shutdown --激活端口
R2(config-if)#exit --返回上一级
R2(config)#route rip --开启rip协议
R2(config-router)#version 2 --版本2
R2(config-router)#no auto-summary --关闭自动汇总
R2(config-router)#network 172.16.0.0 --添加直连网段到rip
R2(config-router)#network 10.0.0.0
R2(config-router)#end --返回特权模式
(3)R3路由器配置
Router>enable --进入特权模式
Router#configure terminal --进入全局配置模式
Enter configuration commands, one per line. End with CNTL/Z.
Router(config)#hostname R3 --修改路由名为R3
R3(config)#interface f0/0 --进入端口
R3(config-if)#ip address 172.16.3.1 255.255.255.0 --为端口配置ip地址
R3(config-if)#no shutdown --激活端口
R3(config-if)#interface s0/0/0 --进入端口
R3(config-if)#ip address 10.3.0.2 255.255.0.0 --为端口配置ip地址
R3(config-if)#no shutdown --激活端口
R3(config-if)#exit --返回上一级
R3(config)#route rip --开启rip协议
R3(config-router)#version 2 --版本2
R3(config-router)#no auto-summary --关闭自动汇总
R3(config-router)#network 10.0.0.0 --添加直连网段到rip
R3(config-router)#network 172.16.0.0
R3(config-router)#end --返回特权模式
(4)R4路由器配置
Router>enable --进入特权模式
Router#configure terminal --进入全局配置模式
Enter configuration commands, one per line. End with CNTL/Z.
Router(config)#hostname R4 --修改主机名为R4
R4(config)#interface f0/1 --进入端口
R4(config-if)#ip address 192.168.2.1 255.255.255.0 --为端口配置ip地址
R4(config-if)#no shutdown --激活端口
R4(config-if)#interface f0/0 --进入端口
R4(config-if)#ip address 192.168.1.2 255.255.255.0 --为端口配置ip地址
R4(config-if)#no shutdown --激活端口
R4(config-if)#exit --返回上一级
R4(config)#route rip --开rip协议
R4(config-router)#version 2 --版本
R4(config-router)#no auto-summary --关闭自动汇总
R4(config-router)#network 192.168.1.0 --添加直连网段到rip
R4(config-router)#network 192.168.2.0
R4(config-router)#end --返回特权模式
四、验证测试:
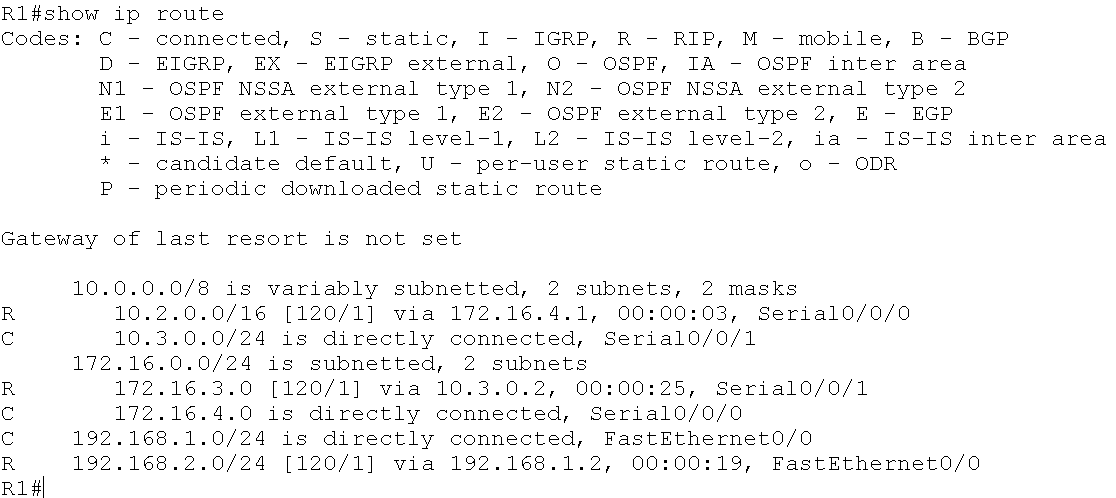
(1)查看R1路由表信息
(2)测试各台主机相互之间是否能ping通
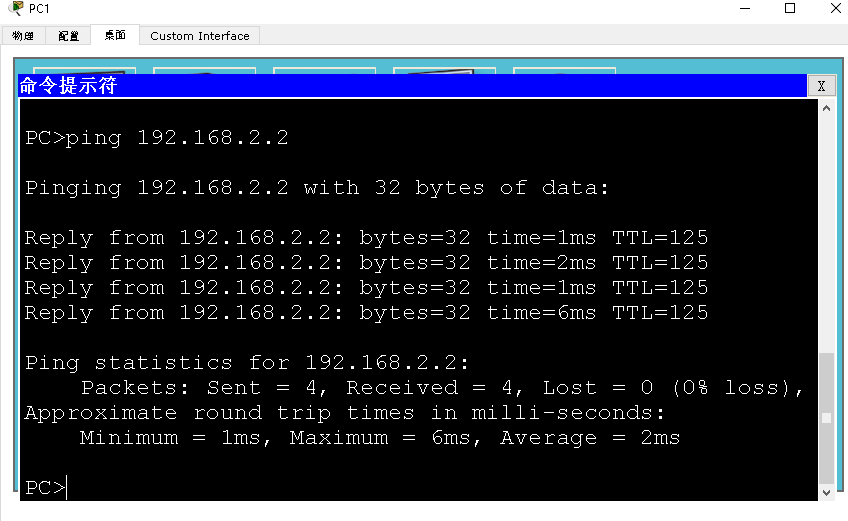
1、PC1与PC2
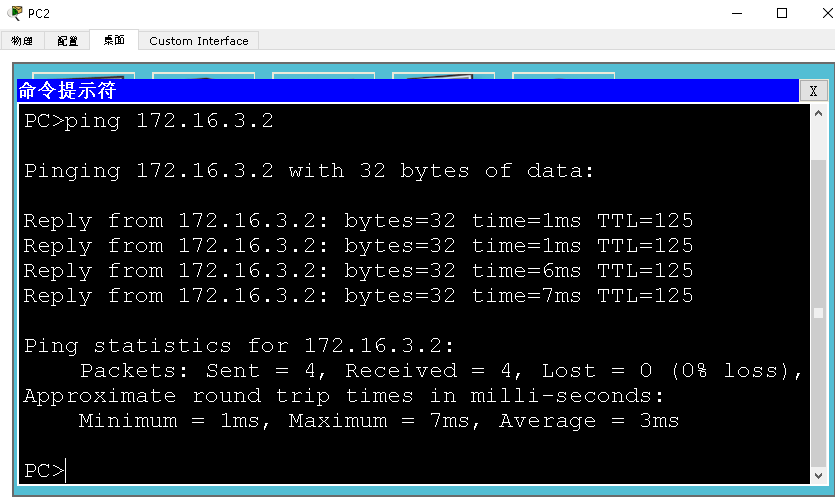
2、PC2与PC3
3、PC3与PC1
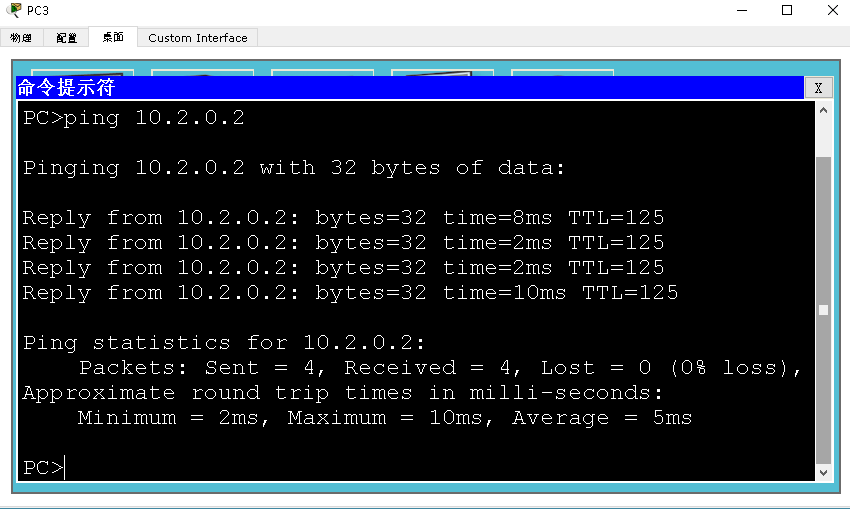
结果:全网互通成功

 浙公网安备 33010602011771号