1.微服务的注册中心
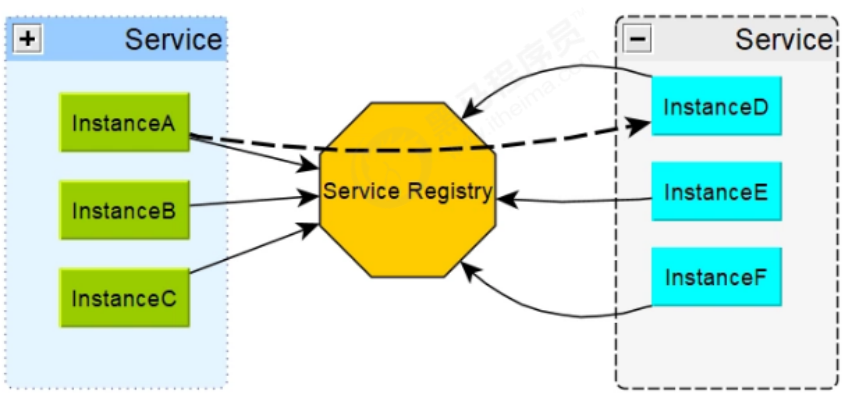
注册中心可以说是微服务架构中的”通讯录“,它记录了服务和服务地址的映射关系。在分布式架构中,服务会注册到这里,当服务需要调用其它服务时,就这里找到服务的地址,进行调用。
1.1 注册中心的主要作用
服务注册中心(下称注册中心)是微服务架构非常重要的一个组件,在微服务架构里主要起到了协调者的一个作用。注册中心一般包含如下几个功能:
-
服务发现:
- 服务注册/反注册:保存服务提供者和服务调用者的信息
- 服务订阅/取消订阅:服务调用者订阅服务提供者的信息,最好有实时推送的功能
- 服务路由(可选):具有筛选整合服务提供者的能力。
-
服务配置:
- 配置订阅:服务提供者和服务调用者订阅微服务相关的配置
- 配置下发:主动将配置推送给服务提供者和服务调用者
-
服务健康检测
- 检测服务提供者的健康情况
1.2 常见的注册中心
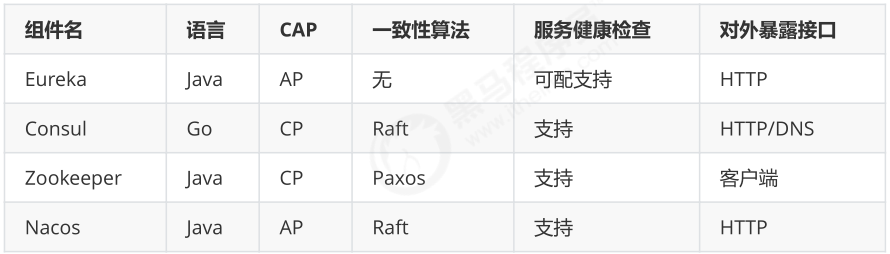
Zookeeper
zookeeper它是一个分布式服务框架,是Apache Hadoop 的一个子项目,它主要是用来解决分布式应用中经常遇到的一些数据管理问题,如:统一命名服务、状态同步服务、集群管理、分布式应用配置项的管理等。简单来说zookeeper=文件系统+监听通知机制。
Eureka
Eureka是在Java语言上,基于Restful Api开发的服务注册与发现组件,Springcloud Netflix中的重要组件。
Consul
Consul是由HashiCorp基于Go语言开发的支持多数据中心分布式高可用的服务发布和注册服务软件,采用Raft算法保证服务的一致性,且支持健康检查。
Nacos
Nacos是一个更易于构建云原生应用的动态服务发现、配置管理和服务管理平台。简单来说 Nacos 就是注册中心 + 配置中心的组合,提供简单易用的特性集,帮助我们解决微服务开发必会涉及到的服务注册与发现,服务配置,服务管理等问题。Nacos 还是 Spring Cloud Alibaba 组件之一,负责服务注册与发现。
2.Eureka的概述
2.1 Eureka的基础知识
Eureka是Netflix开发的服务发现框架,SpringCloud将它集成在自己的子项目spring-cloud-netflix中,实现SpringCloud的服务发现功能。
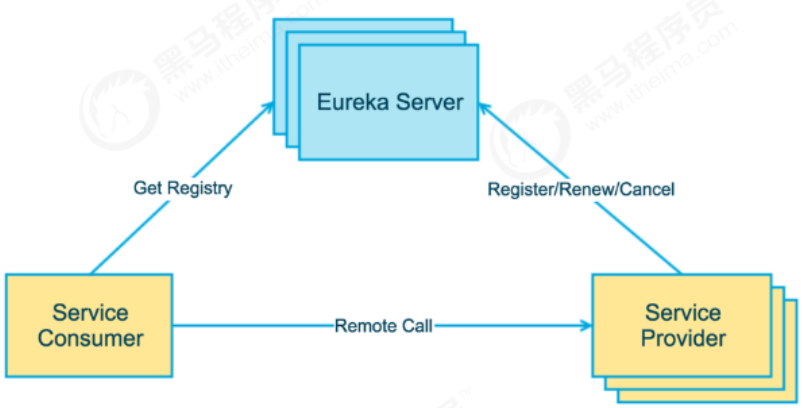
上图简要描述了Eureka的基本架构,由3个角色组成:
1、Eureka Server
- 提供服务注册和发现
2、Service Provider
- 服务提供方
- 将自身服务注册到Eureka,从而使服务消费方能够找到
3、Service Consumer
- 服务消费方
- 从Eureka获取注册服务列表,从而能够消费服务
什么是服务治理
在传统的rpc远程调用框架中,管理每个服务与服务之间依赖关系比较复杂,管理比较复杂,所以需要使用服务治理,管理服务于服务之间依赖关系,可以实现服务调用、负载均衡、容错等,实现服务发现与注册。
什么是服务注册与发现
Eureka采用了CS的设计架构,Eureka Server 作为服务注册功能的服务器,它是服务注册中心。而系统中的其他微服务,使用 Eureka的客户端连接到 Eureka Server并维持心跳连接。这样系统的维护人员就可以通过 Eureka Server 来监控系统中各个微服务是否正常运行。
在服务注册与发现中,有一个注册中心。当服务器启动的时候,会把当前自己服务器的信息 比如 服务地址通讯地址等以别名方式注册到注册中心上。另一方(消费者|服务提供者),以该别名的方式去注册中心上获取到实际的服务通讯地址,然后再实现本地RPC调用RPC远程调用框架核心设计思想:在于注册中心,因为使用注册中心管理每个服务与服务之间的一个依赖关系(服务治理概念)。在任何rpc远程框架中,都会有一个注册中心(存放服务地址相关信息(接口地址))
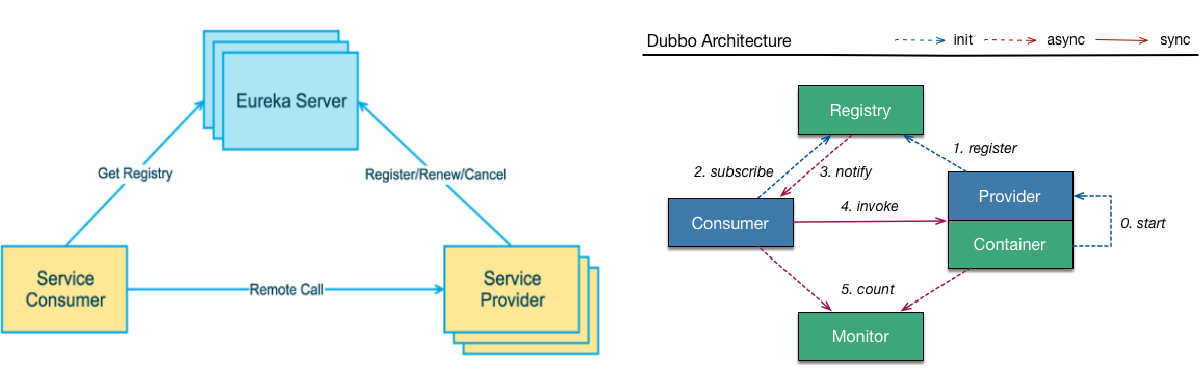
下左图是Eureka系统架构,右图是Dubbo的架构,请对比
Eureka Server提供服务注册服务
各个微服务节点通过配置启动后,会在EurekaServer中进行注册,这样EurekaServer中的服务注册表中将会存储所有可用服务节点的信息,服务节点的信息可以在界面中直观看到。
EurekaClient通过注册中心进行访问
是一个Java客户端,用于简化Eureka Server的交互,客户端同时也具备一个内置的、使用轮询(round-robin)负载算法的负载均衡器。在应用启动后,将会向Eureka Server发送心跳(默认周期为30秒)。如果Eureka Server在多个心跳周期内没有接收到某个节点的心跳,EurekaServer将会从服务注册表中把这个服务节点移除(默认90秒)
2.2 Eureka的交互流程与原理

图是来自Eureka官方的架构图,大致描述了Eureka集群的工作过程。图中包含的组件非常多,可能比较难以理解,我们用通俗易懂的语言解释一下:
- Application Service 相当于本书中的服务提供者,Application Client相当于服务消费者;
- Make Remote Call,可以简单理解为调用RESTful API;
- us-east-1c、us-east-1d等都是zone,它们都属于us-east-1这个region;
由图可知,Eureka包含两个组件:Eureka Server 和 Eureka Client,它们的作用如下:
- Eureka Client是一个Java客户端,用于简化与Eureka Server的交互;
- Eureka Server提供服务发现的能力,各个微服务启动时,会通过Eureka Client向Eureka Server进行注册自己的信息(例如网络信息),Eureka Server会存储该服务的信息;
- 微服务启动后,会周期性地向Eureka Server发送心跳(默认周期为30秒)以续约自己的信息。如果Eureka Server在一定时间内没有接收到某个微服务节点的心跳,Eureka Server将会注销该微服务节点(默认90秒);
- 每个Eureka Server同时也是Eureka Client,多个Eureka Server之间通过复制的方式完成服务注册表的同步;
- Eureka Client会缓存Eureka Server中的信息。即使所有的Eureka Server节点都宕掉,服务消费
- 者依然可以使用缓存中的信息找到服务提供者。
综上,Eureka通过心跳检测、健康检查和客户端缓存等机制,提高了系统的灵活性、可伸缩性和可用性。
3.Eureka中的自我保护
微服务第一次注册成功之后,每30秒会发送一次心跳将服务的实例信息注册到注册中心。通知 EurekaServer 该实例仍然存在。如果超过90秒没有发送更新,则服务器将从注册信息中将此服务移除。
Eureka Server在运行期间,会统计心跳失败的比例在15分钟之内是否低于85%,如果出现低于的情况(在单机调试的时候很容易满足,实际在生产环境上通常是由于网络不稳定导致),Eureka Server会将当前的实例注册信息保护起来,同时提示这个警告。保护模式主要用于一组客户端和Eureka Server之间存在网络分区场景下的保护。一旦进入保护模式,Eureka Server将会尝试保护其服务注册表中的信息,不再删除服务注册表中的数据(也就是不会注销任何微服务)
验证完自我保护机制开启后,并不会马上呈现到web上,而是默认需等待 5 分钟(可以通过eureka.server.wait-time-in-ms-when-sync-empty 配置),即 5 分钟后你会看到下面的提示信息:

如果关闭自我保护
通过设置 eureka.enableSelfPreservation=false 来关闭自我保护功能。
4.Eureka中的元数据
Eureka的元数据有两种:标准元数据和自定义元数据。
- 标准元数据:主机名、IP地址、端口号、状态页和健康检查等信息,这些信息都会被发布在服务注册表中,用于服务之间的调用。
- 自定义元数据:可以使用eureka.instance.metadata-map配置,符合KEY/VALUE的存储格式。这些元数据可以在远程客户端中访问。
在程序中可以使用DiscoveryClient 获取指定微服务的所有元数据信息
@SpringBootTest
@RunWith(SpringJUnit4ClassRunner.class)
public class RestTemplateTest {
  @Autowired
  private DiscoveryClient discoveryClient;

  @Test
  public void test() {
    //根据微服务名称从注册中心获取相关的元数据信息
    List<ServiceInstance> instances = discoveryClient.getInstances("shop-service-product");
    for (ServiceInstance instance : instances) {
      System.out.println(instance);
    }
 }
}
5.Eureka Server 高可用集群
在上一个章节,实现了单节点的Eureka Server的服务注册与服务发现功能。Eureka Client会定时连接Eureka Server,获取注册表中的信息并缓存到本地。微服务在消费远程API时总是使用本地缓存中的数据。因此一般来说,即使Eureka Server发生宕机,也不会影响到服务之间的调用。但如果EurekaServer宕机时,某些微服务也出现了不可用的情况,Eureka Server中的缓存若不被刷新,就可能会影响到微服务的调用,甚至影响到整个应用系统的高可用。因此,在生成环境中,通常会部署一个高可用的Eureka Server集群。
Eureka Server可以通过运行多个实例并相互注册的方式实现高可用部署,Eureka Server实例会彼此增量地同步信息,从而确保所有节点数据一致。事实上,节点之间相互注册是Eureka Server的默认行为。

5.1搭建 Eureka Server高可用集群
(1)新建项目
cloud-eureka-server-7001
cloud-eureka-server-7002
(2)修改本机host属性
127.0.0.1 eureka7001.com
127.0.0.1 eureka7002.com
(3)yml文件
cloud-eureka-server-7001
server:
  port: 7001

eureka:
  instance:
    hostname: eureka7001.com #eureka服务端的实例名称
  client:
    #false表示不向注册中心注册自己。
    register-with-eureka: false
    #false表示自己端就是注册中心,我的职责就是维护服务实例,并不需要去检索服务
    fetch-registry: false
    service-url:
    #设置与Eureka Server交互的地址查询服务和注册服务都需要依赖这个地址。
     defaultZone: http://eureka7002.com:7002/eureka/
cloud-eureka-server-7002
  server:
  port: 7002

eureka:
  instance:
    hostname: eureka7002.com #eureka服务端的实例名称
  client:
    #false表示不向注册中心注册自己。
    register-with-eureka: false
    #false表示自己端就是注册中心,我的职责就是维护服务实例,并不需要去检索服务
    fetch-registry: false
    service-url:
    #设置与Eureka Server交互的地址查询服务和注册服务都需要依赖这个地址。
      defaultZone: http://eureka7001.com:7001/eureka/
(4)服务注册到Eureka Server集群
eureka:
  client:
    #表示是否将自己注册进EurekaServer默认为true。
    register-with-eureka: true
    #是否从EurekaServer抓取已有的注册信息,默认为true。单节点无所谓,集群必须设置为true才能配合ribbon使用负载均衡
    fetchRegistry: true
    service-url:
      defaultZone: http://eureka7001.com:7001/eureka,http://eureka7002.com:7002/eureka  # 集群版
6.Eureka中的常见问题
6.1服务注册慢
默认情况下,服务注册到Eureka Server的过程较慢。SpringCloud官方文档中给出了详细的原因

大致含义:服务的注册涉及到心跳,默认心跳间隔为30s。在实例、服务器、客户端都在本地缓存中具有相同的元数据之前,服务不可用于客户端发现(所以可能需要3次心跳)。可以通过配置eureka.instance.leaseRenewalIntervalInSeconds (心跳频率)加快客户端连接到其他服务的过程。在生产中,最好坚持使用默认值,因为在服务器内部有一些计算,他们对续约做出假设。
6.2服务节点剔除问题
默认情况下,由于Eureka Server剔除失效服务间隔时间为90s且存在自我保护的机制。所以不能有效而迅速的剔除失效节点,这对开发或测试会造成困扰。解决方案如下:
Eureka Server:
配置关闭自我保护,设置剔除无效节点的时间间隔
eureka:
 instance:
  hostname: eureka1
 client:
  service-url:
   defaultZone: http://eureka2:8762/eureka
  server:
   enable-self-preservation: false  #关闭自我保护
   eviction-interval-timer-in-ms: 4000 #剔除时间间隔,单位:毫秒
Eureka Client:
配置开启健康检查,并设置续约时间
eureka:
 client:
  healthcheck: true #开启健康检查(依赖spring-boot-actuator)
  serviceUrl:
   defaultZone: http://eureka1:8761/eureka/,http://eureka1:8761/eureka/
 instance:
  preferIpAddress: true
  lease-expiration-duration-in-seconds: 10 #eureka client发送心跳给server端后,续约到期时间(默认90秒)
  lease-renewal-interval-in-seconds: 5 #发送心跳续约间隔
6.3监控页面显示ip
在Eureka Server的管控台中,显示的服务实例名称默认情况下是微服务定义的名称和端口。为了更好的对所有服务进行定位,微服务注册到Eureka Server的时候可以手动配置示例ID。配置方式如下
eureka:
 instance:
  instance-id: ${spring.cloud.client.ip-address}:${server.port}
#spring.cloud.client.ip-address:获取ip地址

7.Eureka源码解析
7.1SpringBoot中的自动装载
(1)ImportSelector
ImportSelector接口是Spring导入外部配置的核心接口,在SpringBoot的自动化配置和@EnableXXX(功能性注解)中起到了决定性的作用。当在@Configuration标注的Class上使用@Import引入了一个ImportSelector实现类后,会把实现类中返回的Class名称都定义为bean。
public interface ImportSelector {
  String[] selectImports(AnnotationMetadata var1);
}
DeferredImportSelector接口继承ImportSelector,他和ImportSelector的区别在于装载bean的时机上,DeferredImportSelector需要等所有的@Configuration都执行完毕后才会进行装载
public interface DeferredImportSelector extends ImportSelector {
//...省略
}
接下来我们写一个小例子,看下ImportSelector的用法
1)定义Bean对象
public class User {
private String username;
private Integer age;
//省略..
}
2)定义配置类Configuration
//定义一个configuration ,注意这里并没有使用spring注解,spring扫描的时候并不会装载该类
public class UserConfiguration {
  @Bean
  public User getUser() {
    return new User("张三",18);
  }
}
3 ) 定义ImportSelector
public class UserImportSelector implements ImportSelector {
  @Override
  public String[] selectImports(AnnotationMetadata importingClassMetadata) {
    //获取配置类名称
    return new String[]{UserConfiguration.class.getName()};
  }
}
4) 定义EnableXXX注解
@Retention(RetentionPolicy.RUNTIME)
@Documented
@Target(ElementType.TYPE)
@Import(UserImportSelector.class)
public @interface EnableUserBean {
}
5 ) 测试
/**
* 通过在类上声明@EnableUserBean,会自动的加载所有对象
*/
@EnableUserBean
public class TestApplication {
  public static void main(String[] args) {
    AnnotationConfigApplicationContext applicationContext = new AnnotationConfigApplicationContext(TestApplication.class);
    User user = applicationContext.getBean(User.class);
    System.out.println(user);
  }
}
由此可见,HelloWorldConfiguration对象并没有使用Spring的对象对象创建注解声明(@Controller,@Service,@Repostiroty),而是使用编程的方式动态的载入bean。
这个接口在哪里调用呢?我们可以来看一下ConfigurationClassParser这个类的processImports方法
private void processImports(ConfigurationClass configClass, SourceClass currentSourceClass,Collection<SourceClass> importCandidates, boolean checkForCircularImports) {
    if (importCandidates.isEmpty()) {
      return;
    }
    if (checkForCircularImports && isChainedImportOnStack(configClass)) {
      this.problemReporter.error(new CircularImportProblem(configClass,this.importStack));
    }else {
      this.importStack.push(configClass);
      try {
        for (SourceClass candidate : importCandidates){ //对ImportSelector的处理
          if (candidate.isAssignable(ImportSelector.class)) {
            // Candidate class is an ImportSelector -> delegate toit to determine imports
            Class<?> candidateClass = candidate.loadClass();
            ImportSelector selector = BeanUtils.instantiateClass(candidateClass, ImportSelector.class);
            ParserStrategyUtils.invokeAwareMethods(selector, this.environment, this.resourceLoader,this.registry);
            if (this.deferredImportSelectors != null && selector instanceof DeferredImportSelector) { //如果为延迟导入处理则加入集合当中
              this.deferredImportSelectors.add(new DeferredImportSelectorHolder(configClass, (DeferredImportSelector) selector));
            }else { //根据ImportSelector方法的返回值来进行递归操作
              String[] importClassNames = selector.selectImports(currentSourceClass.getMetadata());
              Collection<SourceClass> importSourceClasses = asSourceClasses(importClassNames);
              processImports(configClass, currentSourceClass,importSourceClasses, false);
            }
         }else if(candidate.isAssignable(ImportBeanDefinitionRegistrar.class)) {
            // Candidate class is an ImportBeanDefinitionRegistrar ->
            // delegate to it to register additional bean definitions
            Class<?> candidateClass = candidate.loadClass();
            ImportBeanDefinitionRegistrar registrar = BeanUtils.instantiateClass(candidateClass,ImportBeanDefinitionRegistrar.class);
            ParserStrategyUtils.invokeAwareMethods(registrar, this.environment,this.resourceLoader, this.registry);
            configClass.addImportBeanDefinitionRegistrar(registrar,currentSourceClass.getMetadata());
         }else { // 如果当前的类既不是ImportSelector也不是ImportBeanDefinitionRegistar就进行@Configuration的解析处理
            // Candidate class not an ImportSelector orImportBeanDefinitionRegistrar ->
            // process it as an @Configuration class
            this.importStack.registerImport(currentSourceClass.getMetadata(),candidate.getMetadata().getClassName());
            processConfigurationClass(candidate.asConfigClass(configClass));
         }
       }
     }catch (BeanDefinitionStoreException ex) {
        throw ex;
     }catch (Throwable ex) {
        throw new BeanDefinitionStoreException("Failed to process import candidates for configuration class [" + configClass.getMetadata().getClassName() + "]", ex);
     }finally {
        this.importStack.pop();
     }
   }
 }
在这里我们可以看到ImportSelector接口的返回值会递归进行解析,把解析到的类全名按照@Configuration进行处理
(2)springBoot自动装载
SpringBoot开箱即用的特点,很大程度上归功于ImportSelector。接下来我们看下springBoot是如何在spring的基础上做扩展的。
在SpringBoot中最重要的一个注解SpringBootApplication
@Target({ElementType.TYPE})
@Retention(RetentionPolicy.RUNTIME)
@Documented
@Inherited
@SpringBootConfiguration
@EnableAutoConfiguration
@ComponentScan(
  excludeFilters = {@Filter(
  type = FilterType.CUSTOM,
  classes = {TypeExcludeFilter.class}
), @Filter(
  type = FilterType.CUSTOM,
  classes = {AutoConfigurationExcludeFilter.class}
)}
)
public @interface SpringBootApplication {
//...
}
在SpringBootApplication注解中声明了一个 @EnableAutoConfiguration
@Target({ElementType.TYPE})
@Retention(RetentionPolicy.RUNTIME)
@Documented
@Inherited
@AutoConfigurationPackage
@Import({AutoConfigurationImportSelector.class})
public @interface EnableAutoConfiguration {
  String ENABLED_OVERRIDE_PROPERTY = "spring.boot.enableautoconfiguration";
  Class<?>[] exclude() default {};
  String[] excludeName() default {};
}
在EnableAutoConfiguration中通过Import引入了SpringBoot定义的AutoConfigurationImportSelector
这个类内容比较多,我们只需看下最主要的逻辑代码即可
public class AutoConfigurationImportSelector implements DeferredImportSelector, BeanClassLoaderAware,ResourceLoaderAware,BeanFactoryAware, EnvironmentAware, Ordered {
  @Override
  public String[] selectImports(AnnotationMetadata annotationMetadata) {
    if (!isEnabled(annotationMetadata)) {
      return NO_IMPORTS;
    }

    AutoConfigurationMetadata autoConfigurationMetadata =AutoConfigurationMetadataLoader.loadMetadata(this.beanClassLoader);
    //主要逻辑在getAutoConfigurationEntry这个方法
    AutoConfigurationEntry autoConfigurationEntry = getAutoConfigurationEntry(autoConfigurationMetadata, annotationMetadata);
    return StringUtils.toStringArray(autoConfigurationEntry.getConfigurations());
  }

  protected AutoConfigurationEntry getAutoConfigurationEntry(AutoConfigurationMetadata autoConfigurationMetadata,AnnotationMetadata annotationMetadata) {
    if (!isEnabled(annotationMetadata)) {
    return EMPTY_ENTRY;
    }
    AnnotationAttributes attributes = getAttributes(annotationMetadata);
    //通过getCandidateConfigurations方法获取所有需要加载的bean
    List<String> configurations = getCandidateConfigurations(annotationMetadata,attributes);
    //去重处理
    configurations = removeDuplicates(configurations);
    //获取不需要加载的bean,这里我们可以通过spring.autoconfigure.exclude人为配置
    Set<String> exclusions = getExclusions(annotationMetadata, attributes);
    checkExcludedClasses(configurations, exclusions);
    configurations.removeAll(exclusions);
    configurations = filter(configurations, autoConfigurationMetadata);
    //发送事件,通知所有的AutoConfigurationImportListener进行监听
    fireAutoConfigurationImportEvents(configurations, exclusions);
    return new AutoConfigurationEntry(configurations, exclusions);
  }

  //这里是获取bean渠道的地方,重点看SpringFactoriesLoader#loadFactoryNames
  protected List<String> getCandidateConfigurations(AnnotationMetadata metadata,AnnotationAttributes attributes) {
    //这里的getSpringFactoriesLoaderFactoryClass()最终返回EnableAutoConfiguration.class
    List<String> configurations = SpringFactoriesLoader.loadFactoryNames(getSpringFactoriesLoaderFactoryClass(), getBeanClassLoader());
    Assert.notEmpty(configurations,"No auto configuration classes found in META-INF/spring.factories. If you "+ "are using a custom packaging, make sure that file iscorrect.");
    return configurations;
  }
}
从上面的逻辑可以看出,最终获取bean的渠道在SpringFactoriesLoader.loadFactoryNames
public final class SpringFactoriesLoader {
  public static final String FACTORIES_RESOURCE_LOCATION = "META-INF/spring.factories";
  private static final Log logger = LogFactory.getLog(SpringFactoriesLoader.class);
  private static final Map<ClassLoader, MultiValueMap<String, String>> cache = new ConcurrentReferenceHashMap();

  public static List<String> loadFactoryNames(Class<?> factoryClass, @Nullable ClassLoader classLoader) {
    String factoryClassName = factoryClass.getName();
    //通过factoryClassName获取相应的bean全称
    //上面传入的factoryClass是EnableAutoConfiguration.class
    return (List)loadSpringFactories(classLoader).getOrDefault(factoryClassName,Collections.emptyList());
  }

  private static Map<String, List<String>> loadSpringFactories(@Nullable ClassLoader classLoader) {
    MultiValueMap<String, String> result = (MultiValueMap)cache.get(classLoader);
    if (result != null) {
      return result;
    }else {
      try {
        //获取工程中所有META-INF/spring.factories文件,将其中的键值组合成Map
        Enumeration<URL> urls = classLoader != null ? classLoader.getResources("META-INF/spring.factories") : ClassLoader.getSystemResources("META-INF/spring.factories");
        LinkedMultiValueMap result = new LinkedMultiValueMap();
        while(urls.hasMoreElements()) {
          URL url = (URL)urls.nextElement();
          UrlResource resource = new UrlResource(url);
          Properties properties = PropertiesLoaderUtils.loadProperties(resource);
          Iterator var6 = properties.entrySet().iterator();
          while(var6.hasNext()) {
            Entry<?, ?> entry = (Entry)var6.next();
            String factoryClassName =((String)entry.getKey()).trim();
            String[] var9 = StringUtils.commaDelimitedListToStringArray((String)entry.getValue());
            int var10 = var9.length;
            for(int var11 = 0; var11 < var10; ++var11) {
              String factoryName = var9[var11];
              result.add(factoryClassName, factoryName.trim());
           }
         }
       }
        cache.put(classLoader, result);
        return result;
      } catch (IOException var13) {
        throw new IllegalArgumentException("Unable to load factories from location [META-INF/spring.factories]", var13);
      }
     }
   }

  private static <T> T instantiateFactory(String instanceClassName, Class<T>factoryClass, ClassLoader classLoader) {
    try {
      Class<?> instanceClass = ClassUtils.forName(instanceClassName,classLoader);
      if (!factoryClass.isAssignableFrom(instanceClass)) {
        throw new IllegalArgumentException("Class [" + instanceClassName+ "] is not assignable to [" + factoryClass.getName() + "]");
      } else {
        return ReflectionUtils.accessibleConstructor(instanceClass, new Class[0]).newInstance();
      }
    } catch (Throwable var4) {
      throw new IllegalArgumentException("Unable to instantiate factory class: " + factoryClass.getName(), var4);
    }
  }
}
每个jar都可以定义自己的META-INF/spring.factories ,jar被加载的同时 spring.factories里面定义的bean就可以自动被加载
7.2 Eureka服务注册核心源码解析
EnableEurekaServer注解作用
通过 @EnableEurekaServer 激活EurekaServer
@Target({ElementType.TYPE})
@Retention(RetentionPolicy.RUNTIME)
@Documented
@Import({EurekaServerMarkerConfiguration.class})
public @interface EnableEurekaServer {
}
此类有一个重要作用:导入EurekaServerMarkerConfiguration配置类实例化了一个Marker的bean对象,此对象是实例化核心配置类的前提条件
@Configuration
public class EurekaServerMarkerConfiguration {
  public EurekaServerMarkerConfiguration() {
 }
  @Bean
  public EurekaServerMarkerConfiguration.Marker eurekaServerMarkerBean() {
    return new EurekaServerMarkerConfiguration.Marker();
 }
  class Marker {
    Marker() {
   }
 }
}
自动装载核心配置类
SpringCloud对EurekaServer的封装使得发布一个EurekaServer无比简单,根据自动装载原则可以在spring-cloud-netflix-eureka-server-2.1.0.RELEASE.jar 下找到 spring.factories
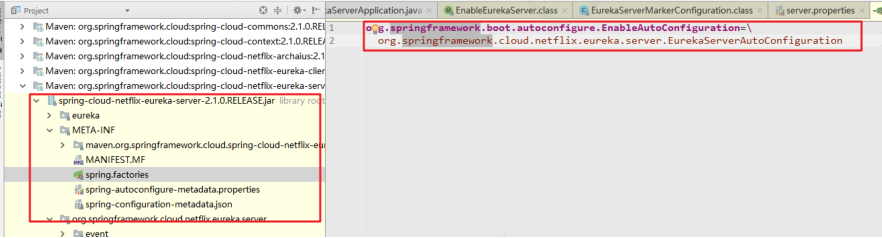
EurekaServerAutoConfiguration 是Eureka服务端的自动配置类
@Configuration
@Import({EurekaServerInitializerConfiguration.class})
@ConditionalOnBean({Marker.class})
@EnableConfigurationProperties({EurekaDashboardProperties.class,
InstanceRegistryProperties.class})
@PropertySource({"classpath:/eureka/server.properties"})
public class EurekaServerAutoConfiguration extends WebMvcConfigurerAdapter {
  //...代码省略
}
现在我们展开来说这个Eureka服务端的自动配置类;
- 这个配置类实例化的前提条件是上下文中存在 EurekaServerMarkerConfiguration.Marker 这个bean,解释了上面的问题
- 通过@EnableConfigurationProperties({ EurekaDashboardProperties.class,InstanceRegistryProperties.class })导入了两个配置类
1. EurekaDashboardProperties : 配置 EurekaServer的管控台
2. InstanceRegistryProperties : 配置期望续约数量和默认的通信数量 - 通过@Import({EurekaServerInitializerConfiguration.class})引入启动配置类
EurekaServerInitializerConfiguration
@Configuration
public class EurekaServerInitializerConfiguration implements ServletContextAware, SmartLifecycle, Ordered {
  public void start() {(new Thread(new Runnable() {
      public void run() {
        try {
          EurekaServerInitializerConfiguration.this.eurekaServerBootstrap.contextInitialized(EurekaServerInitializerConfiguration.this.servletContext);
          EurekaServerInitializerConfiguration.log.info("Started Eureka Server");
          EurekaServerInitializerConfiguration.this.publish(new EurekaRegistryAvailableEvent(EurekaServerInitializerConfiguration.this.getEurekaServerConfig()));
          EurekaServerInitializerConfiguration.this.running = true;
          EurekaServerInitializerConfiguration.this.publish(new EurekaServerStartedEvent(EurekaServerInitializerConfiguration.this.getEurekaServerConfig()));
       } catch (Exception var2) {
          EurekaServerInitializerConfiguration.log.error("Could not initialize Eureka servlet context", var2);
       }
     }
   })).start();
 }
可以看到EurekaServerInitializerConfiguration实现了SmartLifecycle,也就意味着Spring容器启动时会去执行start()方法。加载所有的EurekaServer的配置
EurekaServerAutoConfiguration
实例化了EurekaServer的管控台的Controller类 EurekaController
  @Bean
  @ConditionalOnProperty(
    prefix = "eureka.dashboard",
    name = {"enabled"},
    matchIfMissing = true
 )
  public EurekaController eurekaController() {
    return new EurekaController(this.applicationInfoManager);
 }
实例化EurekaServerBootstrap类
  @Bean
  public EurekaServerBootstrap eurekaServerBootstrap(PeerAwareInstanceRegistry registry, EurekaServerContext serverContext) {
    return new EurekaServerBootstrap(this.applicationInfoManager,this.eurekaClientConfig, this.eurekaServerConfig, registry, serverContext);
  }
实例化jersey相关配置类
  @Bean
  public FilterRegistrationBean jerseyFilterRegistration(Application eurekaJerseyApp) {
    FilterRegistrationBean bean = new FilterRegistrationBean();
    bean.setFilter(new ServletContainer(eurekaJerseyApp));
    bean.setOrder(2147483647);
    bean.setUrlPatterns(Collections.singletonList("/eureka/*"));
    return bean;
  }

  @Bean
  public Application jerseyApplication(Environment environment, ResourceLoader resourceLoader) {
    ClassPathScanningCandidateComponentProvider provider = new ClassPathScanningCandidateComponentProvider(false, environment);
    provider.addIncludeFilter(new AnnotationTypeFilter(Path.class));
    provider.addIncludeFilter(new AnnotationTypeFilter(Provider.class));
    Set<Class<?>> classes = new HashSet();
    String[] var5 = EUREKA_PACKAGES;
    int var6 = var5.length;
    for(int var7 = 0; var7 < var6; ++var7) {
      String basePackage = var5[var7];
      Set<BeanDefinition> beans = provider.findCandidateComponents(basePackage);
      Iterator var10 = beans.iterator();
      while(var10.hasNext()) {
        BeanDefinition bd = (BeanDefinition)var10.next();
        Class<?> cls = ClassUtils.resolveClassName(bd.getBeanClassName(), resourceLoader.getClassLoader());
        classes.add(cls);
      }
    }
    Map<String, Object> propsAndFeatures = new HashMap();

    propsAndFeatures.put("com.sun.jersey.config.property.WebPageContentRegex","/eureka/(fonts|images|css|js)/.*");
    DefaultResourceConfig rc = new DefaultResourceConfig(classes);
    rc.setPropertiesAndFeatures(propsAndFeatures);
    return rc;
  }
jerseyApplication 方法,在容器中存放了一个jerseyApplication对象,jerseyApplication()方法里的东西和Spring源码里扫描@Component逻辑类似,扫描@Path和@Provider标签,然后封装成beandefinition,封装到Application的set容器里。通过filter过滤器来过滤url进行映射到对象的Controller
暴露的服务端接口
由于集成了Jersey,我们可以找到在EurekaServer的依赖包中的 eureka-core-1.9.8.jar ,可以看到一些列的XXXResource
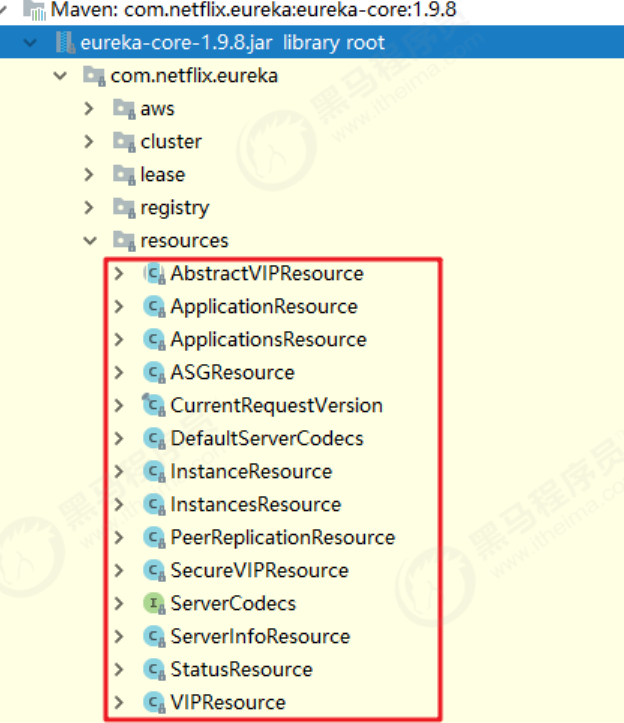
这些类都是通过Jersey发布的供客户端调用的服务接口。
(1)服务端接受客户端的注册
在ApplicationResource.addInstance()方法中可以看到 this.registry.register(info,"true".equals(isReplication));
  public void register(InstanceInfo info, boolean isReplication) {
    //默认有效时长90m
    int leaseDuration = 90;
    if (info.getLeaseInfo() != null && info.getLeaseInfo().getDurationInSecs() > 0) {
      leaseDuration = info.getLeaseInfo().getDurationInSecs();
    }
    //注册实例
    super.register(info, leaseDuration, isReplication);
    //同步到其他EurekaServer服务
    this.replicateToPeers(PeerAwareInstanceRegistryImpl.Action.Register,info.getAppName(), info.getId(), info, (InstanceStatus)null, isReplication);
  }
继续找到父类的register方法可以看到整个注册的过程
  //线程安全的map,存放所有注册的示例对象
  private final ConcurrentHashMap<String, Map<String, Lease<InstanceInfo>>> registry = new ConcurrentHashMap();
  public void register(InstanceInfo registrant, int leaseDuration, boolean isReplication) {
    try {
      this.read.lock();
      Map<String, Lease<InstanceInfo>> gMap = (Map)this.registry.get(registrant.getAppName());
      EurekaMonitors.REGISTER.increment(isReplication);
      //如果第一个实例注册会给registryput进去一个空的
      if (gMap == null) {
        ConcurrentHashMap<String, Lease<InstanceInfo>> gNewMap = new ConcurrentHashMap();
        gMap = (Map)this.registry.putIfAbsent(registrant.getAppName(),gNewMap);
        if (gMap == null) {
          gMap = gNewMap;
       }
     }
     //根据注册的示例对象id,获取已存在的Lease
     Lease<InstanceInfo> existingLease = (Lease)((Map)gMap).get(registrant.getId());

     if (existingLease != null && existingLease.getHolder() != null) {
        Long existingLastDirtyTimestamp =((InstanceInfo)existingLease.getHolder()).getLastDirtyTimestamp();
        Long registrationLastDirtyTimestamp = registrant.getLastDirtyTimestamp();
        logger.debug("Existing lease found (existing={}, provided={}",existingLastDirtyTimestamp, registrationLastDirtyTimestamp);
        if (existingLastDirtyTimestamp > registrationLastDirtyTimestamp){
          logger.warn("There is an existing lease and the existing lease's dirty timestamp {} is greater than the one that is being registered {}",existingLastDirtyTimestamp, registrationLastDirtyTimestamp);
          logger.warn("Using the existing instanceInfo instead of the new instanceInfo as the registrant");
          registrant = (InstanceInfo)existingLease.getHolder();
       }
     } else {
        Object var6 = this.lock;
        synchronized(this.lock) {
          if (this.expectedNumberOfClientsSendingRenews > 0) {
            ++this.expectedNumberOfClientsSendingRenews;
            this.updateRenewsPerMinThreshold();
          }
        }
      logger.debug("No previous lease information found; it is new registration");
     }
     Lease<InstanceInfo> lease = new Lease(registrant, leaseDuration);

     if (existingLease != null) {
        lease.setServiceUpTimestamp(existingLease.getServiceUpTimestamp());
     }
     //将lease存入gMap
     ((Map)gMap).put(registrant.getId(), lease);
     AbstractInstanceRegistry.CircularQueue var20 = this.recentRegisteredQueue;
     synchronized(this.recentRegisteredQueue) {
        this.recentRegisteredQueue.add(new Pair(System.currentTimeMillis(), registrant.getAppName() + "(" + registrant.getId() + ")"));
     }
     if(!InstanceStatus.UNKNOWN.equals(registrant.getOverriddenStatus())) {
        logger.debug("Found overridden status {} for instance {}.Checking to see if needs to be add to the overrides",registrant.getOverriddenStatus(), registrant.getId());
        if(!this.overriddenInstanceStatusMap.containsKey(registrant.getId())) {
          logger.info("Not found overridden id {} and hence adding it", registrant.getId());
          this.overriddenInstanceStatusMap.put(registrant.getId(),
          registrant.getOverriddenStatus());
        }
     }
     InstanceStatus overriddenStatusFromMap = (InstanceStatus)this.overriddenInstanceStatusMap.get(registrant.getId());
     if (overriddenStatusFromMap != null) {
        logger.info("Storing overridden status {} from map",overriddenStatusFromMap);
        registrant.setOverriddenStatus(overriddenStatusFromMap);
     }
     InstanceStatus overriddenInstanceStatus = this.getOverriddenInstanceStatus(registrant, existingLease, isReplication);
     registrant.setStatusWithoutDirty(overriddenInstanceStatus);
     if (InstanceStatus.UP.equals(registrant.getStatus())) {
        lease.serviceUp();
     }
     registrant.setActionType(ActionType.ADDED);
     this.recentlyChangedQueue.add(new AbstractInstanceRegistry.RecentlyChangedItem(lease));
     registrant.setLastUpdatedTimestamp();
     this.invalidateCache(registrant.getAppName(),registrant.getVIPAddress(), registrant.getSecureVipAddress());
     logger.info("Registered instance {}/{} with status {} (replication={})", new Object[]{registrant.getAppName(), registrant.getId(),
      registrant.getStatus(), isReplication});
   } finally {
      this.read.unlock();
   }
 }
(2)服务端接受客户端的续约
在InstanceResource的renewLease方法中完成客户端的心跳(续约)处理,其中最关键的方法就是this.registry.renew(this.app.getName(), this.id, isFromReplicaNode)
 public boolean renew(String appName, String id, boolean isReplication) {
    //客户端续约
    if (super.renew(appName, id, isReplication)) {
      //同步到其他的EurekaServer服务
      this.replicateToPeers(PeerAwareInstanceRegistryImpl.Action.Heartbeat, appName,id, (InstanceInfo)null, (InstanceStatus)null, isReplication);
      return true;
   } else {
      return false;
   }
 }
继续找到父类的renew方法可以看到整个续约的过程
 public boolean renew(String appName, String id, boolean isReplication) {
    EurekaMonitors.RENEW.increment(isReplication);
    Map<String, Lease<InstanceInfo>> gMap = (Map)this.registry.get(appName);
    //从内存map中根据id获取示例对象的Lease对象
    Lease<InstanceInfo> leaseToRenew = null;
    if (gMap != null) {
      leaseToRenew = (Lease)gMap.get(id);
    }
    if (leaseToRenew == null) {
      EurekaMonitors.RENEW_NOT_FOUND.increment(isReplication);
      logger.warn("DS: Registry: lease doesn't exist, registering resource: {} - {}", appName, id);
      return false;
    } else {
      //获取示例对象
      InstanceInfo instanceInfo = (InstanceInfo)leaseToRenew.getHolder();
      if (instanceInfo != null) {
        InstanceStatus overriddenInstanceStatus = this.getOverriddenInstanceStatus(instanceInfo, leaseToRenew, isReplication);
        if (overriddenInstanceStatus == InstanceStatus.UNKNOWN) {
          logger.info("Instance status UNKNOWN possibly due to deleted override for instance {}; re-register required", instanceInfo.getId());
          EurekaMonitors.RENEW_NOT_FOUND.increment(isReplication);
          return false;
        }
        if (!instanceInfo.getStatus().equals(overriddenInstanceStatus)){
          logger.info("The instance status {} is different from overridden instance status {} for instance {}. Hence setting the status to overridden status", new Object[]{instanceInfo.getStatus().name(),instanceInfo.getOverriddenStatus().name(),instanceInfo.getId()});
          //设置示例状态
          instanceInfo.setStatusWithoutDirty(overriddenInstanceStatus);
       }
    }
    //设置续约次数
    this.renewsLastMin.increment();
    leaseToRenew.renew();
    return true;
   }
 }
服务剔除
在AbstractInstanceRegistry.postInit()方法,在此方法里开启了一个每60秒调用一次EvictionTask.evict()的定时器。
  public void evict(long additionalLeaseMs) {
    logger.debug("Running the evict task");
    if (!this.isLeaseExpirationEnabled()) {
      logger.debug("DS: lease expiration is currently disabled.");
    } else {
      List<Lease<InstanceInfo>> expiredLeases = new ArrayList();
      Iterator var4 = this.registry.entrySet().iterator();
      while(true) {
        Map leaseMap;
        do {
          if (!var4.hasNext()) {
            int registrySize = (int)this.getLocalRegistrySize();
            int registrySizeThreshold = (int)((double)registrySize * this.serverConfig.getRenewalPercentThreshold());
            int evictionLimit = registrySize - registrySizeThreshold;
            int toEvict = Math.min(expiredLeases.size(),evictionLimit);
            if (toEvict > 0) {
              logger.info("Evicting {} items (expired={},evictionLimit={})", new Object[]{toEvict, expiredLeases.size(), evictionLimit});
              Random random = new Random(System.currentTimeMillis());
              for(int i = 0; i < toEvict; ++i) {
                int next = i + random.nextInt(expiredLeases.size() - i);
                Collections.swap(expiredLeases, i, next);
                Lease<InstanceInfo> lease = (Lease)expiredLeases.get(i);
                String appName = ((InstanceInfo)lease.getHolder()).getAppName();
                String id = ((InstanceInfo)lease.getHolder()).getId();
                EurekaMonitors.EXPIRED.increment();
                logger.warn("DS: Registry: expired lease for{}/{}", appName, id);
                this.internalCancel(appName, id, false);
             }
           }
            return;
         }
         Entry<String, Map<String, Lease<InstanceInfo>>> groupEntry =(Entry)var4.next();
         leaseMap = (Map)groupEntry.getValue();
       } while(leaseMap == null);

       Iterator var7 = leaseMap.entrySet().iterator();
       while(var7.hasNext()) {
          Entry<String, Lease<InstanceInfo>> leaseEntry = (Entry)var7.next();
          Lease<InstanceInfo> lease = (Lease)leaseEntry.getValue();
          if (lease.isExpired(additionalLeaseMs) && lease.getHolder()!= null) {
            expiredLeases.add(lease);
          }
       }
     }
   }
 }
7.3Eureka服务发现核心源码解析
自动装载
在服务消费者导入的坐标中有 spring-cloud-netflix-eureka-client-2.1.0.RELEASE.jar 找到其中的 spring.factories 可以看到所有自动装载的配置类

服务注册
  boolean register() throws Throwable {
    logger.info("DiscoveryClient_{}: registering service...",this.appPathIdentifier);
    EurekaHttpResponse httpResponse;
    try {
      httpResponse = this.eurekaTransport.registrationClient.register(this.instanceInfo);
    } catch (Exception var3) {
      logger.warn("DiscoveryClient_{} - registration failed {}", new Object[]{this.appPathIdentifier, var3.getMessage(), var3});
      throw var3;
    }
    if (logger.isInfoEnabled()) {
      logger.info("DiscoveryClient_{} - registration status: {}",this.appPathIdentifier, httpResponse.getStatusCode());
    }
    return httpResponse.getStatusCode() == Status.NO_CONTENT.getStatusCode();
  }
服务下架
  @PreDestroy
  public synchronized void shutdown() {
    if (this.isShutdown.compareAndSet(false, true)) {
      logger.info("Shutting down DiscoveryClient ...");
      if (this.statusChangeListener != null && this.applicationInfoManager != null) {
        this.applicationInfoManager.unregisterStatusChangeListener(this.statusChangeListener.getId());
      }
      this.cancelScheduledTasks();
      if (this.applicationInfoManager != null && this.clientConfig.shouldRegisterWithEureka() && this.clientConfig.shouldUnregisterOnShutdown()) {
        this.applicationInfoManager.setInstanceStatus(InstanceStatus.DOWN);
        this.unregister();
      }
      if (this.eurekaTransport != null) {
        this.eurekaTransport.shutdown();
      }
      this.heartbeatStalenessMonitor.shutdown();
      this.registryStalenessMonitor.shutdown();
      logger.info("Completed shut down of DiscoveryClient");
    }
  }
心跳续约
在com.netflix.discovery.DiscoveryClient.HeartbeatThread中定义了续约的操作,我们查看renew()方法;
  boolean renew() {
    try {
      EurekaHttpResponse<InstanceInfo> httpResponse = this.eurekaTransport.registrationClient.sendHeartBeat(this.instanceInfo.getAppName(), this.instanceInfo.getId(), this.instanceInfo, (InstanceStatus)null);
      logger.debug("DiscoveryClient_{} - Heartbeat status: {}",this.appPathIdentifier, httpResponse.getStatusCode());
      if (httpResponse.getStatusCode() == Status.NOT_FOUND.getStatusCode()) {
        this.REREGISTER_COUNTER.increment();
        logger.info("DiscoveryClient_{} - Re-registering apps/{}",this.appPathIdentifier, this.instanceInfo.getAppName());
        long timestamp = this.instanceInfo.setIsDirtyWithTime();
        boolean success = this.register();
        if (success) {
          this.instanceInfo.unsetIsDirty(timestamp);
        }
        return success;
     } else {
        return httpResponse.getStatusCode() == Status.OK.getStatusCode();
     }
    } catch (Throwable var5) {
      logger.error("DiscoveryClient_{} - was unable to send heartbeat!", this.appPathIdentifier, var5);
      return false;
    }
  }
在renew()这个方法中,首先向注册中心执行了心跳续约的请求,StatusCode为200成功,若为404则执行register()重新注册操作;
最后总结一下eureka客户端做的事情;
1.根据配置文件初始化bean,创建客户端实例信息 InstanceInfo
2.第一次全量拉取注册中心服务列表(url=/apps),初始化周期任务:
2.1 CacheRefreshThread 定时刷新本地缓存服务列表,若是客户端第一次拉取,则会全量拉取,后面 则增量拉取.若增量拉取失败则全量拉取,配置属性为eureka.client.registryFetchIntervalSeconds=30默认拉取一次;
2.2 HeartbeatThread 通过renew()续约任务,维持于注册中心的心跳(url=/apps/ {id}),若返回状态码为404则说明该服务实例没有在注册中心注册,执行register()向注册中心注册实例信息;
2.3 ApplicationInfoManager.StatusChangeListener 注册实例状态监听类,监听服务实例状态变化,向注册中心同步实例状态;
2.4 InstanceInfoReplicator 定时刷新实例状态,并向注册中心同步,默认eureka.client.instanceInfoReplicationIntervalSeconds=30执行一次.若实例状态有变更,则重新执行注册;
8.Eureka替换方案
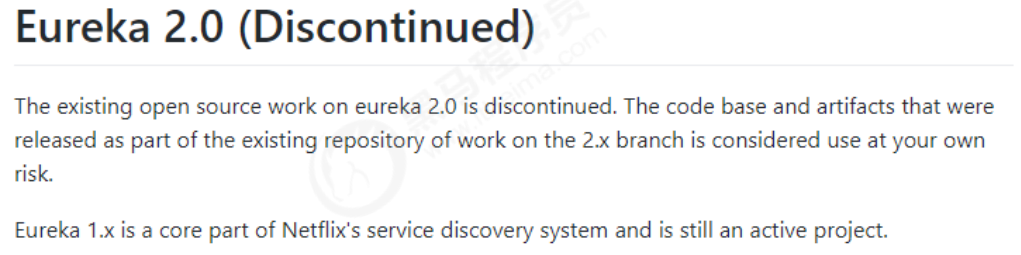
8.1Eureka闭源的影响
在Euraka的GitHub上,宣布Eureka 2.x闭源。近这意味着如果开发者继续使用作为 2.x 分支上现有工作repo 一部分发布的代码库和工件,则将自负风险。
8.2Eureka的替换方案
Zookeeper
ZooKeeper是一个分布式的,开放源码的分布式应用程序协调服务,是Google的Chubby一个开源的实现,是Hadoop和Hbase的重要组件。它是一个为分布式应用提供一致性服务的软件,提供的功能包括:配置维护、域名服务、分布式同步、组服务等。
Consul
consul是近几年比较流行的服务发现工具,工作中用到,简单了解一下。consul的三个主要应用场景:服务发现、服务隔离、服务配置。
Nacos
Nacos 是阿里巴巴推出来的一个新开源项目,这是一个更易于构建云原生应用的动态服务发现、配置管理和服务管理平台。Nacos 致力于帮助您发现、配置和管理微服务。Nacos 提供了一组简单易用的特性集,帮助您快速实现动态服务发现、服务配置、服务元数据及流量管理。Nacos 帮助您更敏捷和容易地构建、交付和管理微服务平台。 Nacos 是构建以“服务”为中心的现代应用架构 (例如微服务范式、云原生范式) 的服务基础设施。

 浙公网安备 33010602011771号