Spring学习(一) ---- ioc与di
ioc&&di
控制反转:IOC——Inversion of Control,把对象的创建权交给容器
翻转资源获取方向。把自己创建资源、向环境索取资源变成环境将资源准备好,我们享受资源注入。
依赖注入:DI——Dependency Injection,再创建对象的时候给属性赋值
●谁依赖于谁:应用程序依赖于IoC容器;
●为什么需要依赖:应用程序需要IoC容器来提供对象需要的外部资源;
●谁注入谁:IoC容器注入应用程序某个对象,应用程序依赖的对象;
●注入了什么:就是注入某个对象所需要的外部资源(包括对象、资源、常量数据)。
1、Spring中使用xml配置ioc与di
在Spring中使用ApplicationContext.xml配置
<?xml version="1.0" encoding="UTF-8" ?>
<beans xmlns="http://www.springframework.org/schema/beans"
       xmlns:xsi="http://www.w3.org/2001/XMLSchema-instance"
       xmlns:context="http://www.springframework.org/schema/context"
       xsi:schemaLocation="
http://www.springframework.org/schema/beans http://www.springframework.org/schema/beans/spring-beans.xsd
http://www.springframework.org/schema/context http://www.springframework.org/schema/context/spring-context.xsd">

中间填写具体配置

</beans>
1.1 Spring中使用xml配置ioc
1)ioc的基本配置
在Spring中配置ioc使用<bean id="" name="" class=""/>标签进行配置
id:bean的id,使用容器可以通过id值获取对应的bean,在一个容器中id唯一
name:bean的别名,可定义多个,使用 , ; 空格 都可以进行分隔
class:bean的全限类名(注意:不能使用接口)
2)ioc创建对象的三种方式
1、构造器实例化
无参构造器实例化
 <bean id="cvn" class="com.gxa.bean.CVN">

    </bean>
有参构造器实例化
    <bean id="jet1" class="com.gxa.bean.Jet">
        <constructor-arg name="name" value="歼十五"/>
        <constructor-arg index="1" value="白色"/>
	<!--<constructor-arg type="java.lang.String" value="白色"/>-->
    </bean>
2、静态工厂实例化
先实现静态工厂
public class StaticFactory {

    public static CVN createCVN(){
        return new CVN();
    }
}
再配置xml
<!--    静态工厂实例化-->
    <bean id="cvn" class="com.gxa.factory.StaticFactory" factory-method="createCVN"/>
3、实例化工厂实例化
先实现实例化工厂
public class NoStaticFactory {

    public CVN createCVN(){
        CVN cvn = new CVN();
        cvn.setName("天津号");
        return cvn;
    }
}
再配置xml
<!--    实例化工厂实例化-->
	<!--先实现工厂对象-->
    <bean id="noStaticFactory" class="com.gxa.factory.NoStaticFactory"/>
	<!--再使用工厂对象创建-->
    <bean id="cvn" factory-bean="noStaticFactory" factory-method="createCVN"/>
1.2 Spring中使用xml配置di -- di注入的四种方式
1、setter注入
在对象的<bean></bean>标签中使用property标签进行配置
需要对象中有无参构造器
<!--    无参构造器实例化-->
    <bean id="cvn" class="com.gxa.bean.CVN" scope="singleton" init-method="initMethod" destroy-method="destroyMethod">
<!--        setter注入-->
        <property name="length" value="350"/>
        <property name="name" value="福建号"/>
        <property name="width" value="120"/>
        <property name="jet" ref="jet1"/>
    </bean>
对于引用数据类型的注入统一使用 ref= 来进行标记
2、构造器注入
使用有参构造器进行注入,再标签中使用constructor-arg进行配置
需要对象中有对应的有参构造器
    <bean id="jet1" class="com.gxa.bean.Jet">
	<!--可以使用name、index(构造器中参数的下标位置--默认1开始)、type(参数类型)进行配置-->
        <constructor-arg name="name" value="歼十五"/>
        <constructor-arg index="1" value="白色"/>
	<!--<constructor-arg type="java.lang.String" value="白色"/>-->
    </bean>
3、自动装配(针对引用类型)
IoC容器根据bean所依赖的资源在容器中自动查找并注入到bean中的过程称为自动装配
自动装配的方式:按类型(最常用)、按名称、按构造方法、不启用自动装配
<!--不用property标签,在 <bean>标签中添加autowire属性即可 -->
    <bean id="cvn" class="com.gxa.bean.CVN" scope="singleton" init-method="initMethod" destroy-method="destroyMethod" autowire="byType">
<!--        setter注入-->
        <property name="length" value="350"/>
        <property name="name" value="福建号"/>
        <property name="width" value="120"/>
	<!--<property name="jet" ref="jet1"/>-->
    </bean>

    <bean id="jet1" class="com.gxa.bean.Jet">
        <constructor-arg name="name" value="歼十五"/>
<!--        也可以通过index下标来指定构造器参数-->
        <constructor-arg type="java.lang.String" value="白色"/>
    </bean>
输出结果:CVN{name='福建号', length=350, width=120, jet=Jet{name='歼十五', color='白色'}}
注意事项:
需要注入属性的类中对应属性的setter方法不能省略
被注入的对象必须要被Spring的IOC容器管理
按照类型在Spring的IOC容器中如果找到多个对象,会报 NoUniqueBeanDefinitionException
4、集合注入(了解)
数组的注入:使用array标签嵌套value标签
list集合的注入:使用list标签嵌套value标签
set集合的注入:使用set标签嵌套value标签
map集合的注入:使用map标签嵌套entry标签
proporties集合的注入:使用props标签中嵌套prop标签使用
//编写对象
public class CollectionBean {

    private List list;
    private Set set;
    private Map map;
    private Properties properties;
	...
}
编写相应的xml文件注入值
<!--    集合注入-->
    <bean id="collectionBean" class="com.gxa.bean.CollectionBean">
        <property name="list">
            <list>
                <value>aaa</value>
                <value>bbb</value>
            </list>
        </property>
        <property name="set">
            <set>
                <value>DASDASD</value>
                <value>DASDAFASD</value>
            </set>
        </property>
        <property name="map">
            <map>
                <entry key="first" value="CCCC"/>
                <entry key="second" value="ddddd"/>
            </map>
        </property>
        <property name="properties">
            <props>
                <prop key="001">AAAA</prop>
                <prop key="002">BBBB</prop>
            </props>
        </property>
    </bean>
1.3 xml中的其他配置
1)配置bean的初始化方法和销毁方法
1、在注解中配置init-method 和 destroy-method
//创建初始化和销毁方法
//表示bean初始化对应的操作,再类的对象中的属性设置后再执行(即容器创建完成后执行)
public void init(){
	System.out.println("init...");
}
//表示bean销毁前对应的操作
public void destory(){
	System.out.println("destory...");
}
<!--使用xml在初始化bean处配置参数-->
    <bean id="jet1" class="com.gxa.bean.Jet" init-method="init()" destroy-method="destroy()">
        <constructor-arg name="name" value="歼十五"/>
<!--        也可以通过index下标来指定构造器参数-->
        <constructor-arg type="java.lang.String" value="白色"/>
    </bean>
2、关于销毁方法的调用
调用销毁方法需要在容器关闭前才调用
close()关闭容器
\\ApplicationContext ctx = new ClassPathXmlApplicationContext("applicationContext.xml");
\\使用ApplicationContext没有close()方法,需要将其向下转型为ConfigurableApplicationContext及其子类才能调用

\\创建容器
ClassPathXmlApplicationContext ctx = new ClassPathXmlApplicationContext("applicationContext.xml");
...
...
\\关闭容器
applicationContext.close();
注册钩子关闭容器
在容器未关闭之前,提前设置好回调函数,让JVM在退出之前回调此函数来关闭容器,调用ctx的registerShutdownHook()方法
ctx.registerShutdownHook();
总结:两种关闭容器方法的差异--close()是在调用的时候关闭,registerShutdownHook()是在JVM退出前调用关闭。
3、类实现InitializingBean, DisposableBean接口中的方法实现初始化与销毁
添加两个接口 InitializingBean, DisposableBean并实现接口中的两个方法 afterPropertiesSet和 destroy即可实现配置bean的初始化方法和销毁方法
public class CVN implements InitializingBean, DisposableBean {

...

public void destroy() throws Exception {
	System.out.println("service destroy");
}
//在属性设置后再执行初始化方法
public void afterPropertiesSet() throws Exception {
	System.out.println("service init");
}

...
2)bean的其他设置
1、设置创建对象的scope
- scope="singleton" --默认单例模式
- scope="prototype" --多例模式,在每次需要时直接创建,不会把对象存入spring容器中
- scope="session" -- 在web项目中使用,会把对象放入session域
- scope="request" -- 在web项目中使用,会把对象放入request域
2、关于scope的思考
- 为什么bean默认为单例?
bean为单例的意思是在Spring的IOC容器中只会有该类的一个对象
bean对象只有一个就避免了对象的频繁创建与销毁,达到了bean对象的复用,性能高 - bean在容器中是单例的,会不会产生线程安全问题?
如果对象是有状态对象,即该对象有成员变量可以用来存储数据的,因为所有请求线程共用一个bean对象,所以会存在线程安全问题。
如果对象是无状态对象,即该对象没有成员变量没有进行数据存储的,因方法中的局部变量在方法调用完成后会被销毁,所以不会存在线程安全问题。 - 哪些bean对象适合交给容器进行管理?
表现层对象、业务层对象、数据层对象、工具对象 - 哪些bean对象不适合交给容器进行管理?
封装实例的域对象,因为会引发线程安全问题,所以不适合。
3)Spring的IOC容器分析
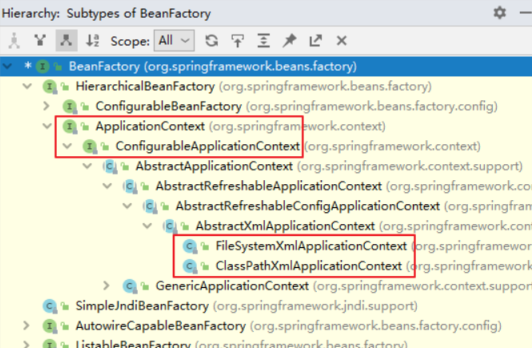
ioc容器的顶层接口为BeanFactory,为其他所有的父类
其中最常用的子接口为ApplicationContext,拥有更多的新特性。几乎在所有的场合都使用ApplicationContext接口
不同点:
BeanFactory是延迟加载,只有在获取bean对象的时候才会去创建
ApplicationContext是立即加载,容器加载的时候就会创建bean对象,延迟加载需要在每个对象后配置lazy-init="true"
在 Spring 环境下看到一个类或接口的名称中包含 ApplicationContext,那基本就可以断定,这个类或接口与 IOC 容器有关。
ApplicationContext主要实现类及其作用
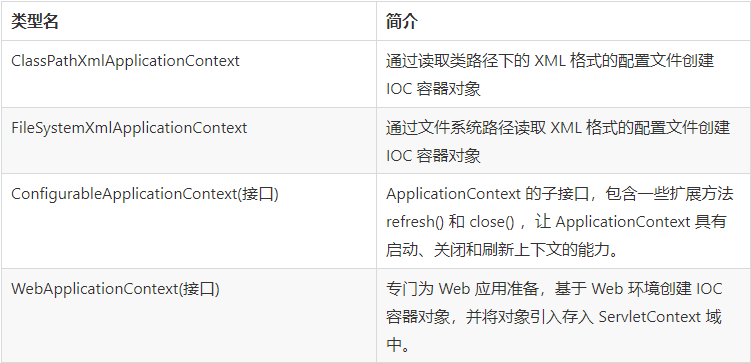
容器的创建方式:
类路径下的XML配置文件
ApplicationContext ctx = new ClassPathXmlApplicationContext("applicationContext.xml");
文件系统下的XML配置文件
ApplicationContext ctx = new FileSystemXmlApplicationContext("D:\\workspace\\spring\\spring_10_container\\src \\main\\resources\\applicationContext.xml");
4)多个配置文件的加载
1、在创建容器时读取多个配置文件
ApplicationContext applicationContext = new ClassPathXmlApplicationContext("applicationContext.xml","beans.xml");
2、在一个配置文件中引入其他配置文件
<!-- 把其他xml合并到当前xml中--> <import resource="beans.xml"/>
5)bean对象的获取方式
方式一:
CVN cvn = (CVN) applicationContext.getBean("cvn");
直接通过name来获取对象,但是需要进行类型转换
方式二:
CVN cvn = applicationContext.getBean("cvn",CVN.class);
这种方式可以解决类型强转问题,但是参数又多加了一个,相对来说没有简化多少。
方式三:
CVN cvn = applicationContext.getBean(CVN.class);
这种方式是1依赖注入中的按类型注入。必须要确保IOC容器中该类型对应的bean对象只能有一个。
2、Spring中使用注解配置ioc与di
2.1 使用注解配置ioc
@Component注解替代bean标签中的配置,如果配置了这个注解spring发现当前类有这个注解,
就会用反射创建对象放入spring容器中,key就用注解配置的名字。
@Component("userService")//注解配置
public class UserServiceImpl implements UserService {
    @Override
    public void helloSpring() {
        System.out.println("hello spring!");
    }
}
配置完成后需要配置xml来扫描
<?xml version="1.0" encoding="UTF-8" ?>
<beans xmlns="http://www.springframework.org/schema/beans"
       xmlns:xsi="http://www.w3.org/2001/XMLSchema-instance"
       xmlns:context="http://www.springframework.org/schema/context"
       xsi:schemaLocation="
http://www.springframework.org/schema/beans http://www.springframework.org/schema/beans/spring-beans.xsd
http://www.springframework.org/schema/context http://www.springframework.org/schema/context/spring-context.xsd">

    <!--配置扫描包 扫描当前包以及当前包的子包-->
    <context:component-scan base-package="com.gxa.service"/>

</beans>
1)ioc中的等效注解
@Componen(重点)替代bean标签的配置
提供了三个等效的注解
@Controller(重点) web层 controller层
@Service(重点) service层
@Repository dao层
@Component 哪一层都不属于用@Component注解
这三个等效注解都是使用了@Component来标记,即@Controller、@Service、@Repository这三个注解只是在@Component注解的基础上起了三个新的名字。
2)ioc注解的默认值
1、默认情况
类名首字母小写就是bean的id。例如:UserService类对应的bean的id就是userServcice
@Service //此时注解生成的bean的名字即是userServiceImpl
public class UserServiceImpl implements UserService {
    @Override
    public void helloSpring() {
        System.out.println("hello spring!");
    }
}
所以,一般开发时都不命名
2、使用value属性指定
@Service (value="userService")//此时注解生成的bean的名字即是userService
public class UserServiceImpl implements UserService {
    @Override
    public void helloSpring() {
        System.out.println("hello spring!");
    }
}
3、ioc中的其他注解配置
@Scope("prototype")// prototype 多例 singleton 单例 配置bean的作用范围
@PostConstruct//配置初始化的方法
@PreDestroy//配置销毁的方法
@Service(value = "userService")
@Scope("prototype")//配置bean的作用范围
public class UserServiceImpl implements UserService {


    @PostConstruct//配置初始化的方法
    public void initMethod(){
        System.out.println("userService被创建了");
    }

    @PreDestroy//配置销毁的方法
    public void destroyMethod(){
        System.out.println("userService被销毁了");
    }

    @Override
    public void helloSpring() {
        System.out.println("hello spring!");
    }
}
2.2 使用注解配置di
1)注入普通属性
使用@Value注解代替property标签
使用注解注入是使用暴力反射注入,可以没有getter、setter方法
但是使用注解配置时必须要有getter、setter方法
@Component
public class FighterPlane {

    //<property name="name" value="歼15"></property>
    @Value("歼15")
    private String name;

    @Value("灰色")
    private String color;

//...省略
}
2)注入引用属性
1、使用Resource
参与自动装配的组件(需要装配别人、被别人装配)全部都必须在IOC容器中。
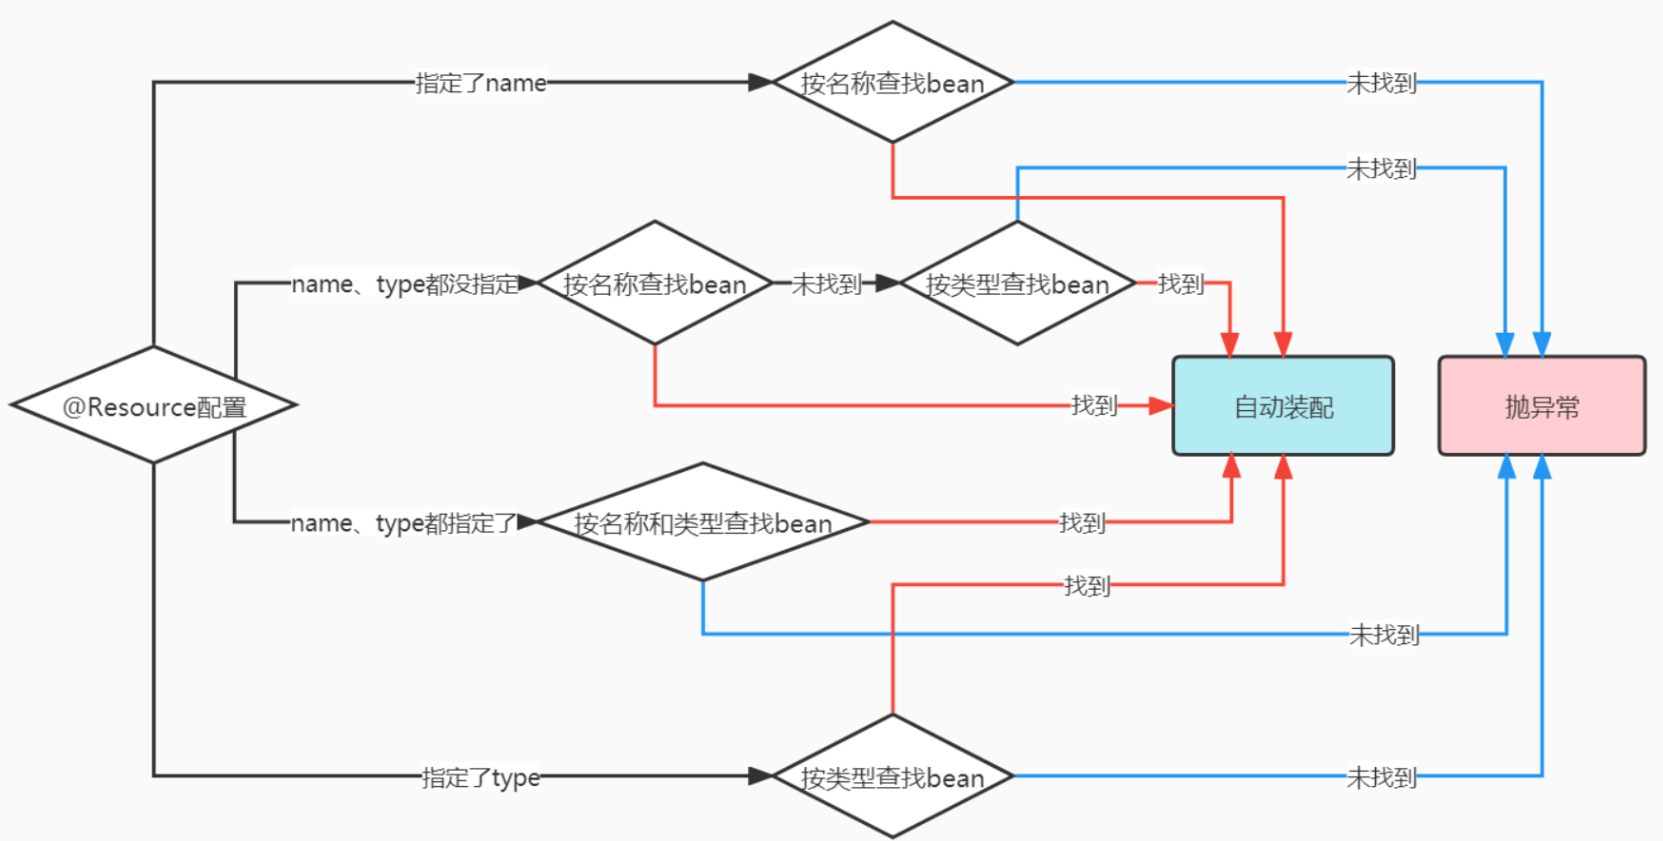
@Resource是JDK自带的注解,用于自动装配。 javax.annotation;
装配方式:
@Resource默认按照名称自动注入。
@Service("userService")
public class UserServiceImpl implements UserService {

    //<property name="userDao" ref="userDao"/>
    //暴力反射
	//Resource 注解可以使用name与type来进行注入
	//@Resource(type = UserServiceImpl.class)
    @Resource(name = "userDao")
    private UserDao userDao;

    @Override
    public void helloSpring() {
        userDao.addUser();
    }
}
再配置扫描包即可实现
<?xml version="1.0" encoding="UTF-8" ?>
<beans xmlns="http://www.springframework.org/schema/beans"
       xmlns:xsi="http://www.w3.org/2001/XMLSchema-instance"
       xmlns:context="http://www.springframework.org/schema/context"
       xsi:schemaLocation="
http://www.springframework.org/schema/beans http://www.springframework.org/schema/beans/spring-beans.xsd
http://www.springframework.org/schema/context http://www.springframework.org/schema/context/spring-context.xsd">

    <!--配置扫描包 扫描当前包以及当前包的子包,如果有多个包逗号分割配置-->
    <context:component-scan base-package="com.gxa.service,com.gxa.bean,com.gxa.dao"/>

</beans>
@Resource注解的扫描流程
2、使用Autowire
@Autowire注解的扫描流程
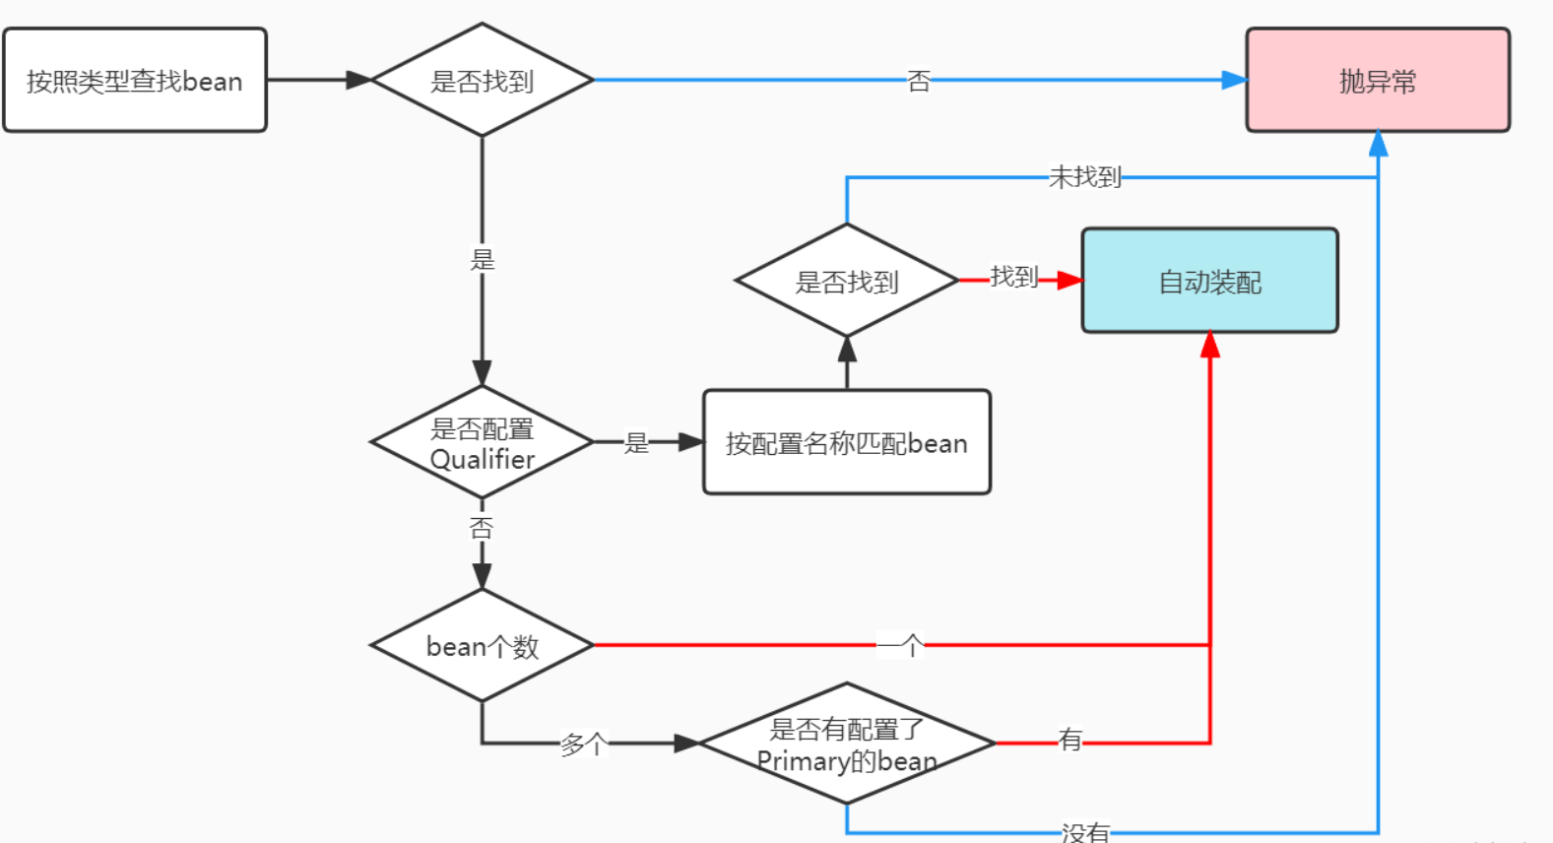
@Autowire默认是使用type匹配注入
@Service("userService")
public class UserServiceImpl implements UserService {

    @Autowired//按照类型注入  就去spring容器自动查找有没有实现了UserDao接口的对象,有的话自动注入
    private UserDao userDao;

    @Override
    public void helloSpring() {
        userDao.addUser();
    }

}
和Qualifier配合按照名称注入:
//@Qualifier的使用
//通过@Autowired和@Qualifier的结合使用可以按名称装配。
@Service("userService")
public class UserServiceImpl implements UserService {

    //<property name="userDao" ref="userDao"/>
    @Qualifier("userDao")  //按照名称注入
    @Autowired     //=  @Resource(name="userDao")
    private UserDao userDao;

    @Override
    public void helloSpring() {
        userDao.addUser();
    }

}
有多个bean对象时配置Primary
在类上使用@Primary标签
@Repository
@Primary
public class UserDaoImpl2 implements UserDao {
    @Override
    public void addUser() {

        System.out.println("2号");
    }
}

 浙公网安备 33010602011771号