简述迭代器的实现原理 以及实现简单迭代器
1、迭代器设计模式
迭代器模式很常用,以至于很多编程语言都默认实现了此模式,所以虽然我们天天都在用迭代器模式,但却很少有自己实现的机会。
其核心动机是为了在迭代一个容器对象的同时不暴露其内部细节,这啥意思呢?
例如 ArrayList 类,当我们需要迭代它的元素的时候,我们不可能将其内部存储元素用的数据结构,例如数组,暴露给用户。那样的话不仅将来更换数据结构变的不可能,而且如果将内部细节暴露给了客户端,那么就无法控制客户端对其行为了。
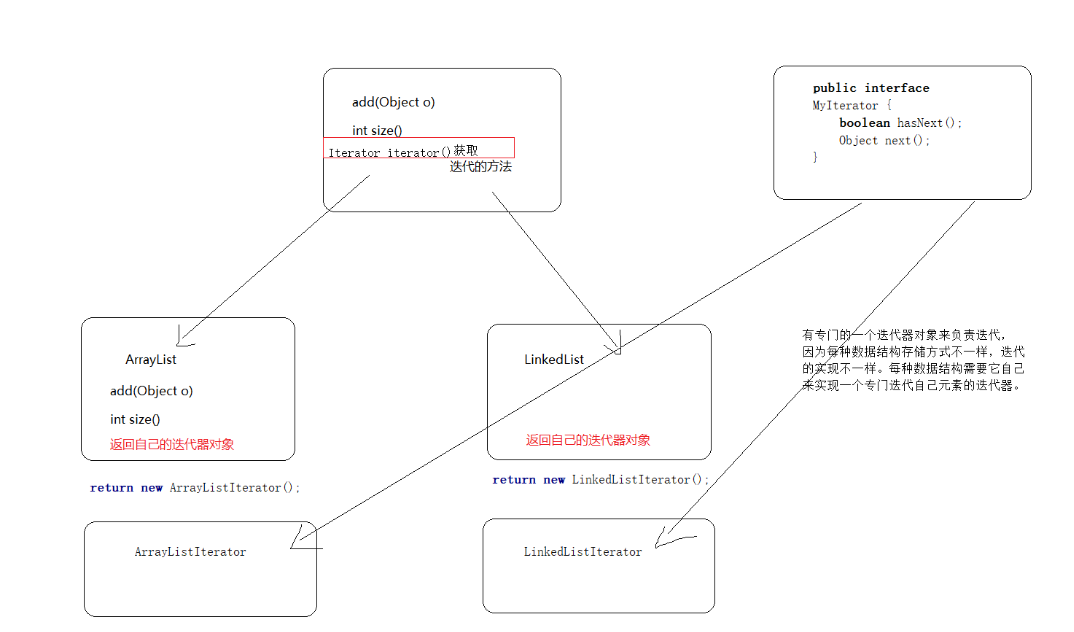
1)手动实现简单迭代器
迭代器是对集合进行操作
(1)先简单实现集合
手动简单实现LinkedList与ArrayList
实现add()和size()方法
定义MyCollection接口
public interface MyCollection {
    public void add(Object val);
    public int size();
    //迭代器方法 获取一个迭代器
    public MyIterator iterator();
}
定义Iterator接口
public interface MyIterator {
    public boolean hasNext();
    public Object next();
}
简单实现ArrayList
class MyArrayList implements MyCollection {
    private Object[] objects = new Object[10];

    //当前容器元素个数
    public int index = 0;

    //添加元素
    public void add(Object o){
        if (index == objects.length){
            //数组大小超过了 扩容
            //方法一:
            //扩容1.5倍
            Object[] newObjects = new Object[objects.length+(objects.length>>1)];
            //使用System.arrayCopyOf扩容
            System.arraycopy(objects,0,newObjects,0,objects.length);
            objects = newObjects;

            //使用Arrays扩容
//            objects = Arrays.copyOf(objects,objects.length+(objects.length>>1));
        }
        objects[index]=o;
        index++;
    }

    public int size(){
        return index+1;
    }
    //重写迭代器方法 返回一个迭代器对象 -- 所以需要定义自己的迭代器
    @Override
    public MyIterator iterator() {
        //匿名内部类实现 或采用下面的内部类实现
        return new MyIterator() {

            //元素个数
            private int currentIndex = 0;

            @Override
            public boolean hasNext() {
                return currentIndex < index;
            }

            @Override
            public Object next() {
                if (currentIndex<index){
                    Object o = objects[currentIndex];
                    currentIndex++;
                    return o;
                }else {
                    throw new NoSuchElementException();
                }
            }
        };
    }

//    public class ArrayListIterator implements MyIterator{
//        //元素个数
//        private int currentIndex = 0;
//
//        @Override
//        public boolean hasNext() {
//            if(currentIndex>=index){
//                return false;
//            }
//            return true;
//        }
//
//        @Override
//        public Object next() {
//            if (hasNext()){
//                Object o = objects[currentIndex];
//                currentIndex++;
//                return o;
//            }else {
//                return null;
//            }
//        }
//    }
}
实现LinkedList集合
//定义节点
class Node {
    Node last;
    Object val;
    Node next;

    Node(Object x) {
        last = null;
        val = x;
        next = null;
    }
}


class MyLinkedList implements MyCollection {
    //定义头节点
    private Node head = null;
    private Node tail = null;
    //大小计数器
    int index = 0;


    //尾插法
    public void add(Object val) {
        if (index == 0) {
            Node newNode = new Node(val);
            //第一次头尾都是空,将器赋值
            head = newNode;
            tail = newNode;
            //数量加一
            index++;
        } else {
            Node newNode = new Node(val);
            //插入新节点
            //最后一个节点指向新的节点
            tail.next = newNode;
            //新的节点指向头节点和上一个节点
            newNode.last = tail;
            newNode.next = head;
            //尾节点向后移动
            tail = newNode;
            //数量加一
            index++;
        }
    }

    //大小
    public int size() {

        return index;
    }

    //重写迭代器方法
    @Override
    public MyIterator iterator() {
        return new MyIterator() {
            Node temp = head;

            @Override
            public boolean hasNext() {
                return temp.next != head;
            }

            @Override
            public Object next() {
                if (temp.next != head) {
                    Object data = temp.val;
                    temp = temp.next;
                    return data;
                } else {
                    throw new NoSuchElementException();
                }
            }
        };
    }
}
整体流程为
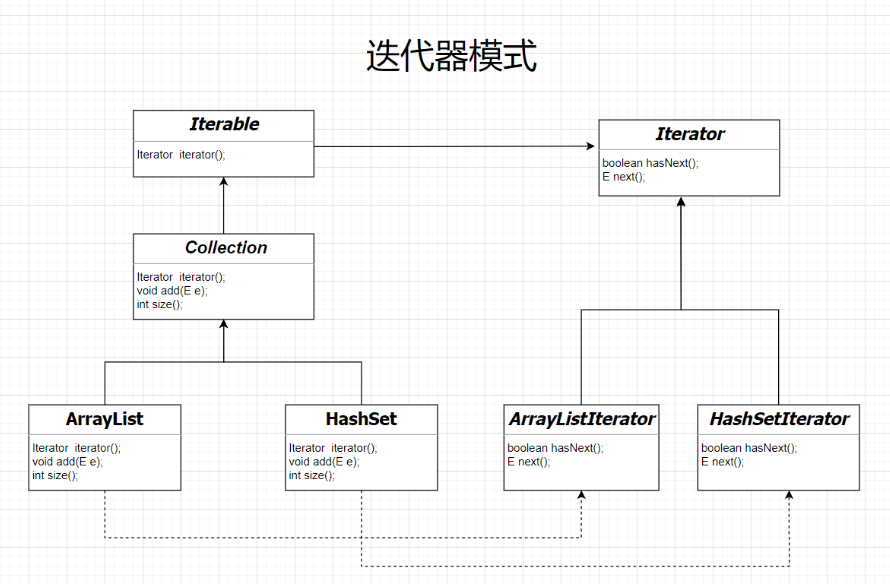
2)分析源码
对JAVA中的ArrayList进行整体大概的分析
//迭代器接口
public interface Iterator<E> {

    //判断是否有下一个元素
    boolean hasNext();

    //获取下一个元素
    E next();
}
//定义一个返回迭代器方法的规范
public interface Iterable<T> {

    //定义抽象方法获取迭代器
    Iterator<T> iterator();

}
//继承返回迭代器方法的接口
public interface Collection<E> extends Iterable<E> {

    //获取迭代器
    Iterator<T> iterator();

    //返回集合的元素个数
    int size();

    //添加元素
    boolean add(E e);
}
//ArrayList的实现
   public class ArrayList<E> extends AbstractList<E>implements List<E>{

       //...
       //获取arrayList专用的迭代器对象
       public Iterator<E> iterator() {
        return new Itr();
       }

        private class Itr implements Iterator<E> {

             public boolean hasNext() {
            //...
            }
             public E next() {
              //...
             }
        }

    }
整体框架
在迭代器遍历过程中不能使用list的remove方法问题的分析
迭代器是一种设计模式,它是一个对象,它可以遍历并选择序列中的对象,而开发人员不需要了解该序列的底层结构。
Java中的Iterator功能比较简单,并且只能单向移动:
(1) 使用方法iterator()要求容器返回一个Iterator。第一次调用Iterator的next()方法时,它返回序列的第一个元素。注意:iterator()方法是java.lang.Iterable接口,被Collection继承。
(2) 使用next()获得序列中的下一个元素。
(3) 使用hasNext()检查序列中是否还有元素。
(4) 使用remove()将迭代器新返回的元素删除。
迭代器中不能使用list的add和remove方法,使用后会出现 ConcurrentModificationException 异常
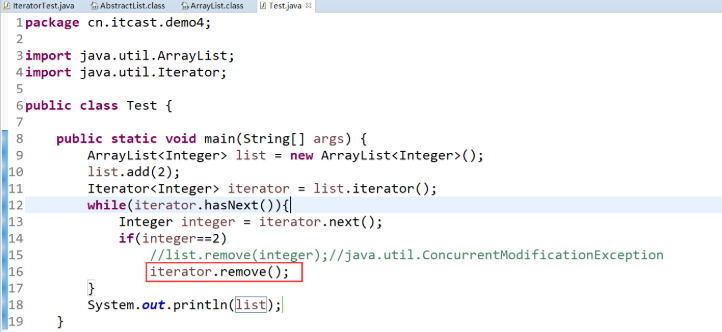
根据案例分析:
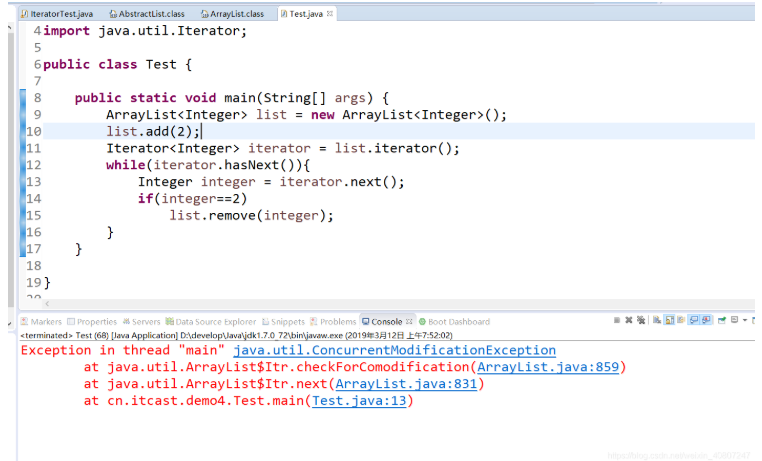
此时报错
可以来看底层:
首先看ArrayList的iterator()方法的具体实现,查看源码发现在ArrayList的源码中iterator()这个方法,下面是其实现代码
public Iterator<E> iterator() {
        return new Itr();//返回一个迭代器
    }
从这段代码可以看出返回的是一个指向Itr类型对象的引用,我们接着看Itr的具体实现,在ArrayList类中找到了Itr类的具体实现,它是ArrayList的一个成员内部类,下面这段代码是Itr类的所有实现:
/**
     * An optimized version of AbstractList.Itr
     */
    private class Itr implements Iterator<E> {//内部类Itr实现迭代器
        int cursor = 0;       // index of next element to return
        int lastRet = -1; // index of last element returned; -1 if no such
        int expectedModCount = modCount;

        public boolean hasNext() {//实现hasNext()方法
            return cursor != size;//通过index of next element和集合长度进行判断
        }

        @SuppressWarnings("unchecked")
        public E next() {//实现next()方法
            checkForComodification();
            int i = cursor;
            if (i >= size)
                throw new NoSuchElementException();
            Object[] elementData = ArrayList.this.elementData;
            if (i >= elementData.length)
                throw new ConcurrentModificationException();
            cursor = i + 1;
            return (E) elementData[lastRet = i];
        }

        public void remove() {//实现remove方法
            if (lastRet < 0)
                throw new IllegalStateException();
            checkForComodification();

            try {
                ArrayList.this.remove(lastRet);
                cursor = lastRet;
                lastRet = -1;
                expectedModCount = modCount;
            } catch (IndexOutOfBoundsException ex) {
                throw new ConcurrentModificationException();
            }
        }

        final void checkForComodification() {
            if (modCount != expectedModCount)
                throw new ConcurrentModificationException();
        }
    }
其中的几个成员变量:
cursor:表示下一个要访问的元素的索引,从next()方法的具体实现就可看出
lastRet:表示上一个访问的元素的索引
expectedModCount:表示对ArrayList修改次数的期望值,它的初始值为modCount。
modCount是AbstractList类中的一个成员变量
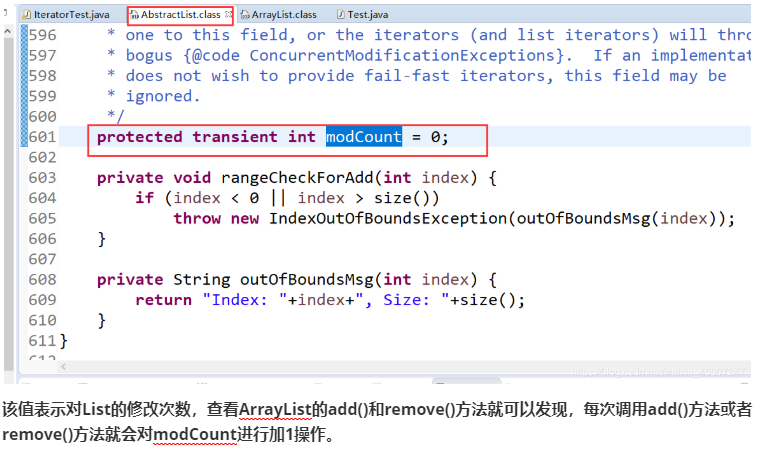
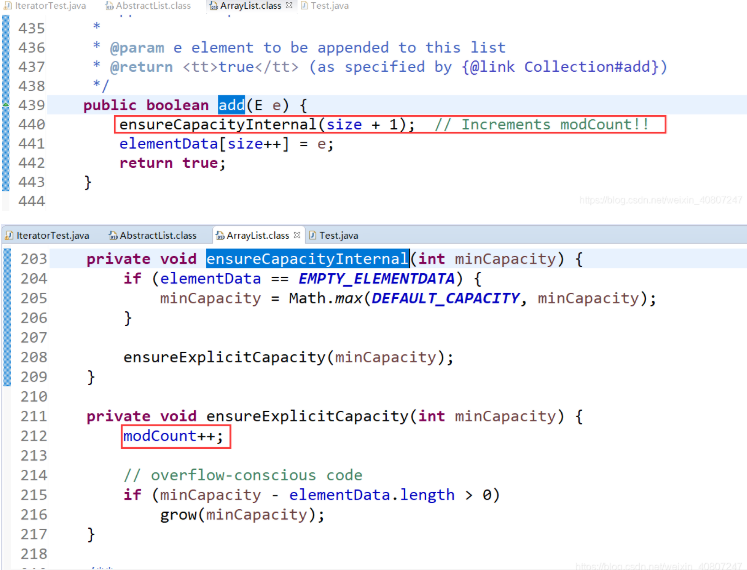
add()方法:
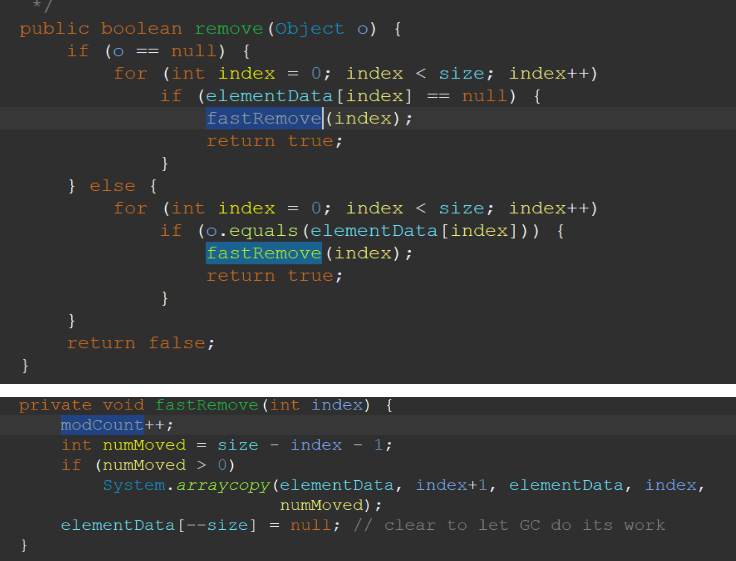
remove()方法:
hasNext()方法很简单,如果下一个访问的元素下标不等于ArrayList的大小,就表示有元素需要访问,这个很容易理解,如果下一个访问元素的下标等于ArrayList的大小,则肯定到达末尾了。
再看next()方法,通过Iterator的next()方法获取到下标为0的元素,我们看一下next()方法的具体实现:
public E next() {//实现next()方法
            checkForComodification();
            int i = cursor;
            if (i >= size)
                throw new NoSuchElementException();
            Object[] elementData = ArrayList.this.elementData;
            if (i >= elementData.length)
                throw new ConcurrentModificationException();
            cursor = i + 1;
            return (E) elementData[lastRet = i];
        }
首先在next()方法中会调用checkForComodification()方法,然后根据cursor的值获取到元素,接着将cursor的值赋给lastRet,并对cursor的值进行加1操作。初始时,cursor为0,lastRet为-1,那么调用一次之后,cursor的值为1,lastRet的值为0。注意此时,modCount为0,expectedModCount也为0。
接着往下看,程序中判断当前元素的值是否为2,若为2,则调用list.remove()方法来删除该元素。
再来看remove()方法:
public boolean remove(Object o) {
        if (o == null) {
            for (int index = 0; index < size; index++)
                if (elementData[index] == null) {
                    fastRemove(index);
                    return true;
                }
        } else {
            for (int index = 0; index < size; index++)
                if (o.equals(elementData[index])) {
                    fastRemove(index);
                    return true;
                }
        }
        return false;
    }


/*
     * Private remove method that skips bounds checking and does not
     * return the value removed.
     */
    private void fastRemove(int index) {
        modCount++;
        int numMoved = size - index - 1;
        if (numMoved > 0)
            System.arraycopy(elementData, index+1, elementData, index,
                             numMoved);
        elementData[--size] = null; // clear to let GC do its work
    }
通过remove方法删除元素最终是调用的fastRemove()方法,在fastRemove()方法中,首先对modCount进行加1操作(因为对集合修改了一次),然后接下来就是删除元素的操作,最后将size进行减1操作,并将引用置为null以方便垃圾收集器进行回收工作。
那么注意此时各个变量的值:对于iterator,其expectedModCount为0,cursor的值为1,lastRet的值为0。
对于list,其modCount为1,size为0。
接着看程序代码,执行完删除操作后,继续while循环,调用hasNext方法()判断,由于此时cursor为1,而size为0,那么返回true,所以继续执行while循环,然后继续调用iterator的next()方法:
注意,此时要注意next()方法中的第一句:checkForComodification()。
在checkForComodification方法中进行的操作是:
final void checkForComodification() {
            if (modCount != expectedModCount)
                throw new ConcurrentModificationException();
        }
如果modCount不等于expectedModCount,则抛出ConcurrentModificationException异常。
很显然,此时modCount为1,而expectedModCount为0,因此程序就抛出了ConcurrentModificationException异常。
关键点就在于:调用list.remove()和list.add()方法导致modCount和expectedModCount的值不一致。
因为foreach底层也是使用迭代器,所以这样操作也会报错
其实可以发现Itr类中也有remove()方法:
        public void remove() {
            if (lastRet < 0)
                throw new IllegalStateException();
            checkForComodification();

            try {
                ArrayList.this.remove(lastRet);
                cursor = lastRet;
                lastRet = -1;
                expectedModCount = modCount;
            } catch (IndexOutOfBoundsException ex) {
                throw new ConcurrentModificationException();
            }
        }
这个方法中其实调用的就是list.remove()方法,但是多了一行代码
expectedModCount = modCount;使得remove后也不会报错。
解决办法:
-
使用Iterator提供的remove方法,用于删除当前元素
-
建一个集合,记录需要删除的元素,之后统一删除(这个方法相对简单快捷)
package cn.itcast.demo4;

import java.util.ArrayList;
public class Test {

	public static void main(String[] args) {
		ArrayList<Integer> list = new ArrayList<Integer>();
        list.add(2);
        ArrayList<Integer> templist = new ArrayList<Integer>();
        for (Integer value : list) {
            if (value.equals(2)) {
                templist.add(value);
            }
        }
        // 可以查看removeAll源码,其中使用Iterator进行遍历
        list.removeAll(templist);
        System.out.println( "List Value:" + list.toString());
	}
}
- 不使用Iterator进行遍历,需要注意的是自己保证索引正常
package cn.itcast.demo4;

import java.util.ArrayList;
public class Test1 {

	public static void main(String[] args) {
		ArrayList<Integer> list = new ArrayList<Integer>();
        list.add(2);
        for ( int i = 0; i < list.size(); i++) {
            Integer value = list.get(i);
            System. out.println( "List Value:" + value);
            if (value.equals(2)) {
            	list.remove(value);  // ok
                i--; // 因为位置发生改变,所以必须修改i的位置
            }
        }

        System.out.println( "List Value:" + list.toString());
	}
}
- 多线程中进行操作

 浙公网安备 33010602011771号