
Windows环境用OpenSSL生成自签名证书,部署HTTPS网站,支持多浏览器,亲测可用
网上很多教程,但是很多限制,基本操作是官网下载安装包
https://slproweb.com/products/Win32OpenSSL.html
(我采用这种方法,比较简单),或者下载源码自行编译两种方法(需要vs环境,相对复杂点),这里遇到很多坑。
主要问题就是各种教程都能够生成证书文件,但是只支持IE浏览器,Chrome,FireFox下就不行,所以这里主要解决这个问题
主要步骤
修改openssl.cnf文件(这个文件后缀可能是conf,cfg等等,内容都是一样的),这个文件比较重要
我的cnf文件内容如下:
#
# OpenSSL example configuration file.
# This is mostly being used for generation of certificate requests.
#
# Note that you can include other files from the main configuration
# file using the .include directive.
#.include filename
# This definition stops the following lines choking if HOME isn't
# defined.
HOME= .
# Extra OBJECT IDENTIFIER info:
#oid_file= $ENV::HOME/.oid
oid_section= new_oids
# To use this configuration file with the "-extfile" option of the
# "openssl x509" utility, name here the section containing the
# X.509v3 extensions to use:
# extensions=
# (Alternatively, use a configuration file that has only
# X.509v3 extensions in its main [= default] section.)
[ new_oids ]
# We can add new OIDs in here for use by 'ca', 'req' and 'ts'.
# Add a simple OID like this:
# testoid1=1.2.3.4
# Or use config file substitution like this:
# testoid2=${testoid1}.5.6
# Policies used by the TSA examples.
tsa_policy1 = 1.2.3.4.1
tsa_policy2 = 1.2.3.4.5.6
tsa_policy3 = 1.2.3.4.5.7
####################################################################
[ ca ]
default_ca= CA_default# The default ca section
####################################################################
[ CA_default ]
dir= ./demoCA# Where everything is kept
certs= $dir/certs# Where the issued certs are kept
crl_dir= $dir/crl# Where the issued crl are kept
database= $dir/index.txt# database index file.
#unique_subject= no# Set to 'no' to allow creation of
# several certs with same subject.
new_certs_dir= $dir/newcerts# default place for new certs.
certificate= $dir/cacert.pem # The CA certificate
serial= $dir/serial # The current serial number
crlnumber= $dir/crlnumber# the current crl number
# must be commented out to leave a V1 CRL
crl= $dir/crl.pem # The current CRL
private_key= $dir/private/cakey.pem# The private key
x509_extensions= usr_cert# The extensions to add to the cert
# Comment out the following two lines for the "traditional"
# (and highly broken) format.
name_opt = ca_default# Subject Name options
cert_opt = ca_default# Certificate field options
# Extension copying option: use with caution.
# copy_extensions = copy
# Extensions to add to a CRL. Note: Netscape communicator chokes on V2 CRLs
# so this is commented out by default to leave a V1 CRL.
# crlnumber must also be commented out to leave a V1 CRL.
# crl_extensions= crl_ext
default_days= 365# how long to certify for
default_crl_days= 30# how long before next CRL
default_md= default# use public key default MD
preserve= no# keep passed DN ordering
# A few difference way of specifying how similar the request should look
# For type CA, the listed attributes must be the same, and the optional
# and supplied fields are just that :-)
policy= policy_match
# For the CA policy
[ policy_match ]
countryName= match
stateOrProvinceName= match
organizationName= match
organizationalUnitName= optional
commonName= supplied
emailAddress= optional
# For the 'anything' policy
# At this point in time, you must list all acceptable 'object'
# types.
[ policy_anything ]
countryName= optional
stateOrProvinceName= optional
localityName= optional
organizationName= optional
organizationalUnitName= optional
commonName= supplied
emailAddress= optional
####################################################################
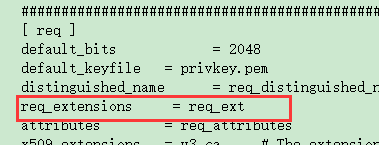
[ req ]
default_bits= 2048
default_keyfile = privkey.pem
distinguished_name= req_distinguished_name
req_extensions = req_ext
attributes= req_attributes
x509_extensions= v3_ca# The extensions to add to the self signed cert
# Passwords for private keys if not present they will be prompted for
# input_password = secret
# output_password = secret
# This sets a mask for permitted string types. There are several options.
# default: PrintableString, T61String, BMPString.
# pkix : PrintableString, BMPString (PKIX recommendation before 2004)
# utf8only: only UTF8Strings (PKIX recommendation after 2004).
# nombstr : PrintableString, T61String (no BMPStrings or UTF8Strings).
# MASK:XXXX a literal mask value.
# WARNING: ancient versions of Netscape crash on BMPStrings or UTF8Strings.
string_mask = utf8only
# req_extensions = v3_req # The extensions to add to a certificate request
[ req_distinguished_name ]
countryName= Country Name (2 letter code)
countryName_default= AU
countryName_min= 2
countryName_max= 2
stateOrProvinceName= State or Province Name (full name)
stateOrProvinceName_default= Some-State
localityName= Locality Name (eg, city)
0.organizationName= Organization Name (eg, company)
0.organizationName_default= Internet Widgits Pty Ltd
# we can do this but it is not needed normally :-)
#1.organizationName= Second Organization Name (eg, company)
#1.organizationName_default= World Wide Web Pty Ltd
organizationalUnitName= Organizational Unit Name (eg, section)
#organizationalUnitName_default=
commonName= Common Name (e.g. server FQDN or YOUR name)
commonName_max= 64
emailAddress= Email Address
emailAddress_max= 64
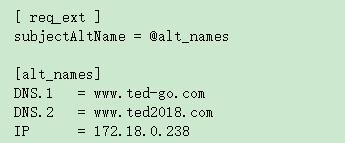
[ req_ext ]
subjectAltName = @alt_names
[alt_names]
DNS.1= www.ted-go.com
DNS.2= www.ted2018.com
IP= 172.18.0.238
# SET-ex3= SET extension number 3
[ req_attributes ]
challengePassword= A challenge password
challengePassword_min= 4
challengePassword_max= 20
unstructuredName= An optional company name
[ usr_cert ]
# These extensions are added when 'ca' signs a request.
# This goes against PKIX guidelines but some CAs do it and some software
# requires this to avoid interpreting an end user certificate as a CA.
basicConstraints=CA:FALSE
# Here are some examples of the usage of nsCertType. If it is omitted
# the certificate can be used for anything *except* object signing.
# This is OK for an SSL server.
# nsCertType= server
# For an object signing certificate this would be used.
# nsCertType = objsign
# For normal client use this is typical
# nsCertType = client, email
# and for everything including object signing:
# nsCertType = client, email, objsign
# This is typical in keyUsage for a client certificate.
# keyUsage = nonRepudiation, digitalSignature, keyEncipherment
# This will be displayed in Netscape's comment listbox.
nsComment= "OpenSSL Generated Certificate"
# PKIX recommendations harmless if included in all certificates.
subjectKeyIdentifier=hash
authorityKeyIdentifier=keyid,issuer
# This stuff is for subjectAltName and issuerAltname.
# Import the email address.
# subjectAltName=email:copy
# An alternative to produce certificates that aren't
# deprecated according to PKIX.
# subjectAltName=email:move
# Copy subject details
# issuerAltName=issuer:copy
#nsCaRevocationUrl= http://www.domain.dom/ca-crl.pem
#nsBaseUrl
#nsRevocationUrl
#nsRenewalUrl
#nsCaPolicyUrl
#nsSslServerName
# This is required for TSA certificates.
# extendedKeyUsage = critical,timeStamping
[ v3_req ]
# Extensions to add to a certificate request
basicConstraints = CA:FALSE
keyUsage = nonRepudiation, digitalSignature, keyEncipherment
[ v3_ca ]
# Extensions for a typical CA
# PKIX recommendation.
subjectKeyIdentifier=hash
authorityKeyIdentifier=keyid:always,issuer
basicConstraints = critical,CA:true
# Key usage: this is typical for a CA certificate. However since it will
# prevent it being used as an test self-signed certificate it is best
# left out by default.
# keyUsage = cRLSign, keyCertSign
# Some might want this also
# nsCertType = sslCA, emailCA
# Include email address in subject alt name: another PKIX recommendation
# subjectAltName=email:copy
# Copy issuer details
# issuerAltName=issuer:copy
# DER hex encoding of an extension: beware experts only!
# obj=DER:02:03
# Where 'obj' is a standard or added object
# You can even override a supported extension:
# basicConstraints= critical, DER:30:03:01:01:FF
[ crl_ext ]
# CRL extensions.
# Only issuerAltName and authorityKeyIdentifier make any sense in a CRL.
# issuerAltName=issuer:copy
authorityKeyIdentifier=keyid:always
[ proxy_cert_ext ]
# These extensions should be added when creating a proxy certificate
# This goes against PKIX guidelines but some CAs do it and some software
# requires this to avoid interpreting an end user certificate as a CA.
basicConstraints=CA:FALSE
# Here are some examples of the usage of nsCertType. If it is omitted
# the certificate can be used for anything *except* object signing.
# This is OK for an SSL server.
# nsCertType= server
# For an object signing certificate this would be used.
# nsCertType = objsign
# For normal client use this is typical
# nsCertType = client, email
# and for everything including object signing:
# nsCertType = client, email, objsign
# This is typical in keyUsage for a client certificate.
# keyUsage = nonRepudiation, digitalSignature, keyEncipherment
# This will be displayed in Netscape's comment listbox.
nsComment= "OpenSSL Generated Certificate"
# PKIX recommendations harmless if included in all certificates.
subjectKeyIdentifier=hash
authorityKeyIdentifier=keyid,issuer
# This stuff is for subjectAltName and issuerAltname.
# Import the email address.
# subjectAltName=email:copy
# An alternative to produce certificates that aren't
# deprecated according to PKIX.
# subjectAltName=email:move
# Copy subject details
# issuerAltName=issuer:copy
#nsCaRevocationUrl= http://www.domain.dom/ca-crl.pem
#nsBaseUrl
#nsRevocationUrl
#nsRenewalUrl
#nsCaPolicyUrl
#nsSslServerName
# This really needs to be in place for it to be a proxy certificate.
proxyCertInfo=critical,language:id-ppl-anyLanguage,pathlen:3,policy:foo
####################################################################
[ tsa ]
default_tsa = tsa_config1# the default TSA section
[ tsa_config1 ]
# These are used by the TSA reply generation only.
dir= ./demoCA# TSA root directory
serial= $dir/tsaserial# The current serial number (mandatory)
crypto_device= builtin# OpenSSL engine to use for signing
signer_cert= $dir/tsacert.pem # The TSA signing certificate
# (optional)
certs= $dir/cacert.pem# Certificate chain to include in reply
# (optional)
signer_key= $dir/private/tsakey.pem # The TSA private key (optional)
signer_digest = sha256# Signing digest to use. (Optional)
default_policy= tsa_policy1# Policy if request did not specify it
# (optional)
other_policies= tsa_policy2, tsa_policy3# acceptable policies (optional)
digests = sha1, sha256, sha384, sha512 # Acceptable message digests (mandatory)
accuracy= secs:1, millisecs:500, microsecs:100# (optional)
clock_precision_digits = 0# number of digits after dot. (optional)
ordering= yes# Is ordering defined for timestamps?
# (optional, default: no)
tsa_name= yes# Must the TSA name be included in the reply?
# (optional, default: no)
ess_cert_id_chain= no# Must the ESS cert id chain be included?
# (optional, default: no)
ess_cert_id_alg= sha1# algorithm to compute certificate
# identifier (optional, default: sha1)
注意,FireFox ,Chrome 需要注意以下几个参数的位置(网上下载的很多都没有)
然后就可以用命令去生成了,打开OpenSSl.exe
--亲测可用
--申请ca证书
genrsa -out ca.key 4096
req -new -sha256 -out ca.csr -key ca.key -config openssl.cnf
x509 -req -days 3650 -in ca.csr -signkey ca.key -out ca.crt
--申请服务端证书
genrsa -out server.key 2048
req -new -sha256 -out server.csr -key server.key -config openssl.cnf
x509 -req -days 3650 -CA ca.crt -CAkey ca.key -CAcreateserial -in server.csr -out server.crt -extensions req_ext -extfile openssl.cnf
--服务器证书格式转换(部署网站的服务器一定要用pfx格式的,不然选不到)
pkcs12 -export -out server.pfx -inkey server.key -in server.crt
生成过程中,如果某一条命令报错,不要紧,关闭并重新打开Openssl.exe重新执行当前命令即可,直到最后一步
然后部署网站,完美访问,具体安装请看下一篇https://www.cnblogs.com/esxbk/p/11868692.html

