JBoss Data Grid 7.2 在OpenShift环境中的Quick Start
为了在容器环境中运行,首先需要弄清楚的是在传统环境下如何运行,所以我们从传统环境开始。
先去http://access.redhat.com下载相应介质,主要是 jboss-datagrid-7.2.0-server.zip和jboss-datagrid-7.2.0-tomcat8-session-client.zip
前者用于jboss data grid的启动,后者用于客户端tomcat通过Client-Server方式去连接和操作
1. 安装
直接解压就是安装,但要注意如果是需要多个server构成一个集群,需要建立两个目录分别解压,我试过只修改配置不成,因为还有
其他文件在进程启动以后需要进行同时写入。所以最佳办法是每个实例分别建立一个目录。
修改配置文件cluster.xml,如果需要加入定义的Cache,可以添加下面这一段
<subsystem xmlns="urn:infinispan:server:endpoint:6.0">
        <hotrod-connector socket-binding="hotrod"  cache-container="clusteredcache">
         <topology-state-transfer lazy-retrieval="false" lock-timeout="1000" replication-timeout="5000"/>
        </hotrod-connector>
        .........
      <subsystem xmlns="urn:infinispan:server:core:6.0" default-cache-container="clusteredcache">
                   <cache-container name="clusteredcache" default-cache="default" statistics="true">
                       <transport executor="infinispan-transport" lock-timeout="60000"/>
                    ......
               <distributed-cache name="directory-dist-cache" mode="SYNC" owners="2" remote-                   timeout="30000" start="EAGER">
              <locking isolation="READ_COMMITTED" acquire-timeout="30000" striping="false"/>
              <eviction strategy="LRU" max-entries="20" />
              <transaction mode="NONE"/>
              </distributed-cache>
             ..............
  </cache-container>
如果不需要定义,可以用缺省的配置,也就是default,配置为分布式
<distributed-cache name="default"/>
修改server2的端口,主要是标黑的port-offset,标黑的那段
<socket-binding-group name="standard-sockets" default-interface="public" port-offset="${jboss.socket.binding.port-offset:100}">
        <socket-binding name="management-http" interface="management" port="${jboss.management.http.port:9990}"/>
        <socket-binding name="management-https" interface="management" port="${jboss.management.https.port:9993}"/>
        <socket-binding name="hotrod" port="11222"/>
        <socket-binding name="hotrod-internal" port="11223"/>
        <socket-binding name="jgroups-mping" port="0" multicast-address="${jboss.default.multicast.address:234.99.54.14}" multicast-port="45700"/>
        <socket-binding name="jgroups-tcp" port="7600"/>
        <socket-binding name="jgroups-tcp-fd" port="57600"/>
        <socket-binding name="jgroups-udp" port="55200" multicast-address="${jboss.default.multicast.address:234.99.54.14}" multicast-port="45688"/>
        <socket-binding name="jgroups-udp-fd" port="54200"/>
        <socket-binding name="memcached" port="11211"/>
        <socket-binding name="rest" port="8080"/>
        <socket-binding name="rest-multi-tenancy" port="8081"/>
        <socket-binding name="rest-ssl" port="8443"/>
        <socket-binding name="txn-recovery-environment" port="4712"/>
        <socket-binding name="txn-status-manager" port="4713"/>
        <outbound-socket-binding name="remote-store-hotrod-server">
            <remote-destination host="remote-host" port="11222"/>
        </outbound-socket-binding>
        <outbound-socket-binding name="remote-store-rest-server">
            <remote-destination host="remote-host" port="8080"/>
        </outbound-socket-binding>
    </socket-binding-group>
2.启动
standalone.bat -c=clustered1.xml -Djboss.node.name=server1

standalone.bat -c=clustered2.xml -Djboss.node.name=server2
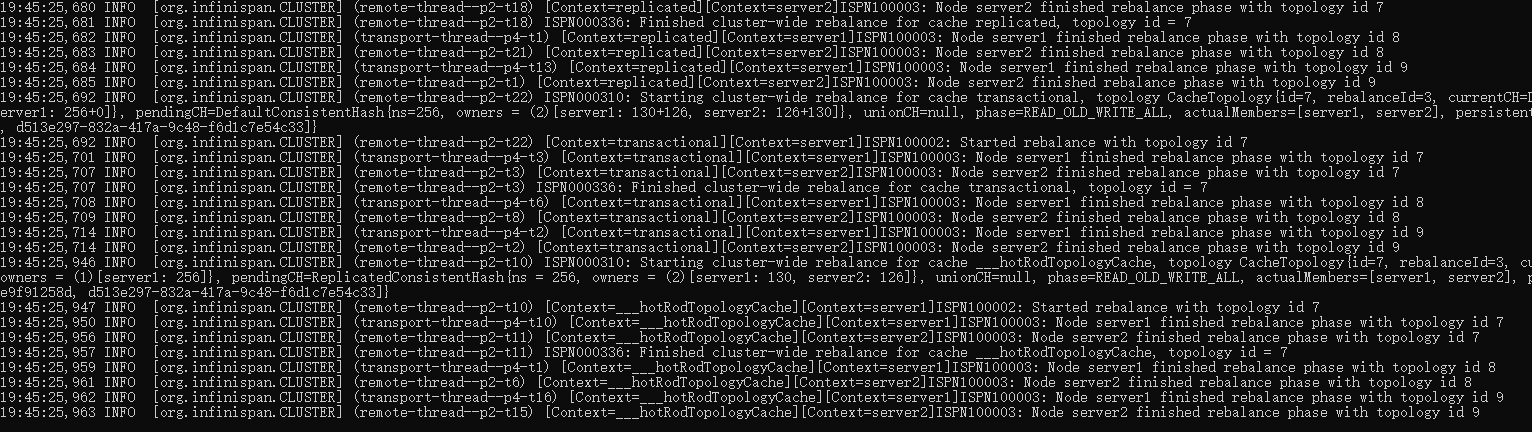
从日志中可以看到server2的加入,并进行数据的rebalance.
3.监控和操作
- CLI操作
可以通过bin/cli.sh或者cli.bat进行直接对缓存的读取。windows环境中基本命令如下
[disconnected /] connect 127.0.0.1:9990
[standalone@127.0.0.1:9990 /] container clustered
[standalone@127.0.0.1:9990 cache-container=clustered] cache
ISPN019029: No cache selected yet
[standalone@127.0.0.1:9990 cache-container=clustered] cache default
[standalone@127.0.0.1:9990 distributed-cache=default] cache
default
[standalone@127.0.0.1:9990 distributed-cache=default] put 1 ericnie
[standalone@127.0.0.1:9990 distributed-cache=default] get 1
ericnie
container的值,可以从cluster.xml的配置中找到,截取一段,cache值也是一样,缺省为default.
<subsystem xmlns="urn:infinispan:server:core:8.5" default-cache-container="clustered">
            <cache-container name="clustered" default-cache="default" statistics="true">
                <transport lock-timeout="60000"/>
                <global-state/>
                <distributed-cache-configuration name="transactional">
                    <transaction mode="NON_XA" locking="PESSIMISTIC"/>
                </distributed-cache-configuration>
                <distributed-cache-configuration name="async" mode="ASYNC"/>
                <replicated-cache-configuration name="replicated"/>
                <distributed-cache-configuration name="persistent-file-store">
                    <file-store shared="false" fetch-state="true" passivation="false"/>
                </distributed-cache-configuration>
                <distributed-cache-configuration name="indexed">
                    <indexing index="LOCAL" auto-config="true"/>
                </distributed-cache-configuration>
- 监控层面
惊闻Jboss ON要end of life,以后更多需要走prometheus或者openshift容器化的监控手段了,所以果断来个最基本的jmx监控。
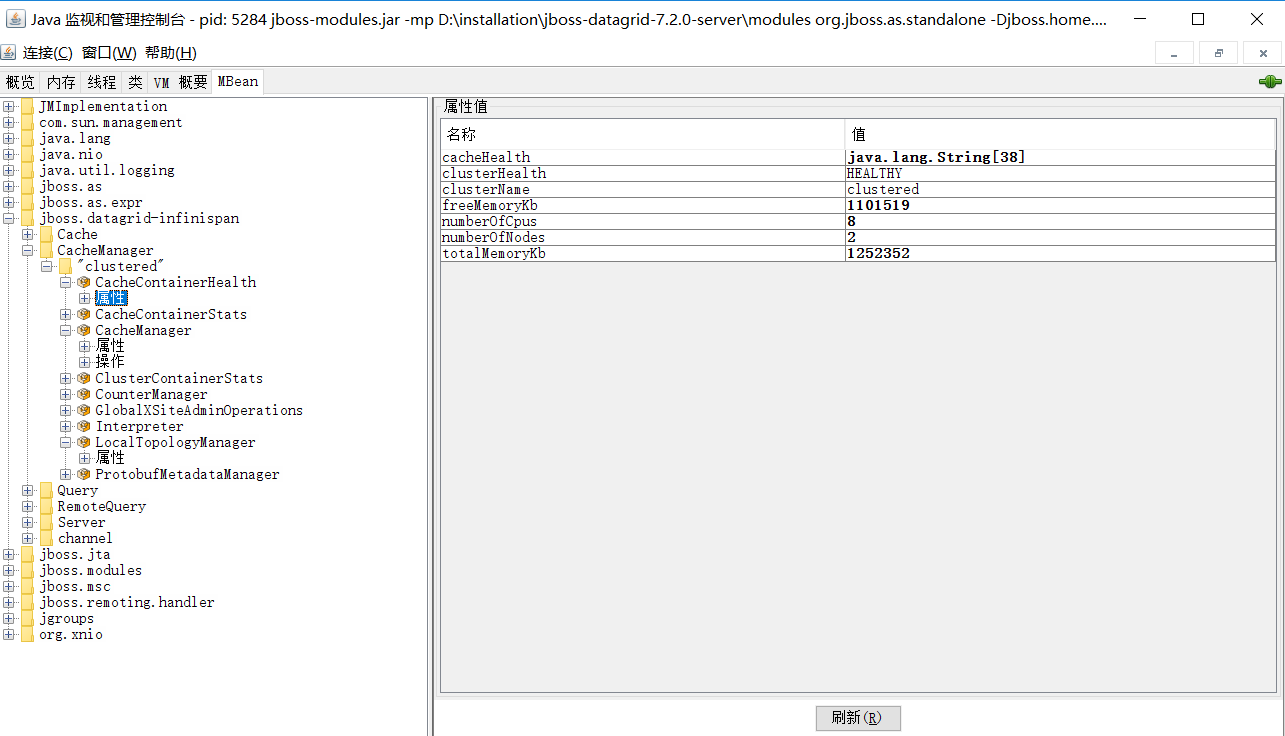
启动jconsole, 基于jmx连接本地或者远程端口(9990),在MBean中找到jboss.datagrid-infinispan
- 查看集群属性,CacheManager->clustered
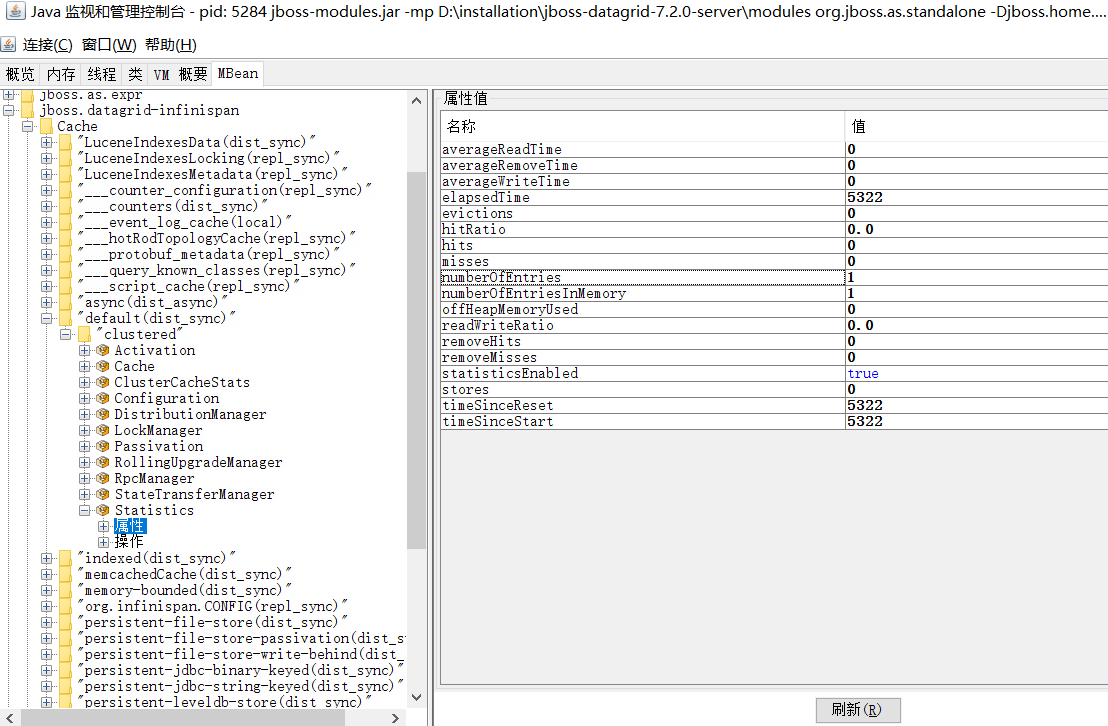
- 查看Cache Entry
4.客户端访问
在tomcat的webapp下建立一个项目jdg,然后建立WEB-INF,在lib下面把之前的jar包拷入。
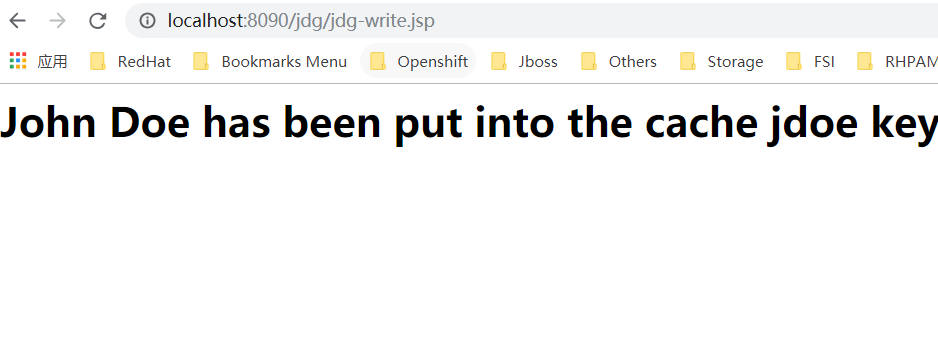
写一段客户端访问代码.
<%@ page language="java" import="java.util.*" pageEncoding="gbk"%>
<%@ page import="org.infinispan.client.hotrod.RemoteCache,org.infinispan.client.hotrod.RemoteCacheManager,org.infinispan.client.hotrod.configuration.ConfigurationBuilder,com.redhat.lab.jdg.*,java.utils.*" %>
<html>
  <head>
    <title>My JSP starting page</title>
  </head>

  <body>
    <h1>

     <%
       try {
              ConfigurationBuilder builder = new ConfigurationBuilder();
                  builder.addServer().host("127.0.0.1")
                   .port(Integer.parseInt("11322"));
                  RemoteCacheManager  cacheManager = new RemoteCacheManager(builder.build());
                  RemoteCache<String, User> cache = cacheManager.getCache();


                    User user = new User();
                    user.setFirstName("John");
                    user.setLastName("Doe");
                    cache.put("jdoe", user);
                    System.out.println("John Doe has been put into the cache");
                    out.println("John Doe has been put into the cache");


                    if (cache.containsKey("jdoe")) {
                            System.out.println("jdoe key is indeed in the cache");
                            out.println("jdoe key is indeed in the cache");
                    }

                    if (cache.containsKey("jane")) {
                            System.out.println("jane key is indeed in the cache");
                            out.println("jane key is indeed in the cache");
                    }

                    user = cache.get("jdoe");
                    System.out.println("jdoe's firstname is " +
                    user.getFirstName());

                    out.println("jdoe's firstname is " +
                    user.getFirstName());


        } catch (Exception e) {
            e.printStackTrace();
    }


     %>
    </h1>
  </body>
</html>
然后是各种验证
5.OpenShift部署
首先找到官方镜像地址
https://github.com/openshift/library/tree/master/official/datagrid
打开imagestreams/jboss-datagrid72-openshift-rhel7.json,然后pull到本地
docker pull registry.redhat.io/jboss-datagrid-7/datagrid72-openshift:1.2
pull前先用docker login登录网站redhat.io(3.11的新特征 :()
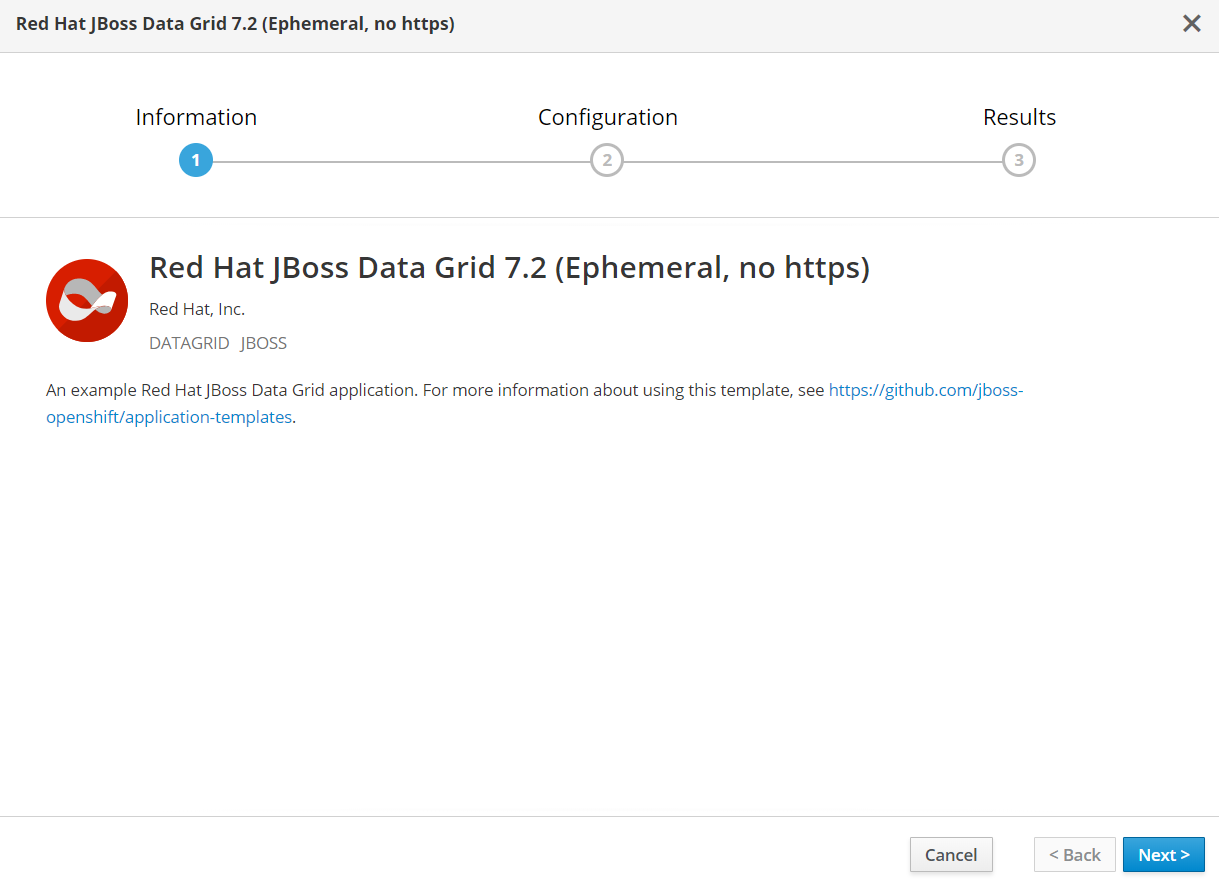
然后查看Service catalog

咱们就来搞这个7.2的Ephemeral, no https了
oc get templates -n openshift

.....
datagrid72-basic                                    An example Red Hat JBoss Data Grid application. For more information about us...   17 (11 blank)     6

........

然后修改镜像地址
oc edit template datagrid72-basic -n openshift
切换到openshift命名空间,导入ImageStream
oc project openshift

oc import-image datagrid72-openshift:1.2   --from=registry.example.com/jboss-datagrid-7/datagrid72-openshift:1.2  --insecure --confirm
一切就绪,开始建立
输入一个Cache名,然后创建.

创建完成
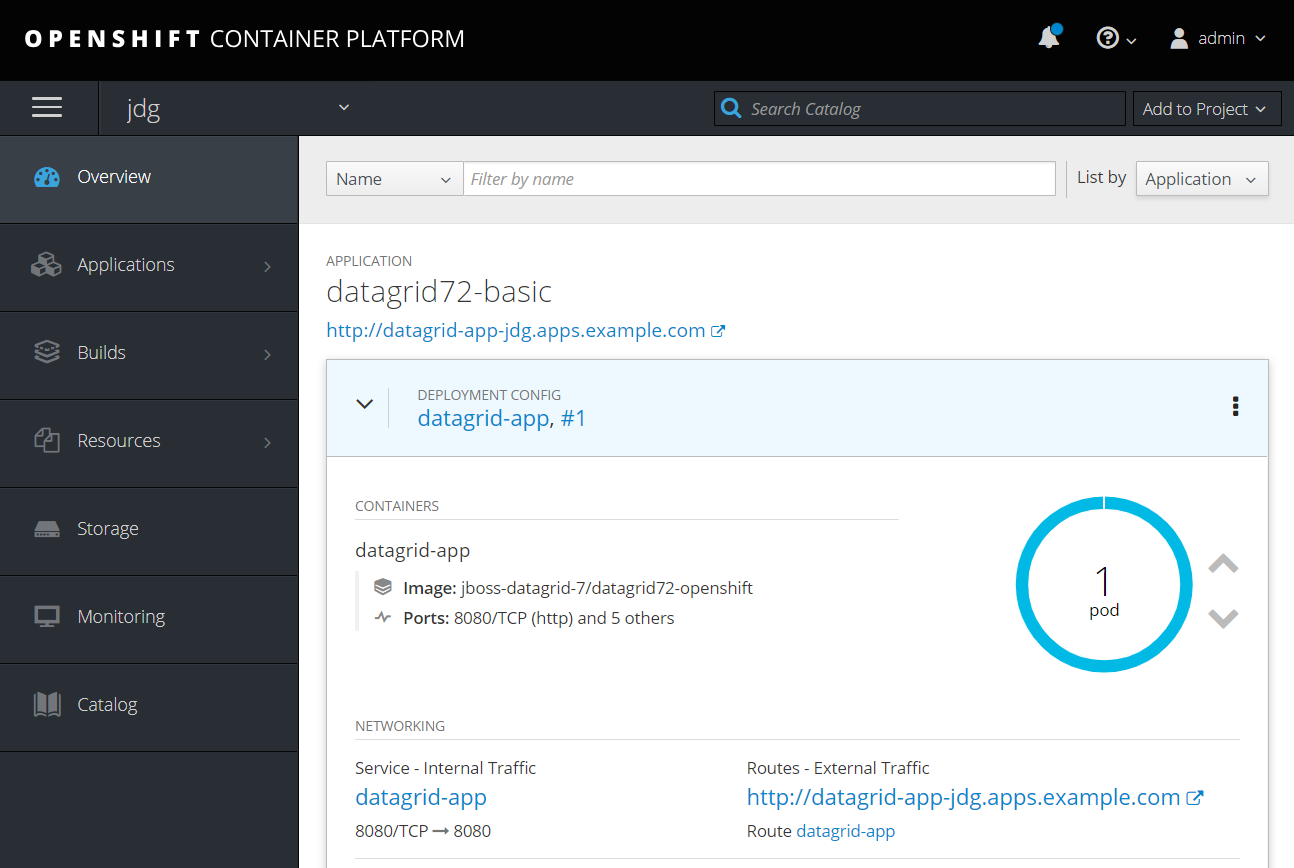
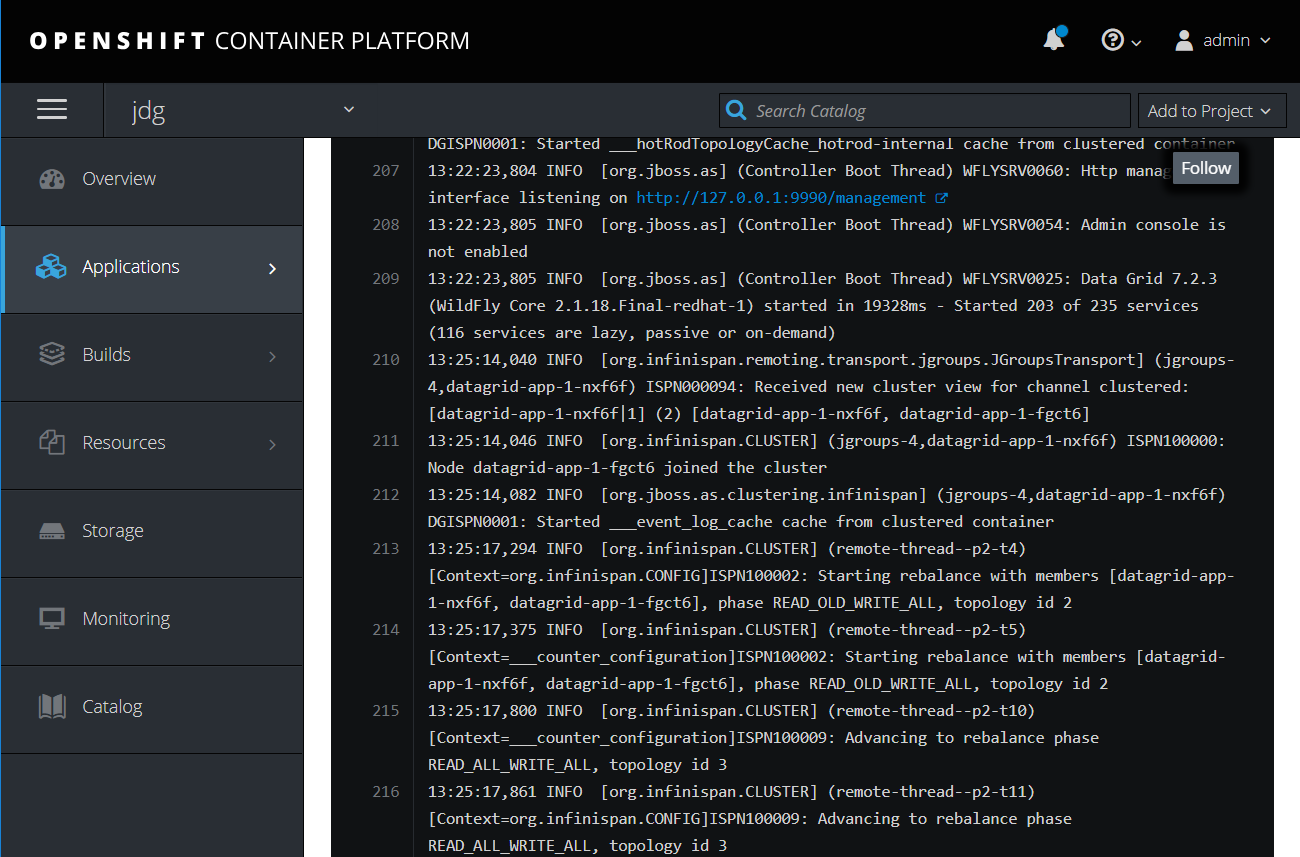
Scale Pod,然后检查Pod日志,可见新的pod已经加入集群。
6.OpenShift环境中的验证
Openshift环境中JDG提供了访问的三种模式
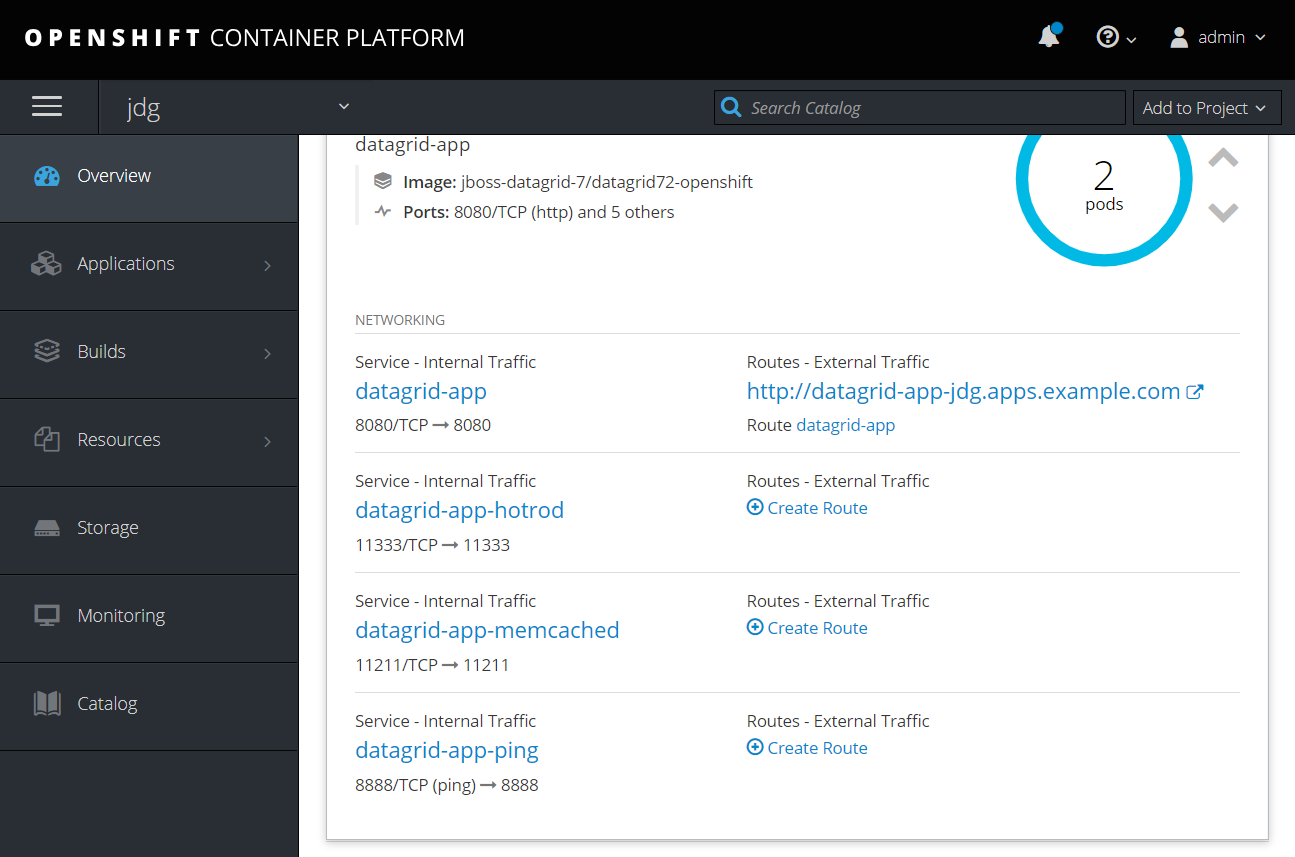
- memcached, 基于memcache协议
- hotrod,基于TCP,适合Client Server
- Rest(对应datagrid-app),适合基于http协议,因此暴露对外路由。
原本想法是,修改hotrod,加入nodePort,然后通过OpenShift外面的tomcat或Java Client进行访问,但尝试了一下,发现不行,
Client端会直接找JDG Pod的实际地址建立连接,然后发现无法访问。因此需要将tomcat部署到OpenShift内部进行尝试。
- 在同一项目中访问,修改jsp代码为
                ConfigurationBuilder builder = new ConfigurationBuilder();
                                builder.addServer().host(System.getenv("DATAGRID_APP_HOTROD_SERVICE_HOST"))
                                .port(Integer.parseInt(System.getenv("DATAGRID_APP_HOTROD_SERVICE_PORT"));
                                RemoteCacheManager  cacheManager = new RemoteCacheManager(builder.build());
这里hotrod的地址是通过存放在tomcat pod中的环境变量DATAGRID_APP_HOTROD_SERVICE_HOST已及ATAGRID_APP_HOTROD_SERVICE_PORT获取
访问成功。
- 不同项目中访问,需要在java代码中根据服务名获取服务地址。
不同的项目访问,在pod的环境变量中不会有其他项目的环境变量,因此需要根据服务名获取服务地址,核心代码为
                        InetAddress address = InetAddress.getByName("datagrid-app-hotrod.jdg");
        System.out.println(address.getHostAddress());


                ConfigurationBuilder builder = new ConfigurationBuilder();
                                builder.addServer().host(address.getHostAddress())
                                .port(Integer.parseInt("11333"));
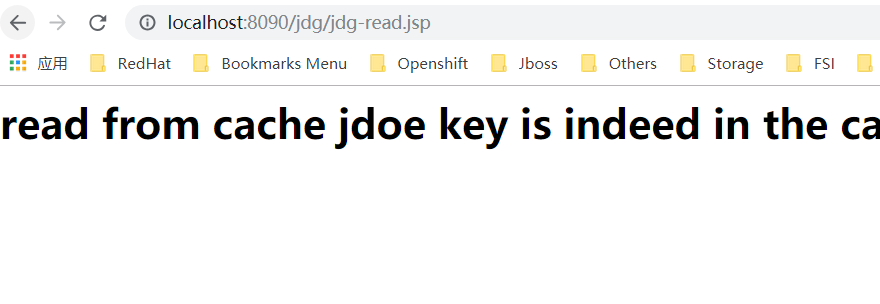
访问hotrod的地址,通过InetAddress.getByName("datagrid-app-hotrod.jdg"),带上服务名以及项目名获取。验证无误。
贴一个jdg-write.jsp的完整代码:
<%@ page language="java" import="java.util.*" pageEncoding="gbk"%>
<%@ page import="org.infinispan.client.hotrod.RemoteCache,org.infinispan.client.hotrod.RemoteCacheManager,org.infinispan.client.hotrod.configuration.ConfigurationBuilder,com.redhat.lab.jdg.*,java.net.*,java.utils.*" %>
<html>
  <head>
    <title>My JSP starting page</title>
  </head>

  <body>
    <h1>

     <%
       try {

                        InetAddress address = InetAddress.getByName("datagrid-app-hotrod.jdg");
        System.out.println(address.getHostAddress());


                ConfigurationBuilder builder = new ConfigurationBuilder();
                                builder.addServer().host(address.getHostAddress())
                                .port(Integer.parseInt("11333"));
                                RemoteCacheManager  cacheManager = new RemoteCacheManager(builder.build());


                RemoteCache<String, User> cache = cacheManager.getCache("samples");

                                        User user = new User();
                                        user.setFirstName("John");
                                        user.setLastName("Doe");
                                        cache.put("jdoe", user);
                                        System.out.println("John Doe has been put into the cache");
                                        out.println("John Doe has been put into the cache");


                                        if (cache.containsKey("jdoe")) {
                                                        System.out.println("jdoe key is indeed in the cache");
                                                        out.println("jdoe key is indeed in the cache");
                                        }

                                        if (cache.containsKey("jane")) {
                                                        System.out.println("jane key is indeed in the cache");
                                                        out.println("jane key is indeed in the cache");
                                        }

                                        user = cache.get("jdoe");
                                        System.out.println("jdoe's firstname is " +
                                        user.getFirstName());

                                        out.println("jdoe's firstname is " +
                                        user.getFirstName());


                } catch (Exception e) {
            e.printStackTrace();
    }


     %>
    </h1>
  </body>
</html>
调试到了第11个版本终于解决了各种低级错误,成功运行,反复调试修改后主要执行的三个命令记录如下
docker build -t registry.example.com/jdg/tomcatsample:v1 .

docker push registry.example.com/jdg/tomcatsample:v1

oc import-image tomcatsample:v1   --from=registry.example.com/jdg/tomcatsample:v1  --insecure --confirm
然后就依赖于Deployconfig的根据镜像变化从而触发Pod更新的trigger了。
形成客户端镜像的Tomcat 的Dockerfile
[root@master client]# cat Dockerfile
FROM registry.example.com/tomcat:8-slim

RUN mkdir -p /usr/local/tomcat/webapps/jdg
COPY samples/jdg/* /usr/local/tomcat/webapps/jdg/


USER root

RUN unzip -d /usr/local/tomcat/webapps/jdg/ /usr/local/tomcat/webapps/jdg/WEB-INF.zip

CMD [ "/usr/local/tomcat/bin/catalina.sh","run" ]

 浙公网安备 33010602011771号