

vue- 脚手架和组件
5.脚手架
基于vue+vue-router单文件开发,可以完成小规模的页面的开发,但如果项目大+组件多+依赖多,开发起来就非常不方便。
此时,脚手架 vue cli (vue cli - Vue Command Line Interface )是一个基于 Vue.js 进行快速开发的完整系统。
官方的说法:
Vue CLI 致力于将 Vue 生态中的工具基础标准化。它确保了各种构建工具能够基于智能的默认配置即可平稳衔接,这样你可以专注在撰写应用上,而不必花好几天去纠结配置的问题。
通俗的说法:
他帮助我们构内置了很多组件来帮助我们更便捷的的开发vue.js项目。
-
第一步:想用脚手架 得安装node.js
Vue CLI 4.x+ 需要 Node.js v8.9 或更高版本 (推荐 v10 以上)。
https://nodejs.org/en/download/![]()
=======如果想要更新node.js的版本=======
1.先查看本机node.js版本:
node -v
2.清除node.js的cache:
sudo npm cache clean -f
3.安装 n 工具,这个工具是专门用来管理node.js版本的,别怀疑这个工具的名字,是他是他就是他,他的名字就是 "n"
sudo npm install -g n
4.安装最新版本的node.js
sudo n stable
5.再次查看本机的node.js版本:
node -v -
第二步:关于npm(node.js是一门变成语言 类似于python)
安装上node之后,自带了npm包管理工具,类似于Python中的pip。
如果想要更新npm到最新版,可以执行命令:
sudo npm install npm@latest -g![]()
-
第三步:npm淘宝源,以后基于npm安装包就会快了(相当于豆瓣的pip源)
npm config set registry https://registry.npm.taobao.org -
第四步:全局安装脚手架 vue-cli
# 安装(最新版)
sudo npm install -g @vue/cli
# 安装(指定版本)
sudo npm install -g @vue/cli@4.5.14
# 卸载
sudo npm uninstall -g @vue/cli![]()


cd /Users/wupeiqi/WebstormProjects // 打开终端 进入需要存放项目的文件
vue create mysite // 执行命令 项目名mysite
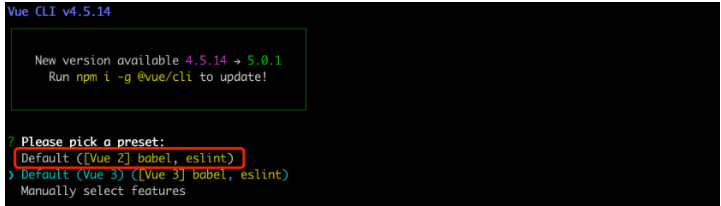
提示:babel是一个将ES6语法转化成ES5的工具,eslint是做语法检查。

a few moments later...
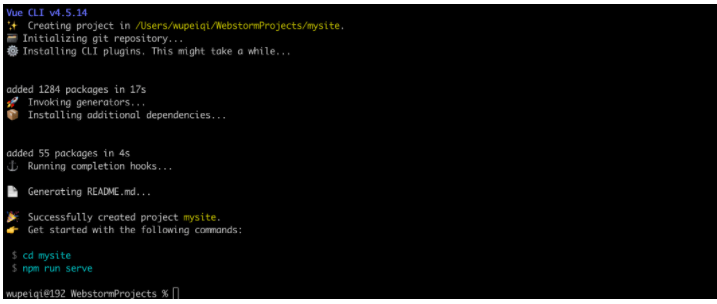
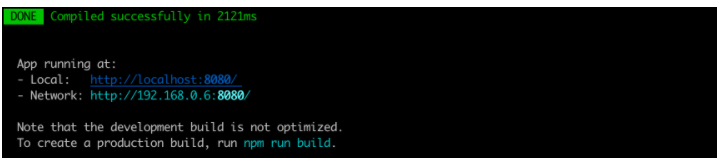
按照提示执行如下命令,脚手架就会给我们大家一个Web服务去运行编写的vue项目(便于开发测试)。
cd mysite
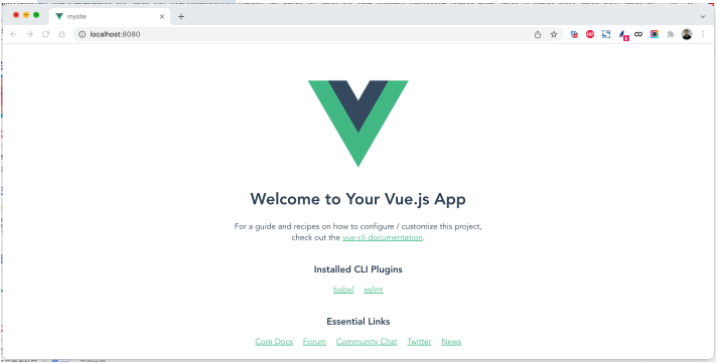
npm run serve
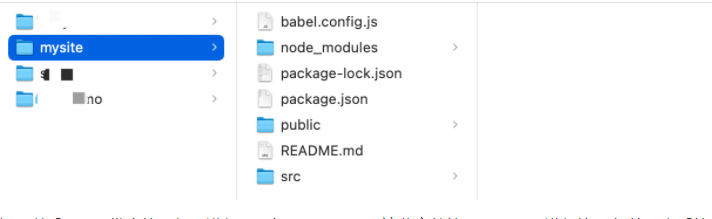
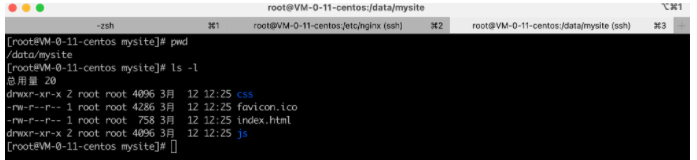
项目创建完,脚手架会默认会生成如下文件(包含项目依赖、配置文件、默认代码)。
如果以后项目开发完毕,想要进行项目部署,是不需要这些文件的,需要npm进行编译 把编译之后的东西放到服务器上
执行命令:
cd 项目目录
npm run build  // 编译当前项目
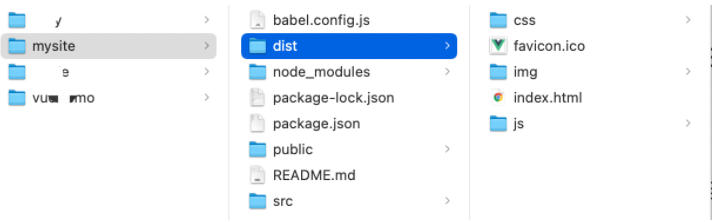
build会将项目中的依赖和代码自动编译成HTML、CSS、JavaScript代码,后续只需要将此代码上传至服务器部署即可。


 1 脚手架本地开发的文件
 2
 3 ```
 4 - babel.config.js      babel是ES6转换ES5的组件,这是他所需的配置文件(一般不需要动)。
 5 - package.json         项目所需的包的版本信息。
 6 - package-lock.json    保存项目所需的包细节以及包的依赖等信息。
 7 - node-modules         项目安装依赖包的文件保存的地方。例如:npm install axios
 8                        axios包会保存在此目录、信息也会写在 package.json、package-lock.json中
 9 - src
10     - main.js          项目的启动 npm run serve ,用户访问时程序的入门。
11     - App.vue           主组件(老父亲 由他来调用其他组件的 )
12     - components       子组件(以后写的组件都写在这里)
13     - assets           静态文件(自己的静态文件,会被压缩和合并)
14 - public              【此目录下的文件直接被复制到dist/目录下,一般放不动的数据,引入第三方】
15     - index.html       主HTML文件(模板引擎)
16     - favicon.icon     图标
17 - README.md            项目说明文档
18 ```
19
20 ```
21 cd 项目
22 npm install  // 联合开发时候 只需要下载下来就可以开发别人的代码
23 ```
24
25 本质上,其实就是将原来的代码做了拆分来进行开发,开发完毕之后再编译整合起来。
26
27 ```html
28 <!DOCTYPE html>
29 <html lang="en">
30 <head>
31     <meta charset="UTF-8">
32     <title>Title</title>
33     <script src="https://cdn.jsdelivr.net/npm/vue@2/dist/vue.js"></script>
34 </head>
35 <body>
36
37 <div id="app">
38     <h1>欢迎学习Vue.js</h1>
39     <div>我叫{{name}},微信{{wechat}}</div>
40 </div>
41
42 <script>
43
44
45     var app = new Vue({
46         el: '#app',
47         data: {
48             name: '武沛齐',
49             wechat: 'wupeiqi888'
50         },
51         methods: {
52             clickMe: function () {
53                 this.name = "alex";
54                 this.wechat = "wupeiqi666";
55             }
56         }
57     })
58 </script>
59 </body>
60 </html>
61 ```
需要安装两个组件在脚手架里
Axios是一个基于 promise 的 HTTP 库,简单的讲就是可以发送get、post请求。
安装:

```
cd 项目目录
npm install axios
npm install vue-axios
```

导入 (main.js):

```
main.js

import Vue from 'vue'
import axios from 'axios'
import VueAxios from 'vue-axios'

Vue.use(VueAxios, axios) // 这两个东西挂载到vue对象里
```

使用:

```
Vue.axios.get(api).then((response) => {
  console.log(response.data)
})
// 或
this.axios.get(api).then((response) => { // this 就是当前vue对象
  console.log(response.data)
})
// 或
this.$http.get(api).then((response) => {
  console.log(response.data)
})
```
 1 安装:
 2
 3 ```
 4 cd 项目目录
 5 npm install vue-router@3 //vue2的项目建议用vue-router@3
 6 ```
 7
 8 引入:(components组件都写在这里router路由都写到这里)
 9
10 ```javascript
11 // router/index.js
12
13 // 第一步
14 import Vue from 'vue'
15 import VueRouter from 'vue-router'
16
17
18 import Home from '../components/Home' // 导入组件
19
20
21 Vue.use(VueRouter) // 让VueRouter挂载到vue对象里
22
23 // 第二步编写路由对象
24 const router = new VueRouter({
25     routes: [
26         {
27             path: '/home',
28             name: "Home",
29             component: Home //组件
30         },
31     ]
32 })
33 // 第三步 导出 外部就可以引入router对象了
34 export default router
35 ```
36
37 ```javascript
38 // main.js
39 import Vue from 'vue'
40 import axios from 'axios'
41 import VueAxios from 'vue-axios'
42
43
44 import App from './App.vue' // 引入App.vue组件
45
46 // 第四步 导入router文件(加载了router生成了对象)
47 import router from "./router"
48
49
50 Vue.use(VueAxios, axios)
51
52 Vue.config.productionTip = true
53
54
55 new Vue({ // 实例化对象
56     // 第五步
57     router: router,// router对象放在这里
58     render: h => h(App), // 用来做渲染的 render里返回的是什么 页面上就是什么 App是个组件
59 }).$mount('#app')//$mount进行挂载 也可以用 el:‘app’
60 ```
61
62 使用:App.vue(路由的切换 都写这里router-link  router-view)
63
64 ```
65 // 最后一步router-link  router-view  项目就可以运行起来了
66
67 <router-link to="/home">点我</router-link>
68 <router-view></router-view>
69 ```
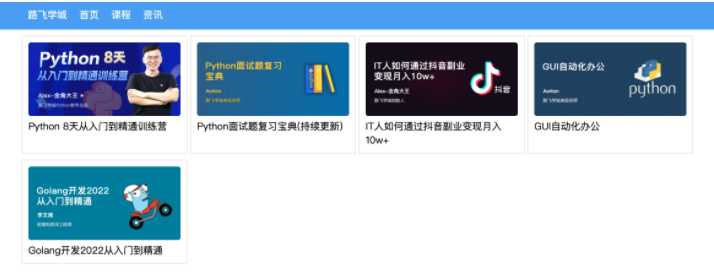
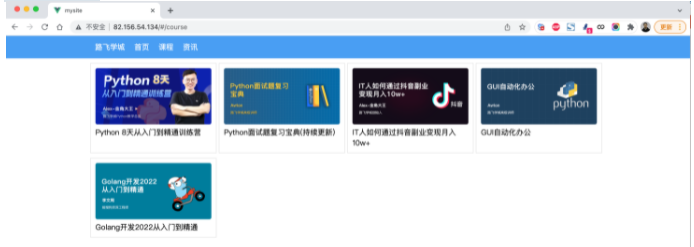
基于vue-cli快速开发:路飞学城(第一版)( 对照着没用脚手架的第一版)
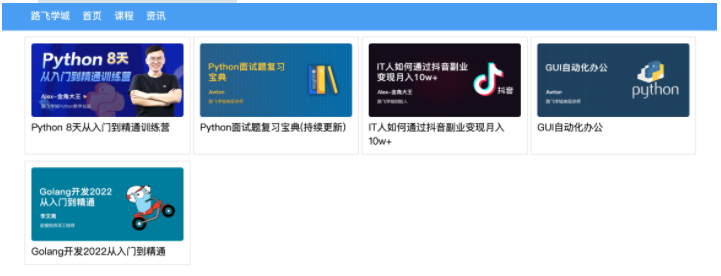
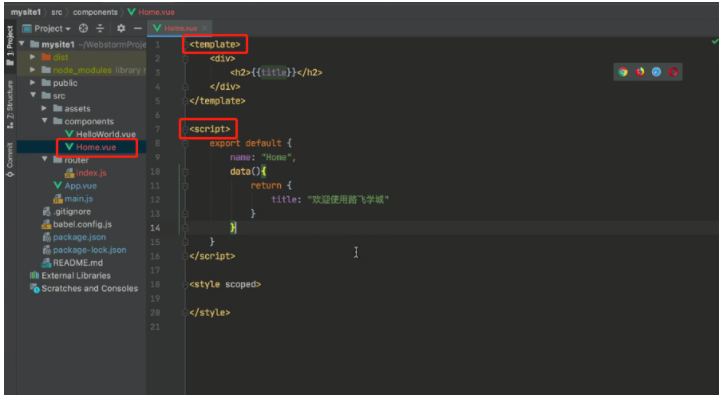
home组件:
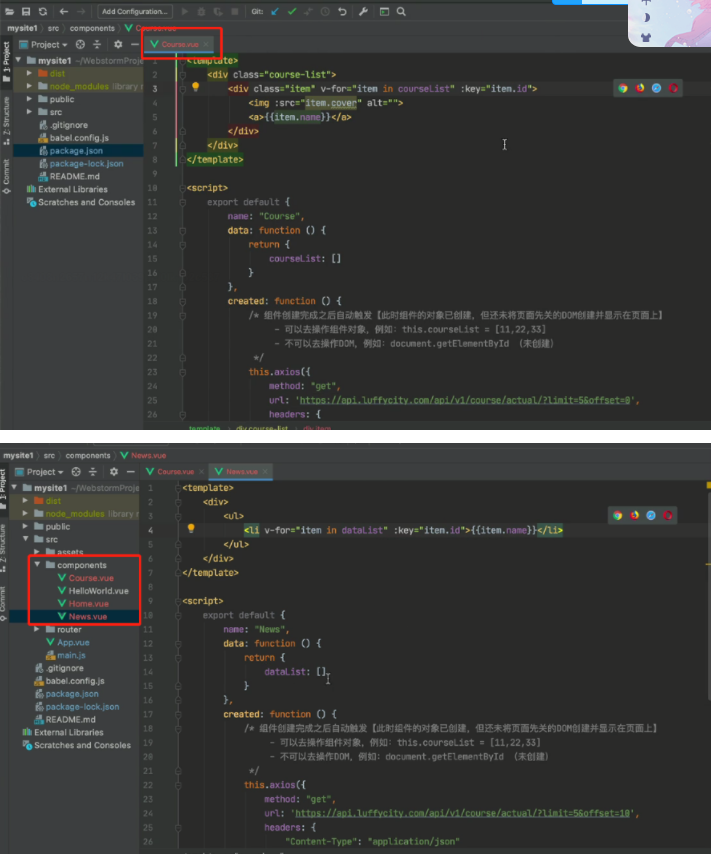
course组件:
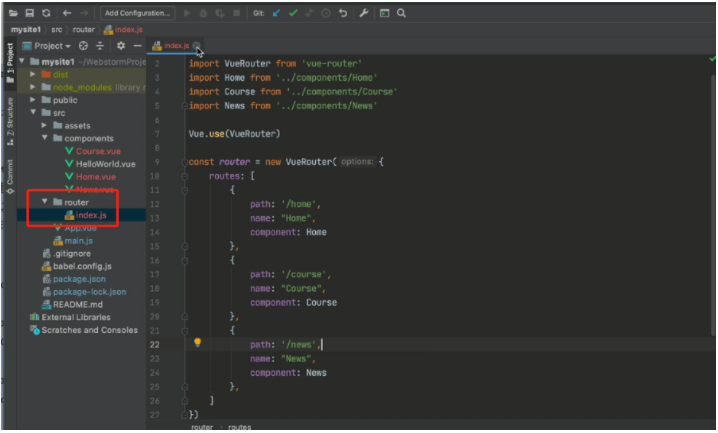
路由:
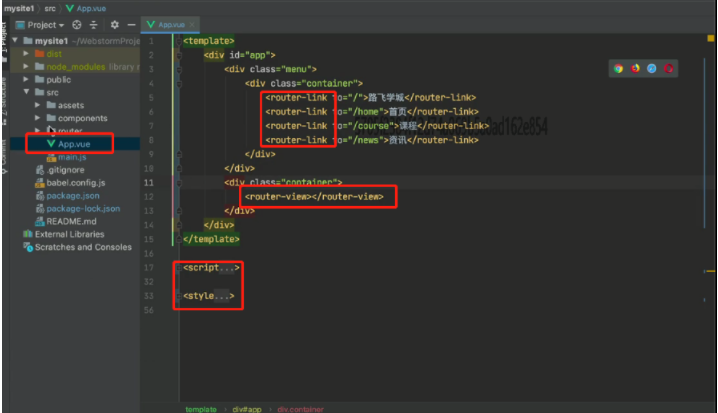
应用:
-
npm run build -
第二步:将编译后的代码dist文件上传到服务器(阿里云、腾讯云)
![]()
-
第三步:安装nginx + 配置 + 启动
yum install nginx
vim /etc/nginx/nginx.conf (修改配置)
 1 user nginx;
 2 worker_processes auto;
 3 error_log /var/log/nginx/error.log;
 4 pid /run/nginx.pid;
 5
 6 # Load dynamic modules. See /usr/share/doc/nginx/README.dynamic.
 7 include /usr/share/nginx/modules/*.conf;
 8
 9 events {
10     worker_connections 1024;
11 }
12
13 http {
14     log_format  main  '$remote_addr - $remote_user [$time_local] "$request" '
15                       '$status $body_bytes_sent "$http_referer" '
16                       '"$http_user_agent" "$http_x_forwarded_for"';
17
18     access_log  /var/log/nginx/access.log  main;
19
20     sendfile            on;
21     tcp_nopush          on;
22     tcp_nodelay         on;
23     keepalive_timeout   65;
24     types_hash_max_size 4096;
25
26     include             /etc/nginx/mime.types;
27     default_type        application/octet-stream;
28
29     include /etc/nginx/conf.d/*.conf;
30
31     server {
32         listen       80;
33         listen       [::]:80;
34         server_name  _;
35         # 项目目录 修改的地方
36         root         /data/mysite;
37
38         # Load configuration files for the default server block.
39         include /etc/nginx/default.d/*.conf;
40
41         error_page 404 /404.html;
42         location = /404.html {
43         }
44
45         error_page 500 502 503 504 /50x.html;
46         location = /50x.html {
47         }
48     }
49
50
51 }
服务器上启动命令

>>>systemctl start nginx
第四步:访问
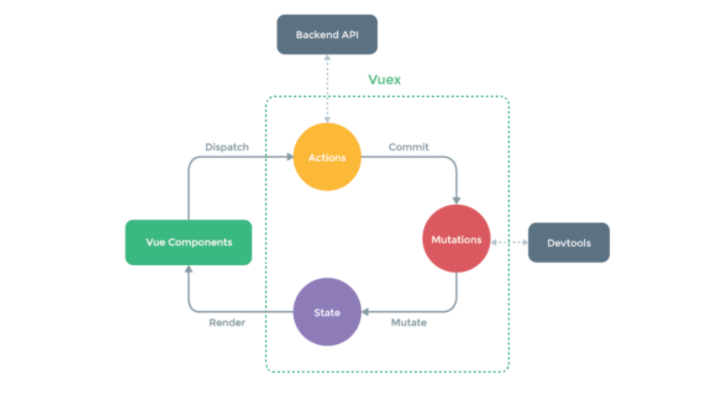
6.vuex
https://next.vuex.vuejs.org/zh/index.html
Vuex 是一个专为 Vue.js 应用程序开发的 状态管理模式 store。它采用集中式存储管理应用的所有组件的状态,并以相应的规则保证状态,以一种可预测的方式发生变化。
Vuex 的思想
当我们在页面上点击一个按钮,它会处发(dispatch)一个action, action 随后会执行(commit)一个mutation, mutation 立即会改变state, state 改变以后,我们的页面会state 获取数据,页面发生了变化。
Store 对象,包含了我们谈到的所有内容,action, state, mutation,所以是核心了
vuex的使用:
初始化store.js
import Vue from "vue";
import Vuex from "vuex";

Vue.use(Vuex)
// 实例化一个vuex存储库
const store = new Vuex.Store({
    state: {// 数据存储位置,相当于组件中的data
        test: 'x'
    },
    mutations: {// 操作数据的方法,相当于methods
        changetest(state, xxx) {
            state.test = xxx
        }
    },
    actions: {
        changetest(context, xxx) {
            context.commit('changetest', xxx)
        }
    },
  getters: {
      test2: state => state.test
  }
})
export default store;
state:相当于Vue的data state为单一状态树,在state中需要定义我们所需要管理的数组、对象、字符串等等,只有在这里定义了,在vue.js的组件中才能获取你定义的这个对象的状态。
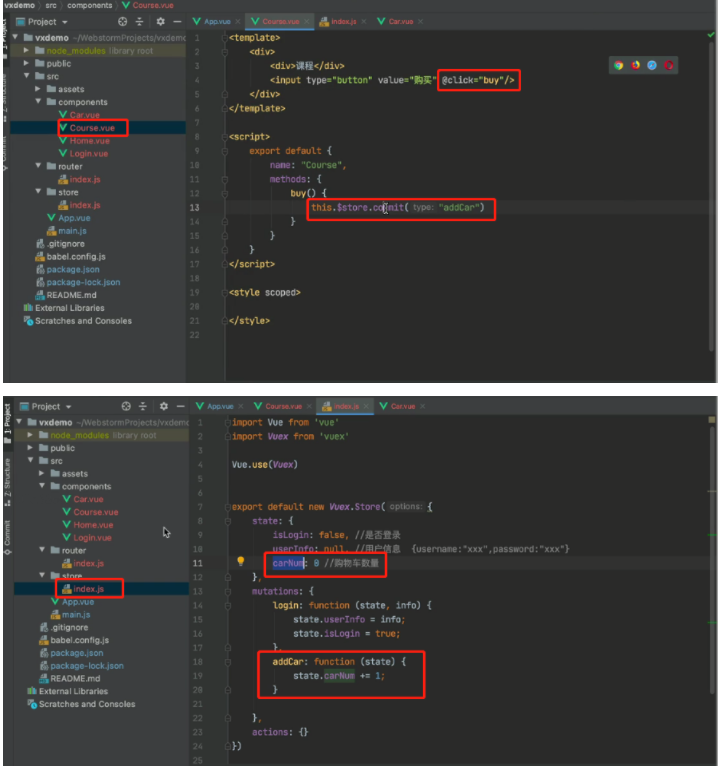
mutations:类似于事件,每个 mutation 都有一个字符串的事件类型 (type)和 一个回调函数 (handler)。这个回调函数就是我们实际进行状态更改的地方,并且它会接受 state 作为第一个参数
更改store中state状态的唯一方法就是提交mutation,就很类似事件。每个mutation都有一个字符串类型的事件类型和一个回调函数,我们需要改变state的值就要在回调函数中改变。我们要执行这个回调函数,那么我们需要执行一个相应的调用方法:store.commit。
actions: Action 类似于 mutation,不同在于Action 提交的是 mutation,而不是直接变更状态,Action 可以包含任意异步操作
action可以提交mutation,在action中可以执行store.commit,而且action中可以有任何的异步操作。
getters:可以认为是 store 的计算属性,就像计算属性一样,getter 的返回值会根据它的依赖被缓存起来,且只有当它的依赖值发生了改变才会被重新计算,接受 state 作为其第一个参数
好了,就这么简单可以用了
使用Vuex
打开main.js,导入,然后用
import Vue from "vue";
import App from "./App.vue";
import store from "./store";

new Vue({
    store,
    render: h => h(App)
}).$mount("#app");
好了,你可以在所有App所有子组件里面使用Vuex了
如何使用 state
子组件能通过 this.$store 访问到
this.$store.state.test
// x
如何使用 mutations
子组件能通过 this.$store.commit 访问到
this.$store.commit('changetest',xxx)
它会去把 changetest 提交到 mutation 执行 ,第二个是载荷(可以理解为参数),大多数载荷应该是一个对象,这样可以包含多个字段并且记录的 mutation 会更易读
如何使用 actions
子组件能通过 this.$store.dispatch 访问到
this.$store.dispatch('changetest'xxx)
它会去把 changetest 分发到 actions 在通过 actions 提交到 mutation 执行
如何使用 getters
子组件能通过 this.$store.getters 访问到
this.$store.getters.test2
//x
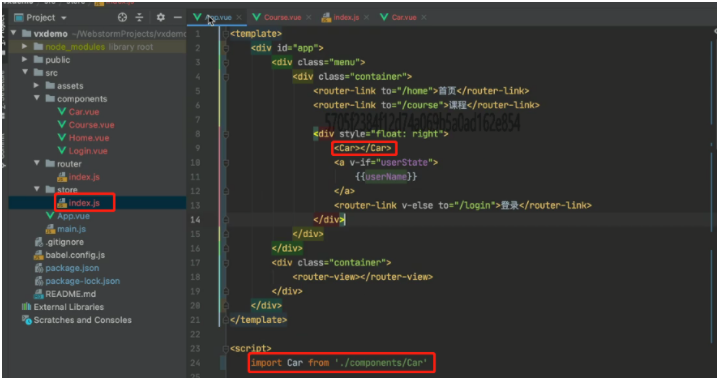
说人话:将组件中需要共享的数据交给vuex来帮我们进行管理,例如:用户登录状态、加入购物车。
###

```
vue create vxdemo  // 创建项目vxdemo
```

```
npm install vue-router@3 // 需要路由 所以装vue-router
```

```
npm install vuex@3 // 状态管理 用户登录成功后 改变登录的状态
```
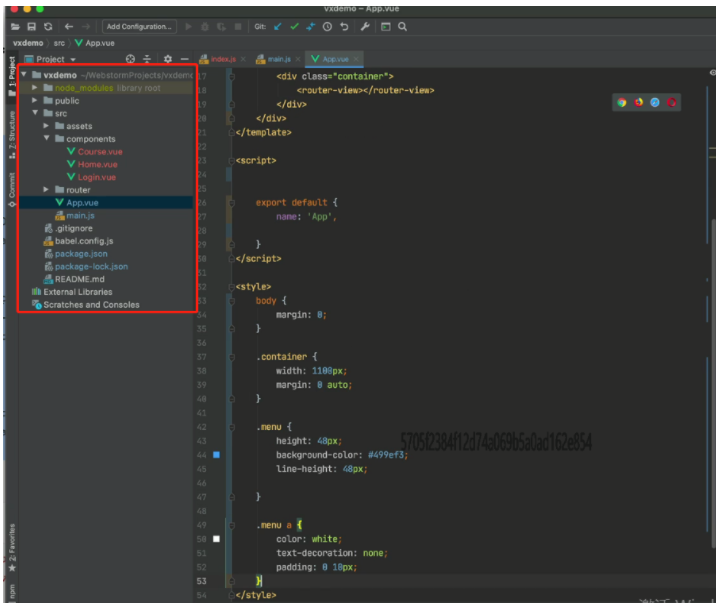
  1 - main.js
  2
  3   ```javascript
  4   import Vue from 'vue'
  5   import App from './App.vue'
  6   import router from "./router"
  7   import store from "./store"
  8
  9   Vue.config.productionTip = false
 10
 11   new Vue({
 12       router: router,
 13       store: store,
 14       render: h => h(App),
 15   }).$mount('#app')
 16   ```
 17
 18 - App.vue
 19
 20   ```vue
 21   <template>
 22       <div id="app">
 23           <div class="menu">
 24               <div class="container">
 25                   <router-link to="/home">首页</router-link>
 26                   <router-link to="/course">课程</router-link>
 27
 28                   <div style="float: right">
 29                       <a v-if="this.$store.state.isLogin"> // 如果state状态是True
 30                           {{this.$store.state.userInfo.username}} //显示用户名
 31                       </a>
 32                       <router-link v-else to="/login">登录</router-link>
 33
 34                   </div>
 35               </div>
 36           </div>
 37           <div class="container">
 38               <router-view></router-view>
 39           </div>
 40       </div>
 41   </template>
 42   <script>
 43       export default {
 44           name: 'App',
 45           data() {
 46               return {}
 47           },
 48           components: {},
 49       }
 50   </script>
 51
 52   <style>
 53       body {
 54           margin: 0;
 55       }
 56       .container {
 57           width: 1100px;
 58           margin: 0 auto;
 59       }
 60       .menu {
 61           height: 48px;
 62           background-color: #499ef3;
 63           line-height: 48px;
 64
 65       }
 66       .menu a {
 67           color: white;
 68           text-decoration: none;
 69           padding: 0 10px;
 70       }
 71   </style>
 72   ```
 73
 74 - store/index.js(vuex代码相关逻辑)
 75
 76   ```javascript
 77   import Vue from 'vue'
 78   import Vuex from 'vuex'
 79
 80   Vue.use(Vuex)
 81
 82
 83   export default new Vuex.Store({ // 实例化对象并导出
 84       state: { // 存储的数据 状态 其他页面可以调用state
 85           isLogin: false, //是否登录
 86           userInfo: null //用户信息
 87       },
 88       mutations: { // 改状态  更改Vuex的store中的状态的唯一方法是提交mutation
 89           login: function (state, info) {
 90               state.userInfo = info; // info 是个对象里面有用户名和密码
 91               state.isLogin = true;
 92           },
 93
 94       },
 95       actions: {}
 96   })
 97
 98   ```
 99
100 - router/index.js
101
102   ```javascript
103   // router/index.js
104
105   import Vue from 'vue'
106   import VueRouter from 'vue-router'
107
108
109   import Home from '../components/Home'
110   import Course from '../components/Course'
111   import Login from '../components/Login'
112
113
114   Vue.use(VueRouter)
115
116   const router = new VueRouter({
117       routes: [
118           {
119               path: '/home',
120               name: "Home",
121               component: Home
122           },
123           {
124               path: '/course',
125               name: "Course",
126               component: Course
127           },
128           {
129               path: '/login',
130               name: "Login",
131               component: Login
132           },
133       ]
134   })
135
136   export default router
137   ```
138
139 - components/Login.vue
140
141   ```html
142   <template>
143       <div>
144           <input type="text" v-model="info.username" placeholder="用户名">
145           <input type="password" v-model="info.password" placeholder="密码">
146           <input type="button" value="登录" @click="doLogin"/>
147       </div>
148   </template>
149
150   <script>
151       export default {
152           name: "Login",
153           data() {
154               return {
155                   info: {
156                       username: "",
157                       password: ""
158                   }
159               }
160           },
161           methods: {
162               doLogin: function () {
163                   // 1.用户登录
164                   this.$store.commit('login', this.info);
165                   // 2.登录成功修改状态 跳转到home页面
166                   this.$router.push({name: 'Home'});
167               }
168           }
169       }
170   </script>
171
172   <style scoped>
173
174   </style>
175   ```
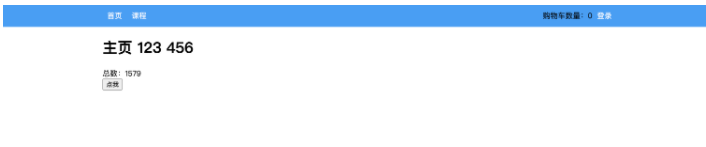
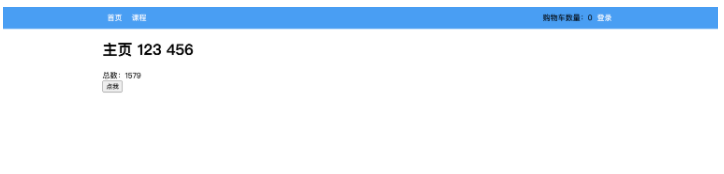
在vue的组件中有一个computed属性(计算属性),监听关联的数据,如果发生变化则重新计算并显示。
<template>
    <div>
        <h1>主页 {{v1}} {{ v2}}</h1> // 两个变量

        <div>总数:{{totalData}}</div> // 自动执行get方法 得到返回值
        <input type="button" value="点我" @click="addData"/>
    </div>
</template>

<script>
    export default {
        name: "Home",
        data() {
            return {
                v1: 123,// 声明两个变量
                v2: 456
            }
        },
        computed: {
            totalData: {
                get() { // 读取
                    let data = this.v1 + this.v2;
                    return data + 1000;
                },
                set(value) { // 设置
                    this.v1 = value;
                }
            }
        },
        methods: {
            addData() {
                this.totalData = 999;// totalData是计算属性 先执行set方法 把值放在value里 赋值的时候想怎么写怎么写 get也会相应变化
                // this.v2 = 1000; // 直接修改v2,get返回值肯定发生变化
            }
        }
    }
</script>

<style scoped>

</style>
所以,上述案例也可以用computed属性来实现,例如:App.vue改成:
 1 <template>
 2     <div id="app">
 3         <div class="menu">
 4             <div class="container">
 5                 <router-link to="/home">首页</router-link>
 6                 <router-link to="/course">课程</router-link>
 7
 8                 <div style="float: right">
 9                     <a v-if="userState"> // 通过计算属性实现
10                         {{userName}} // 通过计算属性实现
11                     </a>
12                     <router-link v-else to="/login">登录</router-link>
13
14                 </div>
15             </div>
16         </div>
17         <div class="container">
18             <router-view></router-view>
19         </div>
20     </div>
21 </template>
22
23 <script>
24
25     export default {
26         name: 'App',
27         data() {
28             return {}
29         },
30         computed: {// 计算属性
31             userState: { // 只读 没有赋值
32                 get() {
33                     return this.$store.state.isLogin;
34                 }
35             },
36             userName() {// 只有只读可以简写
37                 return this.$store.state.userInfo.username;
38             },
39
40         },
41         components: {},
42     }
43 </script>
44
45 <style>
46     body {
47         margin: 0;
48     }
49
50     .container {
51         width: 1100px;
52         margin: 0 auto;
53     }
54
55     .menu {
56         height: 48px;
57         background-color: #499ef3;
58         line-height: 48px;
59
60     }
61
62     .menu a {
63         color: white;
64         text-decoration: none;
65         padding: 0 10px;
66     }
67
68
69 </style>
6.3 案例:购物车
1、创建一个组件car、
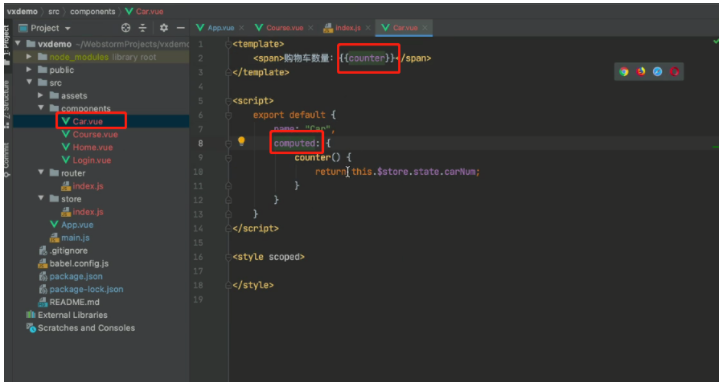
2、组件应用(固定的放在某个位置)
6.4 关于Action
Action 类似于 mutation,不同在于:
-
Action 提交的是 mutation,而不是直接变更状态。
-
Action 可以包含任意异步操作。
-
![]() View Code
View Code1 代码示例: 2 3 ```javascript 4 const store = createStore({ 5 state: { 6 count: 0 7 }, 8 mutations: { 9 increment (state) { 10 state.count+=1; //更新state状态 11 } 12 }, 13 actions: { // 一般没用 有异步操作就有用了 14 15 increment (context) { 16 // 触发mutations 17 context.commit('increment') 18 } 19 } 20 }) 21 ``` 22 23 在组件中如果要触发action,则应该执行: 24 25 ```javascript 26 this.$store.dispatch('increment') 27 ``` 28 29 30 31 这就有点像脱裤子放屁,意义何在呢? 当有异步操作时,应该使用action、而不是mutation,例如: 32 33 ```javascript 34 import Vue from 'vue' 35 import Vuex from 'vuex' 36 37 Vue.use(Vuex) 38 39 40 export default new Vuex.Store({ 41 state: { 42 isLogin: false, //是否登录 43 userInfo: null, //用户信息 44 carNumber: 0, 45 xxxxx: 10 46 }, 47 mutations: { 48 login: function (state, info) { 49 state.userInfo = info; 50 state.isLogin = true; 51 }, 52 addCar: function (state) { 53 state.carNumber += 1; 54 }, 55 56 fetchAsync: function (state) { 57 // // 异步操作 发送ajax请求 58 setTimeout(function () { 59 state.xxxxx += 1; 60 }, 1000); // 1秒后 状态改变 61 } 62 63 }, 64 actions: {} 65 }) 66 67 ``` 68 69 ``` 70 // 按钮执行函数 71 this.$store.commit("fetchAsync"); 72 ``` 73 74 从效果上看是没有问题的,但是通过开发者工具就会发现,监测到的state的数据不准确。 75 76 官方图说 如果发送异步请求应该在actions里做 异步做完了回调函数再去做mutations 在去更改state状态 在mutations 安装一个浏览器插件devtools可以监听里面的状态的值(老师给的文件里有)
所以,这种情况可以选择用Action。

```javascript
import Vue from 'vue'
import Vuex from 'vuex'

Vue.use(Vuex)


export default new Vuex.Store({
    state: {
        isLogin: false, //是否登录
        userInfo: null, //用户信息
        carNumber: 0,
        xxxxx: 10
    },
    mutations: {
        login: function (state, info) {
            state.userInfo = info;
            state.isLogin = true;
        },
        addCar: function (state) {
            state.carNumber += 1;
        },
        fetchAsync: function (state,data) {
            state.xxxxx += 1;
            console.log(data);
        }

    },
    actions: { // 异步动作写在这 异步动作执行完再去改状态 能够保证mutations 里的状态值和整体是一样的
        fetchAsync: function (context,data) {
            setTimeout(function () {
                context.commit("fetchAsync",data);
            }, 1000);
        }
    }
})

```

再触发时,调用:

```
this.$store.dispatch('fetchAsync',{ amount: 10})
```
7.flex布局
在CSS3中flex可以非常便捷的可以帮助我们实现对页面的布局。
-
传统的页面布局,基于div+float来实现。
-
flex可以快速实现页面的布局(很方便)。
关于flex布局你必须要了解的有一下几点:
<div class="menu" 样式>// 容器里加样式
    <div class="item" 样式>112</div> // 在元素里加样式
    <div class="item">113</div>
</div>
7.1 容器
7.1.1 flex布局
在容器元素上应用
<div class="menu">
    <div class="item">112</div>
    <div class="item">113</div>
</div>

<style>
    .menu{
        border: 1px solid red;
        width: 500px;
        display: flex;         // 表示flex布局
    }
</style>
<div class="menu">
    <div class="item">112</div>
    <div class="item">113</div>
</div>
<style>
    .menu{
        border: 1px solid red;
        width: 500px;

        display: flex;         // 表示flex布局
        flex-direction: row;   // row主轴是横向,副轴是纵向。column是主轴是纵轴
    }
</style>
justify-content,主轴上的元素的排列方式
align-items,副轴上的元素的排列方式。

<div class="menu">
    <div class="item">11</div>
    <div class="item">112</div>
    <div class="item">112</div>
</div>
<style>
    .menu {
        width: 500px;
        border: 1px solid red;
        display: flex;

        flex-direction: row; // row主轴是横向,副轴是纵向
        justify-content: flex-start;     /* 主轴=横向,横向从左开始 */
        justify-content: flex-end;       /* 主轴=横向,横向从右开始 */
        justify-content: space-between;   /* 主轴=横向,左右定格,中间元素等分空白 */
        justify-content: space-around;   /* 主轴=横向,所有元素等分空白 */
        justify-content: space-evenly;   /* 主轴=横向,元素间距一样 */
    }

    .item {
        border: 1px solid green;
        padding: 5px 50px;
        height: 50px;
        width: 40px;
    }
</style>

<div class="menu">
    <div class="item">11</div>
    <div class="item">112</div>
    <div class="item">112</div>
</div>
<style>
    .menu {
        width: 500px;
        height: 300px;
        border: 1px solid red;
        display: flex;

        flex-direction: row;
        justify-content: flex-start;     /* 主轴=横向,横向从左开始 */
        justify-content: flex-end;       /* 主轴=横向,横向从右开始 */
        justify-content: space-between;   /* 主轴=横向,左右定格,中间元素等分空白 */
        justify-content: space-around;   /* 主轴=横向,所有元素等分空白 */
        justify-content: space-evenly;   /* 主轴=横向,元素间距一样 */

        align-items: center;             /* 副轴=纵向,元素居中*/
        align-items: flex-start;         /* 副轴=纵向,元素顶部*/
        align-items: flex-end;           /* 副轴=纵向,元素底部*/
    }

    .item {
        border: 1px solid green;
        padding: 5px 50px;
        height: 50px;
        width: 40px;
    }
</style>
7.1.4 换行
-
flex-wrap: nowrap;元素超过容器,不换行 -
flex-wrap: wrap;元素超过容器,换行
示例1:不换行
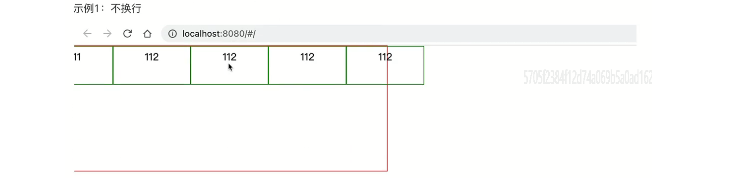
<div class="menu">
    <div class="item">11</div>
    <div class="item">112</div>
    <div class="item">112</div>
    <div class="item">112</div>
    <div class="item">112</div>
</div>
<style>
    .menu {
        width: 500px;
        height: 200px;
        border: 1px solid red;
        display: flex;

        flex-direction: row;
        justify-content: space-evenly;   /* 主轴=横向,元素间距一样 */
        align-items: flex-start;         /* 副轴=纵向,元素顶部*/

        flex-wrap: nowrap;

    }

    .item {
        border: 1px solid green;
        padding: 5px 50px;
        height: 50px;
        width: 40px;
    }
</style>
示例2:换行
<div class="menu">
    <div class="item">111</div>
    <div class="item">112</div>
    <div class="item">112</div>
    <div class="item">112</div>
    <div class="item">112</div>

</div>

<style>
    body{ // 清除浏览器中默认的body的内外边距
        margin: 0;
    }
    .menu {
        width: 500px;
        height: 200px;
        border: 1px solid red;
        display: flex;

        flex-direction: row;
        justify-content: space-evenly;   /* 主轴=横向,元素间距一样 */
        align-items: flex-start;         /* 副轴=纵向,元素顶部*/

        flex-wrap: wrap;

    }

    .item {
        border: 1px solid green;
        padding: 5px 50px;
        height: 50px;
        width: 40px;
    }
</style>
7.1.5 多行对齐方式
align-content
align-content:flex-start;

flex-start | flex-end | center | space-between | space-around | space-evenly | stretch(默认);
7.2 元素
7.2.1 顺序
order,默认0,用于决定项目排列顺序,数值越小,项目排列越靠前。

<div class="father">
    <div class="son" style="order: 2">11</div>
    <div class="son" style="order: 0">22</div>
    <div class="son" style="order: 1">33</div>
</div>

<style scoped>
    .father {
        border: 1px solid red;
        width: 500px;
        height: 300px;
        display: flex;
        flex-direction: row;
        justify-content: flex-start;
    }

    .father .son {
        border: 1px solid saddlebrown;
        width: 20px;
        height: 18px;
    }
</style>
7.2.2 剩余空间(是否占满)
flex-grow,默认0,用于决定项目在有剩余空间的情况下是否放大,默认不放大;

<div class="father">
    <div class="son">11</div>
    <div class="son" style="flex-grow: 1">22</div>
    <div class="son" style="flex-grow: 1">33</div>
</div>
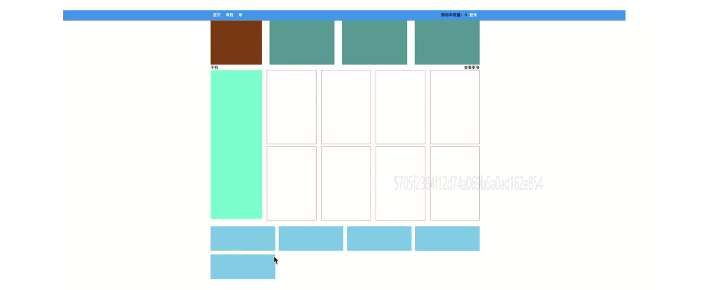
  1 <template>
  2     <div>
  3         <div class="row1">
  4             <div class="company"></div>
  5             <div class="pic"></div>
  6             <div class="pic"></div>
  7             <div class="pic"></div>
  8         </div>
  9         <div class="row2">
 10             <div class="title">
 11                 <div>手机</div>
 12                 <div>查看更多</div>
 13             </div>
 14             <div class="pic-list">
 15                 <div class="big"></div>
 16                 <div class="right-list">
 17                     <div class="group">
 18                         <div class="phone"></div>
 19                         <div class="phone"></div>
 20                         <div class="phone"></div>
 21                         <div class="phone"></div>
 22                     </div>
 23                     <div class="group">
 24                         <div class="phone"></div>
 25                         <div class="phone"></div>
 26                         <div class="phone"></div>
 27                         <div class="phone"></div>
 28                     </div>
 29
 30                 </div>
 31             </div>
 32         </div>
 33
 34         <div class="course-list">
 35             <div class="item"></div>
 36             <div class="item"></div>
 37             <div class="item"></div>
 38             <div class="item"></div>
 39             <div class="item"></div>
 40
 41         </div>
 42     </div>
 43 </template>
 44
 45 <script>
 46     export default {
 47         name: "Mi"
 48     }
 49 </script>
 50
 51 <style scoped>
 52     //  .row1 样式
 53     .row1 {
 54         display: flex;
 55         flex-direction: row;
 56         justify-content: space-between;
 57     }
 58
 59     .row1 .company {
 60         width: 210px;
 61         height: 180px;
 62         background-color: saddlebrown;
 63     }
 64
 65     .row1 .pic {
 66         width: 266px;
 67         height: 180px;
 68         background-color: cadetblue;
 69     }
 70     //  .row2 样式
 71     .row2 .title {
 72         display: flex;
 73         flex-direction: row;
 74         justify-content: space-between;
 75     }
 76
 77     .row2 .pic-list {
 78         display: flex;
 79         flex-direction: row;
 80         justify-content: space-between;
 81     }
 82
 83     .row2 .pic-list .big {
 84         background-color: aquamarine;
 85         height: 610px;
 86         width: 210px;
 87         margin-right: 20px;
 88     }
 89
 90     .row2 .pic-list .right-list {
 91         /*background-color: antiquewhite;*/
 92         flex-grow: 1;
 93     }
 94
 95     .row2 .pic-list .right-list .group {
 96
 97
 98         display: flex;
 99         flex-direction: row;
100         justify-content: space-between;
101         flex-wrap: wrap;
102     }
103
104     .row2 .pic-list .right-list .phone {
105         margin-bottom: 10px;
106         border: 1px solid red;
107         width: 200px;
108         height: 300px;
109     }
110
111     .course-list {
112         display: flex;
113         justify-content: space-between;
114         flex-wrap: wrap;
115     }
116
117     .course-list .item {
118         width: 24%;
119         height: 100px;
120         background-color: skyblue;
121         margin-top: 15px;
122     }
123
124     // 如果最后一个元素,是第3个,右边距=一个位置 + 所有空白位置/3(有三个空白位置)
125     .course-list .item:last-child:nth-child(4n - 1) {
126         margin-right: calc(24% + 4% / 3);
127     }
128
129     // 如果最后一个元素,是第2个,右边距=两个位置 + 所有空白位置/3*2(有三个空白位置)
130     .course-list .item:last-child:nth-child(4n - 2) {
131         margin-right: calc(48% + 8% / 3);
132     }
133 </style>
至此,结合以上的知识点,我们就可以来开发一个项目,但很多的页面按钮、标签、提示框等都需要自己手动,太费劲。
所以,接下来就要给大家的来聊一个UI框架 - ElementUI,他的内部提供了很多方便的样式和组件,可以加速我们开发。
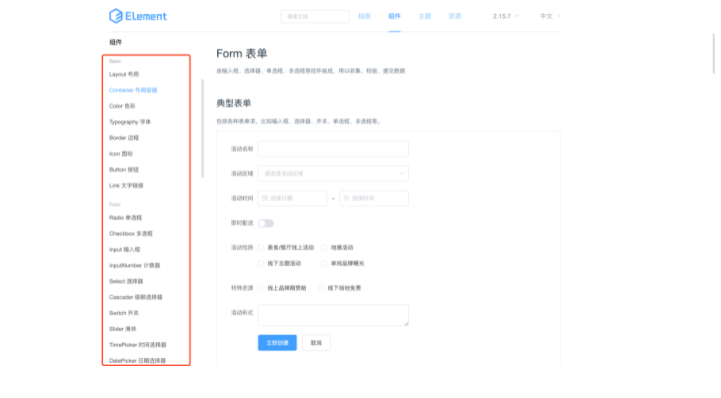
8.ElementUI
Element,是有 饿了吗 团队开发一套为开发者、设计师和产品经理准备的基于 Vue 2.0 的组件库(也支持vue3.x)。
在他的基础上来开发,可以大大提升开发进度。
想要在项目中进行使用element-ui需要提前安装并引入。
8.1 引入
方式1:完整引入

- 安装

  ```
  cd 项目目录
  npm install element-ui
  ```

- 引入

  ```javascript
  import Vue from 'vue';
  import ElementUI from 'element-ui';
  import 'element-ui/lib/theme-chalk/index.css'; // 主题 颜色背景
  import App from './App.vue';

  Vue.use(ElementUI); // 引入 use一下就可以了

  new Vue({
      render: h => h(App),
  }).$mount('#app')

  ```

- 在组件中使用

  ```html
  <el-button type="success">哈哈哈</el-button>
  ```


**方式2**:局部引入

- 安装

  ```
  cd 项目目录
  npm install element-ui
  ```

- 引入

  ```javascript
  import Vue from 'vue';
  import { Button, Select } from 'element-ui'; // 引入指定组件
  import 'element-ui/lib/theme-chalk/index.css';
  import App from './App.vue';


  Vue.use(Button)
  Vue.use(Select)

  new Vue({
      render: h => h(App),
  }).$mount('#app')

  ```

- 在组件中使用

  ```html
  <el-button type="success">哈哈哈</el-button>
  ```

  完整组件名称:https://element.eleme.cn/#/zh-CN/component/quickstart
8.2 组件的使用
参见官方文档,在后续的项目开发中来应用并使用。

 浙公网安备 33010602011771号