Vue3.0 全面探索 - 基于 Composition Api 快速构建实战项目
 本项目综合运用了 Vue3.0 的新特性,适合新手学习😁
基于 Composition API 即 Function-based AP I进行改造,配合 Vue Cli,优先体验 Vue3 特性
使用单例对象模式进行组件通信
使用 axios 库进行网络请求,weui 库实现 UI 界面
本项目综合运用了 Vue3.0 的新特性,适合新手学习😁
基于 Composition API 即 Function-based AP I进行改造,配合 Vue Cli,优先体验 Vue3 特性
使用单例对象模式进行组件通信
使用 axios 库进行网络请求,weui 库实现 UI 界面
Quick Start
本项目综合运用了 Vue3.0 的新特性,适合新手学习😁
- 基于
Composition API即Function-based API进行改造,配合Vue Cli,优先体验Vue3特性 - 使用单例对象模式进行组件通信
- 使用
axios库进行网络请求,weui库实现 UI 界面
# 安装依赖
npm install
# 在浏览器打开localhost:8080查看页面,并实时热更新
npm run serve
# 发布项目
npm run build
建议配合 Visual Studio Code 和 Vue 3 Snippets 代码插件食用Ψ( ̄∀ ̄)Ψ。
Dependencies
以下是项目运用到的依赖,@vue/composition-api 配合 vue 模块让我们 Vue2.0 版本可以抢先体验 Vue3.0 的新特性,axios 是辅助我们发送网络请求得到数据的工具库,weui是一套与微信原生视觉一致的基础样式库,方便我们快速搭建项目页面。
"@vue/composition-api": "^0.3.4",
"axios": "^0.19.0",
"core-js": "^3.4.3",
"vue": "^2.6.10",
"weui": "^2.1.3"
Directory Structure
├── src
│   ├── App.vue                          # 组件入口
│   ├── assets                           # 资源目录
│   ├── stores/index.js                  # 状态管理
│   ├── components                       # 组件目录
│   │   ├── Header.vue                   # 头部组件
│   │   ├── Search.vue                   # 搜索框组件
│   │   ├── Panel.vue                    # 列表组件
│   ├── main.js                          # 项目入口
├── public                               # 模板文件
├── vue.config.js                        # 脚手架配置文件
├── screenshot                           # 程序截图
Composition API
npm install @vue/composition-api --save
使用 npm 命令下载了 @vue/composition-api 插件以后,引入该模块后,需要显式调用 Vue.use(VueCompositionApi) ,按照文档在 main.js 引用便开启了 Composition API 的能力。
// main.js
import Vue from 'vue'
import App from './App.vue'
// 1.引入Composition API模块
import VueCompositionApi from '@vue/composition-api'

Vue.config.productionTip = false
// 2.不要漏了显式调用 VueCompositionApi
Vue.use(VueCompositionApi)

new Vue({
  render: h => h(App),
}).$mount('#app')
npm install weui --save
我们同样使用 npm 安装 weui 模块,然后在 main.js 中引入 weui的基础样式库,方便我们可以在全局使用微信基础样式构建项目页面。
// main.js
import Vue from 'vue'
import App from './App.vue'
// 全局引入 `weui` 的基础样式库
import 'weui'
import VueCompositionApi from '@vue/composition-api'

Vue.config.productionTip = false
Vue.use(VueCompositionApi)

new Vue({
  render: h => h(App),
}).$mount('#app')
回到 App.vue,保留 components 属性值清空 <template> 模板的内容,删除 <style> 模板,等待重新引入新的组件。
<template>
  <div id="app">
    Hello World
  </div>
</template>
<script>
export default {
  name: "app",
  components: {}
};
</script>
在 src/components 目录下新建第一个组件,取名为 Header.vue 写入以下代码,点击查看源代码:
<template>
  <header :style="{
    backgroundColor: color?color:defaultColor
  }">{{title}}</header>
</template>
<script>
import { reactive } from "@vue/composition-api";
export default {
  // 父组件传递进来更改该头部组件的属性值
  props: {
    // 标题
    title: String,
    // 颜色
    color: String
  },
  setup() {
    const state = reactive({
      defaultColor: "red"
    });
    return {
      ...state
    };
  }
};
</script>
<style scoped>
header {
  height: 50px;
  width: 100%;
  line-height: 50px;
  text-align: center;
  color: white;
}
</style>
setup
这里运用了一个全新的属性 setup ,这是一个组件的入口,让我们可以运用 Vue3.0 暴露的新接口,它运行在组件被实例化时候,props 属性被定义之后,实际上等价于 Vue2.0 版本的 beforeCreate 和 Created 这两个生命周期,setup 返回的是一个对象,里面的所有被返回的属性值,都会被合并到 Vue2.0 的 render 渲染函数里面,在单文件组件中,它将配合 <template> 模板的内容,完成 Model 到 View 之间的绑定,在未来版本中应该还会支持返回 JSX 代码片段。
<template>
  <!-- View -->
  <div>{{name}}</div>
</template>
<script>
import { reactive } from '@vue/composition-api'
export default {
  setup() {
    const state = reactive({ name: 'Eno Yao' });
    // return 暴露到 template 中
    return {
      // Model
      ...state
    }
  }
}
</script>
reactive
在 setup 函数里面, 我们适应了 Vue3.0 的第一个新接口 reactive 它主要是处理你的对象让它经过 Proxy 的加工变为一个响应式的对象,类似于 Vue2.0 版本的 data 属性,需要注意的是加工后的对象跟原对象是不相等的,并且加工后的对象属于深度克隆的对象。
const state = reactive({ name: 'Eno Yao' })
props
在 Vue2.0 中我们可以使用 props 属性值完成父子通信,在这里我们需要定义 props 属性去定义接受值的类型,然后我们可以利用 setup 的第一个参数获取 props 使用。
export default {
  props: {
    // 标题
    title: String,
    // 颜色
    color: String
  },
  setup(props) {
    // 这里可以使用父组件传过来的 props 属性值
  }
};
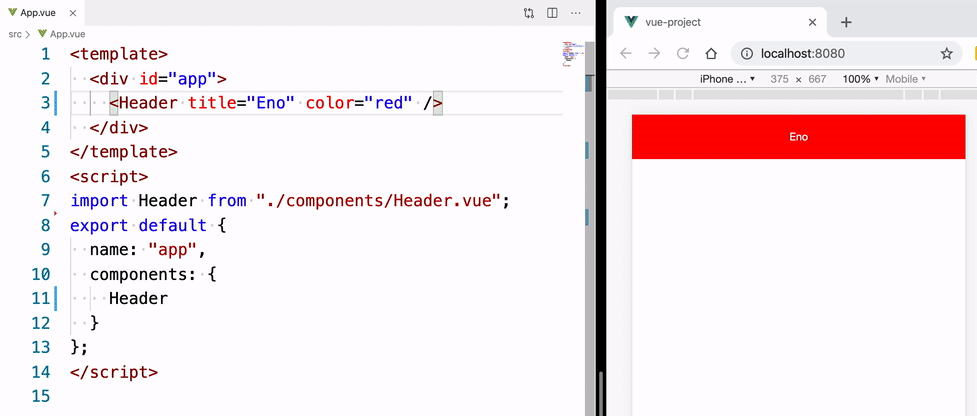
我们在 App.vue 里面就可以使用该头部组件,有了上面的 props 我们可以根据传进来的值,让这个头部组件呈现不同的状态。
<template>
  <div id="app">
    <!-- 复用组件,并传入 props 值,让组件呈现对应的状态 -->
    <Header title="Eno" color="red" />
    <Header title="Yao" color="blue" />
    <Header title="Wscats" color="yellow" />
  </div>
</template>
<script>
import Header from "./components/Header.vue";
export default {
  name: "app",
  components: {
    Header,
  }
};
</script>
context
setup 函数的第二个参数是一个上下文对象,这个上下文对象中包含了一些有用的属性,这些属性在 Vue2.0 中需要通过 this 才能访问到,在 vue3.0 中,访问他们变成以下形式:
setup(props, ctx) {
  console.log(ctx) // 在 setup() 函数中无法访问到 this
  console.log(this) // undefined
}
具体能访问到以下有用的属性:
- root
- parent
- refs
- attrs
- listeners
- isServer
- ssrContext
- emit
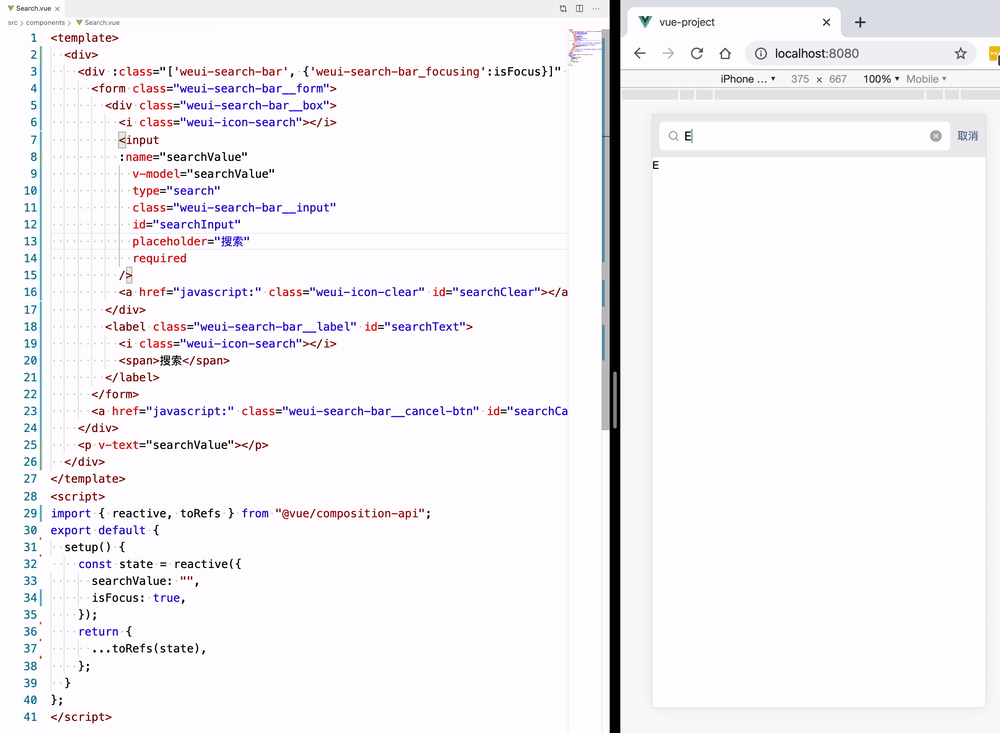
完成上面的 Header.vue 我们就编写 Search.vue 搜索框组件,继续再 src/components 文件夹下面新建 Search.vue 文件,点击查看源代码。
<template>
  <div :class="['weui-search-bar', {'weui-search-bar_focusing' : isFocus}]" id="searchBar">
    <form class="weui-search-bar__form">
      <div class="weui-search-bar__box">
        <i class="weui-icon-search"></i>
        <input
          v-model="searchValue"
          ref="inputElement"
          type="search"
          class="weui-search-bar__input"
          id="searchInput"
          placeholder="搜索"
          required
        />
        <a href="javascript:" class="weui-icon-clear" id="searchClear"></a>
      </div>
      <label @click="toggle" class="weui-search-bar__label" id="searchText">
        <i class="weui-icon-search"></i>
        <span>搜索</span>
      </label>
    </form>
    <a @click="toggle" href="javascript:" class="weui-search-bar__cancel-btn" id="searchCancel">取消</a>
  </div>
</template>
<script>
import { reactive, toRefs, watch } from "@vue/composition-api";
import store from "../stores";
export default {
  // setup相当于2.x版本的beforeCreate生命周期
  setup() {
    // reactive() 函数接收一个普通对象,返回一个响应式的数据对象
    const state = reactive({
      searchValue: "",
      // 搜索框两个状态,聚焦和非聚焦
      isFocus: false,
      inputElement: null
    });
    // 切换搜索框状态的方法
    const toggle = () => {
      // 让点击搜索后出现的输入框自动聚焦
      state.inputElement.focus();
      state.isFocus = !state.isFocus;
    };
    // 监听搜索框的值
    watch(
      () => {
        return state.searchValue;
      },
      () => {
        // 存储输入框到状态 store 中心,用于组件通信
        store.setSearchValue(state.searchValue);
        // window.console.log(state.searchValue);
      }
    );
    return {
      // 将 state 上的每个属性,都转化为 ref 形式的响应式数据
      ...toRefs(state),
      toggle
    };
  }
};
</script>
toRefs
可以看到我们上面用了很多的新属性,我们先介绍 toRefs ,函数可以将 reactive() 创建出来的响应式对象,转换为普通的对象,只不过,这个对象上的每个属性节点,都是 ref() 类型的响应式数据,配合 v-model 指令能完成数据的双向绑定,在开发中非常高效。
import { reactive, toRefs } from "@vue/composition-api";
export default {
  setup() {
    const state = reactive({ name: 'Eno Yao' })
  }
  return {
    // 直接返回 state 那么数据会是非响应式的, MV 单向绑定
    // ...state,
    // toRefs 包装后返回 state 那么数据会是响应式的, MVVM 双向绑定
    ...toRefs(state),
  };
}
template refs
这里的输入框拥有两个状态,一个是有输入框的状态和无输入框的状态,所以我们需要一个布尔值 isFocus 来控制状态,封装了一个 toggle 方法,让 isFocus 值切换真和假两个状态。
const toggle = () => {
  // isFocus 值取反
  state.isFocus = !state.isFocus;
};
然后配合 v-bind:class 指令,让 weui-search-bar_focusing 类名根据 isFocus 值决定是否出现,从而更改搜索框的状态。
<div :class="['weui-search-bar', {'weui-search-bar_focusing' : isFocus}]" id="searchBar">
这里的搜索输入框放入了 v-model 指令,用于接收用户的输入信息,方便后面配合列表组件执行检索逻辑,还放入了 ref 属性,用于获取该 <input/> 标签的元素节点,配合state.inputElement.focus() 原生方法,在切换搜索框状态的时候光标自动聚焦到输入框,增强用户体验。
<input
  v-model="searchValue"
  ref="inputElement"
/>

watch
watch() 函数用来监视某些数据项的变化,从而触发某些特定的操作,使用之前还是需要按需导入,监听 searchValue 的变化,然后触发回调函数里面的逻辑,也就是监听用户输入的检索值,然后触发回调函数的逻辑把 searchValue 值存进我们创建 store 对象里面,方面后面和 Panel.vue 列表组件进行数据通信:
import { reactive, watch } from "@vue/composition-api";
import store from "../stores";
export default {
  setup() {
    const state = reactive({
      searchValue: "",
    });
    // 监听搜索框的值
    watch(
      () => {
        return state.searchValue;
      },
      () => {
        // 存储输入框到状态 store 中心,用于组件通信
        store.setSearchValue(state.searchValue);
      }
    );
    return {
      ...toRefs(state)
    };
  }
};
state management
在这里我们维护一份数据来实现共享状态管理,也就是说我们新建一个 store.js 暴露出一个 store 对象共享 Panel 和 Search 组件的 searchValue 值,当 Search.vue 组件从输入框接受到 searchValue 检索值,就放到 store.js 的 store 对象中,然后把该对象注入到 Search 组件中,那么两个组件都可以共享 store 对象中的值,为了方便调试我们还分别封装了 setSearchValue 和 getSearchValue 来去操作该 store 对象,这样我们就可以跟踪状态的改变。
// store.js
export default {
    state: {
        searchValue: ""
    },
    // 设置搜索框的值
    setSearchValue(value) {
        this.state.searchValue = value
    },
    // 获取搜索框的值
    getSearchValue() {
        return this.state.searchValue
    }
}
完成上面的 Search.vue 我们紧接着编写 Panel.vue 搜索框组件,继续再 src/components 文件夹下面新建 Panel.vue 文件,点击查看源代码。
<template>
  <div class="weui-panel weui-panel_access">
    <div v-for="(n,index) in newComputed" :key="index" class="weui-panel__bd">
      <a href="javascript:void(0);" class="weui-media-box weui-media-box_appmsg">
        <div class="weui-media-box__hd">
          <img class="weui-media-box__thumb" :src="n.author.avatar_url" alt />
        </div>
        <div class="weui-media-box__bd">
          <h4 class="weui-media-box__title" v-text="n.title"></h4>
          <p class="weui-media-box__desc" v-text="n.author.loginname"></p>
        </div>
      </a>
    </div>
    <div @click="loadMore" class="weui-panel__ft">
      <a href="javascript:void(0);" class="weui-cell weui-cell_access weui-cell_link">
        <div class="weui-cell__bd">查看更多</div>
        <span class="weui-cell__ft"></span>
      </a>
    </div>
  </div>
</template>
<script>
import { reactive, toRefs, onMounted, computed } from "@vue/composition-api";
import axios from "axios";
import store from "../stores";
export default {
  setup() {
    const state = reactive({
      // 页数
      page: 1,
      // 列表数据
      news: [],
      // 通过搜索框的值去筛选劣列表数据
      newComputed: computed(() => {
        // 判断是否输入框是否输入了筛选条件,如果没有返回原始的 news 数组
        if (store.state.searchValue) {
          return state.news.filter(item => {
            if (item.title.indexOf(store.state.searchValue) >= 0) {
              return item;
            }
          });
        } else {
          return state.news;
        }
      }),
      searchValue: store.state
    });
    // 发送 ajax 请求获取列表数据
    const loadMore = async () => {
      // 获取列表数据
      let data = await axios.get("https://cnodejs.org/api/v1/topics", {
        params: {
          // 每一页的主题数量
          limit: 10,
          // 页数
          page: state.page
        }
      });
      // 叠加页数
      state.page += 1;
      state.news = [...state.news, ...data.data.data];
    };
    onMounted(() => {
      // 首屏加载的时候触发请求
      loadMore();
    });
    return {
      // 让数据保持响应式
      ...toRefs(state),
      // 查看更多事件
      loadMore
    };
  }
};
</script>
lifecycle hooks
Vue3.0 的生命周期钩子和之前不一样,新版本都是以 onXxx() 函数注册使用,同样需要局部引入生命周期的对应模块:
import { onMounted, onUpdated, onUnmounted } from "@vue/composition-api";
export default {
  setup() {
    const loadMore = () => {};
    onMounted(() => {
      loadMore();
    });
    onUpdated(() => {
      console.log('updated!')
    })
    onUnmounted(() => {
      console.log('unmounted!')
    })
    return {
      loadMore
    };
  }
};
以下是新旧版本生命周期的对比:
beforeCreatesetup()createdsetup()beforeMount->onBeforeMountmounted->onMountedbeforeUpdate->onBeforeUpdateupdated->onUpdatedbeforeDestroy->onBeforeUnmountdestroyed->onUnmountederrorCaptured->onErrorCaptured
同时新版本还提供了两个全新的生命周期帮助我们去调试代码:
- onRenderTracked
- onRenderTriggered
在 Panel 列表组件中,我们注册 onMounted 生命周期,并在里面触发请求方法 loadMore 以便从后端获取数据到数据层,这里我们使用的是 axios 网络请求库,所以我们需要安装该模块:
npm install axios --save
封装了一个请求列表数据方法,接口指向的是 Cnode 官网提供的 API ,由于 axios 返回的是 Promise ,所以配合 async 和 await 可以完美的编写异步逻辑,然后结合onMounted 生命周期触发,并将方法绑定到视图层的查看更多按钮上,就可以完成列表首次的加载和点击查看更多的懒加载功能。
// 发送 ajax 请求获取列表数据
const loadMore = async () => {
  // 获取列表数据
  let data = await axios.get("https://cnodejs.org/api/v1/topics", {
    params: {
      // 每一页的主题数量
      limit: 10,
      // 页数
      page: state.page
    }
  });
  // 叠加页数
  state.page += 1;
  // 合并列表数据
  state.news = [...state.news, ...data.data.data];
};
onMounted(() => {
  // 首屏加载的时候触发请求
  loadMore();
});
computed
接下来我们就使用另外一个属性 computed 计算属性,跟 Vue2.0 的使用方式很相近,同样需要按需导入该模块:
import { computed } from '@vue/composition-api';
计算属性分两种,只读计算属性和可读可写计算属性:
// 只读计算属性
let newsComputed = computed(() => news.value + 1)
// 可读可写
let newsComputed = computed({
  // 取值函数
  get: () => news.value + 2,
  // 赋值函数
  set: val => {
    news.value = news.value - 3
  }
})
这里我们使用可读可写计算属性去处理列表数据,还记得我们上一个组件 Search.vue 吗,我们可以结合用户在搜索框输入的检索值,配合 computed 计算属性来筛选对我们用户有用列表数据,所以我们首先从 store 的共享实例里面拿到 Search.vue 搜索框共享的 searchValue ,然后利用原生字符串方法 indexOf 和 数组方法 filter 来过滤列表的数据,然后重新返回新的列表数据 newsComputed,并在视图层上配合 v-for 指令去渲染新的列表数据,这样做既可以在没搜索框检索值的时候返回原列表数据 news ,而在有搜索框检索值的时候返回新列表数据 newsComputed。
import store from "../stores";
export default {
  setup() {
    const state = reactive({
      // 原列表数据
      news: [],
      // 通过搜索框的值去筛选后的新列表数据
      newsComputed: computed(() => {
        // 判断是否输入框是否输入了筛选条件,如果没有返回原始的 news 数组
        if (store.state.searchValue) {
          return state.news.filter(item => {
            if (item.title.indexOf(store.state.searchValue) >= 0) {
              return item;
            }
          });
        } else {
          return state.news;
        }
      }),
      searchValue: store.state
    });
  }
}
项目源码
如果文章和笔记能带您一丝帮助或者启发,请不要吝啬你的赞和 Star,你的肯定是我前进的最大动力😁

 浙公网安备 33010602011771号