MacOS内核调试环境搭建
http://ddeville.me/2015/08/using-the-vmware-fusion-gdb-stub-for-kernel-debugging-with-lldb
http://ddeville.me/2015/08/kernel-debugging-with-lldb-and-vmware-fusion
https://blog.csdn.net/qq_32400847/article/details/79297177
https://media.defcon.org/DEF CON 25/DEF CON 25 presentations/DEFCON-25-Min-Spark-Zheng-macOS-iOS-Kernel-Debugging.pdf
https://theori.io/research/korean/osx-kernel-exploit-1
方法一:LLDB+VMware Fusion+KDK
准备工作
1.在Mac中安装好LLDB(安装适合自己mac版本的xcode即可,xcode中自带lldb),下载地址:https://developer.apple.com/download/more/
2.在Mac中安装好VMware Fusion,
3.准备好一个macos镜像
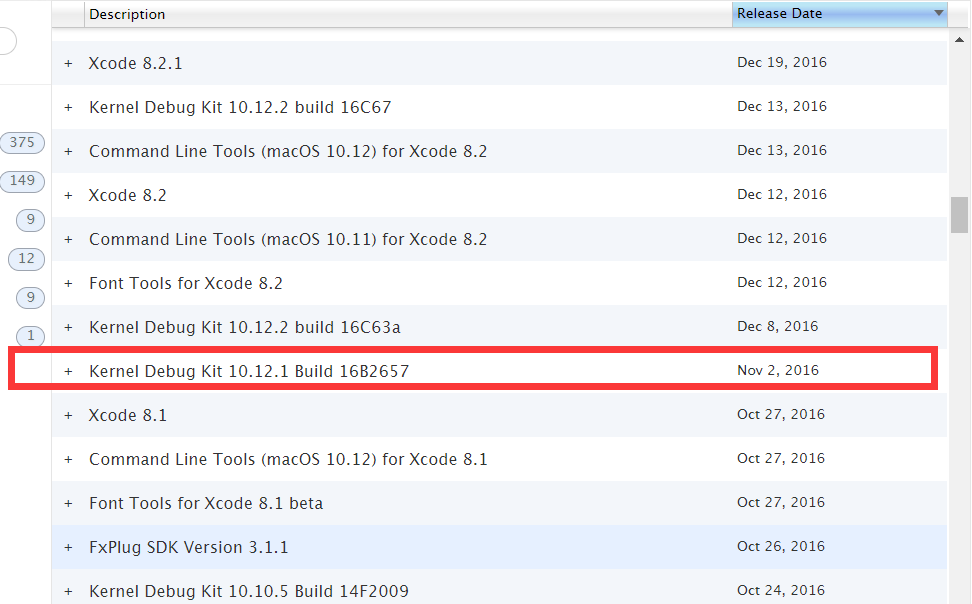
4.下载对应版本内核调试工具包(KDK,下载地址;https://developer.apple.com/download/more/
对于虚拟机中的操作
1.安装MacOS虚拟机
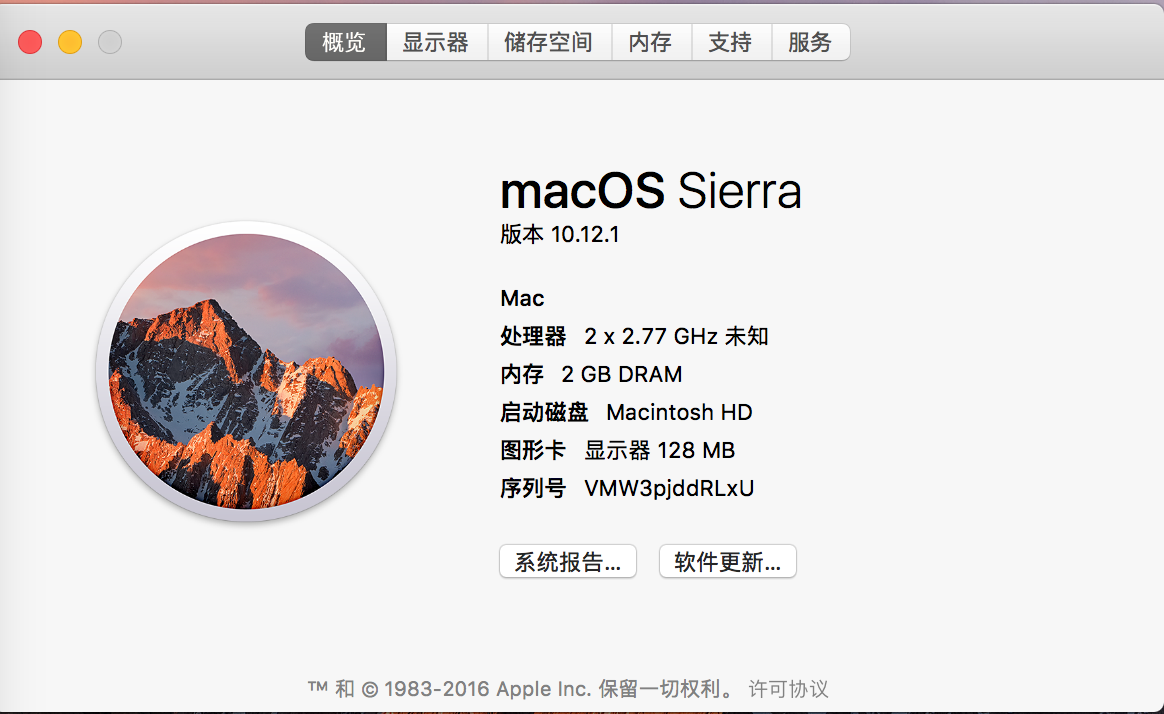
2.安装对应版本内核调试工具包(KDK)
3.关闭SIP
关闭虚拟机的SIP,开机的时候按Command+R进入恢复模式,然后在终端输入csrutil disable。重启之后可以用csrutil status命令查看是否成功关闭。

4.内核替换
将位于KDK安装目录下的可执行文件kernel.development复制到/System/Library/Kernels
cp /Library/Developer/KDKs/KDK_10.12.1_16B2657.kdk/System/Library/Kernels/kernel.development /System/Library/Kernels
5.设置boot-args
为了将虚拟机设置成调试模式,需要使用nvram设置boot-args,命令如下
sudo nvram boot-args="debug=0x141 kext-dev-mode=1 kcsuffix=development pmuflags=1 -v"
debug=0x141含义如下图所示
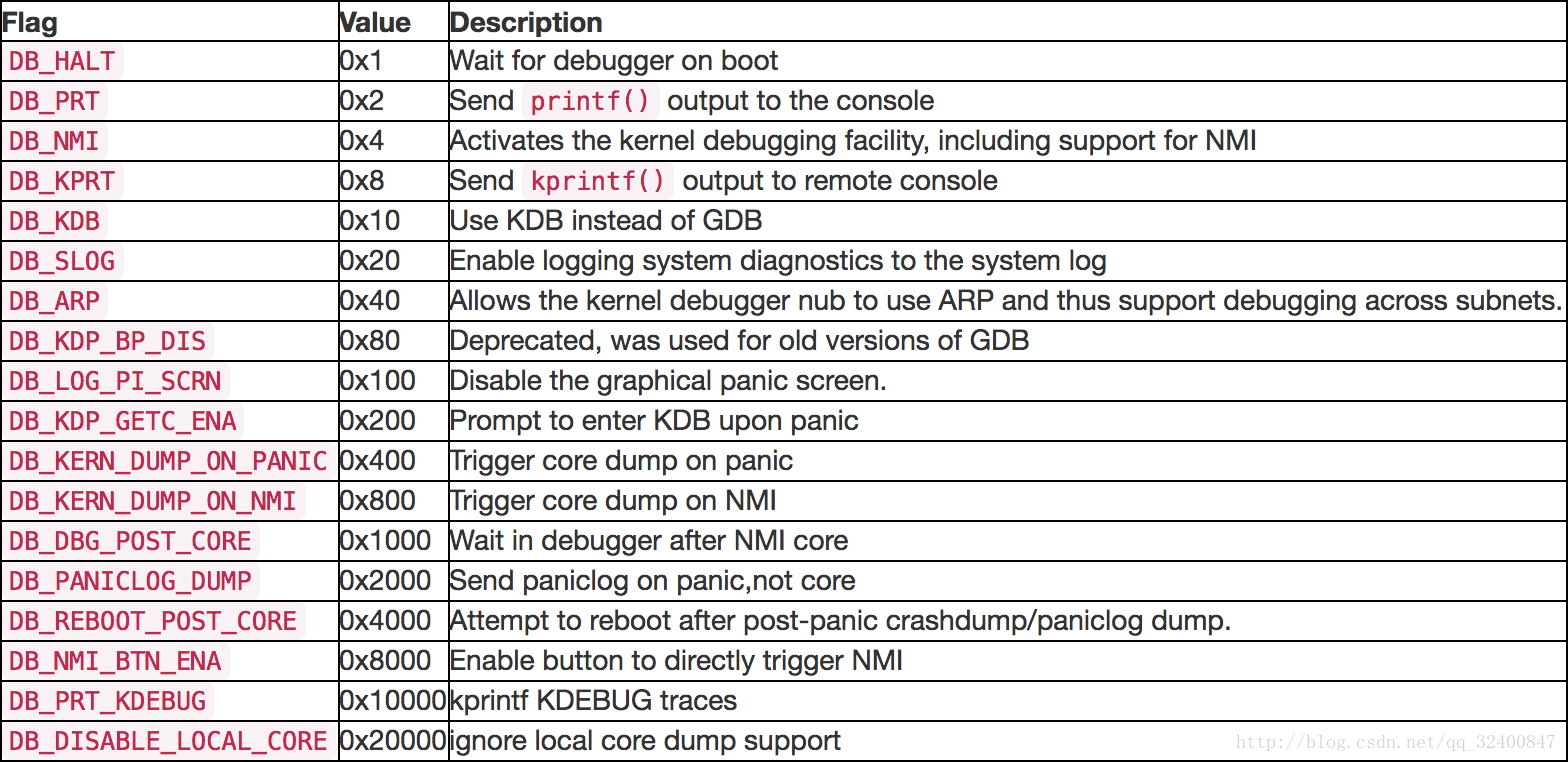
kext-dev-mode=1允许加载未签名kext,kcsuffix=development指定加载上面拷贝的kernel.development,pmuflags=1关闭定时器,-v显示内核加载信息
6.清除kext缓存
sudo kextcache -invalidate /
让虚拟机系统的kext cache无效,使用新的内核调试
7.下载内核代码
运行uname -v命令查看xnu源码版本,并从苹果开源代码上下载,下载地址:https://opensource.apple.com/tarballs/xnu/
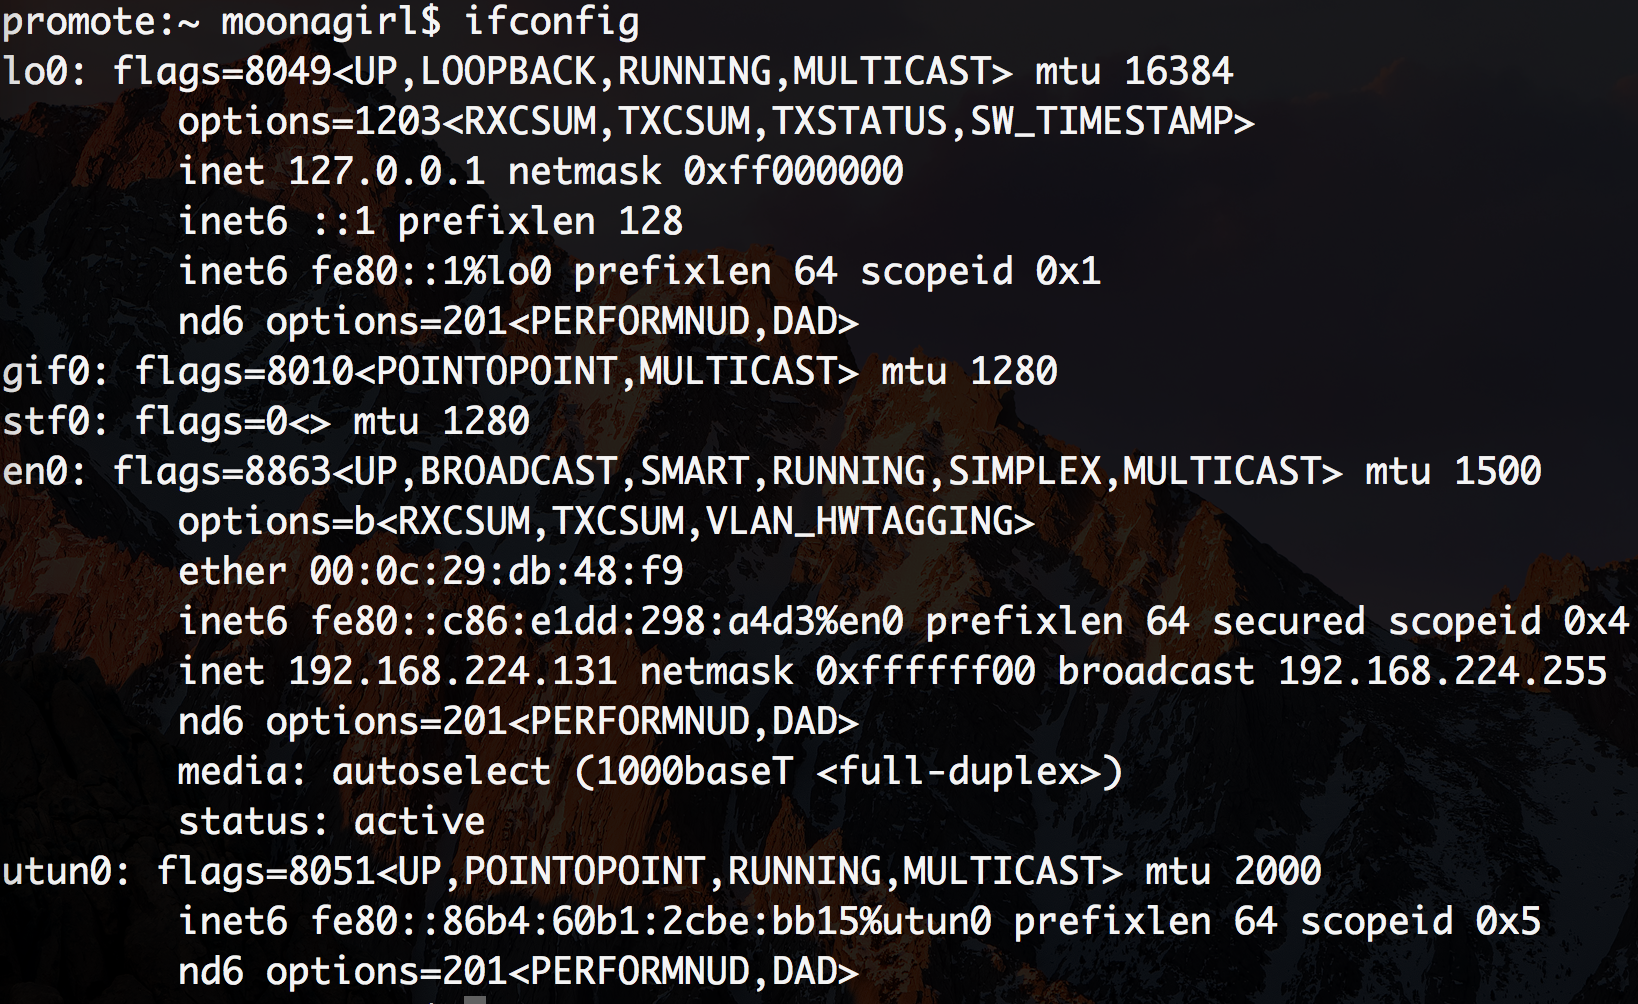
8.查看虚拟机网络配置信息
为了将调试器连接到虚拟机,我们需要一些关于其网络配置的信息
对于主机中的操作
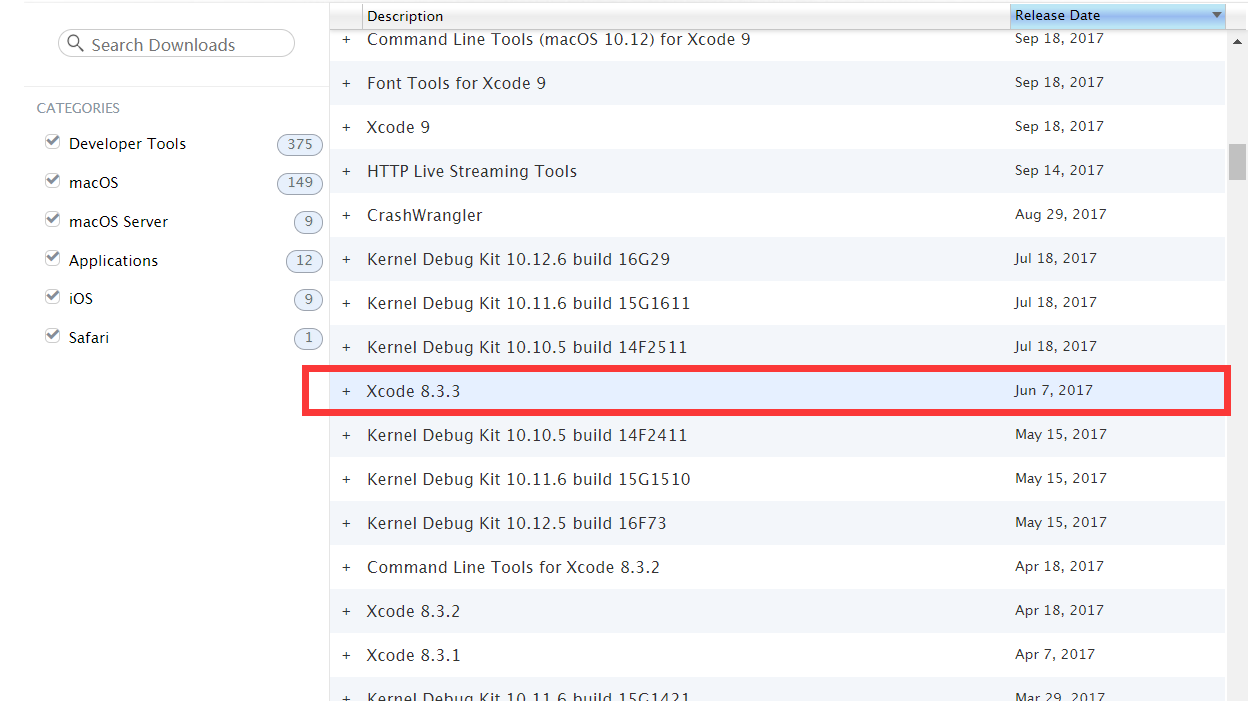
1.安装Xcode
Xcode中自带了lldb,选择适合自己mac版本的xcode版本进行安装,我这里选择8.3.3
2.安装内核调试工具包
安装与虚拟机中相同版本的内核调试工具包
3.关闭SIP
开始调试
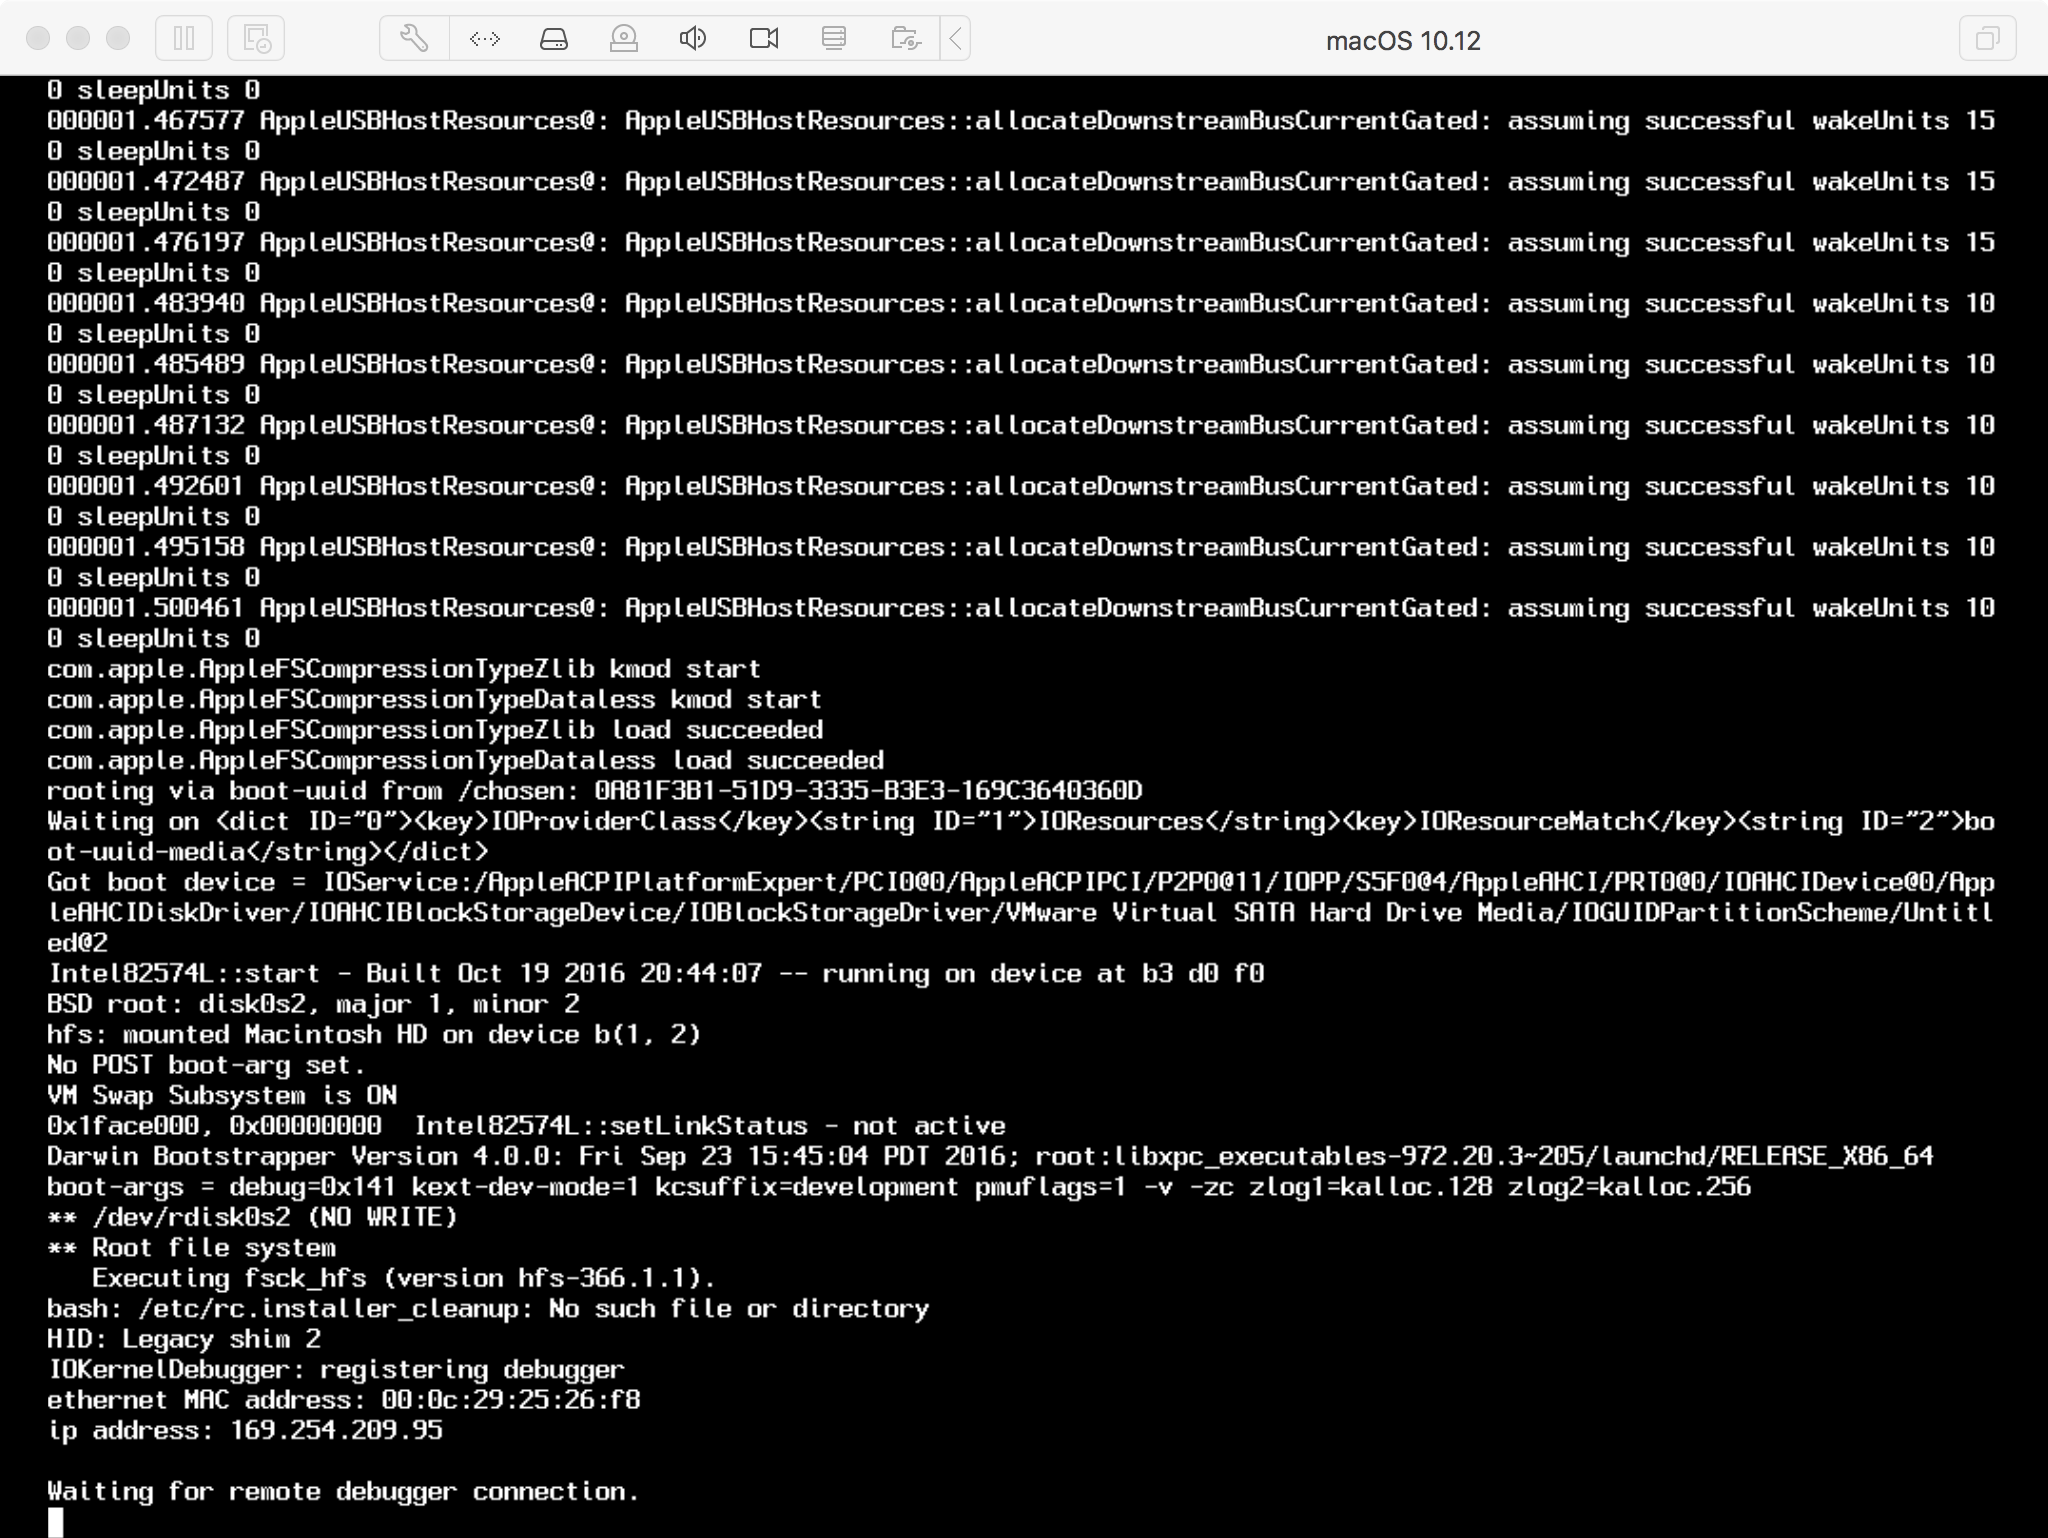
1.重启虚拟机
虚拟机会等待调试器链接
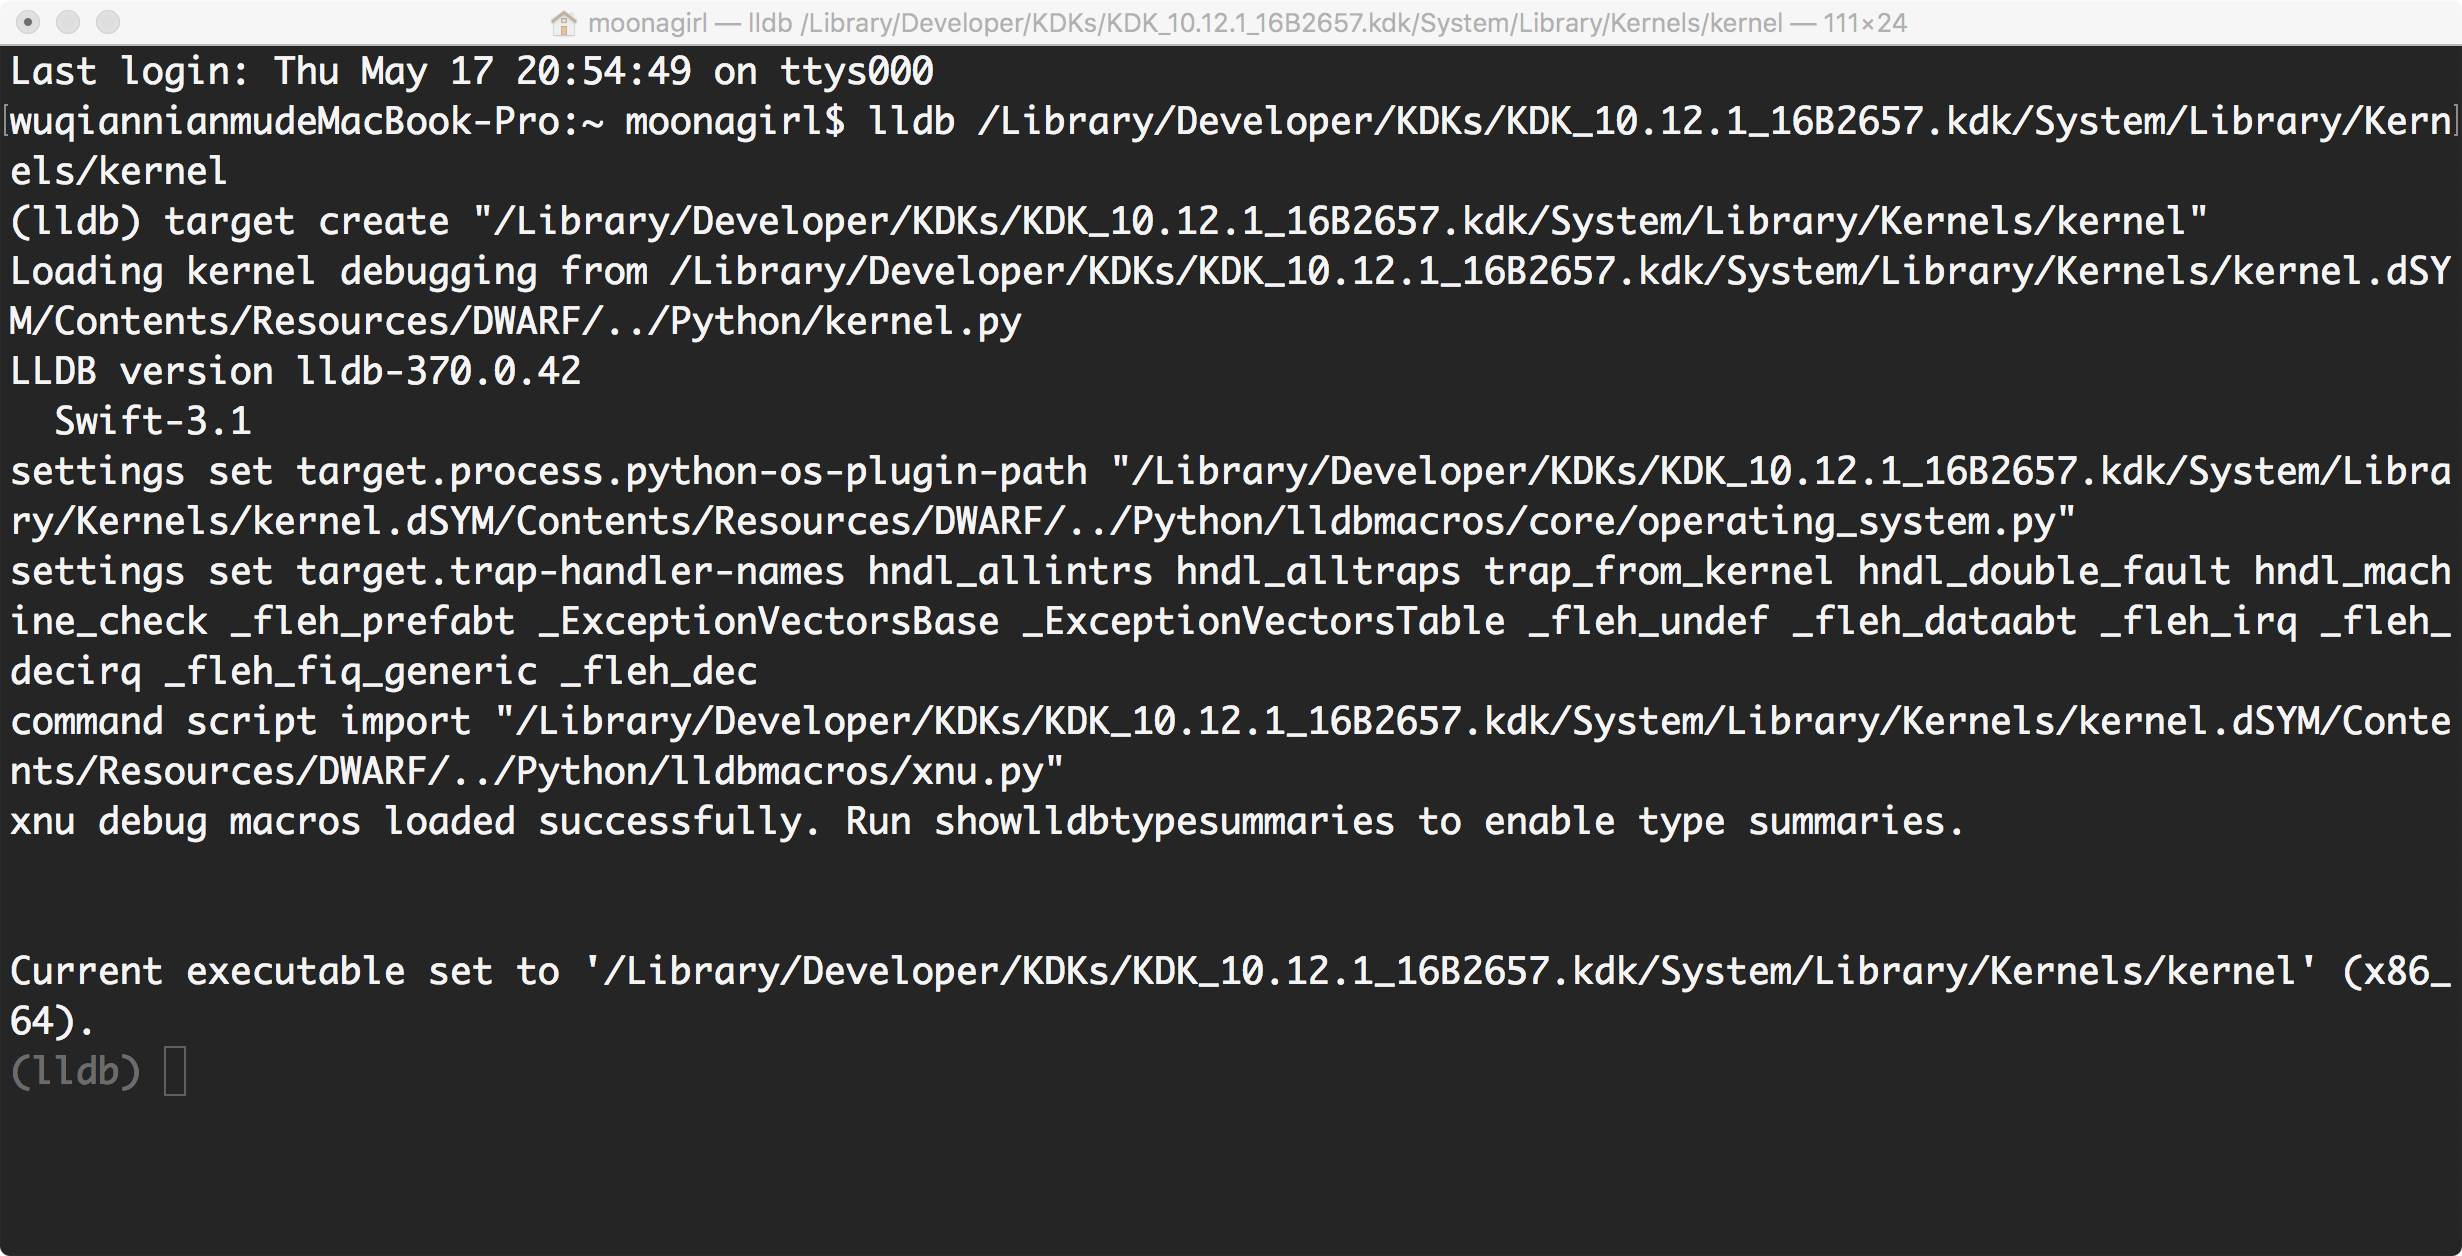
2.启动LLDB并将目标设置为位于KDK中的(本地)内核二进制文件
$lldb
(lldb)target create /Library/Developer/KDKs/KDK_10.12.1_16B2657.kdk/System/Library/Kernels/kernel.development
如果遇到以下问题

就执行以下命令
(lldb) command script import "/Library/Developer/KDKs/KDK_10.12.1_16B2657.kdk/System/Library/Kernels/kernel.dSYM/Contents/Resources/DWARF/../Python/kernel.py"

$ echo "settings set target.load-script-from-symbol-file true" > ~/.lldbinit
再重新启动LLDB并将目标设置为位于KDK中的(本地)内核二进制文件
3.连接虚拟机
执行命令
kdp-remote 虚拟机IP地址
就可以开始调试
存在的问题
一旦内核启动并且调试器继续运行,内核就不能再从调试器中停止。
1.改进
在虚拟机中执行
$sudo nvram boot-args="debug=0x144 kext-dev-mode=1 kcsuffix=development pmuflags=1 -v"
之后如果想再运行时断下,就在虚拟机中按组合键
Command-Option-Control-Shift-Escape
就可以了
方法二:VMware Fusion GDB stub + LLDB
修改虚拟机配置文件
每个虚拟机文件都包含一个可以编辑的.vmx配置文件.vmwarevm(确保虚拟机在编辑时没有运行)
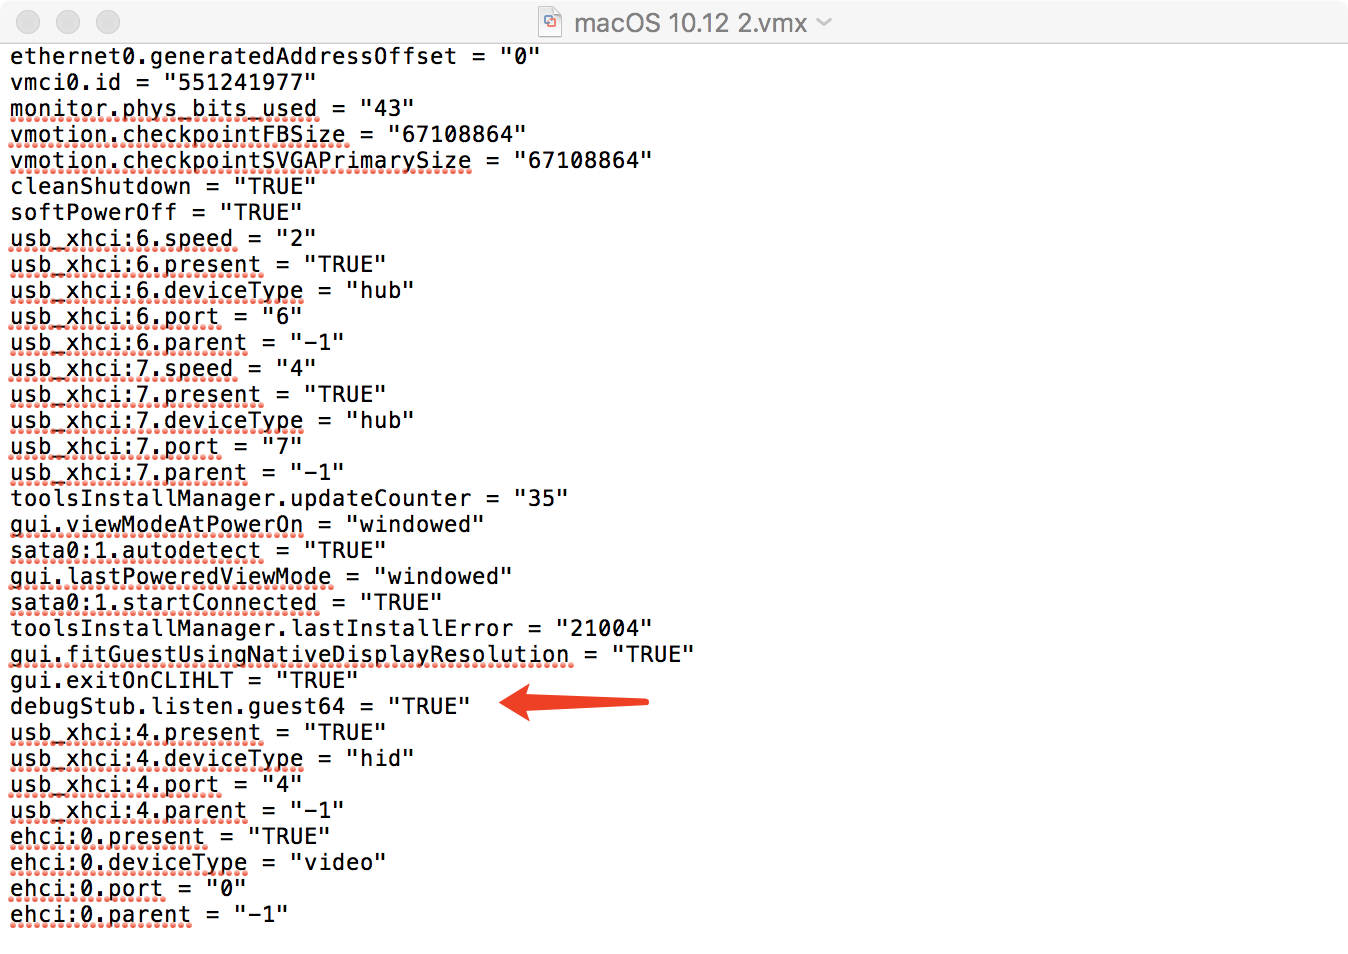
在文本编辑器中打开它并添加以下行:
# If you are debugging a 32-bit machine use `guest32`
debugStub.listen.guest64 = "TRUE"
用gdb进行调试
mac中gdb需要自己安装,请大家自行解决
启动虚拟机,在gdb中附加虚拟机进行调试
(gdb) file /Library/Developer/KDKs/KDK_10.10.5_14F27.kdk/System/Library/Kernels/kernel.development
Reading symbols from /Library/Developer/KDKs/KDK_10.10.5_14F27.kdk/System/Library/Kernels/kernel.development...Reading symbols from /Library/Developer/KDKs/KDK_10.10.5_14F27.kdk/System/Library/Kernels/kernel.development.dSYM/Contents/Resources/DWARF/kernel.development...
done.
(gdb) target remote localhost:8864
Remote debugging using localhost:8864
0xffffff800f9f1e52 in ?? ()
用lldb进行调试
LLDB实际上支持使用gdb-remote命令连接到GDB远程机器
(lldb) file /Library/Developer/KDKs/KDK_10.10.5_14F27.kdk/System/Library/Kernels/kernel.development
Current executable set to '/Library/Developer/KDKs/KDK_10.10.5_14F27.kdk/System/Library/Kernels/kernel.development' (x86_64).
(lldb) gdb-remote 8864
Kernel UUID: C75BDFDD-9F27-3694-BB80-73CF991C13D8
Load Address: 0xffffff800f800000
Kernel slid 0xf600000 in memory.
Loaded kernel file /Library/Developer/KDKs/KDK_10.10.5_14F27.kdk/System/Library/Kernels/kernel.development
Loading 87 kext modules ....................................................................................... done.
Target arch: x86_64
Connected to live debugserver or arm core. Will associate on-core threads to registers reported by server.
Process 1 stopped
* thread #3: tid = 0x0066, name = '0xffffff801c91d9c0', queue = 'cpu-0', stop reason = signal SIGTRAP
    frame #0: 0xffffffffffffffff
实时断点
只需要Ctrl + C即可及时在调试器中断下

 浙公网安备 33010602011771号