

spring boot websocket stomp 实现广播通信和一对一通信聊天
一、前言
玩.net的时候,在asp.net下有一个叫 SignalR 的框架,可以在ASP .NET的Web项目中实现实时通信。刚接触java寻找相关替代品,发现 java 体系中有一套基于stomp协议的websocket通信的框架,websocket是什么可以参考阮老大的《WebSocket 教程》,这篇文章不讨论理论知识,这里只讲应用,把websocket的广播模式与一对一模式一起整理一个demo给大家分享一下。
二、项目结构
因为一对一私聊模式 使用principal的name作为目的地标识。发给消息来源的那个用户,该操作是认为用户登录并且授权认证,所以这里使用Spring Security来控制身份认证,项目结构如下:
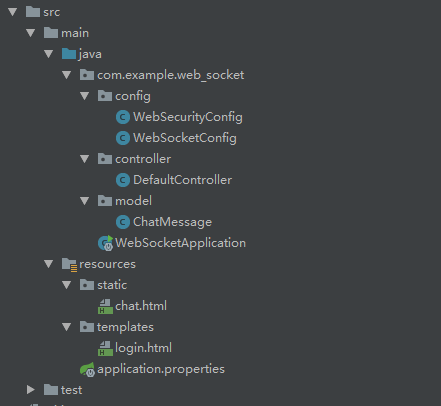
1.WebSecurityConfig: Spring Security安全控制类
2.WebSocketConfig: web socket 控制类
3. DefaultController:mvc控制器
4.ChatMessage: 消息实体对象
5.chat.html : 聊天消息发送接收html客户端页面
6.login.html:登录页
pom.xml依赖如下:
<dependency>
    <groupId>org.springframework.boot</groupId>
    <artifactId>spring-boot-starter-security</artifactId>
</dependency>
<dependency>
    <groupId>org.springframework.boot</groupId>
    <artifactId>spring-boot-starter-thymeleaf</artifactId>
</dependency>
<dependency>
    <groupId>org.springframework.boot</groupId>
    <artifactId>spring-boot-starter-websocket</artifactId>
</dependency>
三、代码实现
1.web服务器安全配置
@Configuration
@EnableWebSecurity
public class WebSecurityConfig extends WebSecurityConfigurerAdapter {
    //注入密码加密解密方式,因为这里使用明文不加密
    @Bean
    public static NoOpPasswordEncoder passwordEncoder() {
        return (NoOpPasswordEncoder) NoOpPasswordEncoder.getInstance();
    }

    @Override
    protected void configure(AuthenticationManagerBuilder auth) throws Exception {
        auth
                .inMemoryAuthentication()
                //在内存中分别配置两个用户user1 user2和密码 ,角色是user,持久化到数据库中的自己配置不在本文知识范围内
                .withUser("user1").password("123").roles("user")
                .and()
                .withUser("user2").password("123").roles("user");

    }

    @Override
    public void configure(WebSecurity web) throws Exception {
        ///resources/static/ 目录下的静态资源,spring security不拦截
        web.ignoring().antMatchers("/resources/static/**","/resources/templates/**");
    }
    @Override
    protected void configure(HttpSecurity http) throws Exception {
        http.authorizeRequests()
                //设置spring security对 /  和  /login  路径不拦截
                .antMatchers("/", "/login").permitAll()
                .anyRequest().authenticated()
                .and()
                .formLogin()
                //设置spring security的登录页面访问路径为 /login
                .loginPage("/login")
                //登陆成功后转向 /chat 路径
                .defaultSuccessUrl("/chat.html")
                .permitAll()
                .and()
                .logout()
                .permitAll();

    }
}
2.WebSocket 配置类
/**
 * WebSocket 配置类
 * Created by ejiyuan on 2018-7-11.
 */
@Configuration
@EnableWebSocketMessageBroker
public class WebSocketConfig implements WebSocketMessageBrokerConfigurer {

    @Override
    public void registerStompEndpoints(StompEndpointRegistry registry) {
        //允许客户端使用socketJs方式访问,访问点为ws,允许跨域
        registry.addEndpoint("/ws").setAllowedOrigins("*").withSockJS();
    }

    @Override
    public void configureMessageBroker(MessageBrokerRegistry registry) {

        //订阅广播 Broker(消息代理)名称
        registry.enableSimpleBroker("/topic"); // Enables a simple in-memory broker
        //全局使用的订阅前缀(客户端订阅路径上会体现出来)
        registry.setApplicationDestinationPrefixes("/app/");
        //点对点使用的订阅前缀(客户端订阅路径上会体现出来),不设置的话,默认也是/user/
        registry.setUserDestinationPrefix("/user/");
    }
}
3.控制器
@Controller
public class DefaultController {

    @GetMapping("/")
    @ResponseBody
    public String helloWord() {
        return "helloWord";
    }
    @GetMapping("/login")
    public String login() {
        return "login";
    }
    //注入SimpMessagingTemplate 用于点对点消息发送
    @Autowired
   private SimpMessagingTemplate messagingTemplate;

    @MessageMapping("/sendPublicMessage") //这里是客户端发送消息对应的路径,等于configureMessageBroker中配置的setApplicationDestinationPrefixes + 这路径即 /app/sendPublicMessage
    @SendTo("/topic/public") //也可以使用 messagingTemplate.convertAndSend(); 推送
    public ChatMessage sendPublicMessage(@Payload ChatMessage chatMessage) {
        return chatMessage;
    }


    @MessageMapping("/sendPrivateMessage") //这里是客户端发送消息对应的路径,等于configureMessageBroker中配置的setApplicationDestinationPrefixes + 这路径即 /app/sendPrivateMessage
    public void sendPrivateMessage(@Payload  ChatMessage msg,Principal principal) {
        msg.setSender(principal.getName());
        //将消息推送到指定路径上
        messagingTemplate.convertAndSendToUser(msg.getReceiver(), "topic/chat", msg);
    }

    /*
    注释方式推不过去这里没调通,有大神的话慢慢研究吧
    @SendToUser(value = "/topic/chat",broadcast=false)
    public ChatMessage sendPrivateMessage(@Payload  ChatMessage msg,Principal principal) {
        msg.setSender(principal.getName());
        return msg;
    }*/

}
4.消息载体:pojo对象
/**
 * 消息载体
 * Created by ejiyuan on 2018-7-11
 */
@JsonSerialize(include = JsonSerialize.Inclusion.NON_EMPTY)
public class ChatMessage {

    private String content;
    private String sender;
    private String receiver;

    public String getContent() {
        return content;
    }

    public void setContent(String content) {
        this.content = content;
    }

    public String getSender() {
        return sender;
    }

    public void setSender(String sender) {
        this.sender = sender;
    }
    public String getReceiver() {
        return receiver;
    }

    public void setReceiver(String receiver) {
        this.receiver = receiver;
    }


}
5.客户端聊天html页面
<!DOCTYPE html>
<html xmlns="http://www.w3.org/1999/xhtml" xmlns:th="http://www.thymeleaf.org"
      xmlns:sec="http://www.thymeleaf.org/thymeleaf-extras-springsecurity3">
<meta charset="UTF-8"/>
<head>
    <title>聊天框</title>
    <script src="https://cdn.bootcss.com/sockjs-client/1.1.4/sockjs.min.js"></script>
    <script src="https://cdn.bootcss.com/stomp.js/2.3.3/stomp.min.js"></script>
    <script src=" https://code.jquery.com/jquery-3.3.1.min.js"></script>
    <script type="text/javascript">
        //ws /ws 的endpoint
        var sock = new SockJS('/ws'); //跟你的WebSocketConfig中配置要一致
        var stomp = Stomp.over(sock);
        //建立连接监听
        stomp.connect({}, function (frame) {
            stomp.subscribe('/topic/public', function (response) {
                $("#output").append('<b>公共消息:' + response.body + '</b><br/>');
            });
            //订阅 /user/topic/chat 发送的消息,这里与
            //在控制器的messagingTemplate.convertAndSendToUser中定义的订阅地址保持一致
            //这里多了 /user ,并且这个 /user是必须的,使用了 /user 才会将消息发送到指定用户
            stomp.subscribe("/user/topic/chat", function handleNotification(message) {
                console.log("msg" + message);
                $("#output").append('<b>' + message.body + '</b><br/>');
            });
        });
        //发送私有消息指定的人能收到
        function sendPrivateMsg() {
            stomp.send("/app/sendPrivateMessage", {}, JSON.stringify({
                'content': $("#text").val(),         //消息内容
                'receiver': $("#receiver").val()    //接收人
            }));
        }
        //发送公共消息 谁都能收到,自己也能收到
        function sendPublicMsg() {
            stomp.send("/app/sendPublicMessage", {}, JSON.stringify({
                'content': $("#text").val(),         //消息内容
            }));
        }
        //断开连接
       function stop() {
            sock.close();
        }
    </script>
</head>
<body>
<div>
    <textarea rows="4" cols="60" name="text" id="text"> </textarea> <br/>
    接收人:
    <input id="receiver" value=""/> <br/>
    <input type="button" value="私有消息" onclick="sendPrivateMsg()"/>
    <input type="button" value="公共消息" onclick="sendPublicMsg()"/>
    <input id="stop" type="button" onclick="stop()" value="断开"/>

</div>
<div id="output"></div>
</body>
</html>
三、测试:
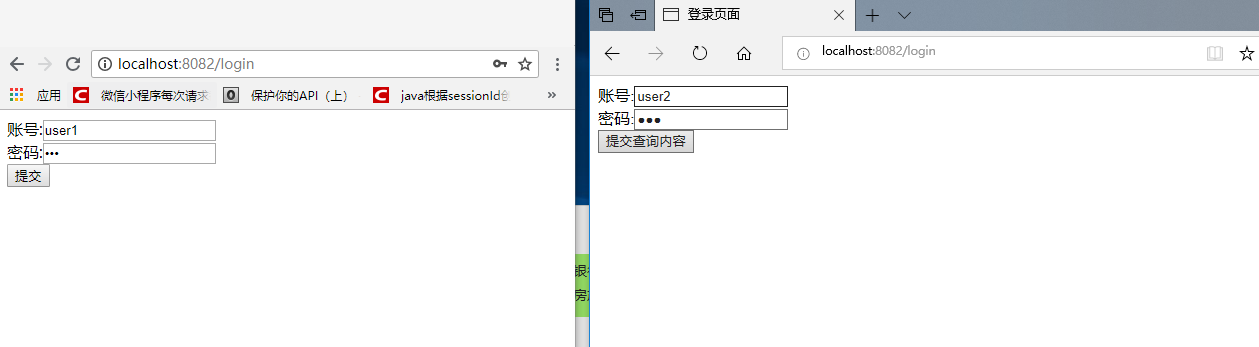
1,分别在两个浏览器中打开,登录user1与user2
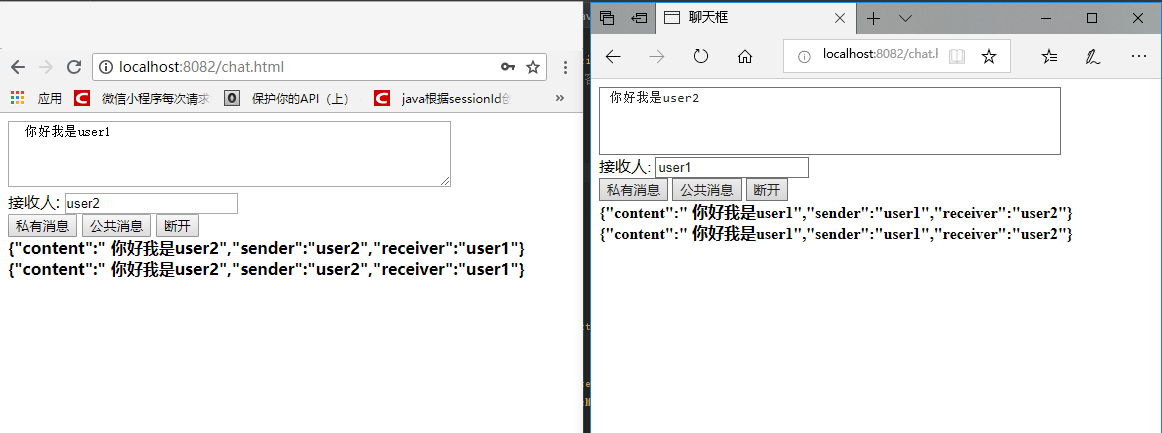
2,发消息测试
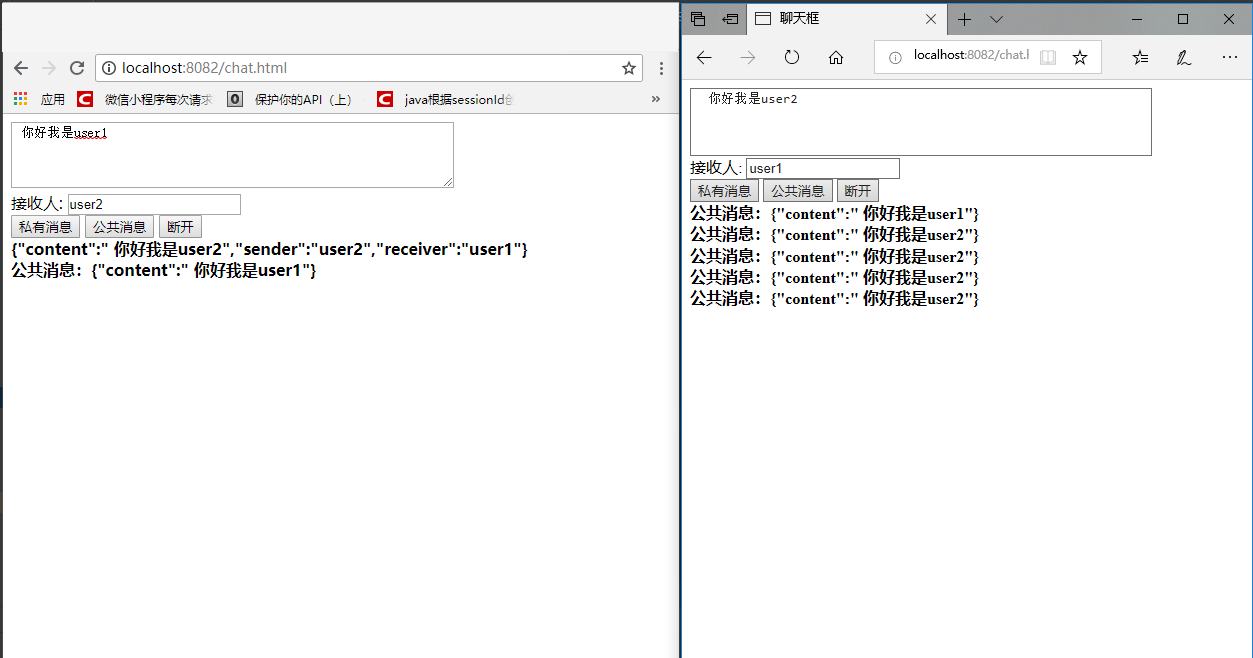
3.断开测试:断开后无论公共消息私有消息都无法再接收
五、源代码:https://download.csdn.net/download/ejiyuan/10536333
六、参考文档
1.WebSocket 教程:http://www.ruanyifeng.com/blog/2017/05/websocket.html
2.玩转spring boot——websocket:https://www.cnblogs.com/GoodHelper/p/7078381.html
3.Spring Boot 开发私有即时通信系统(WebSocket):https://www.jianshu.com/p/0f498adb3820

 浙公网安备 33010602011771号