Netty - 快速开始
一、为什么使用Netty
1. NIO的缺点
- NIO的类库和API繁杂,学习成本高,你需要熟练掌握Selector、ServerSocketChannel、SocketChannel、ByteBuffer等。
- 需要熟悉Java多线程编程。这是因为NIO编程涉及到Reactor模式,你必须对多线程和网络编程非常熟悉,才能写出高质量的NIO程序。
- 臭名昭著的epoll bug。它会导致Selector空轮询,最终导致CPU 100%。直到JDK1.7版本依然没得到根本性的解决。
2. Netty的优点
- API使用简单,学习成本低。
- 功能强大,内置了多种解码编码器,支持多种协议。
- 性能高,对比其他主流的NIO框架,Netty的性能最优。
- 社区活跃,发现BUG会及时修复,迭代版本周期短,不断加入新的功能。
- Dubbo、Elasticsearch都采用了Netty,质量得到验证。
二、Netty架构图
这张图片来自 Netty官网( https://netty.io )
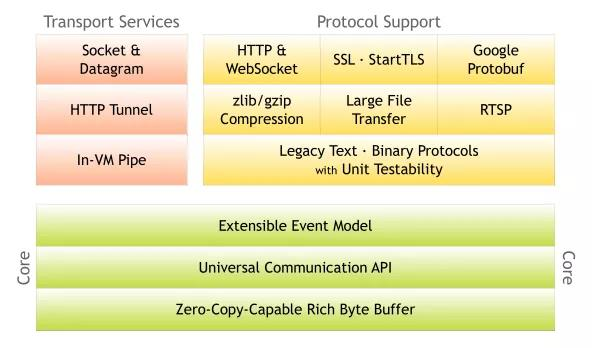
我们从上到下分析一下:
- 绿色的部分Core核心模块,包括零拷贝、API库、可扩展的事件模型。
- 橙色部分Protocol Support协议支持,包括Http协议、webSocket、SSL(安全套接字协议)、谷歌Protobuf协议、zlib/gzip压缩与解压缩、Large File Transfer大文件传输等等。
- 红色的部分Transport Services传输服务,包括Socket、Datagram、Http Tunnel等等。
以上可看出Netty的功能、协议、传输方式都比较全,比较强大。
三、搭建 Hello World
首先搭建一个HelloWord工程,先熟悉一下API,还有为后面的学习做铺垫。
以下面这张模型图为依据:
Netty Reactor 工作架构图
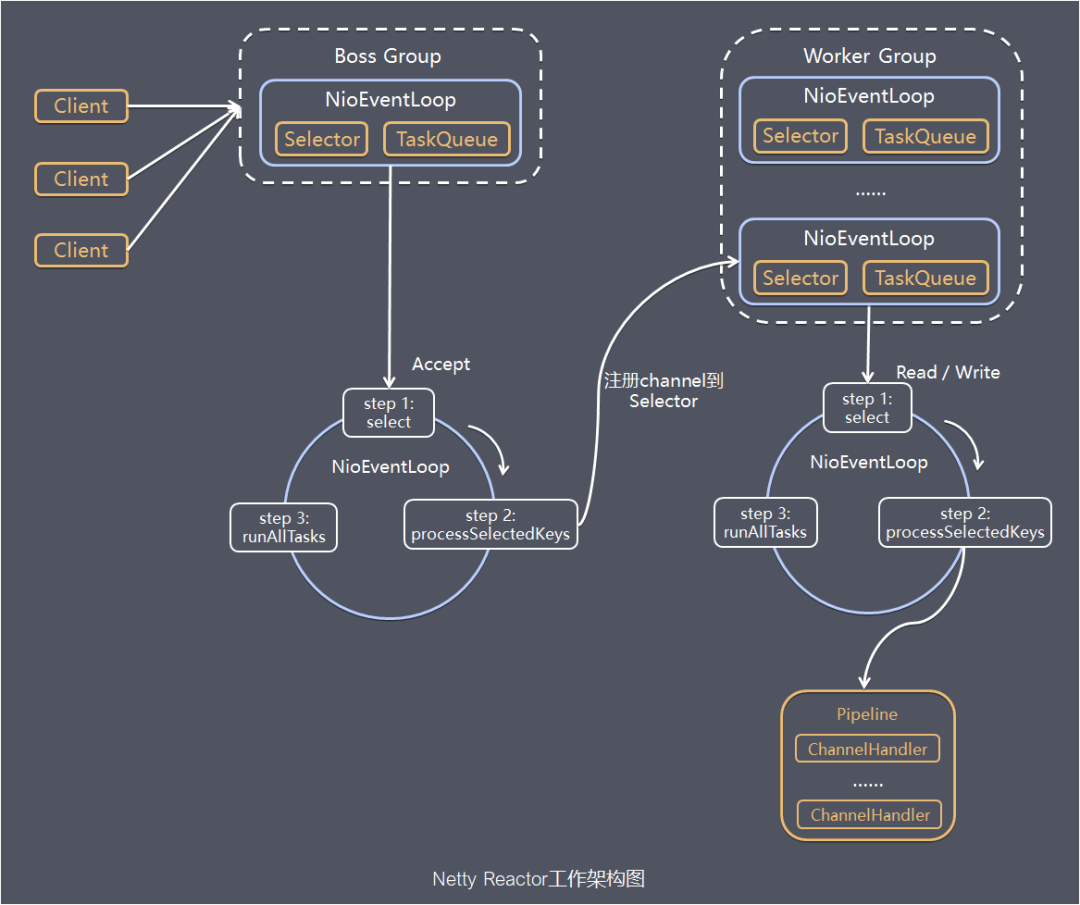
模型说明:
- Netty抽象出2组线程池:
- BossGroup:专门接受客户端的连接
- WorkerGroup:专门负责网络的读写
- BossGroup和WorkerGroup类型都是NioEventLoopGroup
- NioEventLoopGroup相当于一个事件循环组,这个组中含有多个事件循环,每一个事件循环是NioEventLoop
- NioEventLoop表示一个不断循环的执行处理任务的线程,每个NioEventLoop都有一个selector,用于监听绑定在其上的socket的网络通讯
- NioEventLoop可以有多个线程,即可以含有多个NioEventLoop
- 每个Boss NioEventLoop循环执行的步骤有3步:
- 轮询accept事件
- 处理accept事件,与client建立连接,生成NioSocketChannel,并将其注册到某个worker
- 处理任务队列的任务,即runAllTasks
- 每个Worker NIOEventLoop循环执行的步骤:
- 轮询read,write事件
- 处理I/O事件,即read,write事件,在对应NioSocketChannel处理
- 处理任务队列的任务,即runAllTasks
- 每个Worker NIOEventLoop处理业务时,会使用pipeline(管道),pipeline中包含了channel,即通过pipeline可以获取到对应channel,管道中维护了很多的处理器
0. 项目结构概览
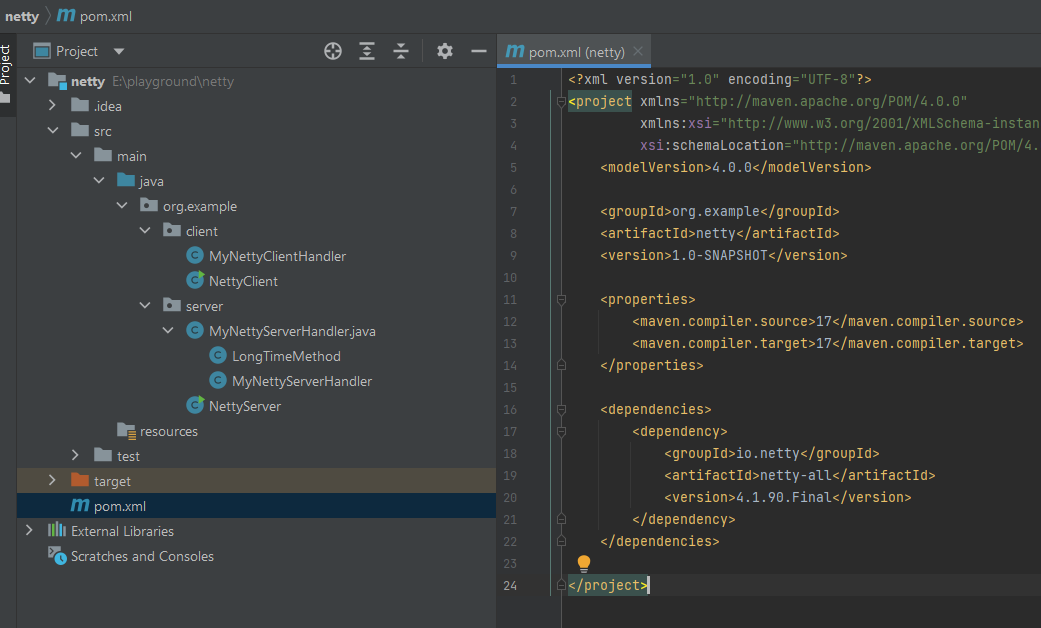
1. 引入Maven依赖
<dependency>
    <groupId>io.netty</groupId>
    <artifactId>netty-all</artifactId>
    <version>4.1.90.Final</version>
</dependency>
2. 创建服务端启动类
package org.example.server;

import io.netty.bootstrap.ServerBootstrap;
import io.netty.channel.ChannelFuture;
import io.netty.channel.ChannelInitializer;
import io.netty.channel.ChannelOption;
import io.netty.channel.EventLoopGroup;
import io.netty.channel.nio.NioEventLoopGroup;
import io.netty.channel.socket.SocketChannel;
import io.netty.channel.socket.nio.NioServerSocketChannel;

public class NettyServer {

    public static void main(String[] args) {
        NettyServer server = new NettyServer();
        server.start();
    }

    public  void start() {
        //创建两个线程组 boosGroup、workerGroup
        EventLoopGroup bossGroup = new NioEventLoopGroup();
        EventLoopGroup workerGroup = new NioEventLoopGroup();
        try {
            //创建服务端的启动对象,设置参数
            ServerBootstrap bootstrap = new ServerBootstrap();
            //设置两个线程组boosGroup和workerGroup
            bootstrap.group(bossGroup, workerGroup)
                //设置服务端通道实现类型
                .channel(NioServerSocketChannel.class)
                //设置线程队列未被 Accept 的等待队列的最大长度为 128
                //注意,此设置对已 Accept 的 ServerSocket 总数量没影响
                .option(ChannelOption.SO_BACKLOG, 128)
                //设置保持活动连接状态
                .childOption(ChannelOption.SO_KEEPALIVE, true)
                //给workerGroup的EventLoop对应的管道设置处理器
                .childHandler(new ChannelInitializer<SocketChannel>() {
                    //使用匿名内部类的形式初始化通道对象
                    @Override
                    protected void initChannel(SocketChannel socketChannel)
                        throws Exception {
                        //给pipeline管道设置处理器
                        socketChannel.pipeline().addLast(new MyNettyServerHandler());
                    }
                });
            System.out.println("java技术爱好者的服务端已经准备就绪...");
            //绑定端口号,启动服务端
            ChannelFuture channelFuture = bootstrap.bind(6666).sync();
            //对关闭通道进行监听
            channelFuture.channel().closeFuture().sync();
        } catch (InterruptedException e) {
            e.printStackTrace();
        } finally {
            bossGroup.shutdownGracefully();
            workerGroup.shutdownGracefully();
        }
    }

}
3. 创建服务端处理类
package org.example.server;

import io.netty.buffer.ByteBuf;
import io.netty.buffer.Unpooled;
import io.netty.channel.ChannelHandlerContext;
import io.netty.channel.ChannelInboundHandlerAdapter;
import io.netty.util.CharsetUtil;

import java.util.concurrent.TimeUnit;

/**
 * 自定义的Handler需要继承Netty规定好的HandlerAdapter
 * 才能被Netty框架所关联,有点类似SpringMVC的适配器模式
 **/
public class MyNettyServerHandler extends ChannelInboundHandlerAdapter {

    @Override
    public void channelRead(ChannelHandlerContext ctx, Object msg) throws Exception {
        //获取客户端发送过来的消息
        ByteBuf byteBuf = (ByteBuf) msg;
        String strMsg = byteBuf.toString(CharsetUtil.UTF_8);
        System.out.println("收到客户端" + ctx.channel().remoteAddress() + "发送的消息:" + strMsg);

        /*
         * 如果Handler处理器有一些长时间的业务处理,可以交给taskQueue异步处理。
         */
        // 长时间操作,不至于长时间的业务操作导致Handler阻塞。
        ctx.channel().eventLoop().execute(new LongTimeMethod(strMsg));

        // 延时任务队列和上面介绍的任务队列非常相似,只是多了一个可延迟一定时间再执行的设置
        ctx.channel().eventLoop().schedule(new LongTimeMethod(strMsg), 5, TimeUnit.SECONDS);
    }

    @Override
    public void channelReadComplete(ChannelHandlerContext ctx) throws Exception {
        //发送消息给客户端
        ctx.writeAndFlush(Unpooled.copiedBuffer("服务端已收到消息,并给你发送一个信号。", CharsetUtil.UTF_8));
    }

    @Override
    public void exceptionCaught(ChannelHandlerContext ctx, Throwable cause) throws Exception {
        //发生异常,关闭通道
        ctx.close();
    }

}

class LongTimeMethod implements Runnable{
    private  String message;

    public  LongTimeMethod (String message) {
        this.message = message;
    }

    @Override
    public void run() {
        try {
            Thread.sleep(5000);
            System.out.println("长时间的业务处理: " + message);
        } catch (InterruptedException e) {
            e.printStackTrace();
        }

    }
}
4. 创建客户端启动类
package org.example.client;

import io.netty.bootstrap.Bootstrap;
import io.netty.channel.ChannelFuture;
import io.netty.channel.ChannelFutureListener;
import io.netty.channel.ChannelInitializer;
import io.netty.channel.nio.NioEventLoopGroup;
import io.netty.channel.socket.SocketChannel;
import io.netty.channel.socket.nio.NioSocketChannel;

public class NettyClient {

    public static void main(String[] args) throws Exception {
        NettyClient client = new NettyClient();
        client.start();

    }

    public void start() {
        NioEventLoopGroup eventExecutors = new NioEventLoopGroup();
        try {
            //创建bootstrap对象,配置参数
            Bootstrap bootstrap = new Bootstrap();
            //设置线程组
            bootstrap.group(eventExecutors)
                    //设置客户端的通道实现类型
                    .channel(NioSocketChannel.class)
                    //使用匿名内部类初始化通道
                    .handler(new ChannelInitializer<SocketChannel>() {
                        @Override
                        protected void initChannel(SocketChannel channel) throws Exception {
                            //添加客户端通道的处理器
                            channel.pipeline().addLast(new MyNettyClientHandler());
                        }
                    });
            System.out.println("客户端准备就绪,随时可以起飞~");
            //连接服务端
            ChannelFuture channelFuture = bootstrap.connect("127.0.0.1", 6666).sync();
            this.addFutureListener(channelFuture);
            //对通道关闭进行监听
            channelFuture.channel().closeFuture().sync();
        } catch (InterruptedException e) {
            e.printStackTrace();
        } finally {
            //关闭线程组
            eventExecutors.shutdownGracefully();
        }
    }

    private void  addFutureListener (ChannelFuture future) {
        //添加监听器
        future.addListener(new ChannelFutureListener() {
            //使用匿名内部类,ChannelFutureListener接口
            //重写operationComplete方法
            @Override
            public void operationComplete(ChannelFuture future) throws Exception {
                //判断是否操作成功
                if (future.isSuccess()) {
                    System.out.println("连接成功");
                } else {
                    System.out.println("连接失败");
                }
            }
        });
    }


}
5. 创建客户端处理类
package org.example.client;


import io.netty.buffer.ByteBuf;
import io.netty.buffer.Unpooled;
import io.netty.channel.ChannelHandlerContext;
import io.netty.channel.ChannelInboundHandlerAdapter;
import io.netty.util.CharsetUtil;

public class MyNettyClientHandler extends ChannelInboundHandlerAdapter {

    @Override
    public void channelActive(ChannelHandlerContext ctx) throws Exception {
        //发送消息到服务端
        String msg = "你好服务端,见到你真高兴!!";
        System.out.println("给服务端发送信息:" + msg);

        ctx.writeAndFlush(Unpooled.copiedBuffer(msg, CharsetUtil.UTF_8));
    }

    @Override
    public void channelRead(ChannelHandlerContext ctx, Object msg) throws Exception {
        //接收服务端发送过来的消息
        ByteBuf byteBuf = (ByteBuf) msg;
        String strMsg = byteBuf.toString(CharsetUtil.UTF_8);

        System.out.println("收到服务端" + ctx.channel().remoteAddress() + "的消息:" + strMsg);
    }
}
6. 测试
先启动服务端,再启动客户端,就可以看到结果:
服务端结果:
# java技术爱好者的服务端已经准备就绪...
# 收到客户端/127.0.0.1:11972发送的消息:你好服务端,见到你真高兴!!
# 长时间的业务处理: 你好服务端,见到你真高兴!!
# 长时间的业务处理: 你好服务端,见到你真高兴!!
客户端结果:
# 客户端准备就绪,随时可以起飞~
# 给服务端发送信息:你好服务端,见到你真高兴!!
# 连接成功
# 收到服务端/127.0.0.1:6666的消息:服务端已收到消息,并给你发送一个信号。
此 Netty 笔记为学习尚硅谷韩老师讲的 Netty 整理完成,原视频讲解十分详细,建议对 Netty 框架感兴趣的同学们可以看一遍原视频:
https://www.bilibili.com/video/BV1DJ411m7NR
Ref

 浙公网安备 33010602011771号