centos mysql初探 -- 配置、基本操作及问题
目录:
- centos安装mysql
- 使用mysql客户端进行简单操作
- python2和python3连接mysql
- mysql导入文件问题
- 死锁解决办法
- windows 7 远程连接 mysql 服务器
1、centos安装mysql
验证是否已有mysql:rpm -qa | grep mysql
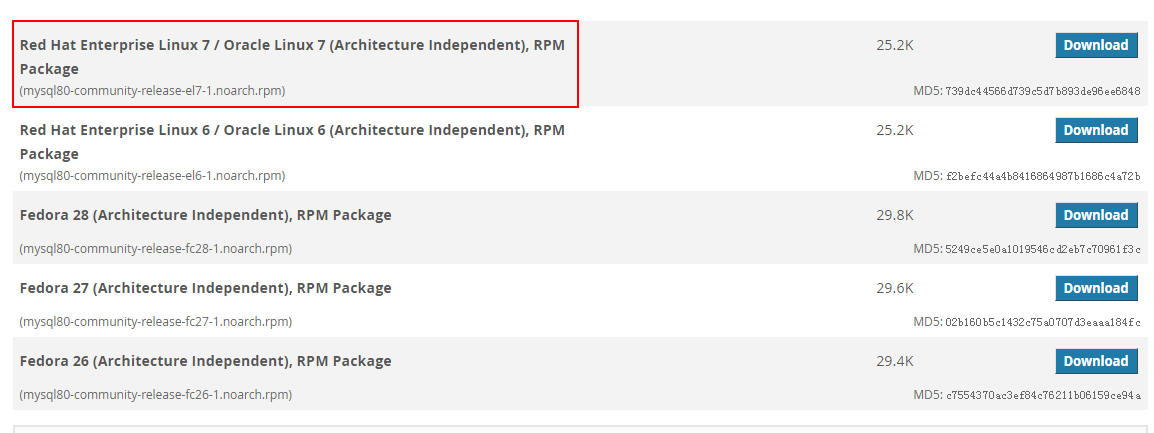
在官网 https://dev.mysql.com/downloads/repo/yum/ 下载rpm,注意下载第一个:
wget https://dev.mysql.com/get/mysql80-community-release-el7-1.noarch.rpm
下载到本地之后,开始yum安装:
rpm -ivh mysql57-community-release-el7-9.noarch.rpm
yum install mysql-server
启动mysql(注意启动只能有管理员权限的用户才可以启动):
sudo systemctl start mysqld
同理停止mysql也只能用管理员权限才可以停止:
sudo service stop mysqld
查看mysql运行状态:
systemctl status mysqld
验证mysql的安装:
mysqladmin --version
mysqladmin Ver 8.0.11 for Linux on x86_64 (MySQL Community Server - GPL)
2、使用客户端进行简单的操作
打开mysql,这里出现了一些问题,输入mysql时出现:
ERROR 1045 (28000): Access denied for user 'fangying'@'localhost' (using password: NO)
解决办法:
找到密码:
cat /var/log/mysqld.log | grep password
2018-06-12T05:16:18.752589Z 5 [Note] [MY-010454] [Server] A temporary password is generated for root@localhost: =h8p&,-IffXs
再用此密码登录即可:(-h是localhost时可以省略,其余的ip不可以省略)
/usr/bin/mysql -h localhost -u root -p
Enter password:
Welcome to the MySQL monitor. Commands end with ; or \g.
Your MySQL connection id is 11
Server version: 8.0.11
查看表之前会让你进行重设密码:
mysql> show databases;
ERROR 1820 (HY000): You must reset your password using ALTER USER statement before executing this statement.
mysql> alter user 'root'@'localhost' identified by 'your password';
Query OK, 0 rows affected (0.04 sec)
此时再次查看表示就可以了:
mysql> show databases;
+--------------------+
| Database           |
+--------------------+
| information_schema |
| mysql              |
| performance_schema |
| sys                |
+--------------------+
4 rows in set (0.00 sec)
3、python2和python3连接mysql
python2可以通过MySQLdb模块来连接mysql,python3则可以通过pymysql来连接mysql:
注意,这里遇到了一个问题:在mysql的客户端可以连接mysql的用户名和密码,在python3连接时,一直提示:
OperationalError: (1045, "Access denied for user 'root'@'localhost' (using password: NO)")
查找了非常多的资料,知道了出现这个错误提示的原因应该是,没找到密码,比如没输入密码,这个混淆使得我找了很久都找不到解决的办法,因为实际上这个提示不够明确!
在使用python2中的MySQLdb模块去连接mysql时的错误提示是:
password' cannot be loaded: /usr/lib64/mysql/plugin/caching_sha2_password.so: cannot open shared object file: No such file or directory")
用这个错误提示去查找解决办法时,立刻就找到了:创建用户使用 mysql_native_password密码(虽然也不是完全一样的问题,但是的确问题得到了解决)
CREATE USER 'root'@'%' IDENTIFIED WITH mysql_native_password BY 'pMQiEge1ikst7S_6tlXzBOmt_4b';
grant all on *.* to 'root'@'%';
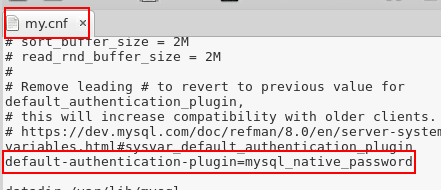
问题在于MySQL8.0.11版本默认的认证方式是caching_sha2_password (而在MySQL5.7版本则为mysql_native_password),为了修改默认认证方式(之后创建密码时),可以修改配置文件/etc/my.cnf:
另:
centos7 python2中MySQLdb模块的安装:
yum install MySQL-python
import MySQLdb
4、mysql的导入问题
1)将本地文件导入到mysql中
将本地文件导入到mysql中,需要指定local_infile这个参数为开启的状态,而做到这一点需要在安装的时候编译源码安装,且指定 --enable-local-infile,默认是不启动的(我安装的时候并没有这么做):
./configure --prefix=/usr/local/mysql --enable-local-infile
make install
所以这个方法就不行了;
如果编译的时候没有这么做,又不想重新编译的话,那就可以在连接数据库时加入 --local-infile:
mysql -u echo -p --local-infile
此时在导入数据时要用 load data local 而不是 load data(这样会出错):
load data local infile '/home/fangying/GAna/aod_csv/aod_all_2015_1.csv' into table example fields terminated by ',' ignore 1 lines;
或者在配置文件/etc/my.cnf的[mysql]和[mysqld]都加上 local-infile=1,随后登录时不加 --local-infile也可以导入本地文件。
若有空值的话,需要把空值处改为‘\n’,否则对于数值型会把空值设为0,对于日期会把空值设为0000-00-00,还可以如下导入也可以使得:(如果想显示警告的话:--show-warnings )
load data local infile '/home/fangying/GAna/aod_csv/aod_all_2015_1.csv' into table example2 fields terminated by ',' ignore 1 lines (id,x,y,@vaod_value,ele,prs,tem,rhu,merra2,date_,win_avg) set aod_value=nullif(@vaod_value,'');
已解决的问题1:
将本地的文件导入到mysql中时,出现了错误:
ERROR 1290 (HY000): The MySQL server is running with the --secure-file-priv option so it cannot execute this statement
这个错误的原因是 --secure-file-priv 参数的设置问题,secure_file_priv参数用于限制LOAD DATA, SELECT …OUTFILE, LOAD_FILE()传到哪个指定目录。
- secure_file_priv 为 NULL 时,表示限制mysqld不允许导入或导出。
- secure_file_priv 为 /tmp 时,表示限制mysqld只能在/tmp目录中执行导入导出,其他目录不能执行。
- secure_file_priv 没有值时,表示不限制mysqld在任意目录的导入导出。
查看这个值:
show global variables like 'secure_file_priv'
                 Value                 Variable_name
0    /var/lib/mysql-files/    secure_file_priv
所以我们需要修改这个参数的值,打开配置文件/etc/my.cnf,加入:
secure_file_priv=''
再次查看变量值已经变成了 ‘’
已经解决的问题2:
在本地已经可以load data local了,但是在jupyter上还做不到这个:
这是因为我的jypyter添加的mysql kernel是直接用的git上面别人写好的程序,在这个程序里面连接mysql用的是pymysql,只能指定常用的参数(host、user、password、port、charset),其他的参数都没有考虑,所以就无法添加local_infile=1这个参数(可以修改源代码),嫌麻烦就不做了。
python连接mysql时,只要指定了 local-infile=1 在操作时就可以local data local了。所以问题还是出在了 local infile 参数的问题上。
但是我比较不理解的是,我在本地客户端连接mysql时只指定了一次 -- local-infile ,此后的连接都不指定这个参数,也是可以导入本地数据的,为什么呢?
2)将服务器上的文件导入到mysql中
使用load data,这里只可以上传配置文件中datadir中指定的位置的文件(/var/lib/mysql)和缓存位置(/tmp),其他的位置上的文件都不行:
load data infile '/var/lib/mysql/a.txt' into table example fields terminated by ',' ignore 1 lines;
可以修改datadir的值,有点麻烦。
注意:这里提到了缓存位置,实际上load data本来就是把数据读取到tmp位置中。
5、死锁解决办法
操作时出现以下错误提示:
1205, 'Lock wait timeout exceeded; try restarting transaction'
找出死锁,杀死:
select * from information_schema.innodb_trx

kill 22
直接在mysql中执行kill操作。
6、windows7 远程连接mysql 服务器
1)在centos 的mysql 服务器上创建一个允许ip为192.168.***.***的主机访问的用户并授权:(在mysql 8中必须先创建后授权,注意授权用户的权限)
create user 'username'@'192.168.***.***' identified by 'your password';
grant all privileges on *.* to username@192.168.***.***;
注意:这里创建用户的含义是ip为192.168.***.***的主机的username用户可以访问mysql服务器,并拥有这些权限。
2)在centos 开放mysql占用的端口:
sudo firewall-cmd --zone=public --add-port=3307/tcp --permanent
3)在windows 7命令行或者workbench连接即可:
mysql -h 192.168.***.*** -u username -p
在workbench中 ,database - connect database即可。

 浙公网安备 33010602011771号