

记一次flink入门学习笔记
团队有几个系统数据量偏大,且每天以几万条的数量累增。有一个系统每天需要定时读取数据库,并进行相关的业务逻辑计算,从而获取最新的用户信息,定时任务的整个耗时需要4小时左右。由于定时任务是夜晚执行,目前看来,系统还能抗1年,每天晚上可以把数据处理结束,第二天上班期间可以展示最新的数据。随着数据和业务的增加,亟需解决这个瓶颈。团队架构师决定使用flink大数据技术解决该瓶颈,所以本周开始学习与探索flink,并编写一些demo。
1.项目的搭建
flink项目依赖于jdk和maven,且要求jdk版本高于1.7,maven版本好像需要3.0以上。我使用的是jdk1.8,maven是3.6,如下图查看其版本

网上提供了3中方式搭建项目:
1.1.通过maven命令搭建
1 mvn archetype:generate \
2     -DarchetypeGroupId=org.apache.flink \
3     -DarchetypeArtifactId=flink-quickstart-java \
4     -DarchetypeVersion=1.7.2 \
5     -DgroupId=flink-project \
6     -DartifactId=flink-project \
7     -Dversion=0.1 \
8     -Dpackage=myflink \
9     -DinteractiveMode=false
1.2.通过flink提供的脚本搭建
curl https://flink.apache.org/q/quickstart.sh | bash
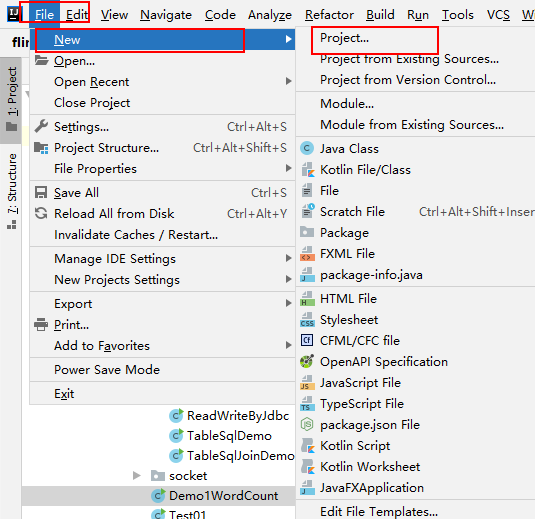
1.3.通过idea创建maven项目搭建
可直接通过一键next方式创建maven项目,可自行谷歌。
我使用flink模板创建的,如下图
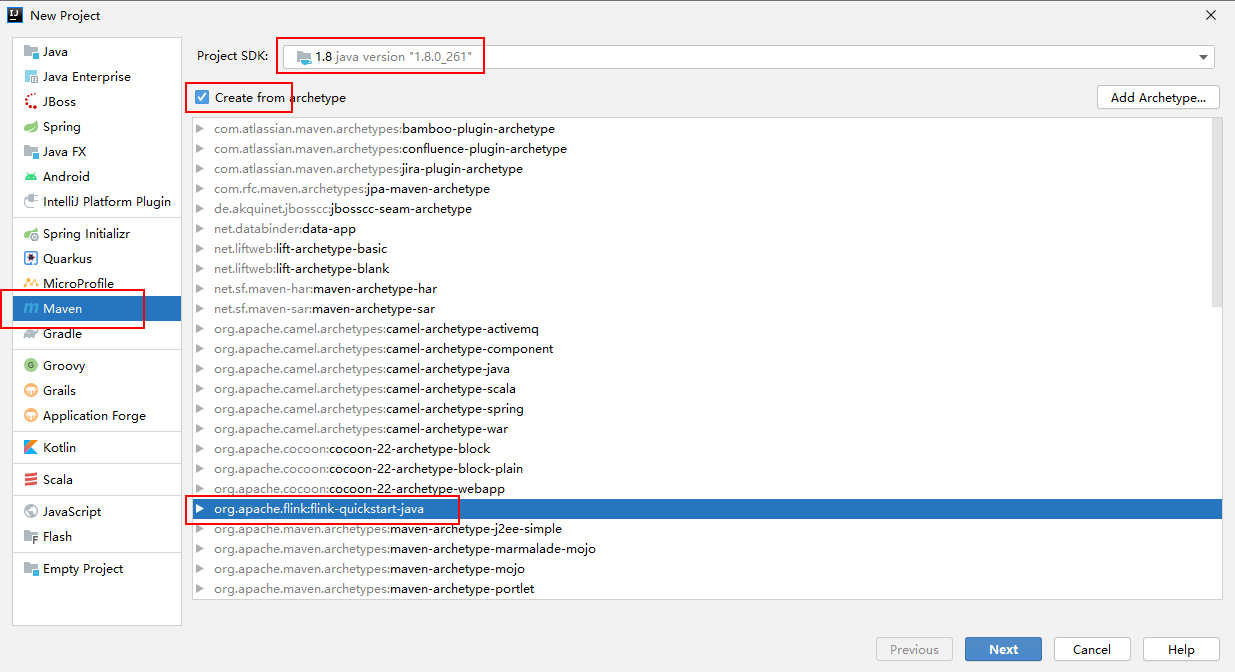
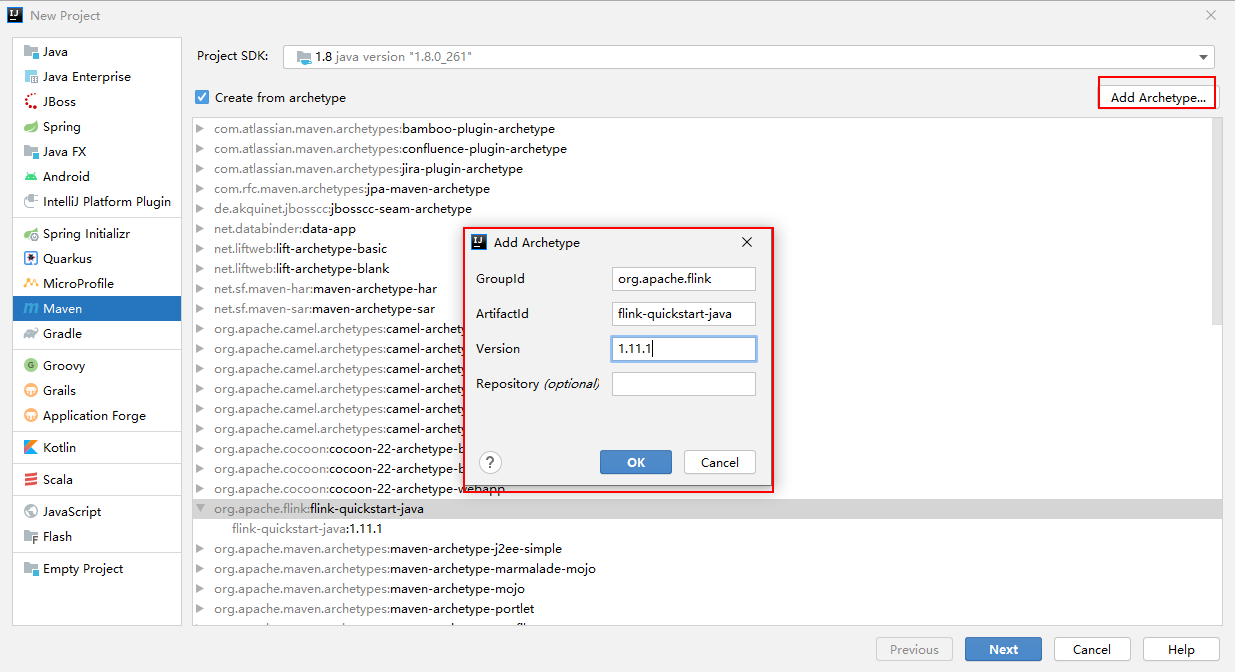
这里idea默认是没有flink-quickstart-java的模板的,需要先自行创建一个模板,如下图:其中flink的版本可自行选择,我maven网站查看flink的依赖热度,发现1.11.1目前使用的最多,所以也使用此版本。
项目创建好后,编写相关demo熟悉flink相关api
2.demo
demo主要分为获取有界数据源和无解数据源2类demo。有界数据源如文件、数据库等,无解数据源如MQ,Socket等。每类我都尝试了1个demo,同时利用flink的复杂api写了对数据库数据的聚合、过滤、联合,因为我们的业务主要是对数据库的读取、写入与计算。
2.1 Flink的Hello Word demo
这个demo是官网git提供的,类似一个hello word,入门flink应该首先看这个demo。可自行去官网git查看代码:https://github.com/apache/flink
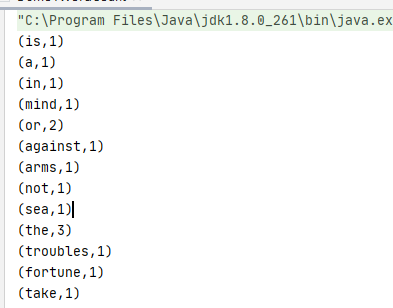
本地代码和执行结果如下:
1 public class Demo1WordCount { 2 public static void main(String[] args) throws Exception { 3 4 // set up the execution environment 5 final ExecutionEnvironment env = ExecutionEnvironment.getExecutionEnvironment(); 6 7 // get input data 8 DataSet<String> text = env.fromElements( 9 "To be, or not to be,--that is the question:--", 10 "Whether 'tis nobler in the mind to suffer", 11 "The slings and arrows of outrageous fortune", 12 "Or to take arms against a sea of troubles," 13 ); 14 15 DataSet<Tuple2<String, Integer>> counts = 16 // split up the lines in pairs (2-tuples) containing: (word,1) 17 text.flatMap(new LineSplitter()) 18 // group by the tuple field "0" and sum up tuple field "1" 19 .groupBy(0) //(i,1) (am,1) (chinese,1) 20 .sum(1); 21 22 // execute and print result 23 counts.print(); 24 25 } 26 27 // 28 // User Functions 29 // 30 31 /** 32 * Implements the string tokenizer that splits sentences into words as a user-defined 33 * FlatMapFunction. The function takes a line (String) and splits it into 34 * multiple pairs in the form of "(word,1)" (Tuple2<String, Integer>). 35 */ 36 public static final class LineSplitter implements FlatMapFunction<String, Tuple2<String, Integer>> { 37 38 @Override 39 public void flatMap(String value, Collector<Tuple2<String, Integer>> out) { 40 // normalize and split the line 41 String[] tokens = value.toLowerCase().split("\\W+"); 42 43 // emit the pairs 44 for (String token : tokens) { 45 if (token.length() > 0) { 46 out.collect(new Tuple2<String, Integer>(token, 1)); 47 } 48 } 49 } 50 } 51 }
2.2.读取有界数据:对mysql进行读取与写入
 1 public class ReadWriteByJdbc {
 2
 3     private static final Logger logger = LoggerFactory.getLogger(ReadWriteByJdbc.class);
 4     private static final String INSERT = "insert into flink_demo (name, password) values (?,?)";
 5     private static final String SELECT = "select name,description from flink_demo where description is not null";
 6
 7     public static void main(String[] args) throws Exception {
 8         String driverClass = "com.mysql.jdbc.Driver";
 9         String dbUrl = "jdbc:mysql://xxxxxxxxxx:xxxxxxxxxx/xxxxxxxxxx";
10         String userNmae = "xxxxxxxxxxxxxxx";
11         String passWord = "xxxxxxxxxxxxxxxx";
12
13         ExecutionEnvironment env = ExecutionEnvironment.getExecutionEnvironment();
14         String filePath = "file:///E:/4_data/flink.txt";
15         DataSet<Row> write = env.readCsvFile(filePath).fieldDelimiter("  ").types(String.class, String.class)
16                 .map(new MapFunction<Tuple2<String, String>, Row>() {
17                     @Override
18                     public Row map(Tuple2<String, String> stringIntegerTuple2) throws Exception {
19                         Row row = new Row(2);
20                         row.setField(0, stringIntegerTuple2.f0.getBytes("UTF-8"));
21                         row.setField(1, stringIntegerTuple2.f1.getBytes("UTF-8"));
22                         return row;
23                     }
24                 });
25         write.output(
26                 JDBCOutputFormat.buildJDBCOutputFormat()
27                         .setDrivername(driverClass)
28                         .setDBUrl(dbUrl)
29                         .setUsername(userNmae)
30                         .setPassword(passWord)
31                         .setQuery(INSERT)
32                         .finish()
33         );
34         env.execute();
35         logger.error("------------------数据写入mysql成功----------------");
36         Thread.sleep(5000);
37         DataSource<Row> read = env.createInput(JDBCInputFormat.buildJDBCInputFormat()
38                 .setDrivername(driverClass)
39                 .setDBUrl(dbUrl)
40                 .setUsername(userNmae)
41                 .setPassword(passWord)
42                 .setQuery(SELECT)
43                 .setRowTypeInfo(new RowTypeInfo(BasicTypeInfo.STRING_TYPE_INFO, BasicTypeInfo.INT_TYPE_INFO))
44                 .finish()
45         );
46         logger.error("------------------读取mysql数据如下---------------");
47         read.map(new MapFunction<Row, Tuple2<String, String>>() {
48             @Override
49             public Tuple2<String, String> map(Row row) throws Exception {
50                 return new Tuple2<>(row.getField(0).toString(), row.getField(1).toString());
51             }
52         }).print();
53         logger.error("===============Succeed==============");
54     }
55
56 }
2.3.读取无解数据,读取socket数据
首先需要启动一个socket,linux和苹果系统自带socket插件。windows系统可以通过netcat模拟socket,netcat软件可在网盘下载:
链接:https://pan.baidu.com/s/1oet8Vaza4D2JKdYBwwF7qA 提取码:wrx4
直接在window上启动:nc -L -p 9000 -v ,如图

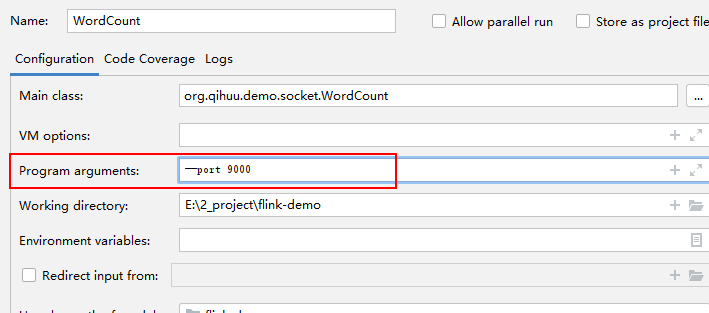
表示socket已经正常启动,监听端口为9000,所以idea中执行java方法时,也需要设置端口为9000,设置方式如下:--port 9000
执行java方法,如下图表示socket连接上了:

直接在dos中输入字符串,idea就会接受到这些字符串,并通过flink对字符串进行处理。
 1 public class WordCount {
 2     public static void main(String[] args) throws Exception {
 3         //定义socket的端口号
 4         int port;
 5         try {
 6             ParameterTool parameterTool = ParameterTool.fromArgs(args);
 7             port = parameterTool.getInt("port");
 8         } catch (Exception e) {
 9             System.err.println("没有指定port参数,使用默认值9000");
10             port = 9000;
11         }
12
13         //获取运行环境
14         StreamExecutionEnvironment env = StreamExecutionEnvironment.getExecutionEnvironment();
15
16         //连接socket获取输入的数据
17         DataStreamSource<String> text = env.socketTextStream("127.0.0.1", port, "\n");
18
19         //计算数据
20         DataStream<WordWithCount> windowCount = text.flatMap(new FlatMapFunction<String, WordWithCount>() {
21             public void flatMap(String value, Collector<WordWithCount> out) throws Exception {
22                 String[] splits = value.split("\\s");
23                 for (String word : splits) {
24                     out.collect(new WordWithCount(word, 1L));
25                 }
26             }
27         })//打平操作,把每行的单词转为<word,count>类型的数据
28                 .keyBy("word")//针对相同的word数据进行分组
29                 .timeWindow(Time.seconds(2), Time.seconds(1))//指定计算数据的窗口大小和滑动窗口大小
30                 .sum("count");
31
32         //把数据打印到控制台
33         windowCount.print()
34                 .setParallelism(1);//使用一个并行度
35         //注意:因为flink是懒加载的,所以必须调用execute方法,上面的代码才会执行
36         env.execute("streaming word count");
37
38     }
39
40     /**
41      * 主要为了存储单词以及单词出现的次数
42      */
43     public static class WordWithCount {
44         public String word;
45         public long count;
46
47         public WordWithCount() {
48         }
49
50         public WordWithCount(String word, long count) {
51             this.word = word;
52             this.count = count;
53         }
54
55         @Override
56         public String toString() {
57             return "WordWithCount{" +
58                     "word='" + word + '\'' +
59                     ", count=" + count +
60                     '}';
61         }
62     }
63 }
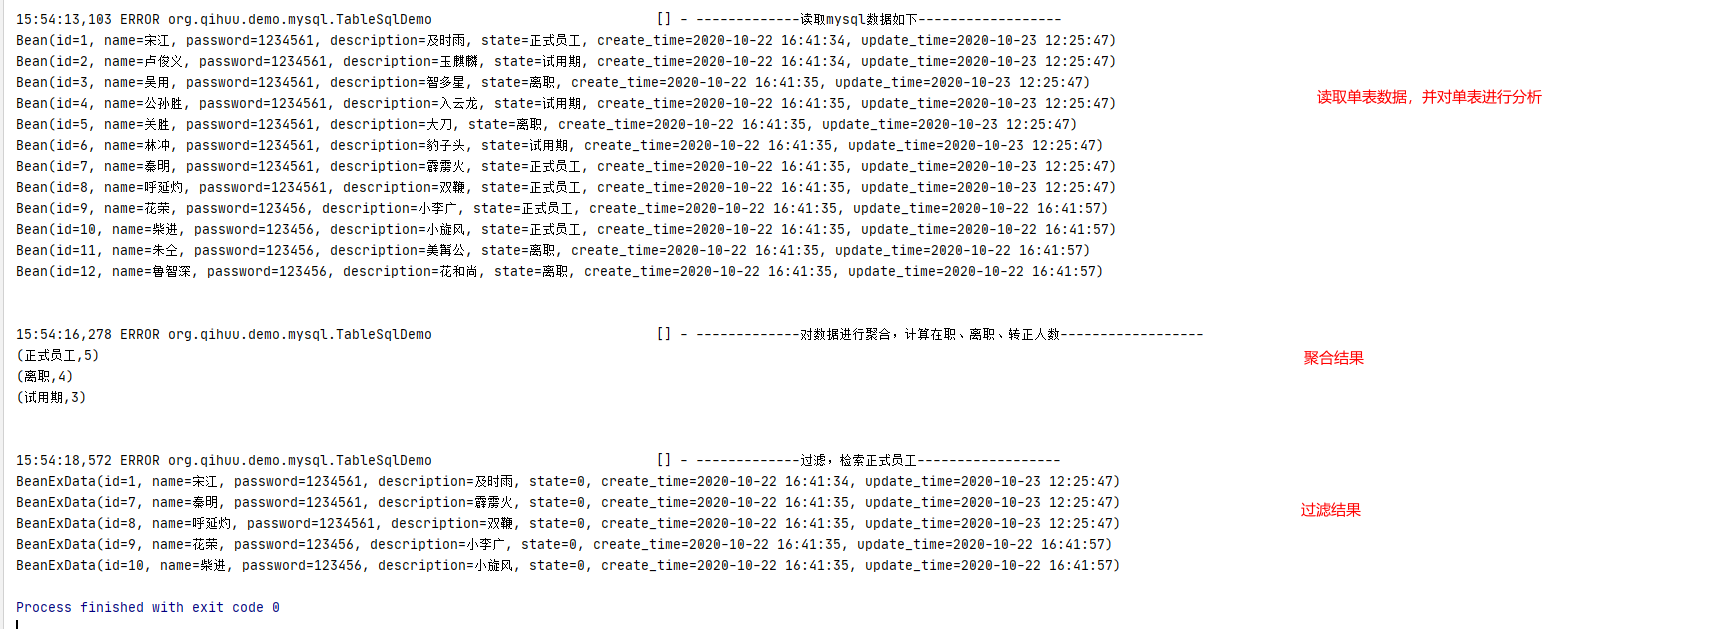
2.4.读取mysql数据,并进行聚合与过滤
 1 @Slf4j
 2 public class TableSqlDemo {
 3     private static final String SELECT = "select cast(id as char) as id, name, password, description, cast(state as char ) as state, " +
 4             "cast(create_time as char ) as create_time, cast(update_time as char ) as update_time from flink_demo;";
 5     // 数据库相关配置
 6     private static final String DRIVER_CLASS = "com.mysql.jdbc.Driver";
 7     private static final String DBURL = "jdbc:mysql://ip:port/flink_data?characterEncoding=utf-8&useSSL=false";
 8     private static final String USERNMAE = "xxxxx";
 9     private static final String PASSWORD = "xxxxxx";
10
11     public static void main(String[] args) throws Exception {
12
13
14         ExecutionEnvironment env = ExecutionEnvironment.getExecutionEnvironment();
15         // 读取数据库数据
16         DataSource<Row> read = env.createInput(JDBCInputFormat.buildJDBCInputFormat()
17                 .setDrivername(DRIVER_CLASS)
18                 .setDBUrl(DBURL)
19                 .setUsername(USERNMAE)
20                 .setPassword(PASSWORD)
21                 .setQuery(SELECT)
22                 .setRowTypeInfo(new RowTypeInfo(BasicTypeInfo.STRING_TYPE_INFO, BasicTypeInfo.STRING_TYPE_INFO, BasicTypeInfo.STRING_TYPE_INFO,
23                         BasicTypeInfo.STRING_TYPE_INFO, BasicTypeInfo.STRING_TYPE_INFO, BasicTypeInfo.STRING_TYPE_INFO, BasicTypeInfo.STRING_TYPE_INFO))
24                 .finish()
25         );
26         System.out.println(System.getProperty("line.separator"));
27         log.error("-------------读取mysql数据如下------------------");
28         // 将row当做字符串输出
29 //        read.map((MapFunction<Row, String>) row -> row.toString()).print();
30
31         // 通过map方法映射到bean实体,并输出
32         read.map((MapFunction<Row, Bean>) row -> new Bean(
33                 row.getField(0).toString(),
34                 row.getField(1).toString(),
35                 row.getField(2).toString(),
36                 row.getField(3).toString(),
37                 switchState(row.getField(4).toString()),
38                 row.getField(5).toString(),
39                 row.getField(6).toString())).print();
40         System.out.println(System.getProperty("line.separator"));
41         log.error("-------------对数据进行聚合,计算在职、离职、转正人数------------------");
42         // 对读取到的数据做聚合
43         DataSet<Tuple2<String, Integer>> counts =
44                 read.flatMap(new StateCount())
45                         .groupBy(0)
46                         .sum(1);
47
48         // execute and print result
49         counts.print();
50
51         // 维表关联
52 //        TableConfig tableConfig = TableConfig.DEFAULT();
53         BatchTableEnvironment tableEnv = new BatchTableEnvironment(env, TableConfig.DEFAULT());
54         tableEnv.registerDataSet("t1", read, "id, name, password, description, state, create_time, update_time");
55         /*System.out.println(System.getProperty("line.separator"));
56         log.error("-------------打印数据类型(这块有点坑)------------------");
57         tableEnv.sqlQuery("select id, name, password, description, state, create_time, update_time from t1").printSchema();*/
58         System.out.println(System.getProperty("line.separator"));
59         log.error("-------------过滤,检索正式员工------------------");
60         Table t2 = tableEnv.sqlQuery("select id, name, password, description, state, create_time, update_time from t1").where("state = '0'");
61         DataSet<BeanExData> beanExDataDataSet = tableEnv.toDataSet(t2, BeanExData.class);
62         beanExDataDataSet.print();
63     }
64
65     // 聚合计算,通过实现FlatMapFunction接口,重写flatMap,来实现自己的逻辑
66     public static final class StateCount implements FlatMapFunction<Row, Tuple2<String, Integer>> {
67         @Override
68         public void flatMap(Row in, Collector<Tuple2<String, Integer>> out) throws Exception {
69             // pos 4 为状态字段
70             out.collect(new Tuple2<>(switchState(in.getField(4).toString()), 1));
71         }
72     }
73
74     // 转成中文,可视化
75     private static String switchState(String state) {
76         String _state = "";
77         if (StringUtils.isBlank(state)) {
78             return _state;
79         }
80         switch (state) {
81             case "0":
82                 _state = "正式员工";
83                 break;
84             case "1":
85                 _state = "试用期";
86                 break;
87             case "2":
88                 _state = "离职";
89                 break;
90         }
91         return _state;
92     }
93 }
结果如下:
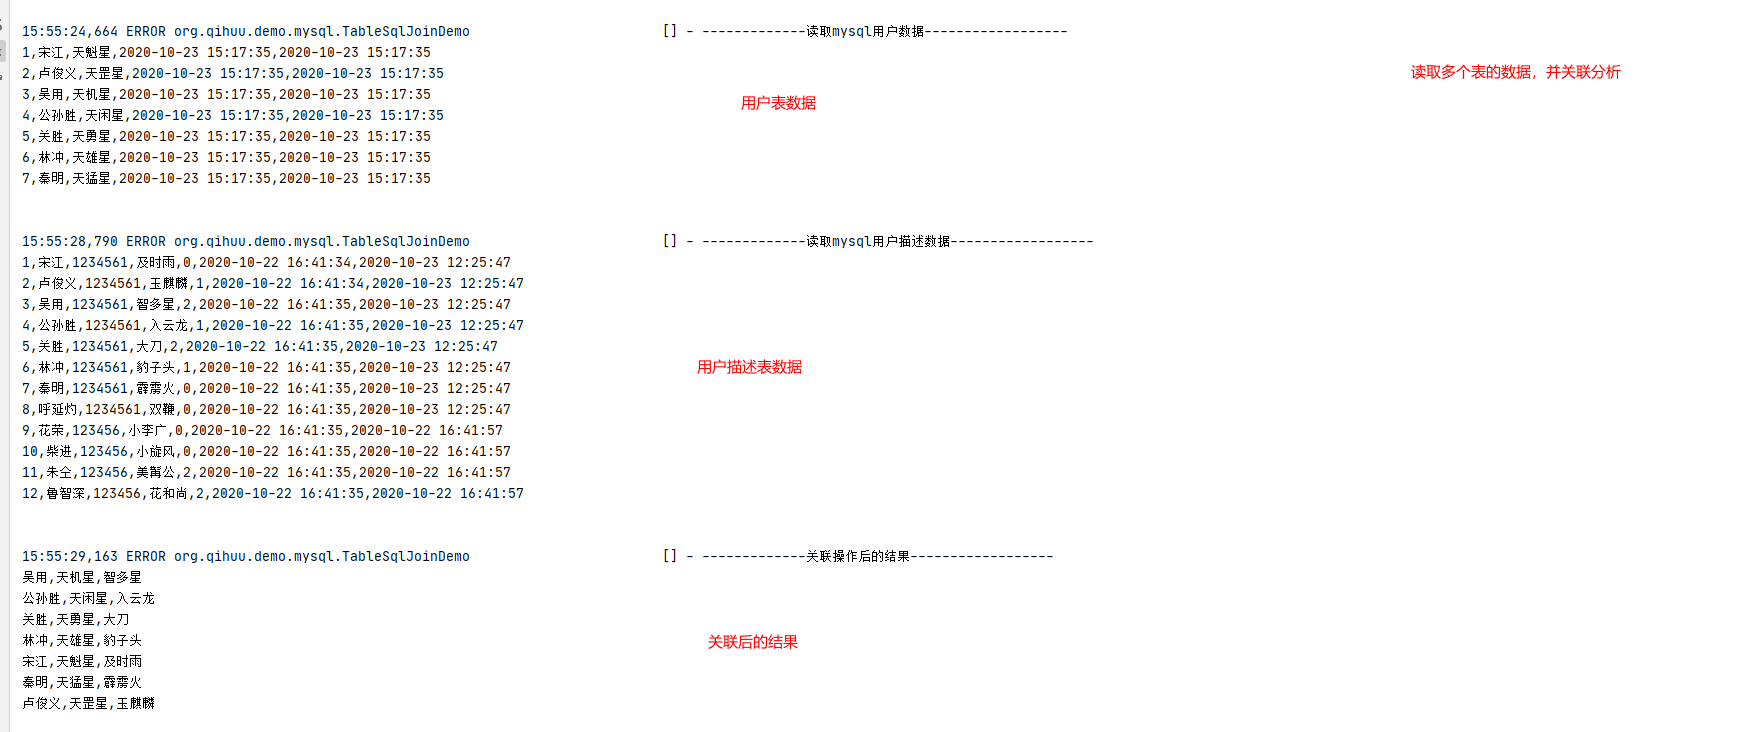
2.5.读取mysql多个table数据,并进行关联
 1 @Slf4j
 2 public class TableSqlJoinDemo {
 3     private static final String SELECT = "select cast(id as char) as id, name, description, " +
 4             "cast(create_time as char) as create_time, cast(update_time as char) as update_time from user_info;";
 5
 6     private static final String USER_INFO = "select cast(id as char) as id, name, password, description, cast(state as char ) as state, " +
 7             "cast(create_time as char ) as create_time, cast(update_time as char ) as update_time from flink_demo;";
 8     // 数据库相关配置
 9     private static final String DRIVER_CLASS = "com.mysql.jdbc.Driver";
10     private static final String DBURL = "jdbc:mysql://ip:port/db?characterEncoding=utf-8&useSSL=false";
11     private static final String USERNMAE = "username";
12     private static final String PASSWORD = "password";
13
14     public static void main(String[] args) throws Exception {
15
16
17         ExecutionEnvironment env = ExecutionEnvironment.getExecutionEnvironment();
18         // 读取数据库数据
19         DataSource<Row> user = env.createInput(JDBCInputFormat.buildJDBCInputFormat().setDrivername(DRIVER_CLASS)
20                 .setDBUrl(DBURL).setUsername(USERNMAE).setPassword(PASSWORD).setQuery(SELECT)
21                 .setRowTypeInfo(new RowTypeInfo(BasicTypeInfo.STRING_TYPE_INFO, BasicTypeInfo.STRING_TYPE_INFO, BasicTypeInfo.STRING_TYPE_INFO,
22                         BasicTypeInfo.STRING_TYPE_INFO, BasicTypeInfo.STRING_TYPE_INFO))
23                 .finish()
24         );
25         System.out.println(System.getProperty("line.separator"));
26         log.error("-------------读取mysql用户数据------------------");
27         // 将row当做字符串输出
28         user.map((MapFunction<Row, String>) row -> row.toString()).print();
29         // 用户信息数据注册到flink
30         BatchTableEnvironment tableEnv = new BatchTableEnvironment(env, TableConfig.DEFAULT());
31         // 第三个参数表示字段,如果不填,表示注册所有的数据
32         tableEnv.registerDataSet("user", user,"id, name, description, create_time, update_time");
33         Table userTable = tableEnv.scan("user");
34         tableEnv.registerTable("userTable", userTable);
35         // 输出字段的类型,保证数据的正确性
36 //        System.out.println(System.getProperty("line.separator"));
37         /*log.error("-------------查看数据类型------------------");
38
39         userTable.printSchema();*/
40
41         // 读取数据库数据
42         DataSource<Row> userInfo = env.createInput(JDBCInputFormat.buildJDBCInputFormat()
43                 .setDrivername(DRIVER_CLASS).setDBUrl(DBURL).setUsername(USERNMAE).setPassword(PASSWORD).setQuery(USER_INFO)
44                 .setRowTypeInfo(new RowTypeInfo(BasicTypeInfo.STRING_TYPE_INFO, BasicTypeInfo.STRING_TYPE_INFO, BasicTypeInfo.STRING_TYPE_INFO,
45                         BasicTypeInfo.STRING_TYPE_INFO, BasicTypeInfo.STRING_TYPE_INFO, BasicTypeInfo.STRING_TYPE_INFO, BasicTypeInfo.STRING_TYPE_INFO))
46                 .finish()
47         );
48         System.out.println(System.getProperty("line.separator"));
49         log.error("-------------读取mysql用户描述数据------------------");
50         // 将row当做字符串输出
51         userInfo.map((MapFunction<Row, String>) row -> row.toString()).print();
52         // 用户信息数据注册到flink
53         tableEnv.registerDataSet("userInfo", userInfo, "id, name, password, description, state, create_time, update_time");
54         Table userInfoTable = tableEnv.scan("userInfo");
55         tableEnv.registerTable("userInfoTable", userInfoTable);
56         // 输出字段的类型,保证数据的正确性
57 //        System.out.println(System.getProperty("line.separator"));
58         /*log.error("-------------查看数据类型------------------");
59         userInfoTable.printSchema();*/
60         // 关联操作
61         System.out.println(System.getProperty("line.separator"));
62         log.error("-------------关联操作后的结果------------------");
63         Table result = tableEnv.sqlQuery("select a.name, a.description, b.description as description1  from userTable a,userInfoTable  b where a.name = b.name");
64         DataSet<Row> beanExDataDataSet = tableEnv.toDataSet(result, Row.class);
65         beanExDataDataSet.map((MapFunction<Row, String>) row -> row.toString()).print();
66     }
67
68  76 96 }
运行结果如下:
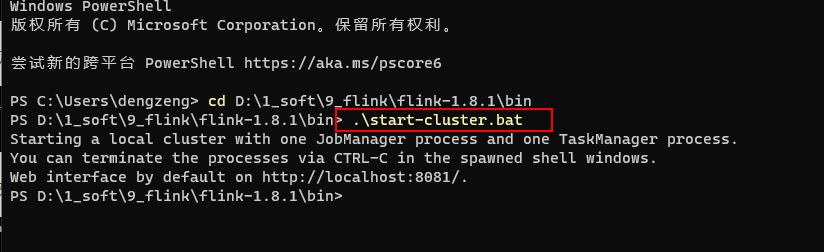
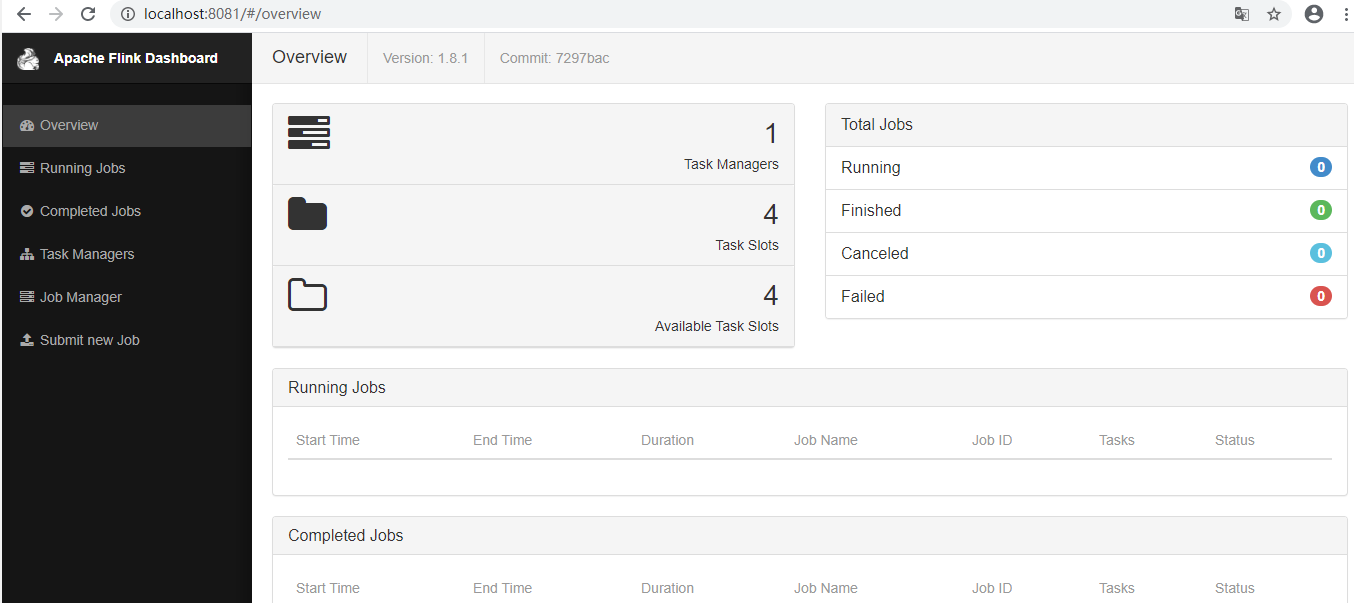
3.windows搭建flink服务
官网下载flink软件:https://flink.apache.org/downloads.html,版本可自行选择
dos上启动.bat文件即可,端口号默认为8081,可通过浏览器访问
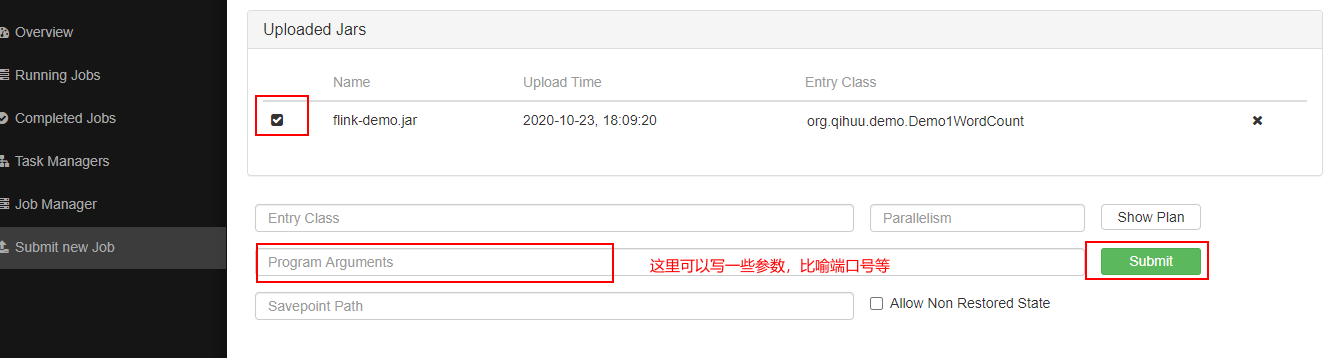
通过idea将java文件打包成jar,并上传到flink服务端上,如图
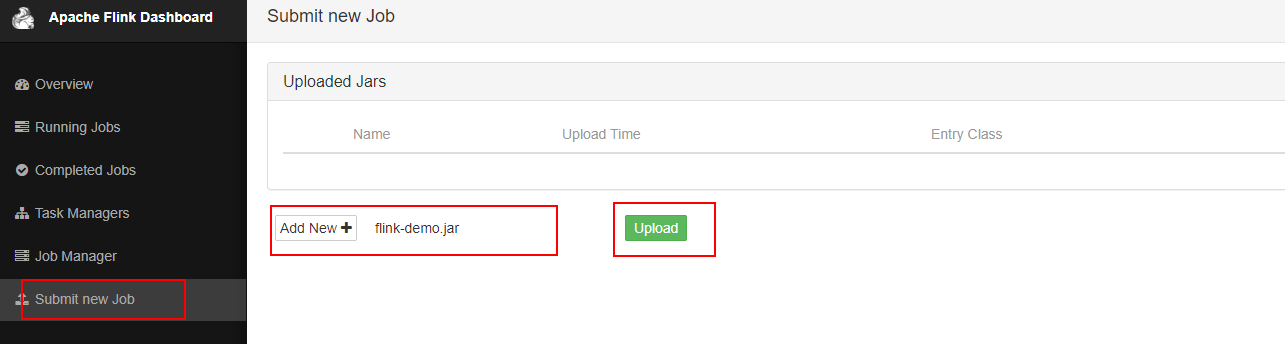
执行submit,既可执行一个任务

 浙公网安备 33010602011771号