一、首页样式调整
HomeView.vue
<template>
  <div class="home">
    <Header></Header>
    <Banner></Banner>
    <div class="course">
      <el-row>
        <el-col :span="6" v-for="(o, index) in 8" :key="o" class="course_detail">
          <el-card :body-style="{ padding: '0px' }">
            <img src="https://tva1.sinaimg.cn/large/e6c9d24egy1h1g0zd133mj20l20a875i.jpg"
                 class="image">
            <div style="padding: 14px;">
              <span>推荐课程</span>
              <div class="bottom clearfix">
                <time class="time">价格:9.9</time>
                <el-button type="text" class="button">查看详情</el-button>
              </div>
            </div>
          </el-card>
        </el-col>
      </el-row>
    </div>
    <img src="https://tva1.sinaimg.cn/large/e6c9d24egy1h1g112oiclj224l0u0jxl.jpg" alt="" width="100%" height="500px">
    <Footer></Footer>
  </div>

</template>


<script>
import Header from '@/components/Header'
import Banner from '@/components/Banner'
import Footer from '@/components/Footer'

export default {
  name: 'HomeView',
  data() {
    return {}
  },
  components: {
    Header, Banner, Footer
  }

}
</script>

<style scoped>
 .time {
    font-size: 13px;
    color: #999;
  }

  .bottom {
    margin-top: 13px;
    line-height: 12px;
  }

  .button {
    padding: 0;
    float: right;
  }

  .image {
    width: 100%;
    display: block;
  }

  .clearfix:before,
  .clearfix:after {
      display: table;
      content: "";
  }

  .clearfix:after {
      clear: both
  }
  .course_detail {
    padding: 50px;
  }
</style>
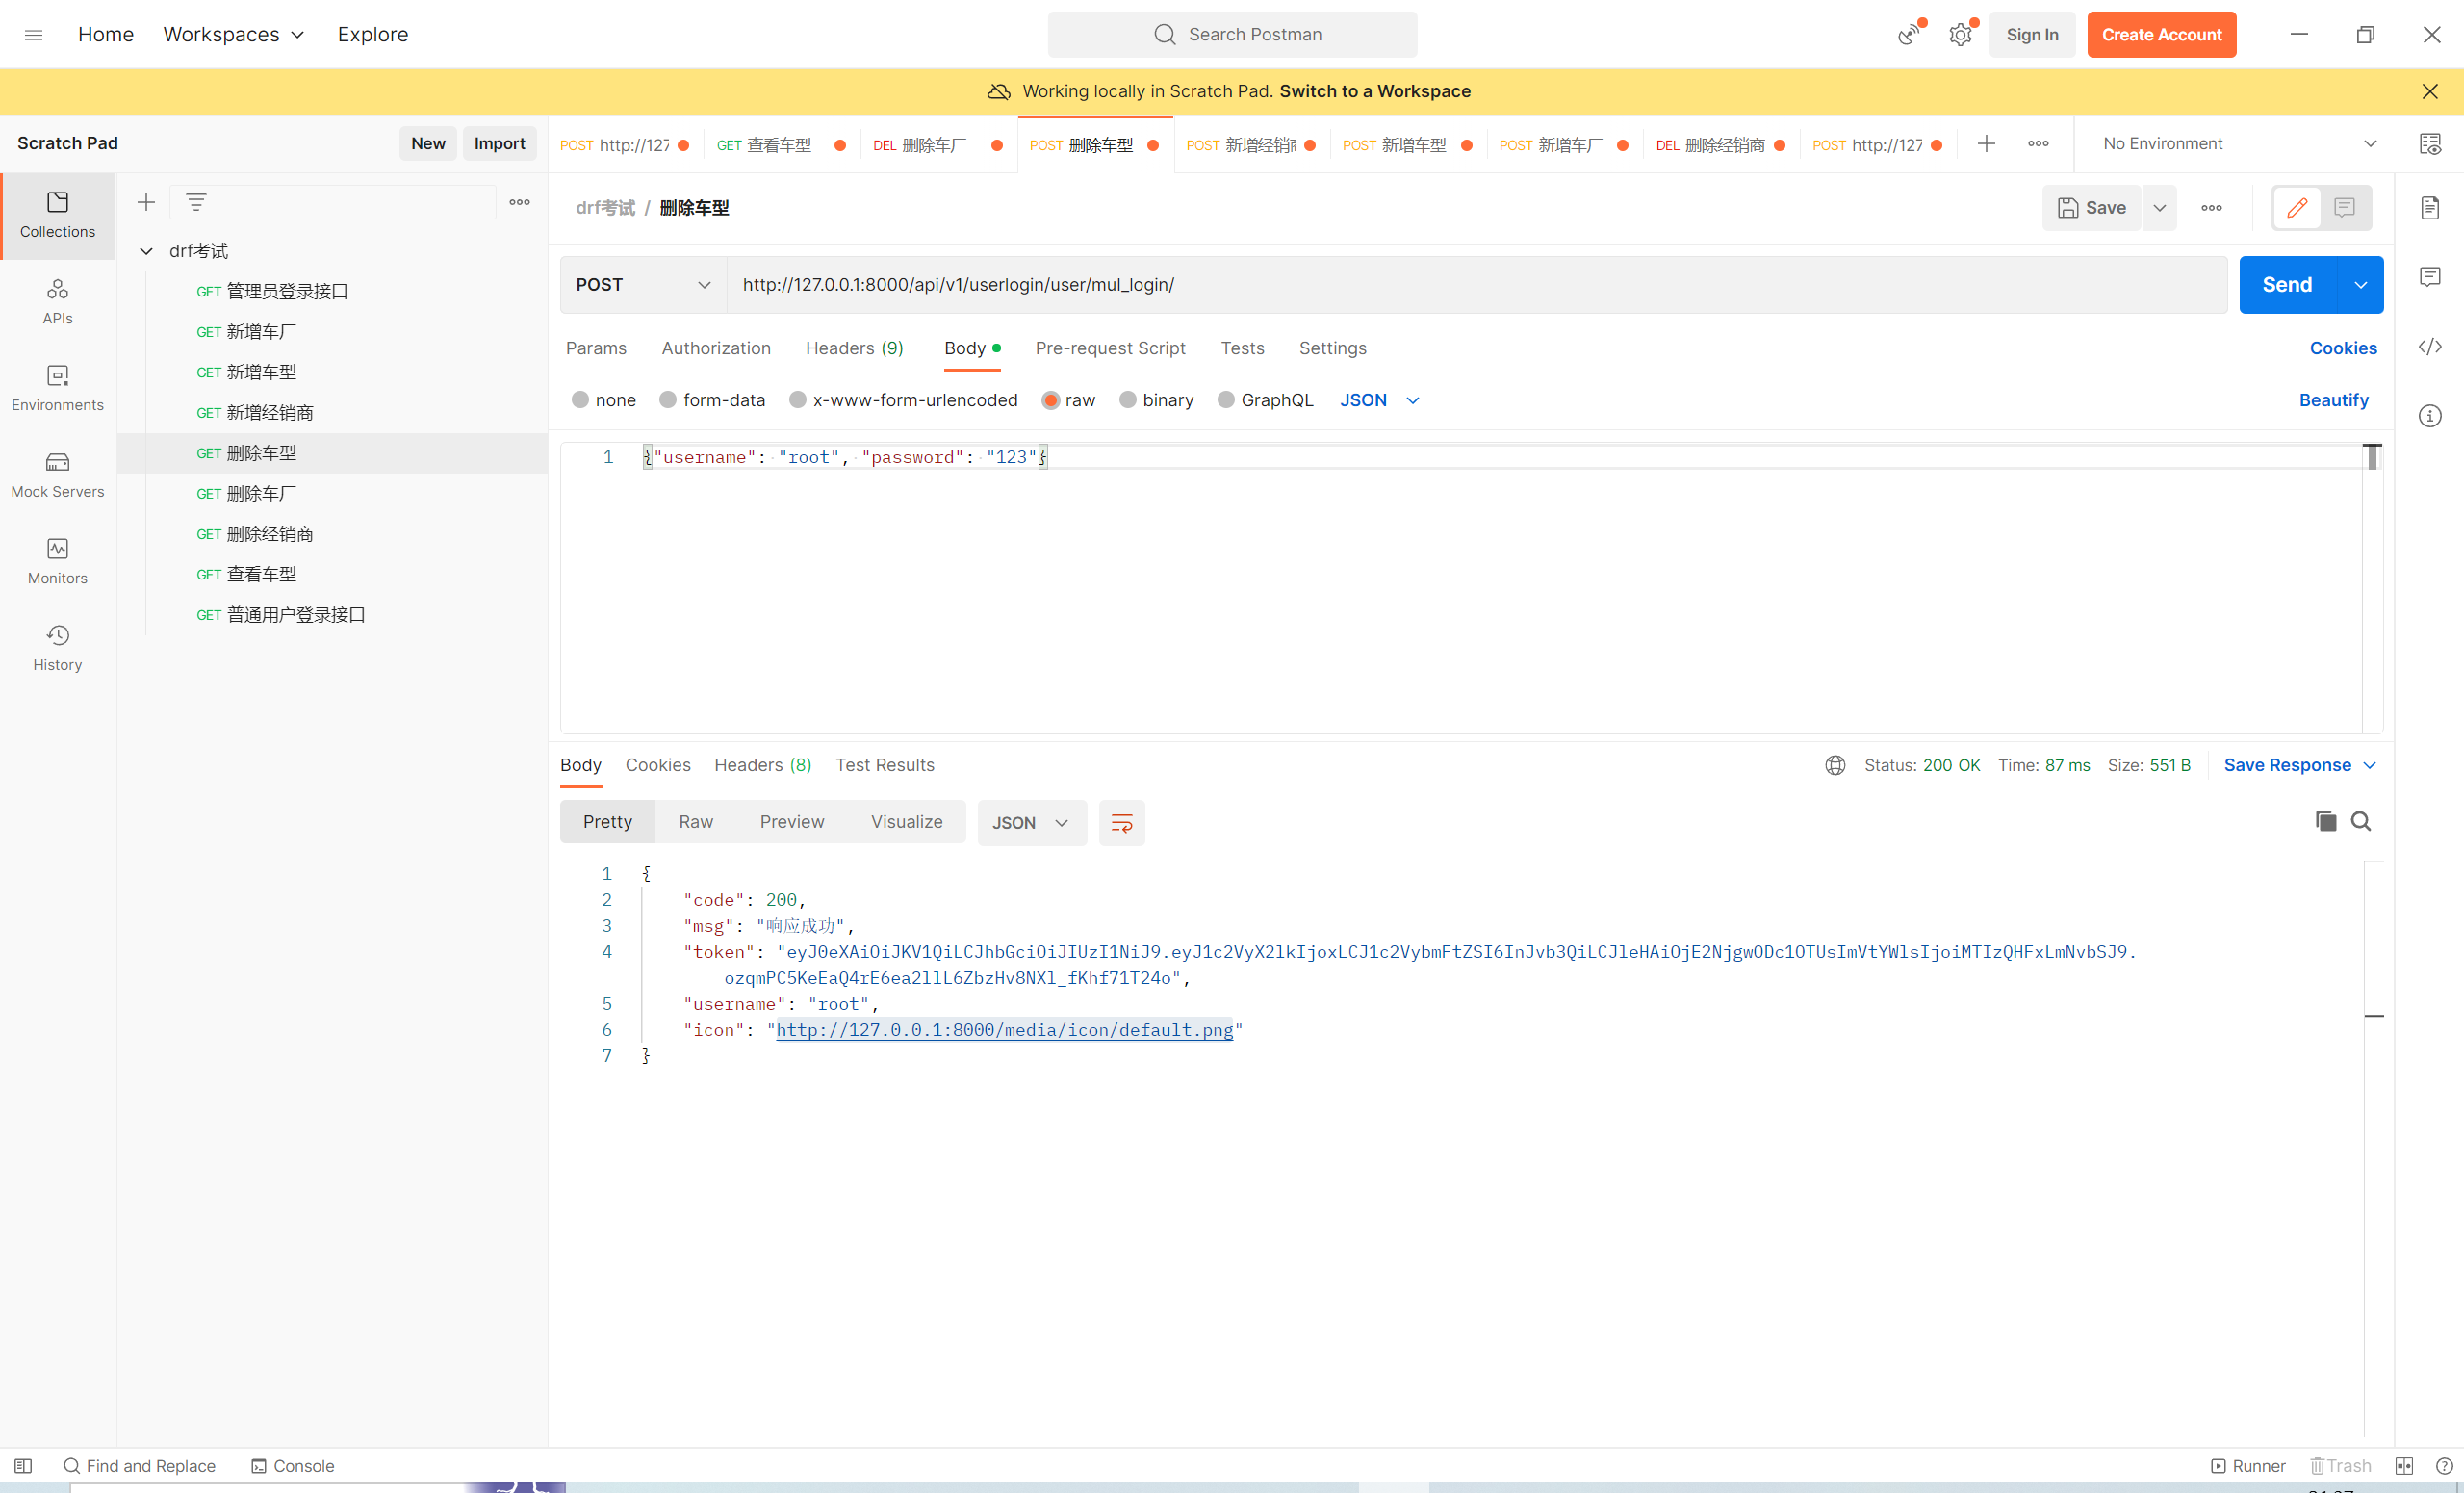
二、多方式登录接口
# 登录注册
    1 多方式登录,如用户名、邮箱、手机号+密码
    2 验证码登录
    3 发送验证码
    4 校验手机号是否存在
    5 手机号注册接口
user/views.py
from rest_framework.viewsets import ViewSet
from rest_framework.decorators import action
from .serializer import UserMulLoginSerializer
from utils.response import APIResponse


class UserView(ViewSet):
    @action(methods=['POST'], detail=False)
    def mul_login(self, request):
        res = UserMulLoginSerializer(data=request.data)   # 实例化得到一个res对象
        res.is_valid(raise_exception=True)   # 如果校验不通过,直接抛异常,这行代码会执行序列化类字段自己的校验规则,以及局部钩子和全局钩子
        # 校验通过,就在序列化类中签发token,这里就可以直接取出token
        token = res.context.get('token')
        username = res.context.get('username')
        icon = res.context.get('icon')
        return APIResponse(token=token, username=username, icon=icon)
user/serializer.py
from rest_framework.serializers import ModelSerializer
from .models import UserInfo
import re
from django.contrib.auth import authenticate
from rest_framework.exceptions import ValidationError
from rest_framework_jwt.settings import api_settings

jwt_payload_handler = api_settings.JWT_PAYLOAD_HANDLER
jwt_encode_handler = api_settings.JWT_ENCODE_HANDLER


# 只用于校验用户登录,不做序列化和反序列化
class UserMulLoginSerializer(ModelSerializer):
    class Meta:
        model = UserInfo
        fields = ['username', 'password']

    def _get_user(self, attrs):
         username = attrs.get('username')
        password = attrs.get('password')
        if re.match(r'^1[3-9][0-9]{9}$', username):
            user = UserInfo.objects.filter(mobile=username).first()
        elif re.match(r'^.+@.+$', username):
            user = UserInfo.objects.filter(email=username).first()
        else:
            user = UserInfo.objects.filter(username=username).first()

        if user and user.check_password(password):
            return user
        else:
            raise APIException('用户名或密码错误')

    def _get_token(self, user):
        try:
            payload = jwt_payload_handler(user)
            token = jwt_encode_handler(payload)
            return token
        except Exception as e:
            raise APIException(str(e))

    def validate(self, attrs):
        # 校验用户是否存在
        user = self._get_user(attrs)
        # 签发token
        token = self._get_token(user)
        self.context['token'] = token
        self.context['username'] = user.username
        self.context['icon'] = 'http://127.0.0.1:8000/media/' + str(user.icon)
        return attrs
luffy_api/urls.py总路由
from django.contrib import admin
from django.urls import path, include
from django.views.static import serve
from django.conf import settings

urlpatterns = [
    path('admin/', admin.site.urls),
    path('api/v1/home/', include('home.urls')),
    path('api/v1/userlogin/', include('user.urls')),

    # 开启media访问
    path('media/<path:path>', serve, kwargs={'document_root': settings.MEDIA_ROOT}),
]
user/urls.py子路由
from . import views
from rest_framework.routers import SimpleRouter

route = SimpleRouter()

route.register('user', views.UserView, 'user')

urlpatterns = [

]

urlpatterns += route.urls
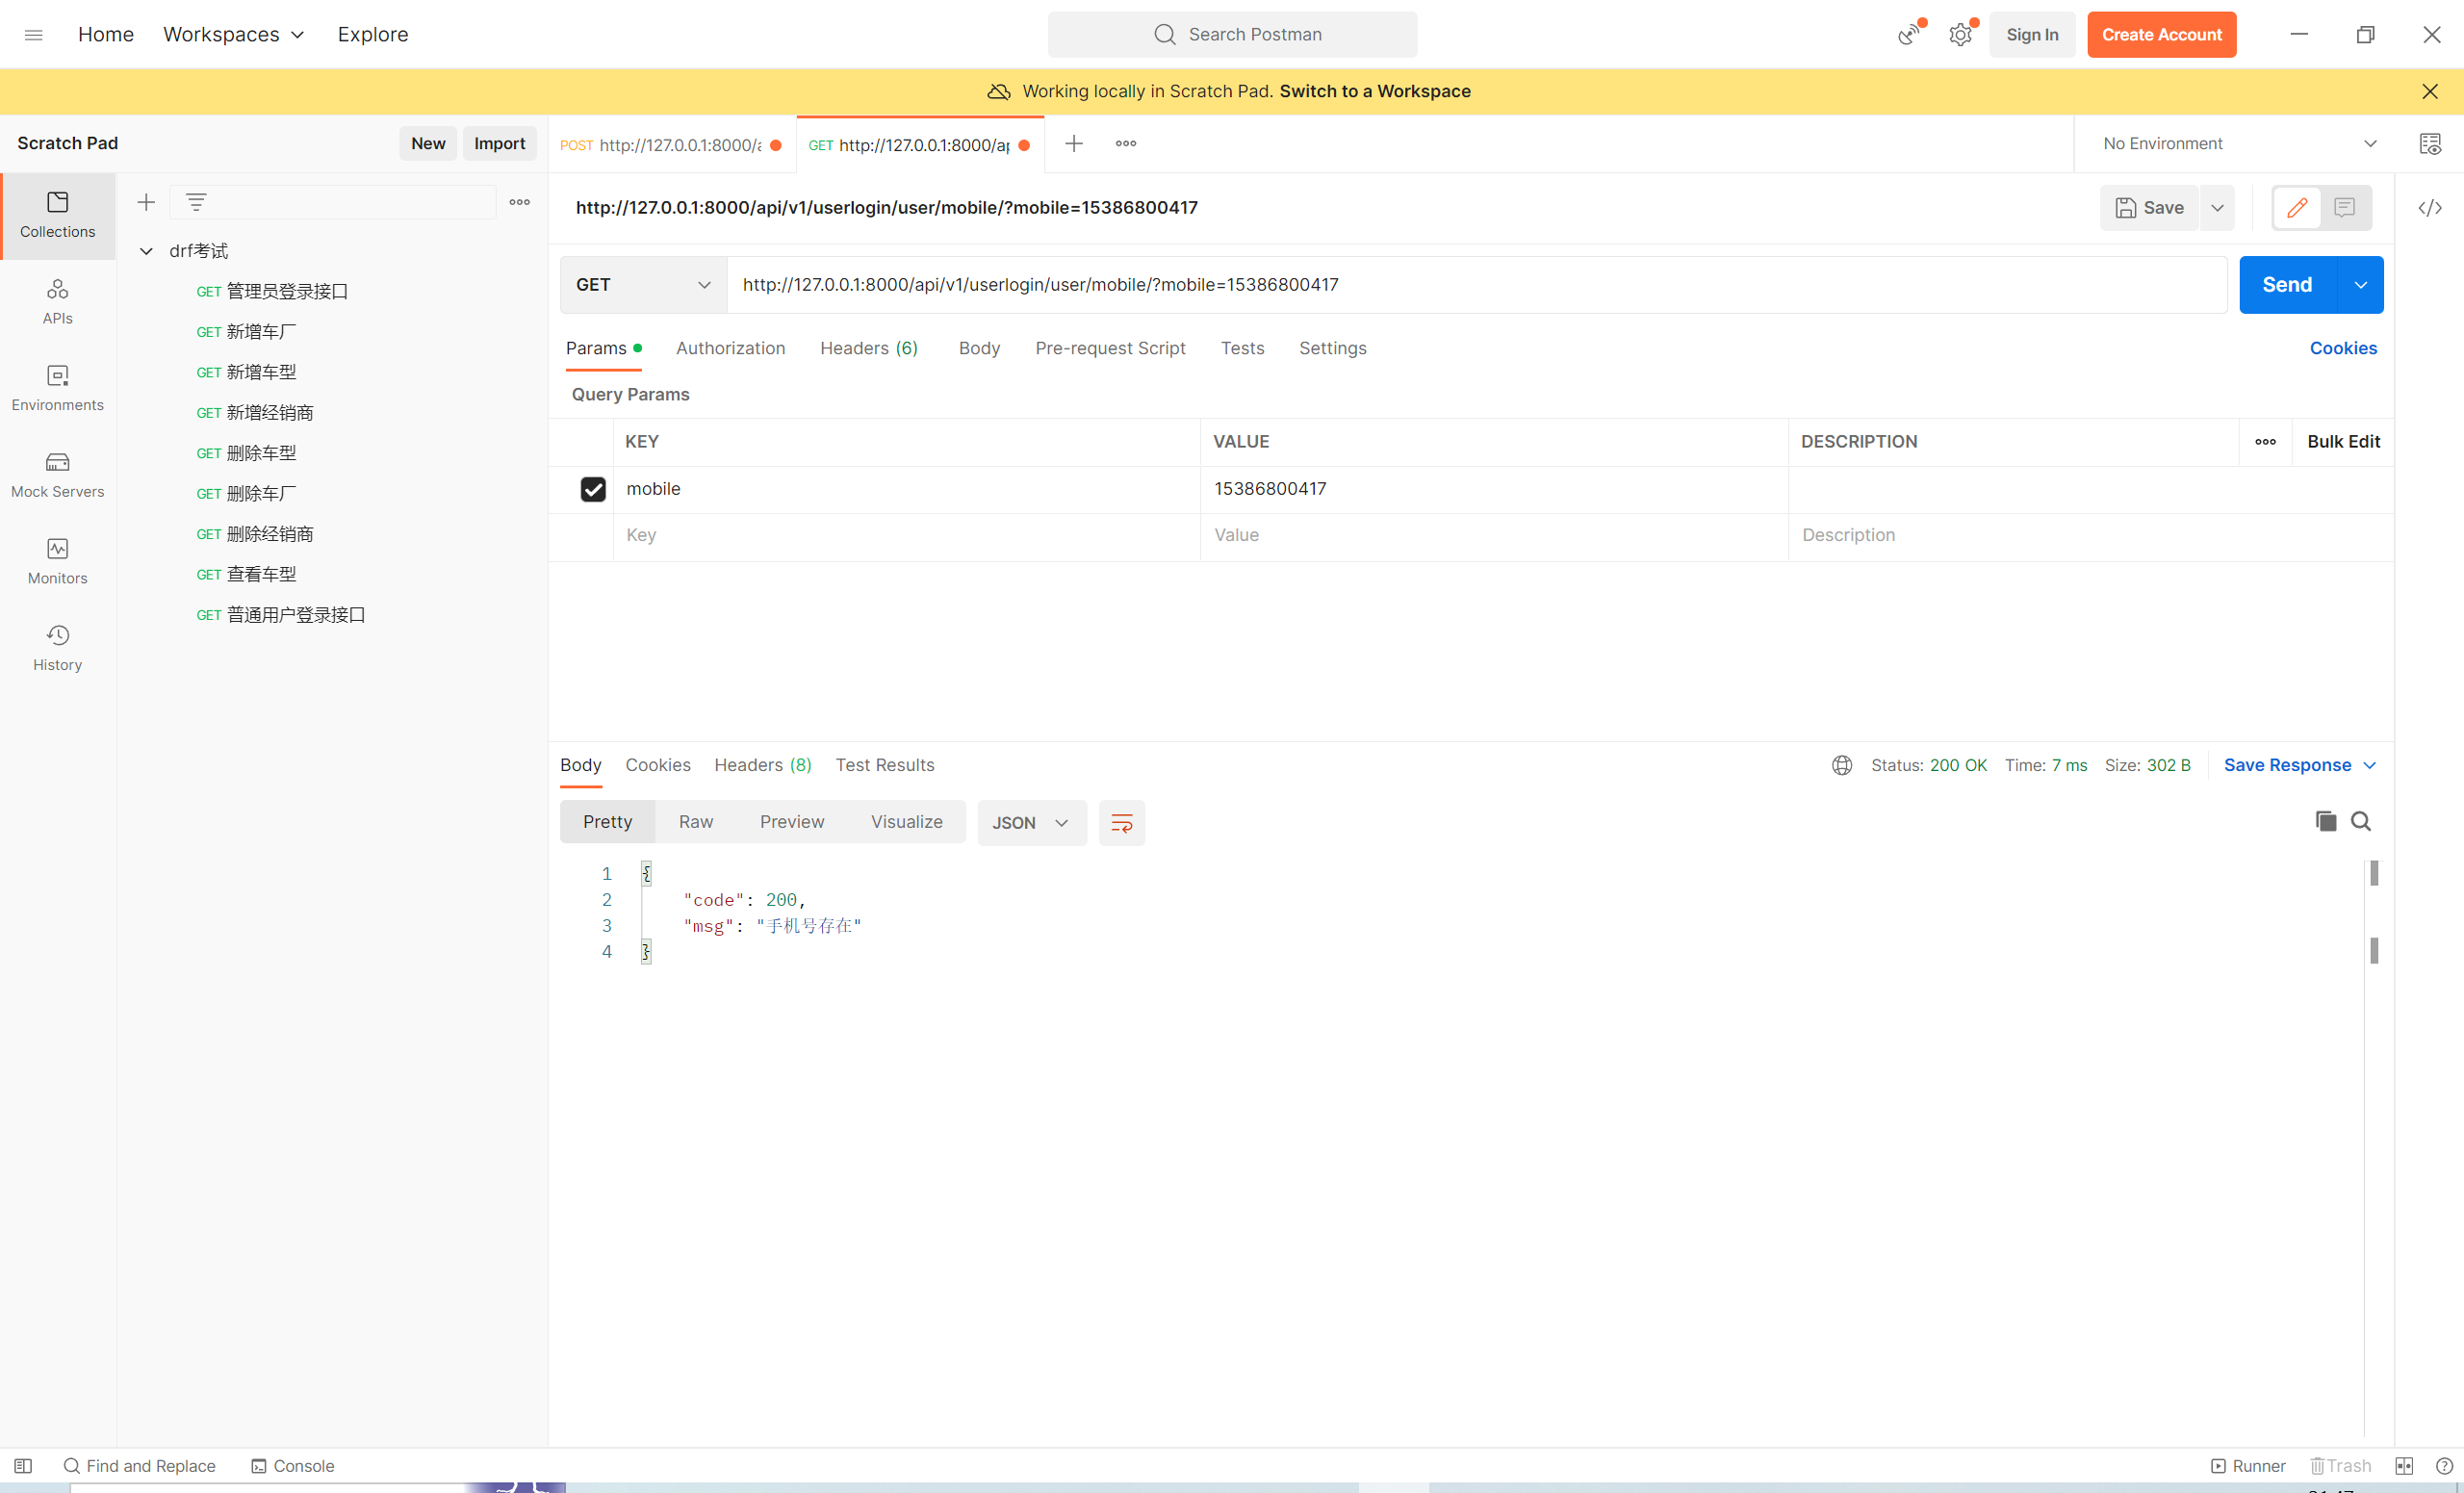
三、验证手机号接口
user/views.py
class UserView(ViewSet):
@action(methods=['GET'], detail=False)
    def mobile(self, request):
        try:
            mobile = request.query_params.get('mobile')
            UserInfo.objects.get(mobile=mobile)
            return APIResponse(msg='该手机号存在')
        except Exception as e:
            raise APIException('该手机号不存在')
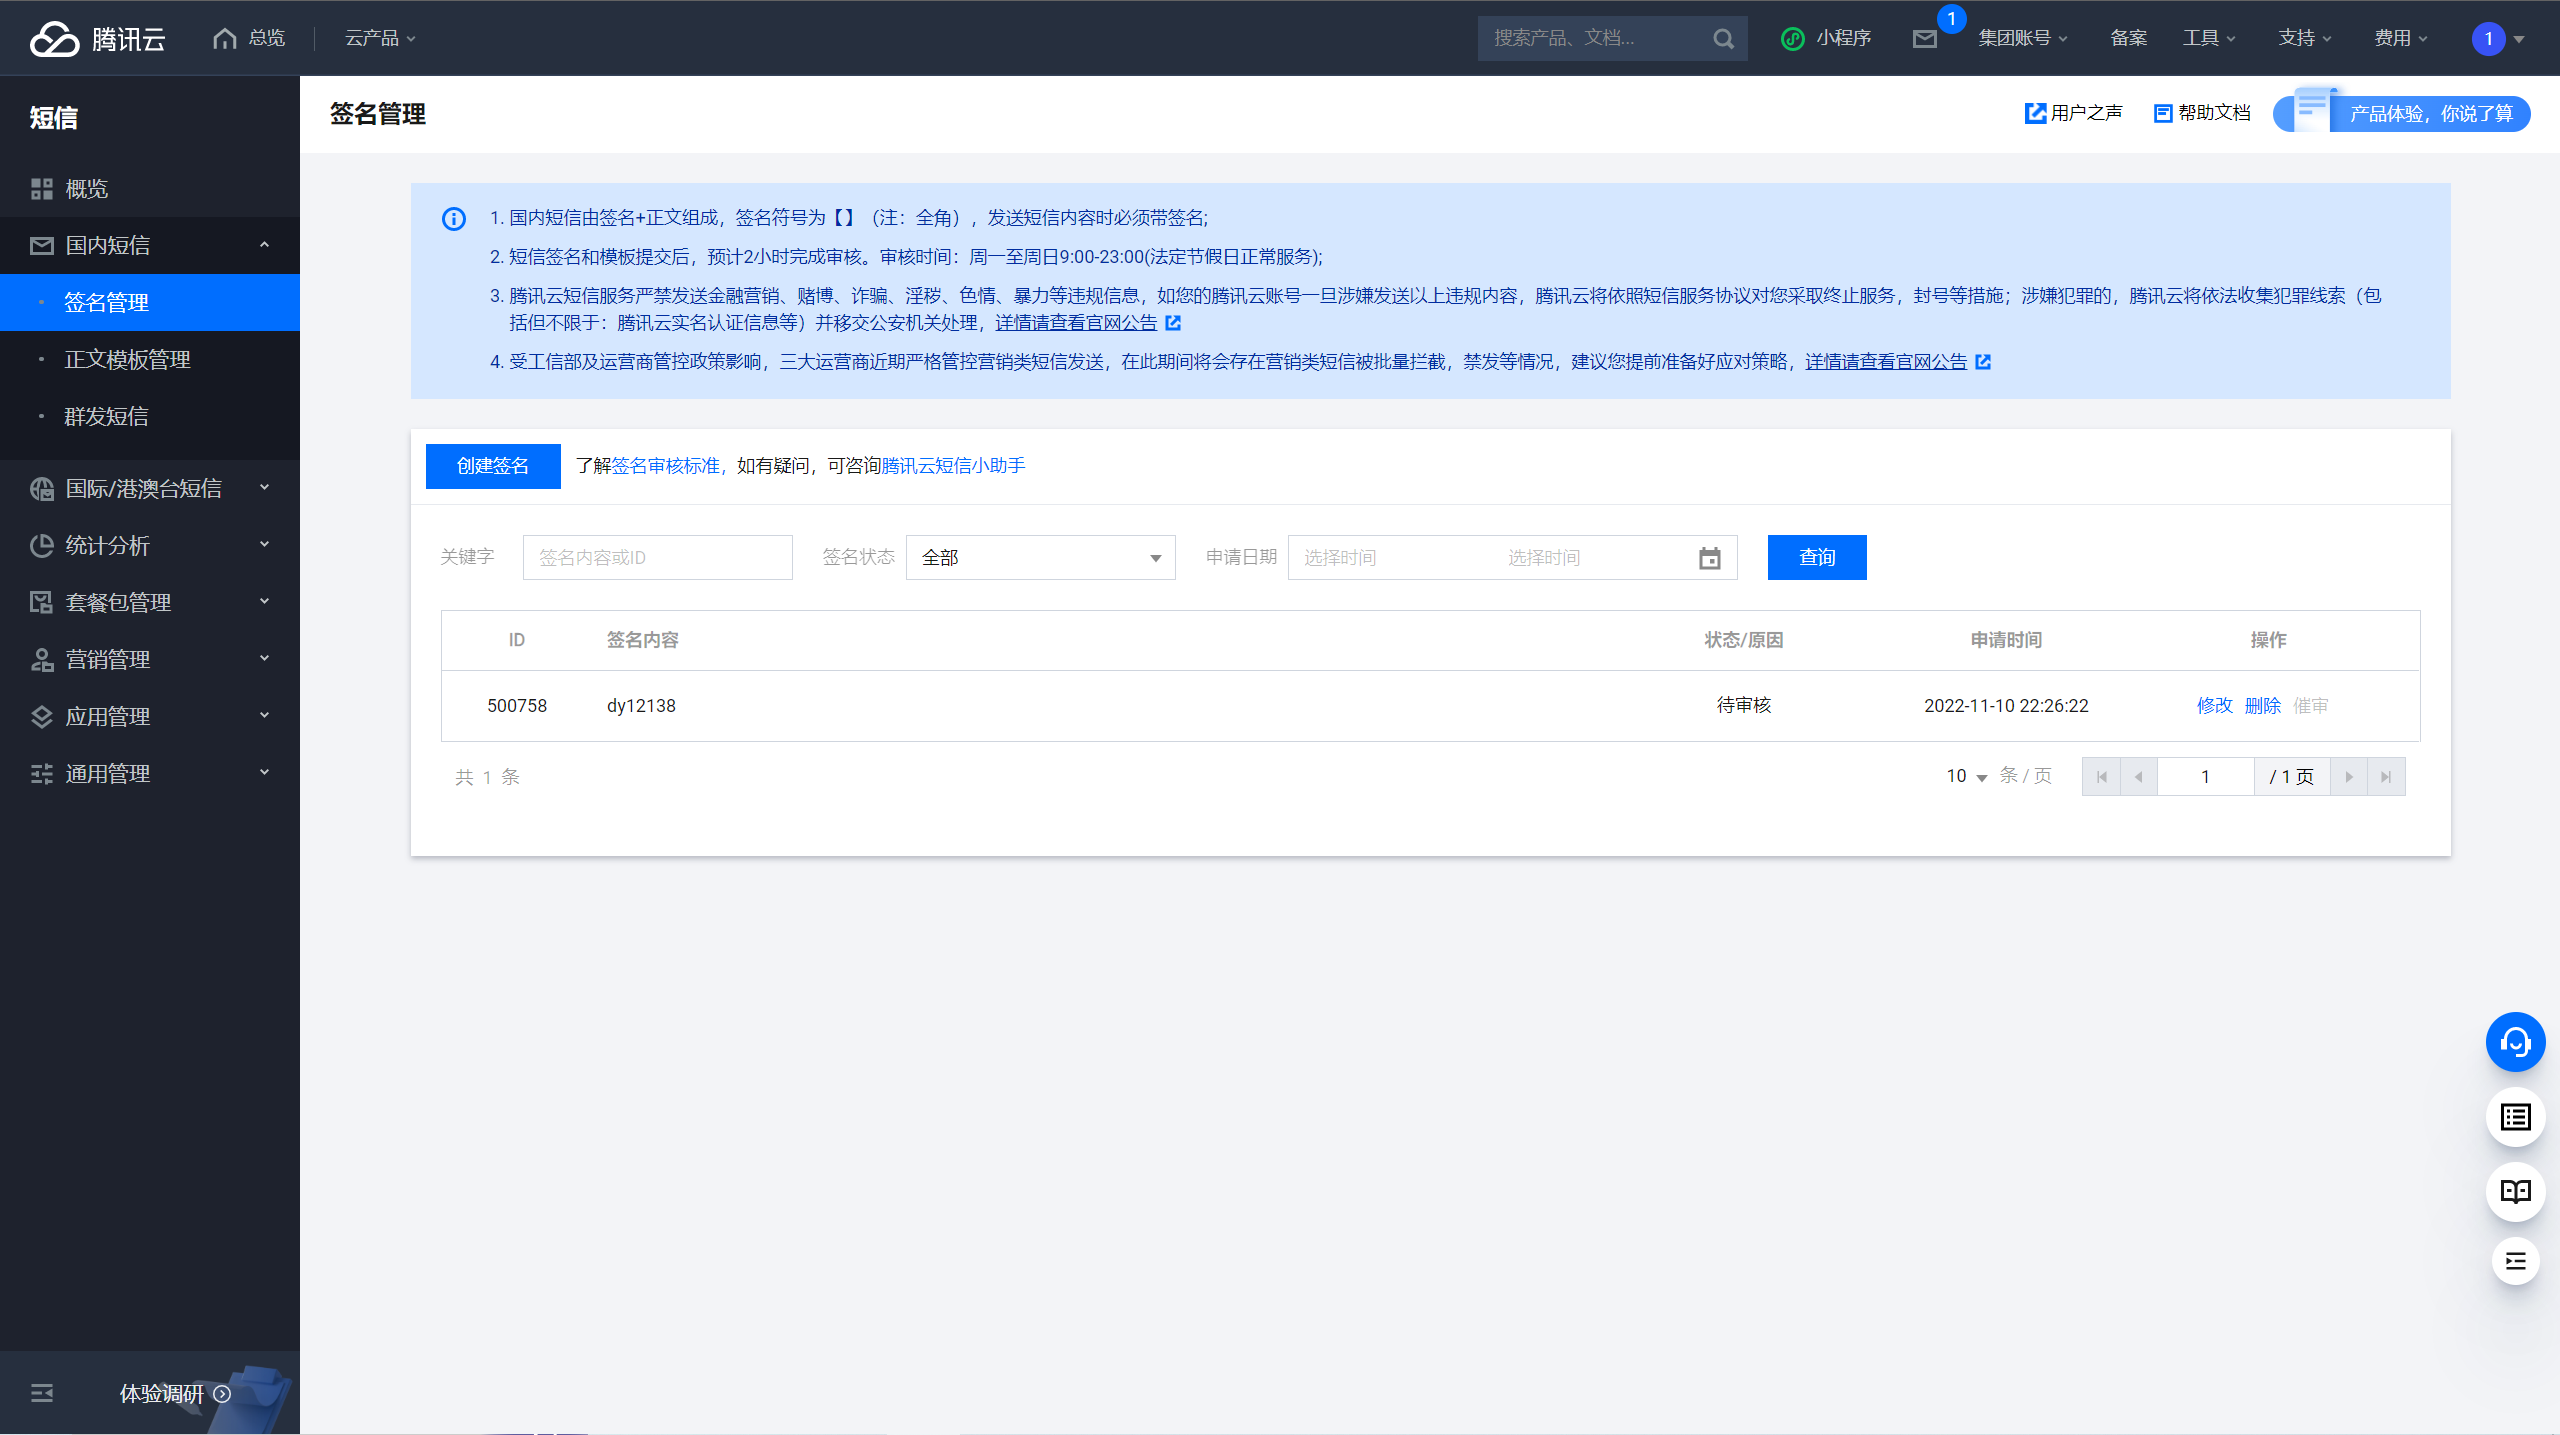
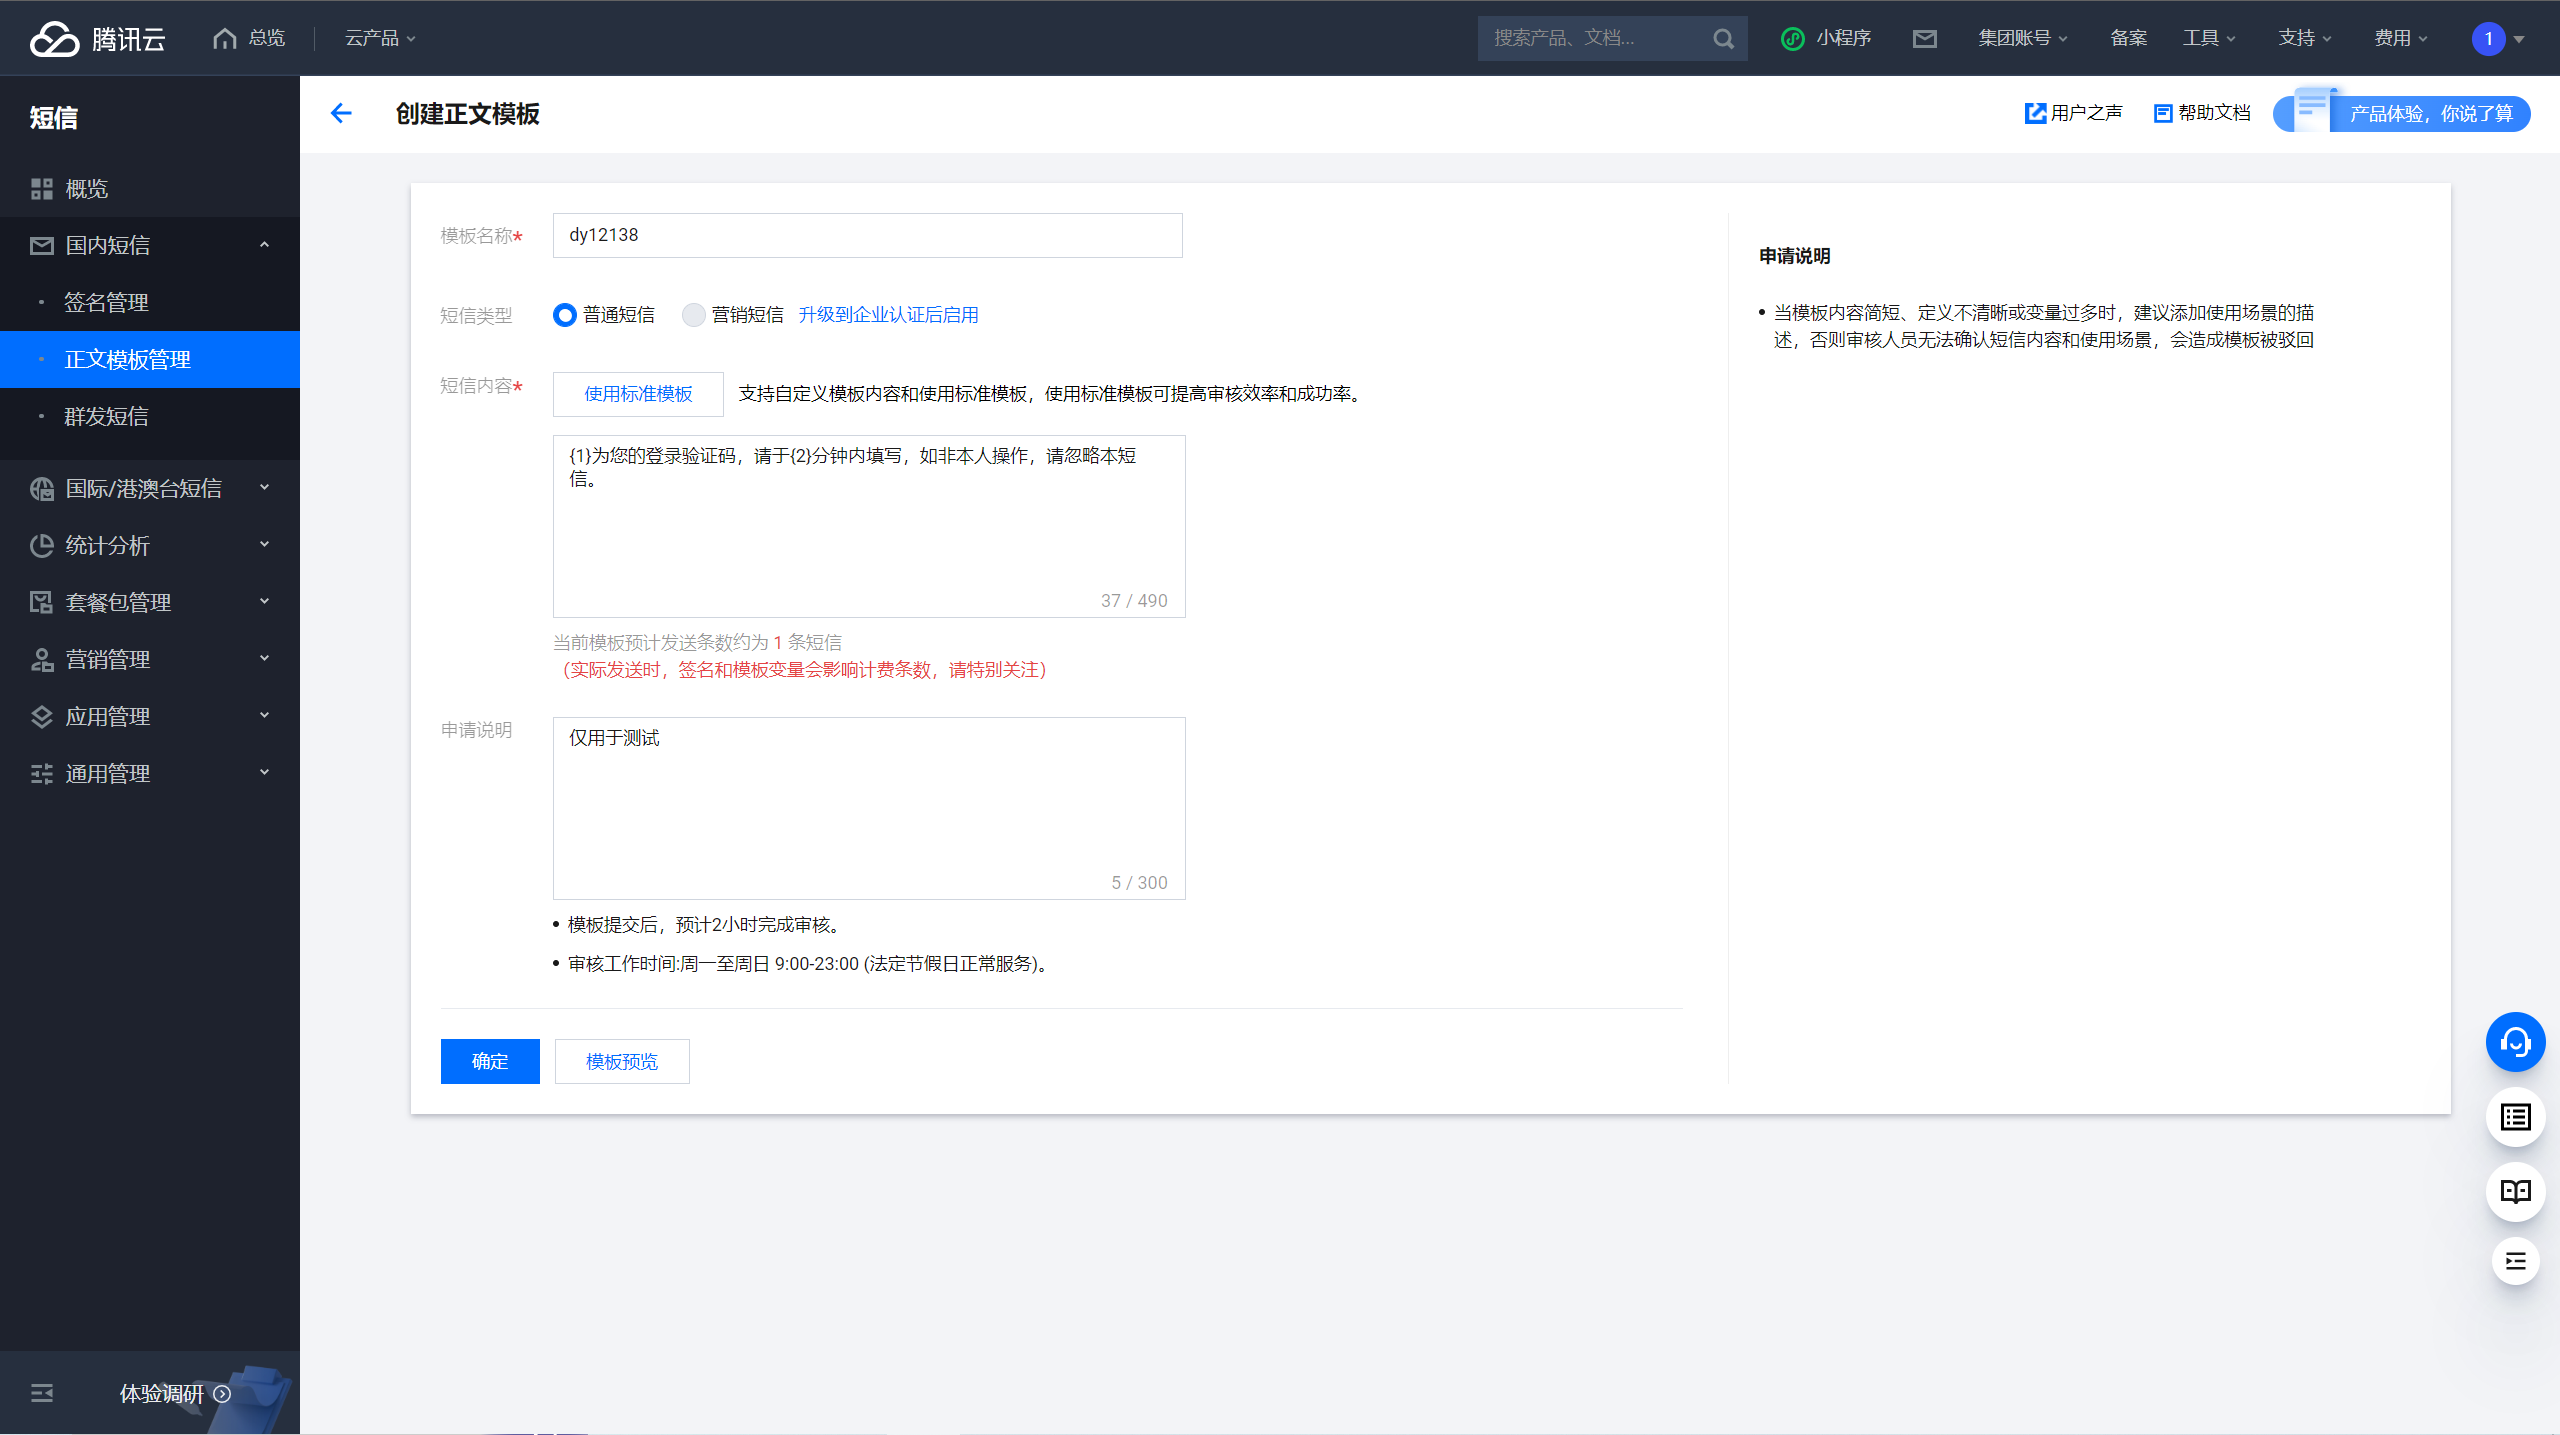
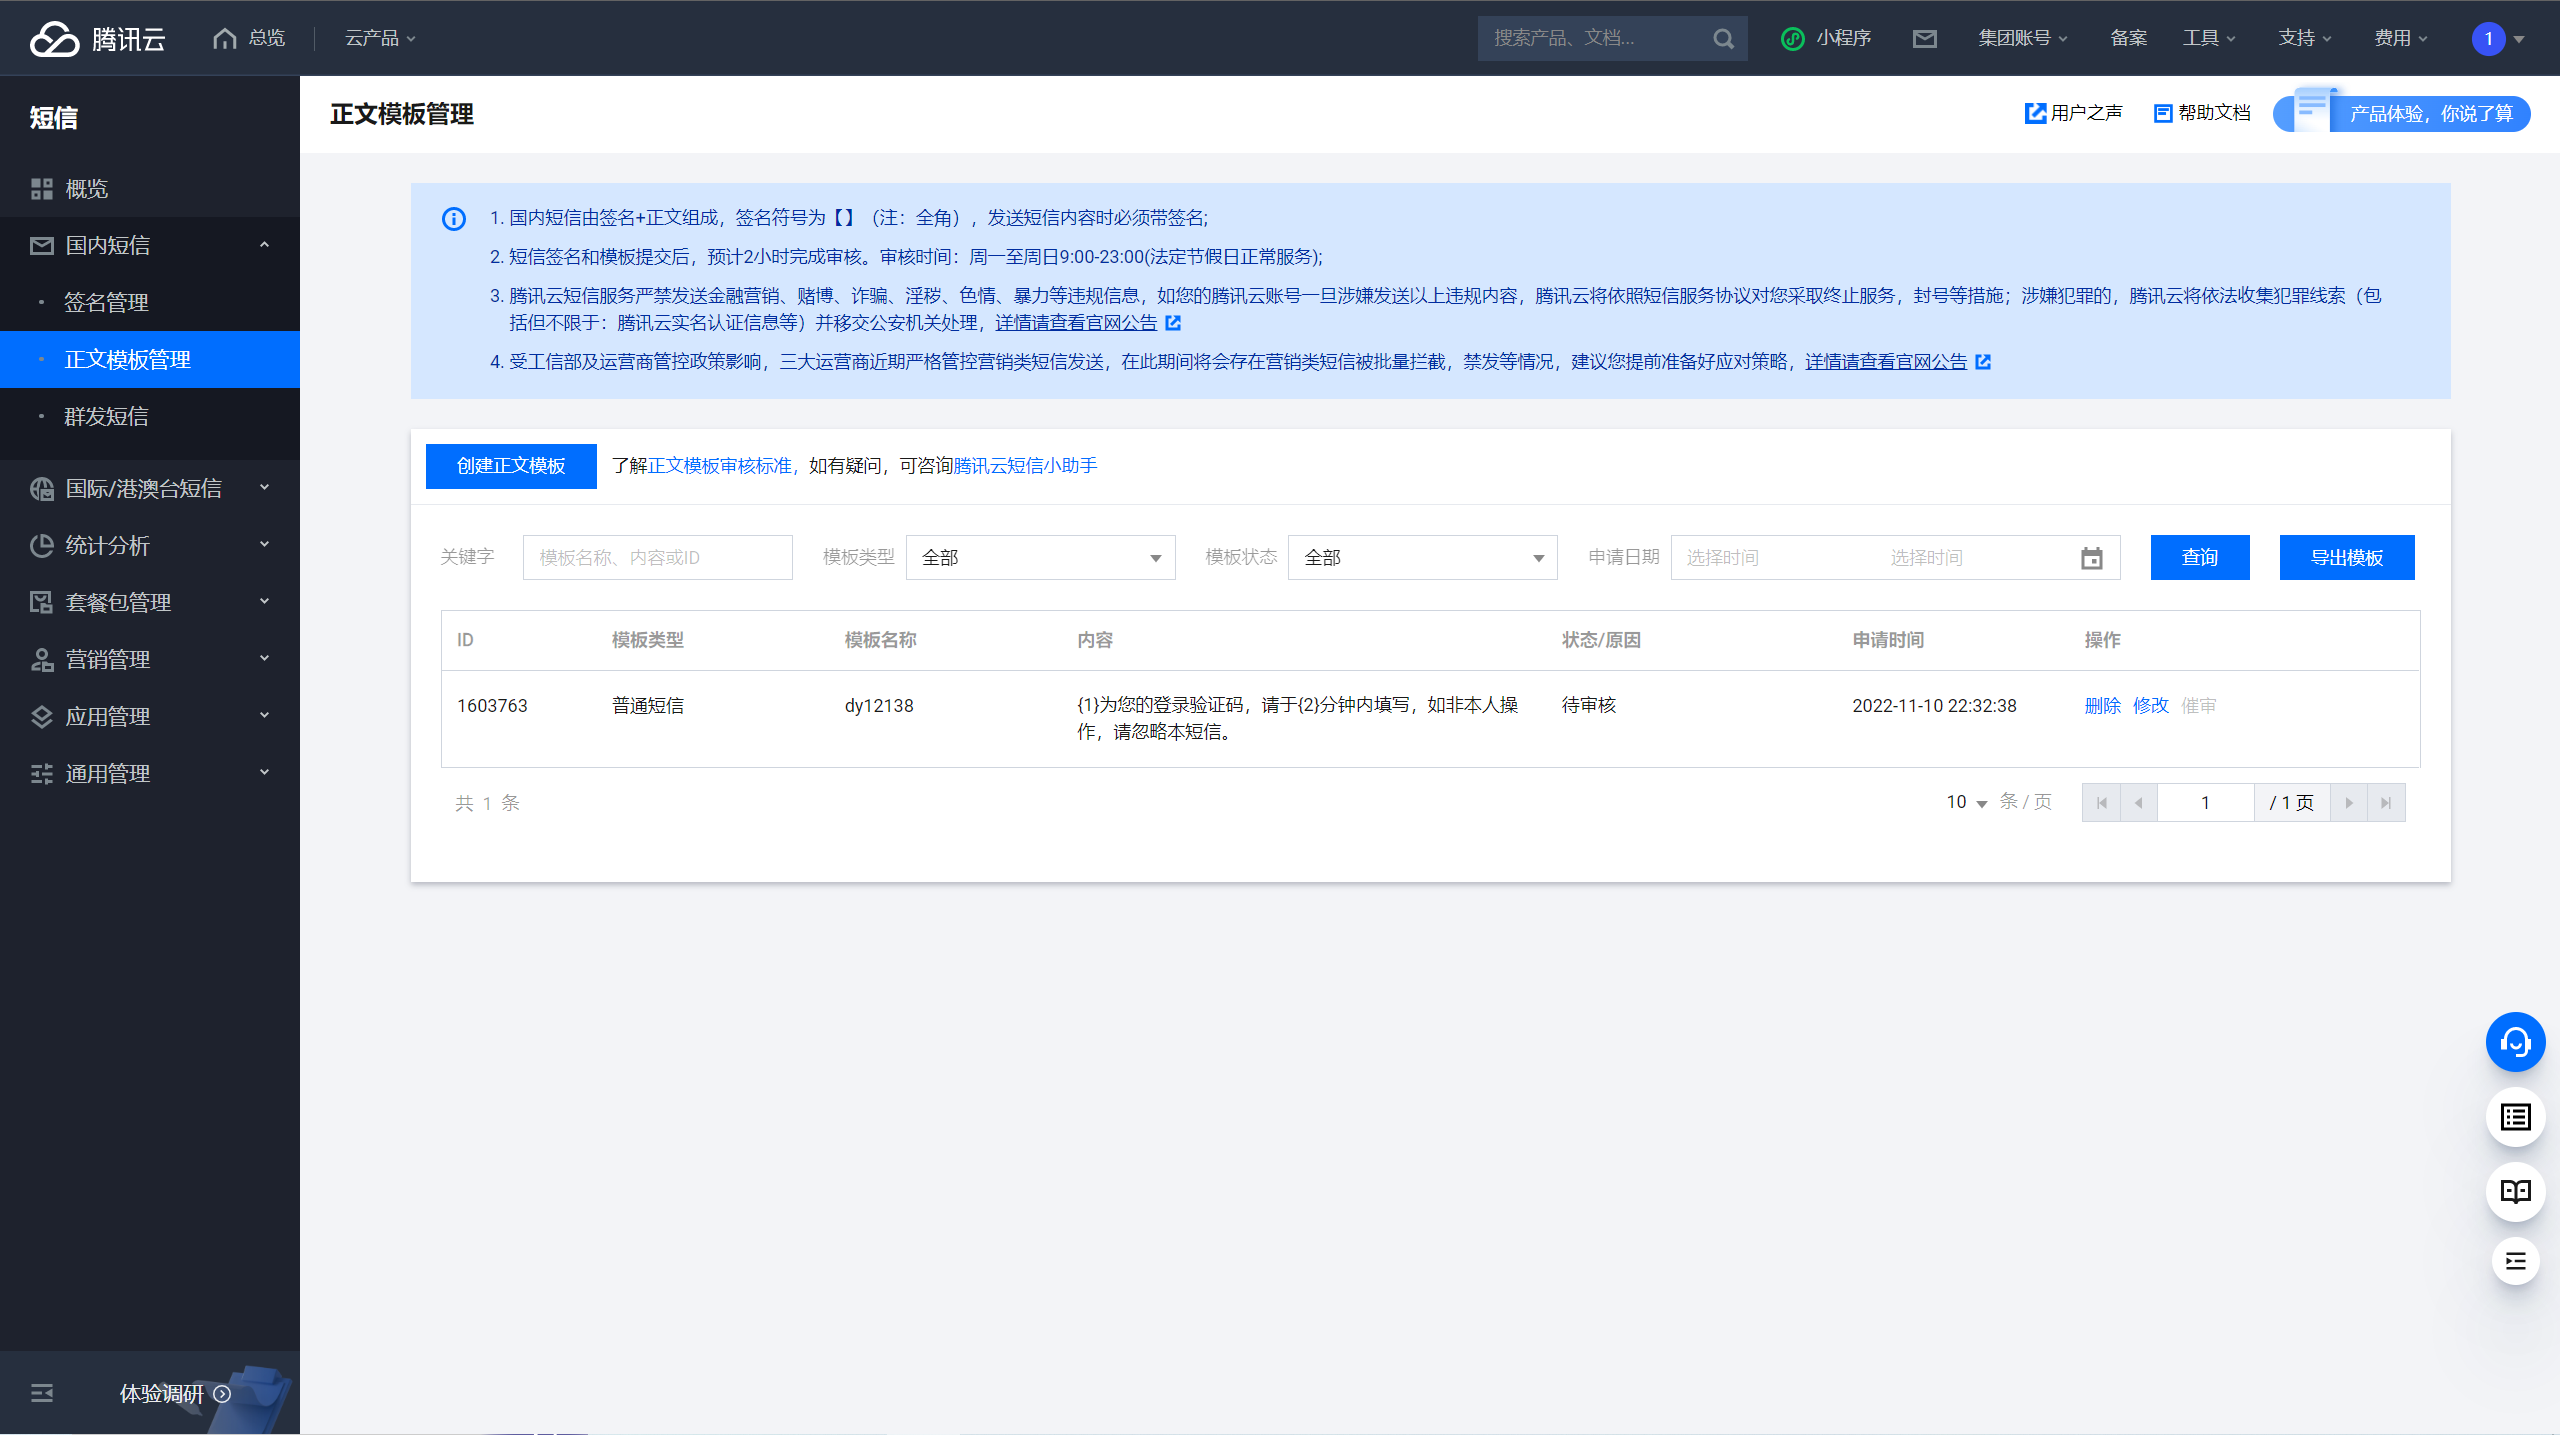
四、腾讯云短信申请
4.1 创建签名
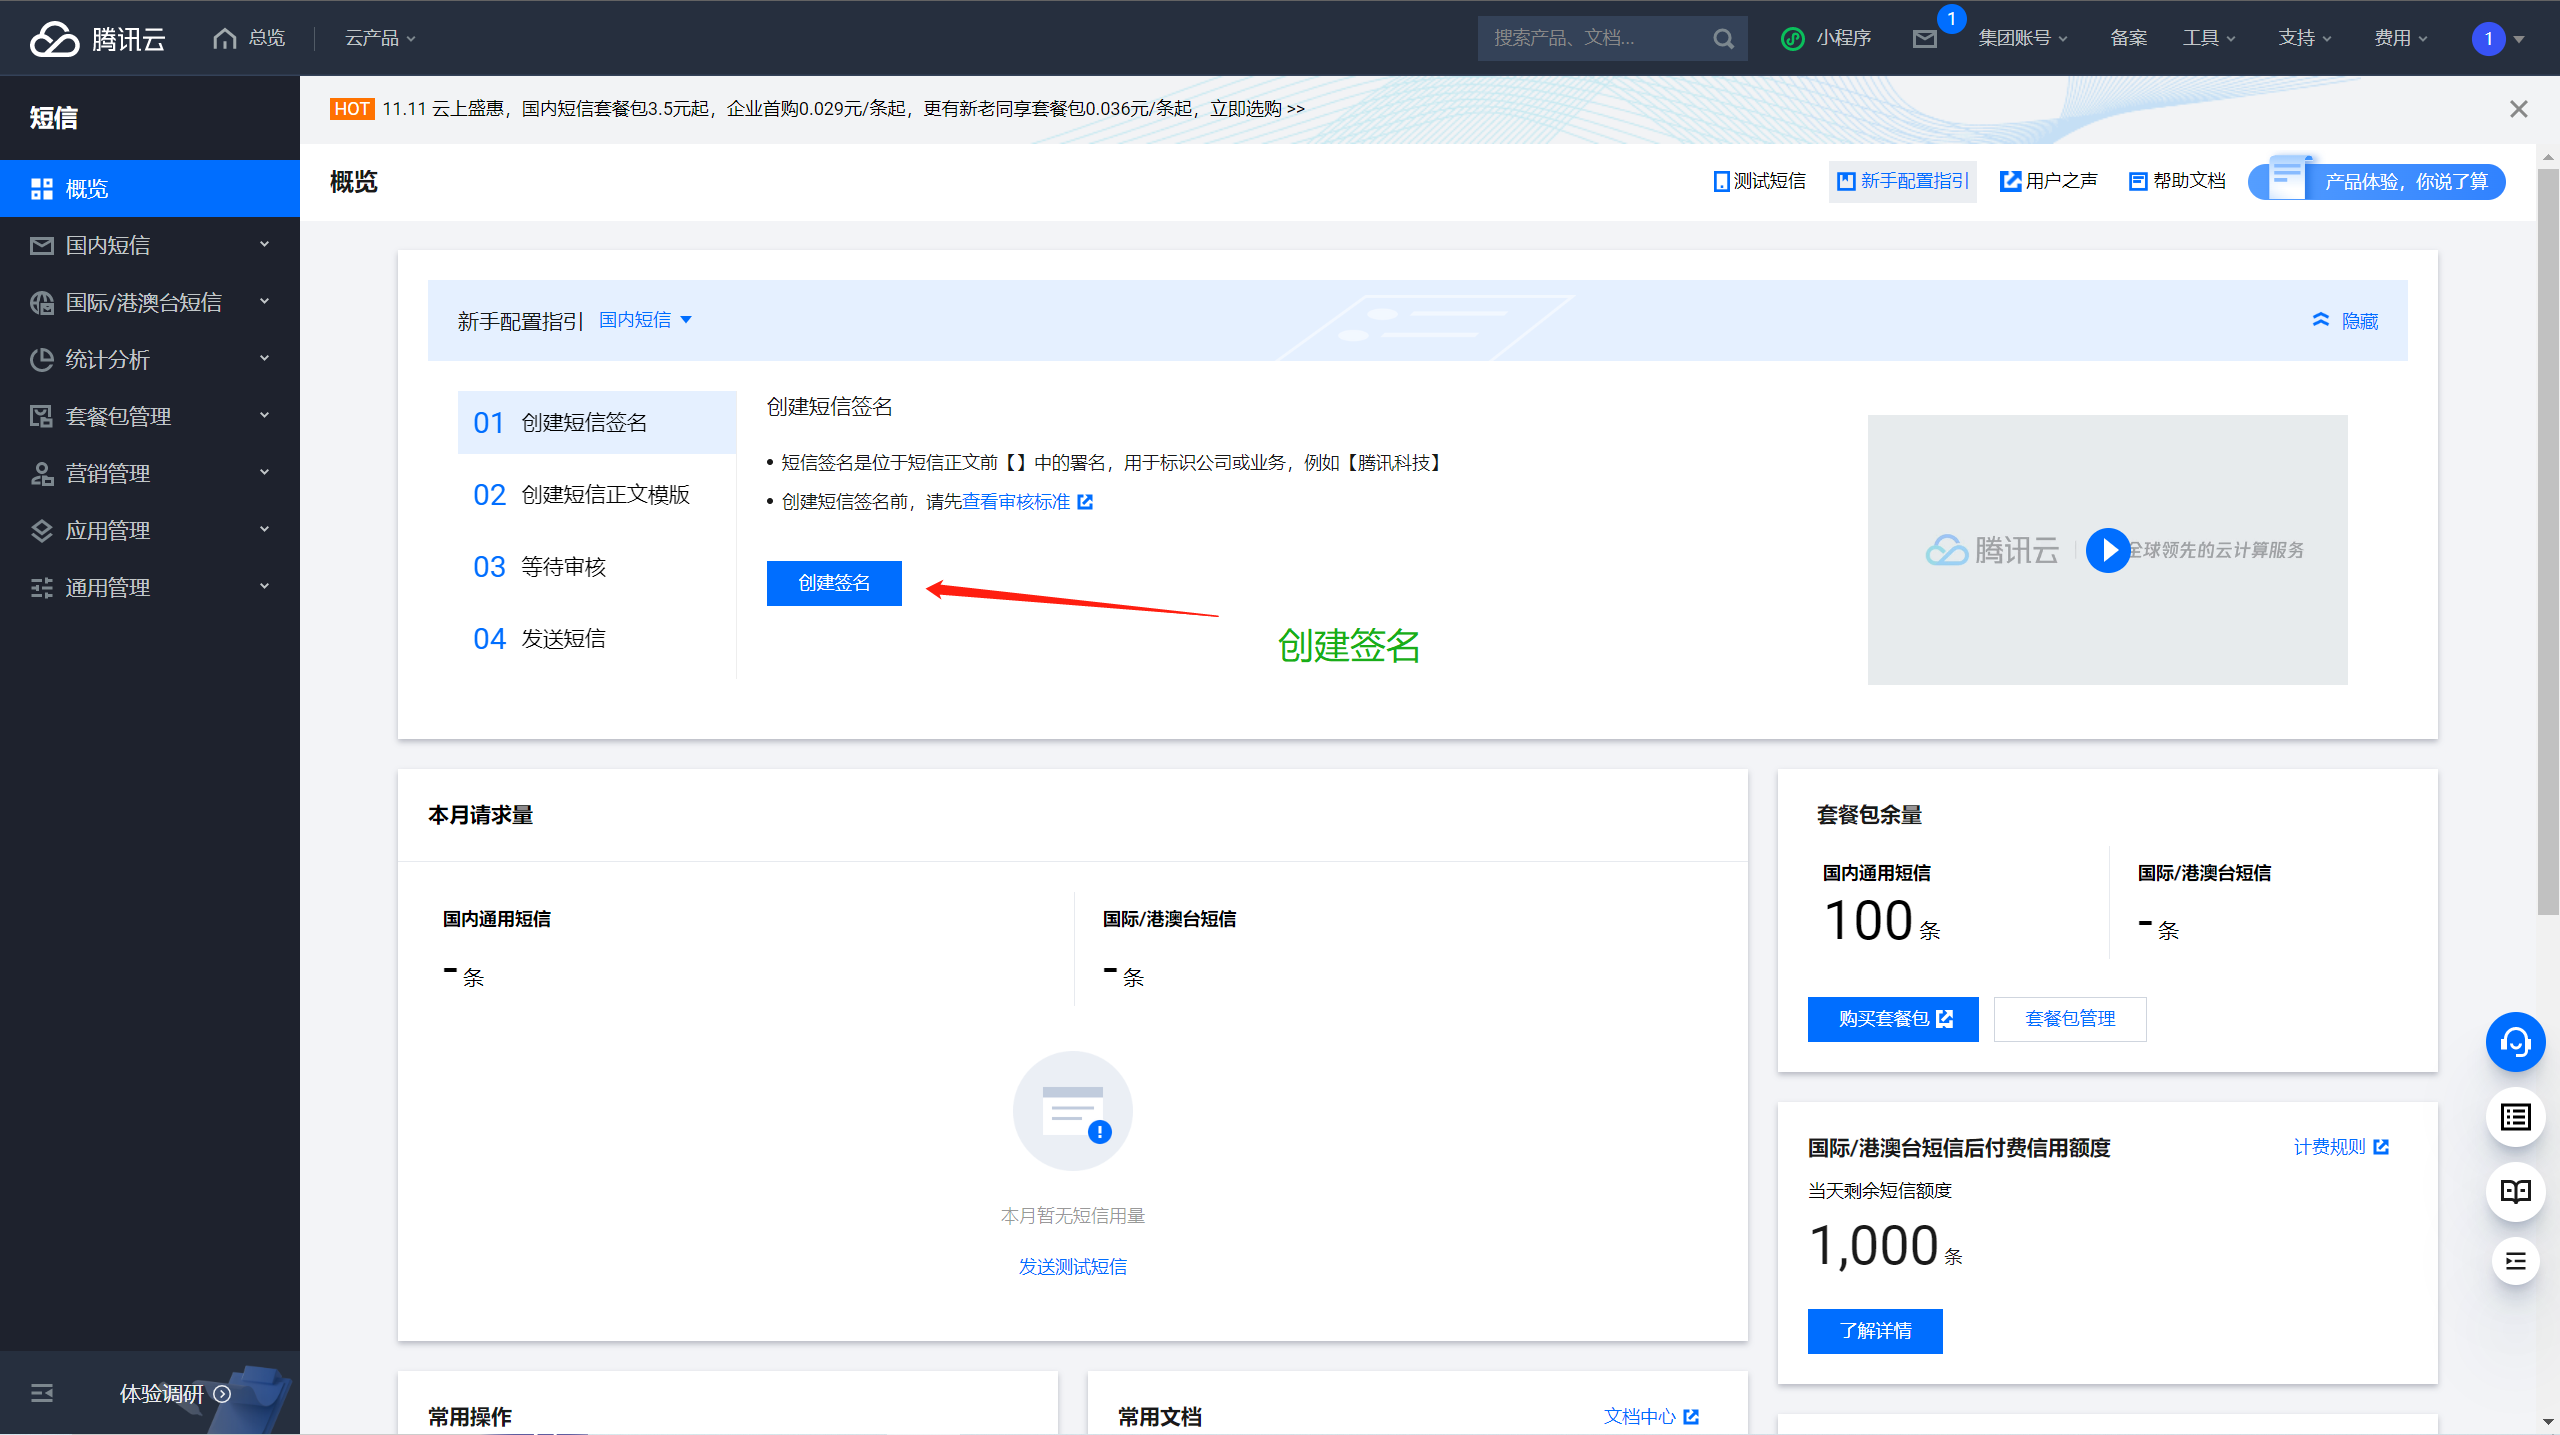
4.2 提交材料
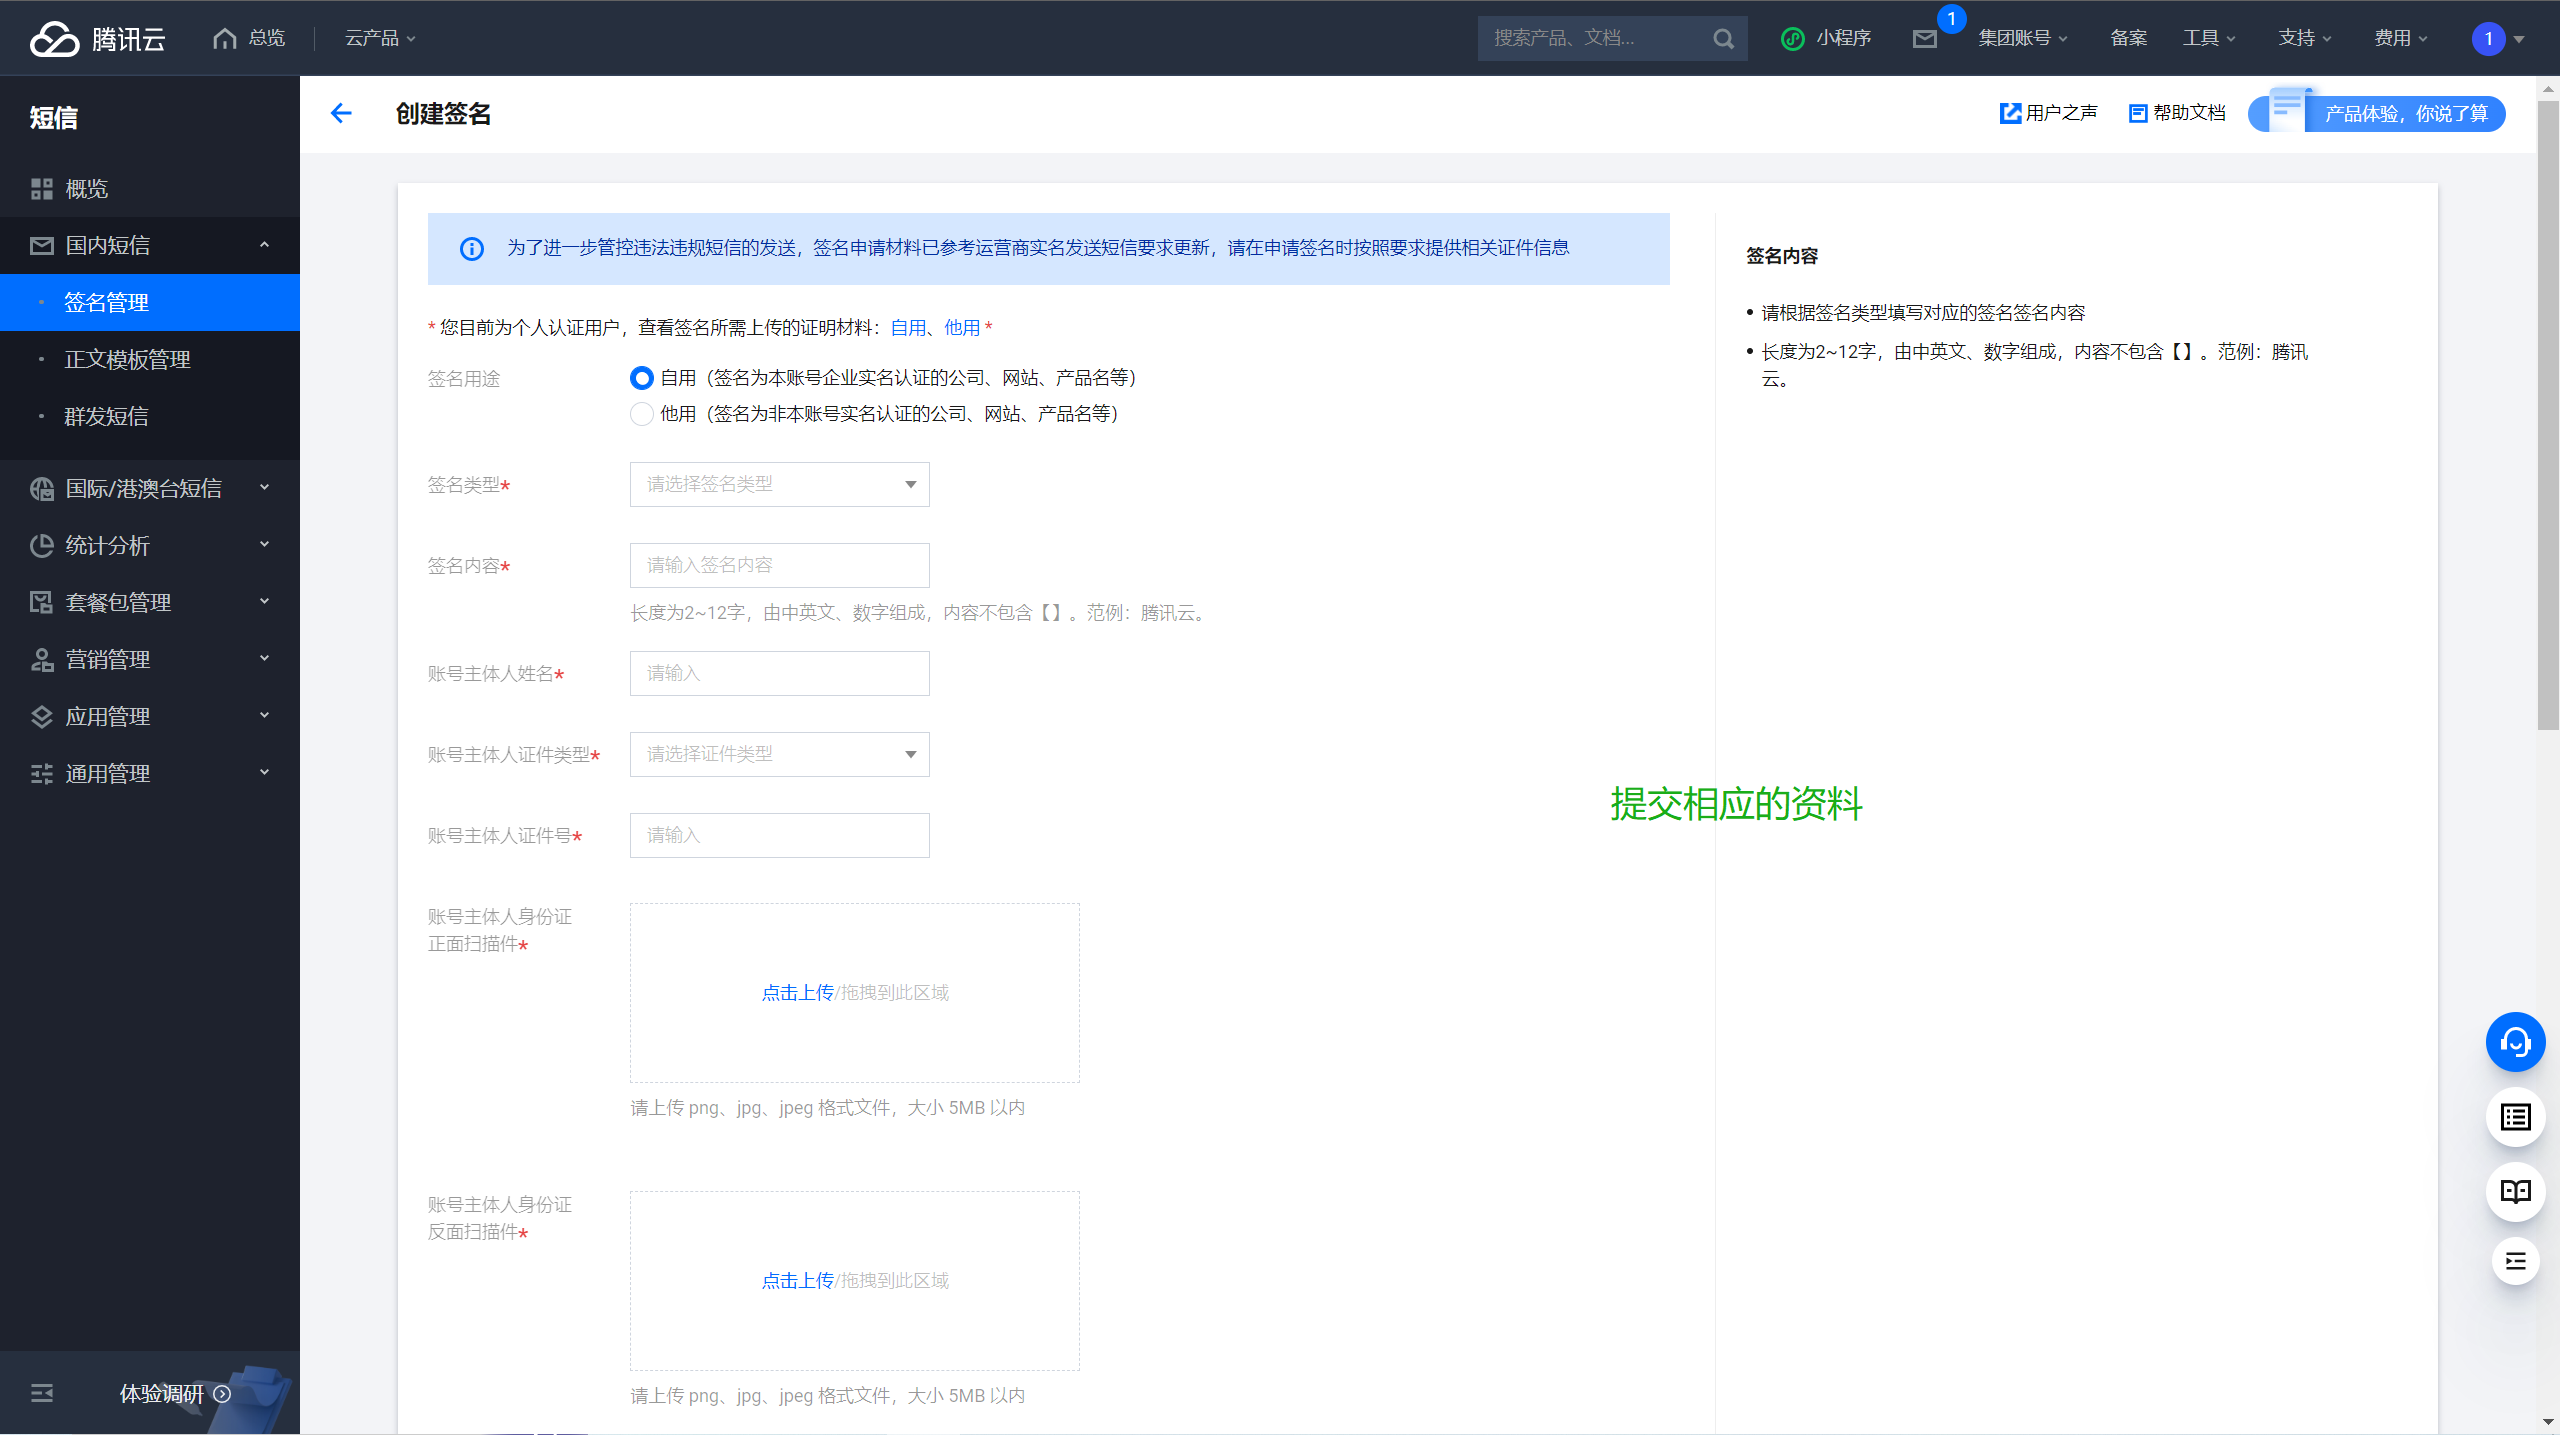
4.3 等待审核
4.4 创建正文模板
4.5 查看审核进度
4.6 发送短信的步骤
# 参考官方文档
	https://cloud.tencent.com/document/product/382/43196
五、API和SDK概念
SDK:软件开发工具包。

指一些被软件工程师用于为特定的软件包、软件架构、硬件平台、操作系统等建立应用软件的开发工具的集合。SDK是一个覆盖面比较广的名词,可以说,辅助开发某一类软件的相关文档,范例等等都可以称作SDK。举例子如果组装一个模型,构建这个模型时需要一整套物品去组装,sdk则是组装所需要的工具,以及装配说明等。SDK的发明就是为了减少工作量的,在日常办公中求和求方差,没有人会傻傻计算,而是直接带入对应的函数计算。


API:应用程序编程接口。

提供用户编程时的接口,是一些预先定义的函数,或者软件系统不同部分组成衔接的约定。

目的为了提供应用程序与开发人员基于某软件或硬件得以访问一组例程的能力,而又无需访问源码,或理解内部工作机制的细节。

主要功能为提供通用功能集,API同时作为一种中间件,为各平台提供数据共享的能力。举一个生活的例子:

例如你想要电脑调用手机里的某个信息,我们会将手机与电脑用数据线连接起来传送信息,API便是连接数据线的接口。


总的来说,两者没有值得比较的区别

因为是具有关联性的两种东西。你可以把SDK想象成一个虚拟的程序包,在这个程序包中有一份做好的软件功能,这份程序包几乎是全封闭的,只有一个小小接口可以联通外界,这个接口就是API。

比如——我们现在要在企业ERP系统中增加某个功能(比如自动备份、数据分析、云存储等),但又不想耗费大量时间、也没那么多研发亲自去做这个功能。这时我们可以选择使用这个“SDK”软件包,把ERP系统连接上API接口,就可以使用SDK软件包里的功能。

 浙公网安备 33010602011771号