WPF教程十二:了解自定义控件的基础和自定义无外观控件
这一篇本来想先写风格主题,主题切换、自定义配套的样式。但是最近加班、搬家、新租的房子打扫卫生,我家宝宝6月中旬要出生协调各种的事情,导致了最近精神状态不是很好,又没有看到我比较喜欢的主题风格去模仿的,又不想降低教程的质量,所以就打算把风格的主题这一篇,放后面等我找到了我喜欢的主题,然后在开始仿写。这一篇先入门自定义控件。
WPF支持样式、内容控件和模板。因此不在刻意的强调自定义控件。这些特性为开发人员提供了多种方式来完善和扩展标准的控件,而不用派生新的控件类。通过以下几种方式能实现大部分需求:
-
样式。可以使用样式方便地重用控件属性和触发器的组合。
-
内容控件。所有继承自ContentControl类的控件都支持嵌套的内容。使用内容控件,可以快速创建聚集其他元素的符合控件(比如,可将按钮变成图像按钮或将列表框变成图象列表)。
-
控件模板。所有WPF控件都是无外观的,这意味着它们具有硬编码的功能,但它们的外观是通过控件模板单独定义的。使用其他新的控件模板代替默认模板,可重新构建基本控件,例如重新构建按钮、复选框、单选框和窗口。
-
数据模板。所有派生自ItemsControl的类都支持数据模板,通过数据模板可创建某些数据对象类型的富列表标识。通过恰当的数据模板,可使用许多元素的组合显示每个项,这些组合元素可以是文本、图像甚至可以是可编辑控件(都在所选的布局容器中)。
如果可以的话,在决定使用自定义控件或其他类型的自定义元素之前,可以继续使用这些方法。因为这些解决方案更简单,更容易实现,并且通常更容易重用。
当微调元素外观时不适用与自定义元素,但是当希望改变底层的功能时,自定义元素就十分有用了。例如,WPF为TextBox控件和PasswordBox控件使用不同的类是有原因的。它们使用不同的方法处理按键,以不同的方式在内部保存它们的数据,以不同的方式与其他组件(剪切板)进行交互,等等,如果希望设计一个具有不同属性、方法和事件集合的控件,就需要构建自己的控件。
这篇文章介绍如何创建自定义元素以及如何使用它们成为WPF中的重要成员。这意味着将使它们具备依赖项属性和路由事件功能,以获得对WPF重要服务的支持,如数据绑定、样式以及动画。还学习如何创建无外观的控件——模板驱动的控件,允许控件的用户提供不同的可视化外观以获得更大的灵活性。
理解WPF中的自定义元素
尽管可以在任意WPF项目中编写自定义元素,但是通常希望在专门的类库程序集(DLL)中放置自定义元素,用于在多个程序之前共享自定义元素。
为确保具有正确得程序集引用和名称空间导入,我们在创建项目时选择Custom Control Library(WPF)项目类型。在类库中,可创建任意数量的控件。
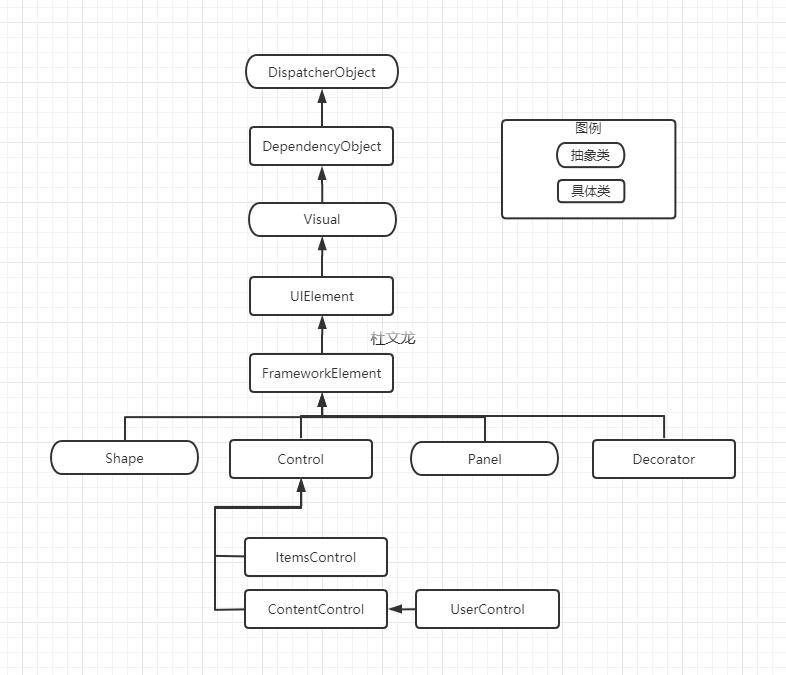
想要写好自定义控件,这个继承关系必须要记着,这些基类工作在WPF的哪个层一定要搞清楚。
![]()
| 名称 | 说明 |
|---|---|
| FrameworkElement | 当创建自定义元素时,这是常用的最低级的基类。通常只有当希望重写OnRender()方法并使用System.Windows.media.DrawingContext从头绘制内容时,才会使用这种方法。FrameworkElement类为哪些不打算与用户进行交互的元素提供了一组基本的属性和事件 |
| Control | 当从头开始创建控件时,这是最常用的起点。该类时所有用户交互小组件的基类。Control类添加了用于设置背景、前景、字体和内容对其方式的属性。控件类还为自身设置了Tab顺序(通过IsTabStop属性),并且引入了鼠标双击功能(通过MouseDoubleClick和PreviewMouseDoubleClick事件)。但最重要的是,Control类定义了Template属性,为了得到无限的灵活性,该属性允许使用自定义元素树替换其外观 |
| ContentControl | 这是能够显示任意单一内容的控件的基类。显示的内容可以是元素或集合使用模板的自定义对象(内容通过Content属性设置,并且可以通过ContentTemplate属性提供可选的模板)。许多控件都封装了特定的类型在一定范围内的内容(比如文本框中的文本字符串)。因为这些控件不支持所有元素,所以它们不是内容控件。 |
| UserControl | 这是可以使用设计视图进行配置的内容控件。尽管用户控件和普通的内容控件是不同的,但是希望在多个窗口中快速重用用户界面中的不变模块时(而不是创建真正的能在不同应用程序之间转移的独立控件),通常使用该基类。 |
| ItemsControl或Selector | ItemsControl 是封装项列表的控件的基类,但不支持选择,二Selector类是支持选择的控件的更具体基类。创建自定义控件不经常使用这些类,因为ListBox、ListView以及TreeView控件的树绑定特性提供了很大的灵活性 |
| Panel | 该类是具有布局逻辑控件的基类,布局空间能够包含多个子元素,并根据特定的布局语义安排这些子元素。通常,面板提供了用于设置子元素的附加属性,配置如何安排子元素。 |
| Decorator | 封装其他元素的元素的基类,并且提供了一种图形效果或特定的功能。两个明显的例子是Border和Viewbox,其中Border控件在元素的周围绘制线条,Viewbox控件使用变换动态缩放其内容。其他装饰元素包括为普通控件(如按钮)提供熟悉边框和背景色的修饰类。 |
| 特殊控件类 | 如果希望改进现有控件,可以直接继承该控件。例如,可创建具有内置验证逻辑的TextBox控件。然而,在采取这一步之前,应该首先分析是否可通过事件处理代码或单独的组件达到同一目的。这两种方法都可以使自定义逻辑和控件相分离,从而可在其他控件中重用。 |
我们通过使用UserControl创建一个颜色拾取器,来分析如何将这个控件分解成为功能更强大的基于模板的控件。
我们的颜色拾取器包含4个Slider、一个Rectangle。slider用来控制Color的A、R、G、B4个通道,Rectangle用来显示4个Slider值对应的ARGB颜色值。
然后再window中使用这个自定义控件。
我们再项目中创建UserControls文件夹,然后添加ColorPickerUserControls.xaml。
创建依赖项属性我们使用的propdp=>2次Tab来实现的。添加的路由事件是我们自己写的propurv=>2次Tab来实现的。
实现过程在这篇博客中:WPF技巧:通过代码片段管理器编写自己常用的代码模板提示效率 - 杜文龙 - 博客园 (cnblogs.com)
好了,自定义控件的代码如下:
<UserControl x:Class="CustomElement.UserControls.ColorPickerUserControls"
             xmlns="http://schemas.microsoft.com/winfx/2006/xaml/presentation"
             xmlns:x="http://schemas.microsoft.com/winfx/2006/xaml"
             xmlns:mc="http://schemas.openxmlformats.org/markup-compatibility/2006"
             xmlns:d="http://schemas.microsoft.com/expression/blend/2008"
             xmlns:local="clr-namespace:CustomElement.UserControls"
             mc:Ignorable="d"
             d:DesignHeight="450" d:DesignWidth="800">
    <Grid>
        <Grid.RowDefinitions>
            <RowDefinition Height="Auto"/>
            <RowDefinition Height="Auto"/>
            <RowDefinition Height="Auto"/>
            <RowDefinition Height="Auto"/>
        </Grid.RowDefinitions>
        <Grid.ColumnDefinitions>
            <ColumnDefinition/>
            <ColumnDefinition Width="Auto"/>
        </Grid.ColumnDefinitions>
        <Slider Name="sliderAlpha" Grid.Row="0" Minimum="0" Maximum="100" Value="{Binding RelativeSource={RelativeSource Findancestor, AncestorType={x:Type  UserControl}}, Path=Alpha}"/>
        <Slider Name="sliderRed" Grid.Row="1" Minimum="0" Maximum="255" Value="{Binding RelativeSource={RelativeSource Findancestor, AncestorType={x:Type  UserControl}},Path=Red}"/>
        <Slider Name="sliderGreen" Grid.Row="2" Minimum="0" Maximum="255" Value="{Binding RelativeSource={RelativeSource Findancestor, AncestorType={x:Type  UserControl}},Path=Green}"/>
        <Slider Name="sliderBlue" Grid.Row="3" Minimum="0" Maximum="255" Value="{Binding RelativeSource={RelativeSource Findancestor, AncestorType={x:Type  UserControl}},Path=Blue}"/>
        <Rectangle Grid.Column="1" Grid.RowSpan="3" Width="50" Stroke="Black" StrokeThickness="1">
            <Rectangle.Fill>
                <SolidColorBrush Color="{Binding RelativeSource={RelativeSource Findancestor, AncestorType={x:Type  UserControl}},Path=Color}"/>
            </Rectangle.Fill>
        </Rectangle>
    </Grid>
</UserControl>
using System.Collections.Generic;
using System.Windows;
using System.Windows.Controls;
using System.Windows.Input;
using System.Windows.Media;

namespace CustomElement.UserControls
{
    /// <summary>
    /// ColorPicker.xaml 的交互逻辑
    /// </summary>
    public partial class ColorPickerUserControls : UserControl
    {
        public byte Alpha
        {
            get { return (byte)GetValue(AlphaProperty); }
            set { SetValue(AlphaProperty, value); }
        }

        // Using a DependencyProperty as the backing store for Alpha.  This enables animation, styling, binding, etc...
        public static readonly DependencyProperty AlphaProperty =
            DependencyProperty.Register("Alpha", typeof(byte), typeof(ColorPickerUserControls), new PropertyMetadata(new PropertyChangedCallback(OnColorRGBChanged)));

        public byte Red
        {
            get { return (byte)GetValue(RedProperty); }
            set { SetValue(RedProperty, value); }
        }

        // Using a DependencyProperty as the backing store for Red.  This enables animation, styling, binding, etc...
        public static readonly DependencyProperty RedProperty =
            DependencyProperty.Register("Red", typeof(byte), typeof(ColorPickerUserControls), new PropertyMetadata(new PropertyChangedCallback(OnColorRGBChanged)));

        public byte Green
        {
            get { return (byte)GetValue(GreenProperty); }
            set { SetValue(GreenProperty, value); }
        }

        // Using a DependencyProperty as the backing store for Green.  This enables animation, styling, binding, etc...
        public static readonly DependencyProperty GreenProperty =
            DependencyProperty.Register("Green", typeof(byte), typeof(ColorPickerUserControls), new PropertyMetadata(new PropertyChangedCallback(OnColorRGBChanged)));

        public byte Blue
        {
            get { return (byte)GetValue(BlueProperty); }
            set { SetValue(BlueProperty, value); }
        }

        // Using a DependencyProperty as the backing store for Blue.  This enables animation, styling, binding, etc...
        public static readonly DependencyProperty BlueProperty =
            DependencyProperty.Register("Blue", typeof(byte), typeof(ColorPickerUserControls), new PropertyMetadata(new PropertyChangedCallback(OnColorRGBChanged)));

        private static void OnColorRGBChanged(DependencyObject d, DependencyPropertyChangedEventArgs e)
        {
            ColorPickerUserControls colorPicker = (ColorPickerUserControls)d;
            Color color = colorPicker.Color;
            if (e.Property == AlphaProperty)
            {
                color.A = (byte)e.NewValue;
            }
            else if (e.Property == RedProperty)
            {
                color.R = (byte)e.NewValue;
            }
            else if (e.Property == GreenProperty)
            {
                color.G = (byte)e.NewValue;
            }
            else if (e.Property == BlueProperty)
            {
                color.B = (byte)e.NewValue;
            }
            colorPicker.Color = color;
        }

        public Color Color
        {
            get { return (Color)GetValue(ColorProperty); }
            set { SetValue(ColorProperty, value); }
        }

        // Using a DependencyProperty as the backing store for Color.  This enables animation, styling, binding, etc...
        public static readonly DependencyProperty ColorProperty =
            DependencyProperty.Register("Color", typeof(Color), typeof(ColorPickerUserControls), new PropertyMetadata(new PropertyChangedCallback(OnColorChanged)));

        private static void OnColorChanged(DependencyObject d, DependencyPropertyChangedEventArgs e)
        {
            ColorPickerUserControls colorPicker = (ColorPickerUserControls)d;
            Color oldColor = (Color)e.OldValue;
            Color newColor = (Color)e.NewValue;
            colorPicker.Alpha = newColor.A;
            colorPicker.Red = newColor.R;
            colorPicker.Green = newColor.G;
            colorPicker.Blue = newColor.B;

            if (!colorPicker.isUndo)
            {
                colorPicker.previousColors.Push((Color)e.OldValue);
                colorPicker.OnColorChanged(oldColor, newColor);
            }
            colorPicker.isUndo = false;

        }
        private bool isUndo = false;
        private Stack<Color> previousColors = new Stack<Color>(100);
        private void OnColorChanged(Color oldValue, Color newValue)
        {
            RoutedPropertyChangedEventArgs<Color> args = new RoutedPropertyChangedEventArgs<Color>(oldValue, newValue);
            args.RoutedEvent = ColorPickerUserControls.ColorChangedEvent;
            RaiseEvent(args);

        }

        public static readonly RoutedEvent ColorChangedEvent = EventManager.RegisterRoutedEvent("ColorChanged", RoutingStrategy.Bubble,
            typeof(RoutedPropertyChangedEventHandler<Color>), typeof(ColorPickerUserControls));

        public event RoutedPropertyChangedEventHandler<Color> ColorChanged
        {
            add { AddHandler(ColorChangedEvent, value); }
            remove { RemoveHandler(ColorChangedEvent, value); }
        }

        static ColorPickerUserControls()
        {
            CommandManager.RegisterClassCommandBinding(typeof(ColorPickerUserControls), new CommandBinding(ApplicationCommands.Undo, UndoCommand_Executed, UndoCommand_CanExecute));
        }
        public ColorPickerUserControls()
        {
            InitializeComponent();
        }

        private static void UndoCommand_CanExecute(object sender, CanExecuteRoutedEventArgs e)
        {
            ColorPickerUserControls colorPicker = (ColorPickerUserControls)sender;
            e.CanExecute = colorPicker.previousColors.Count > 0;
        }

        private static void UndoCommand_Executed(object sender, ExecutedRoutedEventArgs e)
        {
            ColorPickerUserControls colorPicker = (ColorPickerUserControls)sender;
            colorPicker.isUndo = true;
            colorPicker.Color = (Color)colorPicker.previousColors.Pop();

        }
    }
}
完整代码如上,我们主要创建了4个ARGB对应byte依赖项属性,和OnColorRGBChanged变动的事件,如果ARGB值变动了,我们就去修改Color的值。
同时我们又创建了OnColorChanged事件用来更新ARGB。当各个属性改变试图改变其他属性时,WPF不允许重新进入属性变化回调函数。例如。如果改变Color属性,就会触发OnColorChanged()方法。OnColorChanged()方法会修改Alpha、Red、Green、Blue属性,从而触发OnColorRGBChanged()回调方法3次,每个属性一次。
然而OnColorRGBChanged()方法不会再次触发OnColorChanged()方法。
然后我们通过propurv=》2次tab实现了一个路由事件,当Color发生变化时会通知注册了这个事件的控件调用者。而后我们在静态构造函数通过RegisterClassCommandBinding注册了一个撤销命令,用于支持用户撤销他的操作。我们用了一个长度为100的Stack来保持用户操作。
我们在Window下使用这个我们创建好的自定义控件,注意这一行代码:
xmlns:usercontrols="clr-namespace:CustomElement.UserControls"
这是添加相关的引用。
其他完整代码如下:
<Window x:Class="CustomElement.MainWindow"
        xmlns="http://schemas.microsoft.com/winfx/2006/xaml/presentation"
        xmlns:x="http://schemas.microsoft.com/winfx/2006/xaml"
        xmlns:d="http://schemas.microsoft.com/expression/blend/2008"
        xmlns:mc="http://schemas.openxmlformats.org/markup-compatibility/2006"
        xmlns:local="clr-namespace:CustomElement" xmlns:usercontrols="clr-namespace:CustomElement.UserControls"
        mc:Ignorable="d"
        Title="MainWindow" Height="450" Width="800">
    <StackPanel>
        <usercontrols:ColorPickerUserControls Color="Beige" x:Name="colorPicker"  ColorChanged="ColorPicker_ColorChanged"/>
        <TextBlock  Text="{Binding ColorTxt}"/>
        <Button Width="120" Content="撤回" Command="Undo" CommandTarget="{Binding ElementName=colorPicker}"/>
    </StackPanel>
</Window>
using System.Windows;
using System.Windows.Media;

namespace CustomElement
{
    /// <summary>
    /// MainWindow.xaml 的交互逻辑
    /// </summary>
    public partial class MainWindow : Window
    {
        public string ColorTxt
        {
            get { return (string)GetValue(ColorTxtProperty); }
            set { SetValue(ColorTxtProperty, value); }
        }

        // Using a DependencyProperty as the backing store for ColorTxt.  This enables animation, styling, binding, etc...
        public static readonly DependencyProperty ColorTxtProperty =
            DependencyProperty.Register("ColorTxt", typeof(string), typeof(MainWindow));

        public MainWindow()
        {
            InitializeComponent();
            DataContext = this;
        }

        private void ColorPicker_ColorChanged(object sender, RoutedPropertyChangedEventArgs<Color> e)
        {
            ColorTxt = "The new color is " + e.NewValue;
        }
    }
}
这是Window下使用自定义控件的代码。
用户控件的目标是提供增补控件模板的设计表面,提供一种定义控件的快速方法,代价是时去了将来的灵活性,如果喜欢用户控件的功能,但是需要修改其可视化外观时,使用这种方法就有问题了。比如希望使用相同的颜色选择器,但是希望使用不同的“皮肤”,将其更好地融合到已有地应用程序窗口中。可以通过样式来改变用户控件地某些方面,但是该控件地一些部分是在内部锁定,并且硬编码到标记中地,比如无法将预览矩形移动到滑动条左边。一般情况下,我们写自定义控件也都是写到了这一步。一个window下放入多个UserControl。然后编辑这些UserControl。各种逻辑代码和状态代码都混到这里。
那么既然用自定义控件肯定是简单地使用样式、触发器、模板无法满足复杂要求然后才从新做的自定义控件,既然选择了这个还是希望能实现到通用控件的程度,比如做一个播放器控件,做一个图片浏览空间。等等。能够通用和适配的东西,但是这样就涉及到皮肤问题,就比如Button、ListBox等等。现在就开始梳理这个无外观控件。
我们回到最开头的表单中找到Control的描述:
Control:当从头开始创建控件时,这是最常用的起点。该类时所有用户交互小组件的基类。Control类添加了用于设置背景、前景、字体和内容对其方式的属性。控件类还为自身设置了Tab顺序(通过IsTabStop属性),并且引入了鼠标双击功能(通过MouseDoubleClick和PreviewMouseDoubleClick事件)。但最重要的是,Control类定义了Template属性,为了得到无限的灵活性,该属性允许使用自定义元素树替换其外观
所以我们创建一个继承自Control的类来实现无外观控件。
创建一个名为CustomControls的WPF Custom Control Library工程,然后新建类改名为ColorPicker并继承自Control
(不知道为什么在VS2017下有.Net Framework的WPF Custom Control Library工程,但是在VS2019下只有名字为.NET的WPF Custom Control Library工程,我创建的是NET Core3.1版本的,而我的CustomElement工程是.NET Framework 4.7.2的,没法引用没看清楚,导致这里出现了问题,添加引用后一直是黄色不可用状态,浪费了我快半个小时写的代码,然后重新写了)。
using System;
using System.Collections.Generic;
using System.Linq;
using System.Text;
using System.Threading.Tasks;
using System.Windows;
using System.Windows.Controls;
using System.Windows.Data;
using System.Windows.Documents;
using System.Windows.Input;
using System.Windows.Media;
using System.Windows.Media.Imaging;
using System.Windows.Navigation;
using System.Windows.Shapes;

namespace CustomControls
{
    /// <summary>
    /// 按照步骤 1a 或 1b 操作,然后执行步骤 2 以在 XAML 文件中使用此自定义控件。
    ///
    /// 步骤 1a) 在当前项目中存在的 XAML 文件中使用该自定义控件。
    /// 将此 XmlNamespace 特性添加到要使用该特性的标记文件的根
    /// 元素中:
    ///
    ///     xmlns:MyNamespace="clr-namespace:CustomControls"
    ///
    ///
    /// 步骤 1b) 在其他项目中存在的 XAML 文件中使用该自定义控件。
    /// 将此 XmlNamespace 特性添加到要使用该特性的标记文件的根
    /// 元素中:
    ///
    ///     xmlns:MyNamespace="clr-namespace:CustomControls;assembly=CustomControls"
    ///
    /// 您还需要添加一个从 XAML 文件所在的项目到此项目的项目引用,
    /// 并重新生成以避免编译错误:
    ///
    ///     在解决方案资源管理器中右击目标项目,然后依次单击
    ///     “添加引用”->“项目”->[选择此项目]
    ///
    ///
    /// 步骤 2)
    /// 继续操作并在 XAML 文件中使用控件。
    ///
    ///     <MyNamespace:CustomControl1/>
    ///
    /// </summary>
    public class ColorPicker : Control
    {
        public byte Blue
        {
            get { return (byte)GetValue(BlueProperty); }
            set { SetValue(BlueProperty, value); }
        }

        // Using a DependencyProperty as the backing store for Blue.  This enables animation, styling, binding, etc...
        public static readonly DependencyProperty BlueProperty =
            DependencyProperty.Register("Blue", typeof(byte), typeof(ColorPicker), new PropertyMetadata(new PropertyChangedCallback(OnRGBColorChanged)));

        public byte Green
        {
            get { return (byte)GetValue(GreenProperty); }
            set { SetValue(GreenProperty, value); }
        }

        // Using a DependencyProperty as the backing store for Green.  This enables animation, styling, binding, etc...
        public static readonly DependencyProperty GreenProperty =
            DependencyProperty.Register("Green", typeof(byte), typeof(ColorPicker), new PropertyMetadata(new PropertyChangedCallback(OnRGBColorChanged)));

        public byte Red
        {
            get { return (byte)GetValue(RedProperty); }
            set { SetValue(RedProperty, value); }
        }

        // Using a DependencyProperty as the backing store for Red.  This enables animation, styling, binding, etc...
        public static readonly DependencyProperty RedProperty =
            DependencyProperty.Register("Red", typeof(byte), typeof(ColorPicker), new PropertyMetadata(new PropertyChangedCallback(OnRGBColorChanged)));

        private static void OnRGBColorChanged(DependencyObject d, DependencyPropertyChangedEventArgs e)
        {
            ColorPicker colorPicker = (ColorPicker)d;
            Color color = colorPicker.Color;
            if (e.Property == RedProperty)
            {
                color.R = (byte)e.NewValue;
            }
            else if (e.Property == GreenProperty)
            {
                color.G = (byte)e.NewValue;
            }
            else if (e.Property == BlueProperty)
            {
                color.B = (byte)e.NewValue;
            }
            colorPicker.Color = color;
        }

        public Color Color
        {
            get { return (Color)GetValue(ColorProperty); }
            set { SetValue(ColorProperty, value); }
        }

        // Using a DependencyProperty as the backing store for Color.  This enables animation, styling, binding, etc...
        public static readonly DependencyProperty ColorProperty =
            DependencyProperty.Register("Color", typeof(Color), typeof(ColorPicker), new PropertyMetadata(new PropertyChangedCallback(OnColorChanged)));

        private static void OnColorChanged(DependencyObject d, DependencyPropertyChangedEventArgs e)
        {
            ColorPicker colorPicker = (ColorPicker)d;
            Color oldColor = (Color)e.OldValue;
            Color newColor = (Color)e.NewValue;
            colorPicker.Red = newColor.R;
            colorPicker.Green = newColor.G;
            colorPicker.Blue = newColor.B;
            colorPicker.OnColorChanged(oldColor, newColor);
        }

        private void OnColorChanged(Color oldValue, Color newValue)
        {
            RoutedPropertyChangedEventArgs<Color> args = new RoutedPropertyChangedEventArgs<Color>(oldValue, newValue);
            args.RoutedEvent = ColorPicker.ColorChangedEvent;
            RaiseEvent(args);
        }

        public static readonly RoutedEvent ColorChangedEvent = EventManager.RegisterRoutedEvent("ColorChanged", RoutingStrategy.Bubble,
            typeof(RoutedPropertyChangedEventHandler<Color>), typeof(ColorPicker));

        public event RoutedPropertyChangedEventHandler<Color> ColorChanged
        {
            add { AddHandler(ColorChangedEvent, value); }
            remove { RemoveHandler(ColorChangedEvent, value); }
        }

        static ColorPicker()
        {
            DefaultStyleKeyProperty.OverrideMetadata(typeof(ColorPicker), new FrameworkPropertyMetadata(typeof(ColorPicker)));
        }
    }
}
这是ColorPicker.cs的当前的全部代码。注意ColorPicker.cs下的这段代码。默认样式在这里。
DefaultStyleKeyProperty.OverrideMetadata(typeof(ColorPicker), new FrameworkPropertyMetadata(typeof(ColorPicker)));
然后开始写Style。我们在CustomControls下创建themes文件夹然后添加ColorPicker.xaml资源文件和generic.xaml(这应该是创建的时候自带的)。
样式在我们当前的情况下最大的作用就是应用新模板,新模板定义了控件的默认可视化外观。
注意以下几点:
1)当创建到连接到父控件类属性的绑定表达式时,不能使用ElementName,而需要使用RelativeSource属性指示需要希望绑定到的父控件,如果单向绑定完全能够满足要求,可以使用轻量级的TemplateBinding 标记表达式,而不需要使用功能完备的数据绑定。
2)不能再控件模板中关联事件处理程序。相反,需要为元素提供能够时别的名字,并再控件构造函数中通过代码为它们关联事件处理程序。
3)除非希望关联事件处理程序或通过代码与它进行交互,否则不要再控件模板中命名元素。当命名希望使用的元素时,使用"PART_元素名"的形式进行命名。
我们的Border下的Background使用的是TemplateBinding了,他是使用该控件的对象(并引用了该样式和模板)传入的Background。使用TemplateBinding能提取数据,但是如果需要双向绑定,或者继承自Freezable的类比如(SolidColorBrush)TemplateBinding就不工作了,就需要使用RelativeSource绑定的TemplateParent。
这样就完成了控件模板的外观,代码如下:
<ResourceDictionary xmlns="http://schemas.microsoft.com/winfx/2006/xaml/presentation"
                    xmlns:x="http://schemas.microsoft.com/winfx/2006/xaml"
                    xmlns:local="clr-namespace:CustomControls">
    <Style TargetType="{x:Type local:ColorPicker}">
        <Setter Property="Template">
            <Setter.Value>
                <ControlTemplate TargetType="{x:Type local:ColorPicker}">
                    <Border
                        BorderBrush="{TemplateBinding BorderBrush}"
                        BorderThickness="{TemplateBinding BorderThickness}"
                        Background="{TemplateBinding Background}">
                        <Grid>
                            <Grid.RowDefinitions>
                                <RowDefinition Height="Auto"/>
                                <RowDefinition Height="Auto"/>
                                <RowDefinition Height="Auto"/>
                            </Grid.RowDefinitions>
                            <Grid.ColumnDefinitions>
                                <ColumnDefinition/>
                                <ColumnDefinition Width="Auto"/>
                            </Grid.ColumnDefinitions>
                            <Slider Name="PART_RedSlider" Minimum="0" Maximum="255"  Value="{Binding Path=Red, RelativeSource={RelativeSource TemplatedParent}}"/>
                            <Slider Name="PART_GreenSlider" Grid.Row="1" Minimum="0" Maximum="255" Value="{Binding RelativeSource={RelativeSource templatedParent},Path=Green}"/>
                            <Slider Name="PART_BlueSlider" Grid.Row="2" Minimum="0" Maximum="255" Value="{Binding RelativeSource={RelativeSource TemplatedParent},Path=Blue}"/>
                            <Rectangle Width="50" Stroke="Black" Grid.RowSpan="3" Grid.Column="1" StrokeThickness="1">
                                <Rectangle.Fill>
                                    <SolidColorBrush Color="{Binding RelativeSource={RelativeSource TemplatedParent},Path=Color}"/>
                                </Rectangle.Fill>
                            </Rectangle>
                        </Grid>
                    </Border>
                </ControlTemplate>
            </Setter.Value>
        </Setter>
    </Style>
</ResourceDictionary>
Generic.xaml下代码如下:
<ResourceDictionary
    xmlns="http://schemas.microsoft.com/winfx/2006/xaml/presentation"
    xmlns:x="http://schemas.microsoft.com/winfx/2006/xaml"
    xmlns:local="clr-namespace:CustomControls">
    <ResourceDictionary.MergedDictionaries>
        <ResourceDictionary Source="pack://application:,,,/CustomControls;component/themes/ColorPicker.xaml"/>
    </ResourceDictionary.MergedDictionaries>
</ResourceDictionary>
但是这么写的话,每一处模板样式都需要写很多这样的绑定,我们可以把bangding关系放在模板的初始化阶段。
我们再刚才定义了很多的以"PART_"开头的Name。以PART_开头,后面跟元素名称,元素名称的首字母大写。我们现在把这些绑定关系放到一个专用的OnApplyTemplate()方法中,这样就能最简单的来使用模板。移出上面代码中Slider和SolidColorBrush的绑定关系。关键部分代码如下:
        <Slider Name="PART_RedSlider" Minimum="0" Maximum="255" />
                            <Slider Name="PART_GreenSlider" Grid.Row="1" Minimum="0" Maximum="255"/>
                            <Slider Name="PART_BlueSlider" Grid.Row="2" Minimum="0" Maximum="255"/>
                            <Rectangle Width="50" Stroke="Black" Grid.RowSpan="3" Grid.Column="1" StrokeThickness="1">
                                <Rectangle.Fill>
                                    <SolidColorBrush x:Name="PART_PreviewBrush" Color="{Binding  RelativeSource={RelativeSource TemplatedParent},Path=Color}"/>
                                </Rectangle.Fill>
                            </Rectangle>
打开ColorPicker.cs找个合适的位置重写OnApplyemplate()。
  public override void OnApplyTemplate()
        {
            base.OnApplyTemplate();
            RangeBase slider = (RangeBase)GetTemplateChild("PART_RedSlider");
            if (slider != null)
            {
                Binding binding = new Binding("Red");
                binding.Source = this;
                binding.Mode = BindingMode.TwoWay;
                slider.SetBinding(RangeBase.ValueProperty, binding);
            }
            slider = (RangeBase)GetTemplateChild("PART_GreenSlider");
            if (slider != null)
            {
                Binding binding = new Binding("Green");
                binding.Source = this;
                binding.Mode = BindingMode.TwoWay;
                slider.SetBinding(RangeBase.ValueProperty, binding);
            }
            slider = (RangeBase)GetTemplateChild("PART_BlueSlider");
            {
                Binding binding = new Binding("Blue");
                binding.Source = this;
                binding.Mode = BindingMode.TwoWay;
                slider.SetBinding(RangeBase.ValueProperty, binding);
            }
            //Color="{Binding  RelativeSource={RelativeSource TemplatedParent},Path=Color}"
            //这里并没有生效,2个小时了也没有解决,所以这个算作一个问题先放着吧
            //后面单独写博客,解决这个问题,现在把这个相关的binding放到ColorPicker.xaml中。
            #region 这里没有生效 ,先注释掉吧,改用ColorPicker.xaml下使用TemplatedParent.
          //  SolidColorBrush brush =  GetTemplateChild("PART_PreviewBrush") as SolidColorBrush;
          //  if (brush != null)
          //  {
          //      Binding binding = new Binding("Color");
          //      binding.Source = brush;
          //      binding.Mode = BindingMode.OneWayToSource;
          //      this.SetBinding(ColorPicker.ColorProperty, binding);
          //  }
            #endregion
        }
修改ColorPicker.xaml这里直接再模板中绑定。这样的话,每个模板都需要绑定。
<SolidColorBrush x:Name="PART_PreviewBrush" Color="{Binding RelativeSource={RelativeSource TemplatedParent},Path=Color}"/>
我们再上面使用的是RangeBase类,是Slider类的父类,使用这个是为了再其他模板下可以使用继承自RangeBase的类。代替滑动条。
画刷这里有问题,并且还没有解决掉,问题是绑定了,但是没有生效,很奇怪。还没有查到问题。目前Color先使用模板绑定吧。
还有一个关键的内容。为控件添加TemplatePart特性,以记录再控件模板中使用哪些部件名称:
   [TemplatePart(Name="PART_RedSlider",Type =typeof(RangeBase))]
    [TemplatePart(Name ="PART_GreenSlider",Type =typeof(RangeBase))]
    [TemplatePart(Name ="PART_BlueSlider",Type =typeof(RangeBase))]
    public class ColorPicker : Control
我们再MainWindow下使用这个控件。
再MainWindow的工程下如果没有引用这个项目,去添加引用。
然后再MainWindow下设置命名空间
xmlns:customControls="clr-namespace:CustomControls;assembly=CustomControls"
<customControls:ColorPicker Color="Beige" />
这样就可以正常使用拉。
我们再添加一个控件模板。
<Window x:Class="CustomElement.MainWindow"
        xmlns="http://schemas.microsoft.com/winfx/2006/xaml/presentation"
        xmlns:x="http://schemas.microsoft.com/winfx/2006/xaml"
        xmlns:d="http://schemas.microsoft.com/expression/blend/2008"
        xmlns:mc="http://schemas.openxmlformats.org/markup-compatibility/2006"
        xmlns:local="clr-namespace:CustomElement"
        xmlns:usercontrols="clr-namespace:CustomElement.UserControls"
        xmlns:customControls="clr-namespace:CustomControls;assembly=CustomControls"
        mc:Ignorable="d"
        Title="MainWindow" Height="450" Width="800">
    <Window.Resources>
        <Style x:Key="VerticalSliderStyle" TargetType="{x:Type Slider}">
            <Setter Property="Orientation" Value="Vertical"/>
            <Setter Property="Minimum" Value="0"/>
            <Setter Property="Maximum" Value="255"/>

        </Style>
        <ControlTemplate x:Key="FancyColorPickerTemplate">
            <Border Background="LightBlue"
                    BorderBrush="Black"
                    BorderThickness="1">
                <Grid>
                    <Grid.RowDefinitions>
                        <RowDefinition/>
                        <RowDefinition Height="Auto"/>
                    </Grid.RowDefinitions>
                    <Grid.ColumnDefinitions>
                        <ColumnDefinition Width="Auto"/>
                        <ColumnDefinition Width="Auto"/>
                        <ColumnDefinition Width="Auto"/>
                        <ColumnDefinition Width="Auto"/>
                    </Grid.ColumnDefinitions>
                    <Ellipse  Margin="10" Width="100" Height="100" Stroke="LightGoldenrodYellow" StrokeThickness="5">
                        <Ellipse.Fill>
                            <SolidColorBrush Color="{Binding Path=Color,RelativeSource={RelativeSource TemplatedParent}}"></SolidColorBrush>
                        </Ellipse.Fill>
                    </Ellipse>
                    <Slider Style="{StaticResource VerticalSliderStyle}" Name="PART_RedSlider" Grid.Column="1" />
                    <TextBlock Grid.Row="1" Grid.Column="1">RED</TextBlock>
                    <Slider Style="{StaticResource VerticalSliderStyle}" Name="PART_GreenSlider" Grid.Column="2"/>
                    <TextBlock Grid.Row="1" Grid.Column="2">GREEN</TextBlock>
                    <Slider Style="{StaticResource VerticalSliderStyle}" Name="PART_BlueSlider" Grid.Column="3"/>
                    <TextBlock Grid.Row="1" Grid.Column="3">BLUE</TextBlock>
                </Grid>
            </Border>
        </ControlTemplate>
    </Window.Resources>
    <StackPanel>
        <usercontrols:ColorPickerUserControls Color="Beige" x:Name="colorPicker"  ColorChanged="ColorPicker_ColorChanged"/>
        <TextBlock  Text="{Binding ColorTxt}"/>
        <Button Width="120" Content="撤回" Command="Undo" CommandTarget="{Binding ElementName=colorPicker}"/>
        <customControls:ColorPicker Color="Beige" />
        <customControls:ColorPicker Color="Gold" Template="{StaticResource FancyColorPickerTemplate}"/>
    </StackPanel>

</Window>
这个效果就非常棒拉。我们从新定义了外观。刚才哪个绑定失败的问题,这样来看,其实写的过程中影响也不大。但是就是需要再模板下绑定一次。
这篇就写到这里吧,不配图了,静下心自己写出来跑一下更有感觉,这篇只是带着入门以下,这个例子逻辑上非常的简单,但是这篇博客也写了三个晚上了。学习是一个持续的过程,如果这个知识点没有理解,那就建议继续花时间深入以下,如果你只是着急上项目,那么这篇你过一下了解了就行。如果是跟我一样想系统的梳理,建议还是搞清楚你疑惑的这些技术点。这一篇遇到的问题确实比较多,下一篇会写更复杂的通过VisualStateManager来管理我们的模板。

 浙公网安备 33010602011771号