Python3 与 C# 扩展之~基础衍生
本文适应人群:C# or Python3 基础巩固
代码裤子: https://github.com/lotapp/BaseCode
在线编程: https://mybinder.org/v2/gh/lotapp/BaseCode/master
在线预览:http://github.lesschina.com/python/base/ext/基础衍生.html
马上快期末考试了,老师蜜月也回来了,于是有了一场跨季度的复习讲课了:
1.Python基础语法扩展
1.1.if 判断条件相关
None、""、0、[]、{} ==> 假
1、" "、[None,""]、{"":None} ==> 真
小明可高兴了,前几天被打击的面目全非,这几天老师回来了,又可以大发神威了,于是抢先提交demo:
# None
if None:
    print(True)
else:
    print(False)
# 0为False
if 0:
    print(True)
else:
    print(False)
# 空字符串
if "":
    print(True)
else:
    print(False)
# 空列表为False
if []:
    print(True)
else:
    print(False)
# 空字典为False
if {}:
    print(True)
else:
    print(False)
# 1为True
if 1:
    print(True)
else:
    print(False)
# 含空格
if " ":
    print(True)
else:
    print(False)
if [None,""]:
    print(True)
else:
    print(False)
if {"":None}:
    print(True)
else:
    print(False)
a, b = 1, 2

max = a if a > b else b

print(max)
a, b, c = 1, 3, 2

max = a if a > b else b
max = max if max > c else c

print(max)
# 上面的那个还有一种简写(不推荐)
a, b, c = 1, 3, 2

max = (a if a > b else b) if (a if a > b else b) > c else c

print(max)
1.2.字符串和编码
在Python3.x版本中,字符串是以Unicode编码的
对于单个字符的编码,Python提供了ord()函数获取字符的整数表示,chr()函数把编码转换为对应的字符
小潘对这块有所研究,把小明按在桌上然后抢先提交demo:
ord('D')
ord('毒')
chr(68)
chr(27602)
print(ord('A'))
print(ord('Z'))

print(ord('a'))
print(ord('z'))
老师补充讲解道:
编码:encode() 解码:decode()
url相关的可以用:
urllib.parse.quote() and urllib.parse.unquote()
urllib.parse.urlencode() 可以直接对一个key-value进行url编码
# encode() and decode()
name="毒逆天"

name_encode=name.encode("utf-8")

print(name_encode)

print(name_encode.decode("utf-8"))
# 需要导入urlib.parse

import urllib.parse
test_str="淡定"

# 对字符串进行url编码和解码
test_str_enode = urllib.parse.quote(test_str)

print(test_str_enode)

# urllib.parse.quote() 解码
print(urllib.parse.unquote(test_str_enode))
# urlencode 可以直接对一个key-value进行编码

test_dict={"name":"毒逆天","age":23}

encode_str = urllib.parse.urlencode(test_dict)

print(encode_str)
print(urllib.parse.unquote(encode_str))
1.3.值判断和地址判断
小明不乐意了,你个小潘总是抢我的风头,看完标题就刷刷的在黑板上写下了如下知识点:
is 是比较两个引用是否指向了同一个对象(id()得到的地址一样则相同)
== 是比较两个对象的值是否相等
在之前讲Dict的时候提了一下可变和不可变类型:https://www.cnblogs.com/dotnetcrazy/p/9155310.html#5.2.增加和修改
Func里面又系统的说了一下:https://www.cnblogs.com/dotnetcrazy/p/9175950.html#4.5.可变类型和不可变类型
对于可变不可变系列就不去复述了,下面再来几个案例看看 值判断和 地址判断的概念
################ 可变类型 ################
a=[1,2,3]
b=[1,2,3]

# id不一样,那is肯定不一样了
print(id(a))
print(id(b))
# a和b是否指向同一个地址
a is b
# a和b的值是否相同
a == b
################ 开始变化了 ################
# 让a指向b的地址
a=b

# a和b的id一样了
print(id(a))
print(id(b))
# a和b是否指向同一个地址
a is b
# a和b的值是否相同
a == b
################ 不可变类型 ################
a=1
b=1

# id一样
print(id(a))
print(id(b))
a is b
a == b
# 但是你要注意,不是所有不可变类型都这样的

f1=1.2
f2=1.2

# 声明两个相同值的浮点型变量,查看它们的id,发现它们并不是指向同个内存地址(这点和int类型不同)
print(id(f1))
print(id(f2))
# 这个就不一样了
# 这方面涉及Python内存管理机制,Python对int类型和较短的字符串进行了缓存
# 无论声明多少个值相同的变量,实际上都指向同个内存地址,其他的就没这福利咯~

f1 is f2
f1 == f2
2.Python总结之for系列
老师徐徐道来:“之前说for总是零零散散的,现在基础都讲完了,来个小汇总:”
2.1.Base
能够被for循环遍历的,就是可迭代的
For基础系:https://www.cnblogs.com/dotnetcrazy/p/9102030.html#9.1.Python
# 类似于for(int i=0;i<5;i++)

for i in range(5):
    print(i)
#while循环一般通过数值是否满足来确定循环的条件
#for循环一般是对能保存多个数据的变量,进行遍历

name="https://pan.baidu.com/s/1weaF2DGsgDzAcniRzNqfyQ#mmd"

for i in name:
    if i=='#':
        break
    print(i,end='')#另一种写法:print("%s"%i,end="")
print('\n end ...')
# 你期望的结果是:i = 5

for i in range(10):
    if i == 5:
        print("i = %d" % i)
else:
    print("没有找到")
# 当迭代的对象迭代完并为空时,位于else的子句将执行
# 而如果在for循环中含有break时则直接终止循环,并不会执行else子句
# 正确写法如下:

for i in range(10):
    if i == 5:
        print("i = %d" % i)
        break
else:
    print("没有找到")
# 遍历一个字典

test_dict={"Name":"小明","Age":23}

for k,v in test_dict.items():
    print("key:%s,value:%s"%(k,v))
2.2.列表生成式
如果下面知识点还不熟悉的,看看之前讲的~列表生成式:https://www.cnblogs.com/dotnetcrazy/p/9155310.html#1.9.列表生成式
简写:list(range(1, 11)) 全写:[x for x in range(1,11)]
list(range(1, 11))
[x for x in range(1,11)]
# 1~10的平方列表
[x*x for x in range(1,11)]
# 1~10之间的偶数
[x for x in range(1, 11) if x % 2 == 0]
# 数学里面的全排列
[x + y for x in 'ABC' for y in 'AB']
# 数学里面的坐标轴
[(x,y) for x in range(1,5) for y in range(1,4)]
# (x,y,z) 一般三个嵌套就上天了
[(x,y,z) for x in range(1,5) for y in range(1,4) for z in range(1,3)]
2.3.扩展
如果要对list实现类似C#或者java那样的下标循环怎么办?
这块小明又有预习,于是在提交Code的同时大声说道:
Python内置的enumerate函数可以把一个list变成索引-元素对,这样就可以在for循环中同时迭代索引和元素本身
for i, item in enumerate(['A', 'B', 'C']):
    print(i, item)
3.Python中赋值、浅拷贝、深拷贝
看到标题小明和小潘就楞了,老师当时没讲解啊,然后两个人眼巴巴的看着老师讲解:
官方文档:https://docs.python.org/3/library/copy.html
3.1.赋值
通过=来实现,就是把地址拷贝了一份,比如 a = b
a=[1,2,2]
b = a

print(id(a))
print(id(b))
# 再验证

a.append(3)

# 都增加了一个3,说明的确指向同一个内存地址
print(a)
print(b)
import copy

a=[1,2,2]
b=copy.deepcopy(a)

# 指向了不同的内存地址
print(id(a))
print(id(b))
# 再验证一下

a.append(3)

# b不变,说明的确指向不同的内存地址
print(a)
print(b)
################ 开始变化了 ################
# 之前讲了嵌套列表,我们来验证一下

a=[1,2,2]
b=[1,2,3,a]

c=copy.deepcopy(b)

# 发现地址都不一样
print(id(b))
print(id(c))
print(id(b[3]))
print(id(c[3]))
# 直观的验证一下

a.append(666)

# 深拷贝的确是深拷贝
print(b)
print(c)
3.3.浅拷贝copy
copy只是简单拷贝,如果拷贝内容里面还有引用之类的,他是不管的
import copy

a=[1,2,2]
b=copy.copy(a)

# 指向了不同的内存地址
print(id(a))
print(id(b))
################ 开始变化了 ################
# 之前讲了嵌套列表,我们来验证一下

a=[1,2,2]
b=[1,2,3,a]

c=copy.copy(b)

# 第一层地址不一样
print(id(b))
print(id(c))
# 验证一下
b.append(111)

# 第一层指向的不同地址
print(b)
print(c)
# 如果里面还有引用,那么就不管了
print(id(b[3]))
print(id(c[3]))
# 验证一下
a.append(666)

# 内部引用的确没copy新地址
print(b)
print(c)
3.4.知识扩展
如果拷贝的对象是不可变类型,不管深拷贝和浅拷贝以及赋值都是地址引用。但当拷贝的不可变对象含有引用类型时,只有深拷贝(deepcopy)会递归复制
需要注意的是:Python和Net对于值类型处理是不一样的(管理方式不一样导致的)
==>NET中值类型默认是深拷贝的,而对于引用类型,默认实现的是浅拷贝
a=(1,2,2)
b=a

print(id(a))
print(id(b))
a=(1,2,2)
b=copy.deepcopy(a)

print(id(a))
print(id(b))
a=(1,2,2)
b=copy.copy(a)

print(id(a))
print(id(b))
扩:当拷贝的不可变对象含有引用类型时:赋值和浅拷贝不会copy,而深拷贝(deepcopy)会递归复制 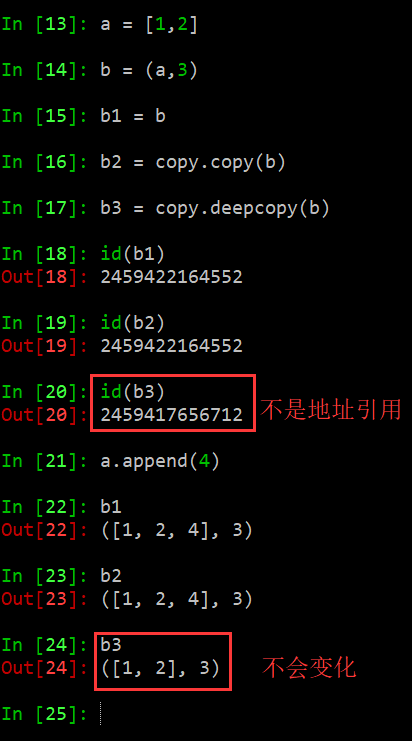
PS:我们常用的切片相当于浅拷贝(copy.copy()) 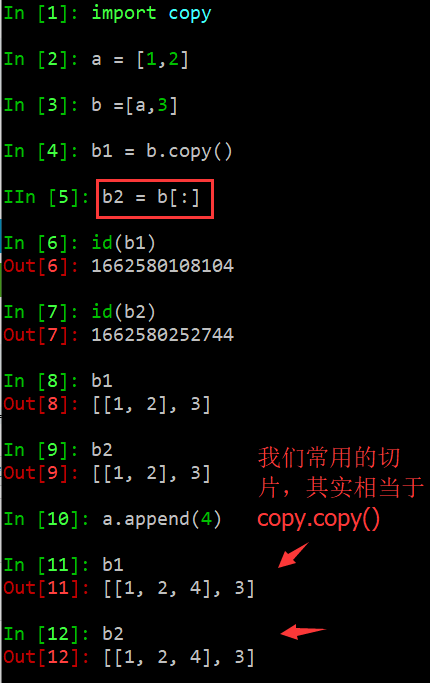
4.CSharp中赋值、浅拷贝、深拷贝
小明听懂了Python的深拷贝和浅拷贝后,本着学以致用的原则,写下了C#的实现:
先声明一下,本机环境是Ubuntu + NetCore,欢迎贴Code补充
4.1.赋值
Code:https://github.com/lotapp/BaseCode/tree/master/netcore/3_Ext/deepcopy
赋值方法和Python一样,直接赋值即可
var list1 = new List<int>() { 1, 2, 2 };
var list2 = list1;
%%script csharp

// Python一样,直接赋值即可
var list1 = new List<int>() { 1, 2, 2 };
var list2 = list1;

// 验证一下
list1.Add(3);//我们修改一下list1,list2也就跟着就改变了

foreach (var item in list1)
{
    Console.Write(item + " ");
}
Console.WriteLine();
foreach (var item in list2)
{
    Console.Write(item + " ");
}
4.2值类型默认深拷贝
NetCore深拷贝相关的官方文档 public void CopyTo (T[] array);
简单类型用最简单的方式就能实现深拷贝了:
官方的CopyTo在这里和这个效果一样,但是比较麻烦,这边就不贴了(Code里面贴了)
var list3 = new List<int>() { 1, 2, 2 };
var list4 = new List<int>(list3);

// 验证一下
list3.Add(3);
foreach (var item in list3)
{
    Console.Write(item + " ");
}
Console.WriteLine();
foreach (var item in list4)
{
    Console.Write(item + " ");
}
结果:
1 2 2 3
1 2 2
4.3.引用类型默认浅拷贝
对于List<T>再复杂点的,上面的方式就变成浅拷贝了:(类似于Python的Copy.Copy)
官方的CopyTo在这里和这个效果一样,但是比较麻烦,这边就不贴了(Demo里面贴了)
定义一个Student
public partial class Student
{
    public string Name { get; set; }
    public int Age { get; set; }

    public override string ToString()
    {
        return $"Name:{Name},Age:{Age}";
    }
}
浅拷贝Demo:
var list5 = new List<Student>(){
    new Student { Name = "小张", Age = 22 },
    new Student { Name = "小明", Age = 23 }
    };
var p = new Student() { Name = "小潘", Age = 23 };
list5.Add(p);

// 浅拷贝一份
var list6 = new List<Student>(list5);

// 浅拷贝测试
// 我们修改一下list5,list6没有跟着改变,说明第一层的地址的确不一样
list5.Add(new Student() { Name = "小胖", Age = 24 });
// 当我们修改小潘同学的年龄时,大家都变了,说明真的只是浅拷贝
p.Age = 24;

foreach (var item in list5)
{
    Console.WriteLine(item);
}
Console.WriteLine("=============");
foreach (var item in list6)
{
    Console.WriteLine(item);
}
结果:
Name:小张,Age:22
Name:小明,Age:23
Name:小潘,Age:24
Name:小胖,Age:24
=============
Name:小张,Age:22
Name:小明,Age:23
Name:小潘,Age:24
4.4.简单方式实现深拷贝
对于List<T>的深拷贝场景,其实项目中还是蛮常见的,那深拷贝怎么搞呢?
先来一个简单的实现方式,需要T实现ICloneable接口才行:
定义一个Person类
public partial class Person : ICloneable
{
    public string Name { get; set; }
    public int Age { get; set; }

    //实现ICloneable的Clone方法
    public object Clone()
    {
        return base.MemberwiseClone();//调用父类方法即可
    }

    public override string ToString()
    {
        return $"Name:{Name},Age:{Age}";
    }
}
给List<T>定义一个扩展方法:(温馨提醒:扩展方法所在的类必须是static Class哦)
public static partial class ListExt
{
    // 只要T实现了ICloneable接口就可以了
    public static IEnumerable<T> DeepCopy<T>(this IEnumerable<T> list) where T : ICloneable
    {
        return list.Select(item => (T)item.Clone()).ToList();
    }
}
来个调用加验证:
#region 引用类型深拷贝-简单实现方式

var oldList = new List<Person>(){
    new Person(){Name="小明",Age=23},
    new Person(){Name="小张",Age=22},
};
var xiaoPan = new Person() { Name = "小潘", Age = 23 };
oldList.Add(xiaoPan);

var newList = oldList.DeepCopy();

//测试
oldList.Add(new Person() { Name = "小胖", Age = 23 });
xiaoPan.Age = 24;

foreach (var item in oldList)
{
    Console.WriteLine(item);
}
Console.WriteLine("========");
foreach (var item in newList)
{
    Console.WriteLine(item);
}

#endregion
结果:
Name:小明,Age:23
Name:小张,Age:22
Name:小潘,Age:24
Name:小胖,Age:23
========
Name:小明,Age:23
Name:小张,Age:22
Name:小潘,Age:23
4.5.序列化方式实现深拷贝(常用)
利用System.Runtime.Serialization序列化与反序列化实现深拷贝
先定义一个Teacher类(别忘记加 Serializable 的标签)
[Serializable]
public partial class Teacher
{
    public string Name { get; set; }
    public int Age { get; set; }

    public override string ToString()
    {
        return $"Name:{Name},Age:{Age}";
    }
}
添加一个扩展方法:
public static partial class ListExt
{
    // 利用System.Runtime.Serialization序列化与反序列化实现深拷贝
    public static T DeepCopy2<T>(this T obj)
    {
        using (var stream = new MemoryStream())
        {
            var formatter = new BinaryFormatter();
            formatter.Serialize(stream, obj);
            stream.Seek(0, SeekOrigin.Begin);
            return (T)formatter.Deserialize(stream);
        }
    }
}
调用:
#region 引用类型深拷贝-序列化实现

var oldTestList = new List<Teacher>(){
    new Teacher(){Name="小明",Age=23},
    new Teacher(){Name="小张",Age=22},
};
var s = new Teacher() { Name = "小潘", Age = 23 };
oldTestList.Add(s);

var newTestList = oldTestList.DeepCopy2();

//测试
oldTestList.Add(new Teacher() { Name = "小胖", Age = 23 });
s.Age = 24;

foreach (var item in oldTestList)
{
    Console.WriteLine(item);
}
Console.WriteLine("========");
foreach (var item in newTestList)
{
    Console.WriteLine(item);
}

#endregion
结果:
Name:小明,Age:23
Name:小张,Age:22
Name:小潘,Age:24
Name:小胖,Age:23
========
Name:小明,Age:23
Name:小张,Age:22
Name:小潘,Age:23
因为主要是说Python,Net只是简单提一下,这边就先到这里了
不尽兴可以看看这篇文章,讲得还是挺全面的
我们接着来对比学习~
# 列表生成式
[x for x in range(10)]
# 生成器写法(Python2.x系列是用xrange)
(x for x in range(10))
遍历方式可以用之前的for循环来遍历(推荐)
也可以用next()或者__next__()方法来遍历。【C#是用MoveNext】
generator保存的是算法,每次调用next(xxx)或者__next__(),就计算出下一个元素的值,直到计算到最后一个元素
当没有更多的元素时,抛出StopIteration的异常
最新的Python3.7在这方面有所优化:https://www.python.org/dev/peps/pep-0479
g=(x for x in range(10))

# for来遍历(推荐)
for i in g:
    print(i)
g=(x for x in range(10))

print(next(g))
print(next(g))
print(next(g))
print(next(g))
print(next(g))
print(g.__next__()) #通过__next__也一样取下一个
print(next(g))
print(next(g))
print(next(g))
print(next(g))
print(next(g))
print(next(g))
# 递归方式:求第30个数是多少

# 1、1、2、3、5、8、13、21、34...
def fib(n):
    if n == 1 or n == 2:
        return 1
    else:
        return fib(n - 1) + fib(n - 2)

fib(30)
# 在讲yield方式之前先用循环实现一下

def fibona(max):
    n, a, b = 0, 0, 1
    while n < max:
        print(b)
        a, b = b, a + b
        n = n + 1

fibona(30)
# for循环实现

def fibona(n):
    a, b = 0, 1
    # [0,n)
    for i in range(n):
        print(b)
        a, b = b, a + b

fibona(30)
a, b = b, a + b 之前交换两数的时候提过
这个相当于==>
temp_tuple = (b, a + b)
a = temp_tuple[0]
b = temp_tuple[1]
要把fibona函数变成generator,只需要把print(b)改为yield b就可以了:
generator在执行过程中,遇到yield就中断,下次又继续执行到yield停下了,一直到最后
生成器的特点:
- 节约内存
- 迭代到下一次的调用时,所使用的参数都是第一次所保留下的(所有函数调用的参数都是第一次所调用时保留的,而不是新创建的)
# 改成生成器比较简单,直接换输出为yield

def fibona(n):
    a, b = 0, 1
    # [0,n)
    for i in range(n):
        yield b
        a, b = b, a + b
# 看看是不是生成器
g = fibona(30)

g
# 遍历输出(基本上都会用for来遍历)
for i in g:
    print(i)
对于函数改成的generator来说,遇到return语句或者执行到函数体最后一行语句,就是结束generator的循环的时候
小明总结如下:
-
在Python中,这种一边循环一边计算的机制称为生成器:generator
-
每一个生成器都是一个迭代器(迭代器不一定是生成器)
-
如果一个函数包含yield关键字,这个函数就会变为一个生成器
-
生成器并不会一次返回所有结果,而是每次遇到yield关键字后返回相应结果,并保留函数当前的运行状态,等待下一次的调用
-
由于生成器也是一个迭代器,那么它就支持next用方法来获取下一个值(我们平时用for来遍历它)
推荐一篇文章,总结的很全了:(yield用法总结)
5.3.扩展之~send(msg)方法:
其实__next__()和send()在一定意义上作用是相似的,区别是send()可以传递yield表达式的值进去
而__next__()不 能传递特定的值。我们可以看做x.__next__() 和 x.send(None) 作用是一样的
# 来个案例:
def test_send(n):
    for i in range(n):
        tmp = yield i
        print(tmp)


g = test_send(5)

g
# 定义一个列表
test_list = []

# 把第一次yield的值放在列表中
test_list.append(g.__next__())

# 把list传给tmp并打印(可以理解为把表达式右边的 yield i 暂时换成了 test_list)
# out的内容是yield返回的值
g.send(test_list)
# 以防你们看不懂,来个简单案例
# 你传啥print(tmp)就给你打印啥
g.send("你好啊")
注意一种情况,generator刚启动的时候,要么不传,要么只能传None
解决:要么一开始send(None)要么一开始先调用一下__next()__ or next()
# 注意一种情况,generator刚启动的时候,要么不传,要么只能传None
def test_send(n):
    for i in range(n):
        tmp = yield i
        print(tmp)


g = test_send(5)
g.send("dog") # TypeError: can't send non-None value to a just-started generator
# 解决:要么一开始send(None)要么一开始先调用一下__next()__ or next()
def test_send(n):
    for i in range(n):
        tmp = yield i
        print(tmp)


g = test_send(5)
g.send(None)
g.send("dog")
扩:C#在遍历generator的时候也是先调一下MoveNext方法
while (tmp.MoveNext())
{
    Console.WriteLine(tmp.Current);
}
5.4.扩展之~return和break的说明
在一个generator函数中,如果没有return则默认执行至函数完毕
如果在执行过程中return或者break则直接抛出StopIteration终止迭代
# break案例
def test_send(n):
    for i in range(n):
        if i==2:
            break
        yield i

g = test_send(5)
for i in g:
    print(i)
# return案例
def test_send(n):
for i in range(n):
if i==2:
return "i==2"
yield i
g = test_send(5)
for i in g:
print(i)
用for循环调用generator时,发现拿不到generator的return语句的返回值
如果想要拿到返回值,必须捕获StopIteration错误,返回值包含在StopIteration的value中
# 上面return的返回值怎么拿呢?
g = test_send(5)
while True:
try:
tmp = g.__next__()
print(tmp)
except StopIteration as ex:
print(ex.value)
break # 一定要加break,别忘了你在死循环里呢
def consumer():
while True:
tmp = yield
# !None就变成真了
if not tmp:
return
print("消费者:",tmp)
# 创建消费者
c = consumer()
# 启动消费者
c.send(None)
# 生产数据,并提交给消费者
c.send("小明")
c.send("小潘")
# 生产结束,通知消费者结束,抛出StopIteration异常
c.send(None) # 使用c.close()可以避免异常
执行流程:
- 创建协程对象(消费者)后,必须使用
send(None)或__next__()启动 - 协程在执行yield后让出执行绪,等待消息
- 调用方发送
send(msg)消息,协程恢复执行,将接收到的数据保存并执行后续流程 - 再次循环到yield,协程返回前面的处理结果,并再次让出执行绪
- 直到关闭或被引发异常
补全demo:
def consumer():
status = ""
while True:
tmp = yield status
if not tmp:
print("消费者已经睡觉了...")
return
print("消费者:获得商品%s号..." % tmp)
status = "ok"
def produce(c):
# 启动消费者
c.send(None)
for i in range(1, 3):
print("生产者:出产商品%s号..." % i)
# 生产商品,并提交给消费者
status = c.send(i)
print("生产者:生产者消费状态: %s" % status)
# c.send(None) 执行这个会引发StopIteration
c.close() # 使用close就可以避免了(手动关闭生成器函数,后面的调用会直接返回StopIteration异常)
# 创建消费者
c = consumer()
produce(c)
# 更多可以查看帮助文档
def test():
yield
help(test())
from collections import Iterable
isinstance("mmd",Iterable)
isinstance((1,2),Iterable)
isinstance([],Iterable)
isinstance({},Iterable)
isinstance((x for x in range(10)),Iterable)
isinstance(1,Iterable)
a=[1,2,3]
next(a)
from collections import Iterator
isinstance([],Iterator)
isinstance((x for x in range(10)),Iterator)
6.3.Iterable 转 Iterator
生成器都是Iterator对象,但list、dict、str虽然是Iterable,却不是Iterator
把list、dict、str等Iterable变成Iterator可以使用iter()函数:
iter(a)
isinstance(iter([]),Iterator)
isinstance(iter({}),Iterator)
Python的Iterator对象表示的是一个数据流,Iterator对象可以被next()or__next__()函数调用并不断返回下一个数据,直到没有数据时抛出StopIteration错误
可以把这个数据流看做是一个有序序列,但我们却不能提前知道序列的长度,只能不断通过next函数实现按需计算下一个数据,所以Iterator的计算是惰性的,只有在需要返回下一个数据时它才会计算。
Iterator甚至可以表示一个无限大的数据流,而list等则不行
小明总结了一下老师讲解的知识点:
-
可以
for循环的对象都是Iterable类型 -
可以使用
next()or__next__()函数的对象都是Iterator类型 -
集合数据类型如list、dict、str等是
Iterable,可以通过iter()函数获得一个Iterator对象
7.CSharp迭代器
乘着下课的时间,小明跑到黑板前,心想:“又到了C#的时候了,看我来收播一大群眼球~”,然后开始了他的个人秀:
其实迭代器(iterator)就是为了更简单的创建枚举器(enumerator)和可枚举类型(enumerator type)的方式
7.1.IEnumerator 和 IEnumerable
通俗话讲:
能不能foreach就看你遍历对象有没有实现IEnumerable,就说明你是不是一个可枚举类型(enumerator type)
public interface IEnumerable
{
IEnumerator GetEnumerator();
}
是不是个枚举器(enumerator)就看你实现了IEnumerator接口没
public interface IEnumerator
{
object Current { get; }
bool MoveNext();
void Reset();
}
最明显的区别:它们两个遍历方式不一样
// 枚举器遍历
var tmp = FibonaByIEnumerator(30);
while (tmp.MoveNext())
{
Console.WriteLine(tmp.Current);
}
// 可枚举类型遍历
foreach (var item in FibonaByIEnumerable(30))
{
Console.WriteLine(item);
}
这个我们在2年前就说过,这边简单提一下(官方文档)(Demo)
MyEnumerator文件:
public class MyEnumerator : IEnumerator
{
/// <summary>
/// 需要遍历的数组
/// </summary>
private string[] array;
/// <summary>
/// 有效数的个数
/// </summary>
private int count;
public MyEnumerator(string[] array, int count)
{
this.array = array;
this.count = count;
}
/// <summary>
/// 当前索引(线moveNext再获取index,用-1更妥)
/// </summary>
private int index = -1;
public object Current
{
get
{
return array[index];
}
}
/// <summary>
/// 移位
/// </summary>
/// <returns></returns>
public bool MoveNext()
{
if (++index < count)
{
return true;
}
return false;
}
/// <summary>
/// 重置
/// </summary>
public void Reset()
{
index = -1;
}
}
MyArray.cs文件
public partial class MyArray
{
/// <summary>
/// 数组容量
/// </summary>
private string[] array = new string[4];
/// <summary>
/// 数组元素个数
/// </summary>
private int count = 0;
/// <summary>
/// 当前数组的长度
/// </summary>
public int Length
{
get
{
return count;
}
}
/// <summary>
/// 添加元素
/// </summary>
/// <param name="str"></param>
/// <returns></returns>
public MyArray Add(string str)
{
//要溢出的时候扩容
if (count == array.Length)
{
string[] newArray = new string[2 * array.Length];
array.CopyTo(newArray, 0);
array = newArray;//array重新指向
}
array[count++] = str;
return this;
}
/// <summary>
/// 移除某一项
/// </summary>
/// <param name="i"></param>
/// <returns></returns>
public MyArray RemoveAt(int i)
{
for (int j = i; j < count - 1; j++)
{
array[j] = array[j + 1];
}
count--;//少了一个元素所以--
return this;
}
/// <summary>
/// 索引器
/// </summary>
/// <param name="index"></param>
/// <returns></returns>
public string this[int index]
{
get
{
return array[index];
}
set
{
array[index] = value;
}
}
}
MyArrayExt.cs文件:
public partial class MyArray: IEnumerable
{
/// <summary>
/// 枚举器方法
/// </summary>
/// <returns></returns>
public IEnumerator GetEnumerator()
{
return new MyEnumerator(this.array, this.count);
}
}
调用:
static void Main(string[] args)
{
MyArray array = new MyArray();
array.Add("~").Add("这").Add("是").Add("一").Add("个").Add("测").Add("试").Add("。").RemoveAt(0).RemoveAt(3).RemoveAt(6);
for (int i = 0; i < array.Length; i++)
{
Console.Write(array[i]);
}
Console.WriteLine();
foreach (var item in array)
{
Console.Write(item);
}
}
结果:
这是一测试
这是一测试7.2.yield方式
小明看着班里女生羡慕的眼神,得意的强调道:
注意一下,C#是用yield return xxx,Python是用yield xxx关键字
还记得开头说的那句话吗?(yield官方文档)
其实迭代器(iterator)就是为了更简单的创建枚举器(enumerator)和可枚举类型(enumerator type)的方式
如果枚举器和可枚举类型还是不理解(举个例子)就懂了:(从遍历方式就看出区别了)
定义一个斐波拉契函数,返回可枚举类型
/// <summary>
/// 返回一个可枚举类型
/// </summary>
public static IEnumerable<int> FibonaByIEnumerable(int n)
{
int a = 0;
int b = 1;
for (int i = 0; i < n; i++)
{
yield return b;
(a, b) = (b, a + b);
}
}
调用:
foreach (var item in FibonaByIEnumerable(30))
{
Console.WriteLine(item);
}
定义一个斐波拉契函数,返回一个枚举器
/// <summary>
/// 返回一个枚举器
/// </summary>
public static IEnumerator<int> FibonaByIEnumerator(int n)
{
int a = 0;
int b = 1;
for (int i = 0; i < n; i++)
{
yield return b;
(a, b) = (b, a + b);
}
}
调用一下:
var tmp = FibonaByIEnumerator(30);
while (tmp.MoveNext())
{
Console.WriteLine(tmp.Current);
}
利用yield轻轻松松就创建了枚举器和可枚举类型
以上面那个MyArray的案例来说,有了yield我们代码量大大简化:(Demo)
MyArray.cs
public partial class MyArray
{
/// <summary>
/// 数组容量
/// </summary>
private string[] array = new string[4];
/// <summary>
/// 数组元素个数
/// </summary>
private int count = 0;
/// <summary>
/// 当前数组的长度
/// </summary>
public int Length
{
get
{
return count;
}
}
/// <summary>
/// 添加元素
/// </summary>
/// <param name="str"></param>
/// <returns></returns>
public MyArray Add(string str)
{
//要溢出的时候扩容
if (count == array.Length)
{
string[] newArray = new string[2 * array.Length];
array.CopyTo(newArray, 0);
array = newArray;//array重新指向
}
array[count++] = str;
return this;
}
/// <summary>
/// 移除某一项
/// </summary>
/// <param name="i"></param>
/// <returns></returns>
public MyArray RemoveAt(int i)
{
for (int j = i; j < count - 1; j++)
{
array[j] = array[j + 1];
}
array[count - 1] = string.Empty;//add 干掉移除的数组
count--;//少了一个元素所以--
return this;
}
/// <summary>
/// 索引器
/// </summary>
/// <param name="index"></param>
/// <returns></returns>
public string this[int index]
{
get
{
return array[index];
}
set
{
array[index] = value;
}
}
}
MyArrayExt.cs
public partial class MyArray : IEnumerable
{
/// <summary>
/// 枚举器方法
/// </summary>
/// <returns></returns>
public IEnumerator GetEnumerator()
{
return MyEnumerator();
}
/// <summary>
/// 通过yield快速实现
/// </summary>
/// <returns></returns>
public IEnumerator<string> MyEnumerator()
{
foreach (var item in this.array)
{
yield return item;
}
}
}
然后就行了,MyEnumerator都不用你实现了:
MyArray array = new MyArray();
array.Add("~").Add("这").Add("是").Add("一").Add("个").Add("测").Add("试").Add("。").RemoveAt(0).RemoveAt(3).RemoveAt(6);
for (int i = 0; i < array.Length; i++)
{
Console.Write(array[i]);
}
Console.WriteLine();
foreach (var item in array)
{
Console.Write(item);
}
结果:
这是一测试
这是一测试扩充一下:Python退出迭代器用yield return 或者 yield break,C#使用yield break来退出迭代
做个 demo 测试下:
public static IEnumerable<int> GetValue()
{
for (int i = 0; i < 5; i++)
{
yield return i;
if (i == 2)
{
yield break;
}
}
}
调用:
static void Main(string[] args)
{
foreach (var item in GetValue())
{
Console.WriteLine(item);
}
}
输出:
0
1
28.闭包
8.1.Python闭包
又到了上课时间,小明灰溜溜的跑回座位,听老师讲起了闭包的知识:
函数方面还有不懂的可以看之前讲的文档:Function Base
函数除了可以接受函数作为参数外,还可以把函数作为结果值返回(有点类似于C++里面的函数指针了)
来看一个可变参数求和的例子:
def slow_sum(*args):
    def get_sum():
        sum = 0
        for i in args:
            sum += i
        return sum

    return get_sum  # 返回函数引用地址(不加括号)

a = slow_sum(1, 2, 3, 4, 5)# 返回get_sum函数的引用
print(a)# 看看引用地址
print(a())# a() 这时候才是调用get_sum()函数
其实上面一个案例就是闭包(Closure)了,来个定义:
在函数内部再定义一个函数,并且这个函数用到了外边函数的变量(参数或者局部变量),那么将这个函数以及用到的一些变量称之为闭包
通俗点说就是:内部函数使用了外部函数作用域里的变量了,那这个内部函数和它用到的变量就是个闭包
注意:当我们调用slow_sum()时,每次调用都会返回一个新的函数(相同的参数也一样)
a = slow_sum(1, 2, 3, 4)
b = slow_sum(1, 2, 3, 4)

a is b

# a()和b()的调用结果互不影响
由于闭包引用了外部函数的局部变量,则外部函数的局部变量没有及时释放,所以也容易消耗内存
so ==> 除非你真正需要它,否则不要使用闭包
返回函数尽量不要引用任何循环变量,或者后续会发生变化的变量(容易出错)
看着小明一脸懵圈的样子,老师说道:
新讲的知识点一般都不太容易快速消化,我们再来看个闭包的好处就理解了:
比如现在我们要根据公式来求解,以y=ax+b为例,传统方法解决:
# 定义一个y=ax+b的函数公式
def get_value(a, b, x):
    return a * x + b
# 每次调用都得传 a,b
print(get_value(2, 1, 1))
print(get_value(2, 1, 2))
print(get_value(2, 1, 3))
print(get_value(2, 1, 4))
每次调用都得额外传a、b的值
就算使用偏函数来简化也不合适(毕竟已经是一个新的函数了):
from functools import partial

new_get_value = partial(get_value, 2, 1)

print(new_get_value(1))
print(new_get_value(2))
print(new_get_value(3))
print(new_get_value(4))
print(new_get_value(5))
简单总结functools.partial的作用就是:
把一个函数的某些参数设置默认值,返回一个新的函数,然后调用新函数就免得你再输入重复参数了
而这时候使用闭包就比较合适了,而且真的是封装了一个通用公式了
a,b的值你可以任意变来生成新的公式,而且公式之间还不干扰,以 y=ax²+bx+c为例:
def quadratic_func(a, b, c):
    """y=ax²+bx+c"""

    def get_value(x):
        return a * x * x + b * x + c

    return get_value
# 来个简单的:x^2+1
f1 = quadratic_func(1, 0, 1)

print(f1(0))
print(f1(1))
print(f1(2))
print(f1(3))
print(f1(4))
print(f1(5))
# 可能不太形象,我们画个图看看:
import matplotlib.pyplot as plt # 导入matplotlib的pyplot模块
# 生成x和y的值
x_list = list(range(-10, 11))
y_list = [x * x + 1 for x in x_list]
print(x_list)
print(y_list)
# 画图
plt.plot(x_list, y_list)
# 显示图片
plt.show()

# 再来个简单的:x^2-1
f2 = quadratic_func(1, 0, -1) # 相互之间不干扰
print(f2(0))
print(f2(1))
print(f2(2))
print(f2(3))
print(f2(4))
print(f2(5))
8.2.CSharp闭包
听完闭包老师就下课了,说什么明天接着闭包讲啥装饰器的。
小明一愣一愣的,然后就屁颠的跑黑板前讲起了C#版本的闭包:
先看看怎么定义一个闭包,和Python一样,用个求和函数举例:(返回一个匿名函数)
// 有返回值就用Func,没有就用Action
public static Func<int> SlowSum(params int[] args)
{
return () =>
{
int sum = 0;
foreach (var item in args)
{
sum += item;
}
return sum;
};
}
调用:
static void Main(string[] args)
{
var f1 = SlowSum(1, 2, 3, 4, 5);
Console.WriteLine(f1);
Console.WriteLine(f1());
}
结果:(从结果可以看到,f1是一个函数,等你调用f1()才会求和)
System.Func`1[System.Int32]
15接着讲 ~ 以上面的 y=ax²+bx+c为例,C#实现:
// 以上面的 y=ax²+bx+c 为例,C#实现:
public static Func<double, double> QuadraticFunc(double a, double b, double c)
{
return x => a * x * x + b * x + c; // 返回一个匿名函数
}
调用:
static void Main(string[] args)
{
var func = QuadraticFunc(1, 0, 1);
Console.WriteLine(func(0));
Console.WriteLine(func(1));
Console.WriteLine(func(2));
Console.WriteLine(func(3));
Console.WriteLine(func(4));
Console.WriteLine(func(5));
}
结果:
1
2
5
10
17
26Func<double,double>不理解就看看定义就懂了:public delegate TResult Func<in T, out TResult>(T arg);
这部分不是很难,简单提一下知识点即可。如果你想深究可以==> (点 点 点)
在收获满满一箩筐眼球后,小明拍拍屁股去了新开的饭店大吃一顿了...
写在最后:还有一些内容没写,估计过几天又有一篇叫 “基础拓展” 的文章了,为啥不一起写完呢?
其实逆天也想写完,真写完文章又被叫做长篇大论一百页了 #^_^# 行了,听取大家意见,不写那么长的文章,下次见~

 浙公网安备 33010602011771号