File system
8 File system
xv6构建的文件系统十分小巧并且功能齐全,虽然与现在的主流文件系统(FAT32、EXT4…)仍有差距,但文件系统实现的思想都大同小异,所以xv6的文件系统值得我们学习。
文件系统使用分层的思想:每一层分别实现某一单一功能;下一层为上一层提供接口。
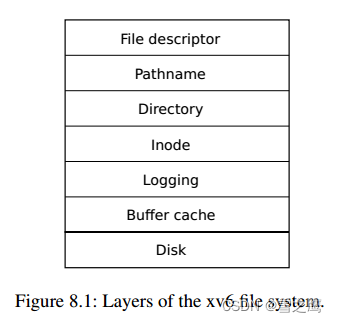
各层实现功能:
- File descriptor:抽象了管道、设备、文件等资源, 即一切皆文件
- Pathname:提供了/usr/xxx这样的分层路径名,可以通过递归来解析
- Directory:将每个目录实现为一种特殊的Inode,把文件命名和Inode绑定
- Inode:将数据块Block和唯一的Inode号绑定
- Logging:实现崩溃恢复,即所有块都更新或不更新
- Buffer cache:磁盘在内存的缓冲区,实现磁盘访问的缓存和同步(缓冲区一次只有一个进程可以访问)
- Disk:读写磁盘上的块
文件系统在磁盘的组织形式也很简单。文件系统按照下图将各部分写入磁盘后,之后的读写都要按照下图的格式来进行

Buffer cache
Buffer cache层(bio.c)主要有两个作用:
- 缓存磁盘块:将磁盘上的block在内存中形成对应的副本cache,之后的操作都是在cache中进行。(磁盘的最小读写单位为扇区sector,xv6中
1 buffer = 1 block = 2 sectors,每次改变几个字节就读写磁盘的代价太大,所以引入了缓冲区)- 同步访问磁盘块:即一次只能有一个进程访问cache。(防止并发问题)
Buffer cache层的功能主要由bread()和bwrite()实现。
// Return a locked buf with the contents of the indicated block.
// buf缓冲区没有才从磁盘读(read:disk->buf)
struct buf *
bread(uint dev, uint blockno)
{
  struct buf *b;

  b = bget(dev, blockno);
  if (!b->valid)
  {
    virtio_disk_rw(b->dev, b, 0);
    b->valid = 1;
  }
  return b;
}

// Write b's contents to disk.  Must be locked.
// 直接buf写数据到磁盘(write:buf->disk,注:这里没有进行延迟写入的操作)
void bwrite(struct buf *b)
{
  if (!holdingsleep(&b->lock))
    panic("bwrite");
  virtio_disk_rw(b->dev, b, 1);
}

// Release a locked buffer.
// Move to the head of the MRU list.
void brelse(struct buf *b)
{
  if (!holdingsleep(&b->lock))
    panic("brelse");

  releasesleep(&b->lock);

  acquire(&bcache.lock);
  b->refcnt--;
  if (b->refcnt == 0)	// 会将此block插入到链表头,作为MRU
  {
    // no one is waiting for it.
    b->next->prev = b->prev;
    b->prev->next = b->next;
    b->next = bcache.head.next;
    b->prev = &bcache.head;
    bcache.head.next->prev = b;
    bcache.head.next = b;
  }

  release(&bcache.lock);
}
对于同步的实现,很容易想到是利用锁完成的。bwrite()的实现也很简单,直接写入磁盘对应的block即可;而bread()需要调用bget(),并且每次bread()之后都需要调用brelse()。
bget():
struct
{
  struct spinlock lock;
  struct buf buf[NBUF];

  // Linked list of all buffers, through prev/next.
  // head.next is most recently used.
  struct buf head;
} bcache;

// Look through buffer cache for block on device dev.
// If not found, allocate a buffer.
// In either case, return locked buffer.
static struct buf *
bget(uint dev, uint blockno)
{
  struct buf *b;

  acquire(&bcache.lock);

  // 如果对应block在buffer cache中
  for (b = bcache.head.next; b != &bcache.head; b = b->next)
  {
    if (b->dev == dev && b->blockno == blockno)
    {
      b->refcnt++;	// 文件引用+1
      release(&bcache.lock);
      acquiresleep(&b->lock);
      return b;
    }
  }

  // 不在则返回一个空闲Block
  for (b = bcache.head.prev; b != &bcache.head; b = b->prev)	// 去链表尾找LRU的block
  {
    if (b->refcnt == 0)
    {
      b->dev = dev;
      b->blockno = blockno;
      b->valid = 0;
      b->refcnt = 1;
      release(&bcache.lock);
      acquiresleep(&b->lock);
      return b;
    }
  }
  panic("bget: no buffers");
}
bget()的作用是获得buffer cache中buffer,它的原理也很简单:如果索取的block号在cache中,refcnt+1并返回对应buffer,不在则取出一个refcnt=0的buffer返回。
需要注意这里使用的置换算法LRU(Least Recently Used)。这里使用链表实现,最少使用的buffer会被挤到环形链表的尾巴上(header->prev),而最常使用的则在链表的头部之后(header->next)。在代码里,bget()如果找不到cache对应的block,就会去链表尾找block替换,因为这里是Least Recently Used;而brelse()会将刚读完释放的block插入到链表头,作为MRU(Most Recently Used)。

Logging
Logging层(log.c)的主要作用:
- 实现文件系统的崩溃恢复机制
举个例子,假如没有logging层,我们进行echo操作:

- 首先是分配inode,因为首先写的是block 33
- 之后inode被初始化,然后又写了一次block 33
- 之后是写block 46,是将文件x的inode编号写入到x所在目录的inode的data block中
- 之后是更新root inode,因为文件x创建在根目录,所以需要更新根目录的inode的size字段,以包含这里新创建的文件x
- 最后再次更新文件x的inode
如果我们在33和46这两步之间发生崩溃,整个系统关机,再重启时系统崩溃前的操作已经完成,崩溃后的操作还没有完成,然而系统会默认它已经完成。造成的问题就是这个Inode没有出现在任何目录中,我们无法删除它,所以就需要一种崩溃恢复的机制来解决这种问题。
分析上面的现象,会发现它们都是出现在写入时出现的BUG。既然多个写磁盘的操作分开就会出现问题,我们的解决办法就是让它变成一个原子操作:要么一次完成全部写入,要么什么都不写入。这也是Logging层实现的目的。
Logging的原理

Logging的基本思想还是很简单的:它将磁盘又多分割了一个Log分区,当我们要对磁盘进行写入时,我们不会直接写到磁盘的data部分,而是先写到log中。在之后的某一时间,我们会commit文件系统的操作,这时log中所有的内容才会被写入到data里,并且log清除,总共分4步:
- log writes:在log header中记录需要更新的log
- commint op:将log header中的记录写入到disk中
- install:将log中的block写入到disk
- clean log:清除log中的所有内容
为什么使用Log就可以实现崩溃恢复呢?
- 崩溃发生在1和2之间:我们只是在内存中的log header中做了记录,并未落盘(写入disk里)。在重启时只需检查disk中的log header有无记录,由于内存中的log header丢失了,所以我们什么都不需要做,系统会当作无事发生。
- 崩溃发生在2和3之间:log header中的记录已经落盘。重启后看到log header中有记录,这时就需要把disk中log的内容写入到disk对应的data区域,并且写完后log header清零。
- 崩溃发生在3和4之间:此时已有log写入到disk中。重启后做的工作和第2步一样,因为重复写入相同位置是没有问题的。
总之,加入了Log后,我们可以做到某个事件的全写入或者全不写入,实现了原子性。在commit前的操作视为全不写入,在commit后的操作视为全写入。
Logging的实现
了解了Logging的原理后,我们来看看它的实现细节。
log_wirte():
// Caller has modified b->data and is done with the buffer.
// Record the block number and pin in the cache by increasing refcnt.
// commit()/write_log() will do the disk write.
//
// log_write() replaces bwrite(); a typical use is:
//   bp = bread(...)
//   modify bp->data[]
//   log_write(bp)
//   brelse(bp)
// 将更新块记录领导log head中
// 注意区分write_log
void log_write(struct buf *b)
{
  int i;

  int dev = b->dev;
  if (log[dev].lh.n >= LOGSIZE || log[dev].lh.n >= log[dev].size - 1)
    panic("too big a transaction");
  if (log[dev].outstanding < 1)
    panic("log_write outside of trans");

  acquire(&log[dev].lock);
  for (i = 0; i < log[dev].lh.n; i++)
  {
    if (log[dev].lh.block[i] == b->blockno) // log absorbtion
      break;
  }
  log[dev].lh.block[i] = b->blockno;
  if (i == log[dev].lh.n)
  {          // Add new block to log?
    bpin(b); // 引用计数+1(假设)
    log[dev].lh.n++;
  }
  release(&log[dev].lock);
}
注释写明用log_wirte()代替了bwrite(),之后的写磁盘操作都调用log_wirte(),所以bwrite()的实现才会那么简单。
log_wirte()对应原理的第一步。作用就是记录更新块,即要写入log中的块,只需改变log header。每当有写入操作的系统调用发生时,都会调用log_wirte()来记录。
commit():
static void
commit(int dev)
{
  if (log[dev].lh.n > 0)
  {
    write_log(dev);     // Write modified blocks from cache to log
    write_head(dev);    // Write header to disk -- the real commit
    install_trans(dev); // Now install writes to home locations
    log[dev].lh.n = 0;
    write_head(dev); // Erase the transaction from the log
  }
}
之后的三步封装在了commit()函数中,因为它们基本都是连在一起调用的,而非log_write()与写操作一起调用。
write_log():
// Copy modified blocks from cache to log.
// cache block->log block
// log[dev].lh.block[tail]由log_write更新
static void
write_log(int dev)
{
  int tail;

  for (tail = 0; tail < log[dev].lh.n; tail++)
  {
    struct buf *to = bread(dev, log[dev].start + tail + 1); // log block
    struct buf *from = bread(dev, log[dev].lh.block[tail]); // cache block
    memmove(to->data, from->data, BSIZE);
    bwrite(to); // write the log
    brelse(from);
    brelse(to);
  }
}
write_log()实现cache block->log block(both memory and disk),将前面log header记录的block写入log中,log部分(除了log header)落盘。
write_head():
// Write in-memory log header to disk.
// This is the true point at which the
// current transaction commits.
static void
write_head(int dev)
{
  struct buf *buf = bread(dev, log[dev].start);
  struct logheader *hb = (struct logheader *)(buf->data);
  int i;
  hb->n = log[dev].lh.n;
  for (i = 0; i < log[dev].lh.n; i++)
  {
    hb->block[i] = log[dev].lh.block[i];
  }
  bwrite(buf);
  brelse(buf);
}
在这一步我们才将log header部分落盘,它是真正意义上的commit。因为我们的崩溃恢复就是靠因为log header的不同才有不同的处理流程。在这之前的崩溃我们可以不关心,在这之后我们就需要依靠log header来恢复数据了。
install_trans():
// Copy committed blocks from log to their home location
static void
install_trans(int dev)
{
  int tail;

  for (tail = 0; tail < log[dev].lh.n; tail++)
  {
    struct buf *lbuf = bread(dev, log[dev].start + tail + 1); // read log block
    struct buf *dbuf = bread(dev, log[dev].lh.block[tail]);   // read dst
    memmove(dbuf->data, lbuf->data, BSIZE);                   // copy block to dst
    bwrite(dbuf);                                             // write dst to disk
    bunpin(dbuf);
    brelse(lbuf);
    brelse(dbuf);
  }
}
install_trans()实现log block->data block(both memory and disk),我们的数据经过log之后终于来到了属于它的block。
在清除了log header之后,一个logging的流程结束。我们再来看看重启是会发生什么。
static void
recover_from_log(int dev)
{
  read_head(dev);
  install_trans(dev); // if committed, copy from log to disk
  log[dev].lh.n = 0;
  write_head(dev); // clear the log
}
有了前面的Logging,重启的操作就很简单。我们只需要知道log header有没有东西,之后就能恢复了。
Challenges
write ahead rule
write ahead rule:预写规则,所有的写入都需要先经过Log才能落盘。
假设进程P已经对block44进行了写入,然而再写入别的block时buffer满了,根据置换算法需要置换出block44。这样是不行的,block44虽然已经写入了log header,但是并没有写入log data中,这样做的后果就是把block44撤回了,原本该写入block的数据没了,肯定是不行的。
置换发生在bget()中,我们发现bget()是通过判断refcnt来决定是否置换的。所以解决办法是在调用log_write()时就让refcnt++,相当于只要是写操作就占有一个refcnt,保证该block不会被置换掉。
log大小
文件系统操作必须适配log的大小,只有这样才能遵循write ahead rule。
xv6中log的大小为30,是因为30比任何一个xv6的文件系统操作都大。然而当我们要强行写一个大文件时,写入的block数就不可避免地大于30了,可以看到filewrite对大文件处理:
filewrite():
// Write to file f.
// addr is a user virtual address.
int filewrite(struct file *f, uint64 addr, int n)
{
 ···
  else if (f->type == FD_INODE)
  { // 文件
    // write a few blocks at a time to avoid exceeding
    // the maximum log transaction size, including
    // i-node, indirect block, allocation blocks,
    // and 2 blocks of slop for non-aligned writes.
    // this really belongs lower down, since writei()
    // might be writing a device like the console.
    int max = ((MAXOPBLOCKS - 1 - 1 - 2) / 2) * BSIZE;
    int i = 0;
    while (i < n)
    {
      int n1 = n - i;
      if (n1 > max)
        n1 = max;

      begin_op(f->ip->dev);
      ilock(f->ip);
      if ((r = writei(f->ip, 1, addr + i, f->off, n1)) > 0)
        f->off += r;
      iunlock(f->ip);
      end_op(f->ip->dev);

      if (r < 0)
        break;
      if (r != n1)
        panic("short filewrite");
      i += r;
    }
    ret = (i == n ? n : -1);
  }
  else
  {
    panic("filewrite");
  }

  return ret;
}
filewrite()将大文件分成了多次写block操作。这确实破坏了我们一直强调的原子性,但这里的妥协是不对文件系统造成损坏,不让文件系统处于不正确的状态中。
并发问题
文件系统的并发问题不仅存在与block的同步上,还有日志的问题。
假设现在有两个并发执行的write_log(),t0写了14log block还没写完,t1写了之后的16个block,此时commit的话就违背了write ahead rule。所以我们需要在每次写入log之前就进行检查,如果写入的长度超了就只有下次再写入了,这里就要提到包裹住文件系统调用(FS syscall)的两个函数:begin_op()和end_op()。
begin_op():
// called at the start of each FS system call.
void begin_op(int dev)
{
  acquire(&log[dev].lock);
  while (1)
  {
    if (log[dev].committing)
    {
      sleep(&log, &log[dev].lock);
    }
    else if (log[dev].lh.n + (log[dev].outstanding + 1) * MAXOPBLOCKS > LOGSIZE) // log[dev].outstanding + 1:当前存在别的进程在进行FS systemcall,不知道其写入log的大小,所以假定最大(MAXOPBLOCKS)
    {
      // this op might exhaust log space; wait for commit.
      // 为了避免并发问题,我们必须限制一次写入log的block大小
      sleep(&log, &log[dev].lock);
    }
    else
    {
      log[dev].outstanding += 1;
      release(&log[dev].lock);
      break;
    }
  }
}
如果这次写入的blocks数超过了LOGSIZE,begin_op()会将此进程睡眠,反之则将outstanding+1并继续。
这里涉及到MAXOPBLOCKS和outstanding两个量。MAXOPBLOCKS将一次写入的最大block数定义为10,也就是说我们是拿此次写入最大blocks的情况来判断的;outstanding用来记录并发进行的FS syscall的个数。
end_op():
// called at the end of each FS system call.
// commits if this was the last outstanding operation.
void end_op(int dev)
{
  int do_commit = 0;

  acquire(&log[dev].lock);
  log[dev].outstanding -= 1;
  if (log[dev].committing)
    panic("log[dev].committing");
  if (log[dev].outstanding == 0)	// 只用FS syscall都结束了才能commit
  {
    do_commit = 1;
    log[dev].committing = 1;
  }
  else
  {
    // begin_op() may be waiting for log space,
    // and decrementing log[dev].outstanding has decreased
    // the amount of reserved space.
    wakeup(&log);	//唤醒begin_op()中因为LOGSIZE睡眠的进程
  }
  release(&log[dev].lock);

  if (do_commit)
  {
    // call commit w/o holding locks, since not allowed
    // to sleep with locks.
    commit(dev);
    acquire(&log[dev].lock);
    log[dev].committing = 0;
    wakeup(&log);
    release(&log[dev].lock);
  }
}
commit操作是在end_op()函数中才会调用,只有在FS syscall都结束了才能commit。就这样,我们通过在FS syscall前后填加begin_op()和end_op()保证了文件系统的并发性。
Inode
我们现在已经实现的Buffer cache层和Logging层,如果忽略用于崩溃恢复的Logging层,我们只能block进行读写,而要实现文件的操作是不够的,所以Inode层就是来做这件事。
Inode层(fs.c)的主要作用:
- 将数据块Block和唯一的Inode号绑定,实现“Inode”版的文件
dinode和inode
我们先来看看Inode里面存的是什么?首先是磁盘中的Inode:
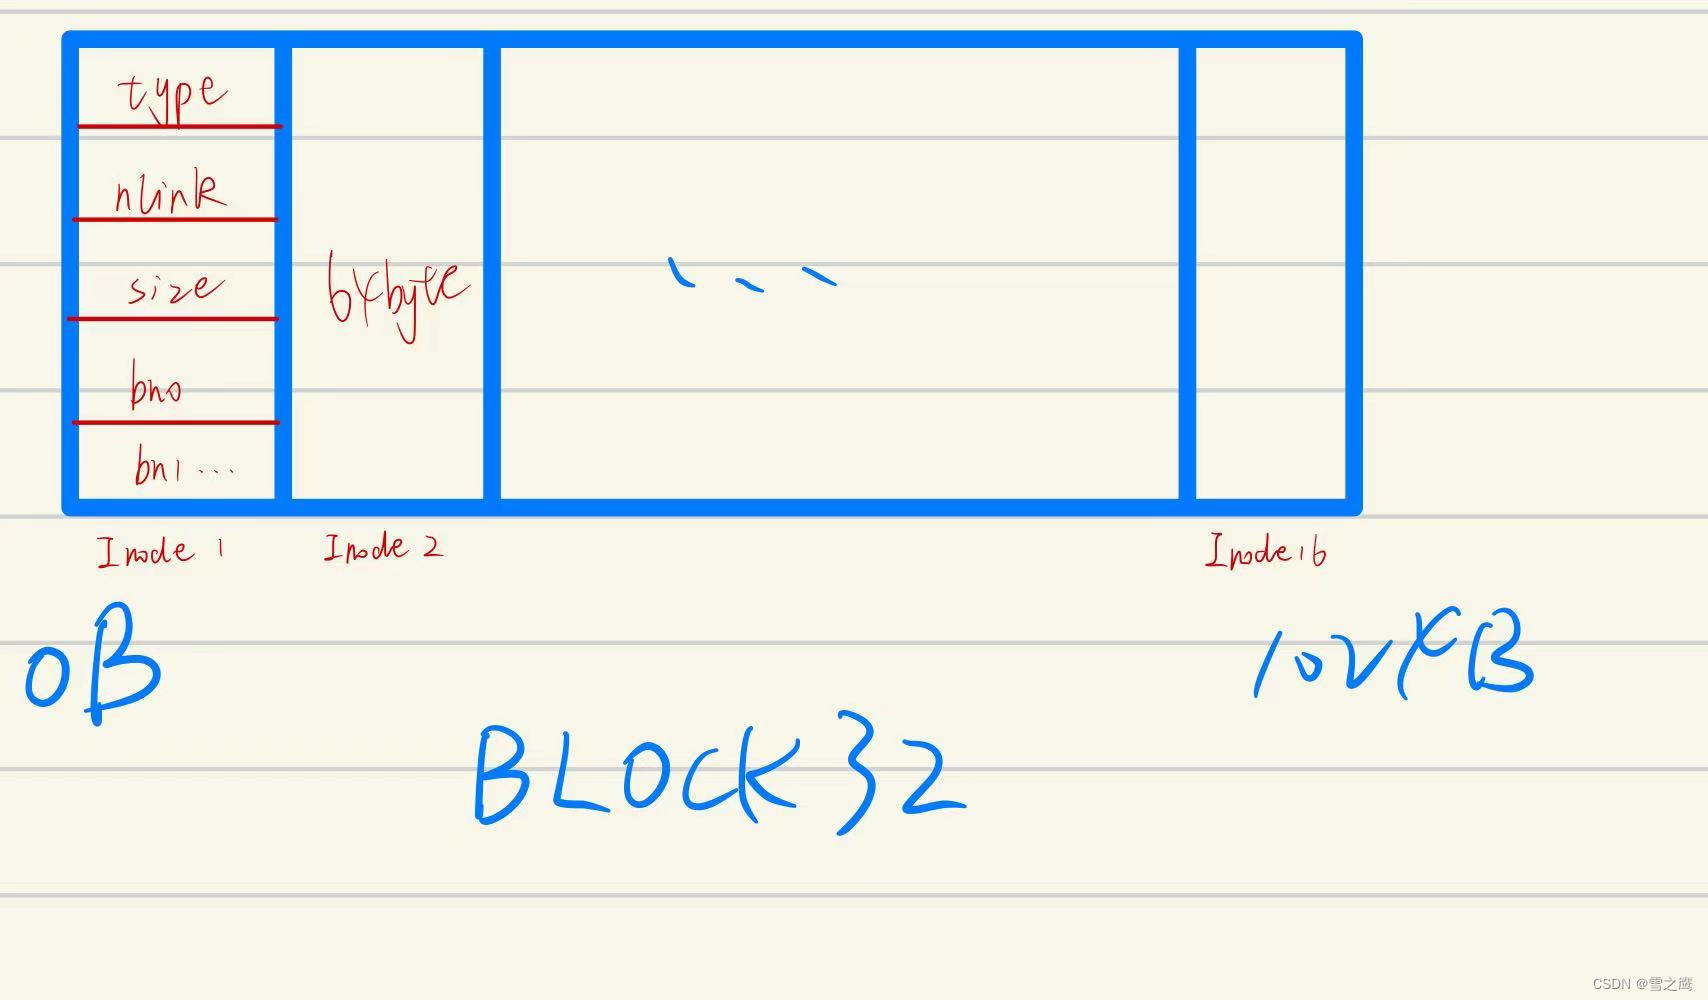
磁盘中每个Inode占64Byte,在Block32里总共有16个Inode。磁盘中Inode里的内容我们可以通过dinode这个结构体解析,它代表磁盘中Inode在内存中的映射。换句话说,我们从磁盘写入和读出的数据格式都是dinode。
dinode将disk里的信息原封不动地呈现,而要进行一些其他操作,仅靠dinode结构体里的变量是不够的,所以我们之后会将dinode(on-disk)转换成inode(in-memory)形式。
// On-disk inode structure
// 用于将磁盘中读取的buf->data数据强转为Inode形式
struct dinode
{
  short type;              // File type
  short major;             // Major device number (T_DEVICE only)
  short minor;             // Minor device number (T_DEVICE only)
  short nlink;             // Number of links to inode in file system
  uint size;               // Size of file (bytes)
  uint addrs[NDIRECT + 2]; // Data block addresses
};

// in-memory copy of an inode
struct inode
{
  uint dev;              // Device number
  uint inum;             // Inode number
  int ref;               // Reference count
  struct sleeplock lock; // protects everything below here
  int valid;             // inode has been read from disk?

  short type; // copy of disk inode
  short major;
  short minor;
  short nlink;
  uint size;
  uint addrs[NDIRECT + 2];
};
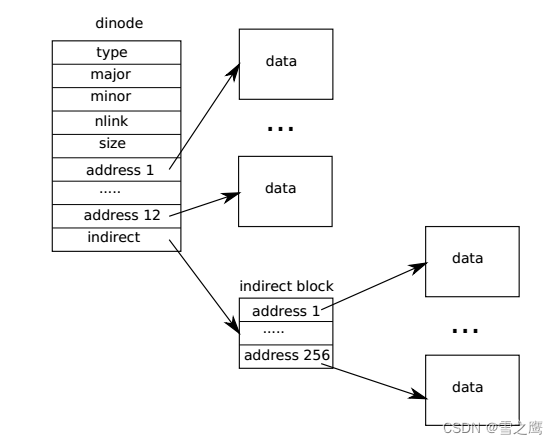
Inode的作用是将blocks组织起来构成文件,在dinode和inode结构体里面是用addrs来记录。其中addr1-addr12为直接索引,它们存储的就是对应的block号;而addr13是间接索引,相当于它指向的block是一个目录,里面存放的也是索引号。所以,一个Inode(文件)最大拥有12+256=268个block。(本章对应的Lab就是要求使用二级索引来增加Inode的block数)
这里还要着重说一下inode中的ref和nlink:
- ref:与进程相关,比如进程打开文件,对应的inode->ref++
- nlink:与目录相关,比如目录中包含了某文件,对应的inode->nlink++
所以我们看到inode比dinode多的一些变量不是随便加的。正是因为ref记录着进程打开文件的次数,nlink记录目录包含文件的次数,我们才选择了这样的设计。
ialloc():
// Allocate an inode on device dev.
// Mark it as allocated by  giving it type type.
// Returns an unlocked but allocated and referenced inode.
struct inode *
ialloc(uint dev, short type)
{
  int inum;
  struct buf *bp;
  struct dinode *dip;

  for (inum = 1; inum < sb.ninodes; inum++)
  {
    bp = bread(dev, IBLOCK(inum, sb));
    dip = (struct dinode *)bp->data + inum % IPB; // 遍历该buffer中所有inode
    if (dip->type == 0)
    { // a free inode
      memset(dip, 0, sizeof(*dip));
      dip->type = type;
      log_write(bp); // mark it allocated on the disk
      brelse(bp);
      return iget(dev, inum);
    }
    brelse(bp);
  }
  panic("ialloc: no inodes");
}
ialloc()用于返回一个空闲的inode,通过遍历得到dip->type = 0的inode的inum,有了inum就可以通过iget()得到inode。
iget():
// Find the inode with number inum on device dev
// and return the in-memory copy. Does not lock
// the inode and does not read it from disk.
// 从inode cache 中获得inode
static struct inode *
iget(uint dev, uint inum)
{
  struct inode *ip, *empty;

  acquire(&icache.lock);

  // Is the inode already cached?
  empty = 0;

  for (ip = &icache.inode[0]; ip < &icache.inode[NINODE]; ip++)
  {
  	// 对应inum的inode就在cache中
    if (ip->ref > 0 && ip->dev == dev && ip->inum == inum)
    {
      ip->ref++;
      release(&icache.lock);
      return ip;
    }
    // 不在则将ip->ref == 0的inode替换掉
    if (empty == 0 && ip->ref == 0) // Remember empty slot.
      empty = ip;
  }

  // Recycle an inode cache entry.
  if (empty == 0)
    panic("iget: no inodes");

  ip = empty;
  ip->dev = dev;
  ip->inum = inum;
  ip->ref = 1;
  ip->valid = 0;
  release(&icache.lock);

  return ip;
}
和buffer cache一样,为了限制inode的数量和支持并发,我们使用的所有的inode也都属于inode cache。
iupdate():
// Copy a modified in-memory inode to disk.
// Must be called after every change to an ip->xxx field
// that lives on disk, since i-node cache is write-through.
// Caller must hold ip->lock.
// 更新Inode(一旦ip->xxx改变就要调用)
void iupdate(struct inode *ip)
{
  struct buf *bp;
  struct dinode *dip;

  bp = bread(ip->dev, IBLOCK(ip->inum, sb));
  dip = (struct dinode *)bp->data + ip->inum % IPB;
  dip->type = ip->type;
  dip->major = ip->major;
  dip->minor = ip->minor;
  dip->nlink = ip->nlink;
  dip->size = ip->size;
  memmove(dip->addrs, ip->addrs, sizeof(ip->addrs));
  log_write(bp);
  brelse(bp);
}
更新inode的内容,将in-memory inode写入on-disk memory inode,并更新磁盘上对应的inode
iput():
// Drop a reference to an in-memory inode.
// If that was the last reference, the inode cache entry can
// be recycled.
// If that was the last reference and the inode has no links
// to it, free the inode (and its content) on disk.
// All calls to iput() must be inside a transaction in
// case it has to free the inode.
// Inode ip的ref--,如果是最后一个的话并且link=0则将此Inode(文件)删除掉
void iput(struct inode *ip)
{
  acquire(&icache.lock);

  if (ip->ref == 1 && ip->valid && ip->nlink == 0)
  {
    // 删除文件
    // ip->ref == 1意味着这是最后一个引用该Inode的地方,注意并没有删除掉对应的block里的内容,而是将Inode清空
    // inode has no links and no other references: truncate and free.
    // ip->ref == 1 means no other process can have ip locked,
    // so this acquiresleep() won't block (or deadlock).

    acquiresleep(&ip->lock);

    release(&icache.lock);

    itrunc(ip); //
    ip->type = 0;
    iupdate(ip);
    ip->valid = 0;

    releasesleep(&ip->lock);

    acquire(&icache.lock);
  }

  ip->ref--;
  release(&icache.lock);
}
iput()负责ref–,前面我们提到ref指的是进程打开文件的次数,所以iput()也只会在类似关闭文件的场合用到。不仅如此,这里还包含了一种情况:ref=0 && nlink=0,即没有任何一个进程或者目录引用它,这不就相当于文件的删除吗。我们来看看xv6是怎么进行文件删除操作的。
itrunc():
// Truncate inode (discard contents).
// Only called when the inode has no links
// to it (no directory entries referring to it)
// and has no in-memory reference to it (is
// not an open file or current directory).
// 释放掉Inode ip的所有addr[](将addr[]清0,不会将指向的block释放掉)
static void
itrunc(struct inode *ip)
{
  int i, j, j2;
  struct buf *bp, *bp2;
  uint *a, *a2;

  for (i = 0; i < NDIRECT; i++)
  {
    if (ip->addrs[i])
    {
      bfree(ip->dev, ip->addrs[i]);
      ip->addrs[i] = 0;
    }
  }

  if (ip->addrs[NDIRECT])
  {
    bp = bread(ip->dev, ip->addrs[NDIRECT]);
    a = (uint *)bp->data;
    for (j = 0; j < NINDIRECT; j++)
    {
      if (a[j])
        bfree(ip->dev, a[j]);
    }
    brelse(bp);
    bfree(ip->dev, ip->addrs[NDIRECT]);
    ip->addrs[NDIRECT] = 0;
  }

  if (ip->addrs[NDIRECT + 1])
  {
    bp = bread(ip->dev, ip->addrs[NDIRECT + 1]);
    a = (uint *)bp->data;
    for (j = 0; j < NINDIRECT; j++)
    {
      if (a[j])
      {
        bp2 = bread(ip->dev, a[j]);
        a2 = (uint *)bp2->data;
        for (j2 = 0; j2 < NINDIRECT; j2++)
        {
          if (a2[j2])
            bfree(ip->dev, a2[j2]);
        }
        brelse(bp2);
        bfree(ip->dev, a[j]);
      }
    }
    brelse(bp);
    bfree(ip->dev, ip->addrs[NDIRECT + 1]);
    ip->addrs[NDIRECT + 1] = 0;
  }

  ip->size = 0;
  iupdate(ip);
}
我们只有看第一处for循环就能明白它的大概原理。xv6的删除文件就是释放掉inode所有的addr,将其清0,而没有把它对应的block清0。这么做的原因有两点:我们的文件本质上就是inode,inode负责索引data,inode没了就相当于文件删除了,block留在磁盘中也不会有影响;可能还会有别的inode引用该block,贸然删除肯定不行。
readi():
// Read data from inode.
// Caller must hold ip->lock.
// If user_dst==1, then dst is a user virtual address;
// otherwise, dst is a kernel address.
// 从Inode中读数据到dst中,off:文件偏移位置,n:总长度
int readi(struct inode *ip, int user_dst, uint64 dst, uint off, uint n)
{
  uint tot, m;
  struct buf *bp;

  if (off > ip->size || off + n < off)
    return -1;
  if (off + n > ip->size)
    n = ip->size - off;

  for (tot = 0; tot < n; tot += m, off += m, dst += m)
  {
    bp = bread(ip->dev, bmap(ip, off / BSIZE));
    m = min(n - tot, BSIZE - off % BSIZE);
    if (either_copyout(user_dst, dst, bp->data + (off % BSIZE), m) == -1)
    {
      brelse(bp);
      break;
    }
    brelse(bp);
  }
  return n;
}

// Write data to inode.
// Caller must hold ip->lock.
// If user_src==1, then src is a user virtual address;
// otherwise, src is a kernel address.
int writei(struct inode *ip, int user_src, uint64 src, uint off, uint n)
{
  uint tot, m;
  struct buf *bp;

  if (off > ip->size || off + n < off)
    return -1;
  if (off + n > MAXFILE * BSIZE)
    return -1;

  for (tot = 0; tot < n; tot += m, off += m, src += m)
  {
    bp = bread(ip->dev, bmap(ip, off / BSIZE));
    m = min(n - tot, BSIZE - off % BSIZE);
    if (either_copyin(bp->data + (off % BSIZE), user_src, src, m) == -1)
    {
      brelse(bp);
      break;
    }
    log_write(bp);
    brelse(bp);
  }

  if (n > 0)
  {
    if (off > ip->size)
      ip->size = off;
    // write the i-node back to disk even if the size didn't change
    // because the loop above might have called bmap() and added a new
    // block to ip->addrs[].
    iupdate(ip);
  }

  return n;
}
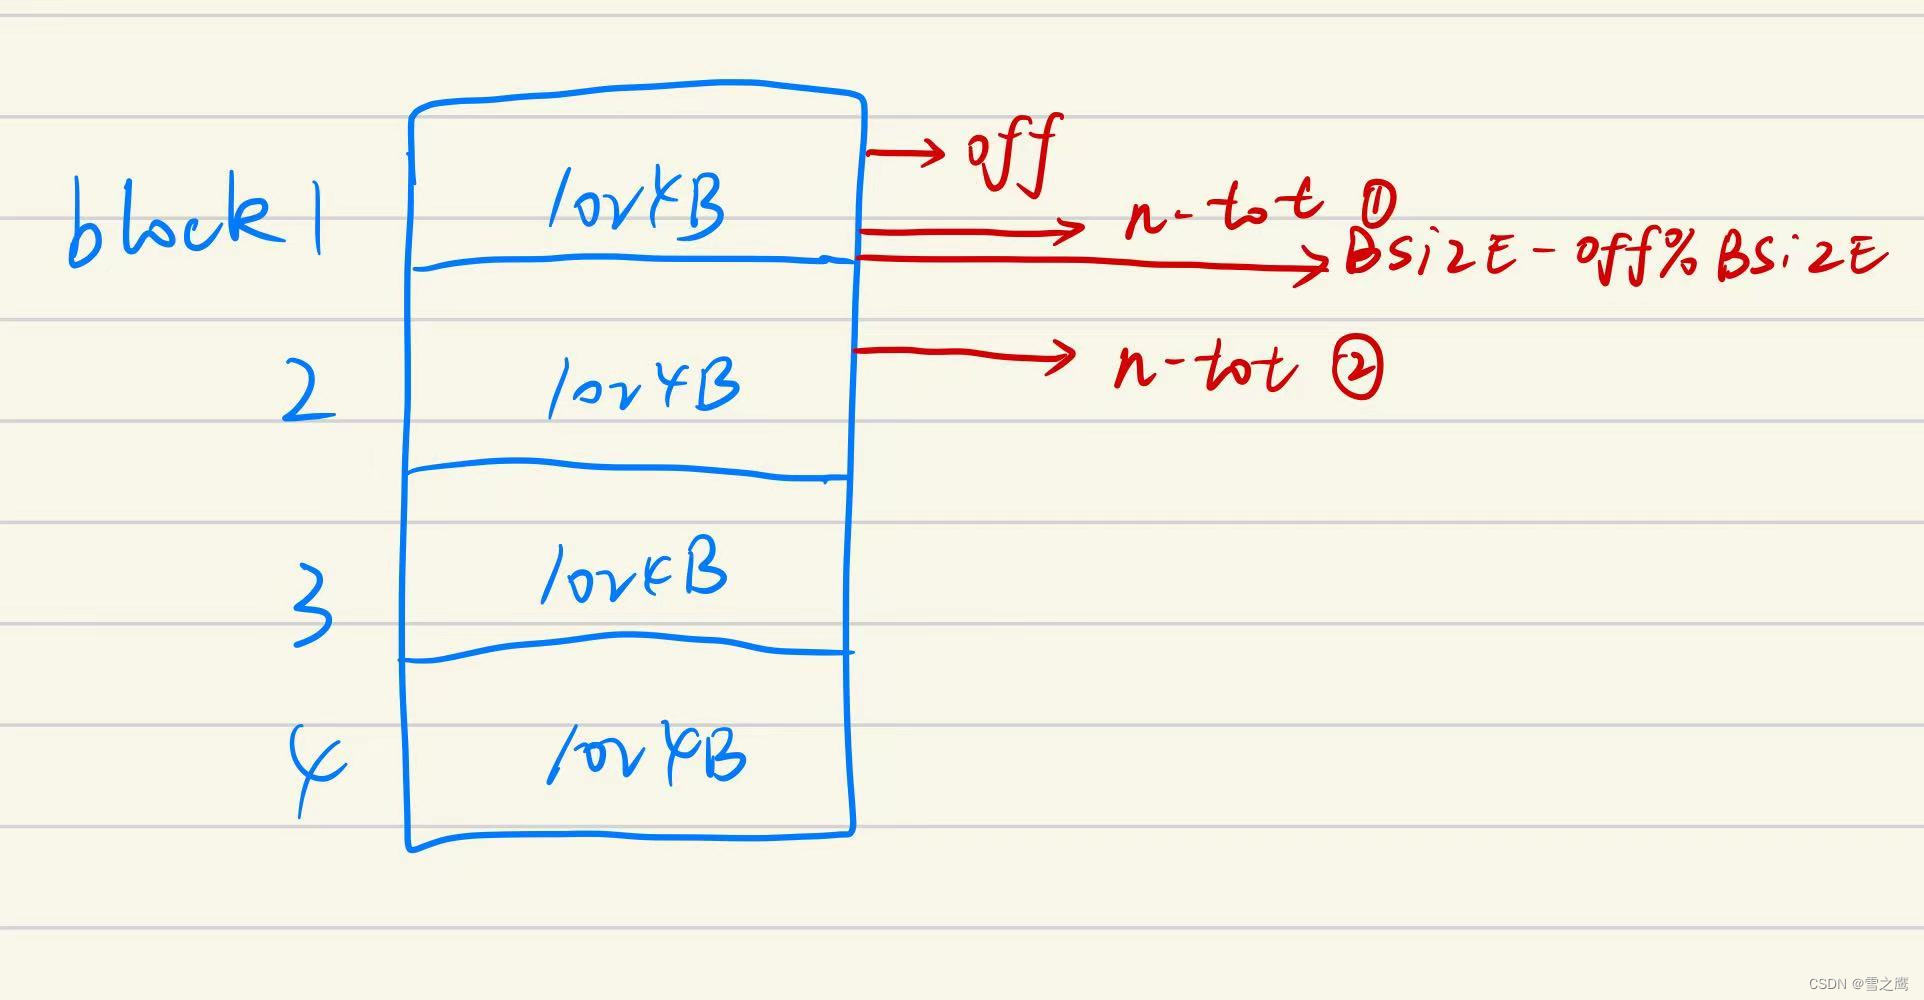
readi()和writei()结构相似,我们只分析readi(), m = min(n - tot, BSIZE - off % BSIZE)实际上是将一次读分成了两种情况:如果这次读的长度n没有超过当前block,则直接读出n-tot长度的数据即可;如果超过了当前block,则需要分多次读(因为我们每次最多读1个block)。
至此,inode层完成,我们的“文件”也形成了。只要我们知道某一文件的Inode号,我们就可以进行文件的读写操作。当然现实的文件系统没有这么不“智能”,接下来我们还要给文件起名字,实现路径等功能。
Directory
Directory层(fs.c)的主要作用:
- Directory:将每个目录实现为一种特殊的Inode,把文件命名和Inode绑定
Directory其实也是文件,因为它和文件一样,都是inode。唯一的不同就是,普通文件存储的是data,而它存储的是dirent(目录)。
struct dirent
{
  ushort inum;
  char name[DIRSIZ];
};
目录里面存的就是dirent这个结构体,它很简单和直观,靠1个inum和1个文件名完成文件名到inode的映射,相当于我们只要找到对应目录下的文件名就能找到对应的Inode,文件系统“智能”起来了。
dirlookup():
// Look for a directory entry in a directory.
// If found, set *poff to byte offset of entry.
// 在目录中根据名字找到文件,返回Inode
struct inode *
dirlookup(struct inode *dp, char *name, uint *poff)
{
  uint off, inum;
  struct dirent de;

  if (dp->type != T_DIR)
    panic("dirlookup not DIR");

  for (off = 0; off < dp->size; off += sizeof(de)) // 遍历该目录下的所有名字,然后匹配
  {
    if (readi(dp, 0, (uint64)&de, off, sizeof(de)) != sizeof(de))
      panic("dirlookup read");
    if (de.inum == 0)
      continue;
    if (namecmp(name, de.name) == 0)
    {
      // entry matches path element
      if (poff)
        *poff = off;
      inum = de.inum;
      return iget(dp->dev, inum);
    }
  }

  return 0;
}
dirlookup()负责查找目录dp下的与name匹配的文件,找到直接返回对应inode号。查找的方式也很直接:遍历当前目录下的所有文件,知道name出现为止。
dirlink():
// Write a new directory entry (name, inum) into the directory dp.
int dirlink(struct inode *dp, char *name, uint inum)
{
  int off;
  struct dirent de;
  struct inode *ip;

  // Check that name is not present.
  if ((ip = dirlookup(dp, name, 0)) != 0)
  {
    iput(ip);
    return -1;
  }

  // Look for an empty dirent.
  for (off = 0; off < dp->size; off += sizeof(de))
  {
    if (readi(dp, 0, (uint64)&de, off, sizeof(de)) != sizeof(de))
      panic("dirlink read");
    if (de.inum == 0)
      break;
  }

  strncpy(de.name, name, DIRSIZ);	// de.name
  de.inum = inum;	// de.inum
  if (writei(dp, 0, (uint64)&de, off, sizeof(de)) != sizeof(de))
    panic("dirlink");

  return 0;
}
dirlink()负责把指定文件inum写入到目录dp中,命名为name。
Pathname
Pathname层(fs.c)的主要作用:
- Pathname:提供路径功能
实现了文件命名的功能后,再看看现在的文件系统,还差一个路径的功能,即目录可以一层套一层,每一个文件或目录都有一个路径。
skipelem():
// Copy the next path element from path into name.
// Return a pointer to the element following the copied one.
// The returned path has no leading slashes,
// so the caller can check *path=='\0' to see if the name is the last one.
// If no name to remove, return 0.
//
// Examples:
//   skipelem("a/bb/c", name) = "bb/c", setting name = "a"
//   skipelem("///a//bb", name) = "bb", setting name = "a"
//   skipelem("a", name) = "", setting name = "a"
//   skipelem("", name) = skipelem("////", name) = 0
//
static char *
skipelem(char *path, char *name)
{
  char *s;
  int len;

  while (*path == '/')
    path++;
  if (*path == 0)
    return 0;
  s = path;
  while (*path != '/' && *path != 0)
    path++;
  len = path - s;
  if (len >= DIRSIZ)
    memmove(name, s, DIRSIZ);
  else
  {
    memmove(name, s, len);
    name[len] = 0;
  }
  while (*path == '/')
    path++;
  return path;
}
skipelem()函数主要是为后面的namex()函数做准备,功能是把路径拆开。比如路径path=“a/bb/c”,它会把第一级路径名赋值给name,剩下的路径名返回,所以name=a, return=bb/c
namex():
// Look up and return the inode for a path name.
// If parent != 0, return the inode for the parent and copy the final
// path element into name, which must have room for DIRSIZ bytes.
// Must be called inside a transaction since it calls iput().
static struct inode *
namex(char *path, int nameiparent, char *name)
{
  struct inode *ip, *next;

  if (*path == '/')
    ip = iget(ROOTDEV, ROOTINO); // 根目录
  else
    ip = idup(myproc()->cwd); // 当前Inode,即进程当前在哪一个目录下

  while ((path = skipelem(path, name)) != 0) // path=0表示末尾,不能再递归遍历了
  {
    ilock(ip);
    if (ip->type != T_DIR)
    {
      iunlockput(ip);
      return 0;
    }
    if (nameiparent && *path == '\0') // path=0表示末尾,不能再递归遍历了
    {
      // Stop one level early.
      iunlock(ip);
      return ip;
    }
    if ((next = dirlookup(ip, name, 0)) == 0)
    {
      iunlockput(ip);
      return 0;
    }
    iunlockput(ip);
    ip = next; // 递归查找
  }
  if (nameiparent)
  {
    iput(ip);
    return 0;
  }
  return ip;
}
namx()会根据路径名path返回对应文件的inode,在dirlookup()的基础上完成了路径功能。忽略nameiparent, while ((path = skipelem(path, name)) != 0)将path一级一级地分解,得到的name作为dirlookup()的参数,如此循环,最后得到我们需要的inode
File descriptor
File descriptor层(file.c)的主要作用:
- File descriptor:抽象了管道、设备、文件等资源, 即一切皆文件
我们经常所说的一切皆文件,就是在File descriptor层实现的。在这里我们只拿里面的fileread()函数作为一个例子解释,看看代码是如何做到管道、设备、文件的抽象。
sys_read():
uint64
sys_read(void)
{
  struct file *f;
  int n;
  uint64 p;

  if (argfd(0, 0, &f) < 0 || argint(2, &n) < 0 || argaddr(1, &p) < 0)
    return -1;
  return fileread(f, p, n);
}

// Fetch the nth word-sized system call argument as a file descriptor
// and return both the descriptor and the corresponding struct file.
static int
argfd(int n, int *pfd, struct file **pf)
{
  int fd;
  struct file *f;

  if (argint(n, &fd) < 0)
    return -1;
  if (fd < 0 || fd >= NOFILE || (f = myproc()->ofile[fd]) == 0)
  {
    printf("f = %d,fd = %d", f, fd);
    return -1;
  }
  if (pfd)
    *pfd = fd;
  if (pf)
    *pf = f;
  return 0;
}
首先从read的系统调用开始,文件描述符fd会作为read的参数传入,通过argfd()解析出对应的file,
f = myproc()->ofile[fd]也解释了fd和file的关系。
fileread():
// Read from file f.
// addr is a user virtual address.
int fileread(struct file *f, uint64 addr, int n)
{
  int r = 0;

  if (f->readable == 0)
    return -1;

  if (f->type == FD_PIPE)
  {
    r = piperead(f->pipe, addr, n);
  }
  else if (f->type == FD_DEVICE)
  {
    if (f->major < 0 || f->major >= NDEV || !devsw[f->major].read)
      return -1;
    r = devsw[f->major].read(f, 1, addr, n);
  }
  else if (f->type == FD_INODE)
  {
    ilock(f->ip);
    if ((r = readi(f->ip, 1, addr, f->off, n)) > 0)
      f->off += r;
    iunlock(f->ip);
  }
  else
  {
    panic("fileread");
  }

  return r;
}
抽象的方法是通过f->type来判断文件的类型,不同类型执行不同的操作。
整体结构可以参考这张图:
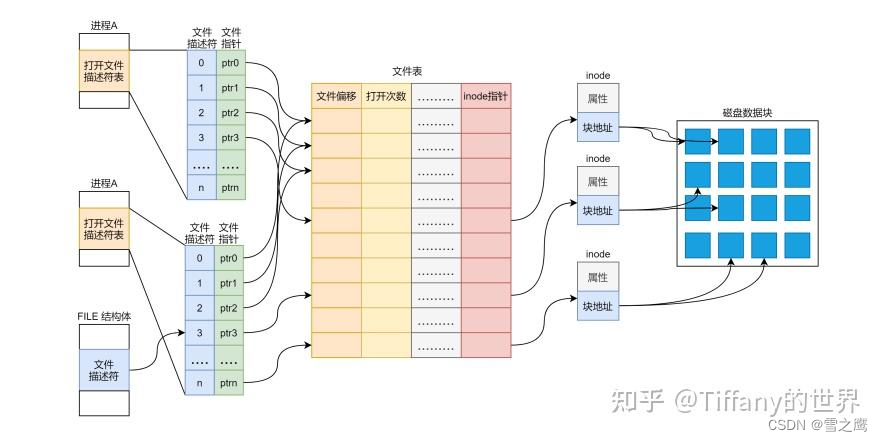
就像buffer cache,inode cache,为了限制数量和支持并发,内核会维护一张文件表,所有的file都属于这个文件表。每个进程都拥有一个属于自己的ofile,用于记录打开的文件,使用文件描述符fd来索引相应的文件。
struct
{
  struct spinlock lock;
  struct file file[NFILE];
} ftable;


 浙公网安备 33010602011771号