Scheduling
7 Scheduling
xv6调度器的实现是非常巧妙的,当然也有很多晦涩的点。本节主要讲解调度器的原理和实现。
7.2 Code:Context Switching
前置知识
- 线程:单个串行执行的代码单元
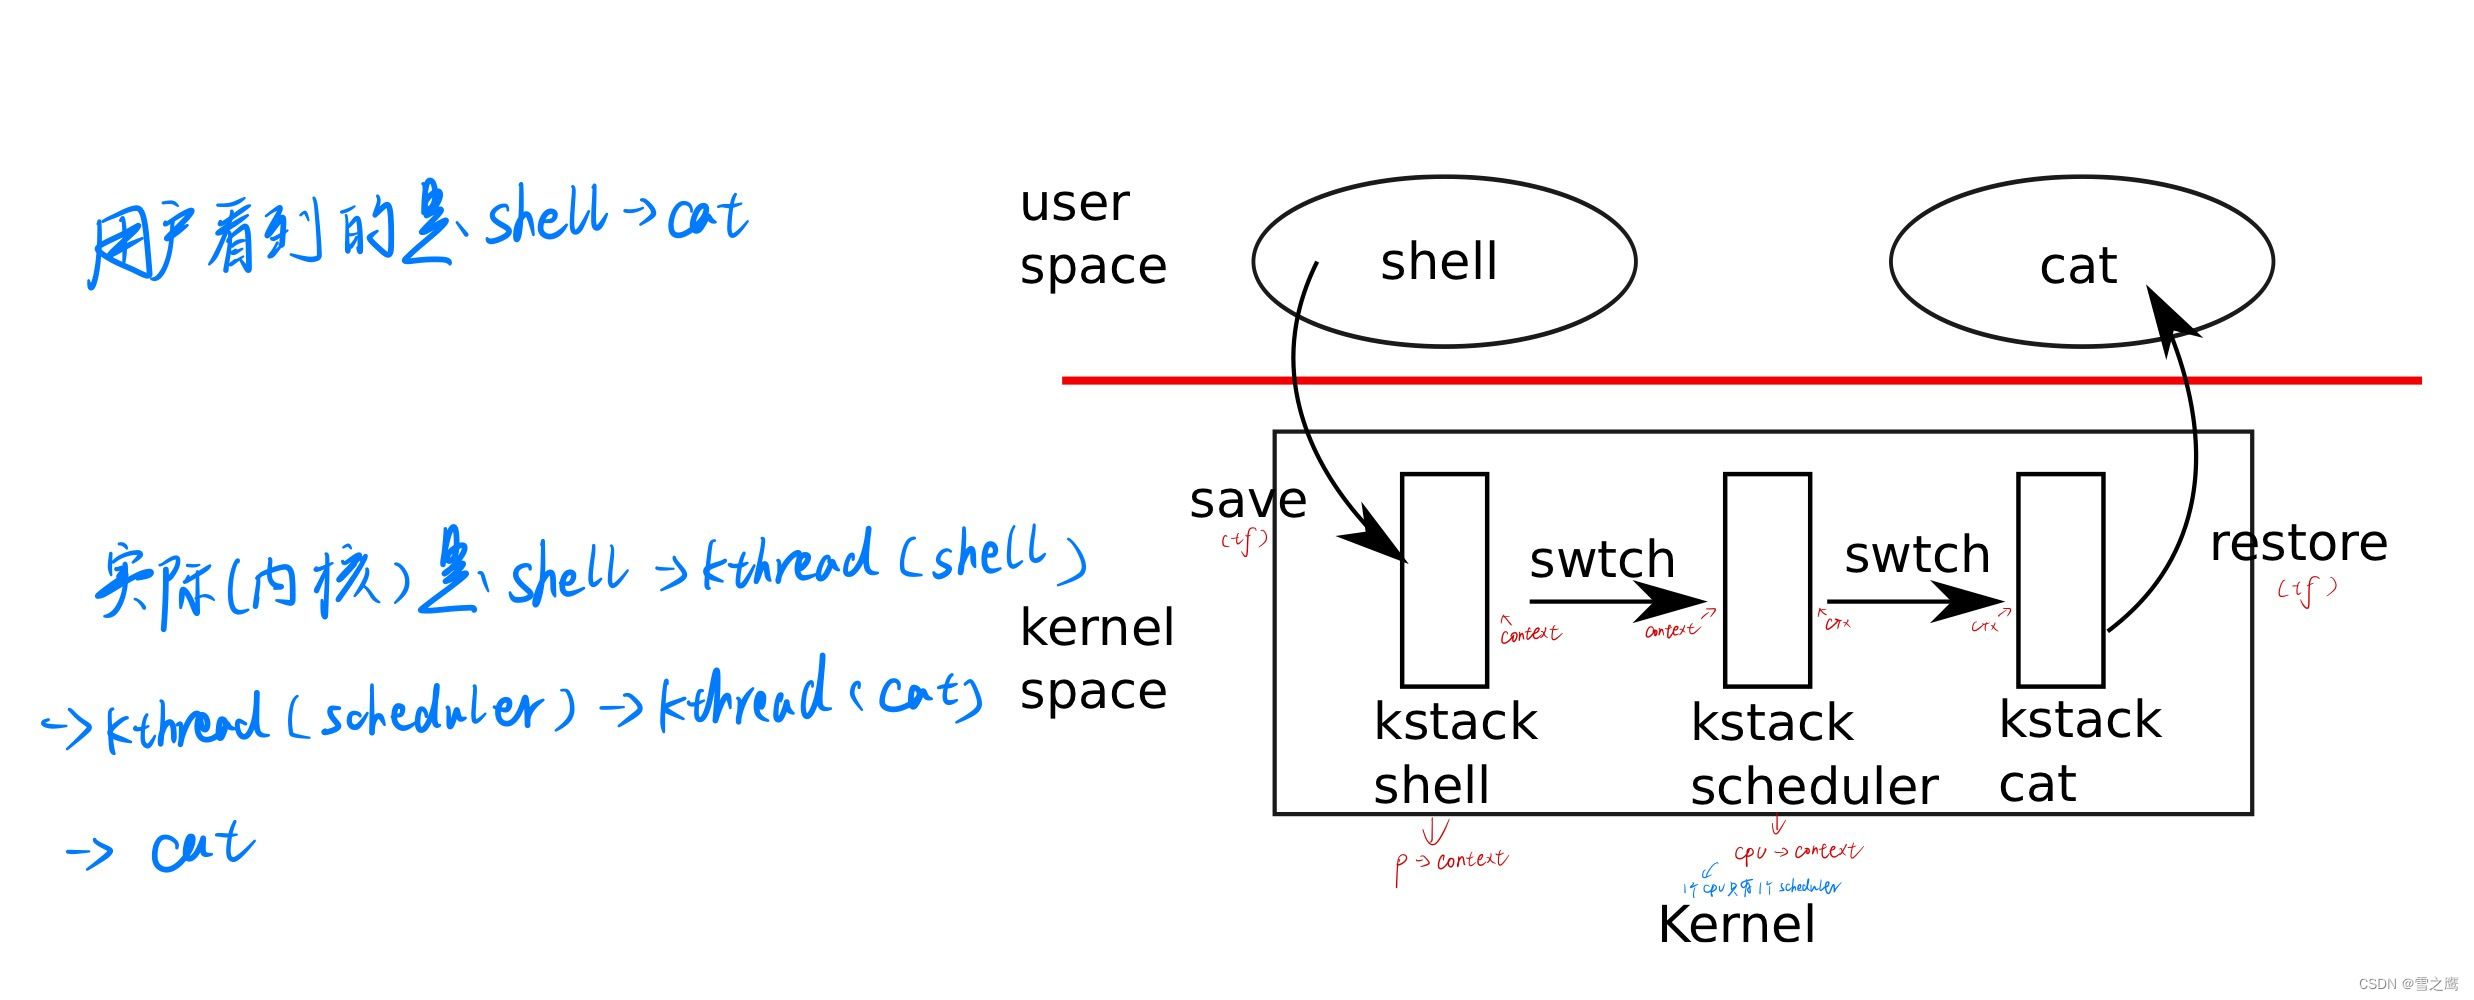
- xv6一个用户进程只能有一个线程(Linux有多个,所以在xv6中我们就说进程=线程),且每个用户进程(对应用户堆栈)都有一个内核线程(对应内核堆栈)
调度的整体过程
在分析调度器源码之前,我们先来看看旧进程->调度器线程->新进程的整体流程。
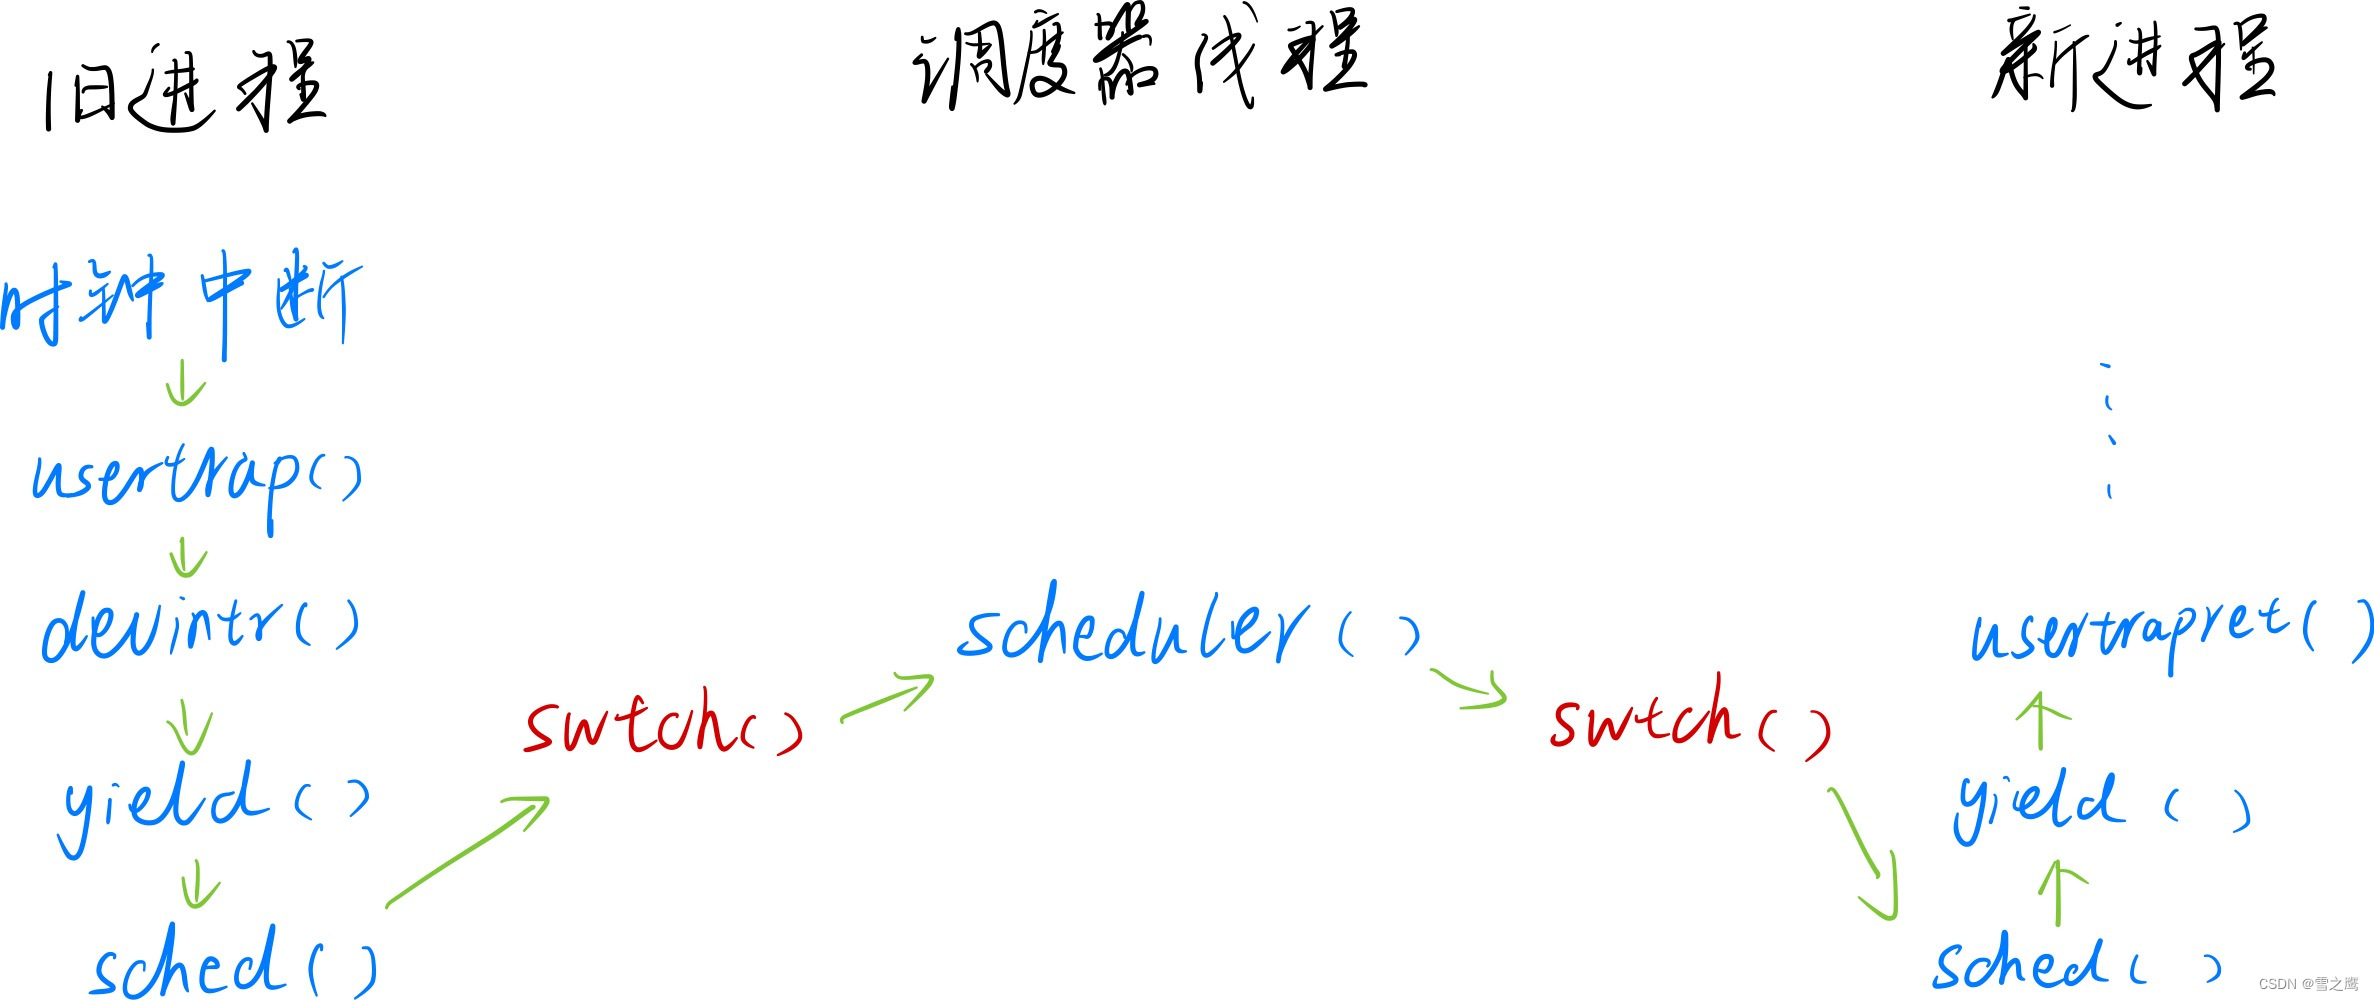
调度器实现原理
上图就是xv6中调度器的实现原理。xv6采用时间片轮转调度的策略,从用户态来看就是一个进程切换到另一个进程(shell和cat进程的切换)。
但是从内核的角度来看整个调度的流程就要更复杂一些了。shell进程运行->定时器中断->执行shell内核线程->执行调度器线程->执行cat内核线程->cat进程运行
调度器实现
关于定时器相关的初始化工作此处跳过,我们从一个定时器中断产生开始,看一看整个调度的过程。
不管是异常还是中断,最终都会跳转到stvec设置的地址处。和之前的system call一样,从用户态它会进入到usertrap()函数(内核态为kernelvec(),此处分析用户态进入的情况,两者原理一样)
usertrap():
//
// handle an interrupt, exception, or system call from user space.
// called from trampoline.S
//
void usertrap(void)
{
  int which_dev = 0;
  ···
  else if ((which_dev = devintr()) != 0)
  {
    // ok
  }
  ···
  if (p->killed)
    exit(-1);

  // give up the CPU if this is a timer interrupt.
  if (which_dev == 2)
    yield();

  usertrapret();
}
usertrap会调用devintr函数,这是中断的处理函数。
devintr():
// check if it's an external interrupt or software interrupt,
// and handle it.
// returns 2 if timer interrupt,
// 1 if other device,
// 0 if not recognized.
int devintr()
{
  uint64 scause = r_scause();

  if ((scause & 0x8000000000000000L) &&
      (scause & 0xff) == 9)
  {
    ···
  }
  else if (scause == 0x8000000000000001L)
  {
    // software interrupt from a machine-mode timer interrupt,
    // forwarded by timervec in kernelvec.S.

    if (cpuid() == 0)
    {
      clockintr();	// 用于sleep系统调用,此处不管
    }

    // acknowledge the software interrupt by clearing
    // the SSIP bit in sip.
    w_sip(r_sip() & ~2);	// 清除中断标注位

    return 2;
  }
  else
  {
    return 0;
  }
}
devintr()做的事很少,但是return 2可以让他进入yield()函数,这里才是任务调度的开始。
yield():
yield():
// Give up the CPU for one scheduling round.
void yield(void)
{
  struct proc *p = myproc();
  acquire(&p->lock); // 加锁的目的:即使p->state = RUNNABLE,但对于其它cpu的调度器来说他还是RUNNING
  p->state = RUNNABLE;
  sched(); // 为什么要在sched里面释放锁,而不是这条语句之前:当前运行的仍是p进程
  release(&p->lock);
}
yield()还在做调度前的一些准备工作。代码本身不复杂,但是要注意两点:
-
值得注意的是,我们获得p->lock的目的,是因为后面p->state = RUNNABLE执行了后以后,进程p并没有真正进入RUNNABLE状态,之后的程序也依旧是在运行进程p的代码;如果不加锁,p->state = RUNNABLE就意味着其它核心的调度器也可以运行进程p,两个核心运行一个程序,不是不可以,但此时他们共享同一个堆栈,那必定对发生错误。
-
acquire获得的锁并没有在下面的release处释放,因为一旦进入sched()就不会回来了,p->lock真正释放锁的位置在sched里
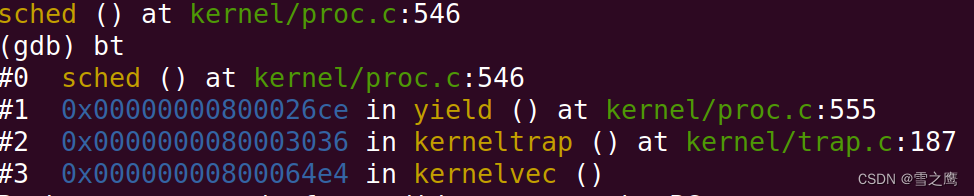
sched():
// Switch to scheduler.  Must hold only p->lock
// and have changed proc->state. Saves and restores
// intena because intena is a property of this
// kernel thread, not this CPU. It should
// be proc->intena and proc->noff, but that would
// break in the few places where a lock is held but
// there's no process.
void sched(void)
{
  int intena;
  struct proc *p = myproc();

  if (!holding(&p->lock))
    panic("sched p->lock");
  if (mycpu()->noff != 1)
    panic("sched locks");
  if (p->state == RUNNING)
    panic("sched running");
  if (intr_get())
    panic("sched interruptible");

  intena = mycpu()->intena;
  swtch(&p->context, &mycpu()->scheduler);
  mycpu()->intena = intena;
}
shed()函数首先做了一些合理性检查,我们先忽略intena = mycpu()->intena,然后进入swtch()函数。
swtch():
# Context switch
#
#   void swtch(struct context *old, struct context *new);
#
# Save current registers in old. Load from new.

# 保存的寄存器都是callee registers,caller registers都由调用函数保存在堆栈了
# 注意区别trapframe的保存,上下文切换是C代码跳转,函数调用编译器会做处理,而trapframe是汇编跳转,需要手动保存
.globl swtch
swtch:
        sd ra, 0(a0)
        sd sp, 8(a0)
        sd s0, 16(a0)
        sd s1, 24(a0)
        sd s2, 32(a0)
        sd s3, 40(a0)
        sd s4, 48(a0)
        sd s5, 56(a0)
        sd s6, 64(a0)
        sd s7, 72(a0)
        sd s8, 80(a0)
        sd s9, 88(a0)
        sd s10, 96(a0)
        sd s11, 104(a0)

        ld ra, 0(a1)
        ld sp, 8(a1)
        ld s0, 16(a1)
        ld s1, 24(a1)
        ld s2, 32(a1)
        ld s3, 40(a1)
        ld s4, 48(a1)
        ld s5, 56(a1)
        ld s6, 64(a1)
        ld s7, 72(a1)
        ld s8, 80(a1)
        ld s9, 88(a1)
        ld s10, 96(a1)
        ld s11, 104(a1)

        ret
swtch()函数由汇编实现,实现上下文(context)切换,我们以“状态机模型”来看待进程的切换。
从一个线程切换到另一个线程(进程=线程=内存+寄存器),我们只要改变了对应内存和寄存器的状态,就实现了线程的切换。
回到swtch()。swtch()实现旧进程切换到调度器线程。它将旧进程的寄存器保存在p->context(属于进程),然后将mycpu()->scheduler里的内容加载到寄存器中。从“状态机模型”来看,我们此处将寄存器s1,s2…s11(callee saved)设置为调度器线程的寄存器,sp(内存)设置为调度其线程的堆栈,“内存+寄存器”均已切换,还差一步改变代码运行位置,线程就可切换完成。
所以有了sd ra, 0(a0)和ld ra, 0(a1)这两条指令。ra寄存器负责保存函数的返回地址。函数结束时ret指令会将ra寄存器里的值赋值给pc,实现函数的返回。在这里保存了旧进程的ra,加载了新进程的ra。

可以看到ra保存的地址在scheduler()调度器函数里,并且刚好在schduler()函数调用swtch()的下一句c->proc = 0,我们来到scheduler()函数的源码。
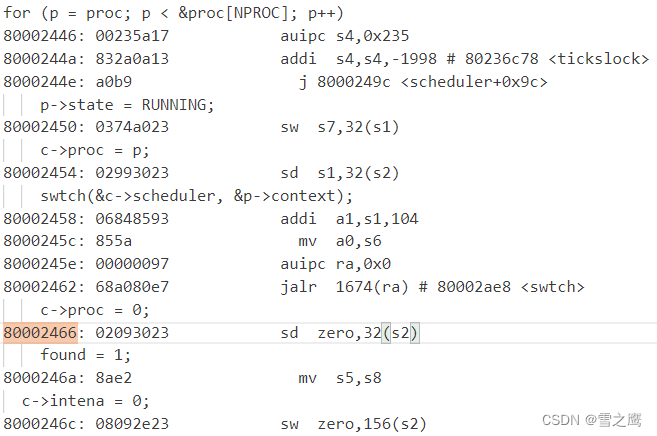
scheduler():
scheduler():
// Per-CPU process scheduler.
// Each CPU calls scheduler() after setting itself up.
// Scheduler never returns.  It loops, doing:
//  - choose a process to run.
//  - swtch to start running that process.
//  - eventually that process transfers control
//    via swtch back to the scheduler.
void scheduler(void)
{
  struct proc *p;
  struct cpu *c = mycpu();

  c->proc = 0;
  for (;;)
  {
    // Avoid deadlock by giving devices a chance to interrupt.
    intr_on();

    // Run the for loop with interrupts off to avoid
    // a race between an interrupt and WFI(wait for interrupt), which would
    // cause a lost wakeup.
    // 此处和下面的c->intena=0都是关闭中断,都是为了避免interrupt and WFI竞争而死锁
    intr_off();

    int found = 0;
    for (p = proc; p < &proc[NPROC]; p++)
    {
      acquire(&p->lock);
      if (p->state == RUNNABLE)
      {
        // Switch to chosen process.  It is the process's job
        // to release its lock and then reacquire it
        // before jumping back to us.
        p->state = RUNNING;
        c->proc = p;
        swtch(&c->scheduler, &p->context);

        // Process is done running for now.
        // It should have changed its p->state before coming back.
        c->proc = 0;	// 表明现在运行的是调度器线程

        found = 1;
      }

      // ensure that release() doesn't enable interrupts.
      // again to avoid a race between interrupt and WFI.
      c->intena = 0;	// c->intena=0会使release(&p->lock)不重新打开中断

      release(&p->lock);	// 此处的release不会打开中断
    }
    if (found == 0)
    {
      asm volatile("wfi");	//wfi指令,使核心进入低功耗模式,等待中断唤醒
    }
  }
}
对于调度器进程切换这个过程来说,scheduler()函数的起点始终是从swtch()函数的结尾,c->proc = 0开始的,而非scheduler()函数头(只有scheduler()初始化时才会从头运行)。整个调度器线程就是一个循环,做的工作也很简单:遍历proc[]数组,找到状态为RUNNABLE的进程,swtch()切换到新进程。
值得注意的是整个大循环里的中断操作,既有开中断又有关中断。
首先是为什么要有关中断操作?注释写的很清楚,关中断是为了不让中断和wfi指令竞争,造成lost wakeup。所以在程序里他首先intr_off()显形关闭了中断,之后为了不让release()打开中断,又让c->intena = 0进而继续让中断处于关闭状态。
那为什么又要在最开始开中断呢?一个很典型的例子就是串口中的Top half和Bottom half机制。Top half会因为缓冲区没有数据而进入睡眠,等待中断唤醒;Bottom half一旦接收到串口数据,就会产生中断,进而唤醒Top half沉睡的进程。所以显式打开中断是有必要的,就算很多时候会有别的地方打开中断,但这样并不是100%的可靠。
当然还不要忘记我们之前在yield()里获得的锁,此处realease()的就是之前yield()里acquire()获得的锁。(p->lock=上一个正在运行进程的锁=这次要让出cpu的进程的锁)
切换新进程
schduler()一旦找到了可RUNNABLE的进程,就会再调用swtch()函数,此时保存的就是调度器线程现场,切换的是新进程的现场。这里还有一个细节可以拧出来,实现调度器现场的保存与恢复,这样每次恢复的调度器的现场都是基于上一次的,比如p,这样就保证了进程调度的公平性,每一编号的进程都有相同几率被调度。如果每次都从0开始,那就意味着编号越小的进程越有机会被调度。
恢复到新进程的现场,此时程序运行到的位置如下:
可以看到,他恢复成了新进程的调用栈,之后的路径就是从sched()结束的地方开始,一路返回到新进程的用户空间。
void sched(void)
{
  int intena;
  ···

  intena = mycpu()->intena;
  swtch(&p->context, &mycpu()->scheduler);
  mycpu()->intena = intena;
}
还记得我们之前忽略的intena吗?现在来看保存的愿意很简单:进入调度器线程会改变intena的值,所以要保存下来,以便恢复。简总,任务调度不管进程怎么变,一定要把现场保存到位,一个也不能落下。
补充:调用swtch的规则
在调用swtch()的过程中,必须持有p->lock(进程对应的锁),但同时又不能持有其他锁
系统编程必须遵循这条规则,比如:假设我们在一个只有一个CPU核的机器上,进程P1调用了switch函数将CPU控制转给了调度器线程,调度器线程发现还有一个进程P2的内核线程正在等待被运行,所以调度器线程会切换到运行进程P2。假设P2也想使用磁盘,UART或者console,它会对P1持有的锁调用acquire,这是对于同一个锁的第二个acquire调用。当然这个锁现在已经被P1持有了,所以这里的acquire并不能获取锁。假设这里是spinlock,那么进程P2会在一个循环里不停的“旋转”并等待锁被释放。但是很明显进程P2的acquire不会返回,所以即使进程P2稍后愿意出让CPU,P2也没机会这么做。之所以没机会是因为P2对于锁的acquire调用在直到锁释放之前都不会返回,而唯一锁能被释放的方式就是进程P1恢复执行并在稍后release锁,但是这一步又还没有发生,因为进程P1通过调用switch函数切换到了P2,而P2又在不停的“旋转”并等待锁被释放。这是一种死锁,它会导致系统停止运行。
7.5 Sleep and wakeup
我们已经知道有自旋锁这个东西,锁没被占用直接获得即可,反之会陷入循环,直到锁释放为止。这个过程是不会让出自己cpu的。对于长时间的占用肯定是不行的,别的进程根本就没机会被调度,所以我们需要另外一种机制,一旦他等待的东西(条件)没有出现,他就会让出自己的cpu,进而让别的进程被调度到。
实际上已经有很多应用的场景:
- 假设我们有一个Pipe,并且我正在从Pipe中读数据。但是Pipe当前又没有数据,所以我需要等待一个Pipe非空的事件。
- 假设我在读取磁盘,我会告诉磁盘控制器请读取磁盘上的特定块。这或许要花费较长的时间,尤其当磁碟需要旋转时(通常是毫秒级别),磁盘才能完成读取。而执行读磁盘的进程需要等待读磁盘结束的事件。
- 一个Unix进程可以调用wait函数。这个会使得调用进程等待任何一个子进程退出。所以这里父进程有意的在等待另一个进程产生的事件。
sleep()和wakeup()函数实现
// Atomically release lock and sleep on chan.
// Reacquires lock when awakened.
void sleep(void *chan, struct spinlock *lk)
{
  struct proc *p = myproc();

  // Must acquire p->lock in order to
  // change p->state and then call sched.
  // Once we hold p->lock, we can be
  // guaranteed that we won't miss any wakeup
  // (wakeup locks p->lock),
  // so it's okay to release lk.
  if (lk != &p->lock)
  {                    // DOC: sleeplock0
    acquire(&p->lock); // DOC: sleeplock1
    release(lk);
  }

  // Go to sleep.
  p->chan = chan;
  p->state = SLEEPING;

  sched();

  // Tidy up.
  p->chan = 0;

  // Reacquire original lock.
  if (lk != &p->lock)
  {
    release(&p->lock);
    acquire(lk);
  }
}

// Wake up all processes sleeping on chan.
// Must be called without any p->lock.
void wakeup(void *chan)
{
  struct proc *p;

  for (p = proc; p < &proc[NPROC]; p++)
  {
    acquire(&p->lock);
    if (p->state == SLEEPING && p->chan == chan)
    {
      p->state = RUNNABLE;
    }
    release(&p->lock);
  }
}
我们先不关心锁的作用(也就是为什么要给sleep()传自旋锁的参数),看一看sleep()和wakeup()的基本原理。
A进程调用了sleep(),会将自身状态设置为SLEEPING,同时还设置变量p->chan = chan,然后sched()强制让出自己的cpu来调度其它进程,进程进入睡眠;直到B进程调用wakeup(),它会遍历所有进程,找出睡眠状态并且p->chan == chan的进程,改变其状态为RUNNABLE,使其能够被调度器调度执行;此时A进程被重新调度,p->chan = 0,继续执行。
所以sleep()和wakeup()的原理是非常简单的。但是我们刚刚的分析把锁是忽略了的,我们需要一个具体的例子来看看sleep()中锁的作用。
这是课堂上的例子,uartwrite()负责发送数据,tx_done未置位则进入睡眠模式,中断uartintr()负责接收用户输入,有输入则将tx_done置位,唤醒uartwrite()所在进程。


从示例中就能看出锁的作用:保护全局变量tx_done和串口,避免并发访问出现错误。既然是因为tx_done和串口,那为什么不分开加锁,这样就不用把锁当参数传递给sleep()了。
为此,Morris教授举了一个例子,看看调用不加锁的sleep()会发生什么。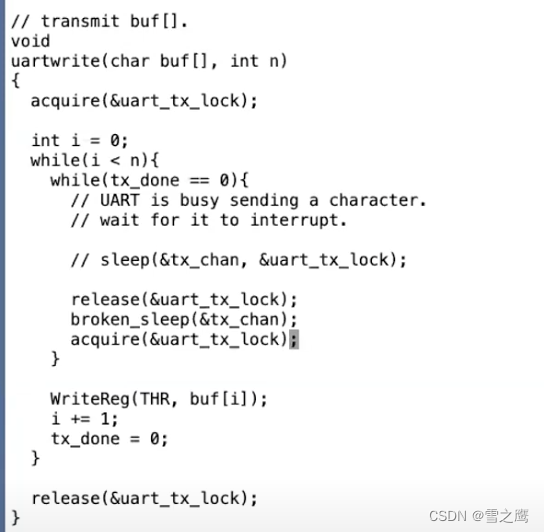
这里就是对tx_done和串口分开加锁。逻辑上没有问题,因为都保护到了我们的共享数据,但是如果此时在此处发生了中断,release()一旦释放锁,uartintr()进程就会马上获得,然后wakeup,然而此时它什么都没有唤醒,因为此时broken_sleep()还没有执行;等broken_sleep()执行时,唤醒已经结束,这就是lost wakeup问题。

所以,我们的锁不可避免地要跨进程释放,要等到进入了sleep()之后并且安全再释放。所以我们再回到sleep()源码。
sleep():
void sleep(void *chan, struct spinlock *lk)
{
  struct proc *p = myproc();
  if (lk != &p->lock)
  {                    // DOC: sleeplock0
    acquire(&p->lock); // DOC: sleeplock1
    release(lk);
  }

  // Go to sleep.
  p->chan = chan;
  p->state = SLEEPING;

  sched();

  // Tidy up.
  p->chan = 0;

  // Reacquire original lock.
  if (lk != &p->lock)
  {
    release(&p->lock);
    acquire(lk);
  }
}
在释放传入的参数lk之前,我们先是获得了p->lock,即本进程的进程锁,然后才释放了lk,这样我们的中断始终处于关闭状态,上述的问题解决。同时这里也再一次验证了之前谈到的调用swtch的规则。
这里还有个小细节,我们发现sleep()是被包在一个while()循环里面的。其实不只是串口,pipe(),wait()等调用sleep()的函数都是使用了一个while()将sleep()包起来的。我们拿这里的串口举例,其他情况使用while()的目的都是如此。
如果只有一个进程,反正wakeup会将tx_done置位,然后唤醒,那直接sleep好像也没问题。我们看看多进程的情况,如果多个进程都在睡眠等待被唤醒,一旦发生wakeup,运气好的(最先被调度)那个进程会退出while(),顺序执行,同时将tx_done置0;而运气差的也被唤醒了,但轮到他们执行的时候发现tx_done已经清零了,所以会继续进入循环,等待下一个wakeup。
spinlock和sleeplock
- spinlock:陷入循环,不会让出cpu,适用于短时间场合
- sleeplock:陷入睡眠,让出cpu,使用长时间场合(因为进程切换的开销,反而不利于短时间场合)
7.8 Code: Wait, exit, and kill
在学习了sleep()和wakeup()后,我们现在讨论如何关闭一个进程。
在XV6中,一个进程如果退出的话,我们需要释放用户内存,释放page table,释放trapframe对象,将进程在进程表单中标为REUSABLE,这些都是典型的清理步骤。当进程退出或者被杀掉时,有许多东西都需要被释放。
但是这里会存在两大问题:
- kill:首先我们不能直接单方面的摧毁另一个线程,因为:另一个线程可能正在另一个CPU核上运行,并使用着自己的栈;也可能另一个线程正在内核中持有了锁;也可能另一个线程正在更新一个复杂的内核数据,如果我们直接就把线程杀掉了,我们可能在线程完成更新复杂的内核数据过程中就把线程杀掉了。我们不能让这里的任何一件事情发生。
- exit:另一个问题是,即使一个线程调用了exit系统调用,并且是自己决定要退出。它仍然持有了运行代码所需要的一些资源,例如它的栈,以及它在进程表单中的位置。当它还在执行代码,它就不能释放正在使用的资源。所以我们需要一种方法让线程能释放最后几个对于运行代码来说关键的资源。
牢记这两个问题,然后理解它们的实现。
exit()和wait()
exit():
// Exit the current process.  Does not return.
// An exited process remains in the zombie state
// until its parent calls wait().
void exit(int status)
{
  struct proc *p = myproc();

  if (p == initproc)
    panic("init exiting");

  // Close all open files.
  for (int fd = 0; fd < NOFILE; fd++)
  {
    if (p->ofile[fd])
    {
      struct file *f = p->ofile[fd];
      fileclose(f);
      p->ofile[fd] = 0;
    }
  }

  // 进程有一个对于当前目录的记录,这个记录会随着你执行cd指令而改变。在exit过程中也需要将对这个目录的引用释放给文件系统
  begin_op(ROOTDEV);
  iput(p->cwd);
  end_op(ROOTDEV);
  p->cwd = 0;

  // we might re-parent a child to init. we can't be precise about
  // waking up init, since we can't acquire its lock once we've
  // acquired any other proc lock. so wake up init whether that's
  // necessary or not. init may miss this wakeup, but that seems
  // harmless.
  acquire(&initproc->lock);
  wakeup1(initproc);
  release(&initproc->lock);

  // grab a copy of p->parent, to ensure that we unlock the same
  // parent we locked. in case our parent gives us away to init while
  // we're waiting for the parent lock. we may then race with an
  // exiting parent, but the result will be a harmless spurious wakeup
  // to a dead or wrong process; proc structs are never re-allocated
  // as anything else.
  acquire(&p->lock);
  struct proc *original_parent = p->parent;
  release(&p->lock);

  // we need the parent's lock in order to wake it up from wait().
  // the parent-then-child rule says we have to lock it first.
  acquire(&original_parent->lock);

  acquire(&p->lock);

  // Give any children to init.
  reparent(p);

  // Parent might be sleeping in wait().
  wakeup1(original_parent);

  p->xstate = status;
  p->state = ZOMBIE;

  release(&original_parent->lock);

  // Jump into the scheduler, never to return.
  sched();
  panic("zombie exit");
}
我们带着上面提到的exit()直接退出会出现的问题,看看xv6怎么实现的。
在准备退出的进程(调用exit())中,它首先关闭了自己所有已经打开了的文件,将目录的引用释放给文件系统;然后reparent()将所有子进程托孤给init进程;最后唤醒自己的父进程,并且将自己设置为ZOMBIE状态,主动调度。
可以看到在exit()里面没有半点释放自己内存的操作,它依旧维持着运行代码所需要的资源。只要该进程在运行,就不能释放它正在使用的资源。
那么谁来释放它的资源呢?自然是它的父进程完成这个工作。
wait():
// Wait for a child process to exit and return its pid.
// Return -1 if this process has no children.
int wait(uint64 addr)
{
  struct proc *np;
  int havekids, pid;
  struct proc *p = myproc();

  // hold p->lock for the whole time to avoid lost
  // wakeups from a child's exit().
  acquire(&p->lock);

  for (;;)
  {
    // Scan through table looking for exited children.
    havekids = 0;
    for (np = proc; np < &proc[NPROC]; np++)
    {
      // this code uses np->parent without holding np->lock.
      // acquiring the lock first would cause a deadlock,
      // since np might be an ancestor, and we already hold p->lock.
      if (np->parent == p)
      {
        // np->parent can't change between the check and the acquire()
        // because only the parent changes it, and we're the parent.
        acquire(&np->lock);
        havekids = 1;
        if (np->state == ZOMBIE)
        {
          // Found one.
          pid = np->pid;
          if (addr != 0 && copyout(p->pagetable, addr, (char *)&np->xstate,
                                   sizeof(np->xstate)) < 0)
          {
            release(&np->lock);
            release(&p->lock);
            return -1;
          }
          freeproc(np);
          release(&np->lock);
          release(&p->lock);
          return pid;
        }
        release(&np->lock);
      }
    }

    // No point waiting if we don't have any children.
    if (!havekids || p->killed)
    {
      release(&p->lock);
      return -1;
    }

    // Wait for a child to exit.
    sleep(p, &p->lock); // DOC: wait-sleep
  }
}
父进程通过调用wait()来释放子进程的资源。wait()里面包含了一个大的循环。当一个进程调用了wait系统调用,它会扫描进程表单,找到父进程是自己且状态是ZOMBIE的进程。从上面可以知道,这些进程已经在exit()函数中几乎要执行完了。之后由父进程调用的freeproc()函数,来完成释放进程资源的最后几个步骤。我们看一下freeproc的实现:
// free a proc structure and the data hanging from it,
// including user pages.
// p->lock must be held.
static void
freeproc(struct proc *p)
{
  if (p->tf)
    kfree((void *)p->tf);
  if (p->usc)
    kfree((void *)p->usc);
  p->tf = 0;
  if (p->pagetable)
    proc_freepagetable(p->pagetable, p->sz);
  p->pagetable = 0;
  p->sz = 0;
  p->pid = 0;
  p->parent = 0;
  p->name[0] = 0;
  p->chan = 0;
  p->killed = 0;
  p->xstate = 0;
  p->state = UNUSED;
}
这是关闭一个进程的最后一些步骤。如果由正在退出的进程自己在exit()函数中执行这些步骤,会出现各种问题。这里释放了trapframe,释放了page table…不管怎样,当进程还在exit函数中运行时,任何这些资源在exi()t函数中释放都会很难受,所以这些资源都是由父进程释放的。
wait()不仅是为了父进程方便的知道子进程退出,wait()实际上也是进程退出的一个重要组成部分。在Unix中,对于每一个退出的进程,都需要有一个对应的wait()系统调用(没有的话其对一个的子进程就会一直保持僵尸进程),这就是为什么当一个进程退出时,它的子进程需要变成init进程的子进程。init进程的工作就是在一个循环中不停调用wait,因为每个进程都需要对应一个wait,这样它的父进程才能调用freeproc函数,并清理进程的资源。
当父进程完成了清理进程的所有资源,子进程的状态会被设置成UNUSED。之后,fork系统调用才能重用进程在进程组的位置。
kill()
带着前面提到的直接kill一个进程的问题,我们看看xv6是怎么实现的。
kill():
// Kill the process with the given pid.
// The victim won't exit until it tries to return
// to user space (see usertrap() in trap.c).
// kill并不直接杀死进程,而是让进程自己退出(系统调用,定时器中断...)
int kill(int pid)
{
  struct proc *p;

  for (p = proc; p < &proc[NPROC]; p++)
  {
    acquire(&p->lock);
    if (p->pid == pid)
    {
      p->killed = 1;
      if (p->state == SLEEPING)
      {
        // Wake process from sleep().
        p->state = RUNNABLE;	// 唤醒沉睡进程,不然就会一直不被kill
      }
      release(&p->lock);
      return 0;
    }
    release(&p->lock);
  }
  return -1;
}
xv6中kill()做的事情很简单:它先扫描进程表单,找到目标进程。然后只是将进程的proc结构体中killed标志位设置为1。如果进程正在SLEEPING状态,将其设置为RUNNABLE。这里只是将killed标志位设置为1,并没有停止进程的运行。所以kill系统调用本身还是很温和的。
而目标进程运行到内核代码中能安全停止运行的位置时,会检查自己的killed标志位,如果设置为1,目标进程会自愿的执行exit系统调用。可以在trap.c中看到所有可以安全停止运行的位置:
trap.c:
void
usertrap(void)
{
  ···
  // 判断trap来源
  if(r_scause() == 8){
    // system call

    if(p->killed)
      exit(-1);

    p->tf->epc += 4;

    // an interrupt will change sstatus &c registers,
    // so don't enable until done with those registers.
    intr_on();	// trap硬件会关闭中断,在保存完必要的寄存器后,要快速打开中断

    syscall();	// 系统调用执行
  } else if((which_dev = devintr()) != 0){
    // ok
  } else {
    printf("usertrap(): unexpected scause %p (%s) pid=%d\n", r_scause(), scause_desc(r_scause()), p->pid);
    printf("            sepc=%p stval=%p\n", r_sepc(), r_stval());
    p->killed = 1;
  }

  if(p->killed)
    exit(-1);

  // give up the CPU if this is a timer interrupt.
  if(which_dev == 2)
    yield();

  usertrapret();
}
在usertrap()函数中,在执行系统调用之前,如果进程已经被kill了,进程会自己调用exit。在这个内核代码位置,代码并没有持有任何锁,也不在执行任何操作的过程中,所以进程通过exit退出是完全安全的。
那如果进程不在用户空间执行,而是正在执行系统调用的过程中,然后它被kill了,我们需要做什么特别的操作吗?之所以会提出这个问题,是因为进程可能正在从console读取即将输入的字符,而我们如果迟迟不输入字符,那kill就永远也不会被检测到,因为它一直处于SLEEPING中。所以这里的机制是在kill()里将进程状态设置为RUNNABLE,是它能够被调度,继续执行。我们看看piperead()就知道这么做的目的了。
piperead():
int
piperead(struct pipe *pi, uint64 addr, int n)
{
  int i;
  struct proc *pr = myproc();
  char ch;

  acquire(&pi->lock);
  while(pi->nread == pi->nwrite && pi->writeopen){  //DOC: pipe-empty
    if(myproc()->killed){
      release(&pi->lock);
      return -1;
    }
    sleep(&pi->nread, &pi->lock); //DOC: piperead-sleep
  }
  for(i = 0; i < n; i++){  //DOC: piperead-copy
    if(pi->nread == pi->nwrite)
      break;
    ch = pi->data[pi->nread++ % PIPESIZE];
    if(copyout(pr->pagetable, addr + i, &ch, 1) == -1)
      break;
  }
  wakeup(&pi->nwrite);  //DOC: piperead-wakeup
  release(&pi->lock);
  return i;
}
可以看到在sleep()的while里多出了killed的判断,也就是说我们唤醒进程之后,进程会再次进入循环,然后检测到killed置位后做出相应操作。这里也对while里包sleep()有了更深的理解。
同时还有一些情况,如果进程在SLEEPING状态中被kill了并不能直接退出。例如,一个进程正在更新一个文件系统并创建一个文件的过程中,进程不适宜在这个时间点退出,因为我们想要完成文件系统的操作,之后进程才能退出。我会向你展示一个磁盘驱动中的sleep循环,这个循环中就没有检查进程的killed标志位。
下面就是virtio_disk.c文件中的一段代码:
  // Wait for virtio_disk_intr() to say request has finished.
  while(b->disk == 1) {
    sleep(b, &disk[n].vdisk_lock);
  }
这里一个进程正在等待磁盘的读取结束,这里没有检查进程的killed标志位。因为现在可能正在创建文件的过程中,而这个过程涉及到多次读写磁盘。我们希望完成所有的文件系统操作,完成整个系统调用,之后再检查p->killed并退出。


 浙公网安备 33010602011771号