


客户端负载均衡Feign之二:Feign 基本功能介绍&超时设置
一、Ribboon配置
在Spring cloud Feign中客户端负载均衡是通过Spring cloud Ribbon实现的,所以我们可以直接通过配置Ribbon客户端的方式来自定义各个服务客户端调用的参数。那么我们怎么在Spring cloud Feign中配置Ribbon呢?
全局配置
全局配置方法简单,直接用ribbon.<key>=<value>的方式设置ribbon的默认参数。如下:
#ribbon请求连接的超时时间
ribbon.ConnectTimeout=250
#请求处理的超时时间
ribbon.ReadTimeout=1000
#对所有操作请求都进行重试
ribbon.OkToRetryOnAllOperations=true
#对当前实例的重试次数
ribbon.MaxAutoRetries=1
#对下个实例的重试次数
ribbon.MaxAutoRetriesNextServer=1
指定服务配置
为了有针对性的配置,针对各个服务客户端进行个性化配置方式与使用Spring cloud Ribbon时的配置方式一样的,都采用<client>.ribbon.<key>=<value>的格式进行设置。如下:
hello-service.ribbon.ConnectTimeout=500
hello-service.ribbon.ReadTimeout=1000
二、重试机制
#对所有操作请求都进行重试
ribbon.OkToRetryOnAllOperations=false
#对当前实例的重试次数
ribbon.MaxAutoRetries=1
#对下个实例的重试次数
ribbon.MaxAutoRetriesNextServer=1
结果:
未超时(正常)时,compute服务被调用一次。

超时时,compute服务被调用3次。

三、Hystrix配置
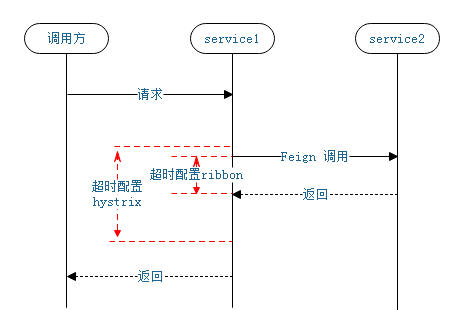
在Spring cloud Feign中,除了引入Spring cloud Ribbon之外,还引入了服务保护与容错的工具Hystrix。默认情况下, Spring cloud Feign会为将所有Feign客户端的方法都封装到Hystrix命令中进行服务保护。
也就是说Feign接口调用分两层,Ribbon的调用和Hystrix调用,理论上设置Ribbon的时间即可,但是Ribbon的超时时间和Hystrix的超时时间需要结合起来,按照木桶原则最低的就是Feign的超时时间,建议最好配置超时时间一致。
那么在Spring cloud Feign如何配置Hystrix的属性以及如何实现服务降级?
全局配置
全局配置通ribbon一样,直接使用它的默认配置前缀hystrix.command.default就可以进行设置,
在设置之前,需要确认feign.hystrix.enabled参数是否设置为false,如果为false则关闭Feign客户端的Hystrix支持。
或者使用hystrix.command.default.execution.timeout.enabled=false来关闭熔断功能。
比如设置全局的超时时间:
hystrix.command.default.execution.isolation.thread.timeoutInMilliseconds
详细参数列表见《服务容错保护断路器Hystrix之二:Hystrix工作流程解析》中的《2.8、关于配置》
指定服务配置
如果想局部关闭Hystrix,需要通过使用@Scope("prototype")注解为指定的客户端配置Feign.Builder实例,详细步骤如下:
package com.dxz.feign;

import org.springframework.context.annotation.Bean;
import org.springframework.context.annotation.Configuration;
import org.springframework.context.annotation.Scope;

import feign.Feign;

@Configuration
public class DisableHystrixConfiguration {

    @Bean
    @Scope("prototype")
    public Feign.Builder feignBuilder() {
        return Feign.builder();
    }
}
package com.dxz.feign.remote;

import org.springframework.cloud.netflix.feign.FeignClient;
import org.springframework.web.bind.annotation.RequestMapping;
import org.springframework.web.bind.annotation.RequestMethod;
import org.springframework.web.bind.annotation.RequestParam;

import com.dxz.feign.DisableHystrixConfiguration;

//@FeignClient("compute-service")
@FeignClient(name="compute-service",configuration=DisableHystrixConfiguration.class)
public interface HelloService {

    @RequestMapping(value="/add", method = RequestMethod.GET)
    String hello(@RequestParam("a") Integer a, @RequestParam("b") Integer b, @RequestParam("sn") Integer sn);

}
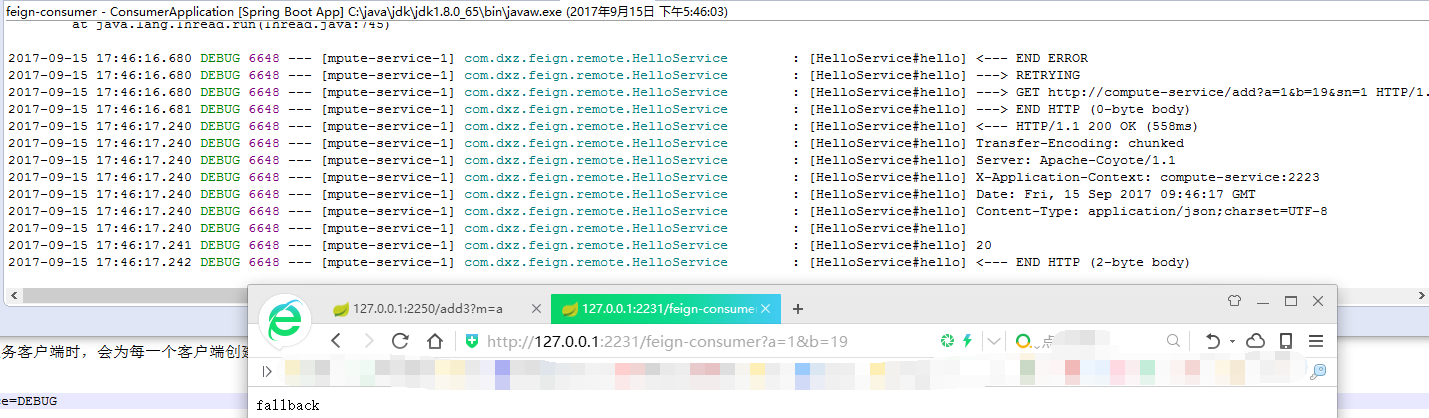
结果:
下面的超时,不会熔断调用fallback方法,而是等待。

四、服务降级配置
新增一个服务降级处理类:
package com.dxz.feign.remote;

import org.springframework.stereotype.Service;

@Service
public class HelloServiceFallback implements HelloService {

    @Override
    public String hello(Integer a, Integer b, Integer sn) {
        System.out.println("HelloServiceFallback");
        return "fallback";
    }

}
在服务绑定接口HelloService中,通过@FeignClient注解的fallback属性来指定服务降级处理类:
package com.dxz.feign.remote;

import org.springframework.cloud.netflix.feign.FeignClient;
import org.springframework.web.bind.annotation.RequestMapping;
import org.springframework.web.bind.annotation.RequestMethod;
import org.springframework.web.bind.annotation.RequestParam;

import com.dxz.feign.DisableHystrixConfiguration;

@FeignClient(name="compute-service", fallback=HelloServiceFallback.class)
//@FeignClient(name="compute-service",configuration=DisableHystrixConfiguration.class)
public interface HelloService {

    @RequestMapping(value="/add", method = RequestMethod.GET)
    String hello(@RequestParam("a") Integer a, @RequestParam("b") Integer b, @RequestParam("sn") Integer sn);

}
测试:

五、其他配置
请求压缩
Spring cloud Feign支持请求与响应的GZIP压缩,以减少通讯过程中的性能损耗。只需要通过下面两个参数设置,就能开启请求与响应的压缩功能:
feign.compression.request.enabled=true
feign.compression.response.enabled=true
六、日志配置
Spring cloud Feign在构建被@FeignClient修饰的服务客户端时,会为每一个客户端创建一个feign.Logger实例,我们可以利用该日志对象的DEBUG模式来帮助分析Feign的请求细节。
开启方式:
logging.level.<FeignClient>=<LEVEL value>
logging.level.com.dxz.feign.remote.HelloService=DEBUG
但是,只添加了如上配置,还无法实现对DEBUG日志的输出,这是由于Feign客户端默认的Logger.LEVEL对象定义为NONE级别。该级别不吉利任何Feign调用过程中的信息,所以需要调整级别,针对全局日志调整,直接在启动类里调整如下,
package com.dxz.feign;

import org.springframework.boot.SpringApplication;
import org.springframework.boot.autoconfigure.SpringBootApplication;
import org.springframework.cloud.client.discovery.EnableDiscoveryClient;
import org.springframework.cloud.netflix.feign.EnableFeignClients;
import org.springframework.context.annotation.Bean;

import feign.Logger;

@SpringBootApplication
@EnableFeignClients
@EnableDiscoveryClient
public class ConsumerApplication {

    @Bean
    Logger.Level feignLoggerLevel() {
        return Logger.Level.FULL;
    }
    public static void main(String[] args) {
        SpringApplication.run(ConsumerApplication.class, args);
    }
}
如果是局部调整,可以为日志级别增加配置类,如下:
package com.dxz.feign;

import org.springframework.context.annotation.Bean;
import org.springframework.context.annotation.Configuration;

import feign.Logger;

@Configuration
public class FullLogConfiguation {

    @Bean
    Logger.Level feignLoggerLevel() {
        return Logger.Level.FULL;
    }

}
package com.dxz.feign.remote;

import org.springframework.cloud.netflix.feign.FeignClient;
import org.springframework.web.bind.annotation.RequestMapping;
import org.springframework.web.bind.annotation.RequestMethod;
import org.springframework.web.bind.annotation.RequestParam;

import com.dxz.feign.DisableHystrixConfiguration;
import com.dxz.feign.FullLogConfiguation;

//@FeignClient(name="compute-service", fallback=HelloServiceFallback.class)
//@FeignClient(name="compute-service",configuration=DisableHystrixConfiguration.class)
@FeignClient(name="compute-service", fallback=HelloServiceFallback.class, configuration=FullLogConfiguation.class)
public interface HelloService {

    @RequestMapping(value="/add", method = RequestMethod.GET)
    String hello(@RequestParam("a") Integer a, @RequestParam("b") Integer b, @RequestParam("sn") Integer sn);

}
测试结果:
==================================================
七、从源码中观察Feign中的可用配置项
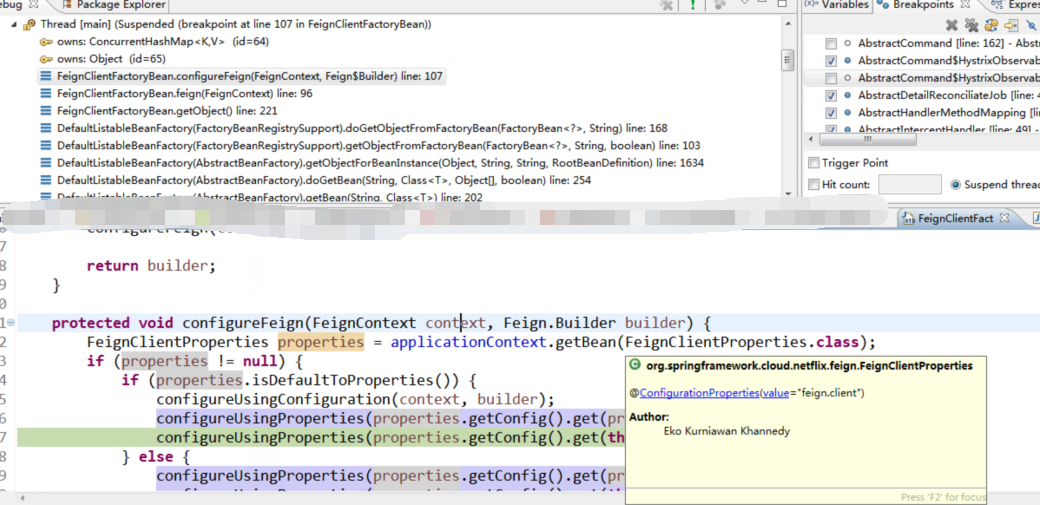
在Feign的配置类FeignClientFactoryBean.java中的这段代码里,加载的配置项有3次机会,一次一次的覆盖配置项,也就是越具体(比方指定服务名称)的配置就是最终生效的,也就是或定制化配置不同服务的目的。
protected void configureFeign(FeignContext context, Feign.Builder builder) {
        FeignClientProperties properties = applicationContext.getBean(FeignClientProperties.class);
        if (properties != null) {
            if (properties.isDefaultToProperties()) {
                configureUsingConfiguration(context, builder);                                               //配置1
                configureUsingProperties(properties.getConfig().get(properties.getDefaultConfig()), builder); //配置2
                configureUsingProperties(properties.getConfig().get(this.name), builder);                     //配置3
            } else {
                configureUsingProperties(properties.getConfig().get(properties.getDefaultConfig()), builder);
                configureUsingProperties(properties.getConfig().get(this.name), builder);
                configureUsingConfiguration(context, builder);
            }
        } else {
            configureUsingConfiguration(context, builder);
        }
    }
一、这些配置信息(配置项)来源哪里?
FeignClientProperties.java
@ConfigurationProperties("feign.client")
public class FeignClientProperties
也就是说feign.client开头的
//配置1 读取的feign包中默认的值,拿timeout来说,来源于feign.Request$Options.java的值(如果你的项目中没有覆盖的话)
    public Options() {
      this(10 * 1000, 60 * 1000);
    }
timeout的默认值分别是10s和60s。要覆盖这个默认值也简单,在RequestInterceptor的继承类中增加:
    @Bean
    Request.Options feignOptions() {
        return new Request.Options(60 * 1000, 60 * 1000);
    }

    @Bean
    Retryer feignRetryer() {
        return Retryer.NEVER_RETRY;
    }

    @Bean
    public Logger.Level feignLoggerLevel() {
        return Logger.Level.FULL;
    }
//配置2 properties.getDefaultConfig(),这个其实就是FeignClientProperties中的default了,也就是:
feign.client.config.default.connectTimeout: 1000
feign.client.config.default.readTimeout: 1000
//配置3 this.name,这个是模块名了例如被调用的模块tag
feign.client.config.tag.connectTimeout: 1000
feign.client.config.tag.readTimeout: 1000
配置的详细内容有:
    protected void configureUsingProperties(FeignClientProperties.FeignClientConfiguration config, Feign.Builder builder) {
        if (config == null) {
            return;
        }

        if (config.getLoggerLevel() != null) {                                    //执行配置1
            builder.logLevel(config.getLoggerLevel());
        }

        if (config.getConnectTimeout() != null && config.getReadTimeout() != null) {                    //执行配置2
            builder.options(new Request.Options(config.getConnectTimeout(), config.getReadTimeout()));
        }

        if (config.getRetryer() != null) {                                                                //执行配置3
            Retryer retryer = getOrInstantiate(config.getRetryer());
            builder.retryer(retryer);
        }

        if (config.getErrorDecoder() != null) {                                                           //执行配置4
            ErrorDecoder errorDecoder = getOrInstantiate(config.getErrorDecoder());
            builder.errorDecoder(errorDecoder);
        }

        if (config.getRequestInterceptors() != null && !config.getRequestInterceptors().isEmpty()) {      //执行配置5
            // this will add request interceptor to builder, not replace existing
            for (Class<RequestInterceptor> bean : config.getRequestInterceptors()) {
                RequestInterceptor interceptor = getOrInstantiate(bean);
                builder.requestInterceptor(interceptor);
            }
        }

        if (config.getDecode404() != null) {                                                               //执行配置6
            if (config.getDecode404()) {
                builder.decode404();
            }
        }
    }
从//执行配置2可知connectTimeout和readTimeout需要成对配置,否则不生效
8、Feign的timeout配置总结
大体上有两种方案,一种是通过设置 ribbon 的超时时间(因为 Feign 是基于 ribbon 来实现的,所以通过 ribbon 的超时时间设置也能达到目的),一种是直接设置 Feign 的超时时间,我将会在下边的篇幅里分别说一下如何通过application.yml 配置文件来设置超时时间。(注:这里是以 Feign 的默认客户端(Client.Default)来说的,如果重写了Feign的客户端,有可能导致部分配置不能生效)
1、ribbon的配置
对于 ribbon 又分为全局配置和指定服务配置:
1.1、全局配置
对所有的服务该配置都生效
ribbon:
    ReadTimeout: 30000 #单位毫秒
    ConnectTimeout: 30000 #单位毫秒
1.2、指定服务配置
下边代码中的 annoroad-beta 是服务的名称,意思是该配置只针对名为 annoroad-beta 的服务有效,根据实际的需要替换成你自己的服务名
tag:
  ribbon:
    ReadTimeout: 30000 #单位毫秒
    ConnectTimeout: 30000 #单位毫秒
与 Ribbon 一样,
2、Feign 也分为全局配置和指定服务配置:
2.1、全局配置
下边代码中使用的 feign.client.config.default ,意思是所有服务都采用该配置
feign.client.config.default.connectTimeout: 1000  #这两个要成对配置,否则无效
feign.client.config.default.readTimeout: 1000     #这两个要成对配置,否则无效
2.2、指定服务配置
下边代码中使用的 feign.client.config.annoroad-beta,意思是该配置只针对名为 annoroad-beta 的服务有效,可以根据实际的需要替换成你自己的服务名
feign.client.config.tag.readTimeout: 120000     #这两个要成对配置,否则无效
feign.client.config.tag.connectTimeout: 120000  #这两个要成对配置,否则无效
总结:
- 如果同时配置了Ribbon、Feign,那么 Feign 的配置将生效
- Ribbon 的配置要想生效必须满足微服务相互调用的时候通过注册中心,如果你是在本地通过 @FeignClient 注解的 url 参数进行服务相互调用的测试,此时 ribbon 设置的超时时间将会失效,但是通过 Feign 设置的超时时间不会受到影响(仍然会生效)
- 综上所述建议使用 Feign 的来设置超时时间
参考:
https://blog.csdn.net/yangchao1125/article/details/104410068
https://blog.csdn.net/xldmx/article/details/106557516

 浙公网安备 33010602011771号