


es之7:elastic search partial update
一、什么是partial update?
PUT /index/type/id,创建文档&替换文档,就是一样的语法1、查询更新全量方式
一般对应到应用程序中,每次的执行流程基本是这样的:(1)应用程序先发起一个get请求,获取到document,展示到前台界面,供用户查看和修改(2)用户在前台界面修改数据,发送到后台(3)后台代码,会将用户修改的数据在内存中进行执行,然后封装好修改后的全量数据(4)然后发送PUT请求,到es中,进行全量替换(5)es将老的document标记为deleted,然后重新创建一个新的document过程如下图: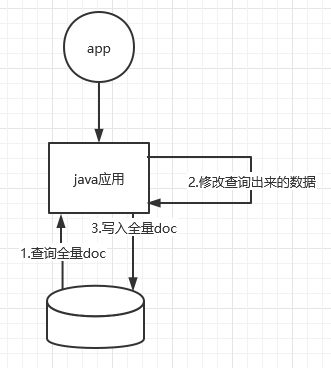
2、partial update方式
POST /index/type/id/_update{"doc": {"要修改的少数几个field即可,不需要全量的数据"}}PUT /test_index/test_type/10{"test_field1": "test1","test_field2": "test2"}POST /test_index/test_type/10/_update{"doc": {"test_field2": "updated test2"}}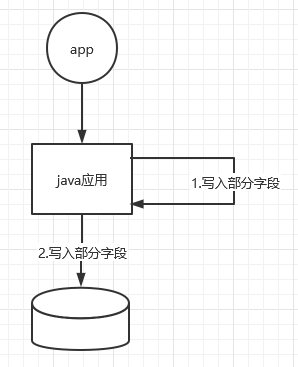
看起来,好像就比较方便了,每次就传递少数几个发生修改的field即可,不需要将全量的document数据发送过去
二、partial update实现原理
partial update直接将数据更新到document中就完成了修改,不用事先先发起一个GET请求数据进行修改然后在将修改后的数据发回去。
es内部:partial update的执行和全量替换一致。
(1)内部先get获取document
(2)将更新的field更新到document的json中
(3)将老的document标记为deleted
(4)创建新的document
三、partial update相较于应用层进行的全量替换的优点
优点:
(1)所有查询,修改和写回操作均发生在同一个shard内,避免了不必要的网络数据传输带来的开销(应用层实现的话,先查询,在java内存修改部分字段,再写回全量数据),大大提升了性能(减少了两次请求,一次GET请求,一次回写请求)
(2)减少修改和查询中的时间间隔(用户等待或者应用层耗时),partial update 在shard内部耗时毫秒级别。有效减少并发冲突的情况
(3)内置乐观锁并发控制
POST /test_index/test_type/id/_update?retry_on_conflict=2
{"doc": {"num":32}}如果更新失败,则获取最新的版本号再次进行更新,最多重试retry_on_conflict指定的次数
POST /test_index/test_type/11/_update?version=3
{"doc": {"num":32}}
三、基于groovy脚本执行partial update
es内部有个内置的脚步支持【elaticsearch scripting module】,可以基于groovy脚步实现各种各样的复杂操作,基于groovy脚步,如何执行partial update
1、内置脚本
示例:
PUT /test_index/test_type/11
 {    "num":0,
    "tags":[]
}
更新num字段:
PUT /test_index/test_type/_update
{
   "script": "ctx._source.num+=8"
}
结果:
{
  "_index" : "test_index",
  "_type" : "test_type",
  "_id" : "_update",
  "_version" : 1,
  "result" : "created",
  "_shards" : {
    "total" : 2,
    "successful" : 1,
    "failed" : 0
  },
  "_seq_no" : 0,
  "_primary_term" : 1
}
2、外部脚本
在Elasticsearch的安装目录下的\config\scripts内添加指定的groovy脚本
(1)添加脚本 test_update_num.groovy
脚本代码:
ctx._source.num+=1
执行脚本:
POST /test_index/test_type/11/_update{"script": {"lang": "groovy","file": "test_update_num"}}
( 2)添加脚本:test-add-tags.groovy
脚本代码:ctx._source.tags+=new_tag
执行脚本:
POST /test_index/test_type/11/_update
{"script": {"lang": "groovy","file": "test-add-tags","params": {"new_tag":"tag_value"}}}
( 3)添加脚本:test-delete-document.groovy
脚本代码:
ctx.op=ctx._source.num==count?"delete":'none'
执行脚本:
POST /test_index/test_type/11/_update{"script": {"lang": "groovy","file": "test-delete-document","params": {"count":17}}}
(4)upsert操作
如果指定的document不存在,就执行upsert中的初始化操作;如果指定的document存在,就执行doc或者script指定的partial update操作
POST /test_index/test_type/11/_update{"script" : "ctx._source.num+=1","upsert": {"num": 0,"tags": []}}
转:https://apppukyptrl1086.h5.xiaoeknow.com/v1/course/video/v_611b1747e4b0a27d0e3e86e4?type=2&pro_id=p_611b0c12e4b0a27d0e3e7ef3&from_multi_course=1

 浙公网安备 33010602011771号