

使用RestDocs生成Contracts
可以使用Spring RestDocs生成Spring Cloud Contract DSL文件和文档。如果您将其与Spring Cloud WireMock相结合,那么您将获得合同和存根。
为什么要使用此功能?社区中的一些人问关于他们希望转移到基于DSL的合同定义的情况,但他们已经很多SpringMVC测试。使用此功能可以生成合同文件,稍后可以修改并移动到文件夹(在配置中定义),以便插件找到它们。
提示您可能会想知道为什么该功能在WireMock模块中。来想一想,它确实有道理,因为只生成合同并且不生成存根就没有意义。这就是为什么我们建议做这两个。
我们来想象下面的测试:
首先一个controller如下:
@RestController
@RequestMapping("/test")
public class TestController {


    @ApiOperation("Generating Contracts with REST Docs")
    @PostMapping("/doc")
    public RespResult<ReqDto> openAccount(@RequestBody ReqDto req) {
        Bar bar = req.new Bar();
        bar.setB("c");
        bar.setC("e");
        req.setBar(bar);
        return RespUtil.success(req);
    }
}

public class ReqDto {
    private String foo;
    private Bar bar;

    public String getFoo() {
        return foo;
    }

    public void setFoo(String foo) {
        this.foo = foo;
    }

    public Bar getBar() {
        return bar;
    }

    public void setBar(Bar bar) {
        this.bar = bar;
    }

    public class Bar {
        private String b;
        private String c;

        public String getB() {
            return b;
        }

        public void setB(String b) {
            this.b = b;
        }

        public String getC() {
            return c;
        }

        public void setC(String c) {
            this.c = c;
        }

    }
}
假设我们的项目里有个这么一个简单的RESTFUL接口,现在为该接口编写契约测试。
使用Spring REST Docs有如下几步:
步骤1:准备jar
    testCompile 'org.springframework.cloud:spring-cloud-starter-contract-verifier'
    testCompile 'org.springframework.cloud:spring-cloud-starter-contract-stub-runner'
    implementation 'org.springframework.restdocs:spring-restdocs-mockmvc:1.2.0.RELEASE'
    implementation 'org.springframework.restdocs:spring-restdocs-asciidoctor:1.2.0.RELEASE'
    implementation 'org.springframework.restdocs:spring-restdocs-core:1.2.0.RELEASE'
上面的红色部分是restdocs需要的,另外注意版本号,我的springboot版本是1.5的,restdocs必须要是1.2.0的否则会报这个错误:
java.lang.NoSuchMethodError: org.springframework.restdocs.operation.OperationRequestFactory.create(Ljava/net/URI;Lorg/springframework/http/HttpMethod;[BLorg/springframework/http/HttpHeaders;Lorg/springframework/restdocs/operation/Parameters;Ljava/util/Collection;Ljava/util/Collection;)Lorg/springframework/restdocs/operation/OperationRequest;
    at org.springframework.restdocs.mockmvc.MockMvcRequestConverter.convert(MockMvcRequestConverter.java:79)
    at org.springframework.restdocs.mockmvc.MockMvcRequestConverter.convert(MockMvcRequestConverter.java:57)
步骤2:编写ContractRestDocsApplicationTests.java的junit类
import static org.springframework.restdocs.mockmvc.MockMvcRestDocumentation.document;
import static org.springframework.test.web.servlet.request.MockMvcRequestBuilders.get;
import static org.springframework.test.web.servlet.request.MockMvcRequestBuilders.post;
import static org.springframework.test.web.servlet.result.MockMvcResultMatchers.content;
import static org.springframework.test.web.servlet.result.MockMvcResultMatchers.status;

import org.junit.Test;
import org.junit.runner.RunWith;
import org.springframework.beans.factory.annotation.Autowired;
import org.springframework.boot.test.autoconfigure.restdocs.AutoConfigureRestDocs;
import org.springframework.boot.test.autoconfigure.web.servlet.AutoConfigureMockMvc;
import org.springframework.boot.test.context.SpringBootTest;
import org.springframework.cloud.contract.wiremock.restdocs.SpringCloudContractRestDocs;
import org.springframework.cloud.contract.wiremock.restdocs.WireMockRestDocs;
import org.springframework.http.MediaType;
import org.springframework.test.context.junit4.SpringRunner;
import org.springframework.test.web.servlet.MockMvc;
import org.springframework.restdocs.snippet.Snippet;

@RunWith(SpringRunner.class)
 @SpringBootTest
 @AutoConfigureRestDocs(outputDir = "target/snippets")
 @AutoConfigureMockMvc
 public class ContractRestDocsApplicationTests {

     @Autowired
     private MockMvc mockMvc;

     @Test
     public void contextLoads() throws Exception {
     this.mockMvc.perform(post("/test/doc")
          .accept(MediaType.APPLICATION_JSON)
          .header("countryCode", "NG")
          .contentType(MediaType.APPLICATION_JSON)
          //.param("memberId", "abc123"))
          .content("{\"foo\": 23 }"))
     .andExpect(status().isOk())
     .andExpect(content().string("{\"respCode\":\"00000000\",\"respMsg\":\"success\",\"data\":{\"foo\":\"23\",\"bar\":{\"b\":\"c\",\"c\":\"e\"}}}"))
     // first WireMock
     //.andDo(//WireMockRestDocs.verify()
          //.jsonPath("$[?(@.foo >= 20)]")
          //.contentType(MediaType.valueOf("application/json"))
             //)
     // then Contract DSL documentation
     .andDo(document("index", SpringCloudContractRestDocs.dslContract()));
     }
}
步骤3:运行上面的junit类
运行成功后,看target目录:
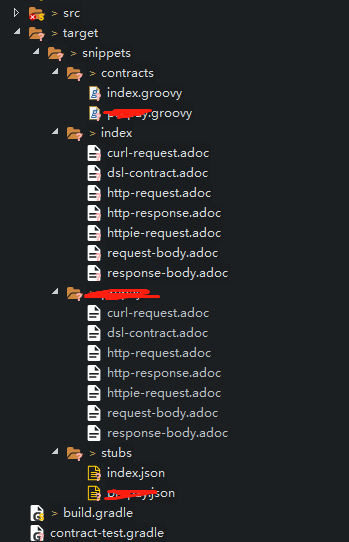
上面的示例中,为index生成了index.groovy文件,index目录(生成的文档asciidoc的示例),stubs下的index.json存根。
生成的index.groovy的DSL文件如下:
import org.springframework.cloud.contract.spec.Contract

Contract.make {
    request {
        method 'POST'
        url '/test/doc'
        body('''
            {"foo": 23 }
        ''')
        headers {
            header('''Content-Type''', '''application/json;charset=UTF-8''')
            header('''Accept''', '''application/json''')
            header('''countryCode''', '''NG''')
        }
    }
    response {
        status 200
        body('''
        {"respCode":"00000000","respMsg":"success","data":{"foo":"23","bar":{"b":"c","c":"e"}}}
        ''')
        headers {
            header('''X-Application-Context''', '''loan:dev:-1''')
            header('''Content-Type''', '''application/json;charset=UTF-8''')
        }
    }
}
生成的index.json如下:
{
  "id" : "2f825cf9-3668-478a-9c18-8c881898f110",
  "request" : {
    "url" : "/test/doc",
    "method" : "POST",
    "headers" : {
      "Content-Type" : {
        "equalTo" : "application/json;charset=UTF-8"
      },
      "Accept" : {
        "equalTo" : "application/json"
      },
      "countryCode" : {
        "equalTo" : "NG"
      }
    },
    "bodyPatterns" : [ {
      "equalToJson" : "{\"foo\": 23 }"
    } ]
  },
  "response" : {
    "status" : 200,
    "body" : "{\"respCode\":\"00000000\",\"respMsg\":\"success\",\"data\":{\"foo\":\"23\",\"bar\":{\"b\":\"c\",\"c\":\"e\"}}}",
    "headers" : {
      "X-Application-Context" : "loan:dev:-1",
      "Content-Type" : "application/json;charset=UTF-8"
    }
  },
  "uuid" : "2f825cf9-3668-478a-9c18-8c881898f110"
}

 浙公网安备 33010602011771号