

ES之一:Elasticsearch入门相关(版本兼容、安装问题)
一、elasticsearch版本与jdk版本对应关系
2020年3月27日更新

二、Transport Client和Rest Client对比
所有Elasticsearch操作都是使用Client对象执行的。Client 定义的所有API都是异步执行的。(要么使用事件监听器回调或者使用Future模式)
Elasticsearch计划在Elasticsearch 7.0中弃用TransportClient,在8.0中完全删除它。故在实际使用过程中建议您使用Java高级REST client。Rest client执行HTTP请求来执行操作,无需再序列化的Java请求。
按照官方的意思,以后ElasticSearch应该不会再为某一种具体语言单独提供客户端API,而是使用通用rest请求(http)来ElasticSearch服务器进行交互。
接下来我们会从java api开始进入ElasticSearch API的学习。
ElasticSearch Client按照编程语言提供如下实现:
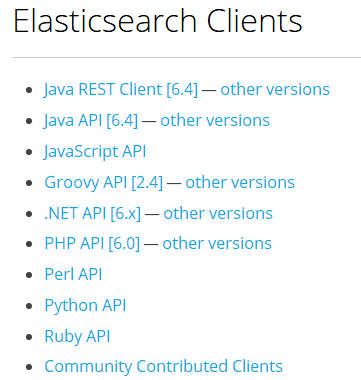
官方文档链接:https://www.elastic.co/guide/en/elasticsearch/client/index.html
接下来将重点分析JAVA Client与Java REST Client。
2、TransportClient详解
2.1 TransportClient概述
TransportClient 是ElasticSearch(java)客户端封装对象,使用transport模块远程连接到Elasticsearch集群,该transport node并不会加入集群,而是简单的向ElasticSearch集群上的节点发送请求。transport node使用轮询机制进行集群内的节点进行负载均衡,尽管大多数操作(请求)可能是“两跳操作”。(图片来源于Elasticsearch权威指南)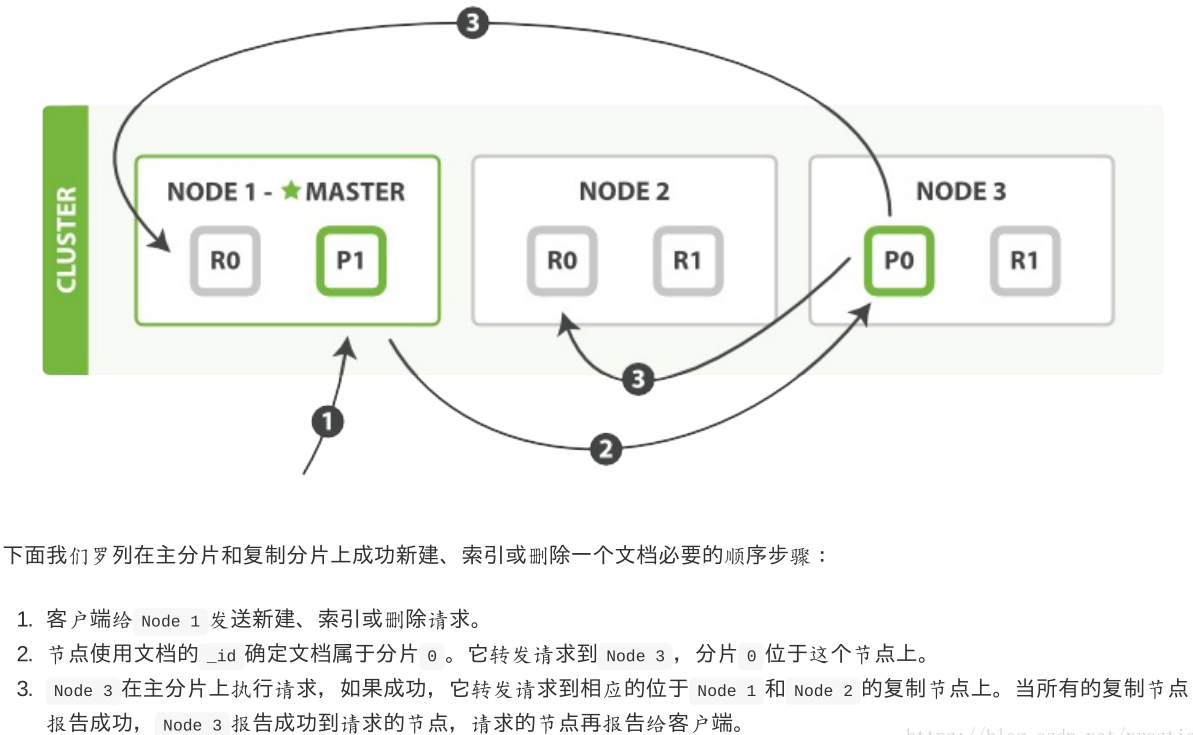
正如上述图所述,以一个新建操作为例,第一个请求首先发送到NODE1,然后会根据ID进行路由计算(hashcode(id)%主分片个数),例如使用p0(第一个主分片),此时NODE1会将请求转发到Node3,然后客户端发送第二个请求,会发送到NODE2上(上文中的轮询机制)。
默认构建TransportClient的方法如下:
// on startup
TransportClient client = new PreBuiltTransportClient(Settings.EMPTY)    // @1
        .addTransportAddress(new TransportAddress(InetAddress.getByName("192.168.1.10"), 9300))     // @2
        .addTransportAddress(new TransportAddress(InetAddress.getByName("192.168.1.11"), 9300));
 // on shutdown
 client.close();
代码@1:使用空配置。
代码@2:连接ElasticSearch 节点,可以通过addTransportAddress方法连接多个Node节点,这样请求会轮流发送到这些节点上,实现集群节点在接受请求时的负载均衡。
TransportClient级别的主要参数如下:
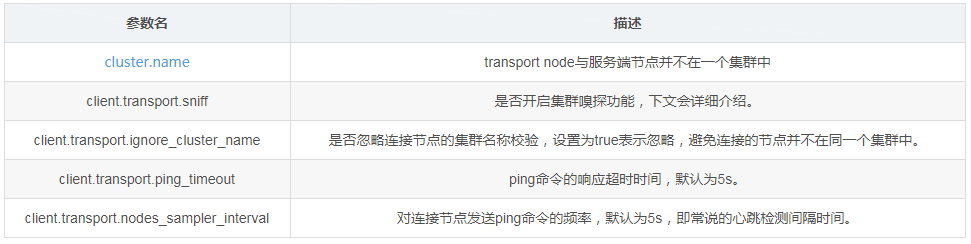
接下来重点描述一下client.transport.sniff参数,集群群嗅探机制。
在创建TransportClient时可以通过addTransportAddress来静态的增加ElasticSearch集群中的节点,如果开启集群群嗅探机制,即开启节点动态发现机制,允许动态添加和删除节点。当启用嗅探功能时,首先客户端会连接addTransportAddress中的节点上。在此之后,客户端将调用这些节点上的内部集群状态API来发现可用的数据节点。客户端的内部节点列表将仅被发现的数据数据节点替换。默认情况下,这个列表每5秒刷新一次。也就意味着如果该节点不是数据节点,则列表可能不包括它连接的原始节点。例如,如果您最初连接到一个主节点,在嗅探之后,如果发现了有其对应的数据节点,则不会再向该主节点发出请求,而是向任何数据节点发出请求。传输客户端排除非数据节点的原因是为了避免只向主节点发送搜索流量。
使用配置构建Settings构建TransportClient对象代码如下:
Settings settings = Settings.builder()
   .put("cluster.name", "myClusterName")
        .put("client.transport.sniff", "true").build();
TransportClient client = new PreBuiltTransportClient(settings)
   .addTransportAddress(new TransportAddress(InetAddress.getByName("192.168.1.10"), 9300))  ;
 //Add transport addresses and do something with the client...
2.2、TransportClient API
TransportClient 的核心类继承图如下:
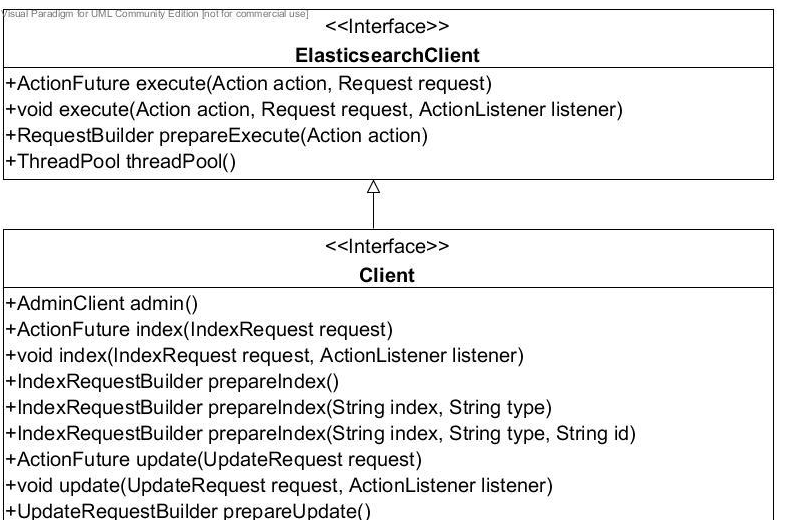
上述API的设计要点:
整个客户端API提供两个最底层的方法,execute,其关键特征如下:
ActionFuture execute(Action<Request, Response, RequestBuilder> action, Request request);
返回ActionFuture,根据名称即可知道,该方法是典型的异步调用,Future模式。
void execute(Action<Request, Response, RequestBuilder> action, Request request, ActionListener listener);
无返回值,但需要传入ActionListener listener,同样根据名称即可知道,该参数的作用是事件监听器(回调方法),也就是收到服务端响应后,调用回调函数,进行结果处理。
注意:ElasticSearch Client API 其本质是使用异步请求模式。
prepare 开头的方法,例如IndexRequestBuilder prepareIndex()
这类API的设计是使用Build模式,先通过build构建请求参数,最终会通过调用get()方法完成接口调用。
TransportClient Api就先解释到这里了,后续会详细对上述API进行分类详解。
2.3 Maven依懒
<dependency>
    <groupId>org.elasticsearch.client</groupId>
    <artifactId>transport</artifactId>
    <version>6.4.1</version>
</dependency>
<dependency>
    <groupId>org.apache.logging.log4j</groupId>
    <artifactId>log4j-core</artifactId>
    <version>2.11.1</version>
</dependency>
3、Java Rest Client详解
Java REST客户端有两种风格:
Java Low Level REST Client:elasticsearch client 低级别客户端。它允许通过http请求与Elasticsearch集群进行通信。API本身不负责数据的编码解码,由用户去编码解码。它与所有的ElasticSearch版本兼容。
Java High Level REST Client:Elasticsearch client官方高级客户端。基于低级客户端,它定义的API,已经对请求与响应数据包进行编码解码。
3.1 Java High Level REST Client
3.1.1 初始化
RestHighLevelClient client = new RestHighLevelClient(
        RestClient.builder(
                new HttpHost("localhost", 9200, "http"),
                new HttpHost("localhost", 9201, "http")));

// close
client.close();
new HttpHost(“localhost”, 9200, “http”)其机制与TransportClient的addTransportAddress的作用一致。
3.1.2 核心API依懒
RestHighLevelClient 的类图 如下:
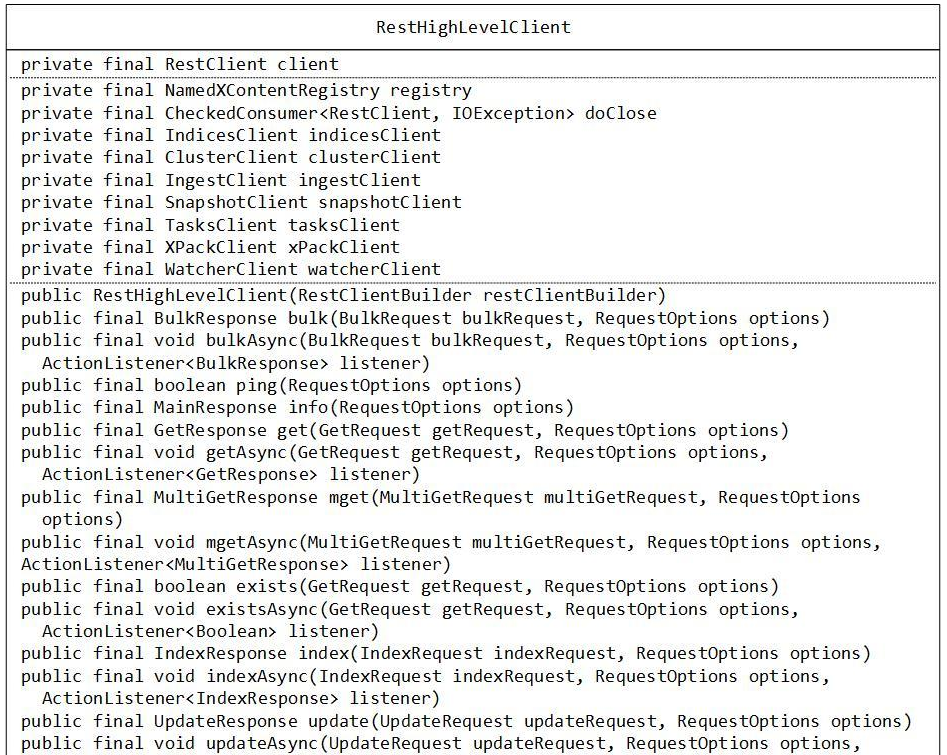
其API设计具有如下特征:
每个API提供同步与异步调用,方法名以async结尾的方法为异步调用,需要提供对应的ActionListener实现。
每个API都可以提供RequestOptions对象来定制请求选型。
本节将不会对上述API一一介绍,上述API会在后续文章中详细解析。
3.1.3 Maven依懒
<dependency>
        <groupId>org.elasticsearch.client</groupId>
        <artifactId>elasticsearch-rest-client</artifactId>
        <version>6.4.0</version>
</dependency>
 <dependency>
        <groupId>org.elasticsearch.client</groupId>
        <artifactId>elasticsearch-rest-high-level-client</artifactId>
        <version>6.4.0</version>
         <type>pom</type>
</dependency>
本文就先介绍到这里了,详细分析介绍了Elasticsearch两大客户端 TransportClient与RestHighLevelClient ,后续文章会详细介绍各个API,例如文档的索引、更新、查询、删除、批量查询,Search API等。
elasticsearch安装 及 启动异常解决
虚拟机使用net连接模式
1
Download and unzip the latest Elasticsearch distribution
2
Run bin/elasticsearch on Unix or bin\elasticsearch.bat on Windows
3
Run curl -X GET http://localhost:9200/
官网 :www.elastic.co
包含 安装介质 和 权威指南
1下载
elasticsearch 下载地址: https://www.elastic.co/cn/downloads/elasticsearch
linux 对应版本 elasticsearch-7.0.0-rc2-linux-x86_64.tar.gz 大小330 MB
2建用户
useradd es
passwd es
123456
es/123456
3上传到虚拟机
put elasticsearch-7.0.0-rc2-linux-x86_64.tar.gz
4解压
tar -zxvf elasticsearch-7.0.0-rc2-linux-x86_64.tar.gz
启动
cd elasticsearch-7.0.0-rc2/bin
./elasticsearch
5警告跳过
unable to install syscall filter:
java.lang.UnsupportedOperationException: seccomp unavailable: requires kernel 3.5+ with CONFIG_SECCOMP and CONFIG_SECCOMP_FILTER compiled in
6检验
http://localhost:9200/
{
"name" : "localhost.localdomain",
"cluster_name" : "elasticsearch",
"cluster_uuid" : "WuVD9aKLTYyt_XbWbxZxAg",
"version" : {
"number" : "7.0.0-rc2",
"build_flavor" : "default",
"build_type" : "tar",
"build_hash" : "f076a79",
"build_date" : "2019-04-02T17:20:40.380908Z",
"build_snapshot" : false,
"lucene_version" : "8.0.0",
"minimum_wire_compatibility_version" : "6.7.0",
"minimum_index_compatibility_version" : "6.0.0-beta1"
},
"tagline" : "You Know, for Search"
}
遇到得问题
7 http://ip:9200/ 无法访问
vim config/elasticsearch.yml
# 增加
network.host: 0.0.0.0
8重启 es 异常
ERROR: [5] bootstrap checks failed
[1]: max file descriptors [4096] for elasticsearch process is too low, increase to at least [65535]
[2]: max number of threads [1024] for user [es] is too low, increase to at least [4096]
[3]: max virtual memory areas vm.max_map_count [65530] is too low, increase to at least [262144]
[4]: failed to install; check the logs and fix your configuration or disable system call filters at your own risk
[5]: the default discovery settings are unsuitable for production use; at least one of [discovery.seed_hosts, discovery.seed_providers, cluster.initial_master_nodes] must be configured
[2019-04-09T09:51:29,228][INFO ][o.e.n.Node ] [localhost.localdomain] stopping ...
[2019-04-09T09:51:29,264][INFO ][o.e.n.Node ] [localhost.localdomain] stopped
[2019-04-09T09:51:29,265][INFO ][o.e.n.Node ] [localhost.localdomain] closing ...
[2019-04-09T09:51:29,320][INFO ][o.e.n.Node ] [localhost.localdomain] closed
[2019-04-09T09:51:29,323][INFO ][o.e.x.m.p.NativeController] [localhost.localdomain] Native controller process has stopped - no new native processes can be started
切换root用户
vi /etc/security/limits.conf
在倒数第二行
* soft nofile 65536
* hard nofile 65536
# End of file
vi /etc/sysctl.conf
添加
vm.max_map_count=655360
保存后执行
sysctl -p
重启es 异常
ERROR: [3] bootstrap checks failed
[1]: max number of threads [1024] for user [es] is too low, increase to at least [4096]
[2]: system call filters failed to install; check the logs and fix your configuration or disable system call filters at your own risk
[3]: the default discovery settings are unsuitable for production use; at least one of [discovery.seed_hosts, discovery.seed_providers, cluster.initial_master_nodes] must be configured
vi /etc/security/limits.d/90-nproc.conf
修改
* soft nproc 1024
为
* soft nproc 4096
重启es 异常
ERROR: [2] bootstrap checks failed
[1]: system call filters failed to install; check the logs and fix your configuration or disable system call filters at your own risk
[2]: the default discovery settings are unsuitable for production use; at least one of [discovery.seed_hosts, discovery.seed_providers, cluster.initial_master_nodes] must be configured
在 elasticsearch.yml中添加配置项:bootstrap.system_call_filter为false:
bootstrap.memory_lock: false
bootstrap.system_call_filter: false
重启es 异常
ERROR: [1] bootstrap checks failed
[1]: the default discovery settings are unsuitable for production use; at least one of [discovery.seed_hosts, discovery.seed_providers, cluster.initial_master_nodes] must be configured
修改
elasticsearch.yml
取消注释保留一个节点
cluster.initial_master_nodes: ["node-1"]
这个的话,这里的node-1是上面一个默认的记得打开就可以了
重启 正常
jvm内存分配的问题heap size [268435456] not equal to maximum heap size [2147483648],需要修改的jvm配置
*此操作需要root权限
[root@localhost ~]# sysctl -w vm.max_map_count=262144
查看修改
[root@localhost ~]# sysctl -a|grep vm.max_map_count
vm.max_map_count = 262144
或者永久性修改
[root@localhost ~]# cat /etc/sysctl.conf | grep -v "vm.max_map_count" > /tmp/system_sysctl.conf
[root@localhost ~]# echo "vm.max_map_count=262144" >> /tmp/system_sysctl.conf
[root@localhost ~]# mv /tmp/system_sysctl.conf /etc/sysctl.conf
mv:是否覆盖"/etc/sysctl.conf"? y
[root@localhost ~]# cat /etc/sysctl.conf
# System default settings live in /usrb/sysctl.d/00-system.conf.
# To override those settings, enter new settings here, or in an /etc/sysctl.d/<name>.conf file
#
# For more information, see sysctl.conf(5) and sysctl.d(5).
vm.max_map_count=262144
[root@localhost ~]# sysctl -p
vm.max_map_count = 262144
————————————————
版权声明:本文为CSDN博主「happyzxs」的原创文章,遵循 CC 4.0 BY-SA 版权协议,转载请附上原文出处链接及本声明。
原文链接:https://blog.csdn.net/happyzxs/article/details/89156068
原文链接:https://blog.csdn.net/prestigeding/article/details/83188043

 浙公网安备 33010602011771号