
LRU原理和Redis实现——一个今日头条的面试题(转载)
很久前参加过今日头条的面试,遇到一个题,目前半部分是如何实现 LRU,后半部分是 Redis 中如何实现 LRU。
我的第一反应是操作系统课程里学过,应该是内存不够的场景下,淘汰旧内容的策略。LRU ... Least Recent Used,淘汰掉最不经常使用的。可以稍微多补充两句,因为计算机体系结构中,最大的最可靠的存储是硬盘,它容量很大,并且内容可以固化,但是访问速度很慢,所以需要把使用的内容载入内存中;内存速度很快,但是容量有限,并且断电后内容会丢失,并且为了进一步提升性能,还有CPU内部的 L1 Cache,L2 Cache等概念。因为速度越快的地方,它的单位成本越高,容量越小,新的内容不断被载入,旧的内容肯定要被淘汰,所以就有这样的使用背景。
LRU原理
在一般标准的操作系统教材里,会用下面的方式来演示 LRU 原理,假设内存只能容纳3个页大小,按照 7 0 1 2 0 3 0 4 的次序访问页。假设内存按照栈的方式来描述访问时间,在上面的,是最近访问的,在下面的是,最远时间访问的,LRU就是这样工作的。

但是如果让我们自己设计一个基于 LRU 的缓存,这样设计可能问题很多,这段内存按照访问时间进行了排序,会有大量的内存拷贝操作,所以性能肯定是不能接受的。
那么如何设计一个LRU缓存,使得放入和移除都是 O(1) 的,我们需要把访问次序维护起来,但是不能通过内存中的真实排序来反应,有一种方案就是使用双向链表。
基于 HashMap 和 双向链表实现 LRU 的
整体的设计思路是,可以使用 HashMap 存储 key,这样可以做到 save 和 get key的时间都是 O(1),而 HashMap 的 Value 指向双向链表实现的 LRU 的 Node 节点,如图所示。
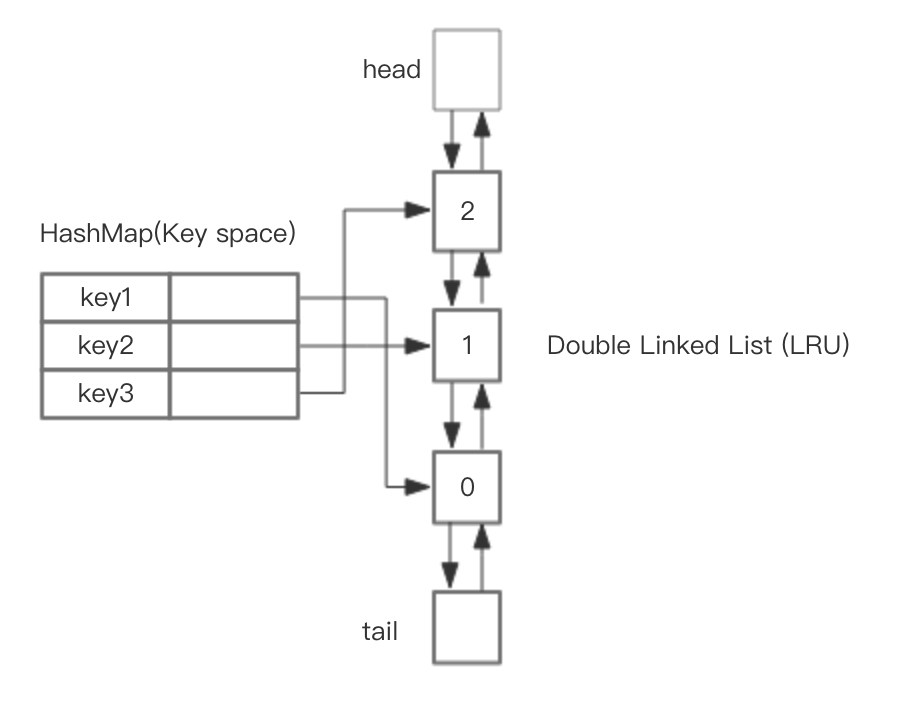
LRU 存储是基于双向链表实现的,下面的图演示了它的原理。其中 h 代表双向链表的表头,t 代表尾部。首先预先设置 LRU 的容量,如果存储满了,可以通过 O(1) 的时间淘汰掉双向链表的尾部,每次新增和访问数据,都可以通过 O(1)的效率把新的节点增加到对头,或者把已经存在的节点移动到队头。
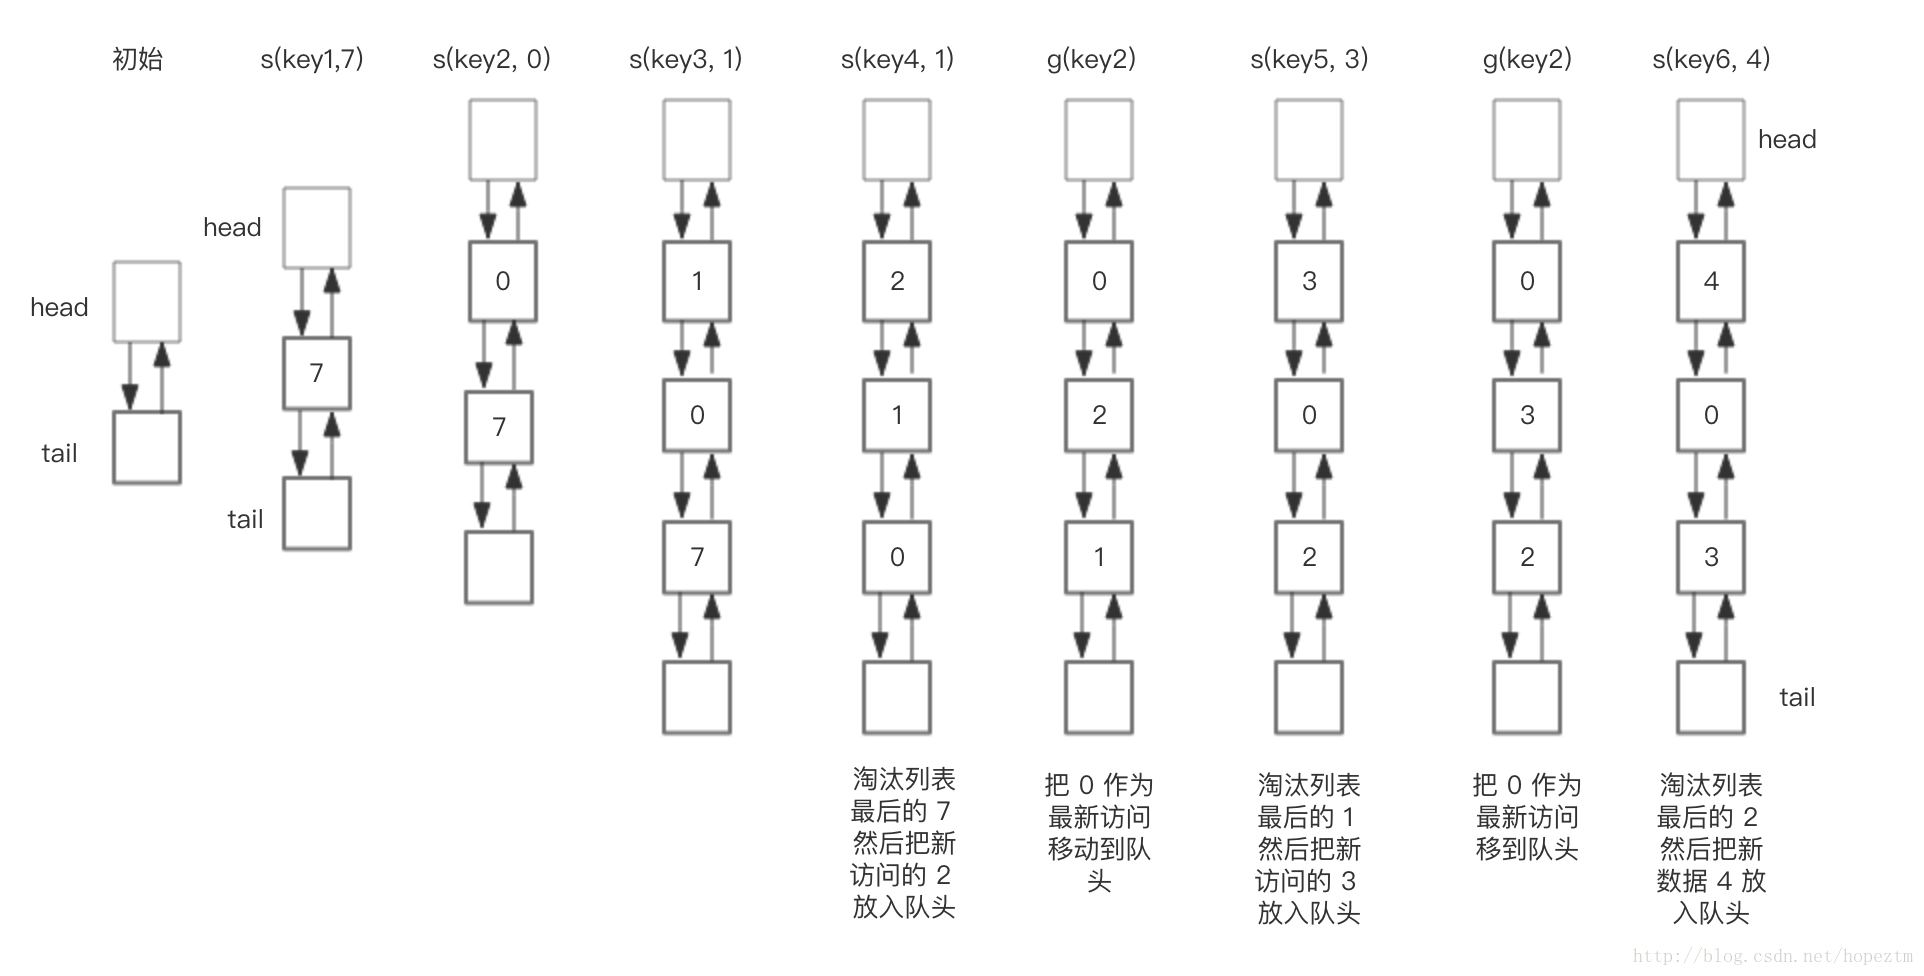
下面展示了,预设大小是 3 的,LRU存储的在存储和访问过程中的变化。为了简化图复杂度,图中没有展示 HashMap部分的变化,仅仅演示了上图 LRU 双向链表的变化。我们对这个LRU缓存的操作序列如下:
save("key1", 7)
save("key2", 0)
save("key3", 1)
save("key4", 2)
get("key2")
save("key5", 3)
get("key2")
save("key6", 4)
相应的 LRU 双向链表部分变化如下:
总结一下核心操作的步骤:
- save(key, value),首先在 HashMap 找到 Key 对应的节点,如果节点存在,更新节点的值,并把这个节点移动队头。如果不存在,需要构造新的节点,并且尝试把节点塞到队头,如果LRU空间不足,则通过 tail 淘汰掉队尾的节点,同时在 HashMap 中移除 Key。
- get(key),通过 HashMap 找到 LRU 链表节点,把节点插入到队头,返回缓存的值。
完整基于 Java 的代码参考如下
-
class DLinkedNode {
-
String key;
-
int value;
-
DLinkedNode pre;
-
DLinkedNode post;
-
}
LRU Cache
-
public class LRUCache {
-
-
private Hashtable<Integer, DLinkedNode>
-
cache = new Hashtable<Integer, DLinkedNode>();
-
private int count;
-
private int capacity;
-
private DLinkedNode head, tail;
-
-
public LRUCache(int capacity) {
-
this.count = 0;
-
this.capacity = capacity;
-
-
head = new DLinkedNode();
-
head.pre = null;
-
-
tail = new DLinkedNode();
-
tail.post = null;
-
-
head.post = tail;
-
tail.pre = head;
-
}
-
-
public int get(String key) {
-
-
DLinkedNode node = cache.get(key);
-
if(node == null){
-
return -1; // should raise exception here.
-
}
-
-
// move the accessed node to the head;
-
this.moveToHead(node);
-
-
return node.value;
-
}
-
-
-
public void set(String key, int value) {
-
DLinkedNode node = cache.get(key);
-
-
if(node == null){
-
-
DLinkedNode newNode = new DLinkedNode();
-
newNode.key = key;
-
newNode.value = value;
-
-
this.cache.put(key, newNode);
-
this.addNode(newNode);
-
-
++count;
-
-
if(count > capacity){
-
// pop the tail
-
DLinkedNode tail = this.popTail();
-
this.cache.remove(tail.key);
-
--count;
-
}
-
}else{
-
// update the value.
-
node.value = value;
-
this.moveToHead(node);
-
}
-
}
-
/**
-
* Always add the new node right after head;
-
*/
-
private void addNode(DLinkedNode node){
-
node.pre = head;
-
node.post = head.post;
-
-
head.post.pre = node;
-
head.post = node;
-
}
-
-
/**
-
* Remove an existing node from the linked list.
-
*/
-
private void removeNode(DLinkedNode node){
-
DLinkedNode pre = node.pre;
-
DLinkedNode post = node.post;
-
-
pre.post = post;
-
post.pre = pre;
-
}
-
-
/**
-
* Move certain node in between to the head.
-
*/
-
private void moveToHead(DLinkedNode node){
-
this.removeNode(node);
-
this.addNode(node);
-
}
-
-
// pop the current tail.
-
private DLinkedNode popTail(){
-
DLinkedNode res = tail.pre;
-
this.removeNode(res);
-
return res;
-
}
-
}
那么问题的后半部分,是 Redis 如何实现,这个问题这么问肯定是有坑的,那就是redis肯定不是这样实现的。
Redis的LRU实现
如果按照HashMap和双向链表实现,需要额外的存储存放 next 和 prev 指针,牺牲比较大的存储空间,显然是不划算的。所以Redis采用了一个近似的做法,就是随机取出若干个key,然后按照访问时间排序后,淘汰掉最不经常使用的,具体分析如下:
为了支持LRU,Redis 2.8.19中使用了一个全局的LRU时钟,server.lruclock,定义如下,
-
-
unsigned lruclock:REDIS_LRU_BITS; /* Clock for LRU eviction */
默认的LRU时钟的分辨率是1秒,可以通过改变REDIS_LRU_CLOCK_RESOLUTION宏的值来改变,Redis会在serverCron()中调用updateLRUClock定期的更新LRU时钟,更新的频率和hz参数有关,默认为100ms一次,如下,
-
-
-
-
void updateLRUClock(void) {
-
server.lruclock = (server.unixtime / REDIS_LRU_CLOCK_RESOLUTION) &
-
REDIS_LRU_CLOCK_MAX;
-
}
server.unixtime是系统当前的unix时间戳,当 lruclock 的值超出REDIS_LRU_CLOCK_MAX时,会从头开始计算,所以在计算一个key的最长没有访问时间时,可能key本身保存的lru访问时间会比当前的lrulock还要大,这个时候需要计算额外时间,如下,
-
/* Given an object returns the min number of seconds the object was never
-
* requested, using an approximated LRU algorithm. */
-
unsigned long estimateObjectIdleTime(robj *o) {
-
if (server.lruclock >= o->lru) {
-
return (server.lruclock - o->lru) * REDIS_LRU_CLOCK_RESOLUTION;
-
} else {
-
return ((REDIS_LRU_CLOCK_MAX - o->lru) + server.lruclock) *
-
REDIS_LRU_CLOCK_RESOLUTION;
-
}
-
}
Redis支持和LRU相关淘汰策略包括,
volatile-lru设置了过期时间的key参与近似的lru淘汰策略allkeys-lru所有的key均参与近似的lru淘汰策略
当进行LRU淘汰时,Redis按如下方式进行的,
-
......
-
/* volatile-lru and allkeys-lru policy */
-
else if (server.maxmemory_policy == REDIS_MAXMEMORY_ALLKEYS_LRU ||
-
server.maxmemory_policy == REDIS_MAXMEMORY_VOLATILE_LRU)
-
{
-
for (k = 0; k < server.maxmemory_samples; k++) {
-
sds thiskey;
-
long thisval;
-
robj *o;
-
-
de = dictGetRandomKey(dict);
-
thiskey = dictGetKey(de);
-
/* When policy is volatile-lru we need an additional lookup
-
* to locate the real key, as dict is set to db->expires. */
-
if (server.maxmemory_policy == REDIS_MAXMEMORY_VOLATILE_LRU)
-
de = dictFind(db->dict, thiskey);
-
o = dictGetVal(de);
-
thisval = estimateObjectIdleTime(o);
-
-
/* Higher idle time is better candidate for deletion */
-
if (bestkey == NULL || thisval > bestval) {
-
bestkey = thiskey;
-
bestval = thisval;
-
}
-
}
-
}
-
......
Redis会基于server.maxmemory_samples配置选取固定数目的key,然后比较它们的lru访问时间,然后淘汰最近最久没有访问的key,maxmemory_samples的值越大,Redis的近似LRU算法就越接近于严格LRU算法,但是相应消耗也变高,对性能有一定影响,样本值默认为5。
总结
看来,虽然一个简单的概念,在工业界的产品中,为了追求空间的利用率,也会采用权衡的实现方案。
传送门 https://zhuanlan.zhihu.com/p/34133067
原文:https://blog.csdn.net/hopeztm/article/details/79547052
关于linkedhashmap实现LRU:https://www.cnblogs.com/lzrabbit/p/3734850.html

 浙公网安备 33010602011771号