
linux权限管理
学习目标
1、为什么要设置权限
2、linux中和权限有关的操作
3、文件、文件夹的读、写、执行权限
4、文件、文件夹的属主、属组
5、特殊权限扩展(suid、sgid、sbit)
6、ACL的重要性
7、umask
8、特殊属性(chattr、lsattr)
一、权限
1、什么是权限
我都知道linux是多用户、多任务的,当于超、张三、李四,一起使用linux服务器时,他们对机器上的文件操作,权限都是怎么样的,所有文件都是可以读取、写入、修改、执行的吗?
要不要做权限限制,保护系统安全,保护数据安全?
在linux中,一切皆文件,我们要对文件进行读取、写入、执行(脚本程序文件)。
2、为什么要权限
1、保护服务器数据、文件、进程等
2、不要莫名其妙的背黑锅,权限限制(你作为运维,要限制其他用户的权限,不要伤害你的机器,否则你就背黑锅)
3、针对不同部门,不同员工的工作职责,分工不同,权限应该做好限制。
4、对来自外部的恶意攻击进行防御。
3、权限分类
权限针对文件,file 权限针对目录,directory
读r,read 表示可以查看文件内容;cat 表示可以(ls)查看目录中存在的文件名称
写w,write 表示可以更改文件的内容;vim 修改,保存退出 表示是否可以删除目录中的子文件或者新建子目录(rm/touch/mkdir)
执行x,executable 表示是否可以执行文件,一般指二进制文件、或者脚本文件 表示是否可以进入目录中(cd)
4、Linux的文件属于谁?
图解linux文件权限,觉得超哥牛吗?
linux中的每一个文件,都有自己的主人,并且有权限限制,限制主人的读、写、执行权限。

限制其他人的读、写、执行权限。

限制组内的r、w、x权限。

可见关于linux的文件,有三个角色

user 、属主
group、属组
other、其他人
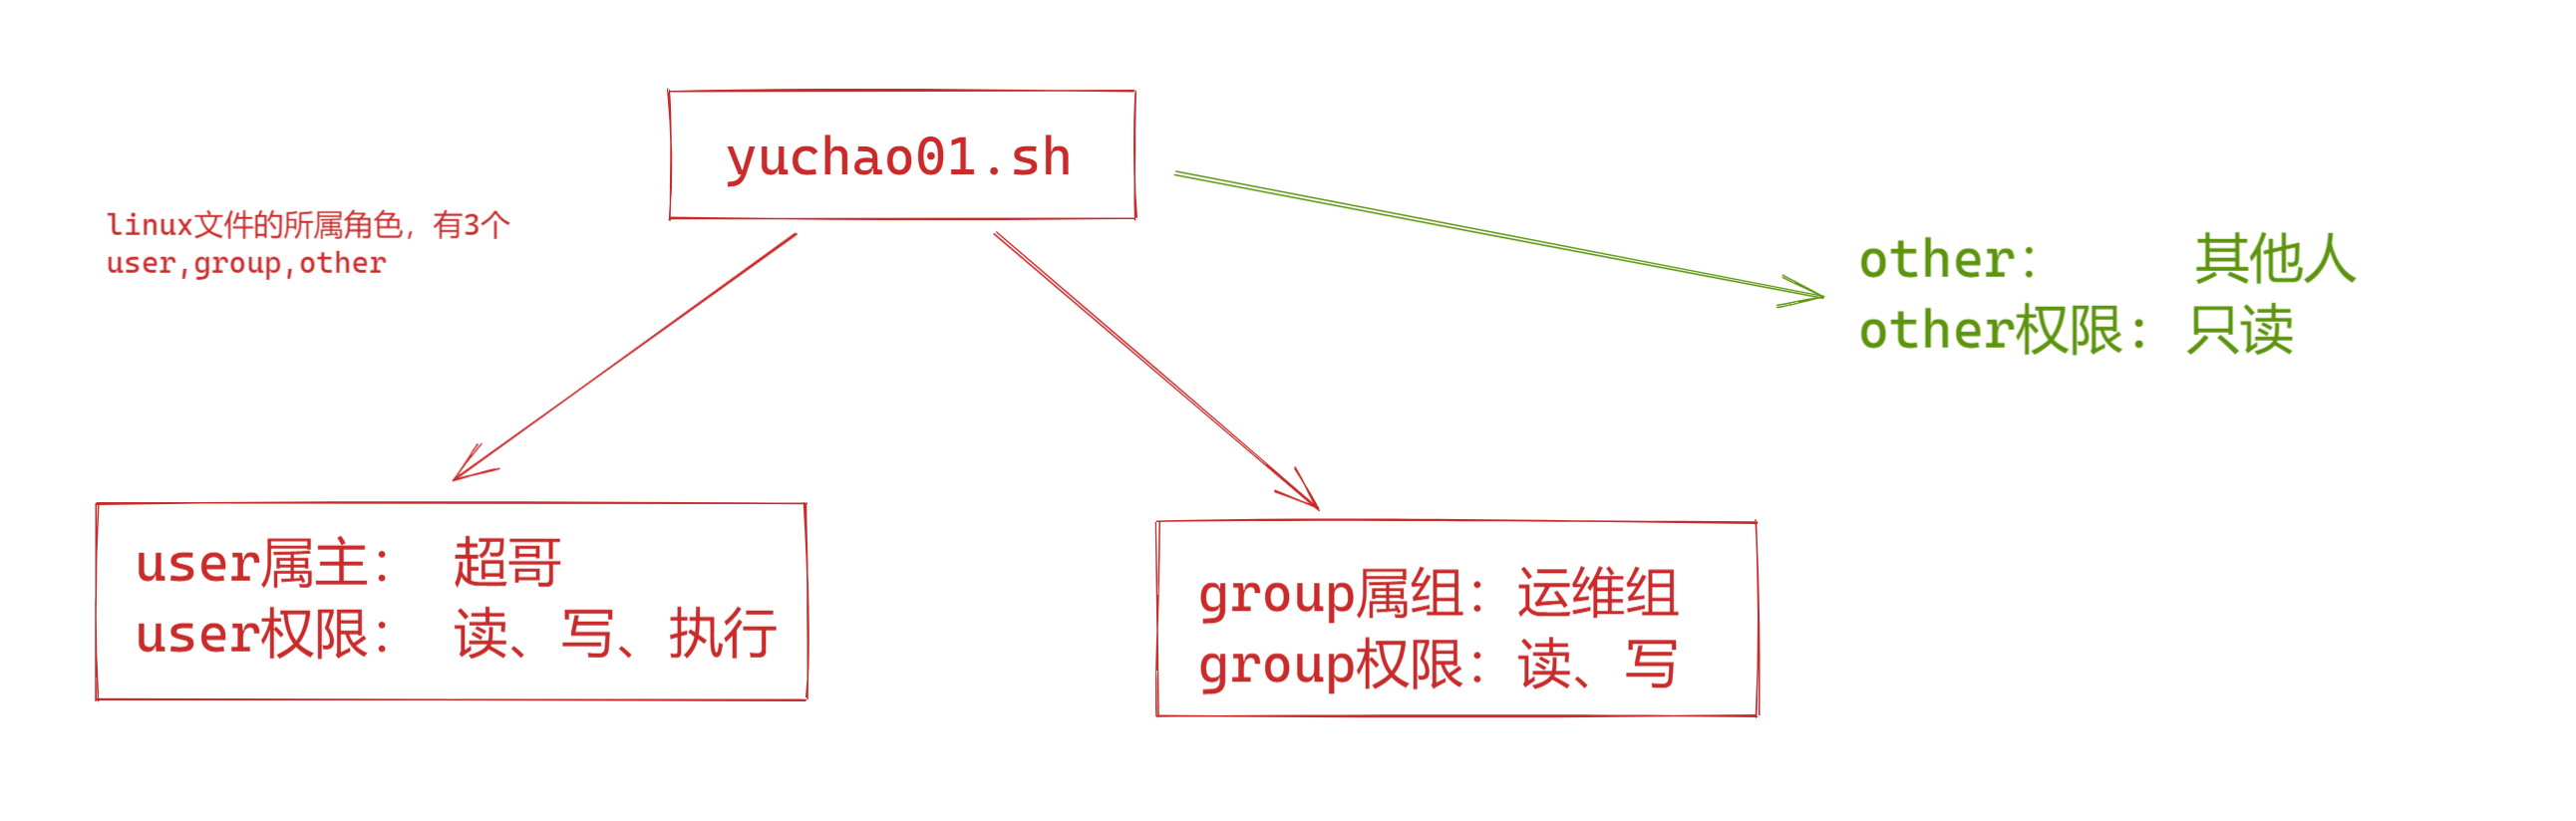
user属主
表示文件的创建者、拥有者,也可理解为,某个用户、对这个文件拥有的权限。
一个文件只能有一个主人,一部手机只能有一个主人。

你可以对你的手机做任何的事,其他的人你可以禁止他碰你手机!

你可以对你的linux文件进行读、写、执行,也可以禁止别人对你的文件做任何操作!
group属组
文件所属的用户组,拥有组,可以理解为,某一个组的用户,对这个文件的权限。
文件
user,属主是于超 ,权限是允许读、写、执行
group,属组是运维组,权限是读,写,不可执行
other其他用户
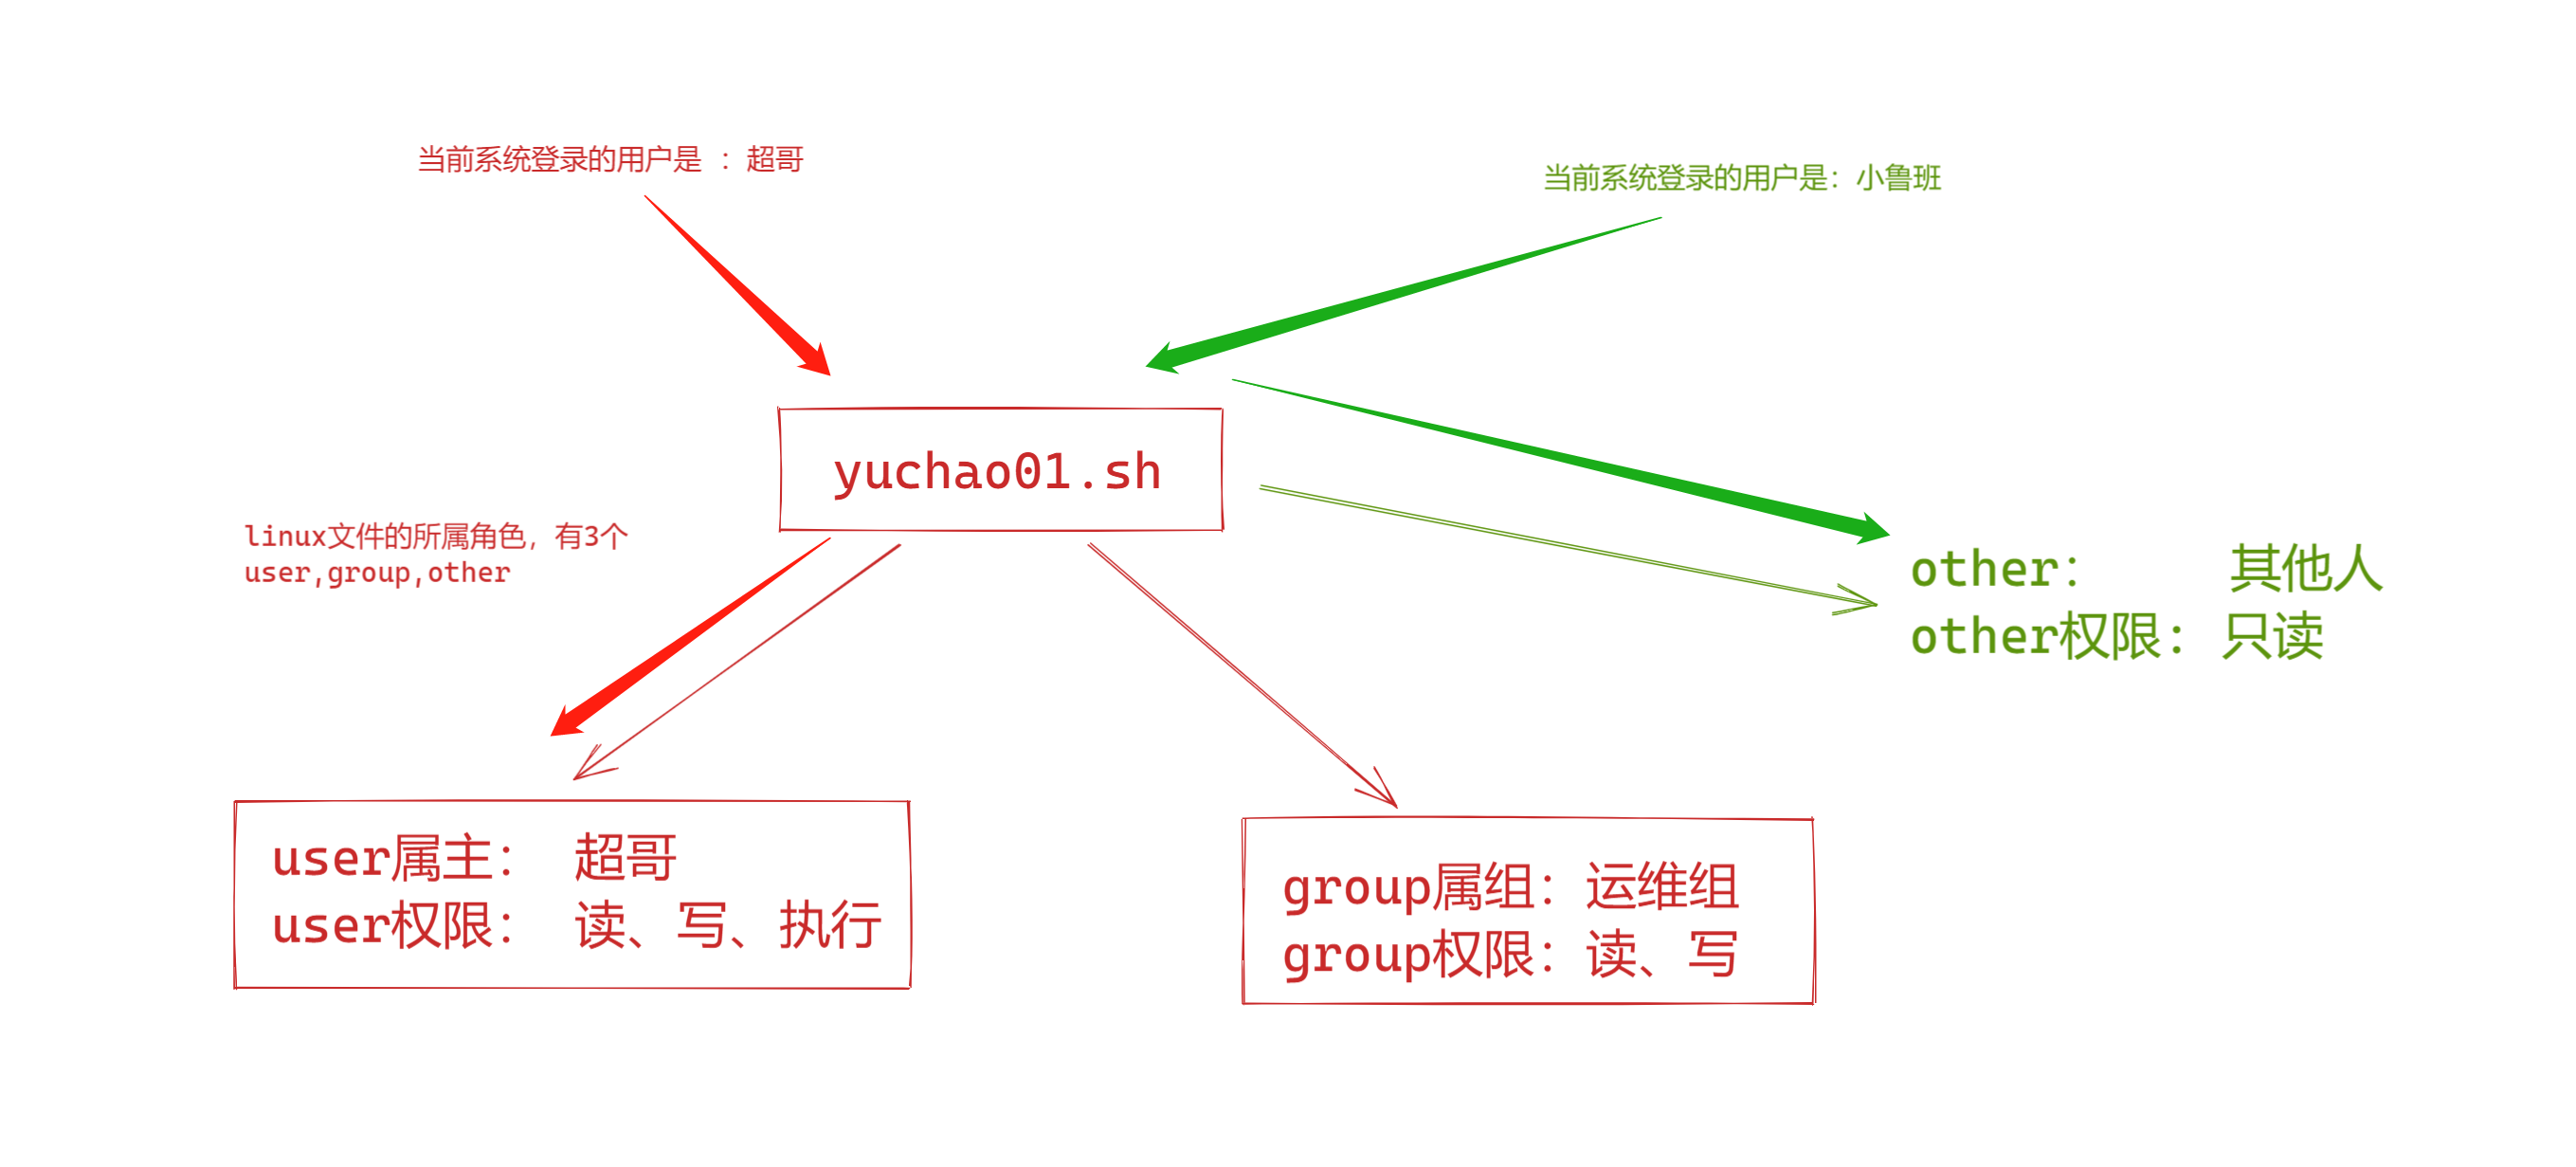
当前登录系统用户是yuchao,你想操作yuchao01.sh文件,权限自然是读、写、执行
当前登录系统用户是,小鲁班,对于yuchao01.sh这个文件,权限怎么判定呢?
    看是不是在yuchao01.sh的属组里,存在,享受group内权限
    不存在,执行other角色权限
5、所属者的表示方法
我们再懂得了,文件的所属关系,所属角色有user、group、other之后,下一步应该如何使用linux命令,去查看、设置、文件的所属角色呢。
u属主
用u表示文件的属主,u是个缩写,全称是the user who owns it(拥有它的用户)是谁
默认是文件的创建者,就是文件的属主
g 属组
g来表示文件属组,默认是创建该文件的用户(的主组)
比如是yuchao01用户创建了文件,linux.log
touch linux.log
该文件的默认
属主、属组就是
yuchao01 yuchao01
g全拼是,other users in file's group(文件组中的其他用户)可以享有的权限。
o 其他人
用o表示,既不是文件的创建者,也不是文件属组里的用户,那么就是其他人的角色。
all 角色
在后续使用linux命令,修改文件权限时,除了会用到 u、g、o三个角色,还会使用all(缩写a),表示一次性对三个角色,设置权限。
root 用户
linux中的root用户是特殊用户,是系统的超级管理员,有最大权限,可以任意修改linux文件,因此权利越大、责任越大。
工作里尽量都不用root,以防出故障。
二、权限管理
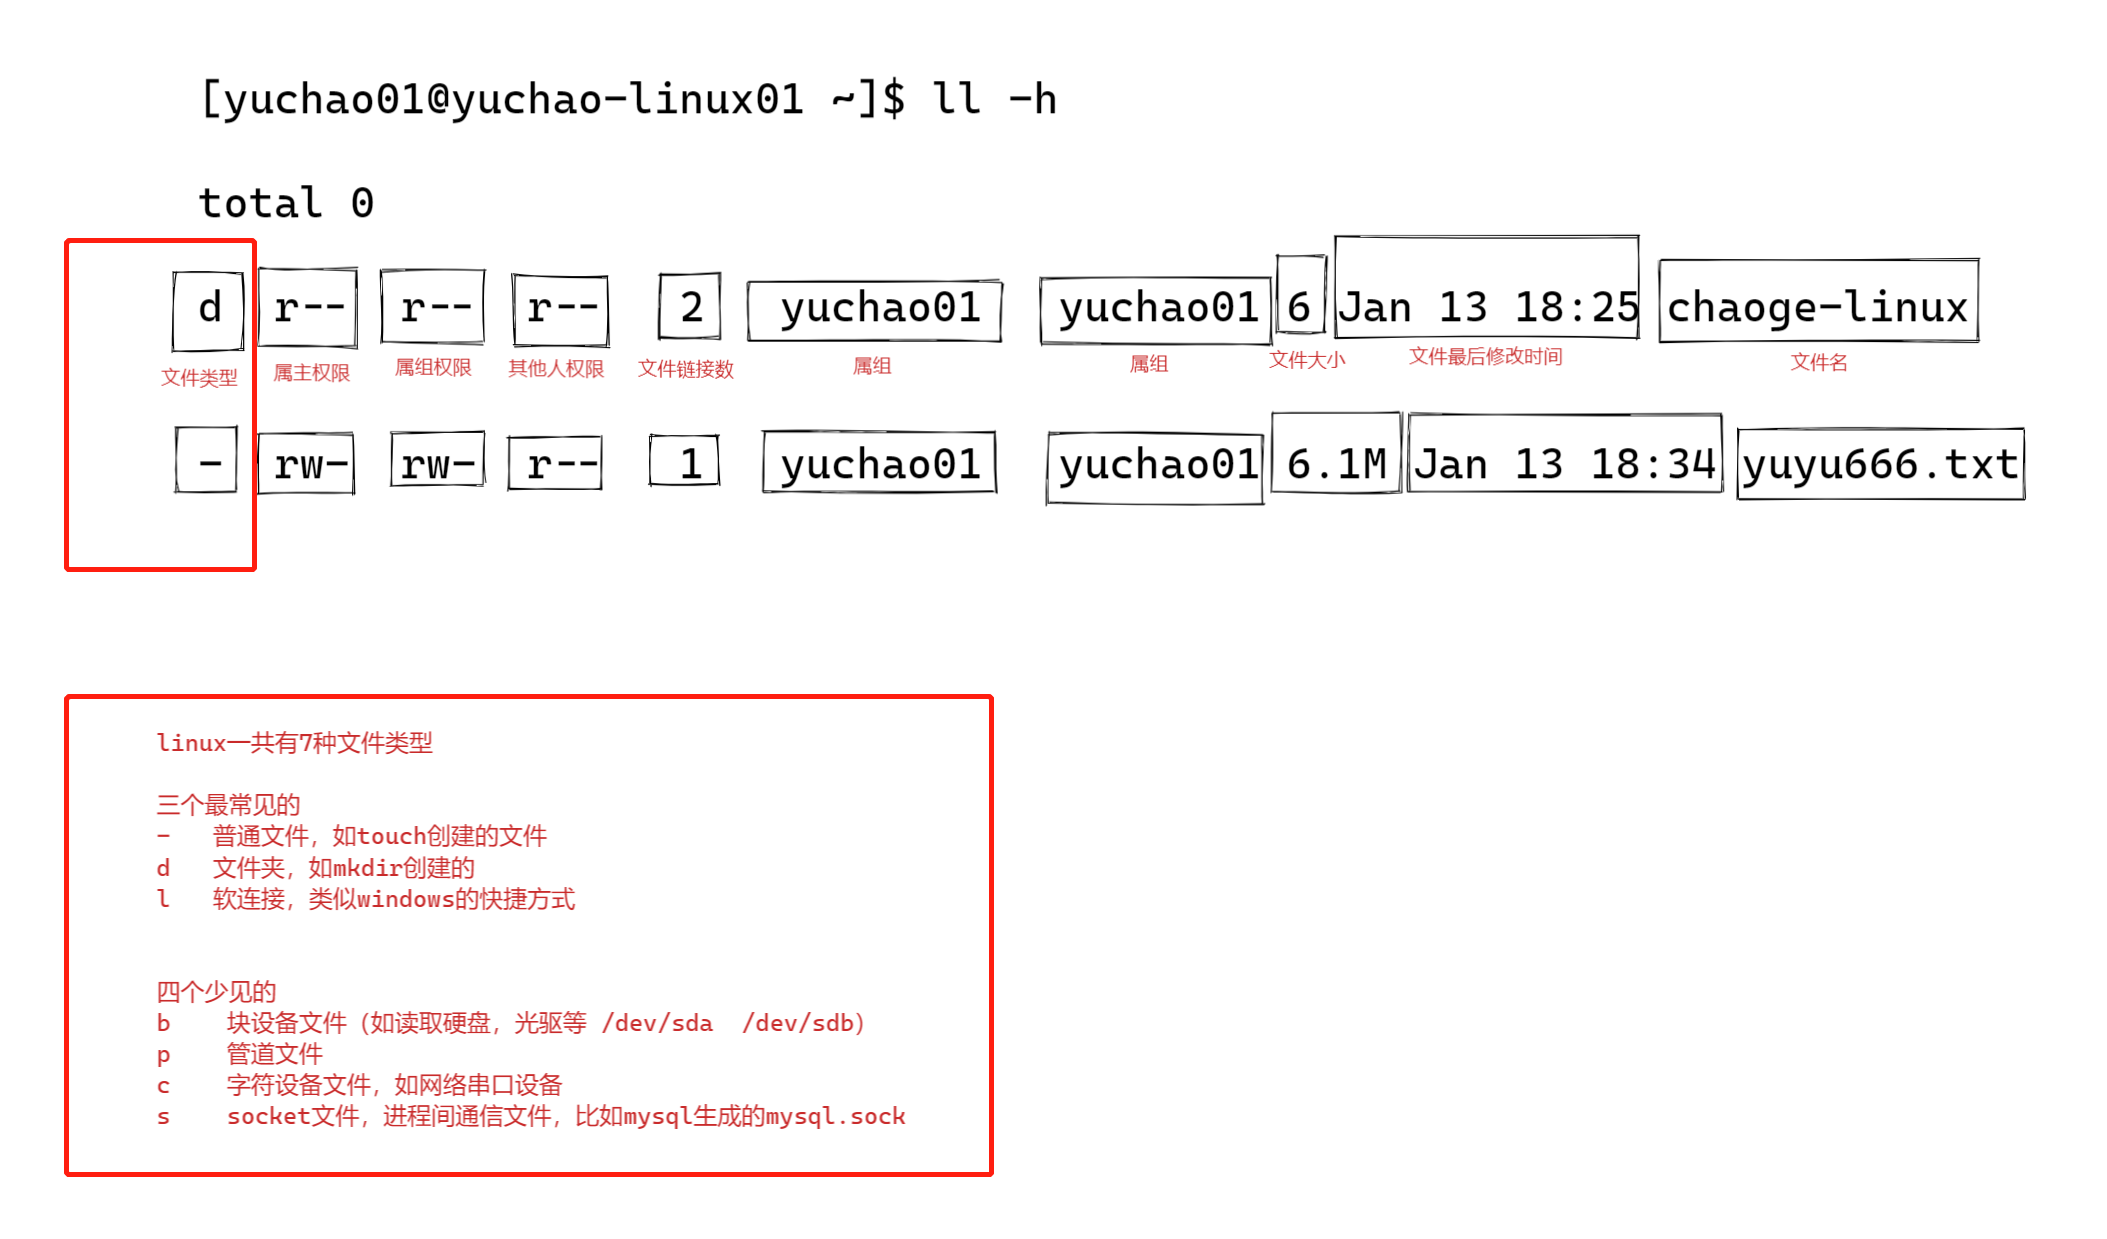
1、查看文件属性
要设置权限,就需要知道文件的一些基本属性和权限的分配规则。
在Linux 中,ls 命令常用来查看文档的属性,用于显示文件的文件名和相关属性。
ls命令我们之前学过,用于查看文件信息,这里我们使用之前提到过的一个用法,ll
ll命令
查看文件夹下所有的文件(文件夹)详细信息
[yuchao01@yuchao-linux01 ~]$ ll
total 6240
dr--r--r-- 2 yuchao01 yuchao01 6 Jan 13 18:25 chaoge-linux
-rw-rw-r-- 1 yuchao01 yuchao01 6388895 Jan 13 18:38 yuyu666.txt
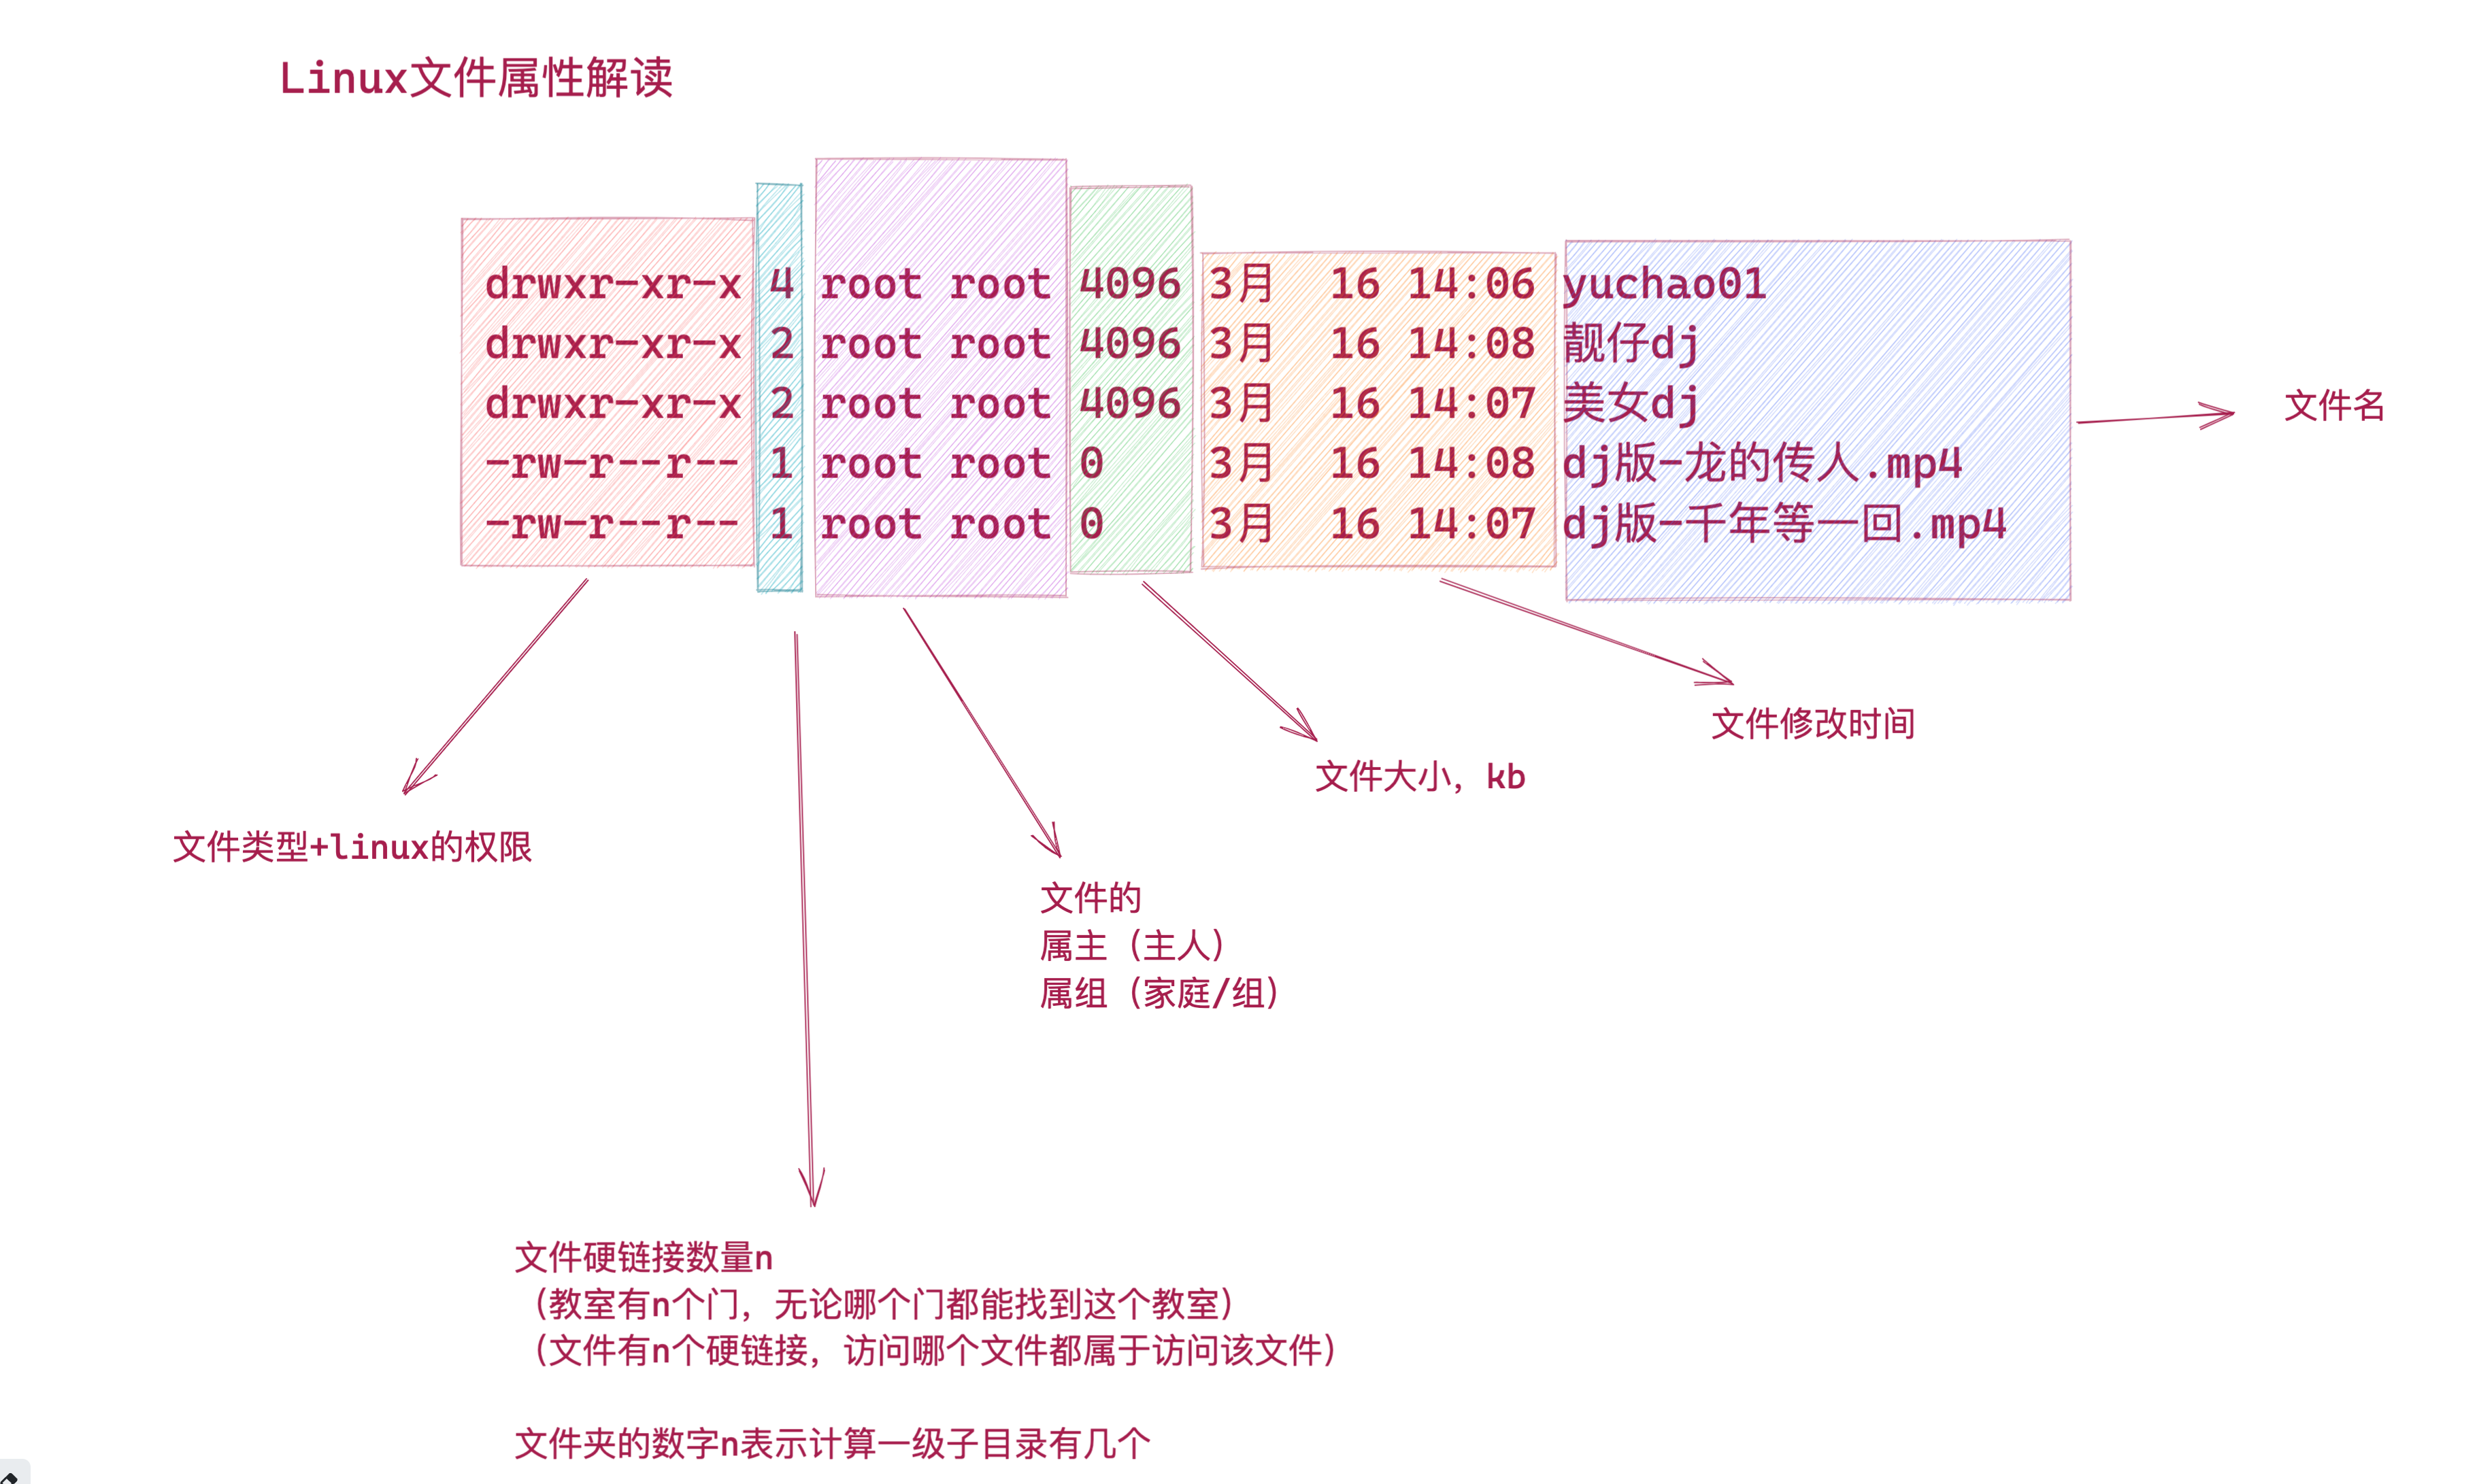
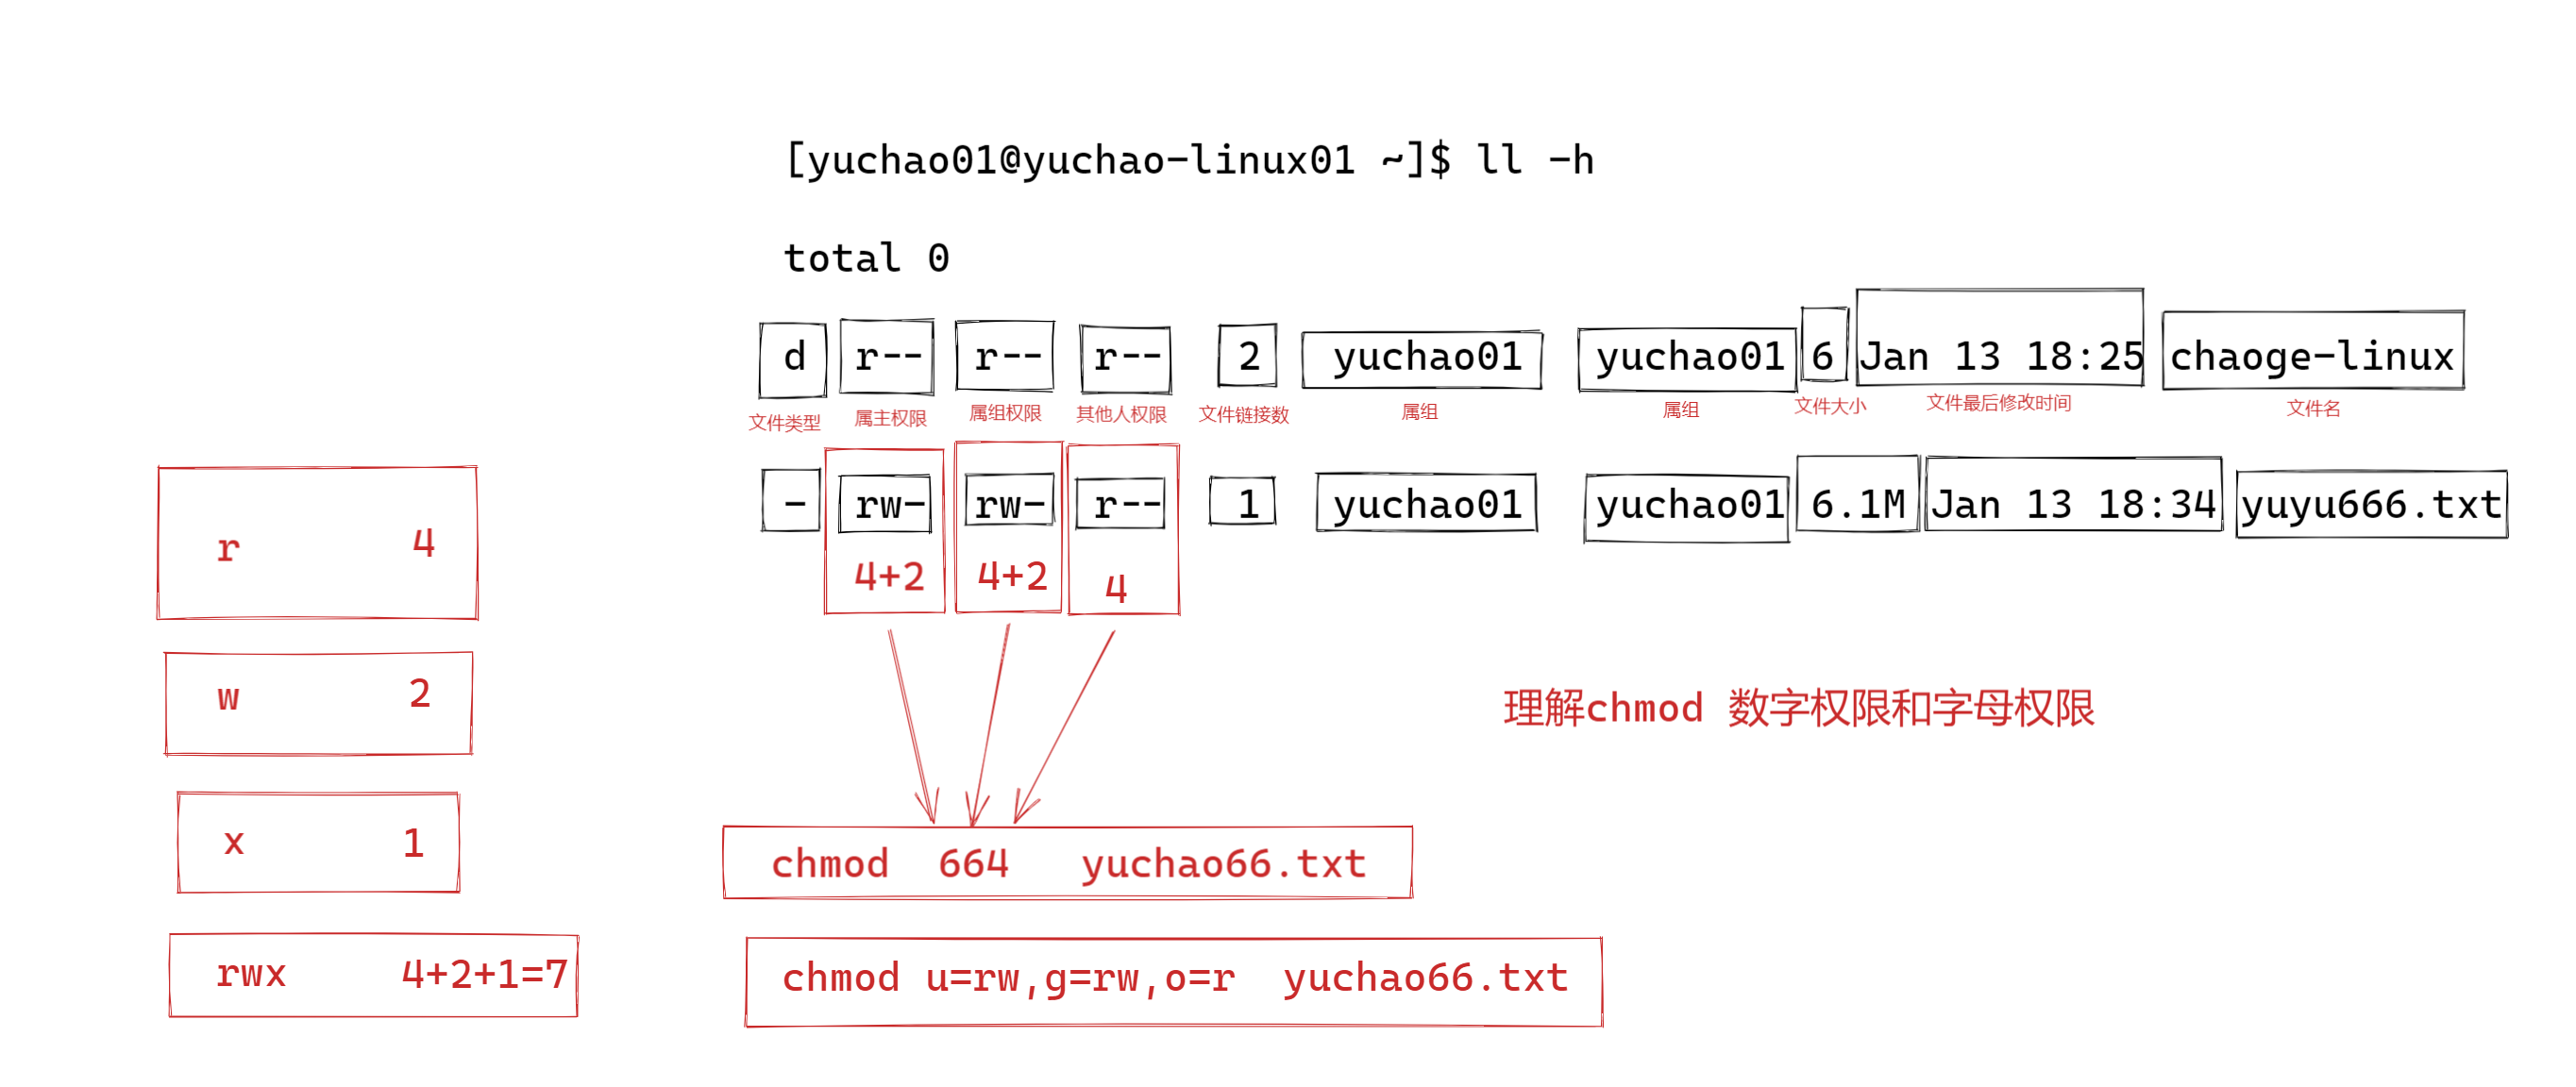
2、文件属性详解
关于文件属性,如图所示
2.1 文件权限(字母,数字表示)
权限 对应数字 意义
r 4 可读
w 2 可写
x 1 可执行
2.2 如何解读文件属性
[yuchao01@yuchao-linux01 ~]$ ll
total 6240
dr--r--r-- 2 yuchao01 yuchao01 6 Jan 13 18:25 chaoge-linux
-rw-rw-r-- 1 yuchao01 yuchao01 6388895 Jan 13 18:38 yuyu666.txt
如 yuchao666.txt文件的属性
第1位,- 表示是普通文件类型
第2-4位, rw- 表示user权限,是读、写、没有执行权限
第5~7, rw- 表示group权限,是读、写、没有执行权限
第8~10, r-- 表示other权限,其他人只读
3、设置文件权限
设置、或修改文件权限,需要使用命令
语法(change mode)
chmod 选项 权限 文件
作用:设置、修改文件的权限(包括设置user,group,other对应的权限)
选项: -R 递归设置文件夹权限
注意:使用该命令,要么是root登录,要么是属主(你不可能随便修改别人的资料)
字母权限实践
用法1:使用root登录系统,获取最大权限,可以修改他人文件属性
1.给文件添加执行权限
一般可执行的命令,脚本文件,都需要添加执行权限。
给文件添加执行权限
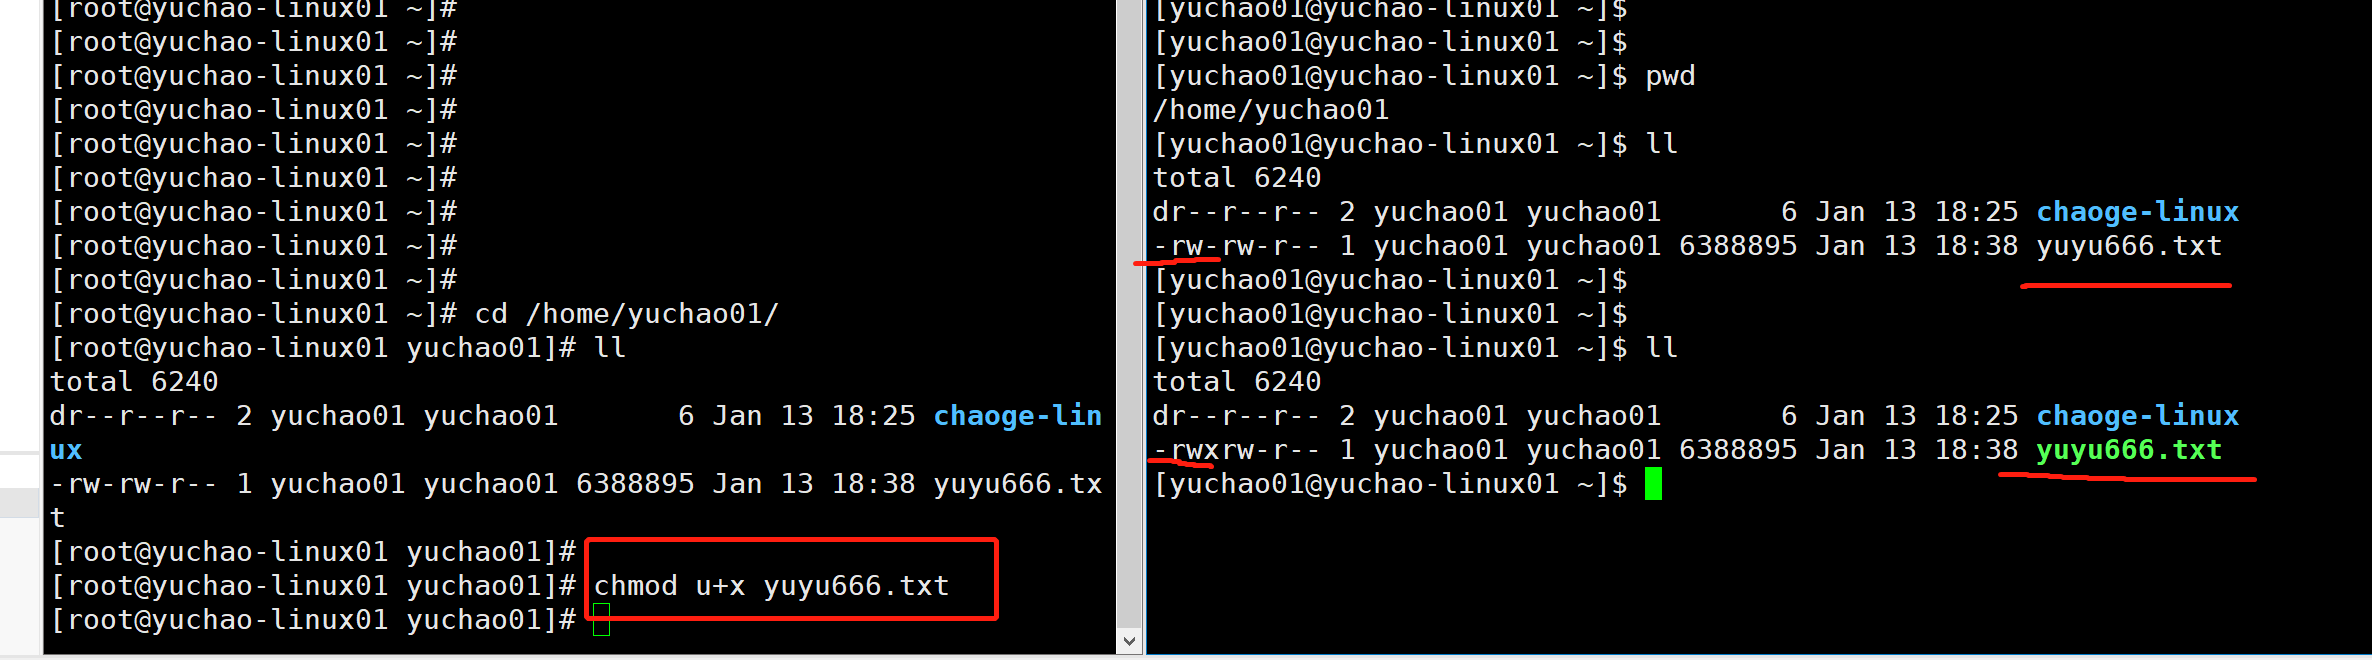
扣除文件执行权限
为什么我们能使用ls,echo命令,因为他们都有x执行权限。
[yuchao01@yuchao-linux01 ~]$ ll /bin/ls
-rwxr-xr-x. 1 root root 117672 Apr 11 2018 /bin/ls
[yuchao01@yuchao-linux01 ~]$
[yuchao01@yuchao-linux01 ~]$ ll /bin/echo
-rwxr-xr-x. 1 root root 33072 Apr 11 2018 /bin/echo
一次性添加、减少多个文件的权限。

一次性减少2个文件的user,读权限。
[yuchao01@yuchao-linux01 ~]$ ll
total 6240
dr--r--r-- 2 yuchao01 yuchao01 6 Jan 13 18:25 chaoge-linux
-rw-rw-r-- 1 yuchao01 yuchao01 6388895 Jan 13 18:38 yuyu666.txt
[yuchao01@yuchao-linux01 ~]$
[yuchao01@yuchao-linux01 ~]$
[yuchao01@yuchao-linux01 ~]$ chmod u-r chaoge-linux yuyu666.txt
[yuchao01@yuchao-linux01 ~]$ ll
total 6240
d---r--r-- 2 yuchao01 yuchao01 6 Jan 13 18:25 chaoge-linux
--w-rw-r-- 1 yuchao01 yuchao01 6388895 Jan 13 18:38 yuyu666.txt
修改yuchao666.txt权限为

user,可读、可写、可执行

group、只读

other、只读
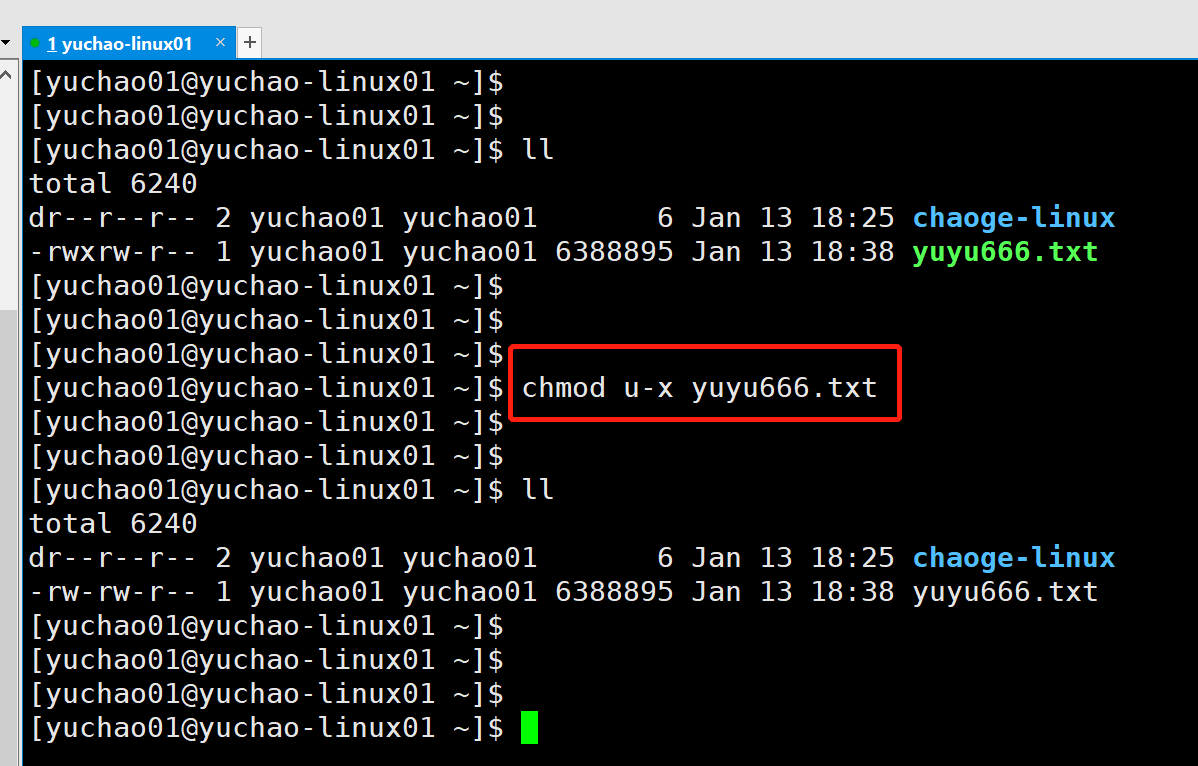
[yuchao01@yuchao-linux01 ~]$ chmod u=rwx,g=r,o=r yuyu666.txt
[yuchao01@yuchao-linux01 ~]$ ll yuyu666.txt
-rwxr--r-- 1 yuchao01 yuchao01 6388895 Jan 13 18:38 yuyu666.txt
一次性设置yuchao666.txt所有角色,仅可以读写。
[yuchao01@yuchao-linux01 ~]$ chmod a=rw yuyu666.txt
[yuchao01@yuchao-linux01 ~]$ ll
total 6240
dr--r--r-- 2 yuchao01 yuchao01 6 Jan 13 18:25 chaoge-linux
-rw-rw-rw- 1 yuchao01 yuchao01 6388895 Jan 13 18:38 yuyu666.txt
一次性设置当前目录下所有文件,全部最大权限。

-R 文件夹递归操作
[yuchao01@yuchao-linux01 ~]$ chmod -R a=rwx /home/yuchao01/*
[yuchao01@yuchao-linux01 ~]$
[yuchao01@yuchao-linux01 ~]$ ll /home/yuchao01/
total 6240
drwxrwxrwx 2 yuchao01 yuchao01 6 Jan 13 18:25 chaoge-linux
-rwxrwxrwx 1 yuchao01 yuchao01 6388895 Jan 13 18:38 yuyu666.txt
总结
语法
chmod 权限设置 文件
1.给哪些用户角色设置,语法如何表示
chmod u file
chmod g file
chmod o file
chmod ugo file
chmod a file
2.添加,还是减少,还是赋值
chmod +  添加
chmod -  减少
chmod =  赋值
-
具体哪些权限
r 读
w 写
x 执行 -
具体语法
chmod ugo=rwx file.log # 给与所有角色,所有权限,最大权限,危险命令
chmod ug=r file.log # 修改user,group,只读,other不修改
chmod go-w file.log # 只给group,other,减去掉写入权限
chmod uo+r file.log # 只给user,other,添加一个读取权限,group不动
字母 选项 作用
u(谁) user 属主
g(谁) group 属组
o(谁) other 其他用户
a(谁) all 所有人(包含ugo)
+(作用) 加 增加作用
-(作用) 减 移除作用
=(作用) 等于 赋值作用
r(权限) read 可读权限
w(权限) write 可写权限
x(权限) execute 可执行权限
-(权限) - 没有任何权限
注,如果要设置多个角色,多个权限,需要逗号隔开
一般用于直接赋值权限,也别去计算,加还是减去权限了,简单粗暴
[yuchao01@yuchao-linux01 ~]$ chmod g=r,o=w,u=rwx yuyu666.txt
[yuchao01@yuchao-linux01 ~]$ ll yuyu666.txt
-rwxr---w- 1 yuchao01 yuchao01 6388895 Jan 13 18:38 yuyu666.txt
思考题
限制yuyu666.txt文件,权限改为属主最大权限,属组可读写,其他人只读,有几种写法。
1.考虑当前文件属性,进行修改
2.直接属性赋值
解题
当前文件属性
[yuchao01@yuchao-linux01 ~]$ ll yuyu666.txt
-rw-r--r-- 1 yuchao01 yuchao01 6388895 Jan 13 18:38 yuyu666.txt
方法1,逐个添加
chmod u+x,g+w yuyu666.txt
方法2,直接赋值
chmod u=rwx,g=rw,o=r yuyu666.txt
数字权限
权限简介
Linux系统上对文件的权限有着严格的控制,用于如果相对某个文件执行某种操作,必须具有对应的权限方可执行成功。
Linux下文件的权限类型一般包括读,写,执行。对应字母为 r、w、x。
Linux下权限的粒度有 拥有者 、群组 、其它组 三种。每个文件都可以针对三个粒度,设置不同的rwx(读写执行)权限。通常情况下,一个文件只能归属于一个用户和组, 如果其它的用户想有这个文件的权限,则可以将该用户加入具备权限的群组,一个用户可以同时归属于多个组。
Linux上通常使用chmod命令对文件的权限进行设置和更改。

刚才讲的是字母权限,还可以使用数字权限进行快速授权
权限 对应数字 意义
r 4 可读
w 2 可写
x 1 可执行
关于数字权限和读、写、执行的参照,以及权限的组合表
数字 权限 作用
0 - 不能读,不能写,不能执行
1 execute 不能读,不能写,可执行
2 write 不能读,可写,不能执行
3 2+1 不能读,可写,可执行
4 read 可读,不能写,不能执行
5 4+1 可读,不能写,可执行
6 4+2 可读,可写,不能执行
7 4+2+1 可读,可写,可执行
结合chmod用法
常见权限对应关系
444 r--r--r--
600 rw-------
644 rw-r--r--
666 rw-rw-rw-
700 rwx------
744 rwxr--r--
755 rwxr-xr-x
777 rwxrwxrwx
给与yuchao66.txt,属主读、写、执行权限,属组读写权限,其他人读权限。
[yuchao01@yuchao-linux01 ~]$ chmod 764 yuyu666.txt
[yuchao01@yuchao-linux01 ~]$ ll
total 6240
drwxrwxrwx 3 yuchao01 yuchao01 38 Jan 14 11:32 chaoge-linux
-rwxrw-r-- 1 yuchao01 yuchao01 6388895 Jan 13 18:38 yuyu666.txt
2.给与yuchao666.txt所有角色只读
方法1
[yuchao01@yuchao-linux01 ~]$ chmod u=r,g=r,o=r yuyu666.txt
方法2
[yuchao01@yuchao-linux01 ~]$ chmod 444 yuyu666.txt
提示
1.记住常见权限即可,一般降低权限,给与只读即可,不要给些奇葩的权限,比如:
只允许写入权限
只允许写入
[yuchao01@yuchao-linux01 ~]$ chmod 333 yuyu666.txt
[yuchao01@yuchao-linux01 ~]$ ll yuyu666.txt
--wx-wx-wx 1 yuchao01 yuchao01 4 Jan 14 14:18 yuyu666.txt
只允许写入,vim就无法使用了,因为vim要先获取文件内容,得有read权限
你可以只重定向数据进入
一般不随便给与777权限
建议,一般是644,754。
练习题
1.给/data目录设置,属主全部权限,属组可读可执行,其他用户无权限,请用2种方式写。
方法1
[root@yuchao-linux01 /]# chmod -R u=rwx,g=rx,o='' /data
[root@yuchao-linux01 /]#
[root@yuchao-linux01 /]#
[root@yuchao-linux01 /]#
[root@yuchao-linux01 /]# ll -d /data
drwxr-x--- 2 root root 6 Jan 14 14:36 /data
数字权限
[root@yuchao-linux01 /]# chmod -R 750 /data
[root@yuchao-linux01 /]#
[root@yuchao-linux01 /]# ll -d /data
drwxr-x--- 2 root root 6 Jan 14 14:36 /data
2.设置/data/user_info.txt权限,属主读、写,属组读、写,其他人只读。
查看touch默认权限
提示,root、普通用户、创建文件默认权限是不一样的
[root@yuchao-linux01 /]# touch /data/userinfo.txt
[root@yuchao-linux01 /]# ll /data
total 0
-rw-r--r-- 1 root root 0 Jan 14 14:41 userinfo.txt
字母权限
chmod g+w userinfo.txt
数字权限
chmod 664 userinfo.txt
3.设置/data/password.txt文件,只有属主读写,其他人无权限。
chmod 600 /data/password.txt
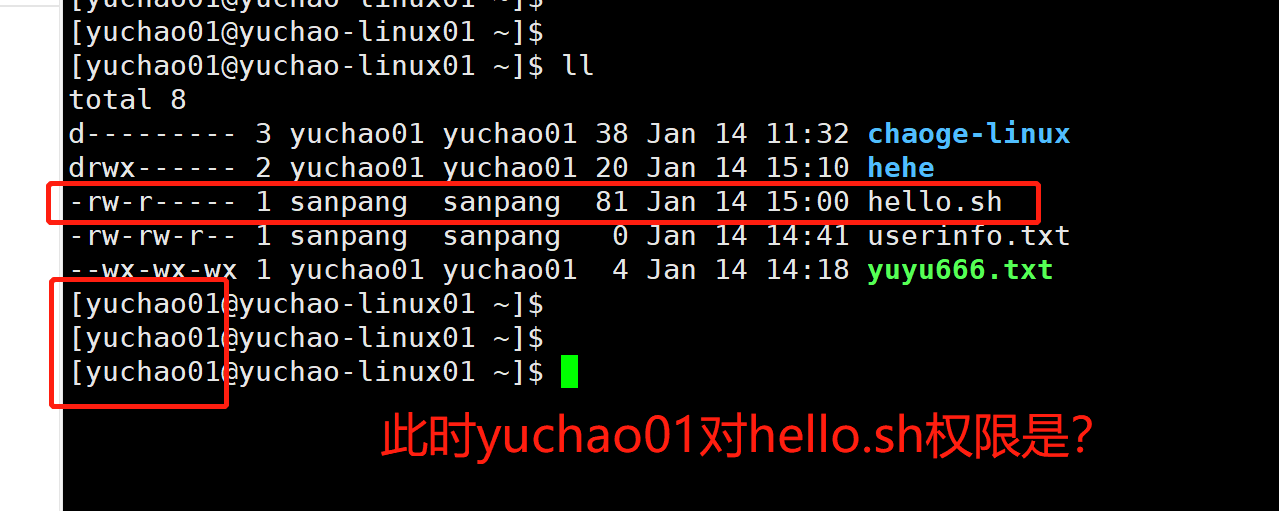
4、文件、目录的的rwx
1.想要删除文件,要看是否有该文件所在目录,目录是否有w权限,才可以删除文件,且还得有x权限,才能进入文件夹。(用普通用户测试)
权限针对文件 权限针对目录
读r 表示可以查看文件内容 表示可以(ls)查看目录中存在的文件名称
写w 表示可以更改文件的内容 表示是否可以删除目录中的子文件或者新建子目录(rm/touch/mkdir)
执行x 表示是否可以开启文件当中记录的程序,一般指二进制文件(.sh) 表示是否可以进入目录中(cd)
测试文件
写一个简单的shell脚本
[yuchao01@yuchao-linux01 ~]$ cat hello.sh
echo 你学会linux权限管理了吗
echo 学会80%了
[yuchao01@yuchao-linux01 ~]$
[yuchao01@yuchao-linux01 ~]$
[yuchao01@yuchao-linux01 ~]$ ll hello.sh
-rw-rw-r-- 1 yuchao01 yuchao01 57 Jan 14 14:54 hello.sh
去掉文件权限,逐个添加
[yuchao01@yuchao-linux01 ~]$ chmod 0 hello.sh
读
[yuchao01@yuchao-linux01 ~]$ cat hello.sh
cat: hello.sh: Permission denied
[yuchao01@yuchao-linux01 ~]$
写
[yuchao01@yuchao-linux01 ~]$ echo "echo 还可以" >> hello.sh
-bash: hello.sh: Permission denied
执行
[yuchao01@yuchao-linux01 ~]$ ./hello.sh
-bash: ./hello.sh: Permission denied
#################
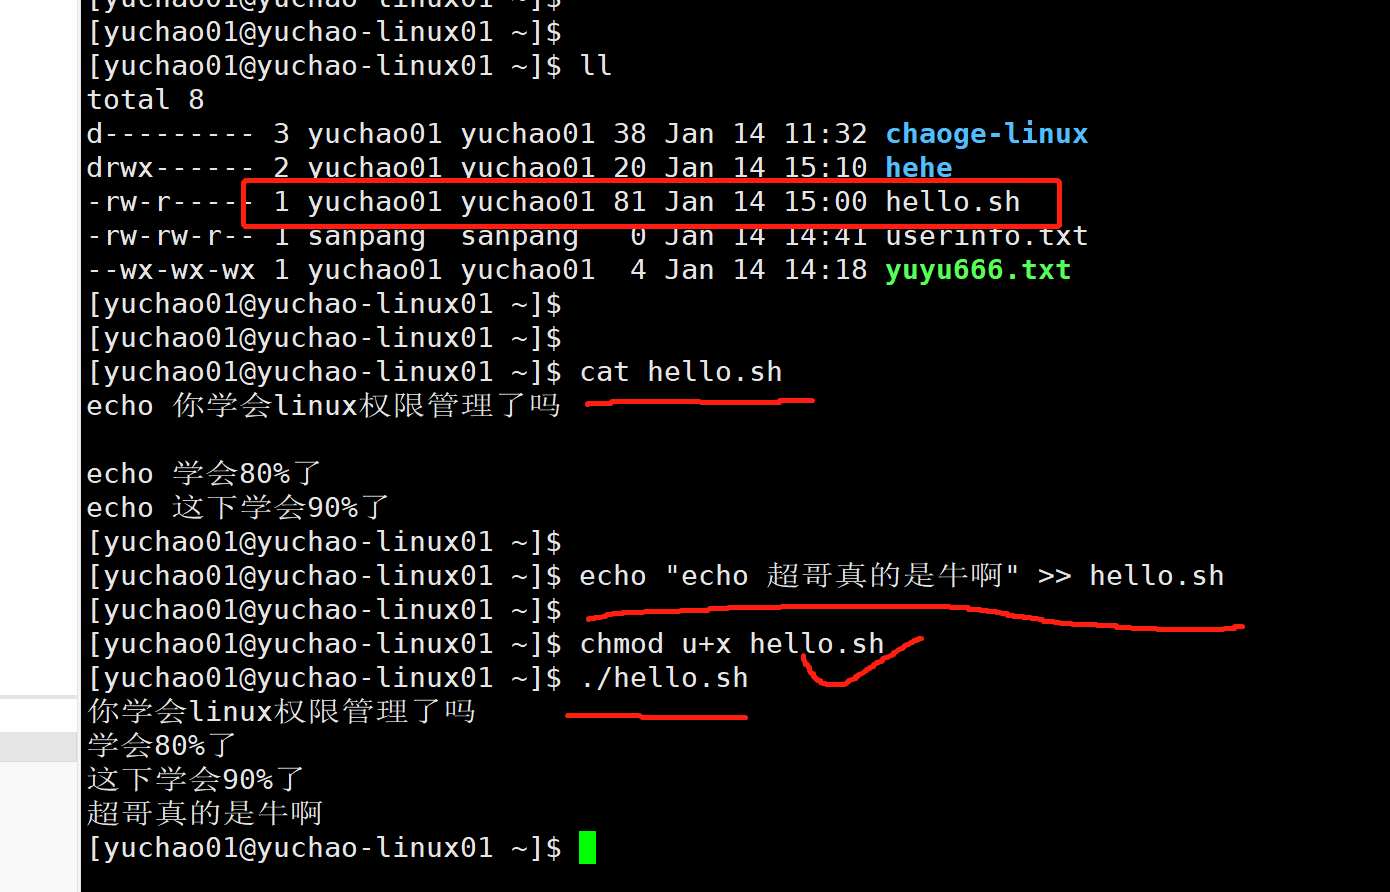
加上r权限
[yuchao01@yuchao-linux01 ~]$ chmod u+r hello.sh
[yuchao01@yuchao-linux01 ~]$ cat hello.sh
echo 你学会linux权限管理了吗
echo 学会80%了
加上w
[yuchao01@yuchao-linux01 ~]$ chmod 0 hello.sh
[yuchao01@yuchao-linux01 ~]$ echo "echo 这下学会90%了" >> hello.sh
-bash: hello.sh: Permission denied
[yuchao01@yuchao-linux01 ~]$
[yuchao01@yuchao-linux01 ~]$ chmod u+w hello.sh
[yuchao01@yuchao-linux01 ~]$ echo "echo 这下学会90%了" >> hello.sh
[yuchao01@yuchao-linux01 ~]$ cat hello.sh
cat: hello.sh: Permission denied
[yuchao01@yuchao-linux01 ~]$
[yuchao01@yuchao-linux01 ~]$ chmod u=rw hello.sh
[yuchao01@yuchao-linux01 ~]$ cat hello.sh
echo 你学会linux权限管理了吗
echo 学会80%了
echo 这下学会90%了
加上x
[yuchao01@yuchao-linux01 ~]$ chmod u+x hello.sh
[yuchao01@yuchao-linux01 ~]$ ./hello.sh
你学会linux权限管理了吗
学会80%了
这下学会90%了
[yuchao01@yuchao-linux01 ~]$ chmod u-x hello.sh
[yuchao01@yuchao-linux01 ~]$ ./hello.sh
-bash: ./hello.sh: Permission denied
测试文件夹
准备一个0权限文件夹
[yuchao01@yuchao-linux01 ~]$ chmod 0 hehe
[yuchao01@yuchao-linux01 ~]$
[yuchao01@yuchao-linux01 ~]$ ll -d hehe
d--------- 2 yuchao01 yuchao01 6 Jan 14 14:49 hehe
测试rwx
默认无权限
[yuchao01@yuchao-linux01 ~]$ cd hehe
-bash: cd: hehe: Permission denied
[yuchao01@yuchao-linux01 ~]$
[yuchao01@yuchao-linux01 ~]$ ls hehe
ls: cannot open directory hehe: Permission denied
[yuchao01@yuchao-linux01 ~]$
[yuchao01@yuchao-linux01 ~]$ touch hehe/yu.txt
touch: cannot touch ‘hehe/yu.txt’: Permission denied
添加r,只能ls
[yuchao01@yuchao-linux01 ~]$ chmod u+r hehe
[yuchao01@yuchao-linux01 ~]$
[yuchao01@yuchao-linux01 ~]$ ls hehe
[yuchao01@yuchao-linux01 ~]$
添加w,且必须结合x权限,才能进入,且创建文件夹中内容
[yuchao01@yuchao-linux01 ~]$ chmod u=rwx hehe
[yuchao01@yuchao-linux01 ~]$
[yuchao01@yuchao-linux01 ~]$
[yuchao01@yuchao-linux01 ~]$ touch hehe/yu.txt
[yuchao01@yuchao-linux01 ~]$ cd hehe
[yuchao01@yuchao-linux01 hehe]$ ls
yu.txt
三、属主、属组、实践
1、属主、属组是什么
属主,user、文件属于某个用户
属组,group,文件可以属于一个组,且该组有对于的读、写、执行权限。在这个组中的用户,享受组内权限。
查看user,group
2、chown命令
change owner
语法
chown -R 新属主名 文件路径
作用
修改文件的属主
注意
谁能在公司里,随便篡改资产属于谁?个人肯定不行,老板能行。
linux能修改文件权限的,只有root
场景:

/data/user_info.txt 存放部门用户信息,以前属于yuchao维护,可以读写执行,后来yuchao调部门了,换了个新运维sanpang来维护,主人就改变了。
实践
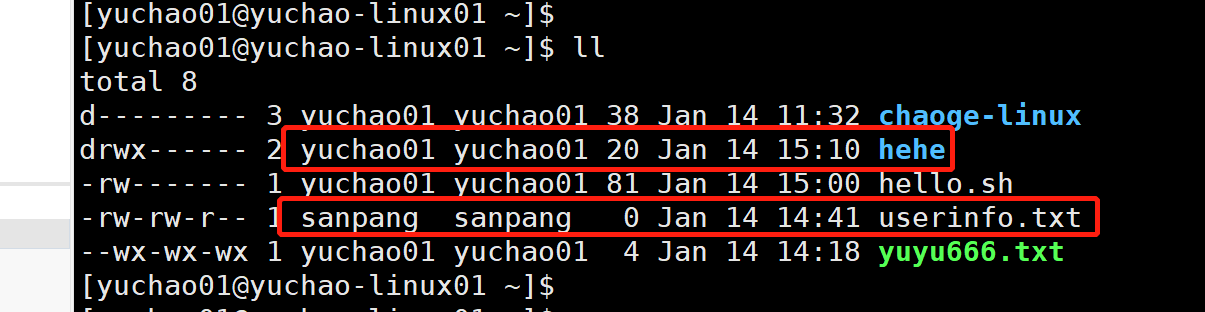
1.修改文件属主
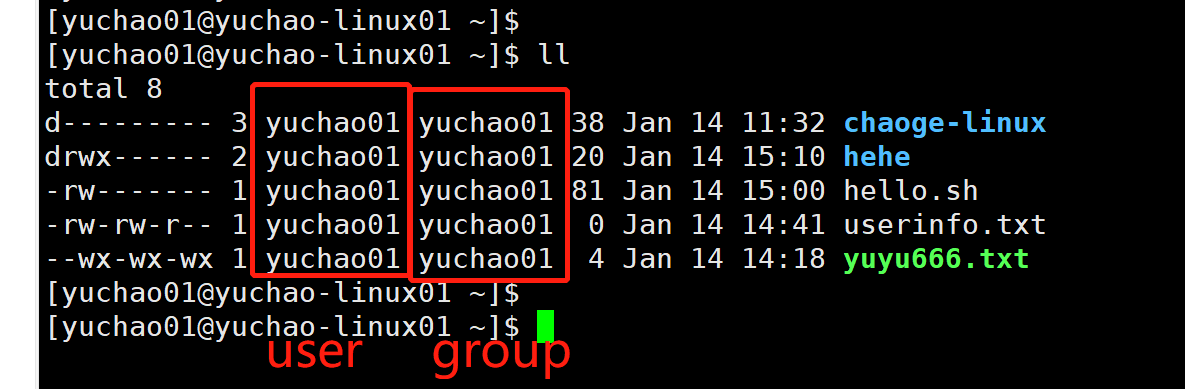
[yuchao01@yuchao-linux01 ~]$ ll
total 8
d--------- 3 yuchao01 yuchao01 38 Jan 14 11:32 chaoge-linux
drwx------ 2 yuchao01 yuchao01 20 Jan 14 15:10 hehe
-rw------- 1 yuchao01 yuchao01 81 Jan 14 15:00 hello.sh
-rw-rw-r-- 1 sanpang sanpang 0 Jan 14 14:41 userinfo.txt
--wx-wx-wx 1 yuchao01 yuchao01 4 Jan 14 14:18 yuyu666.txt
把hello.sh 属主,改为sanpang
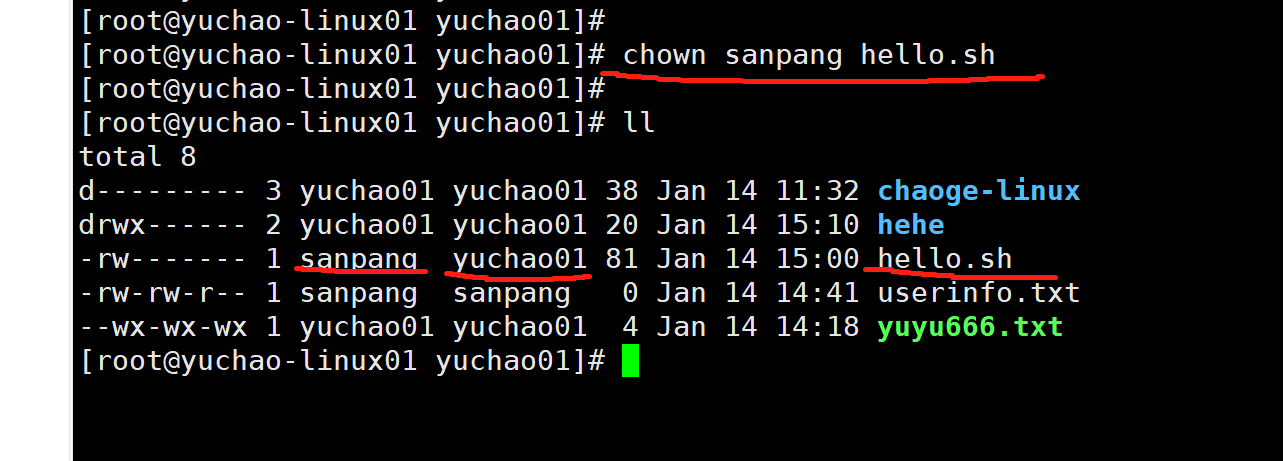
此时怎么解读hello.sh的权限?
-rw------- 1 sanpang yuchao01 81 Jan 14 15:00 hello.sh
- hello.sh属于sanpang用户,权限是rw-
- hello.sh属于yuchao01组,该组内用户无权限
- 其他人无权操作hello.sh
可以尝试用不同的用户,登录机器,查看操作文件的状态
3、chgrp命令
change group更改文件的属组
语法
chgrp 参数 组名 文件
案例
修改hello.sh的属组,查看修改后的权限效果。
[root@yuchao-linux01 yuchao01]# chgrp sanpang hello.sh
4、chown同时修改属主,属组
语法
[root@yuchao-linux01 yuchao01]# chown yuchao01:yuchao01 hello.sh
四、特殊权限
4.0 什么是特殊权限
上节课我们学习了Linux系统的9位基本权限rwx rwx rwx,但是有时候会发现系统一些关键的文件,存在一些没见过的权限字符。
比如/etc/passwd
[root@yuchao-tx-server ~]# ll /usr/bin/passwd
-rwsr-xr-x 1 root root 27856 4月 1 2020 /usr/bin/passwd
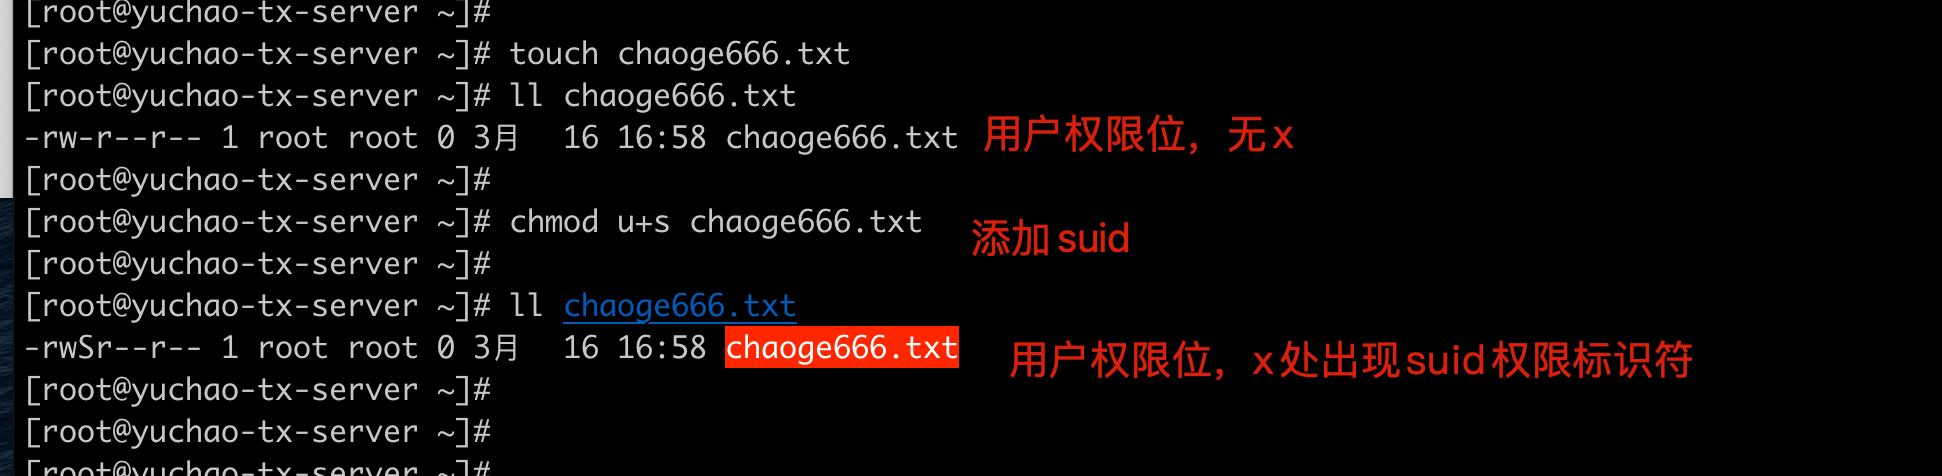
可见,出现了没见过的s字符权限,这是什么鬼?超哥告诉你,它是传说中的特殊权限suid。
除了超哥讲的9位基本权限之外,linux权限位,还有3个特殊权限,一共是12位权限。
suid(setuid)
sgid(setgid)
sbit(sticky)
特殊权限对照表
类别 suid sgid sticky
字符表示 S S T
出现位置 用户权限位x 用户组权限位x 其他用户权限位x
基本权限位有x s s t
数字表示法 4 2 1
八进制表示法 4000 2000 1000
生效对象 用户位 用户组 其他用户
4.1 、SUID 特殊权限
4.1.1 suid基础原理
- suid通过S字符标识,存在于用户权限位的x权限对应位置。
- 如果某文件,用户权限位本身就有x权限,给该文件设置suid权限时,则以小写s标识,否则就是大写的S字符。
- 给文件设置s权限对应的数字表示法是4,八进制数下可以用4000
- suid同样也用chmod设置权限,可以以字符法,数字法两种标识。
4.1.2 自定义文件设置suid
4.1.3 /usr/bin/passwd与suid
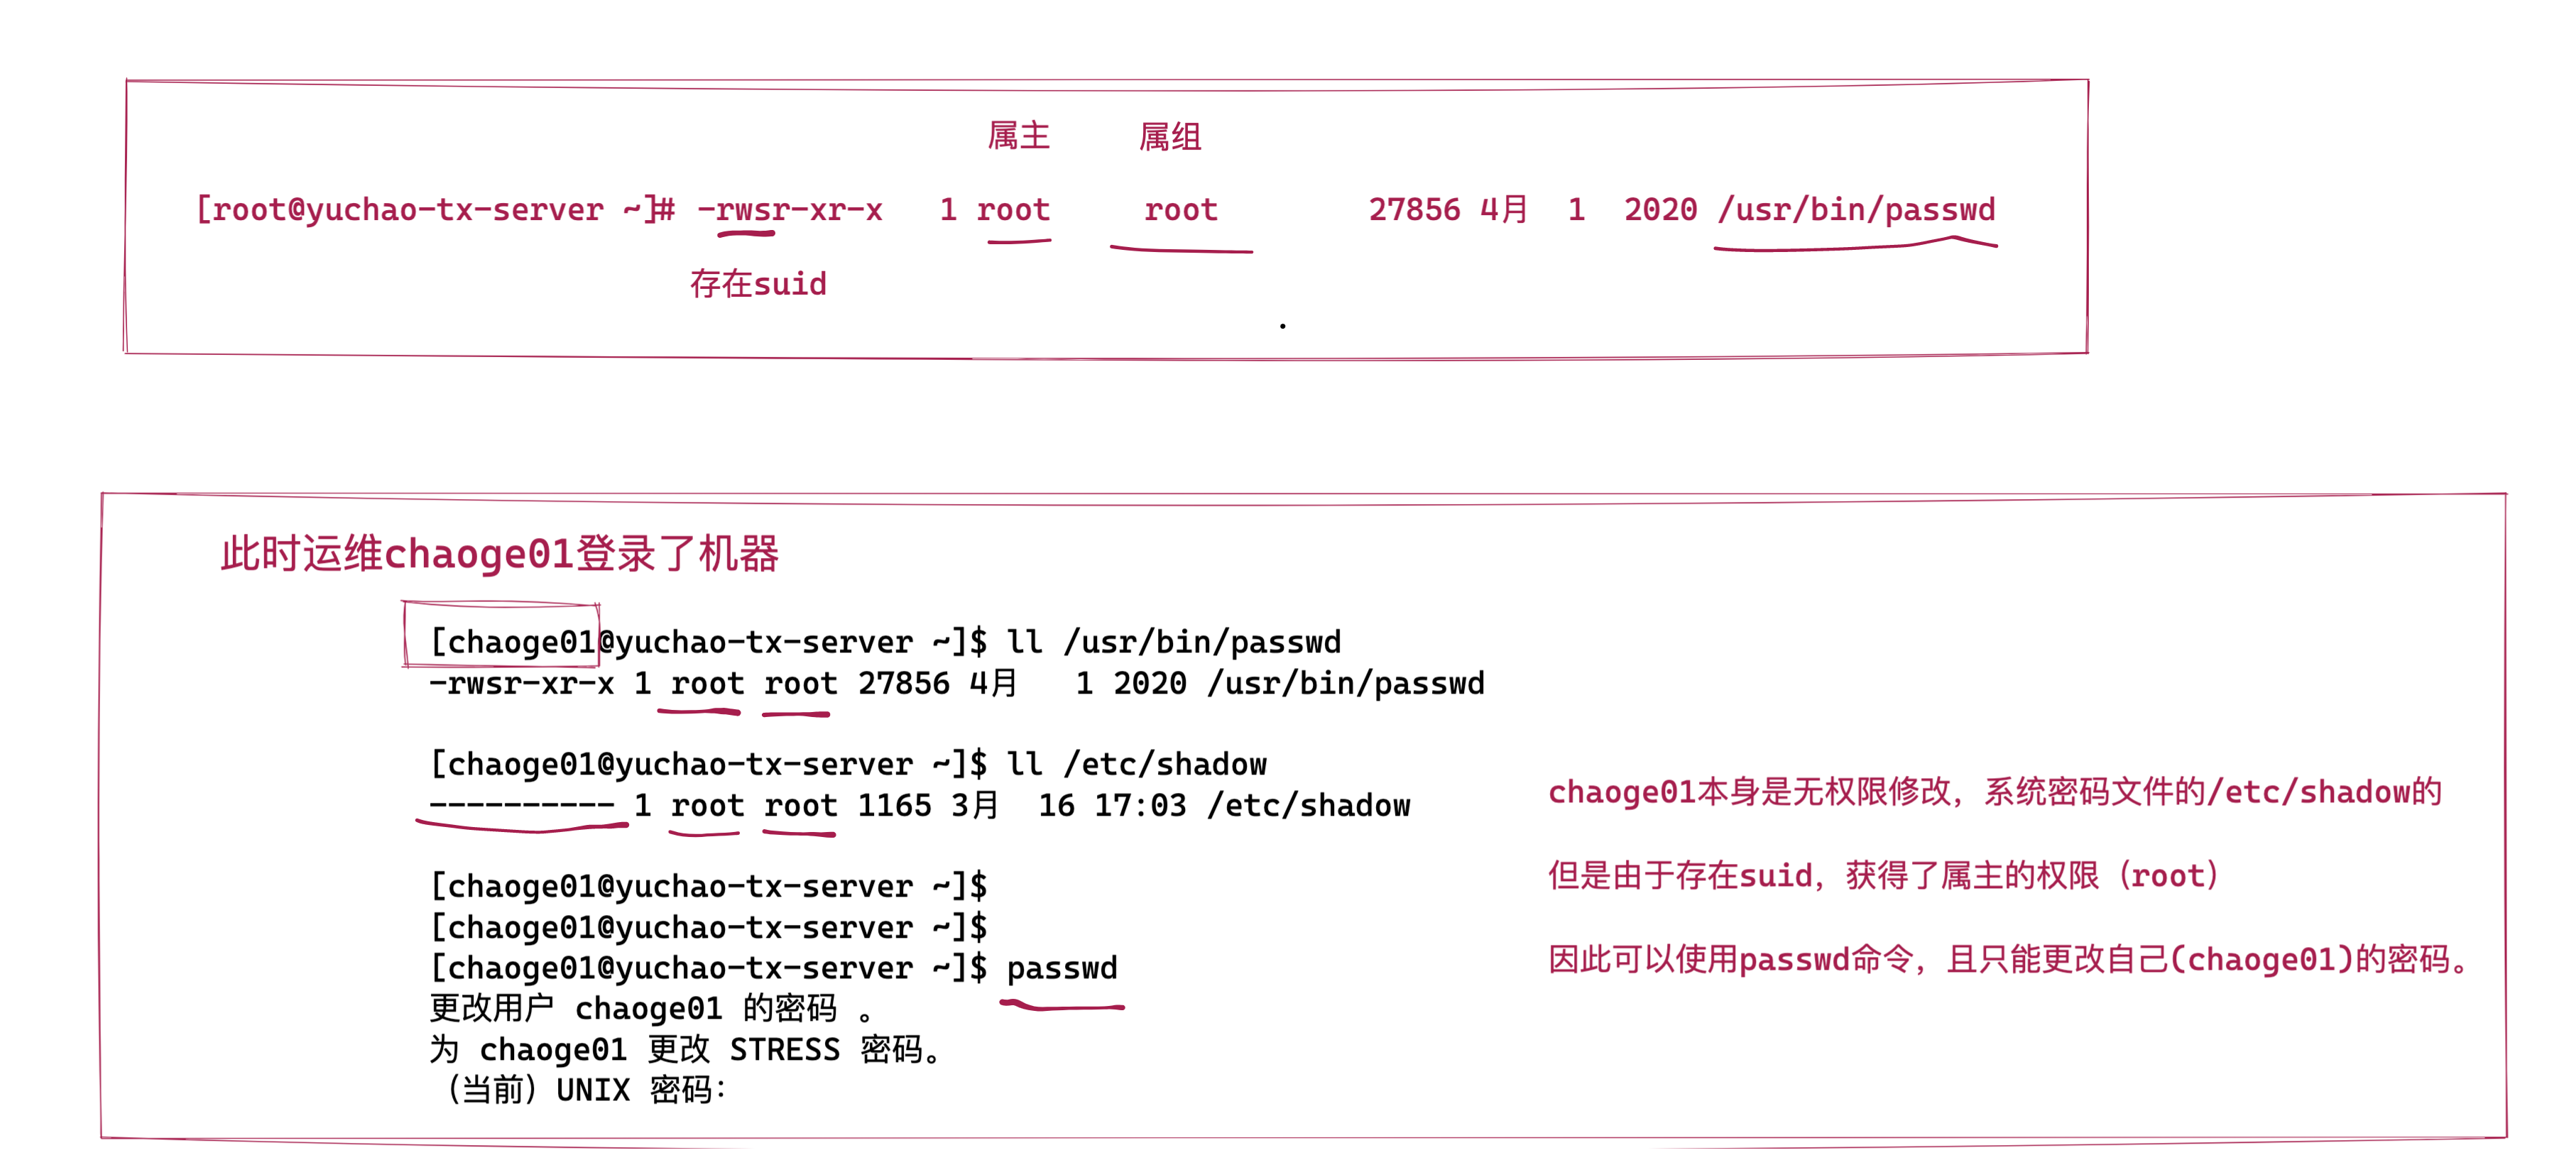
[yuchao01@yuchao-linux01 ~]$ ll /usr/bin/passwd
-rwsr-xr-x. 1 root root 27832 Jun 10 2014 /usr/bin/passwd
我们会发现这个passwd命令,有一个奇怪的s权限,这干啥的?
可以看到,原本表示文件所有者权限中的 x 权限位,却出现了 s 权限,此种权限通常称为 SetUID,简称 SUID 特殊权限。
SUID 特殊权限仅适用于可执行文件
所具有的功能是,只要用户对设有 SUID 的文件有执行权限,那么当用户执行此文件时,会以文件属主的身份去执行此文件
一旦文件执行结束,身份的切换也随之消失。
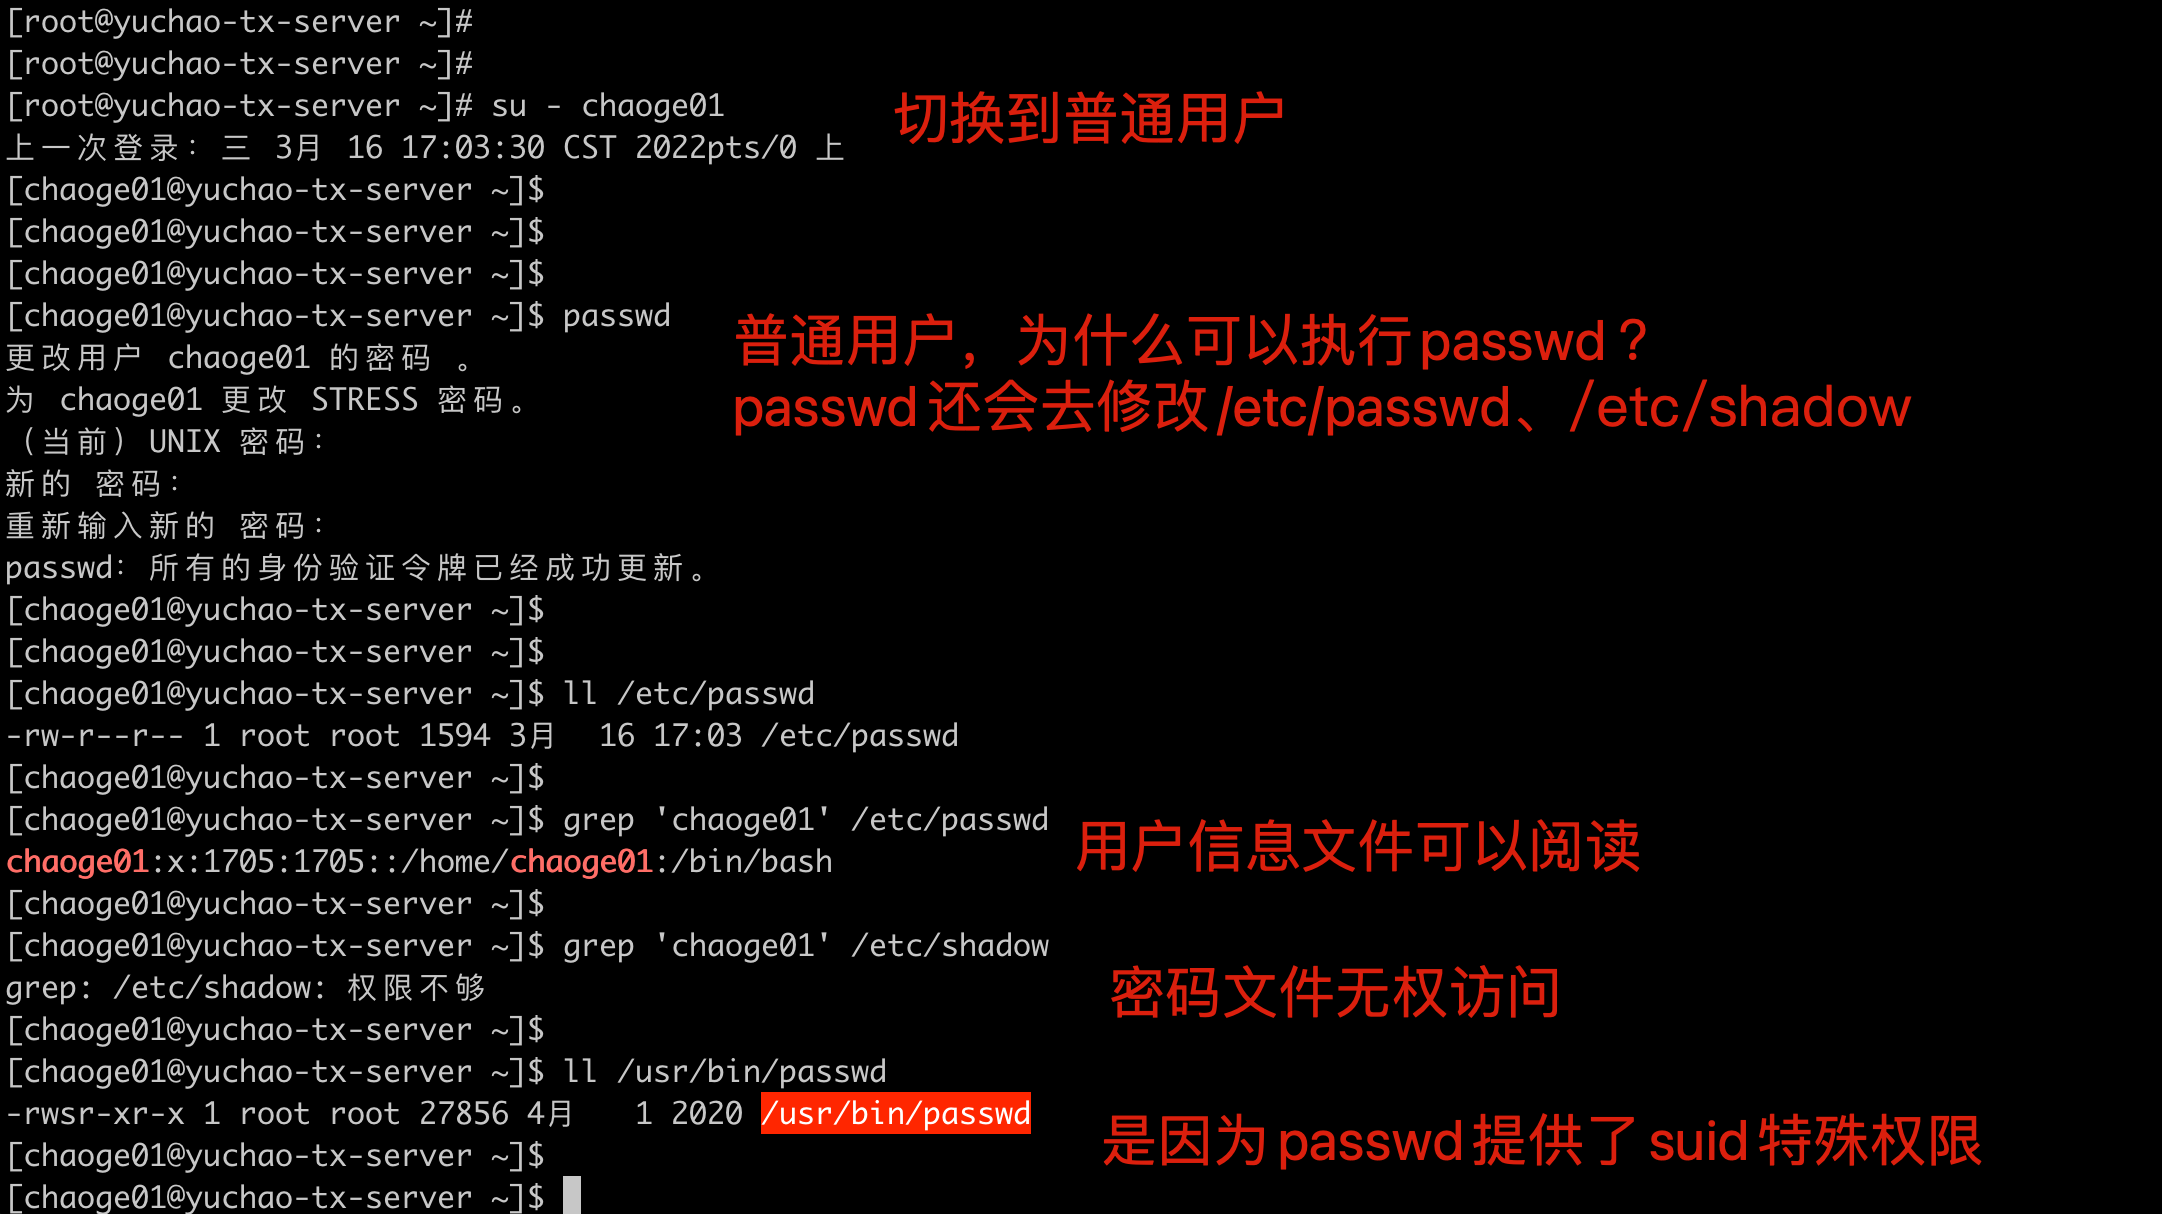
以这个/usr/bin/passwd可执行命令举例
就是让普通用户,执行该命令时,临时获得root的权限。
解释关于linux的用户创建。
用户创建完用户后,需要修改密码,执行passwd命令
但是passwd命令需要读取,修改/etc/passwd、/etc/shadow文件,这些文件都是属于root,那不就没权限操作了吗,但是普通用户,如何执行passwd命令,修改自己的密码呢?
可以让普通用户临时获得root的身份,不就有属主的权限了吗。
这就是设置SUID的一个根本原因。
且SUID特殊权限,只能用在二进制可执行文件上。
图解suid应用
4.2、实践SUID
既然passwd有s权限,可以让用户修改自己的密码
问题,如何进制用户自己修改密码?
去除passwd的s权限
[root@yuchao-linux01 yuchao01]# chmod u-s /usr/bin/passwd
[root@yuchao-linux01 yuchao01]#
[root@yuchao-linux01 yuchao01]#
[root@yuchao-linux01 yuchao01]# ll /usr/bin/passwd
-rwxr-xr-x. 1 root root 27832 Jun 10 2014 /usr/bin/passwd
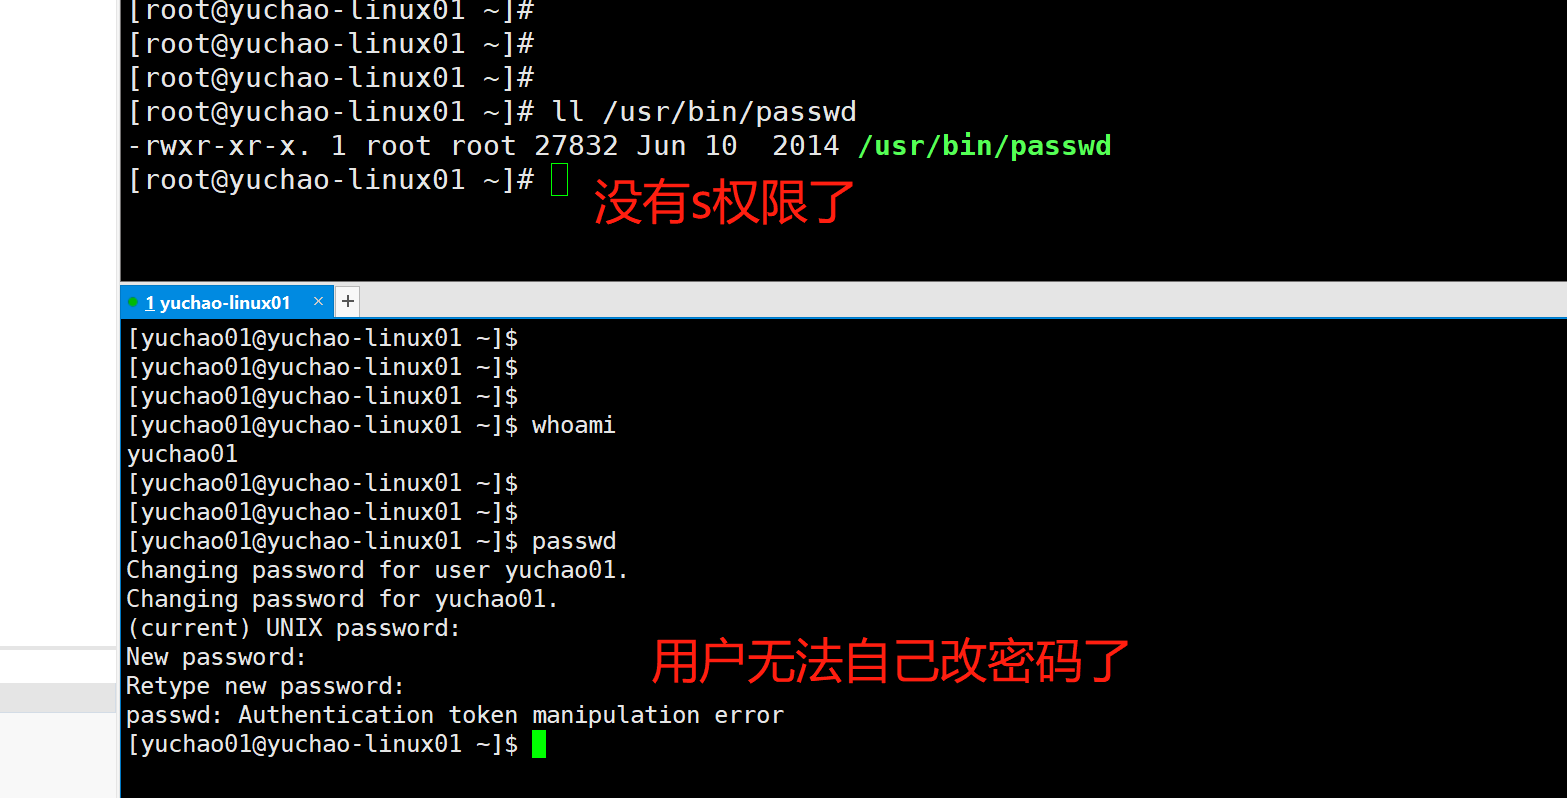
如何再给SUID特殊权限加上去。
[root@yuchao-linux01 ~]# ll /usr/bin/passwd
-rwxr-xr-x. 1 root root 27832 Jun 10 2014 /usr/bin/passwd
添加方式一
[root@yuchao-linux01 ~]# chmod u+s /usr/bin/passwd
[root@yuchao-linux01 ~]#
添加方式二,数字权限
[root@yuchao-linux01 ~]# chmod 4755 /usr/bin/passwd
[root@yuchao-linux01 ~]# ll /usr/bin/passwd
-rwsr-xr-x. 1 root root 27832 Jun 10 2014 /usr/bin/passwd
此时用户可以正确自己修改密码。
4.2.1 总结suid
请注意:学习SUID是为了知道有它的存在,但不要随便用。
SUID位的文件被执行时,该文件将以所有者的身份运行,也就是说无论谁来执行这个文件,他都有文件所有者的特权。
如果属主是root的话,那么执行人就有超级用户的特权了。这时该位将变成一个安全漏洞,因此不要轻易设置该位。
- suid功能是针对二进制可执行命令设置的,不能用在shell脚本上。
- 用户权限位的x权限位置处,如果有s或S,表示该命令存在suid权限。
- suid的作用就是,让普通用户在执行设置了suid权限的命令时,可以拥有其(属主)的权限(一般默认是root)。
- 二进制命令,如系统提供的ls,mkdir等命令,都需要有x权限才可以操作。
- suid是一个危险的命令,对系统有一定威胁,一般依然是用sudo命令代替suid等特殊权限操作。
- 系统安全优化时,会尽量去除所有设置suid的命令。
4.2.2 suid危险实践
在没有配置sudo的情况下,普通用户肯定是不能删除别人的数据的,比如。
默认用户是无法删除别人的资料的
[root@yuchao-tx-server ~]# touch /opt/我是root的文件
[root@yuchao-tx-server ~]#
[root@yuchao-tx-server ~]#
[root@yuchao-tx-server ~]# su - chaoge01
上一次登录:三 3月 16 17:03:41 CST 2022pts/0 上
[chaoge01@yuchao-tx-server ~]$
[chaoge01@yuchao-tx-server ~]$
[chaoge01@yuchao-tx-server ~]$ ls /opt/
containerd rh 我是root的文件
[chaoge01@yuchao-tx-server ~]$
[chaoge01@yuchao-tx-server ~]$ rm /opt/我是root的文件
rm:是否删除有写保护的普通空文件 "/opt/我是root的文件"?y
rm: 无法删除"/opt/我是root的文件": 权限不够
当rm命令添加了suid权限。
[root@yuchao-tx-server ~]# chmod u+s /bin/rm
[root@yuchao-tx-server ~]#
[root@yuchao-tx-server ~]# ll /bin/rm
-rwsr-xr-x 1 root root 62872 11月 17 2020 /bin/rm
再用普通用户,试试rm命令,危险警告!!
[chaoge01@yuchao-tx-server ~]$ ll /opt/我是root的文件
-rw-r--r-- 1 root root 0 3月 16 17:46 /opt/我是root的文件
[chaoge01@yuchao-tx-server ~]$
[chaoge01@yuchao-tx-server ~]$
[chaoge01@yuchao-tx-server ~]$
[chaoge01@yuchao-tx-server ~]$ rm /opt/我是root的文件
[chaoge01@yuchao-tx-server ~]$
[chaoge01@yuchao-tx-server ~]$ ll /opt/我是root的文件
ls: 无法访问/opt/我是root的文件: 没有那个文件或目录
[chaoge01@yuchao-tx-server ~]$
太可怕了!!!!!!!!!!!赶紧去掉suid。
[root@yuchao-tx-server ~]# ll /bin/rm
-rwsr-xr-x 1 root root 62872 11月 17 2020 /bin/rm
[root@yuchao-tx-server ~]#
[root@yuchao-tx-server ~]# chmod u-s /bin/rm
[root@yuchao-tx-server ~]#
[root@yuchao-tx-server ~]# ll /bin/rm
-rwxr-xr-x 1 root root 62872 11月 17 2020 /bin/rm
给rm命令设置suid之后,任何普通用户去执行这个命令,都会以root身份去运行,因此及其危险。
你学废了吗?兄弟。
4.2.3 查找系统中所有的suid权限文件
find搜索,根据权限搜索
[root@yuchao-tx-server ~]# find / -type f -perm -4000 -ls
4.2.4 补充sgid(了解即可)
sgid原理篇
1.对于二进制命令来说,sgid的功能和suid基本一样,只不过一个是设置文件属主的权限,一个是设置属组的权限,和9位基本rwx那个理解概念一样。
-
suid是获得文件属主的权限,sgid是获得文件属组的权限
-
sgid主要用于文件夹,为某个目录设置sgid之后,在该目录中的创建的文件,都以(目录的属组)权限为准,而不属于创建该文件的用户权限,这就实现了多个用户,可以共享一个目录的作用。
sgid针对文件、文件夹的作用
对文件来说
-
sgid只对二进制命令生效,且需要二进制命令本身有x权限。
-
执行包含sgid权限的二进制命令时,会获得该命令在执行期间所属的组的身份与权限。
对文件夹来说
-
linux中所有的用户,默认创建的文件,文件夹,属主和属组都是用户自身。
-
设置了sgid的目录,会保证在这个目录下创建的文件、文件夹都保持同样的权限属性,都属于该目录的属组权限。
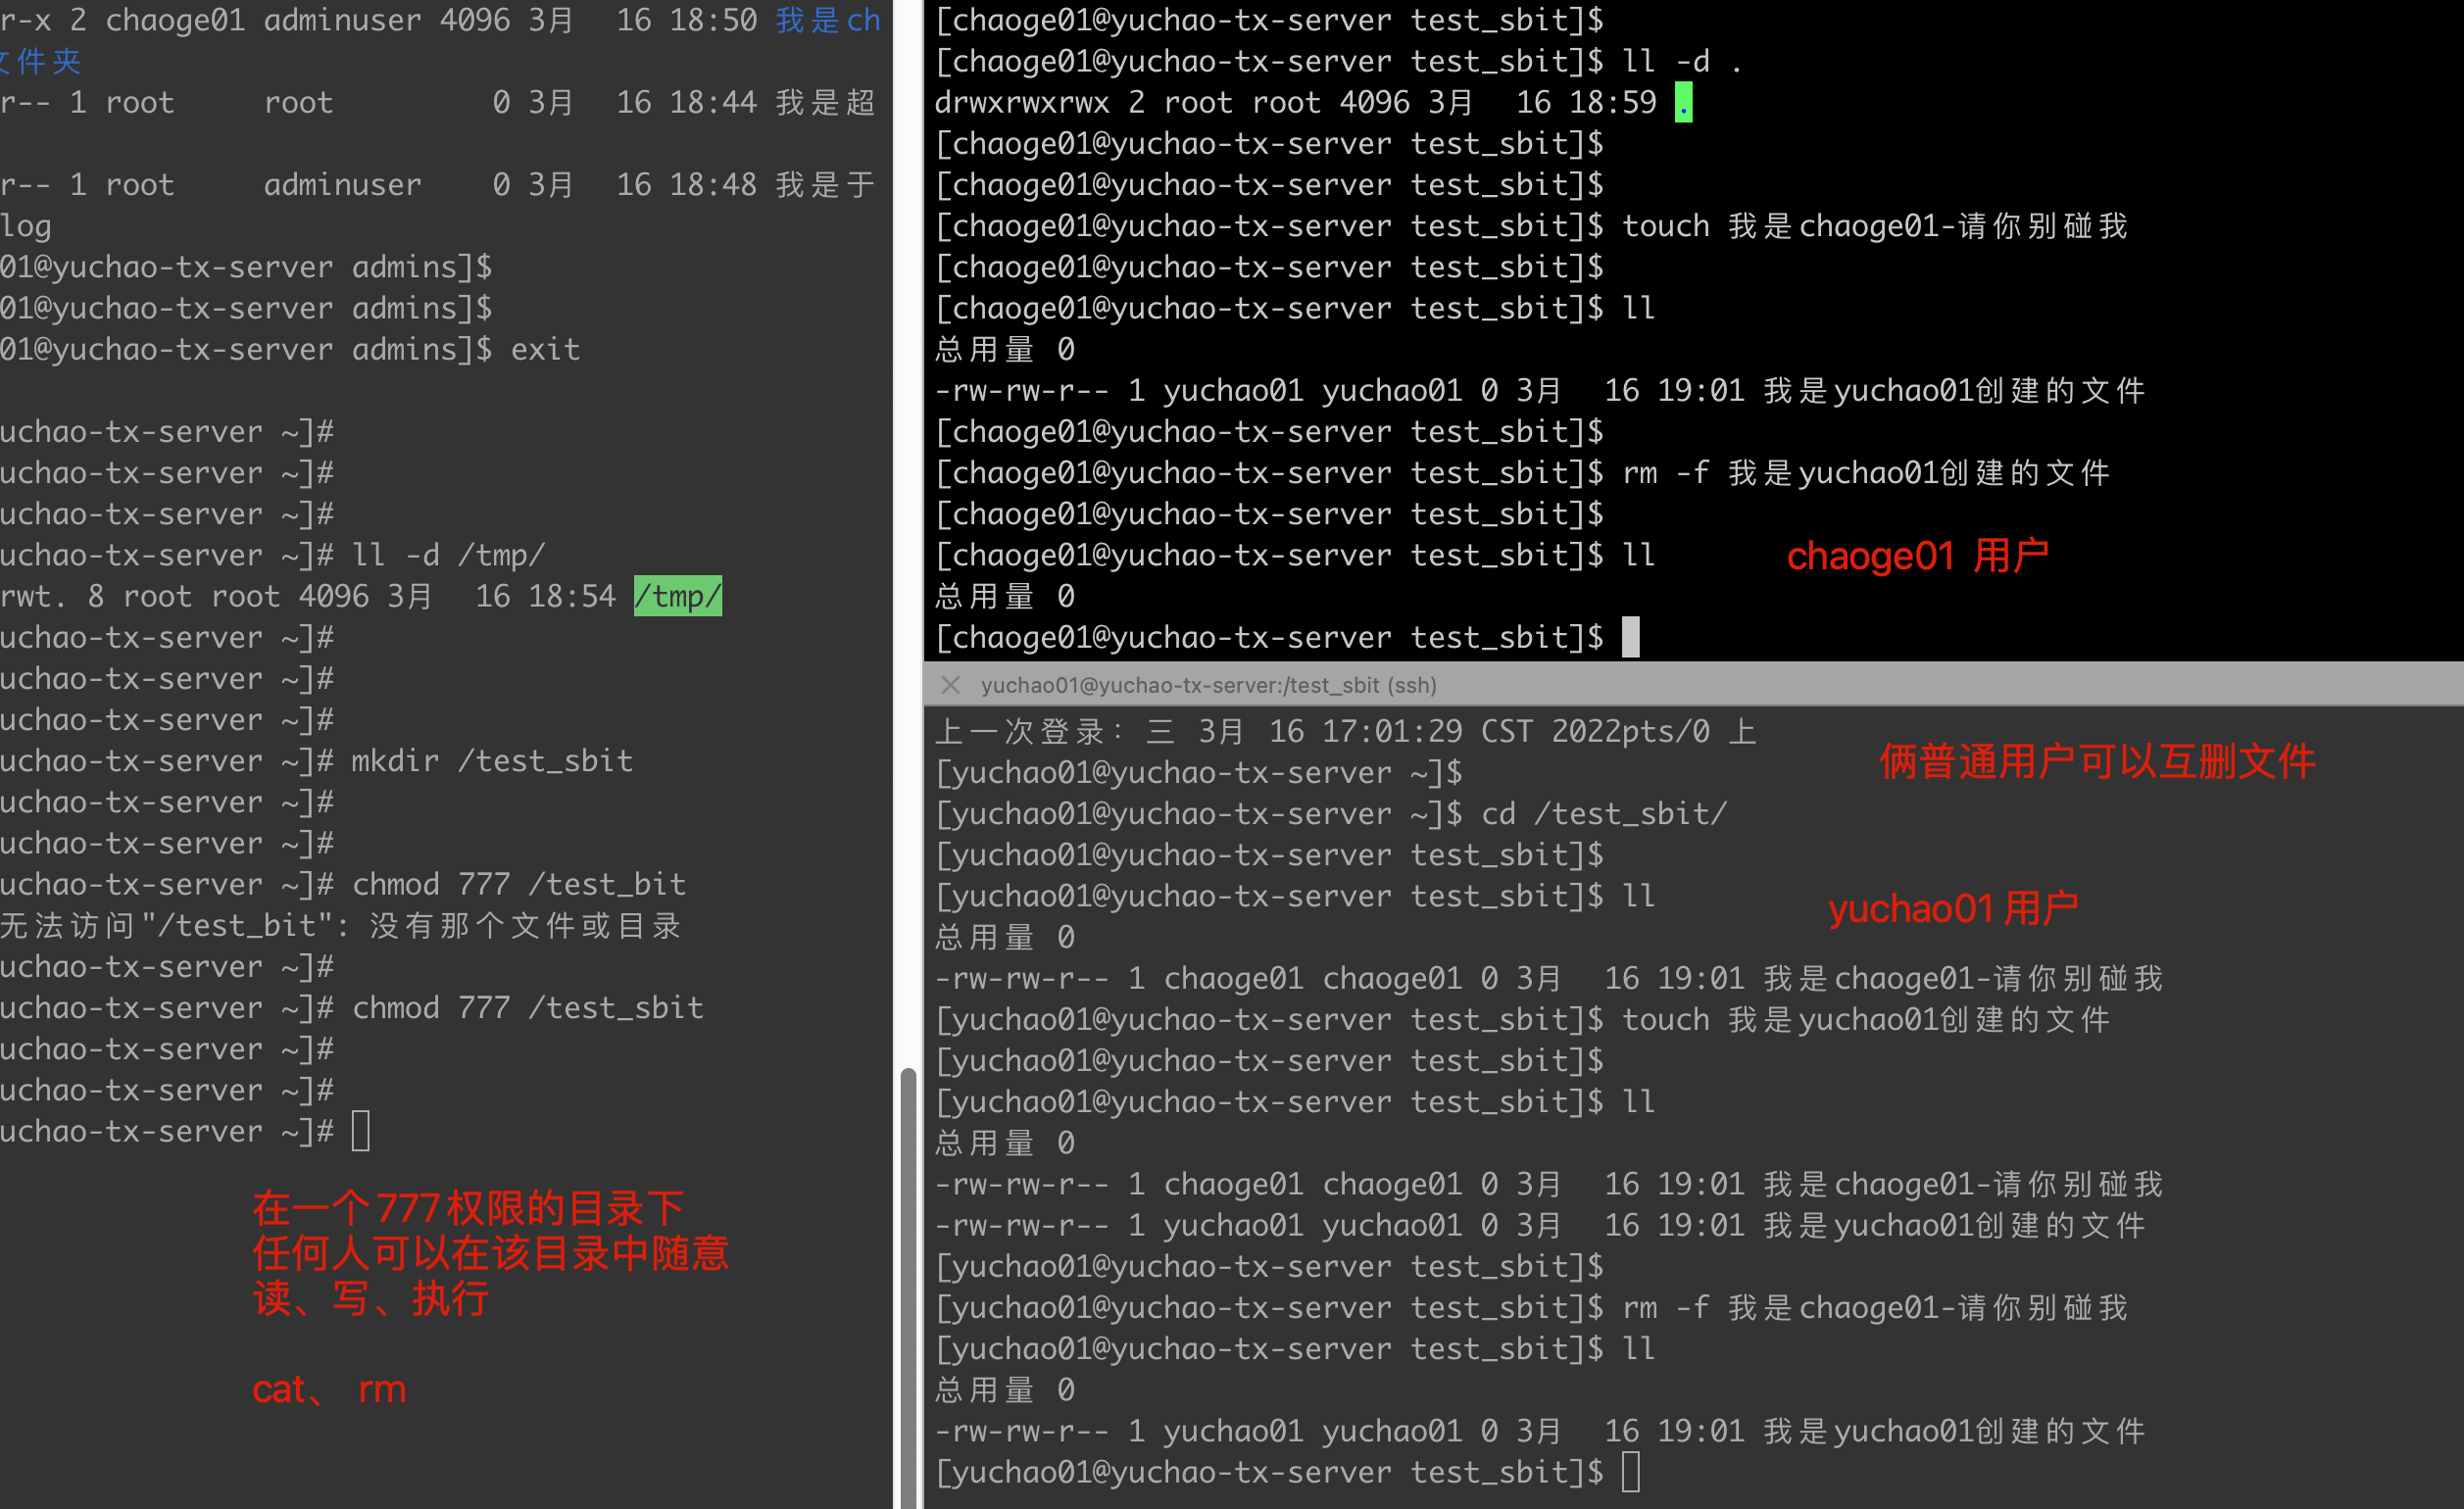
实践操作(红帽认证考题)
1.创建一个共享目录/home/admins
2.要求该目录属组是adminuser,adminuser组内成员对该目录的权限是,可读,可写,可执行。
3.其他用户均无任何权限(root特例)
4.进入/home/admins创建的文件,自动继承adminuser组的权限。
实践过程
[root@yuchao-tx-server ~]# mkdir /home/admins
[root@yuchao-tx-server ~]# groupadd adminuser
[root@yuchao-tx-server ~]# ll -d /home/admins
drwxr-xr-x 2 root root 4096 3月 16 18:18 /home/admins
修改属组
[root@yuchao-tx-server ~]# chown :adminuser /home/admins
[root@yuchao-tx-server ~]#
[root@yuchao-tx-server ~]#
[root@yuchao-tx-server ~]# ls -ld /home/admins/
drwxr-xr-x 2 root adminuser 4096 3月 16 18:18 /home/admins/
[root@yuchao-tx-server ~]#
还未设置sgid时,权限依然遵循linux默认的规则
[root@yuchao-tx-server ~]# touch /home/admins/我是超哥.log
[root@yuchao-tx-server ~]#
[root@yuchao-tx-server ~]# ll /home/admins/
总用量 0
-rw-r--r-- 1 root root 0 3月 16 18:44 我是超哥.log
加上sgid特殊权限
[root@yuchao-tx-server ~]# chmod 2770 /home/admins/
[root@yuchao-tx-server ~]#
[root@yuchao-tx-server ~]# ll -ld /home/admins/
drwxrws--- 2 root adminuser 4096 3月 16 18:44 /home/admins/
在该目录下创建的文件夹,自动属于adminuser组了
[root@yuchao-tx-server ~]# touch /home/admins/我是于超老师.log
[root@yuchao-tx-server ~]#
[root@yuchao-tx-server ~]# ll /home/admins/
总用量 0
-rw-r--r-- 1 root root 0 3月 16 18:44 我是超哥.log
-rw-r--r-- 1 root adminuser 0 3月 16 18:48 我是于超老师.log
换一个普通用户试试
[root@yuchao-tx-server ~]# su - chaoge01
上一次登录:三 3月 16 18:04:22 CST 2022pts/0 上
[chaoge01@yuchao-tx-server ~]$
[chaoge01@yuchao-tx-server ~]$ cd /home/admins/
-bash: cd: /home/admins/: 权限不够
[chaoge01@yuchao-tx-server ~]$
必须要求该用户是adminuser组里的成员,才有权限
[root@yuchao-tx-server ~]# usermod -G adminuser chaoge01
[root@yuchao-tx-server ~]#
[root@yuchao-tx-server ~]# su - chaoge01
上一次登录:三 3月 16 18:49:39 CST 2022pts/0 上
[chaoge01@yuchao-tx-server ~]$
[chaoge01@yuchao-tx-server ~]$ cd /home/admins/
[chaoge01@yuchao-tx-server admins]$ touch 我是chaoge01.log
[chaoge01@yuchao-tx-server admins]$
[chaoge01@yuchao-tx-server admins]$ ll
总用量 0
-rw-rw-r-- 1 chaoge01 adminuser 0 3月 16 18:50 我是chaoge01.log
-rw-r--r-- 1 root root 0 3月 16 18:44 我是超哥.log
-rw-r--r-- 1 root adminuser 0 3月 16 18:48 我是于超老师.log
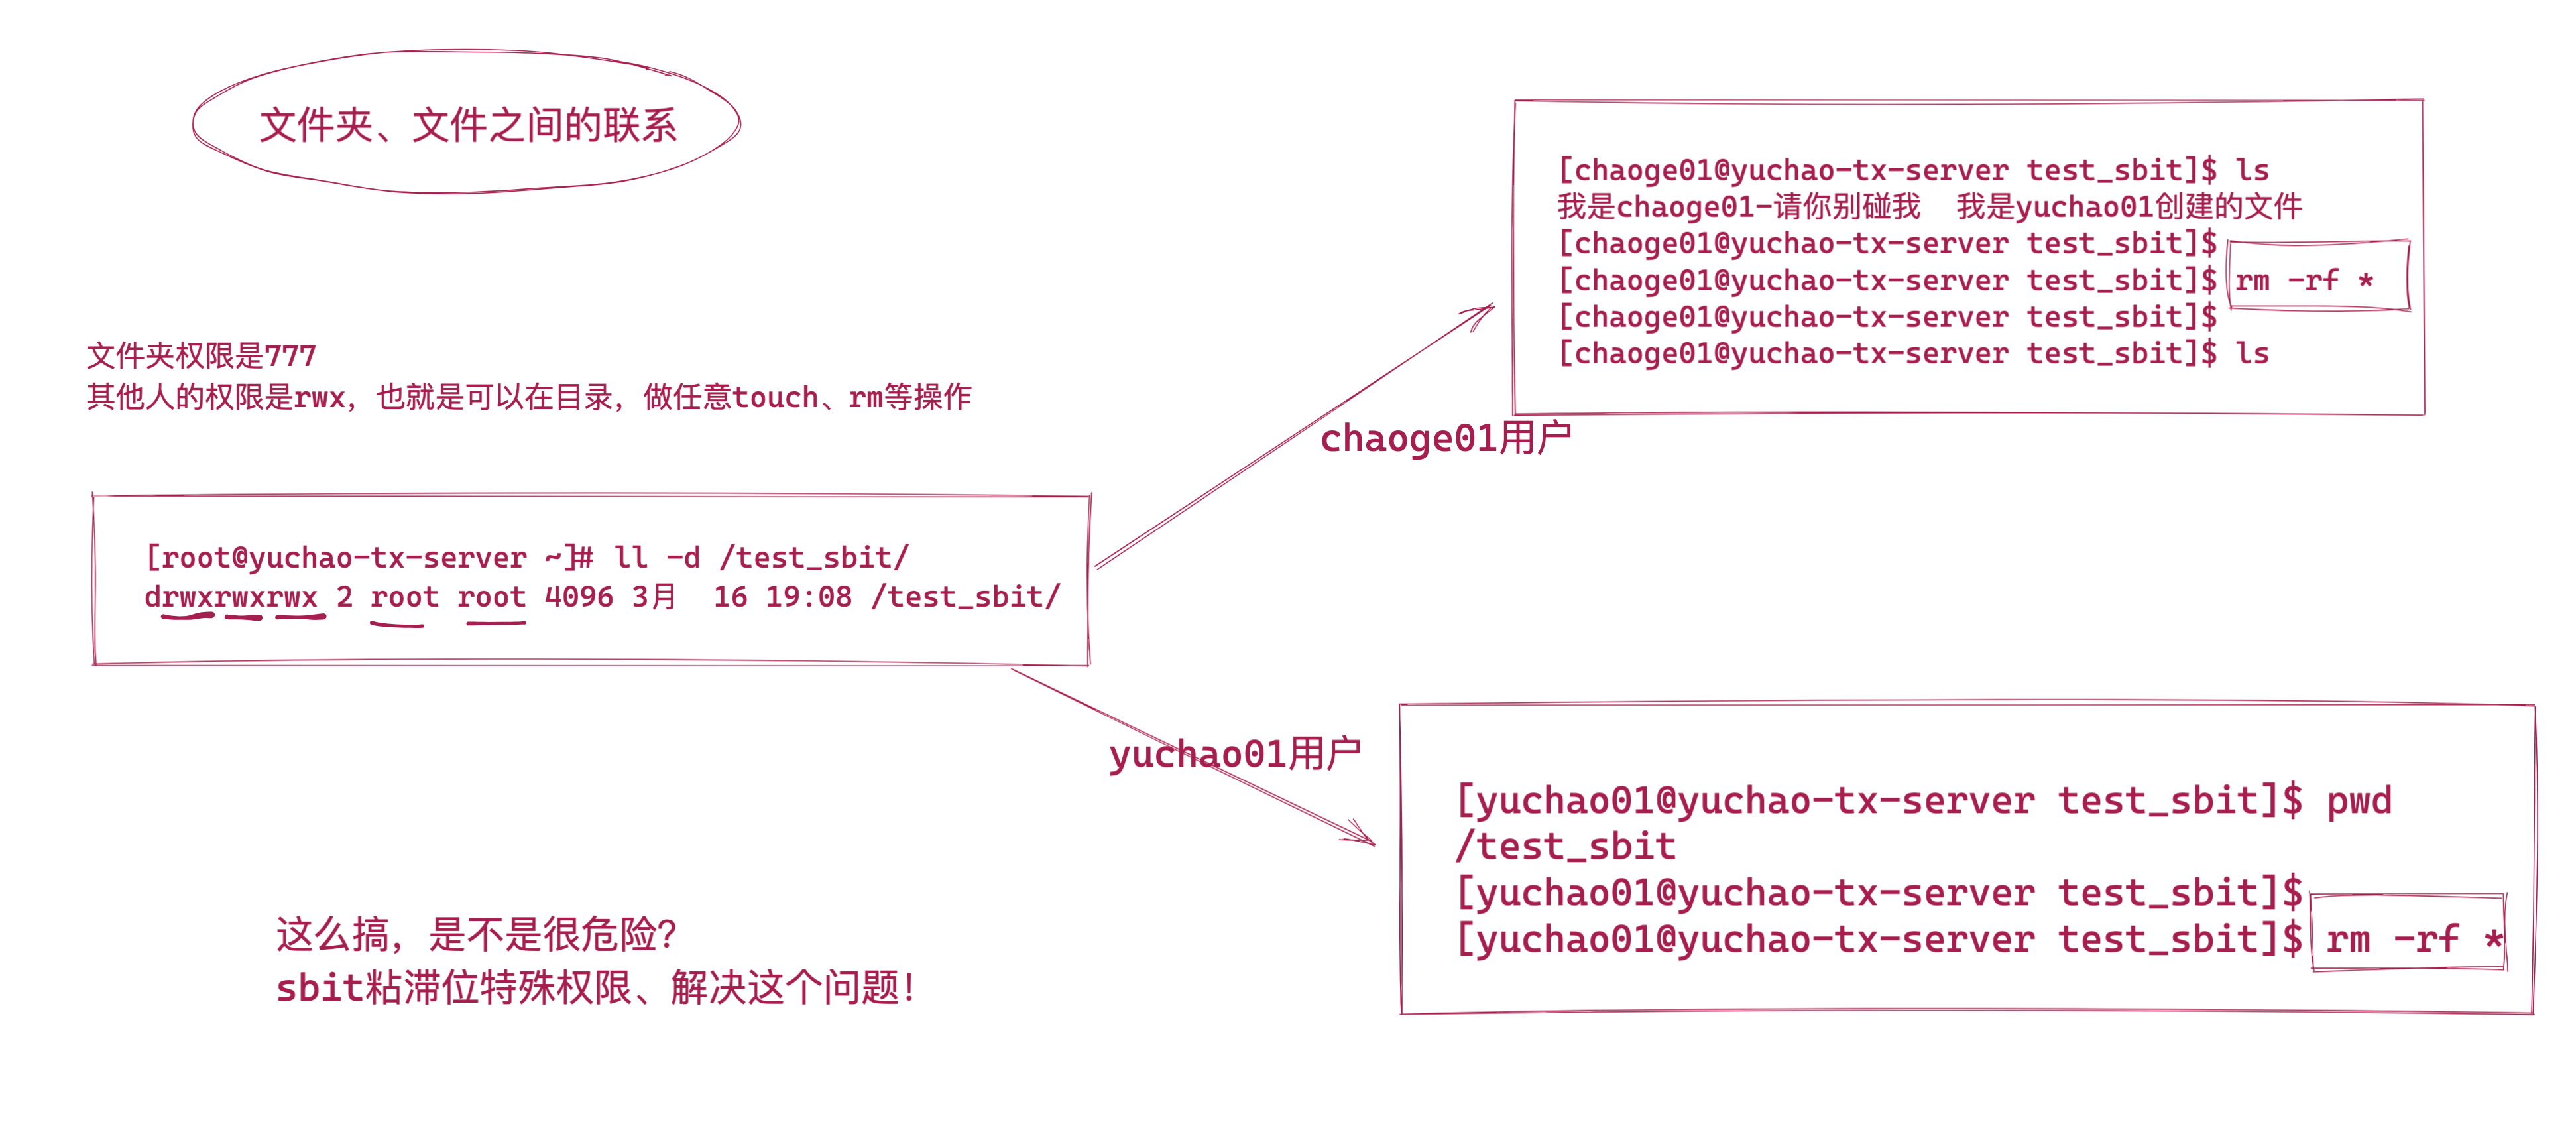
4.3、SBIT特殊权限(sticky bit)
图解,为什么会用到sbit
sbit原理
粘滞位(Sticky bit),又称作粘着位,linux下另一个特殊权限。
sbit粘滞位,用的已经很少了,但是对于系统特殊文件夹/tmp来说,是整个系统所有用户的临时文件存放地,谁都有任意的权限,你会发现该目录的权限巨大。
[root@yuchao-tx-server ~]# ll -d /tmp/
drwxrwxrwt. 8 root root 4096 3月 16 18:54 /tmp/
但是看到了一个特殊权限t
一句话总结。
当目录有了粘滞位特殊权限,这个目录除了root用户特殊以外,任何用户都只能删除、移动自己的创建的文件,而不能影响到其他人。
演示
没有设置粘滞位,且目录是777权限时,也就是任意的user、group、other角色在这个目录下,可以进行读、写、执行任意文件。
最常见的用法在目录上设置粘滞位,如此以来,只有目录内文件的所有者或者root才可以删除或移动该文件。
如果不为目录设置粘滞位,任何具有该目录写和执行权限的用户都可以删除和移动其中的文件。
实际应用中,粘滞位一般用于/tmp目录,以防止普通用户删除或移动其他用户的文件。

因此,t权限,是用于限制用户权限,禁止用户删除其他人资料的
[root@jumpserver ~]# ll /tmp/ -d
drwxrwxrwt. 14 root root 4096 Feb 10 18:49 /tmp/
命令:chmod
语法:# chmod [选项] 文件夹
作用:只允许文件的创建者和root用户删除文件
常用选项
o+t 添加粘滞位
o-t 去掉粘滞位
用法:chmod o+t 目录名
示例代码:
chmod o+t
含义:给目录增加粘滞位权限。
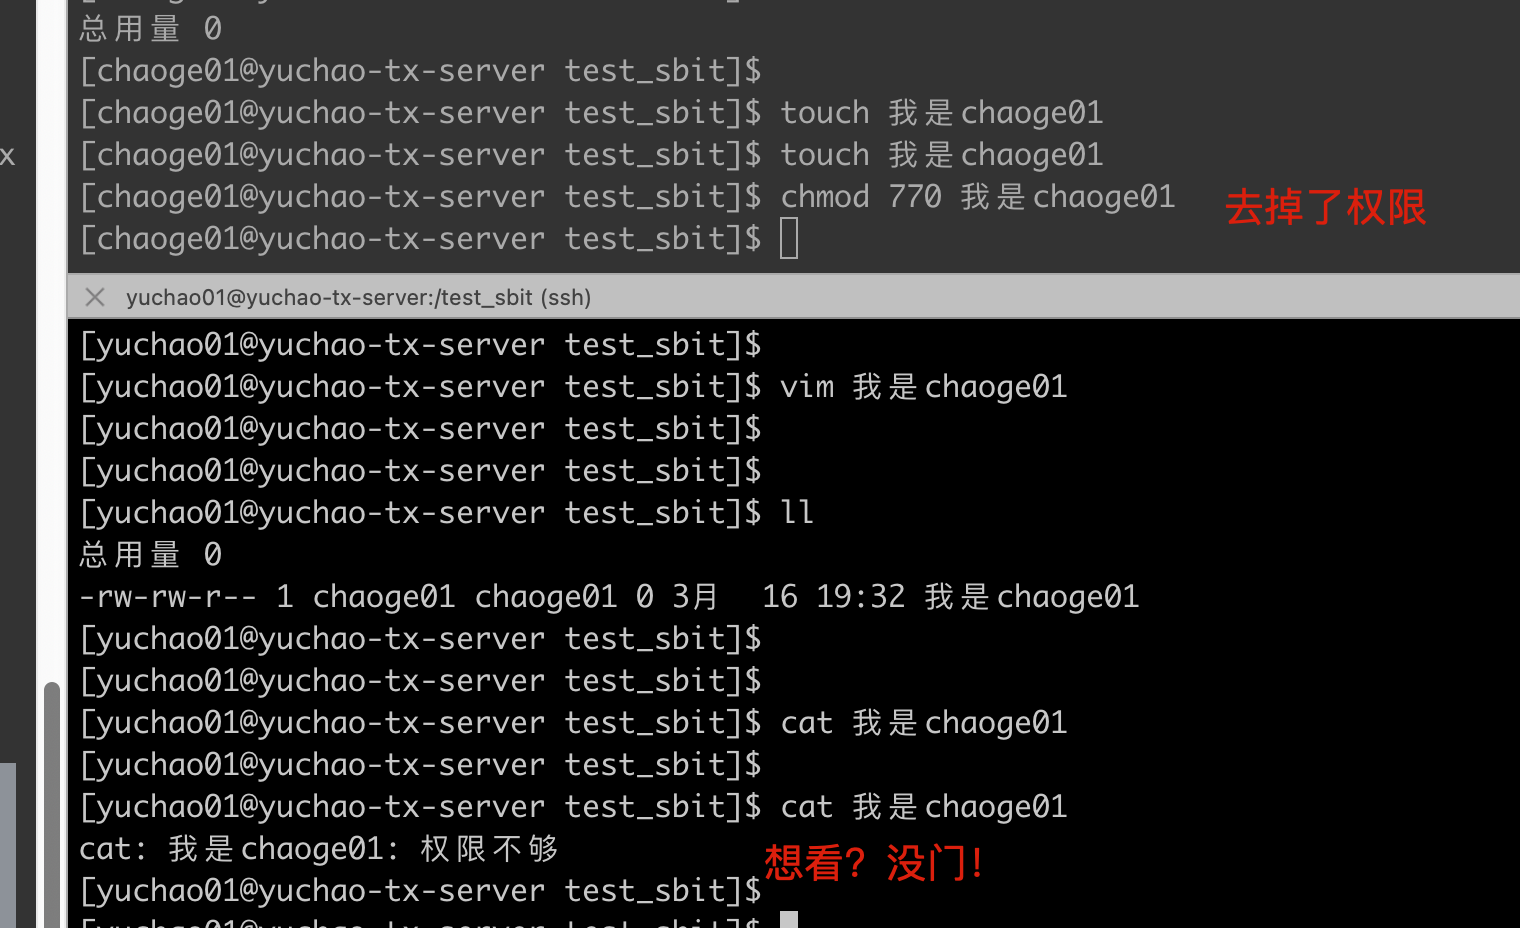
4.3.0 实践
1.添加目录的sbit权限
[root@yuchao-tx-server ~]# chmod o+t /test_sbit/
[root@yuchao-tx-server ~]#
注意了,这个目录,是完全属于root用户的,但是other的权限也给到了最大。
[root@yuchao-tx-server ~]# ll -d /test_sbit/
drwxrwxrwt 2 root root 4096 3月 16 19:14 /test_sbit/
2.分别用两个普通用户测试,是否可以任意删除别人数据。
在这个拥有了sbit权限的目录下,你可以自由存放自己的资料,别人也可以

但是你只能操作你的文件,无法动别人的文件了。

别人设置,看都不让你看。
4.3.1 sbit应用
公司多个部门公用一个文件夹work,为了让所有人都能访问,work文件夹赋予了777权限,用户root新建了一个文件root.txt,发现被别人删除了。
我们希望root建立的文件,只有root自己可以删。
步骤1:root用户下操作
root用户新建文件夹/work,并且新建两个文件root.txt和root1.txt,赋予/work文件夹和下面的文件777权限.
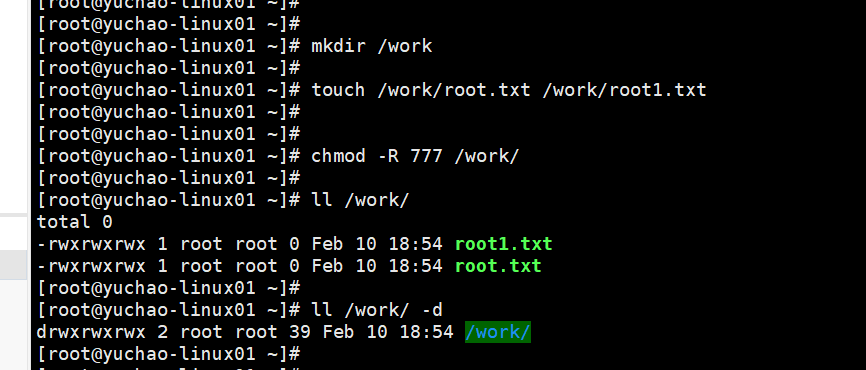
[root@yuchao-linux01 ~]# mkdir /work
[root@yuchao-linux01 ~]#
[root@yuchao-linux01 ~]# touch /work/root.txt /work/root1.txt
[root@yuchao-linux01 ~]#
[root@yuchao-linux01 ~]#
[root@yuchao-linux01 ~]# chmod -R 777 /work/
[root@yuchao-linux01 ~]#
[root@yuchao-linux01 ~]# ll /work/
total 0
-rwxrwxrwx 1 root root 0 Feb 10 18:54 root1.txt
-rwxrwxrwx 1 root root 0 Feb 10 18:54 root.txt
[root@yuchao-linux01 ~]#
[root@yuchao-linux01 ~]# ll /work/ -d
drwxrwxrwx 2 root root 39 Feb 10 18:54 /work/
[root@yuchao-linux01 ~]#
步骤2,使用普通用户登录,模拟恶意删除其他人文件。
[yuchao66@yuchao-linux01 ~]$ ls /work/
root1.txt root.txt
[yuchao66@yuchao-linux01 ~]$
[yuchao66@yuchao-linux01 ~]$
[yuchao66@yuchao-linux01 ~]$ ls /work/ -d
/work/
[yuchao66@yuchao-linux01 ~]$
[yuchao66@yuchao-linux01 ~]$
[yuchao66@yuchao-linux01 ~]$ ll /work/ -d
drwxrwxrwx 2 root root 39 Feb 10 18:54 /work/
[yuchao66@yuchao-linux01 ~]$
[yuchao66@yuchao-linux01 ~]$
[yuchao66@yuchao-linux01 ~]$ cd /work/
[yuchao66@yuchao-linux01 work]$ ll
total 0
-rwxrwxrwx 1 root root 0 Feb 10 18:54 root1.txt
-rwxrwxrwx 1 root root 0 Feb 10 18:54 root.txt
[yuchao66@yuchao-linux01 work]$
[yuchao66@yuchao-linux01 work]$ rm -f root.txt
[yuchao66@yuchao-linux01 work]$
[yuchao66@yuchao-linux01 work]$ ll
total 0
-rwxrwxrwx 1 root root 0 Feb 10 18:54 root1.txt
[yuchao66@yuchao-linux01 work]$
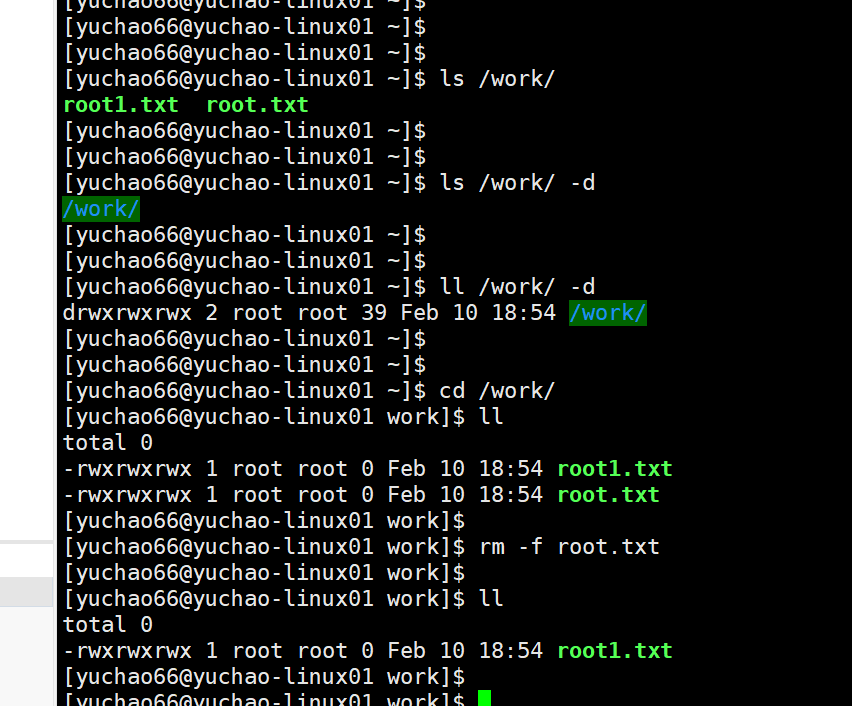
你看,这么一个公共目录,一个普通用户yuchao66就能随便删除人家的资料,这么是不对的。
步骤3:给该公共目录添加粘滞位,再看看效果。
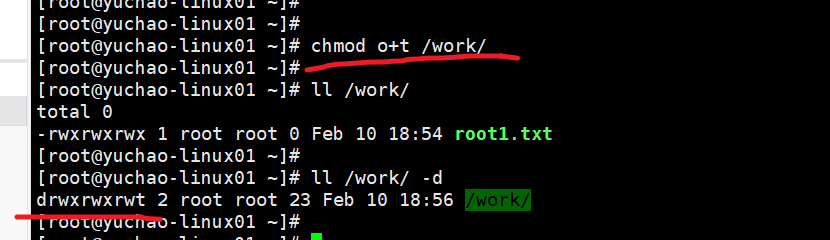
[root@yuchao-linux01 ~]# chmod o+t /work/
[root@yuchao-linux01 ~]#
[root@yuchao-linux01 ~]# ll /work/
total 0
-rwxrwxrwx 1 root root 0 Feb 10 18:54 root1.txt
[root@yuchao-linux01 ~]#
[root@yuchao-linux01 ~]# ll /work/ -d
drwxrwxrwt 2 root root 23 Feb 10 18:56 /work/
[root@yuchao-linux01 ~]#
步骤4,使用yuchao66用户,再看下有什么权限
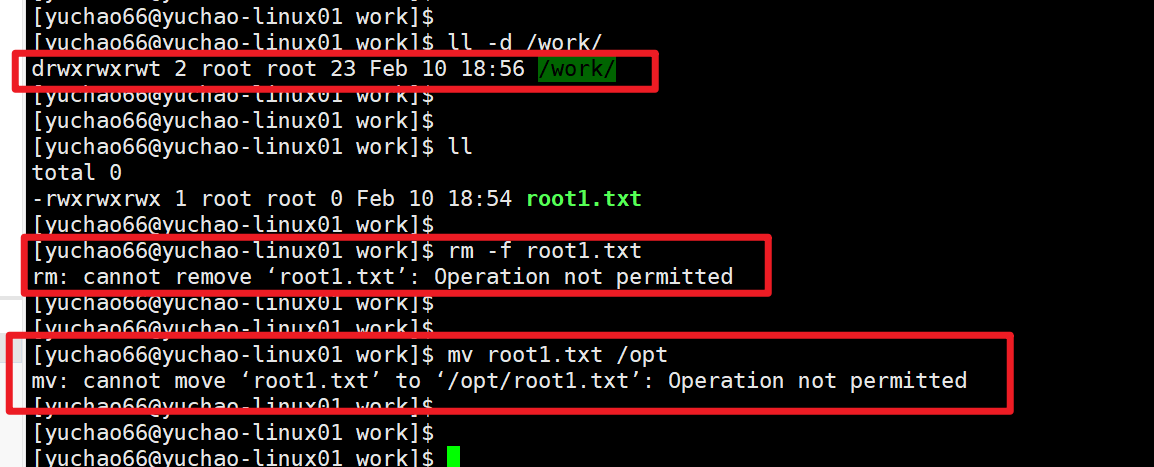
[yuchao66@yuchao-linux01 work]$
[yuchao66@yuchao-linux01 work]$ ll -d /work/
drwxrwxrwt 2 root root 23 Feb 10 18:56 /work/
[yuchao66@yuchao-linux01 work]$
[yuchao66@yuchao-linux01 work]$
[yuchao66@yuchao-linux01 work]$ ll
total 0
-rwxrwxrwx 1 root root 0 Feb 10 18:54 root1.txt
[yuchao66@yuchao-linux01 work]$
[yuchao66@yuchao-linux01 work]$ rm -f root1.txt
rm: cannot remove ‘root1.txt’: Operation not permitted
[yuchao66@yuchao-linux01 work]$
[yuchao66@yuchao-linux01 work]$
[yuchao66@yuchao-linux01 work]$ mv root1.txt /opt
mv: cannot move ‘root1.txt’ to ‘/opt/root1.txt’: Operation not permitted
[yuchao66@yuchao-linux01 work]$
步骤5,去掉粘滞位,再看看权限
只有root才给权限
[root@yuchao-linux01 ~]# chmod o-t /work/
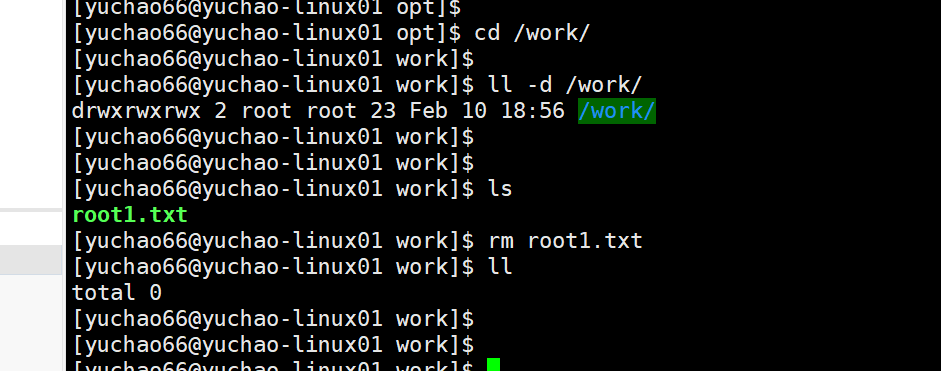
[yuchao66@yuchao-linux01 opt]$ cd /work/
[yuchao66@yuchao-linux01 work]$
[yuchao66@yuchao-linux01 work]$ ll -d /work/
drwxrwxrwx 2 root root 23 Feb 10 18:56 /work/
[yuchao66@yuchao-linux01 work]$
[yuchao66@yuchao-linux01 work]$
[yuchao66@yuchao-linux01 work]$ ls
root1.txt
[yuchao66@yuchao-linux01 work]$ rm root1.txt
[yuchao66@yuchao-linux01 work]$ ll
total 0
[yuchao66@yuchao-linux01 work]$
五、ACL访问控制
回忆之前讲了什么
关于文件拥有者的身份
user
group
other
关于文件的权限
read
write
execute
SUID
但是在工作里的复杂环境下,这样的权限,已经不够用了。

5.1、ACL使用场景
/data是运维部门的资料,运维ops组里的员工可以rwx权限管理
root作为该目录的属主,也拥有rwx权限
其他部门的员工,比如开发同学就无法访问这个目录数据
偶然的,现在有一个测试岗的同事chaoge,需要访问该/data数据,读取文件夹数据,就得有rx两个权限,并且只能是rx权限,只读文件夹,不得给w写入权限。
应该如何给与他使用权限?
修改属主?不可能
    好比别人想看看你手机,难不成你就要送给他?
修改属组?有同学会尝试思考如下方案,你来看对不对
    这个/data被整个ops部门组的用户在使用,肯定不可能改为chaoge组
    并且即使给这个chaoge用户,加入ops组,也不对,ops组是rwx权限,我们要求只给chaoge用户rx权限。
    还有就是修改other的权限为rx?因为chaoge属于是other角色,但是这样也不行,导致其他人都能访问了。

就是这个情况,我们能明显感到头大,自带的权限,没办法啊。
ACL是Access Control List(访问控制列表)的缩写,不过在Linux系统中,ACL用于设定用户针对文件的权限。
ACL这个功能就是用来解决上述权限不够的问题的,使用ACL给用户chaoge分配权限,chaoge既不是/data的属主,也不是属组,单独给chaoge用户分配关于/data文件夹的r-x权限。
5.2 检查ACL功能
ACL访问控制列表这个功能是和文件系统挂钩的,需要文件系统的支持,并且在centos7系统下,默认就支持ACL了。
可以通过dmesg命令,查看到ACL相关信息。
dmesg可以查看到系统的启动信息,包括硬件信息,操作系统信息。
[root@yuchao-linux01 ~]# dmesg |grep ACL
[ 16.890605] systemd[1]: systemd 219 running in system mode. (+PAM +AUDIT +SELINUX +IMA -APPARMOR +SMACK +SYSVINIT +UTMP +LIBCRYPTSETUP +GCRYPT +GNUTLS +ACL +XZ +LZ4 -SECCOMP +BLKID +ELFUTILS +KMOD +IDN)
[ 17.775177] SGI XFS with ACLs, security attributes, no debug enabled
如果未安装ACL,可以手动安装(需要配置好网络)
[root@yuchao-linux01 ~]# yum install acl -y
5.3 命令使用
getfacl命令:查看文件的ACL策略及权限
setfacl命令: 给文件针对某个用户或者某个组来增加(设置)ACL策略
Linux设置文件ACL权限是通过setfacl工具来设置的,通过getfacl工具来获取ACL访问控制列表
5.4 getfacl命令
如何判断linux的文件,是否额外设置了ACL权限。
ls -l工具可以查看到文件所属的九列权限,同时可以看到九列权限之后一位:如果是点(.)表示仅仅有九列权限,如果是+,表示除九列之外还有ACL权限,这时候就需要通过getfacl工具查看ACL权限
看看getfacl命令怎么用
前三行,以井号开头的,表示注释信息,不起作用
    file,显示文件,目录名
    owner,紧跟着属主名
    group,紧跟着属组名
非井号开头的,就是ACL的权限控制规则了
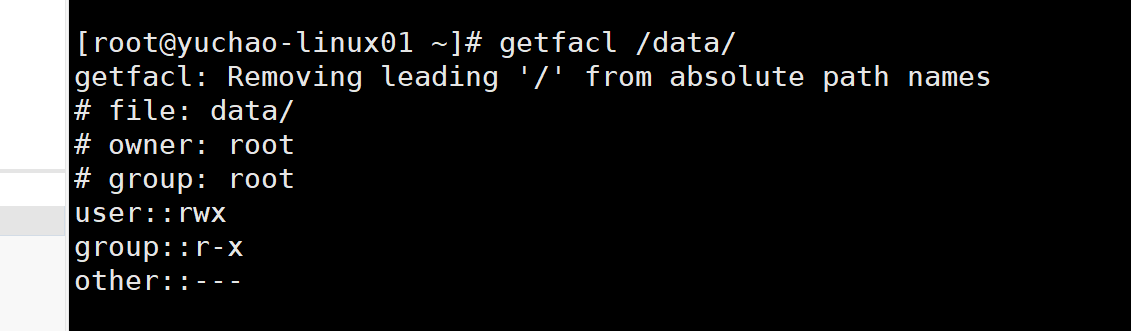
[root@yuchao-linux01 ~]# getfacl /data/
getfacl: Removing leading '/' from absolute path names
file: data/
owner: root
group: root
user::rwx
group::r-x
other::---
语法
user:用户名:权限,这一行完整的写法是 user:root:rwx
group:组名:权限,这一行也是省略了,其实是group:root:r-x
other::--- 表示其他人没有任何权限
先知道,getfcal命令是能够查看文件的acl配置的
5.5 setfacl命令
语法
setfacl 选项 文件
选项:
-m:设定 ACL 权限。
如果是给予用户 ACL 权限,则使用"u:用户名:权限"格式赋予;如果是给予组 ACL 权限,则使用"g:组名:权限" 格式赋予;
-x:删除指定的 ACL 权限;
-b:删除所有的 ACL 权限;
-d:设定默认 ACL 权限。
只对目录生效,指目录中新建立的文件拥有此默认权限;
-k:删除默认 ACL 权限;
-R:递归设定 ACL 权限。
不加-R的话,生成新子目录后,权限不继承。
指设定的 ACL 权限会对目录下的所有子文件生效;
实践setfacl
实践,给chaoge用户设置访问/data文件夹的r-x权限。
准备好测试数据
准备好测试数据
[root@yuchao-linux01 ~]# ll -d /data
drwxr-x--- 2 root ops 26 Jan 14 14:41 /data
[root@yuchao-linux01 ~]#
[root@yuchao-linux01 ~]# cd /data
[root@yuchao-linux01 data]#
[root@yuchao-linux01 data]# touch chaoge{1..10}.txt
[root@yuchao-linux01 data]#
[root@yuchao-linux01 data]# chown -R root.ops /data
[root@yuchao-linux01 data]#
[root@yuchao-linux01 data]#
[root@yuchao-linux01 data]#
[root@yuchao-linux01 data]# ll /data
total 0
-rw-r--r-- 1 root ops 0 Jan 14 17:59 chaoge10.txt
-rw-r--r-- 1 root ops 0 Jan 14 17:59 chaoge1.txt
-rw-r--r-- 1 root ops 0 Jan 14 17:59 chaoge2.txt
-rw-r--r-- 1 root ops 0 Jan 14 17:59 chaoge3.txt
-rw-r--r-- 1 root ops 0 Jan 14 17:59 chaoge4.txt
-rw-r--r-- 1 root ops 0 Jan 14 17:59 chaoge5.txt
-rw-r--r-- 1 root ops 0 Jan 14 17:59 chaoge6.txt
-rw-r--r-- 1 root ops 0 Jan 14 17:59 chaoge7.txt
-rw-r--r-- 1 root ops 0 Jan 14 17:59 chaoge8.txt
-rw-r--r-- 1 root ops 0 Jan 14 17:59 chaoge9.txt
给chaoge用户添加acl权限
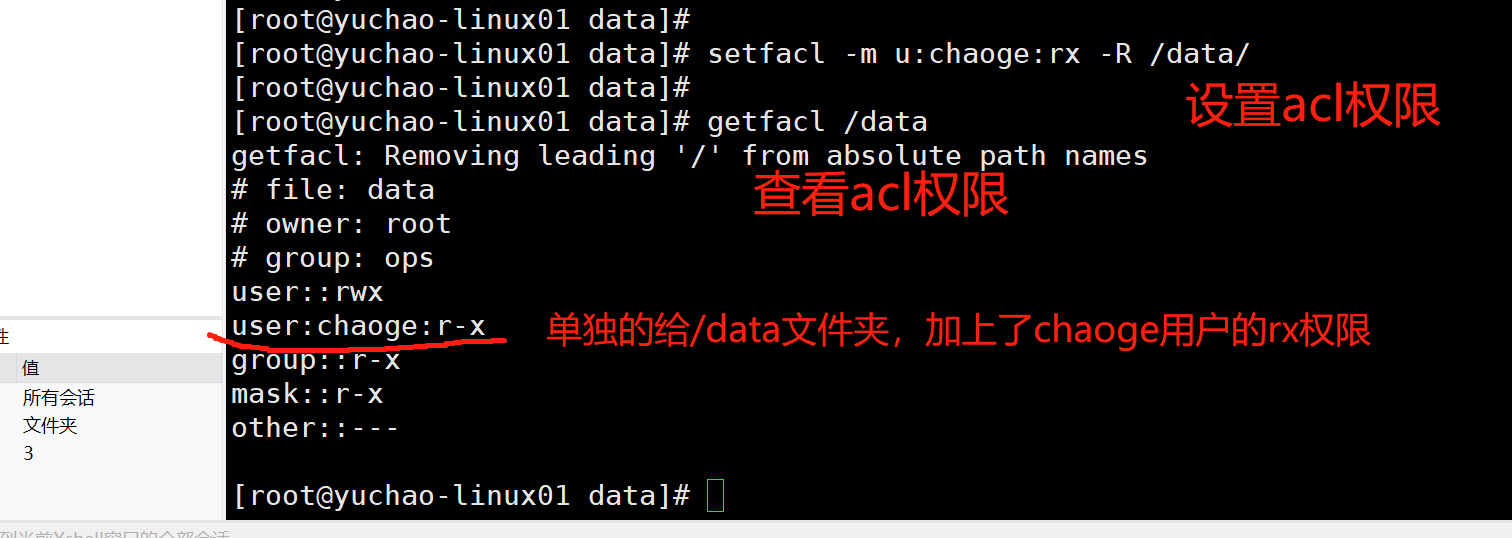
测试权限(图解)
先来看看,/data目录,会发现结尾多了一个+号,表示存在acl规则
[root@yuchao-linux01 data]# ll -d /data
drwxr-x---+ 2 root ops 197 Jan 14 17:59 /data
用yuchao01用户试试访问该目录,注意该目录,其他人是无权限的。

删除acl
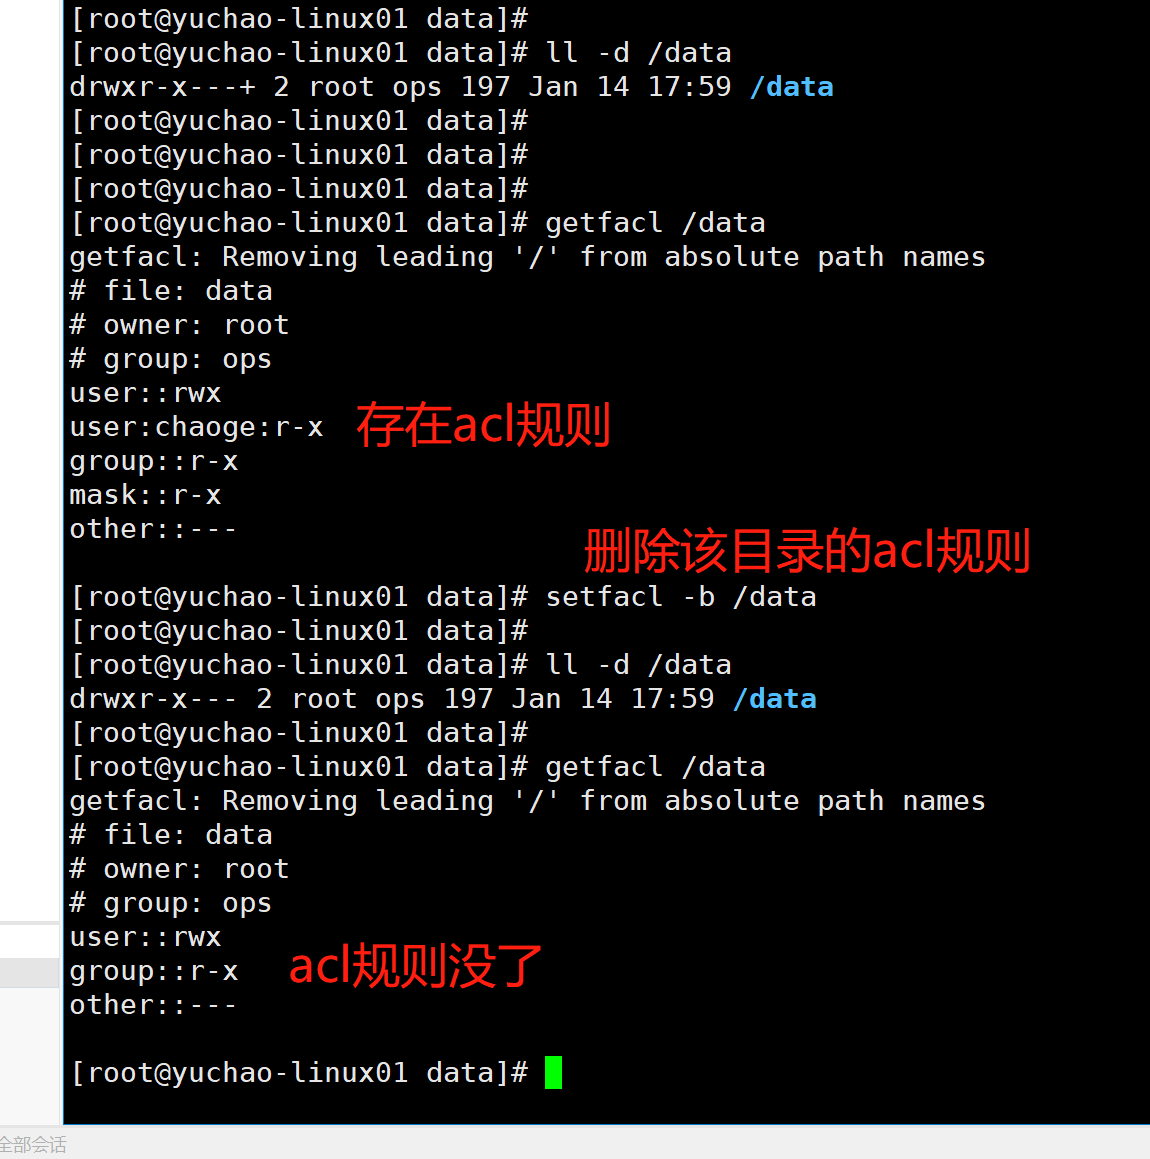
规则删除后,chaoge用户也会在第一时间,丢失权限。
六、umask
umask 命令用来限制新文件权限的掩码,也称之为遮罩码。
防止文件、文件夹创建的时候,权限过大
当新文件被创建时,其最初的权限由文件创建掩码决定。

用户每次注册进入系统时,umask命令都被执行,并自动设置掩码改变默认值,新的权限将会把旧的覆盖。

root用户和普通用户的,umask值不一样,创建文件的权限也不一样。
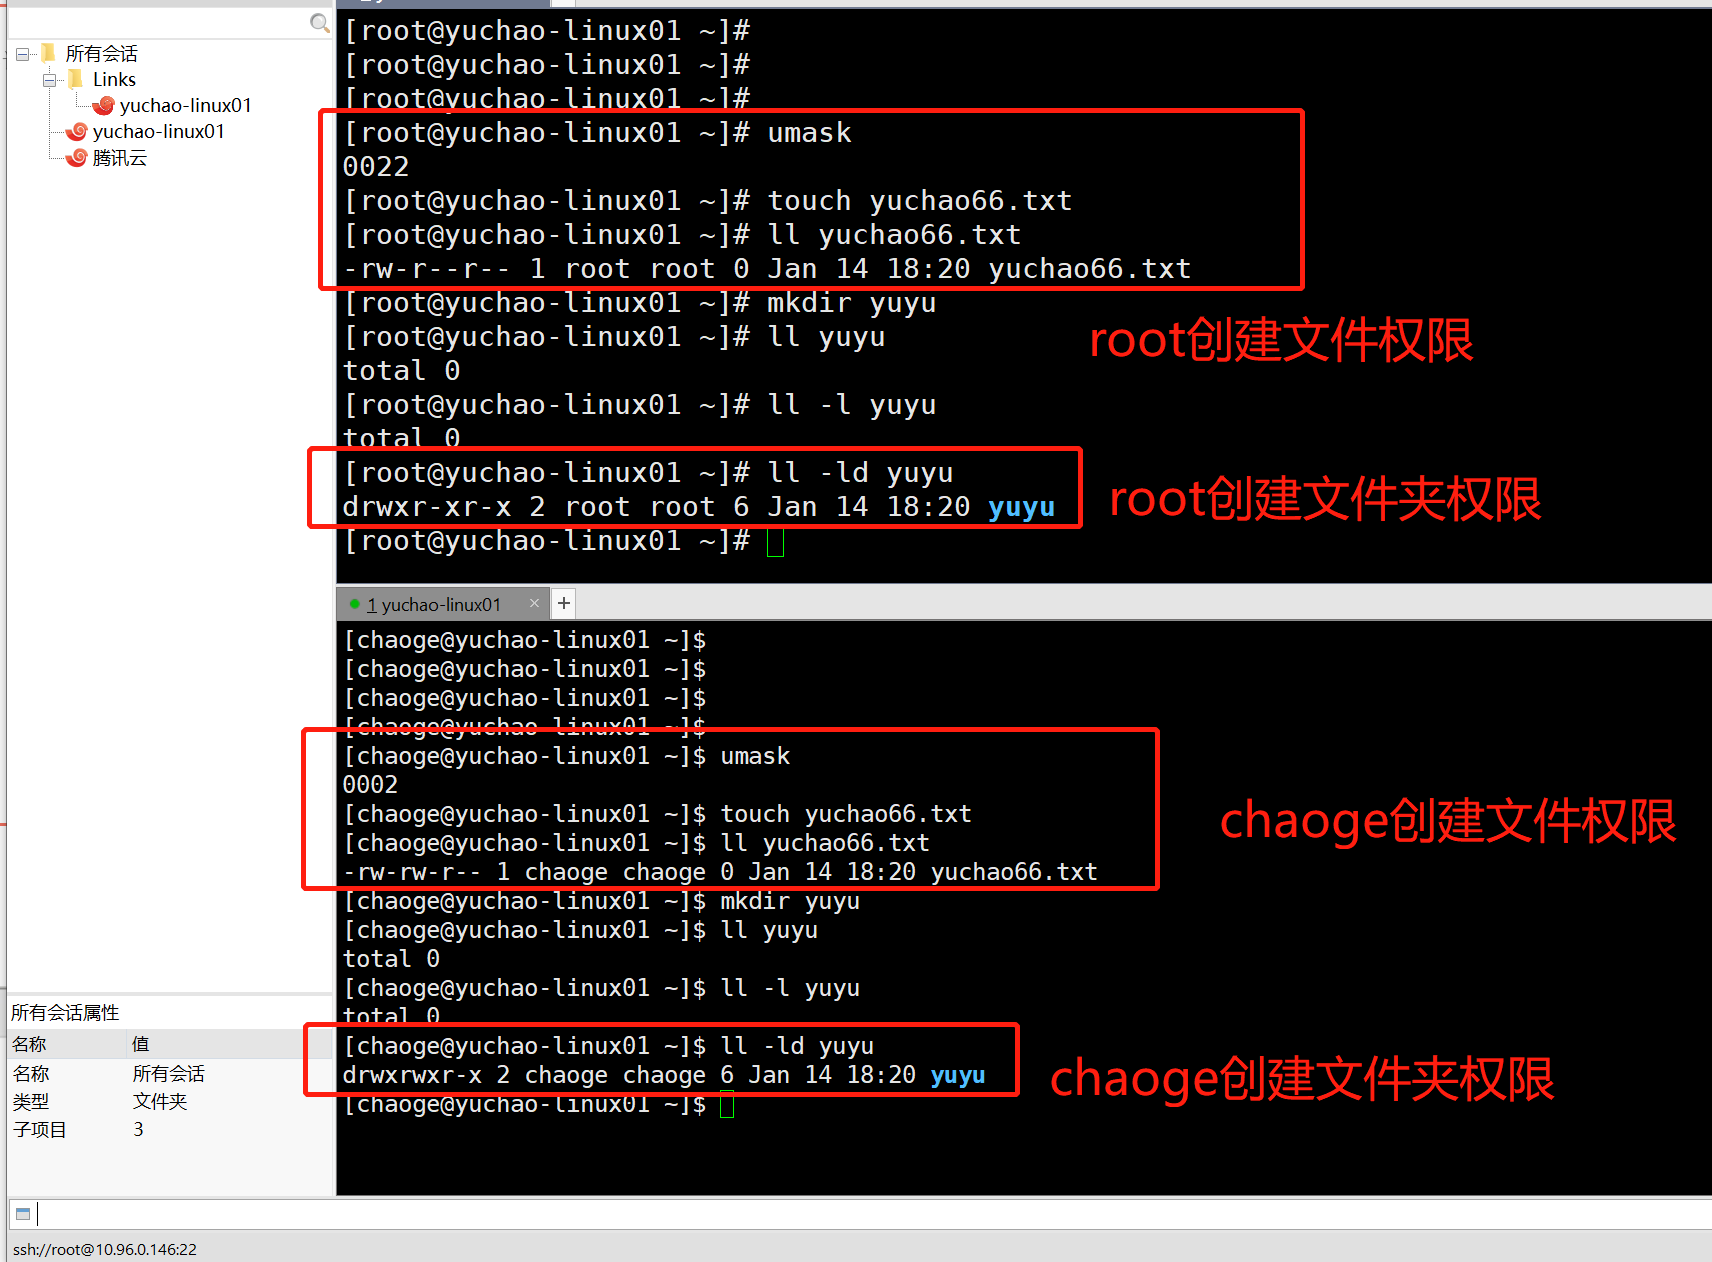
root用户创建的
文件夹权限默认是755
[root@yuchao-linux01 ~]# ll -ld yuyu
drwxr-xr-x 2 root root 6 Jan 14 18:20 yuyu
文件权限默认644
[root@yuchao-linux01 ~]# ll yuchao66.txt
-rw-r--r-- 1 root root 0 Jan 14 18:20 yuchao66.txt
chaoge普通用户创建的
文件夹权限775
[chaoge@yuchao-linux01 ~]$ ll -ld yuyu
drwxrwxr-x 2 chaoge chaoge 6 Jan 14 18:20 yuyu
文件权限 664
[chaoge@yuchao-linux01 ~]$ ll yuchao66.txt
-rw-rw-r-- 1 chaoge chaoge 0 Jan 14 18:20 yuchao66.txt
并且直接输入umask可以看到默认的值。
[root@yuchao-linux01 ~]# umask
0022
[chaoge@yuchao-linux01 ~]$ umask
0002
umask默认配置在/etc/profile 61-64行
6.1 图解umask
linux默认文件夹最大权限是777(文件夹必须、可读、可写、可执行)
linux文件默认最大权限是666(缺少x,因为x专门给可执行命令用,而不是普通文件)
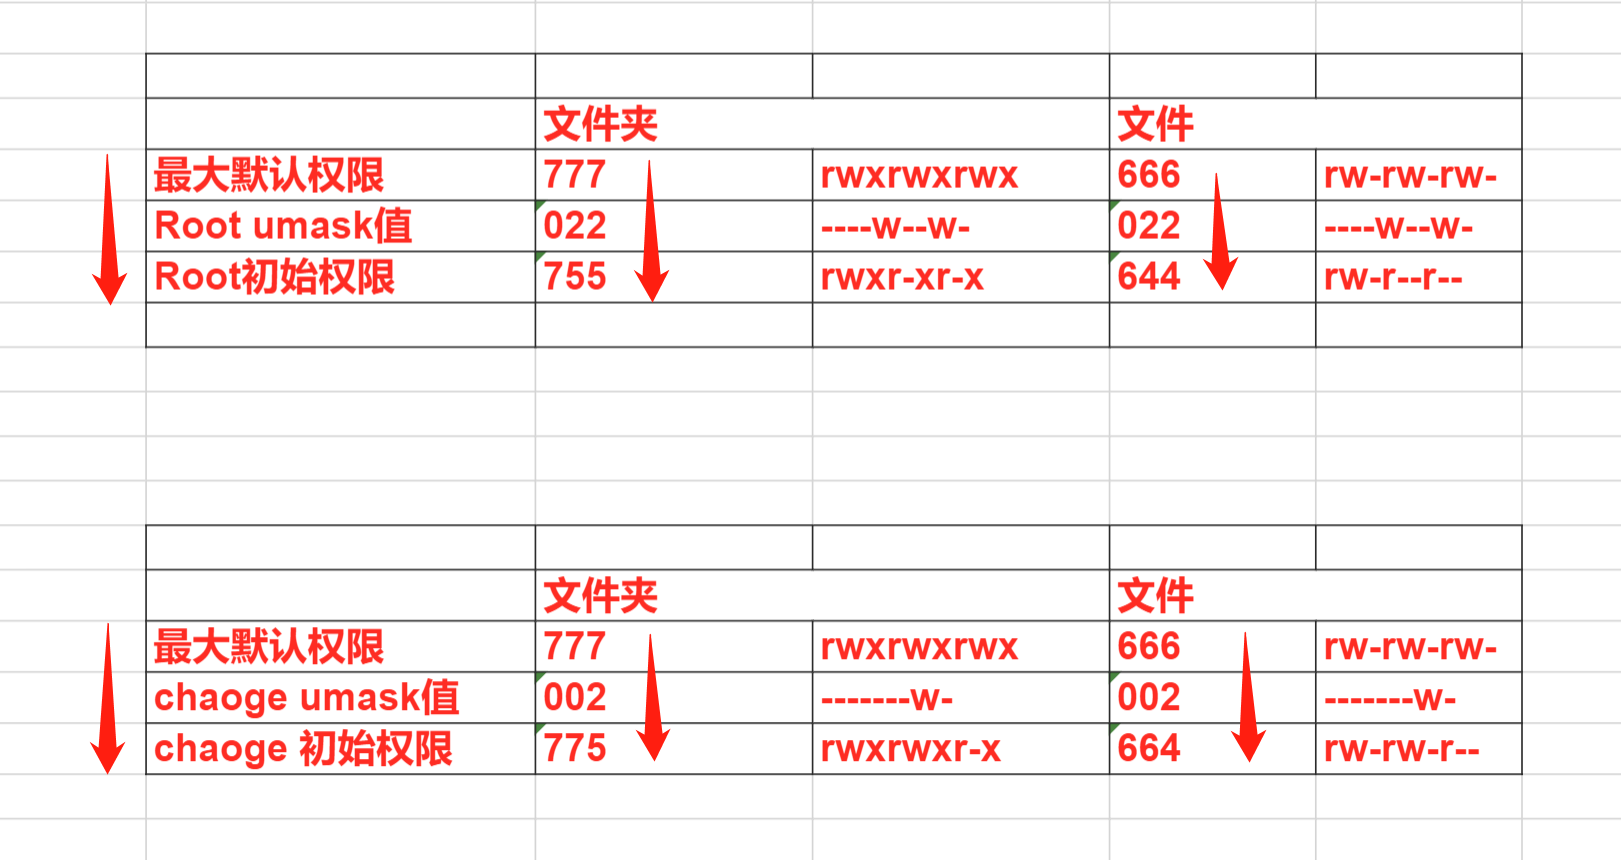
从这个表格来看
linux用户默认创建文件,文件夹的权限是怎么决定的
默认最高权限 - umask = 初始权限
比如文件的
root 666-022=644 rw-r--r--
chaoge 666-002=664 rw-rw-r--
6.2 注意umask别设置为基数
当umask设置为011时
比如root用户
默认文件最大权限 666
umask值 011
初始文件权限,理论是 655
但是结果是这样吗
[root@yuchao-linux01 ~]# umask 011
[root@yuchao-linux01 ~]# touch test-umask.txt
[root@yuchao-linux01 ~]# ll test-umask.txt
-rw-rw-rw- 1 root root 0 Jan 16 14:01 test-umask.txt
发现文件权限依然是666
这是因为文件默认是没有x权限的,x权限一般专门用于二进制文件,比如一个可以执行的linux命令。
如果遮罩码设置为奇数,创建的文件权限会自动+1变成偶数权限。
6.3 修改mask值(了解即可,不要改)
临时修改umask值
[root@yuchao-linux01 ~]#
[root@yuchao-linux01 ~]# umask 011
[root@yuchao-linux01 ~]# touch test-umask.txt
[root@yuchao-linux01 ~]# ll test-umask.txt
-rw-rw-rw- 1 root root 0 Jan 16 14:01 test-umask.txt
以后你默认创建的文件,其他人角色,也都有了写入权限,这不太合适吧。
永久修改umask值(所谓永久修改,指的是数据写入文件,每次开机都会加载)
1.编辑用户环境变量文件,用于设置针对你个人用户,每次开机想得到一些专属于你自己的信息
vim ~/.bashrc
2.写入信息,保存
umask 044
3. 重启登录ssh会话
exit
4.检查umask值
[root@yuchao-linux01 ~]# umask
0044
5.查看默认权限
[root@yuchao-linux01 ~]# touch t2-umask.txt
[root@yuchao-linux01 ~]#
[root@yuchao-linux01 ~]# ll t2-umask.txt
-rw--w--w- 1 root root 0 Jan 16 14:20 t2-umask.txt
七、文件特殊属性
7.1 修改文件特殊属性chattr
命令说明
chattr用于改变文件的扩展属性。
chmod用于修改文件9位基础权限、r、w、x
更底层的权限由chattr改变。
语法、参数
参数
a:只能向文件中添加数据,不得删除
-R:递归更改目录属性
-V:显示命令执行过程
模式
- 增加参数
- 移除参数
= 更新为指定参数
A 不让系统修改文件最后访问时间
a 只能追加文件数据,不得删除
i 文件不能被删除、改名、修改内容
7.1.1 +a参数
+a 限制文件只能继续追加数据,不得删除。
[root@yuanlai-0224 ~]# echo "于超老师带你学Linux" >> t1.log
[root@yuanlai-0224 ~]#
[root@yuanlai-0224 ~]# lsattr t1.log
---------------- t1.log
添加一个a特殊属性,限制只能追加,且不得删除
发现除了追加写入,不得对文件做任何更改,连vim都不能
[root@yuanlai-0224 ~]# chattr +a t1.log
[root@yuanlai-0224 ~]#
[root@yuanlai-0224 ~]# lsattr t1.log
-----a---------- t1.log
[root@yuanlai-0224 ~]#
[root@yuanlai-0224 ~]# echo '666' >> t1.log
[root@yuanlai-0224 ~]# echo '666' >> t1.log
[root@yuanlai-0224 ~]# echo '666' > t1.log
-bash: t1.log: Operation not permitted
[root@yuanlai-0224 ~]#
[root@yuanlai-0224 ~]# mv t1.log t2.log
mv: cannot move ‘t1.log’ to ‘t2.log’: Operation not permitted
7.1.2 +i参数
+i 文件不能被删除、改名、修改内容,文件锁定。
[root@yuchao-tx-server ~]# touch t1.log
[root@yuchao-tx-server ~]# lsattr t1.log
---------------- t1.log
[root@yuchao-tx-server ~]#
[root@yuchao-tx-server ~]#
[root@yuchao-tx-server ~]# chattr +i t1.log
[root@yuchao-tx-server ~]# lsattr t1.log
----i----------- t1.log
无法操作
[root@yuchao-tx-server ~]# echo '123' > t1.log
-bash: t1.log: 权限不够
[root@yuchao-tx-server ~]#
[root@yuchao-tx-server ~]# mv t1.log t1.log.bak
mv: 无法将"t1.log" 移动至"t1.log.bak": 不允许的操作
[root@yuchao-tx-server ~]#
[root@yuchao-tx-server ~]# rm -rf t1.log
rm: 无法删除"t1.log": 不允许的操作
[root@yuchao-tx-server ~]#
[root@yuchao-tx-server ~]# cat t1.log
当你需要保护某个文件,不被删除,不得清空,保证只能写入新数据,比如一些系统日志,你要保留其所有的内容,可以设置。
chattr +a /var/log/messages
7.2 lsattr查看文件特殊属性
lsattr用于查看文件扩展的属性。
-R
递归地列出目录以及其下内容的属性.
-a
列出目录中的所有文件,包括以`.'开头的文件的属性.
-d
列出目录本身的属性
实践
[root@yuchao-tx-server ~]# lsattr t1.log
----i----------- t1.log
八、文件属性inode和block
linux为什么要设计inode
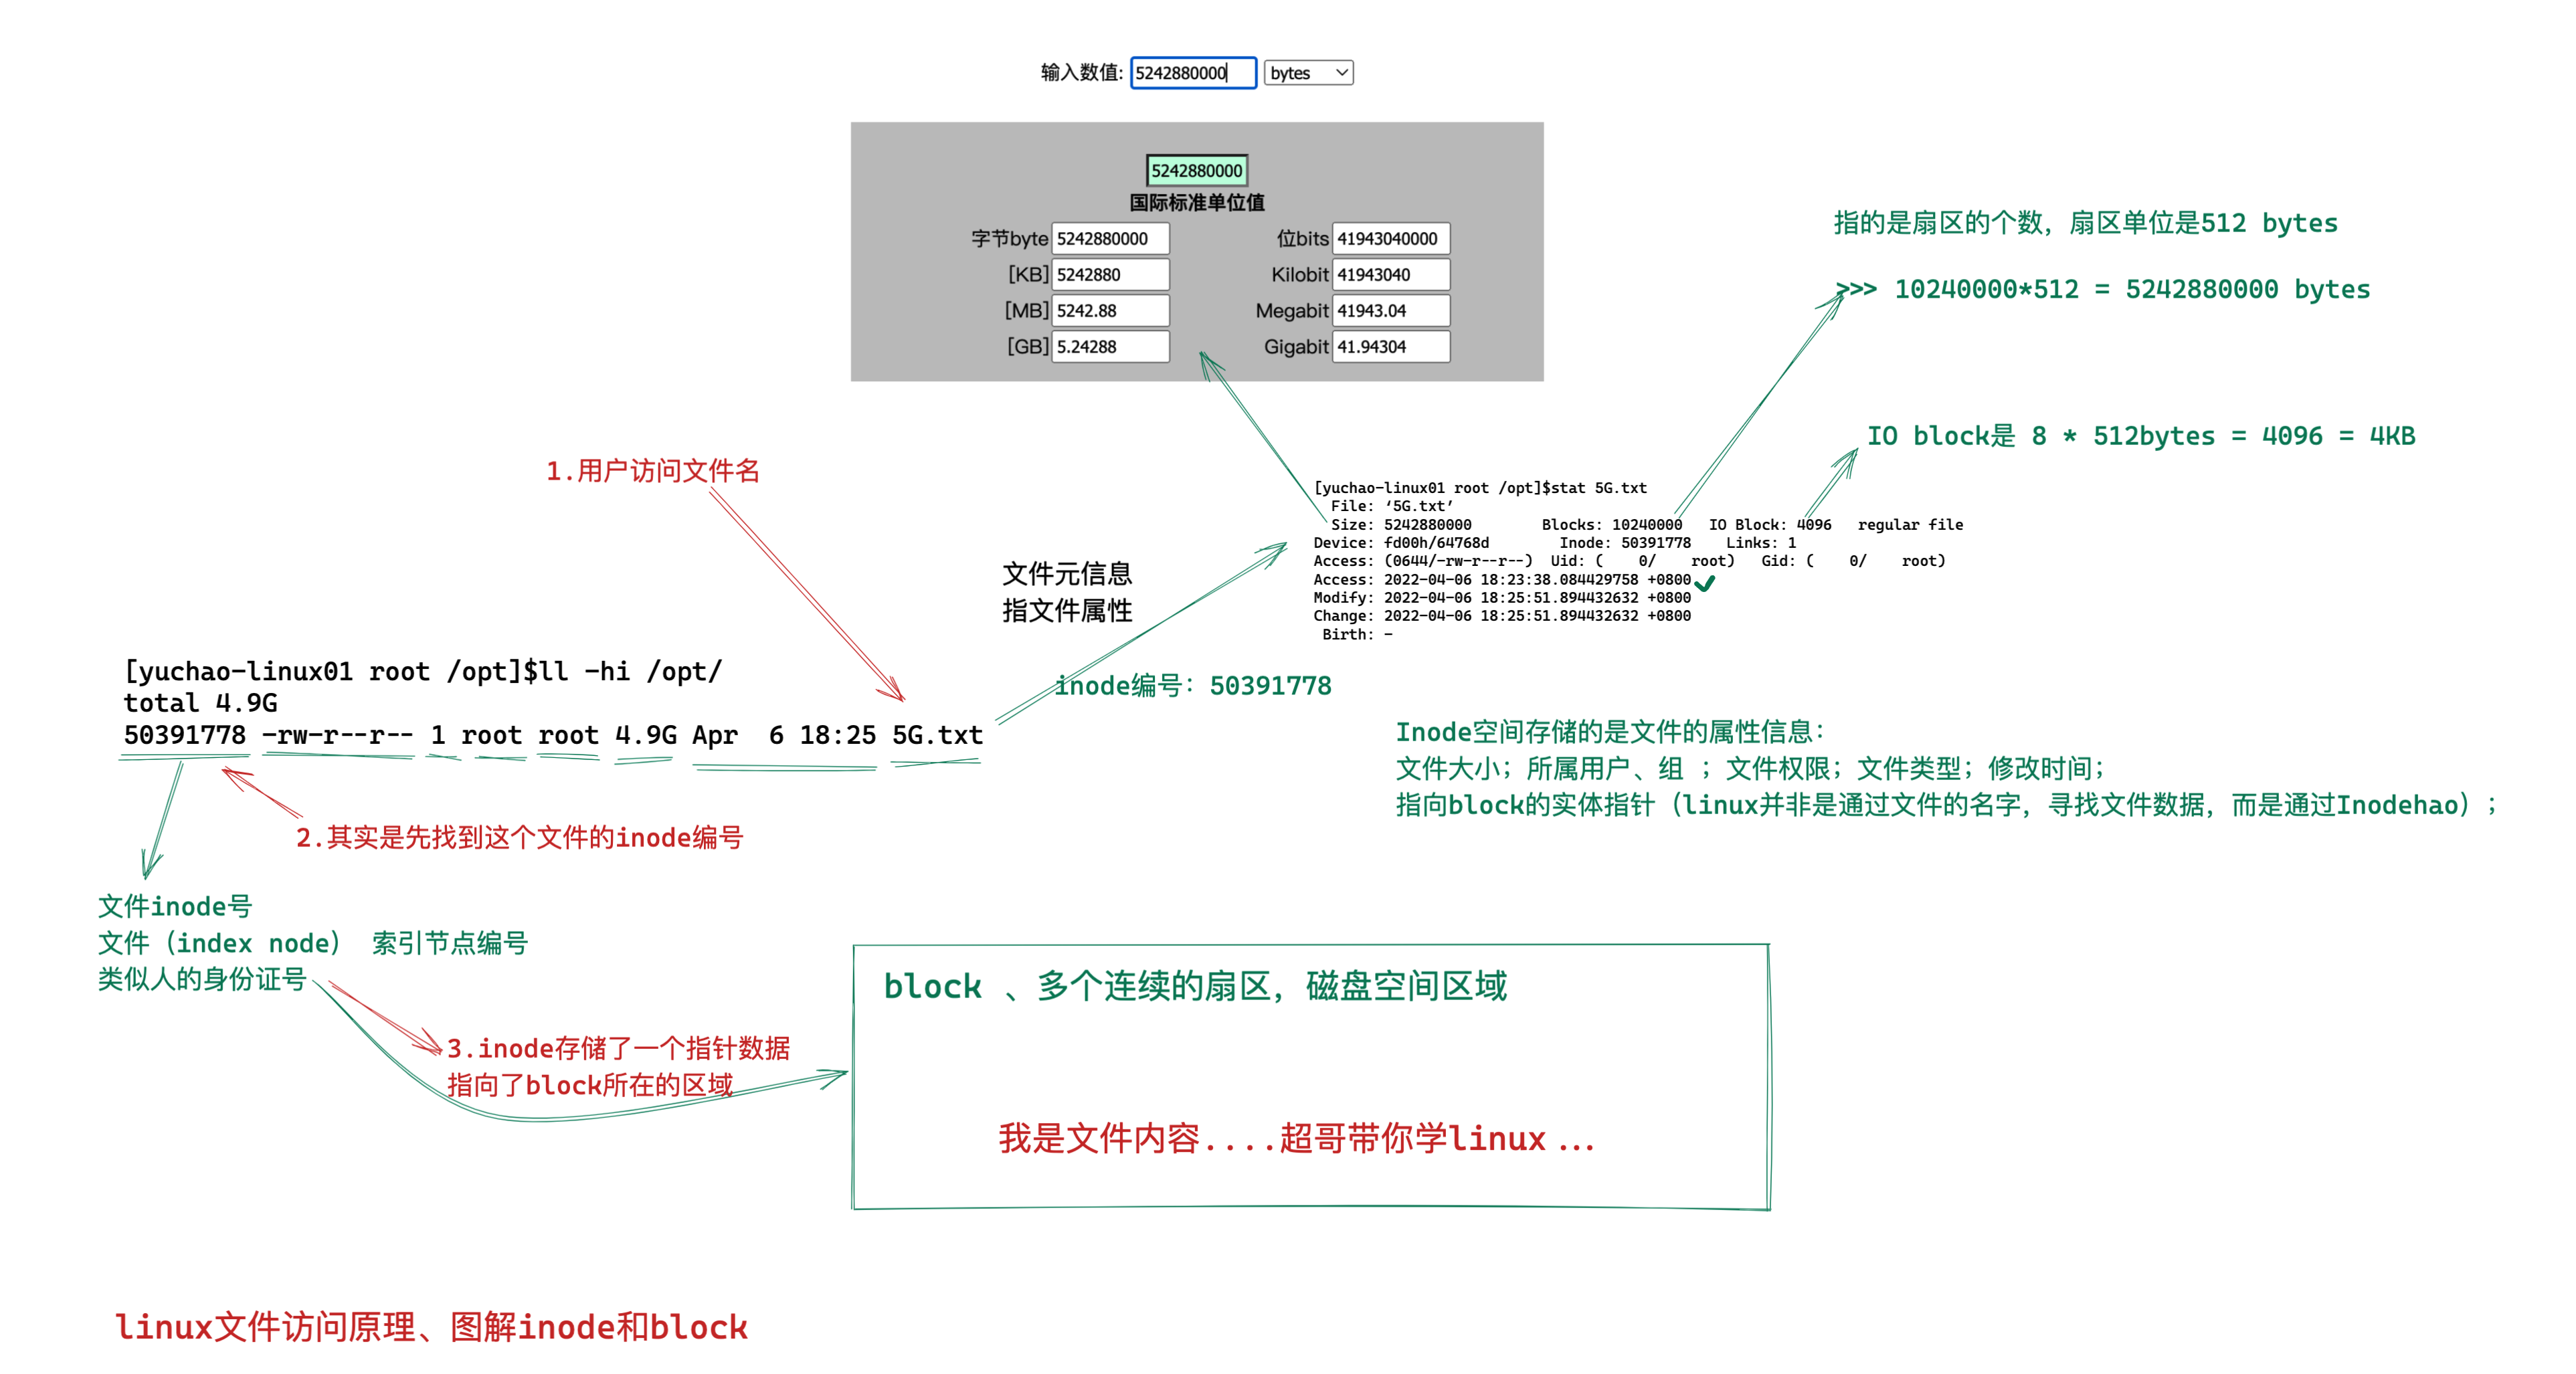
理解inode,要从文件储存说起。
文件储存在硬盘上,硬盘的最小存储单位叫做"扇区"(Sector)。每个扇区储存512字节(相当于0.5KB)。
操作系统读取硬盘的时候,不会一个个扇区地读取,这样效率太低,而是一次性连续读取多个扇区,即一次性读取一个"块"(block)。这种由多个扇区组成的"块",是文件存取的最小单位。"块"的大小,最常见的是4KB,即连续八个 sector组成一个 block。
文件数据都储存在"块"中,那么很显然,我们还必须找到一个地方储存文件的元信息,比如文件的创建者、文件的创建日期、文件的大小等等。这种储存文件元信息的区域就叫做inode,中文译名为"索引节点"。
每一个文件都有对应的inode,里面包含了与该文件有关的一些信息。
查看inode存储的内容
-
文件的字节数
-
文件拥有者的User ID
-
文件的Group ID
-
文件的读、写、执行权限
-
文件的时间戳,共有三个:ctime指inode上一次变动的时间,mtime指文件内容上一次变动的时间,atime指文件上一次打开的时间。
-
链接数,即有多少文件名指向这个inode
-
文件数据block的位置
1.文件属性与inode查看
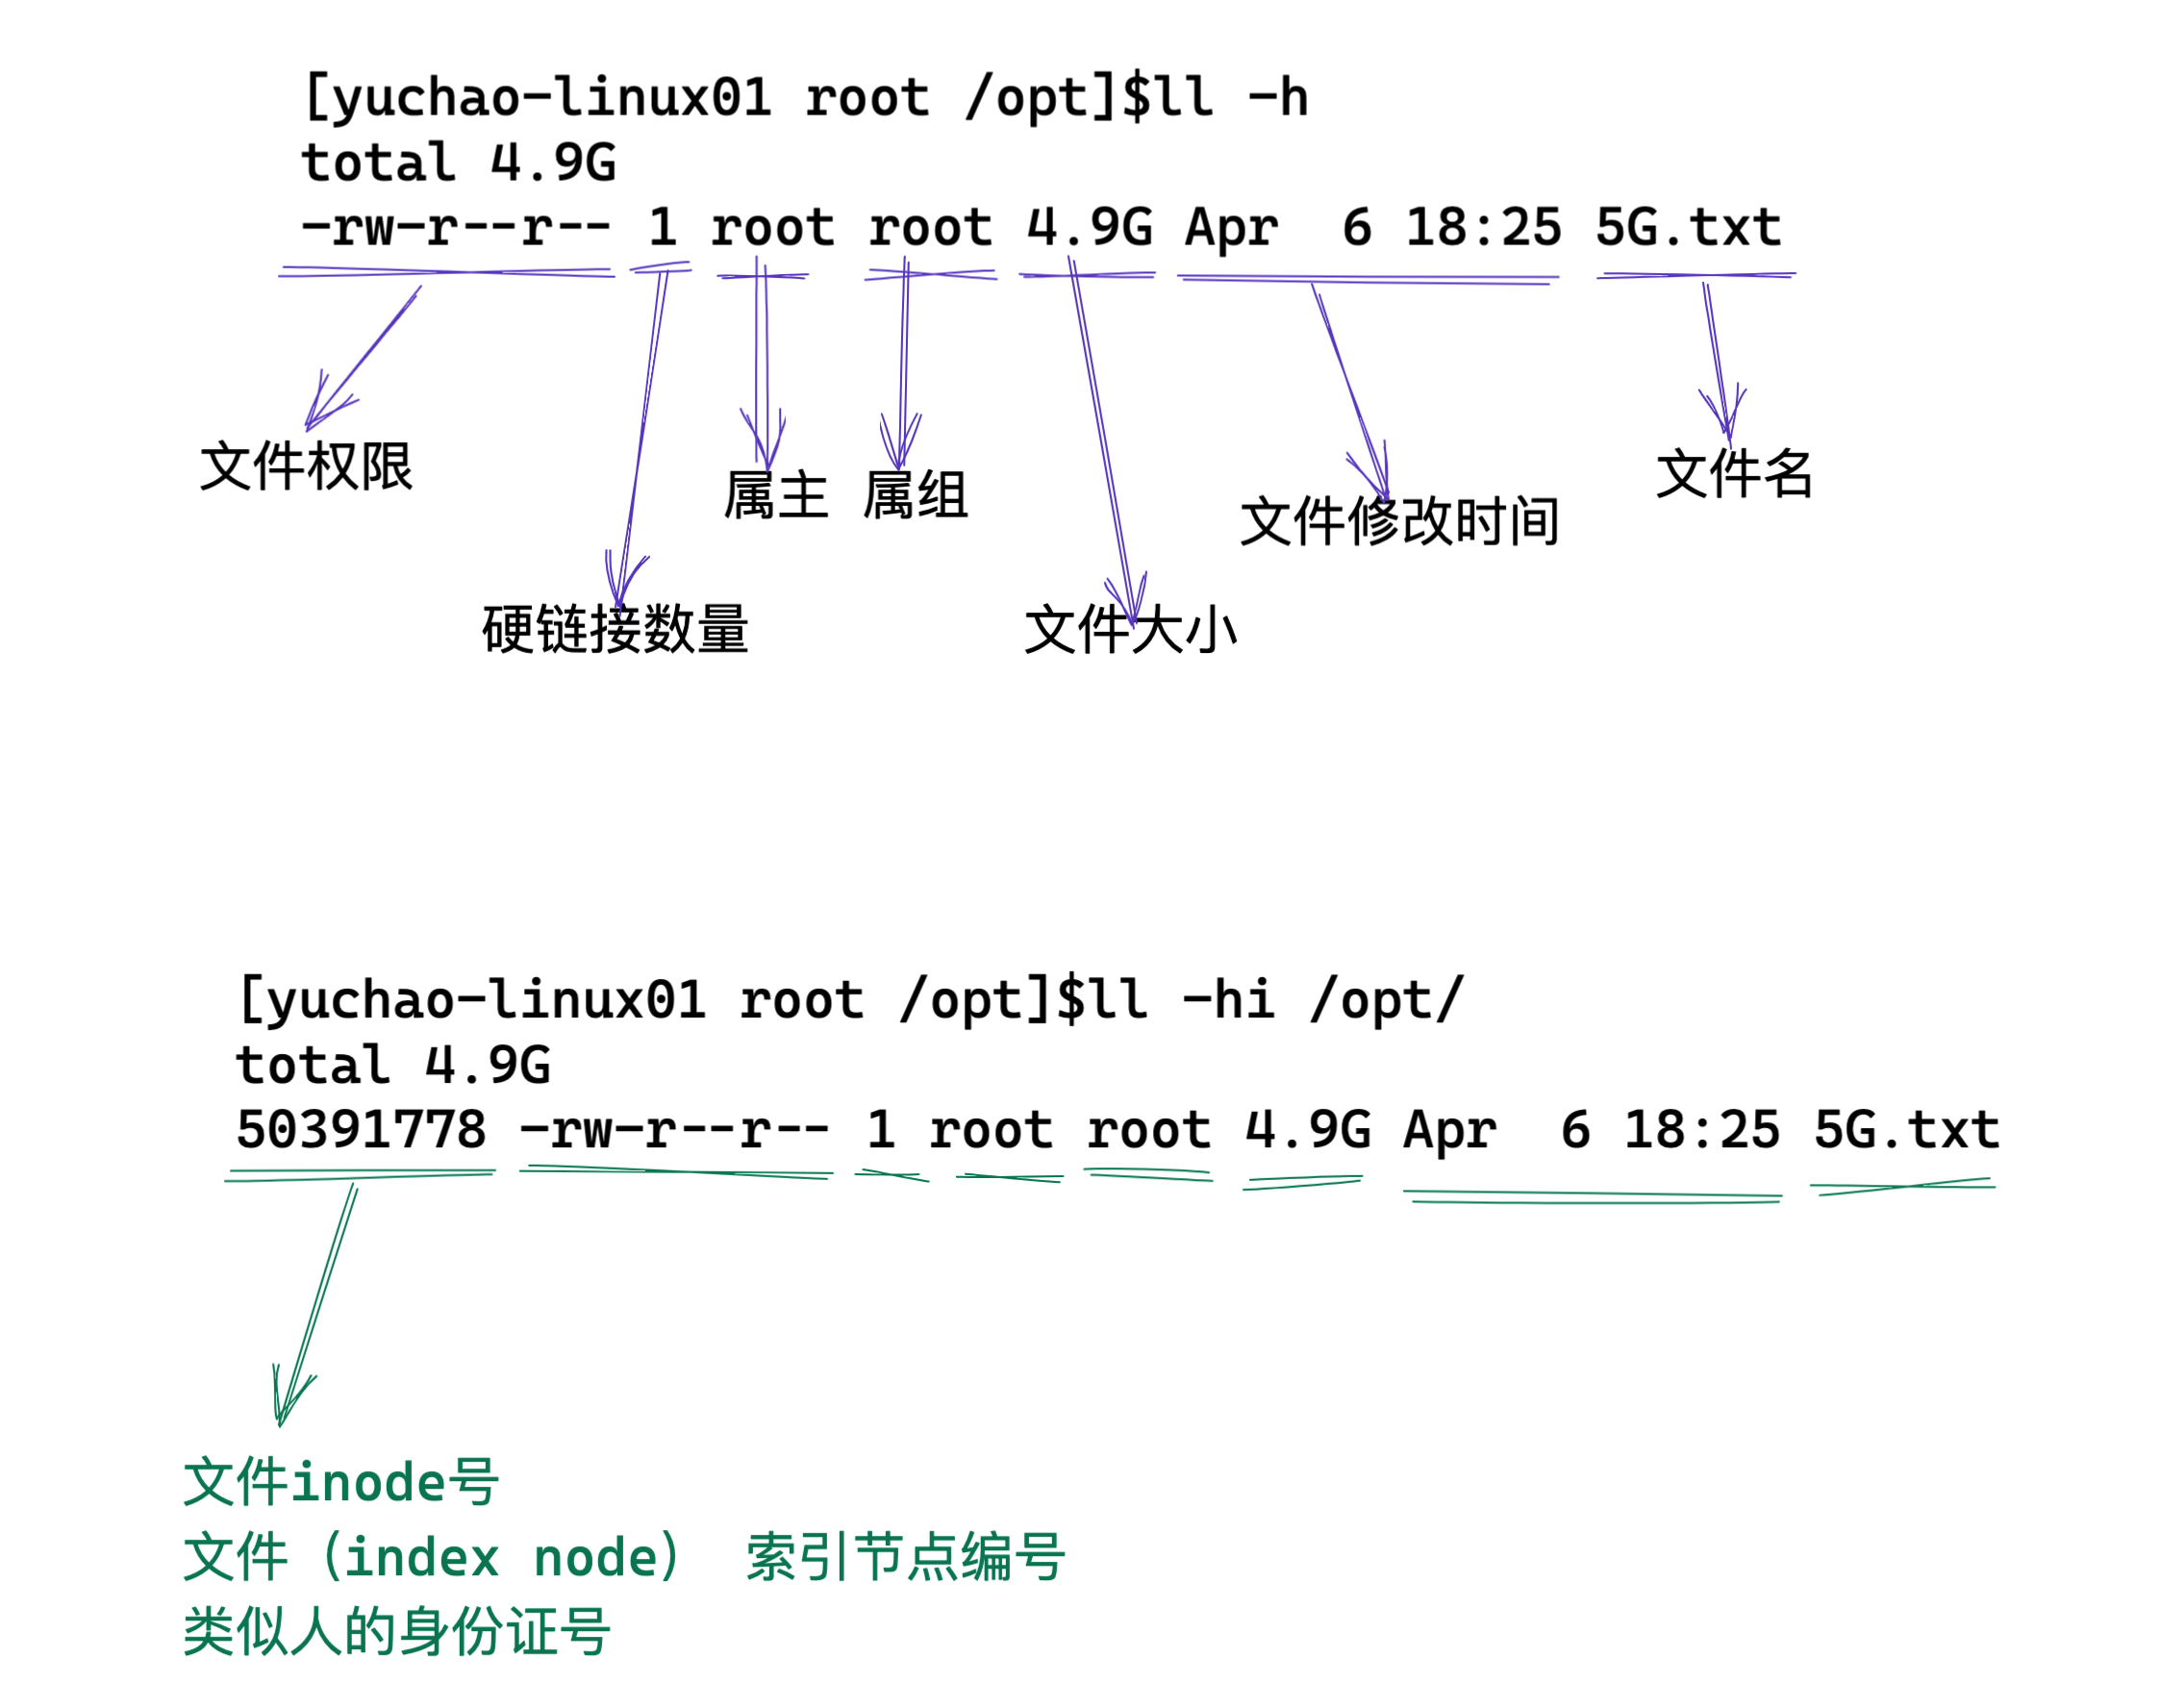
2.什么是inode
linux的文件,其实是分为了元数据+文件内容,两部分。
元数据,也就是文件的属性信息,可以通过stat命令查看到
存储元数据信息的空间,被称之为Inode
存储文件数据的空间,被称之为block
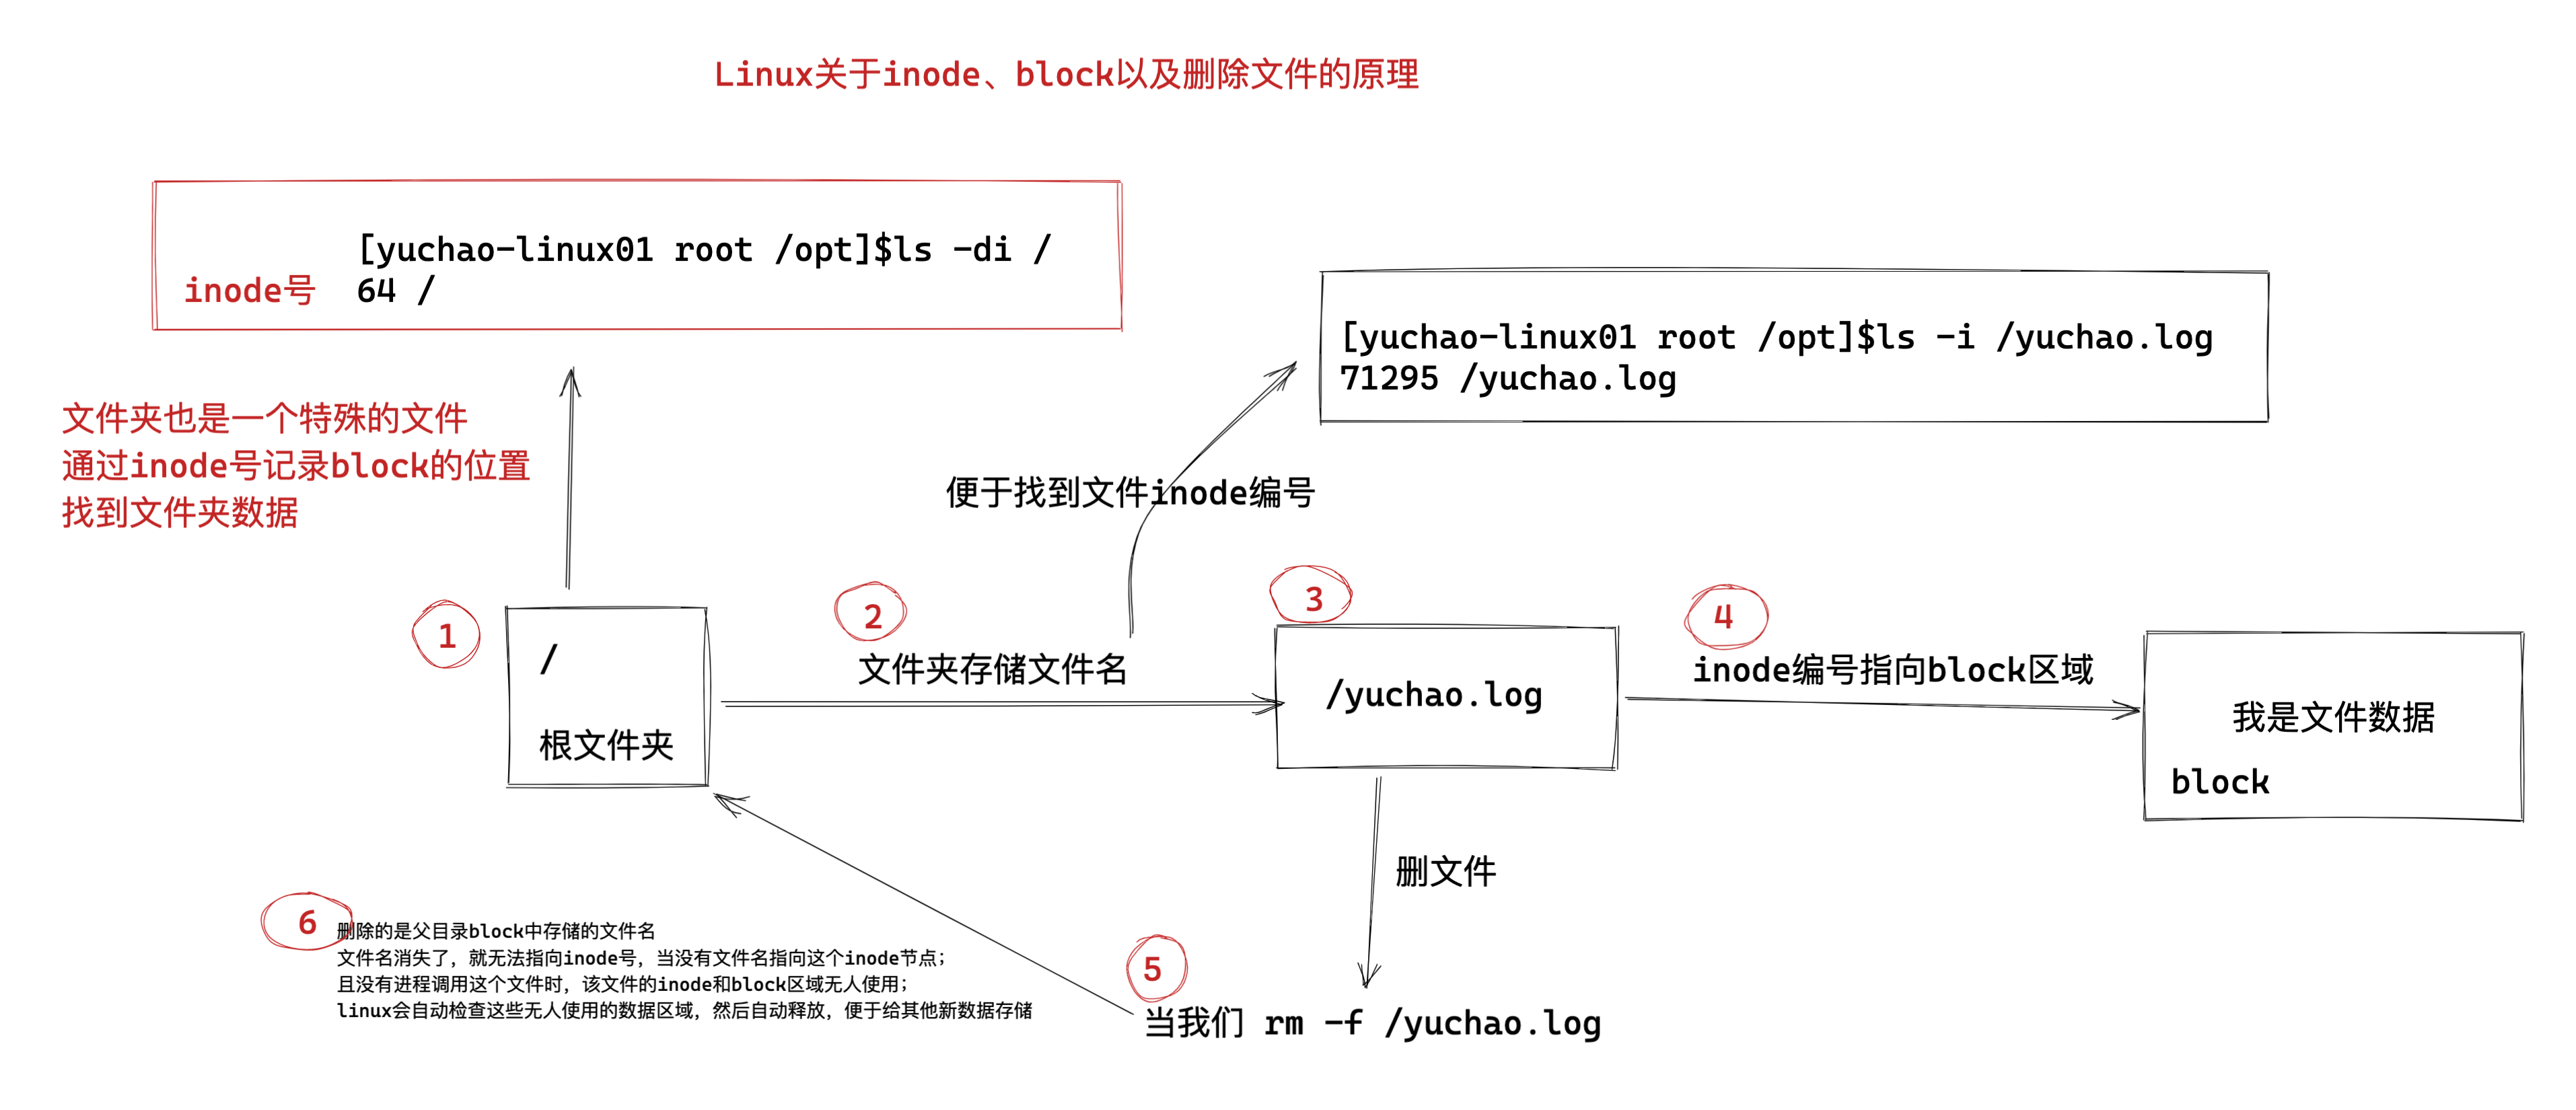
linux读取文件内容,其实是 以 文件名 > inode编号 > block 的顺序来读取
在你创建文件前必须先要分区、格式化(创建文件系统),创建文件系统后inode和block的数量就会固定下来。
每个inode都有一个号码,操作系统用inode号码来识别不同的文件。
这里值得重复一遍,Unix/Linux系统内部不使用文件名,而使用inode号码来识别文件。对于系统来说,文件名只是inode号码便于识别的别称或者绰号。
表面上,用户通过文件名,打开文件。实际上,系统内部这个过程分成三步:首先,系统找到这个文件名对应的inode号码;其次,通过inode号码,获取inode信息;最后,根据inode信息,找到文件数据所在的block,读出数据。
使用如下命令,可以查看文件的inode号
[yuchao-linux01 root /opt]$ls -i 5G.txt
50391778 5G.txt
3.图解,文件访问原理
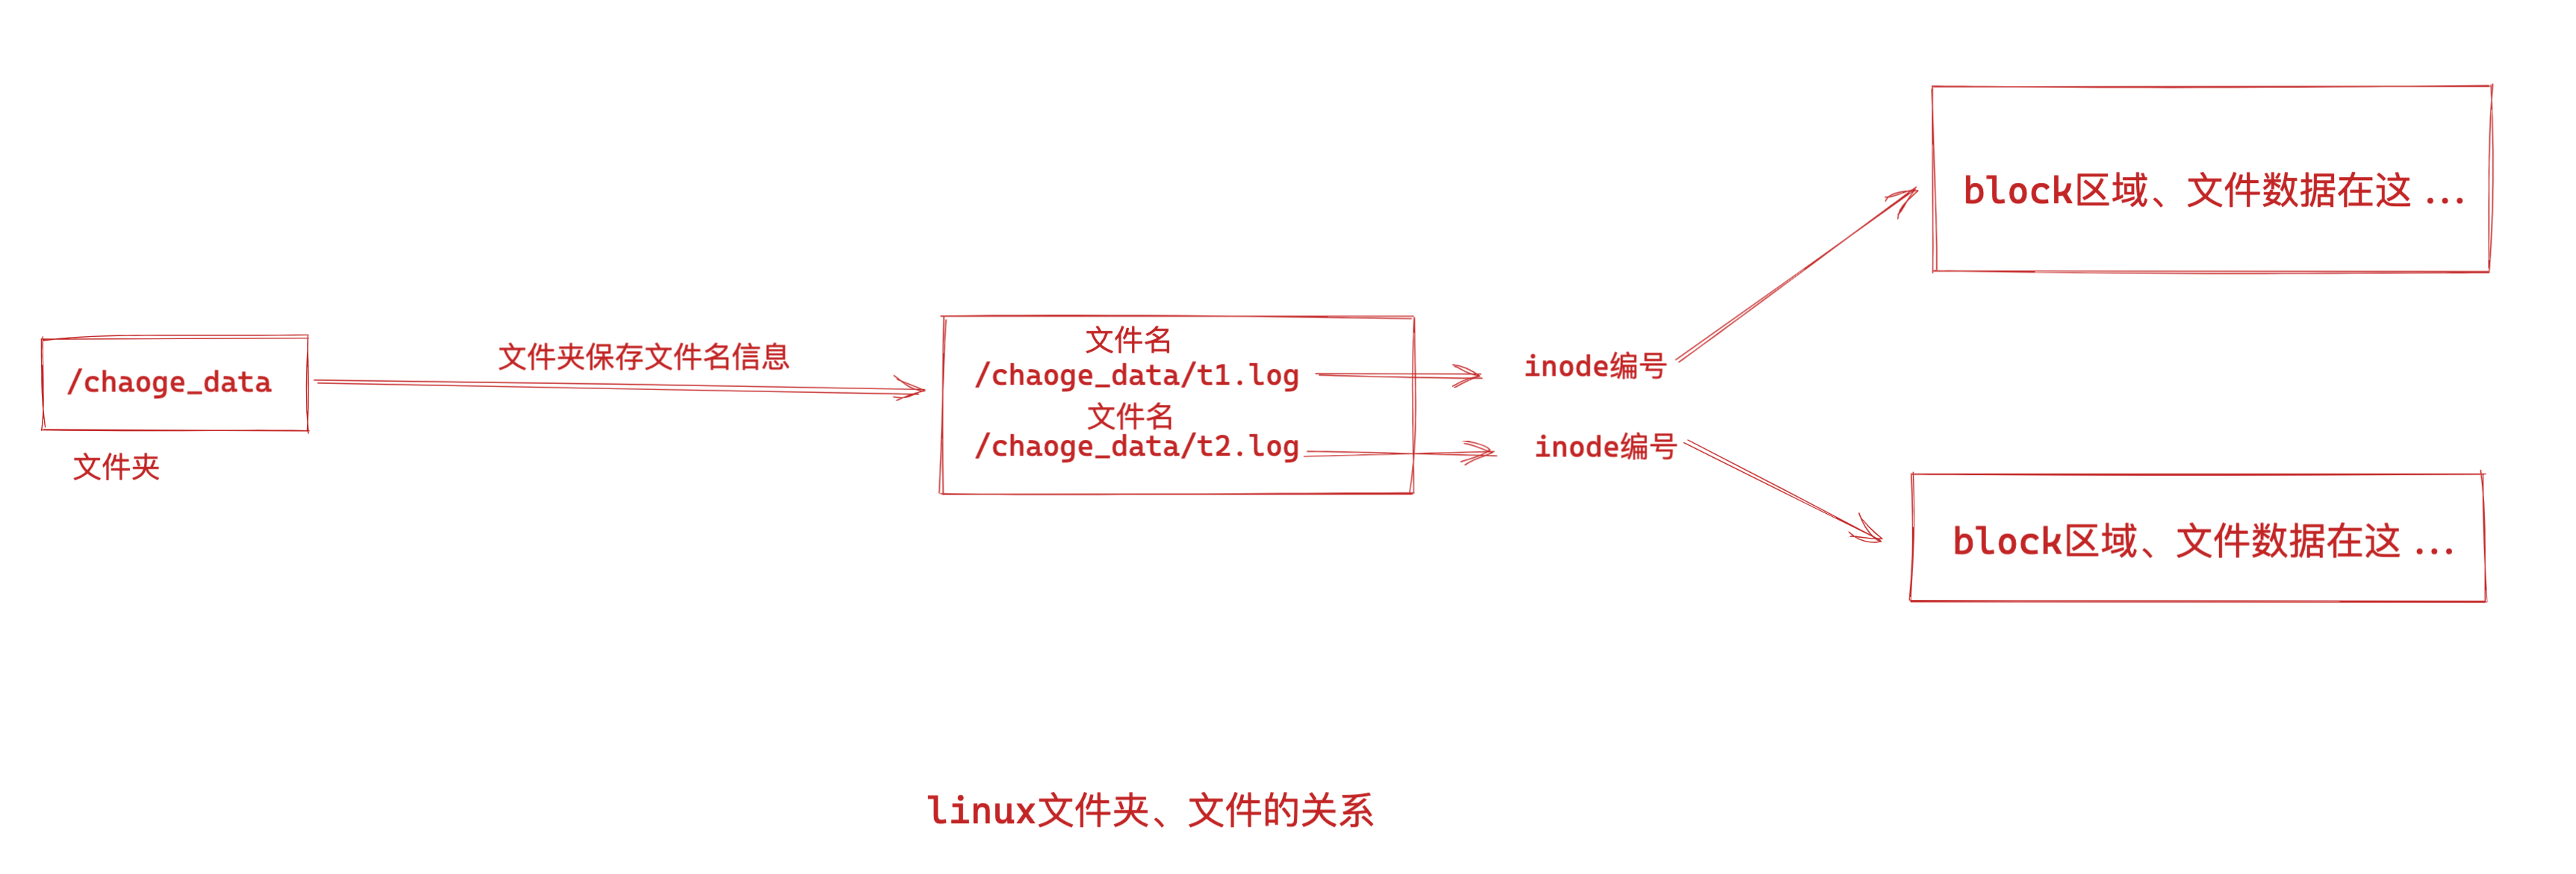
4.文件、文件夹的关系
目录是一个特殊的文件,目录保存的是当前目录下的文件名字
简单说,文件夹就是方便人类记忆文件存在哪、然后通过这个文件名吗,找到对应的文件inode号
inode号里记录了文件数据所处的block位置,最终访问到数据
5.关于删除文件原理
九、软连接、硬链接
1.软连接就是windows下的快捷方式
软连接文件存储的是源文件的路径。
访问软连接 ln -s
↓
访问到源文件的路径,源文件的文件名
↓
访问源文件的inode编号 ls -i filename
↓
inode找到block,访问到数据
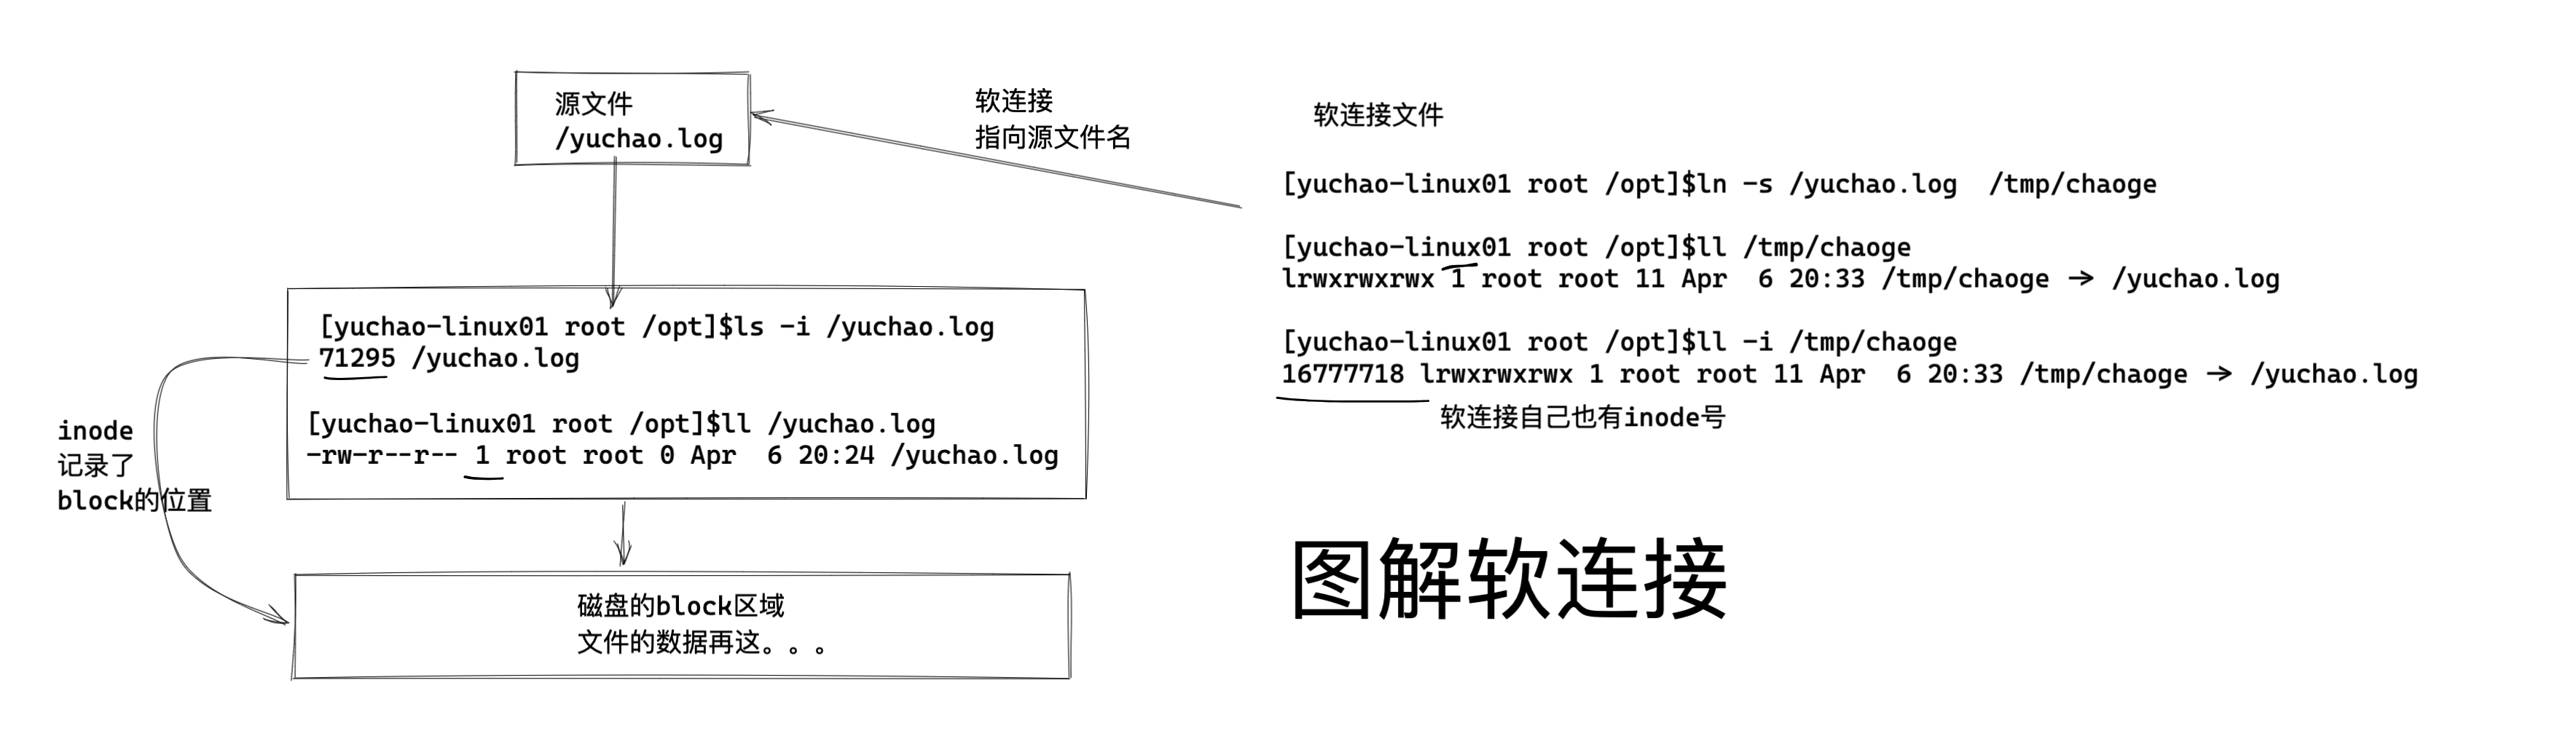
软连接特点
1.软连接文件的inode号和源文件不同,作用是存储源文件的路径
2.命令ln -s创建
3.删除普通软连接,不影响源文件
4.删除源文件,软连接找不到目标,报错提示。
2.硬链接
硬链接,就是一个数据(block)被多个相同inode号的文件指向。
就好比超市有好多个大门,但是都能进入到这个超市。。。
创建语法
ln 源文件 目标文件
创建硬链接
[yuchao-linux01 root /opt]$ls -l /yuchao.log
-rw-r--r-- 1 root root 0 Apr 6 20:24 /yuchao.log
[yuchao-linux01 root /opt]$
[yuchao-linux01 root /opt]$ln /yuchao.log /tmp/c1
[yuchao-linux01 root /opt]$ln /yuchao.log /tmp/c2
[yuchao-linux01 root /opt]$
[yuchao-linux01 root /opt]$ls -l /yuchao.log
-rw-r--r-- 3 root root 0 Apr 6 20:24 /yuchao.log
检查多个硬链接的inode号,都是同一个,表示是指向同一个区域的数据
[yuchao-linux01 root /opt]$ls -i /yuchao.log
71295 /yuchao.log
[yuchao-linux01 root /opt]$ls -i /tmp/c1
71295 /tmp/c1
[yuchao-linux01 root /opt]$ls -i /tmp/c2
71295 /tmp/c2
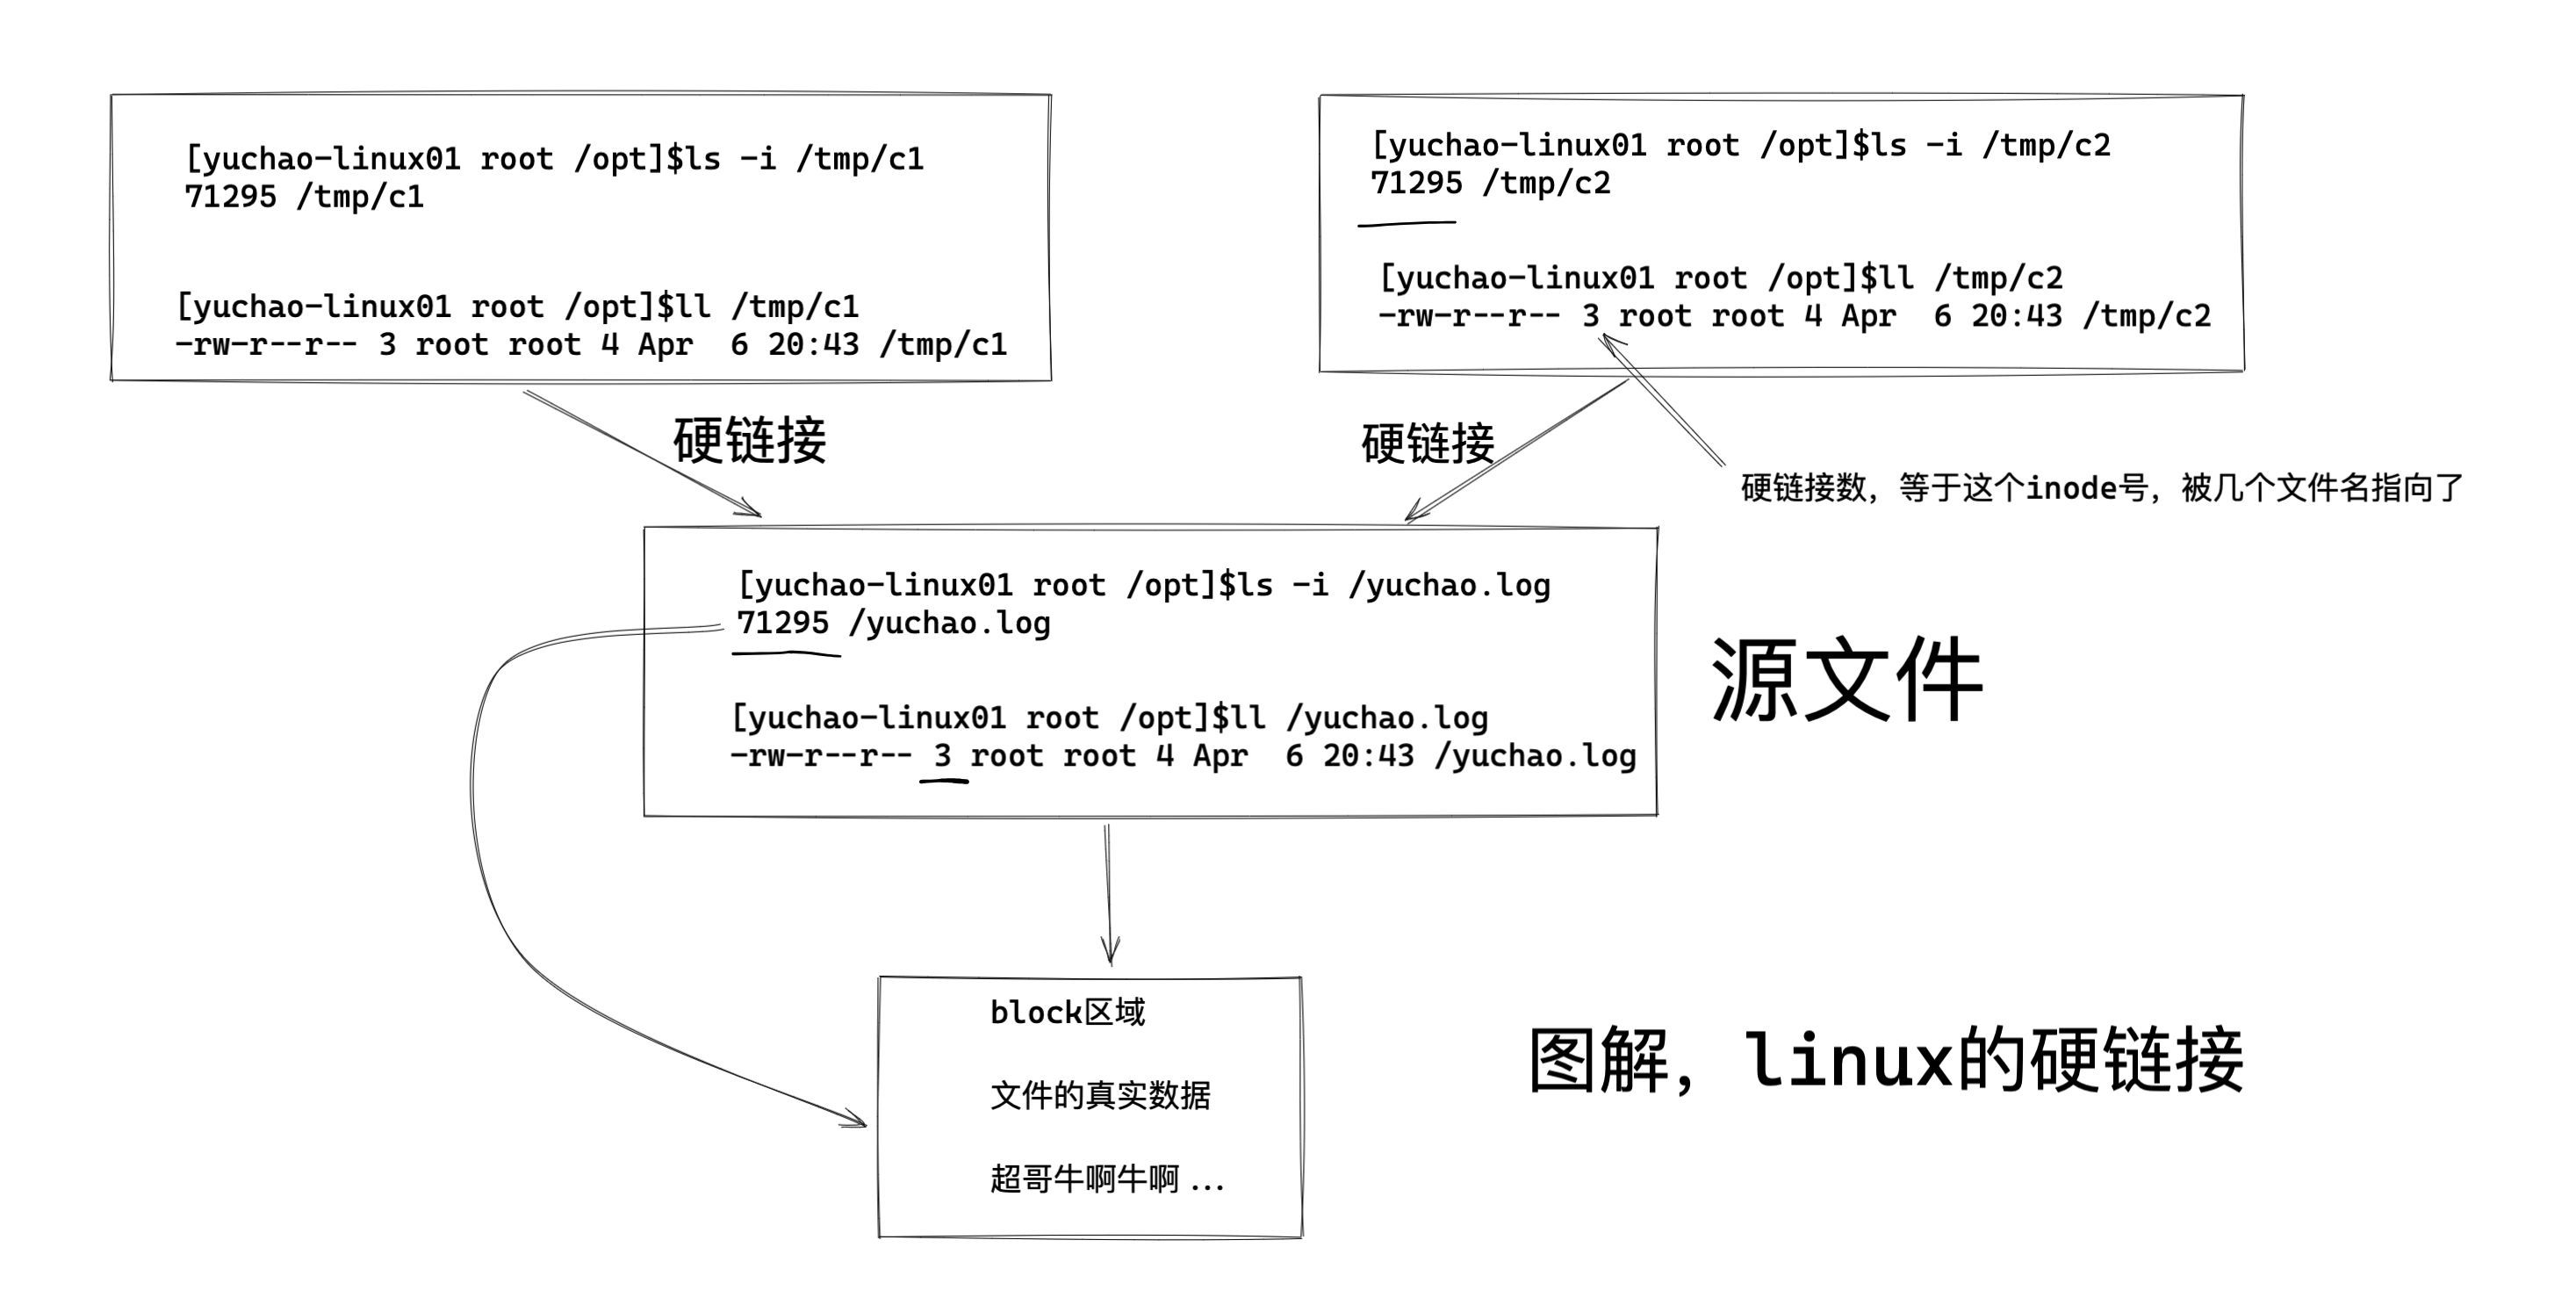
硬链接特点
1.可以对已存在的文件做硬链接
2.硬链接的文件,inode相同,属性一致
3.只能在同一个磁盘分区下,同一个文件系统下创建硬链接
4.不能对文件夹创建硬链接,只有文件可以
5.删除一个硬链接,不影响其他相同inode号的文件
6.文件夹的硬链接,默认是2个,以及是2+(第一层子目录总数)=文件夹的硬链接数量
7.可以用任意一个硬链接作为入口,操作文件
8.当文件的硬链接数为0时,文件真的被删除
6.工作里咋用
1.一般会给文件夹添加软连接,便于管理
2.通过软连接来区分软件的多种版本
3.通过inode号彻底删除文件
7.练习题
1.创建文件夹的软连接
2.创建文件的软连接
3.删除文件、目录的软连接,查看效果
4.删除文件、目录的源文件,查看效果
5.往源文件写入数据,查看软连接文件的变化
6.往软连接里写数据,查看源文件的变化
Copyright © www.yuchaoit.cn 2023 all right reserved,powered by Gitbook作者:于超 2022-04-06 20:57:11

 浙公网安备 33010602011771号