

Spring源码解析二:IOC容器初始化过程详解
IOC容器初始化分为三个步骤,分别是:
1、Resource定位,即BeanDefinition的资源定位。
2、BeanDefinition的载入
3、向IOC容器注册BeanDefinition
下面我们来详细展开这三部分的内容
一、Resource定位
以ApplicationContext的具体实现FileSystemXmlApplicationContext来介绍Resource定位的过程:
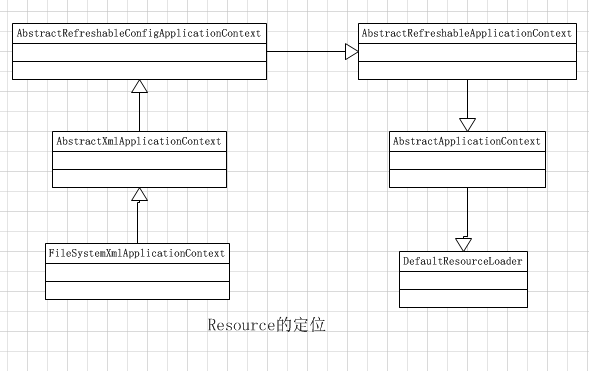
IOC容器初始化类比为用木桶来装水,Resource的定位过程就是寻找水的过程。
它是由ResourceLoader通过统一的Resource接口来完成的,Resource对各种形式的BeanDefinition的使用都提供了统一的接口。
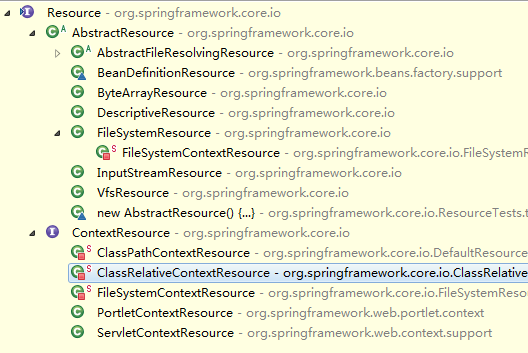
Resource接口有许多实现类,针对不同的BeanDefinition,如:
在文件系统中的Bean定义信息可以使用FileSystemResource来进行抽象。
在类路径中的Bean定义信息可以使用ClassPathResource来进行抽象。
我们来看下FileSystemXmlApplicationContext其中的一个构造函数:
public FileSystemXmlApplicationContext(String[] configLocations, boolean refresh, ApplicationContext parent)
            throws BeansException {

        super(parent);
        setConfigLocations(configLocations);
        if (refresh) {
            refresh();
        }
    }
这里有个refresh()方法,这个方法非常重要,可以说是IOC容器启动的入口,该方法的实现在AbstractApplicationContext中。
在AbstractApplicationContext的refresh方法中,最终对调用到AbstractRefreshableApplicationContext的refreshBeanFactory,在这里会创建一个基础的IOC容器供ApplicationContext使用,这个基础的BeanFactory就是DefaultListableBeanFactory。
protected final void refreshBeanFactory() throws BeansException {
        if (hasBeanFactory()) {
            destroyBeans();
            closeBeanFactory();
        }
        try {
            DefaultListableBeanFactory beanFactory = createBeanFactory();
            beanFactory.setSerializationId(getId());
            customizeBeanFactory(beanFactory);
            loadBeanDefinitions(beanFactory);
            synchronized (this.beanFactoryMonitor) {
                this.beanFactory = beanFactory;
            }
        }
        catch (IOException ex) {
            throw new ApplicationContextException("I/O error parsing bean definition source for " + getDisplayName(), ex);
        }
    }
再根据loadBeanDefinitions方法一直往下查找,最终会找到DefaultResourceLoader类的getResource方法:
public Resource getResource(String location) {
        Assert.notNull(location, "Location must not be null");
        if (location.startsWith(CLASSPATH_URL_PREFIX)) {
            return new ClassPathResource(location.substring(CLASSPATH_URL_PREFIX.length()), getClassLoader());
        }
        else {
            try {
                // Try to parse the location as a URL...
                URL url = new URL(location);
                return new UrlResource(url);
            }
            catch (MalformedURLException ex) {
                // No URL -> resolve as resource path.
                return getResourceByPath(location);
            }
        }
    }
这里的getResourceByPath方法最终被子类重写,该场景下重写该方法的类就是FileSystemXmlApplicationContext
protected Resource getResourceByPath(String path) {
        if (path != null && path.startsWith("/")) {
            path = path.substring(1);
        }
        return new FileSystemResource(path);
    }
这样我们从FileSystemXmlApplicationContext的构造函数中的refresh方法开始,最终到getResourceByPath结束,完成了资源定位的解析。但是这个只是容器启动中的一部分,还有载入和解析也是糅合在一起的,只是为了思路清晰,故意对这些地方视而不见。
二、BeanDefinition的载入和解析
在第一部分资源的定位中,我们是以getResourceByPath()结束的,接下来我们要通过该方法返回的Resource对象来进行BeanDefinition的载入了。现在我们已经知道水在哪里了,就可以现在打水和装水之旅了。
这个过程就是将定义的BeanDefinition在IOC容器中转化成一个Spring内部表示的数据结构的过程。我们紧接着前面的源码往下梳理:
AbstractRefreshableApplicationContext的方法refreshBeanFactory中调用loadBeanDefinitions(),往下梳理找到类AbstractXmlApplicationContext,源码片段如下;
 1 protected void loadBeanDefinitions(DefaultListableBeanFactory beanFactory) throws BeansException, IOException {
 2         // Create a new XmlBeanDefinitionReader for the given BeanFactory.
 3         XmlBeanDefinitionReader beanDefinitionReader = new XmlBeanDefinitionReader(beanFactory);
 4
 5         // Configure the bean definition reader with this context's
 6         // resource loading environment.
 7         beanDefinitionReader.setResourceLoader(this);
 8         beanDefinitionReader.setEntityResolver(new ResourceEntityResolver(this));
 9
10         // Allow a subclass to provide custom initialization of the reader,
11         // then proceed with actually loading the bean definitions.
12         initBeanDefinitionReader(beanDefinitionReader);
13         loadBeanDefinitions(beanDefinitionReader);
14     }
其中第7行是为读取器设置ResourceLoader,为后面的资源读取做准备;第13行就是启动Bean定义信息载入的开始。
 1 protected void loadBeanDefinitions(XmlBeanDefinitionReader reader) throws BeansException, IOException {
 2         Resource[] configResources = getConfigResources();
 3         if (configResources != null) {
 4             reader.loadBeanDefinitions(configResources);
 5         }
 6         String[] configLocations = getConfigLocations();
 7         if (configLocations != null) {
 8             reader.loadBeanDefinitions(configLocations);
 9         }
10     }
第2行是以Resource的方式获取配置文件的资源位置,而第6行是以String的形式获取配置文件的位置。
reader.loadBeanDefinitions()的实现见XmlBeanDefinitionReader的父类AbstractBeanDefinitionReader
1 public int loadBeanDefinitions(String... locations) throws BeanDefinitionStoreException {
2         Assert.notNull(locations, "Location array must not be null");
3         int counter = 0;
4         for (String location : locations) {
5             counter += loadBeanDefinitions(location);
6         }
7         return counter;
8     }
这里如果Resource为空,则停止BeanDefinition的载入。在启动BeanDefinition的过程中,会遍历整个Resource集合所包含的BeanDefinition的信息。
这里面调用的loadBeanDefinitions()方法具体实现并不在AbstractBeanDefinitionReader,而是在子类里:
 1 public int loadBeanDefinitions(EncodedResource encodedResource) throws BeanDefinitionStoreException {
 2         Assert.notNull(encodedResource, "EncodedResource must not be null");
 3         if (logger.isInfoEnabled()) {
 4             logger.info("Loading XML bean definitions from " + encodedResource.getResource());
 5         }
 6
 7         Set<EncodedResource> currentResources = this.resourcesCurrentlyBeingLoaded.get();
 8         if (currentResources == null) {
 9             currentResources = new HashSet<EncodedResource>(4);
10             this.resourcesCurrentlyBeingLoaded.set(currentResources);
11         }
12         if (!currentResources.add(encodedResource)) {
13             throw new BeanDefinitionStoreException(
14                     "Detected cyclic loading of " + encodedResource + " - check your import definitions!");
15         }
16         try {
17             InputStream inputStream = encodedResource.getResource().getInputStream();
18             try {
19                 InputSource inputSource = new InputSource(inputStream);
20                 if (encodedResource.getEncoding() != null) {
21                     inputSource.setEncoding(encodedResource.getEncoding());
22                 }
23                 return doLoadBeanDefinitions(inputSource, encodedResource.getResource());
24             }
25             finally {
26                 inputStream.close();
27             }
28         }
在这里可以拿到代表XML文件的Resource,读取器在打开I/O流后就可以得到XML的文件对象,接下来的事情就是按照Spring的Bean定义规则对这个XML文件做解析并封装了。而这个解析的过程是在类BeanDefinitionParserDelegate
在调用doLoadBeanDefinitions过程中,代码会走到类XmlBeanDefinitionReader中的doLoadBeanDefinitions的方法
1 protected int doLoadBeanDefinitions(InputSource inputSource, Resource resource)
2             throws BeanDefinitionStoreException {
3         try {
4             int validationMode = getValidationModeForResource(resource);
5             Document doc = this.documentLoader.loadDocument(
6                     inputSource, getEntityResolver(), this.errorHandler, validationMode, isNamespaceAware());
7             return registerBeanDefinitions(doc, resource);
8         }
这里第5行就是Document对象生成的入口,具体实现在DefaultDocumentLoader中。
第7行就是BeanDefinition解析的入口,我们接着往下走,最终的解析过程在类BeanDefinitionParserDelegate中,源码如下:
 1 public BeanDefinitionHolder parseBeanDefinitionElement(Element ele, BeanDefinition containingBean) {
 2         String id = ele.getAttribute(ID_ATTRIBUTE);
 3         String nameAttr = ele.getAttribute(NAME_ATTRIBUTE);
 4
 5         List<String> aliases = new ArrayList<String>();
 6         if (StringUtils.hasLength(nameAttr)) {
 7             String[] nameArr = StringUtils.tokenizeToStringArray(nameAttr, BEAN_NAME_DELIMITERS);
 8             aliases.addAll(Arrays.asList(nameArr));
 9         }
10
11         String beanName = id;
12         if (!StringUtils.hasText(beanName) && !aliases.isEmpty()) {
13             beanName = aliases.remove(0);
14             if (logger.isDebugEnabled()) {
15                 logger.debug("No XML 'id' specified - using '" + beanName +
16                         "' as bean name and " + aliases + " as aliases");
17             }
18         }
19
20         if (containingBean == null) {
21             checkNameUniqueness(beanName, aliases, ele);
22         }
23
24         AbstractBeanDefinition beanDefinition = parseBeanDefinitionElement(ele, beanName, containingBean);
25         if (beanDefinition != null) {
26             if (!StringUtils.hasText(beanName)) {
27                 try {
28                     if (containingBean != null) {
29                         beanName = BeanDefinitionReaderUtils.generateBeanName(
30                                 beanDefinition, this.readerContext.getRegistry(), true);
31                     }
32                     else {
33                         beanName = this.readerContext.generateBeanName(beanDefinition);
34                         // Register an alias for the plain bean class name, if still possible,
35                         // if the generator returned the class name plus a suffix.
36                         // This is expected for Spring 1.2/2.0 backwards compatibility.
37                         String beanClassName = beanDefinition.getBeanClassName();
38                         if (beanClassName != null &&
39                                 beanName.startsWith(beanClassName) && beanName.length() > beanClassName.length() &&
40                                 !this.readerContext.getRegistry().isBeanNameInUse(beanClassName)) {
41                             aliases.add(beanClassName);
42                         }
43                     }
44                     if (logger.isDebugEnabled()) {
45                         logger.debug("Neither XML 'id' nor 'name' specified - " +
46                                 "using generated bean name [" + beanName + "]");
47                     }
48                 }
49                 catch (Exception ex) {
50                     error(ex.getMessage(), ele);
51                     return null;
52                 }
53             }
54             String[] aliasesArray = StringUtils.toStringArray(aliases);
55             return new BeanDefinitionHolder(beanDefinition, beanName, aliasesArray);
56         }
57
58         return null;
59     }
其中 第24行会触发对Bean元素的详细解析,解析完成后会返回一个AbstractBeanDefinition对象,可以看下这个对象的属性,基本上都是Spring配置文件中的常用属性。

解析方法的具体内容如下:
 1 public AbstractBeanDefinition parseBeanDefinitionElement(
 2             Element ele, String beanName, BeanDefinition containingBean) {
 3
 4         this.parseState.push(new BeanEntry(beanName));
 5
 6         String className = null;
 7         if (ele.hasAttribute(CLASS_ATTRIBUTE)) {
 8             className = ele.getAttribute(CLASS_ATTRIBUTE).trim();
 9         }
10
11         try {
12             String parent = null;
13             if (ele.hasAttribute(PARENT_ATTRIBUTE)) {
14                 parent = ele.getAttribute(PARENT_ATTRIBUTE);
15             }
16             AbstractBeanDefinition bd = createBeanDefinition(className, parent);
17
18             parseBeanDefinitionAttributes(ele, beanName, containingBean, bd);
19             bd.setDescription(DomUtils.getChildElementValueByTagName(ele, DESCRIPTION_ELEMENT));
20
21             parseMetaElements(ele, bd);
22             parseLookupOverrideSubElements(ele, bd.getMethodOverrides());
23             parseReplacedMethodSubElements(ele, bd.getMethodOverrides());
24
25             parseConstructorArgElements(ele, bd);
26             parsePropertyElements(ele, bd);
27             parseQualifierElements(ele, bd);
28
29             bd.setResource(this.readerContext.getResource());
30             bd.setSource(extractSource(ele));
31
32             return bd;
33         }
其中第18行-27行,都是对Spring配置文件中不同<Bean>节点的解析,可以每个都深入去研究下。最终返回一个AbstractBeanDefinition对象。
到这里,XML文件中定义的BeanDefinition就被整个载入到IOC容器中,建立了对应的数据结构,可以看成是POJO在容器中的抽象。但是这个时候容器中还只是有一些静态的配置信息,完成了管理Bean对象的数据准备工作,但是容器还没有完全发挥作用。
三、BeanDefinition注册过程
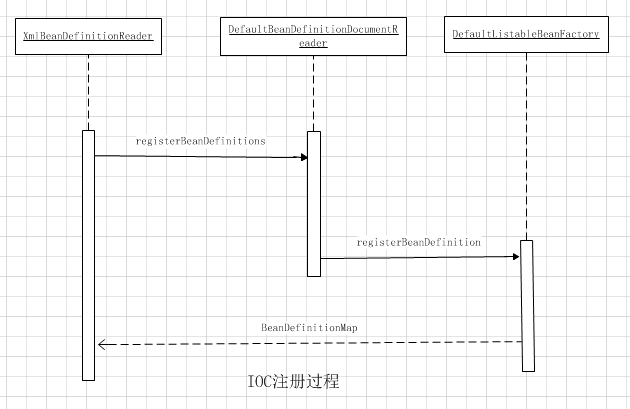
这个源码中方法调用过程比较简单,我们直接来看注册的核心代码:
 1 public void registerBeanDefinition(String beanName, BeanDefinition beanDefinition)
 2             throws BeanDefinitionStoreException {
 3
 4         Assert.hasText(beanName, "Bean name must not be empty");
 5         Assert.notNull(beanDefinition, "BeanDefinition must not be null");
 6
 7         if (beanDefinition instanceof AbstractBeanDefinition) {
 8             try {
 9                 ((AbstractBeanDefinition) beanDefinition).validate();
10             }
11             catch (BeanDefinitionValidationException ex) {
12                 throw new BeanDefinitionStoreException(beanDefinition.getResourceDescription(), beanName,
13                         "Validation of bean definition failed", ex);
14             }
15         }
16
17         synchronized (this.beanDefinitionMap) {
18             Object oldBeanDefinition = this.beanDefinitionMap.get(beanName);
19             if (oldBeanDefinition != null) {
20                 if (!this.allowBeanDefinitionOverriding) {
21                     throw new BeanDefinitionStoreException(beanDefinition.getResourceDescription(), beanName,
22                             "Cannot register bean definition [" + beanDefinition + "] for bean '" + beanName +
23                             "': There is already [" + oldBeanDefinition + "] bound.");
24                 }
25                 else {
26                     if (this.logger.isInfoEnabled()) {
27                         this.logger.info("Overriding bean definition for bean '" + beanName +
28                                 "': replacing [" + oldBeanDefinition + "] with [" + beanDefinition + "]");
29                     }
30                 }
31             }
32             else {
33                 this.beanDefinitionNames.add(beanName);
34                 this.frozenBeanDefinitionNames = null;
35             }
36             this.beanDefinitionMap.put(beanName, beanDefinition);
37
38             resetBeanDefinition(beanName);
39         }
40     }
最关键的一步就是第36行,所谓的注册就是将解析得到的BeanDefinition设置到hashMap中去。至此就完成了整个IOC容器初始化的工作,这样一来就可以在beanDefinition里检索和使用已经配置好的Bean了。ICO容器的作用就是维护和处理里面的Bean。
最后,我们来回答下这个问题,spring 容器中bean是什么时候被初始化的?
通过前面的分析,我们知道bean的实例化是伴随着容器的初始化而同时进行的(但是也有特例),并且默认情况下是单例的。

 浙公网安备 33010602011771号