移动端服务器i-jetty下载编译安装及问题解决系列
2020-03-16 18:37 dogdogwang 阅读(399) 评论(0) 收藏 举报由于新项目需要在一台Android平台的设备中布署WEB服务器并提供内网接入者通过浏览器访问WEB程序,遂考虑了Eclipse基金会的开源项目Jetty for Android,由于没有接触过所以已经做好心理准备会遇到一系列的问题,但猜到了开始却没猜到结局,解决问题的过程相当坎坷。这也是这篇随笔出现的原因,一来为自己长记性,二来吧,对于Jetty for Android,网路上那些群魔乱舞的资料实在是太让我无语了,毫无用处的博文实在是太多太多,有些在看的时候把人都看懵圈了,所以以本篇随笔作为整理之用。
首先惯例环境说明:Windows XP sp3 (苦逼公司)、JDK1.7、Apache Maven 3.2.5、Git 2.6.4、eclipse luna 4.4.2。
关于环境的准备这里就不作说明了,相信作为软件开发人员,不管老手菜鸟以上这些工具应该都玩得666的,怎么会没有安装不会配置呢。但还是要确定以下字段已声明在系统变量,并将"import"文字后说明的目录引入到Path属性中:
JAVA_HOME -- java jdk root path --import:\bin;\jre\bin
MAVEN_HOME -- maven root path --import:\bin
ANDROID_HOME -- android sdk root path --import:\tools;\platform-tools
1,Download
参考Jetty for Android项目主页利用Git将i-jetty代码同步到本地。
$ git clone https://github.com/jetty-project/i-jetty.git
在查看Jetty for Android项目主页时,注意到页面中在说明Depedencies时并没有说明Maven 的版本,但项目中Pom清单默认所依赖的类库Jar包的版本若与当前系统使用的Maven 的版本互相不兼容,后面编译项目时会出现一系列的问题,这点需要注意,关于项目中类库的版本与Maven版本的支持关系在下面有说明。
该项目包含三个项目四个工程,有一个是web Example,i-jetty是jetty容器主体项目,console用于发布一个web-war到jetty容器中。我们只需要编译打包i-jetty、console,然后将apk安装到移动设备上。
2,Building i-jetty
下载完毕首先做的不应该是打开eclipse 来 Import Maven Project,不然等着你的将会是恶梦连篇,而首先要做的应该是修改项目Pom文件以适应本地环境,再使用Maven同步相应的依赖类库项,确定本地环境能适应项目的编译过程。
项目中默认在使用老得不能再老的Android API 4 平台,作者也是够念旧的,我们暂时不改动它就用<platform>4</platform>,但请确认系统中已经下载了API 4 的SDK Platform,否则参考此亲提供的下载Android API 4 platform。
注意解压时不要直接解压到ANDROID_HOME中,参考SDK的目录结构,应在platforms,samples,system-images目录中建立android-4放置相应文件,tools目录内文件请对位入座。
此时我们还需要根据Maven 版本来修改项目中的Pom文件,例如我的为Apache Maven 3.2.5:i-jetty\i-jetty\i-jetty-ui\pom.xml
|
1
2
3
4
5
6
7
8
9
10
11
12
13
14
15
16
17
18
19
20
21
22
23
24
25
26
27
28
29
30
31
32
33
34
35
36
37
|
<plugin> <groupId>com.jayway.maven.plugins.android.generation2</groupId> <artifactId>android-maven-plugin</artifactId><!-- 改这里 --> <version>3.8.2</version><!-- 再改这里 --> <extensions>true</extensions> <configuration> <sdk> <platform>4</platform> </sdk> <deleteConflictingFiles>true</deleteConflictingFiles> <extractDuplicates>true</extractDuplicates> <undeployBeforeDeploy>true</undeployBeforeDeploy> </configuration> <executions> <execution> ... </execution> </executions> </plugin><profiles> <profile> <id>sign</id> <build> <plugins> <plugin> <groupId>com.jayway.maven.plugins.android.generation2</groupId> <artifactId>android-maven-plugin</artifactId><!-- 还有改这里 --> <configuration> <sign> <debug>false</debug> </sign> </configuration> </plugin> </plugins> </build> </profile></profiles> |
* 注:maven-android-plugin在3.0.0版本开始已经更名为android-maven-plugin,而项目中还在使用maven-android-plugin : 2.9.0-beta-5,作者年龄暴露无遗。
若是其它Maven 版本具体请参考以下的版本支持修改范围:
Maven 3.0.3 -- android-maven-plugin : 3.0.0
Maven 3.0.5 -- android-maven-plugin : 3.3.0~3.5.3
Maven 3.1.1 -- android-maven-plugin : 3.8.0~3.8.1
修改完毕,命令行定位到i-jetty\i-jetty目录开始编译apk:
|
1
|
mvn clean install |
此时Maven会根据Pom清单同步依赖项到Maven的本地repository中,到这里你就开始祈祷吧... --(此处根据网速快进若时间)-- 如果一切正确无误将会出现以下的编译结果:
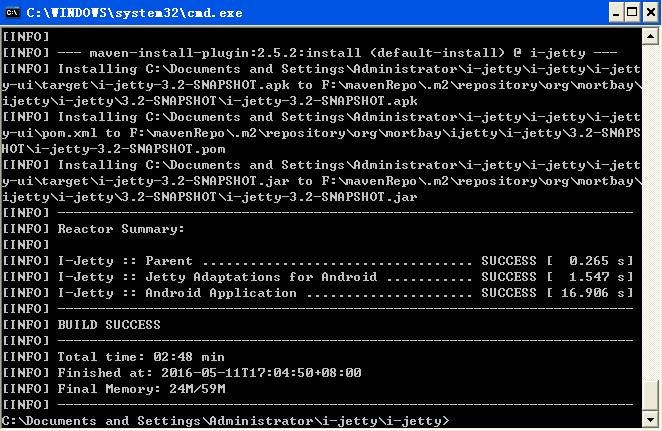
3,Using i-jetty
检查i-jetty-ui\target\发现已经编译成功的APK -- i-jetty-3.2-SNAPSHOT.apk ,将其安装到设备中:
|
1
|
adb install -s "C:\Documents and Settings\Administrator\i-jetty\i-jetty\i-jetty-ui\target\i-jetty-3.2-SNAPSHOT.apk" |
4,Building console
继续编译WEB项目,同样是修改Pom清单适应本地编译环境:i-jetty\console\webapp\pom.xml -- 从第70行开始
|
1
2
3
4
5
6
7
8
9
10
11
12
13
14
15
16
17
18
19
20
21
22
23
24
25
26
27
28
29
30
31
|
<plugin> <groupId>org.codehaus.mojo</groupId> <artifactId>exec-maven-plugin</artifactId> <version>1.2</version> <executions> <!-- Convert the compiled classes into a clases.dex. --> <execution> <id>generate-dex</id> <phase>process-classes</phase> <goals> <goal>exec</goal> </goals> <configuration> <executable>java</executable> <arguments> <argument>-jar</argument> <!-- 改为从android-api-4 解压出来的dx.jar的正确路径,用来将clss文件打包成dex文件 --> <argument>${env.ANDROID_HOME}/tools/lib/dx.jar</argument> <!--<argument>-JXmx1024M</argument>--> <argument>--dex</argument> <argument>--verbose</argument> <argument>--core-library</argument> <argument>--output=${project.build.directory}/classes.dex</argument> <argument>--positions=lines</argument> <argument>${project.build.directory}/classes/</argument> <argument>${project.build.directory}/generated-classes/</argument> </arguments> </configuration> </execution> </executions> </plugin> |
修改完毕,命令行定位到i-jetty\console\webapp目录开始编译war:
|
1
|
mvn clean install |
又是一阵焦急的等待...
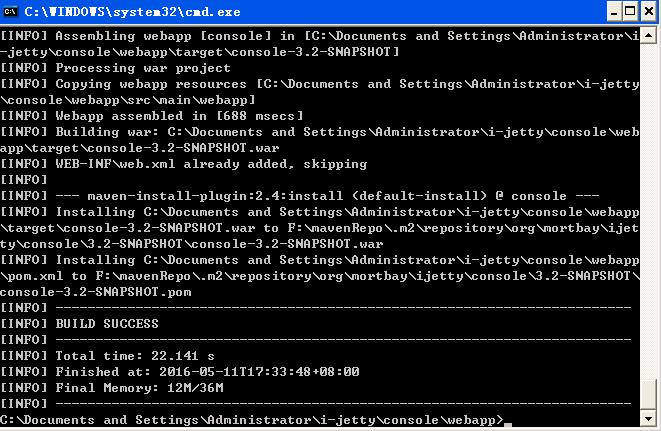
5,Using console
这个WEB是提供给i-jetty-console-installer作为要发布的程序,其实可以手工直接将war解压出来的console拷贝到/sdcard/jetty/webapps/下,这里演示过程需要所以将其copy到i-jetty-console-installer的res/raw/下,并将原来的空的console.war替换掉:
|
1
|
del "C:\Documents and Settings\Administrator\i-jetty\console\apk\res\raw\*.*" |
|
1
|
copy "C:\Documents and Settings\Administrator\i-jetty\console\webapp\target\console-3.2-SNAPSHOT.war" "C:\Documents and Settings\Administrator\i-jetty\console\apk\res\raw" |
|
1
|
rename "C:\Documents and Settings\Administrator\i-jetty\console\apk\res\raw\console-3.2-SNAPSHOT.war" console.war |
6,Building i-jetty-console-installer
顾名思义作用就是将console.war解压发布到i-jetty的工作目录webapps/下,当然先要修改Pom清单:i-jetty\console\apk\pom.xml -- 从第69行开始
|
1
2
3
4
5
6
7
8
9
10
11
12
13
14
15
16
17
18
19
20
21
22
23
24
25
26
27
28
29
30
31
32
33
34
35
36
37
38
39
40
41
42
43
44
45
46
|
<plugin> <groupId>com.jayway.maven.plugins.android.generation2</groupId> <artifactId>android-maven-plugin</artifactId><!-- 改这里 --> <version>3.8.2</version><!-- 还有改这里 --> <extensions>true</extensions> <configuration> <sdk> <platform>4</platform> </sdk> <deleteConflictingFiles>true</deleteConflictingFiles> <extractDuplicates>true</extractDuplicates> <undeployBeforeDeploy>true</undeployBeforeDeploy> <resourceOverlayDirectories> <resourceOverlayDirectory>${project.build.directory}/res-overlay</resourceOverlayDirectory> </resourceOverlayDirectories> </configuration> <executions> <execution> <id>alignApk</id> <phase>package</phase> <goals> <goal>zipalign</goal> </goals> </execution> </executions> </plugin> </plugins></build><profiles> <profile> <id>sign</id> <build> <plugins> <plugin> <groupId>com.jayway.maven.plugins.android.generation2</groupId> <artifactId>android-maven-plugin</artifactId><!-- 最后改这里 --> <configuration> <sign> <debug>false</debug> </sign> </configuration> </plugin> </plugins> </build> </profile> </profiles> |
翘起二郞腿命令行定位到i-jetty\console\apk目录开始编译apk,结果抛出了异常,好不容易硬起来一下子就又软了:
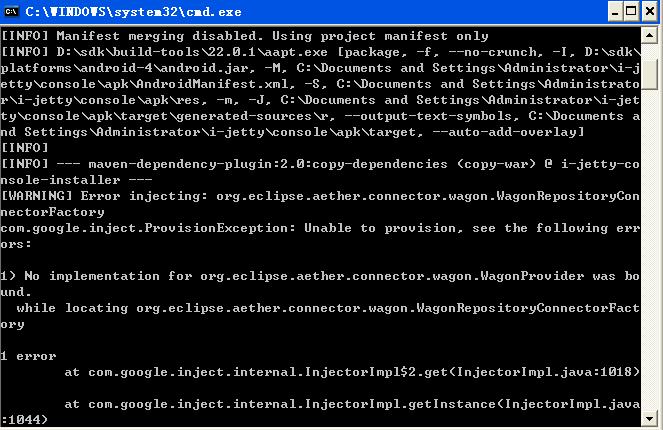
从截图可以看出Maven生命周期在执行 -- maven-dependency-plugin:2.0:copy-dependencies (copy-war) @ i-jetty-console-installer --的时候抛出了一个Warning Error injecting: org.eclipse.aether,connector.wagon.WagonRepositoryConnectorFactory ... ...
查看执行maven-dependency-plugin部分的goals,发现又是版本问题,其它maven-dependency-plugin都是用2.3版本的,唯独i-jetty\console\apk\pom.xml这个在用2.0版本,将其修改为2.3版本:i-jetty\console\apk\pom.xml -- 从第46行开始
|
1
2
3
4
5
6
7
8
9
10
11
12
13
14
15
16
17
18
19
20
21
22
23
|
<plugin> <groupId>org.apache.maven.plugins</groupId> <artifactId>maven-dependency-plugin</artifactId> <version>2.3</version><!-- 改这里 --> <executions> <execution> <id>copy-war</id> <phase>generate-sources</phase> <goals> <goal>copy-dependencies</goal> </goals> <configuration> <outputDirectory>${project.build.directory}/res-overlay/raw</outputDirectory> <overWriteReleases>false</overWriteReleases> <overWriteSnapshots>false</overWriteSnapshots> <overWriteIfNewer>true</overWriteIfNewer> <excludeTransitive>true</excludeTransitive> <stripVersion>true</stripVersion> <includeArtifactIds>console</includeArtifactIds> </configuration> </execution> </executions></plugin> |
修改完毕再编译该Pom,结果 BUILD SUCCESS !!! 哈哈哈,二郞腿翘起来,并将其安装到设备中。
7,Using i-jetty-console-installer
|
1
|
adb install -s "C:\Documents and Settings\Administrator\i-jetty\console\apk\target\i-jetty-console-installer-3.2-SNAPSHOT.apk" |
从设备中运行I-Jetty-Console,点击Install按钮。提示 success ,此时/sdcard/jetty/webapps/下多了一项console的WEB目录说明发布完成。
8,Browser console
查看设备WiFi Connector Information并从浏览器中访问
|
1
2
|
adb shellshell@android:/ $ netcfg |
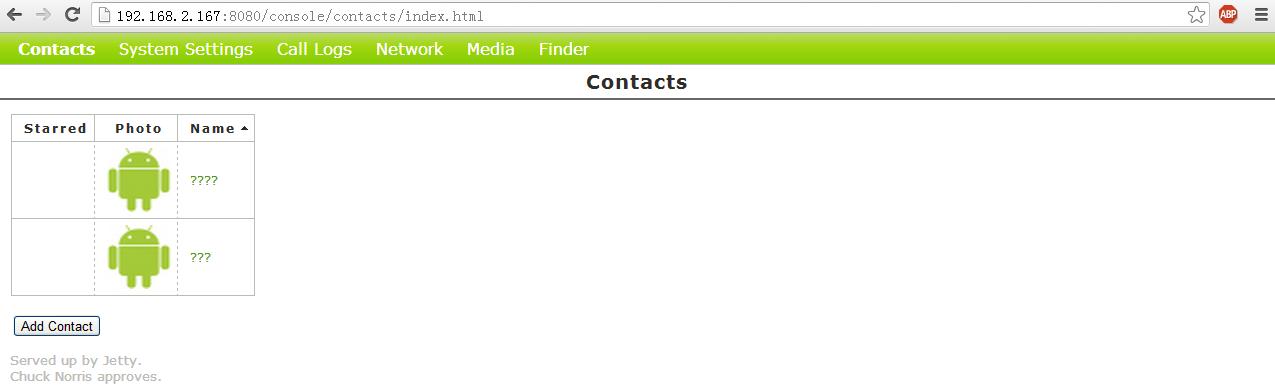
这个是Jetty for Android提供的一个示例项目,可以通过参考其中源码来了解如何从WEB中访问设备内部的数据。本随笔暂时到此结束,此处应有掌声。

 浙公网安备 33010602011771号