
zabbix监控基础
1. 安装前准备
|
1
2
3
4
|
setenforce 0sed -i "s/SELINUX=enforcing/SELINUX=disabled/g" /etc/selinux/configrpm --import /etc/pki/rpm-gpg/RPM-GPG-KEY-CentOS-7yum install net-tools openssl-devel openssl epel-release wget vim gcc gcc-c++ lsof chrony tree unzip rsync -y |
2. LAMP环境搭建
安装:
|
1
|
yum install -y httpd mariadb mariadb-server mariadb-client php php-mysql |
启动mysql,设置开机启动,修改mysql密码,注意下面的yourpassword要替换为你自己的密码
|
1
2
3
|
systemctl start mariadb.servicesystemctl enable mariadb.service #设置开机启动mysqladmin -u root -p password yourpassword |
3. 安装Zabbix服务
|
1
2
3
|
rpm -ivh http://repo.zabbix.com/zabbix/3.2/rhel/7/x86_64/zabbix-release-3.2-1.el7.noarch.rpmrpm --import /etc/pki/rpm-gpg/RPM-GPG-KEY-ZABBIXyum install -y zabbix-server-mysql zabbix-web-mysql zabbix-get zabbix-agent |
4. 创建Zabbix数据库
|
1
2
3
4
5
|
mysql -uroot -pMariaDB [(none)]> CREATE DATABASE zabbix DEFAULT CHARACTER SET utf8 COLLATE utf8_bin;MariaDB [(none)]> grant all privileges on zabbix.* to zabbix@localhost identified by 'zabbix';MariaDB [(none)]> flush privileges;MariaDB [(none)]> quit |
导入数据:
|
1
2
|
cd /usr/share/doc/zabbix-server-mysql-3.2.10/zcat create.sql.gz | mysql -uzabbix -pzabbix |
5. 修改zabbix配置
注意:下面的zabbix请替换为你自己的数据库密码
|
1
2
3
4
5
6
7
8
9
10
11
12
13
14
15
16
|
grep -Ev "^$|#" /etc/zabbix/zabbix_server.confLogFile=/var/log/zabbix/zabbix_server.logLogFileSize=0PidFile=/var/run/zabbix/zabbix_server.pidDBHost=localhostDBName=zabbixDBName=zabbixDBUser=zabbixDBUser=zabbixDBPassword=zabbixSNMPTrapperFile=/var/log/snmptrap/snmptrap.logTimeout=4AlertScriptsPath=/usr/lib/zabbix/alertscriptsExternalScripts=/usr/lib/zabbix/externalscriptsLogSlowQueries=3000 |
修改时区:
|
1
2
|
vim /etc/httpd/conf.d/zabbix.confphp_value date.timezone Asia/Shanghai |
6. 修改zabbix登录密码
|
1
2
3
4
5
6
7
8
9
10
11
12
13
14
15
16
17
18
19
20
21
22
23
24
25
26
27
|
# mysql -uroot -pEnter password:Welcome to the MariaDB monitor. Commands end with ; or \g.Your MariaDB connection id is 326Server version: 5.5.56-MariaDB MariaDB ServerCopyright (c) 2000, 2017, Oracle, MariaDB Corporation Ab and others.Type 'help;' or '\h' for help. Type '\c' to clear the current input statement.MariaDB [(none)]> use zabbixReading table information for completion of table and column namesYou can turn off this feature to get a quicker startup with -ADatabase changedMariaDB [zabbix]> select userid, alias, name, passwd from users;+--------+-------+--------+----------------------------------+| userid | alias | name | passwd |+--------+-------+--------+----------------------------------+| 1 | Admin | Zabbix | 5fce1b3e34b520afeffb37ce08c7cd66 || 2 | guest | | d41d8cd98f00b204e9800998ecf8427e |+--------+-------+--------+----------------------------------+2 rows in set (0.00 sec)MariaDB [zabbix]> update users set passwd=md5('newpassword') where userid='1';Query OK, 1 row affected (0.00 sec)Rows matched: 1 Changed: 1 Warnings: 0 |
7. 启动并设置开机启动
|
1
2
3
4
5
6
7
|
systemctl start httpdsystemctl start zabbix-serversystemctl start zabbix-agentsystemctl enable httpdsystemctl enable zabbix-serversystemctl enable zabbix-agent |
8. 访问zabbix页面
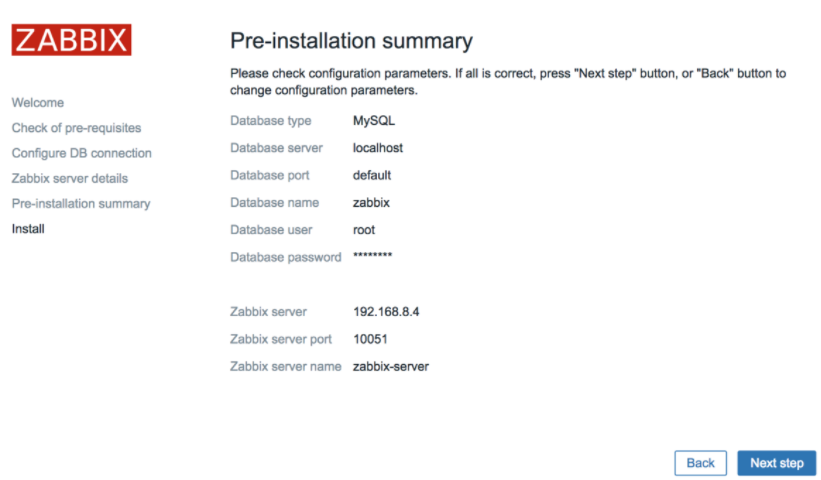
通过http://hostname/zabbix访问zabbix的安装页面,填写安装信息,完成安装。完成安装后,初始登录账户密码为Admin/zabbix。
9. 安装zabbix-agent
zabbix-server安装好了,下面需要“接入”其他机器,将它们纳入到zabbix-server的管理
|
1
2
|
rpm -ivh http://repo.zabbix.com/zabbix/3.2/rhel/7/x86_64/zabbix-release-3.2-1.el7.noarch.rpmyum install -y zabbix-agent |
配置zabbix-agent:
|
1
2
3
4
5
6
7
8
|
# grep -Ev "^$|#" /etc/zabbix/zabbix_agentd.confPidFile=/var/run/zabbix/zabbix_agentd.pidLogFile=/var/log/zabbix/zabbix_agentd.logLogFileSize=0Server=192.168.1.1ServerActive=192.168.1.1Hostname=192.168.1.2Include=/etc/zabbix/zabbix_agentd.d/*.conf |
启动zabbix-agent:
|
1
2
|
systemctl start zabbix-agent.servicesystemctl enable zabbix-agent.service |
操作命令:
|
1
2
3
4
5
6
7
8
9
10
11
12
13
14
15
16
17
18
|
rpm -ivh http://repo.zabbix.com/zabbix/3.2/rhel/7/x86_64/zabbix-release-3.2-1.el7.noarch.rpmyum install -y zabbix-agentcp /etc/zabbix/zabbix_agentd.conf /etc/zabbix/zabbix_agentd.conf.baksed -i s'$ServerActive=127.0.0.1$ServerActive=192.168.1.1$'g /etc/zabbix/zabbix_agentd.confsed -i s'$Server=127.0.0.1$Server=192.168.1.1$'g /etc/zabbix/zabbix_agentd.confsed -i s'$# UnsafeUserParameters=0$UnsafeUserParameters=1$'g /etc/zabbix/zabbix_agentd.confsed -i s'$# EnableRemoteCommands=0$EnableRemoteCommands=1$'g /etc/zabbix/zabbix_agentd.confHOSTIP=`ifconfig | grep "inet" | egrep -v '(192.168.50|127.0.0.1)'|awk -F ' ' '{print $2}'`sed -i s"/Hostname=Zabbix server/Hostname=$HOSTIP/"g /etc/zabbix/zabbix_agentd.conf检查:grep -Ev "^$|#" /etc/zabbix/zabbix_agentd.conf启动zabbix-agent服务:systemctl start zabbix-agent.servicesystemctl enable zabbix-agent.service |
10. 添加服务器
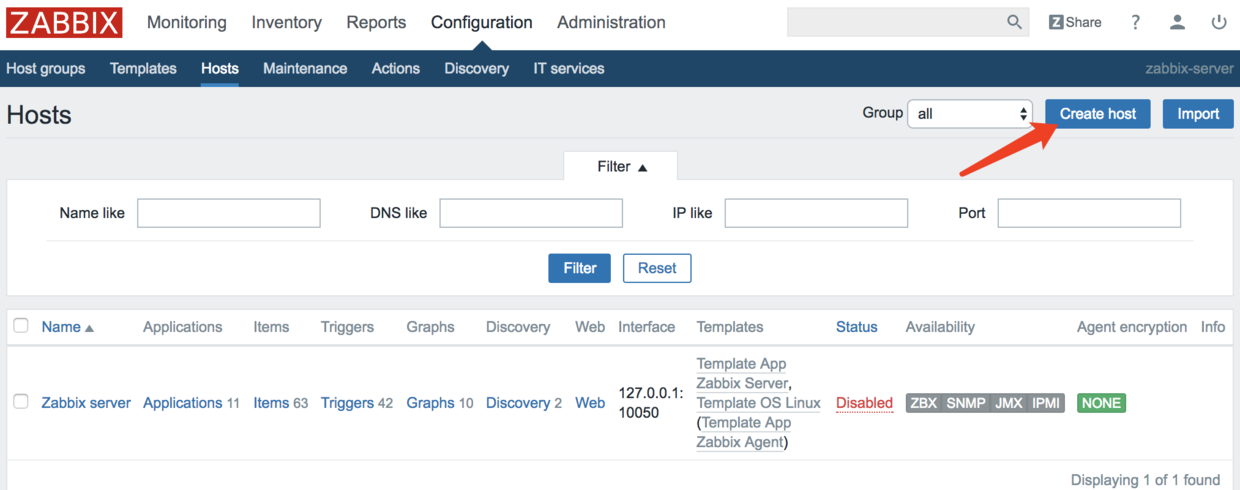

注意:中间的Agent interfaces是提供给Zabbix Server调用的接口,需确保该ip和port可以访问
绑定模板:

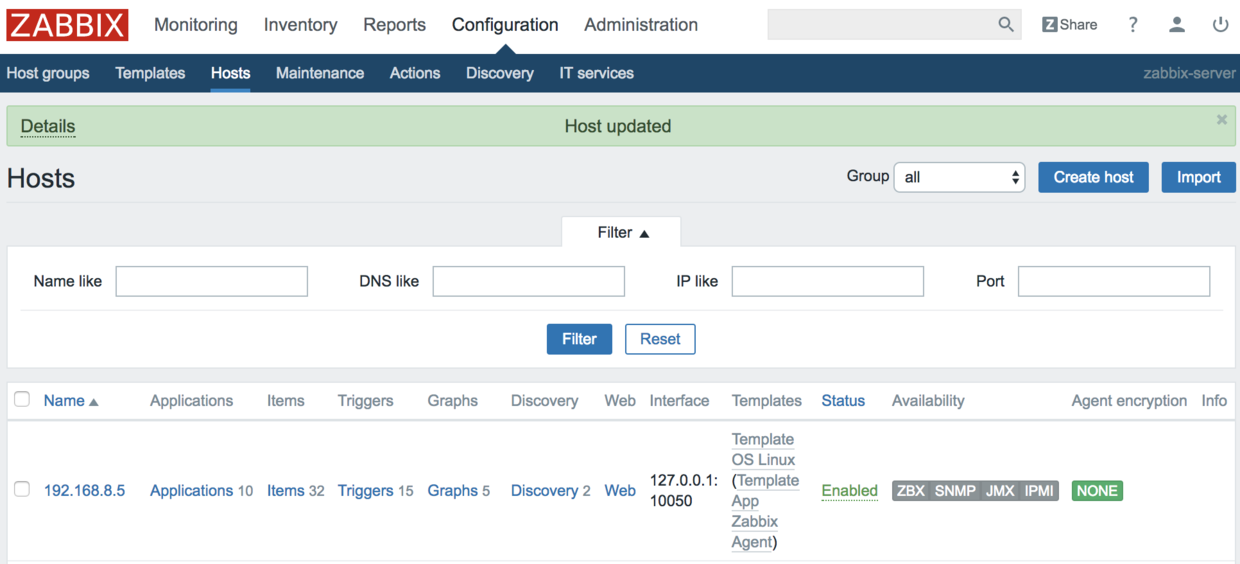
注意:如果zabbix-agent需要被其他机器调用,例如通过zabbix_get获得监控信息,需要在防火墙设置“放开10050端口”
11. Zabbix批量添加web监控
本文参考自 清风拂面 《python实现zabbix批量监控WEB网站和批量监控主机端口》 修改,使得以后添加web时更加方便,zabbix agent端完成1-3步,在zabbix web端直接导入模板即可使用。
web监控模板(zbx_web_monitor_templates.xml)
(1) agent端批量添加脚本/data/zabbix/scripts/web_site_moniter.py
|
1
2
3
4
5
6
7
8
9
10
11
12
13
14
15
16
17
18
19
20
21
22
23
24
25
26
27
28
29
30
31
32
33
34
35
36
37
38
39
40
41
42
43
44
45
46
47
48
49
50
51
52
|
#!/usr/bin/env python# coding:utf-8import os, sys, json# 将要监控的web站点url添加到urllist列表# urllist = ["http://baidu.com",# "http://www.qq.com",# "http://www.sina.com.cn/"]files='/etc/zabbix/test/WEB.txt'fd = open(files,'r')urllist=[]for i in fd.readlines(): if i[0] != '#': urllist.append(i.strip('\n'))fd.close()# 这个函数主要是构造出一个特定格式的字典,用于zabbixdef web_site_discovery(): web_list = [] web_dict = {"data": None} for url in urllist: url_dict = {} url_dict["{#SITENAME}"] = url web_list.append(url_dict) web_dict["data"] = web_list jsonStr = json.dumps(web_dict, sort_keys=True, indent=4) return jsonStr# 这个函数用于测试站点返回的状态码,注意在cmd命令中如果有%{}这种字符要使用占位符代替,否则# 会报错def web_site_code(): cmd = 'curl -o /dev/null -s -w %s %s' % ("%{http_code}", sys.argv[2]) reply_code = os.popen(cmd).readlines()[0] return reply_codeif __name__ == "__main__": try: if sys.argv[1] == "web_site_discovery": print web_site_discovery() elif sys.argv[1] == "web_site_code": print web_site_code() else: print "Pls sys.argv[0] web_site_discovery | web_site_code[URL]" except Exception as msg: print msg # 这里对脚本传递进来的第一个参数做判断去执行不同的函数,为什么要这样,因为通过一个脚本写了两个功能 |
(2) zabbix agent配置文件添加如下内容,内容含义请参考《python实现zabbix批量监控WEB网站和批量监控主机端口》已经详细解释说明
|
1
2
3
|
UnsafeUserParameters=1UserParameter=web_site_discovery,/data/zabbix/scripts/web_site_moniter.py web_site_discoveryUserParameter=web_site_code[*],/data/zabbix/scripts/web_site_moniter.py web_site_code $1 |
(3) zabbix agent添加需要监控web /data/zabbix/test/WEB.txt
|
1
2
3
4
|
http://www.ttlsa.com/zabbix/zabbix-zabbix_get-get-items/#www.qq.comwww.baidu.comwww.sina.com |
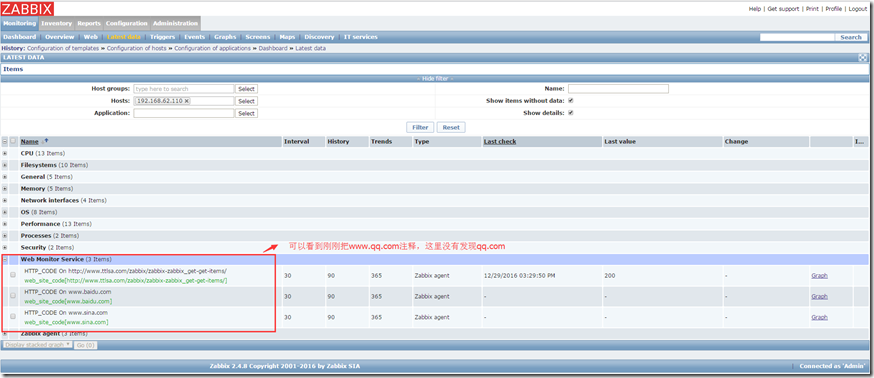
#号将表示取消web监控
修改zabbix agent配置后需要重启agent生效
(4)导入web监控模板zbx_web_monitor_templates.xml
Configuration ---> Templates ---> Import --->选择模板zbx_web_monitor_templates.xml
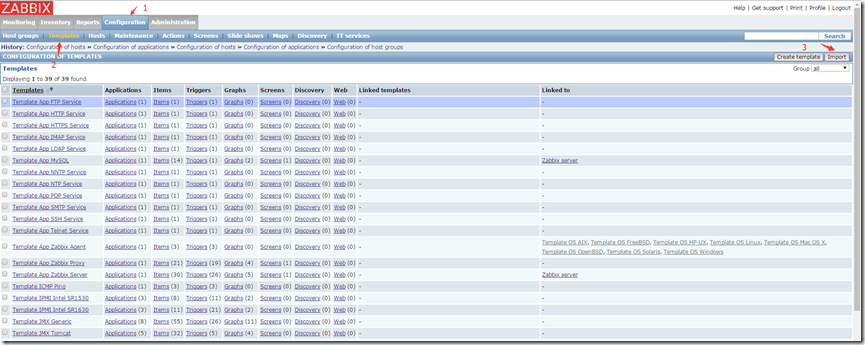

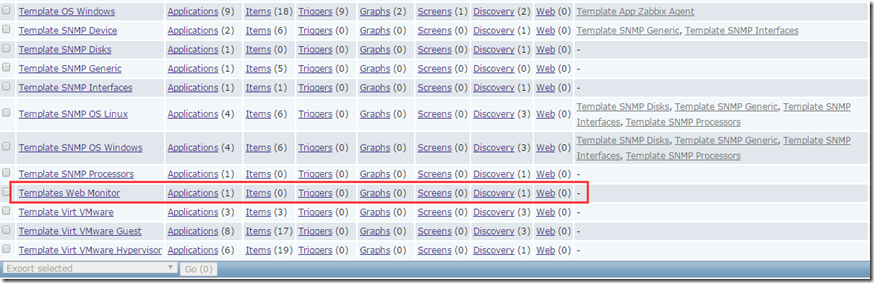
(5)模板导入之后Configuration ---> Templates可以找到Templates Web Monitor 模板
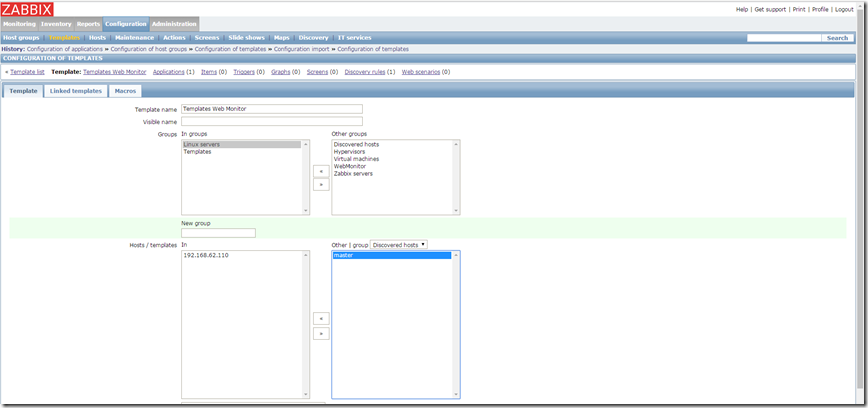
(6)选择Templates Web Monitor模板进行管理主机组或者主机
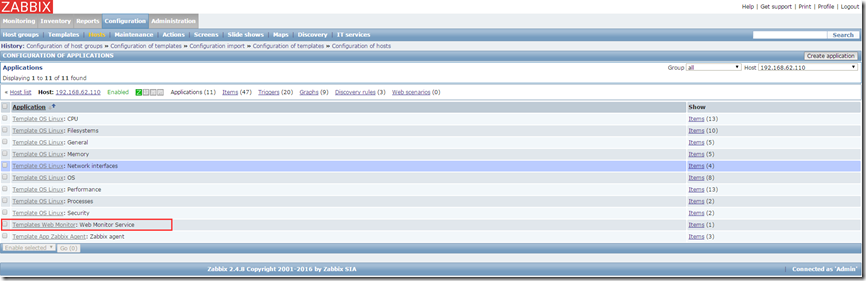
(7)Configuration ---> Hosts --->某主机Applications
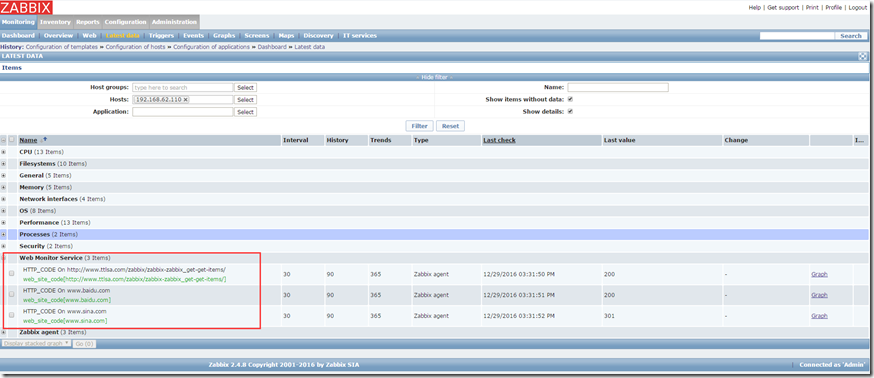
可以发现Templates Web Monitor: Web Monitor Service监控项目
(8)查看监控项目
11. 设置邮件报警
(1)安装邮件发送工具mailx
|
1
2
|
yum install -y mailxln -s /bin/mailx /bin/mail |
(2)配置zabbix服务端外部邮箱
打开文件vi /etc/mail.rc 如果mail.rc文件没有,就手动创建 内容如下:
|
1
2
3
4
5
|
set from=luchuangao@126.comset smtp=smtp.126.comset smtp-auth-user=luchuangao #认证用户set smtp-auth-password=123456 #认证密码set smtp-auth=login |
(3)测试邮件是否可以发出
|
1
|
echo "zabbix test mail" |mail -s "zabbix" luchuangao@126.com |
(4)编写发送邮件脚本
进入下面路径:/usr/lib/zabbix/alertscripts 创建sendmail.sh文件,内容如下
|
1
|
echo "$3" | mail -s "$2" "$1" |
上面的这个三个参数是接收从web页面中传递过来的,$1:收件人邮箱地址;$2:邮件标题;$3:邮件内容
在zabbix_serber.conf文件中配置的AlertScriptsPath=/usr/lib/zabbix/alertscripts,如果想修改服务端的配置文件中的AlertScriptsPath的值。
(5)配置web页面
a. 创建媒体类型
参考:http://www.linuxidc.com/Linux/2017-05/143776p5.htm
12.zabbix报错处理
zabbix监控搭建完后打开web界面http://xxx/zabbix报错:
zabbix server is not running: the information displayed may not be current!
修改zabbix.conf.php :
|
1
2
3
4
5
|
vim /etc/zabbix/web/zabbix.conf.php$DB['SERVER'] = '192.168.1.1'; # 改成本机的ip地址$ZBX_SERVER = '192.168.1.1'; # 改成本机的ip地址$ZBX_SERVER_PORT = '30051'; # 端口 |
重启HTTPD:
|
1
|
systemctl restart httpd |
13.Zabbix监控内存百分比
配置zabbix当内存剩余不足20%的时候触发报警
zabbix默认的剩余内存报警:
Average Lack of available memory on server {HOST.NAME}{Template OS Linux:vm.memory.size[available].last(0)}<20M
这个值配置的过小,当实际内存不足10%的时候就需要配置报警了,20M才出发有点晚
1.创建item
Configuration-->Templates-->Template OS Linux-->items-->create item
name:
Ava memory percent
type:
Calculated #计算类型
key:
|
1
|
vm.memory.free[percent] |
Formula:
|
1
|
100*last("vm.memory.size[available]")/last("vm.memory.size[total]") |
Applications:
Memory

2.创建trigger
Configuration-->Templates-->Template OS Linux-->Triggers-->create trigger
Name:
free mem less 10%
Expression:
{Template OS Linux:vm.memory.free[percent].last()}<10
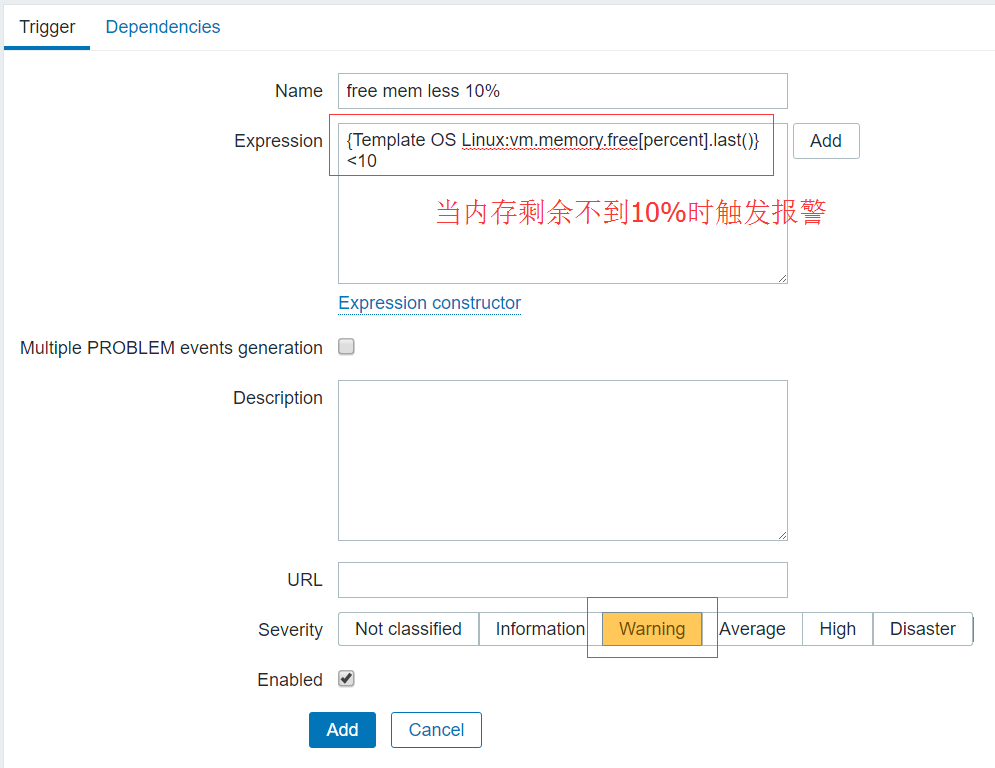
注意:
如果items或者trigger的Status是not suppoted说明表达式可能有问题,需要检查测试
扩展:
内存不足10% 这个时候服务器其实内存资源比较紧张,可以利用这个触发器触发一个脚本来重启占用内存比较多的服务,一般服务器里面的服务都是比较固定的,吃内存比较多的就是那几个,可以挑几个重启(单实例慎用),而且最好对该服务做好监控,避免自动重启服务脚本没有正常启动服务
14.Zabbix监控数据类型单位
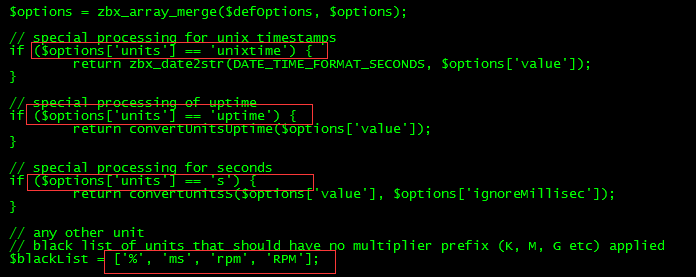
数据类型单位是由前端php来控制得:
|
1
|
vim /usr/share/zabbix/include/func.inc.php |
15.Grafana 4及结合Zabbix3.2实现可视化监控图形
https://www.cnblogs.com/zengqinglei/p/6503548.html
16.Zabbix监控磁盘IO
http://www.coooz.com/archives/222
17.zabbix中文乱码问题
https://www.cnblogs.com/kingwwz/p/5919030.html

 浙公网安备 33010602011771号