Packstack快速部署OpenStack教程
Packstack快速部署OpenStack教程
一、环境准备
1、新建虚拟机

|
操作系统版本 |
硬件配置 |
虚拟机IP地址 |
主机名 |
OpenStack版本 |
|
centos7.9 |
8vCPUS/11G 100G硬盘 |
172.25.254.139/24 |
openstack |
Stein |
环境准备好后,配置虚拟机网络
- 配置网络连接
#以下是我的网络配置环境,根据自己实际情况修改即可
cat /etc/sysconfig/network-scripts/ifcfg-ens33
BOOTPROTO=static
ONBOOT=yes
IPADDR=172.25.254.139
NETMASK=255.255.255.0
GATEWAY=172.25.254.2
DNS1=172.25.254.2
DNS2=223.5.5.5
网络配置好后可以使用连接工具XShell进行连接
3、修改主机名
hostnamectl set-hostname openstack
配置主机映射
at >> /etc/hosts << EOF
> 172.25.254.139 openstack
> EOF
检查映射
more /etc/hosts
127.0.0.1 localhost localhost.localdomain localhost4 localhost4.localdomain4
::1 localhost localhost.localdomain localhost6 localhost6.localdomain6
ping主机名测试
ping -c1 openstack
PING openstack (172.25.254.139) 56(84) bytes of data.
64 bytes from openstack (172.25.254.139): icmp_seq=1 ttl=64 time=0.079 ms
--- openstack ping statistics ---
1 packets transmitted, 1 received, 0% packet loss, time 0ms
rtt min/avg/max/mdev = 0.079/0.079/0.079/0.000 ms
4、关闭防火墙、selinux、NetworkManager服务
同时关闭禁用NetworkManager和firewalld,最后重启network服务以更新网络设置
#关闭禁用防火墙
[root@openstack ~]# systemctl stop firewalld
[root@openstack ~]# systemctl disable firewalld
Removed symlink /etc/systemd/system/multi-user.target.wants/firewalld.service.
Removed symlink /etc/systemd/system/dbus-org.fedoraproject.FirewallD1.service.
#临时禁用selinux(这个作用是不用重启系统)
[root@openstack ~]# setenforce 0
#永久禁用selinux
[root@openstack ~]# sed -i 's/SELINUX=.*/SELINUX=disabled/g' /etc/selinux/config
#关闭禁用NetworkManager
[root@openstack ~]# systemctl stop NetworkManager
[root@openstack ~]# systemctl disable NetworkManager
Removed symlink /etc/systemd/system/multi-user.target.wants/NetworkManager.service.
Removed symlink /etc/systemd/system/dbus-org.freedesktop.nm-dispatcher.service.
Removed symlink /etc/systemd/system/network-online.target.wants/NetworkManager-wait-online.service.
查看NetworkManage状态,确认关闭
[root@openstack ~]# systemctl status NetworkManager
- NetworkManager.service - Network Manager
Loaded: loaded (/usr/lib/systemd/system/NetworkManager.service; disabled; vendor preset: enabled)
Active: inactive (dead) since 二 2024-06-18 16:07:13 CST; 21s ago
Docs: man:NetworkManager(8)
Main PID: 1070 (code=exited, status=0/SUCCESS)
#重启网络
[root@openstack ~]# systemctl restart network
5、获取网络yum源
清空系统默认的yum源
#可以做一个备份(推荐)
mkdir /opt/yum.repo.bak
mv /etc/yum.repos.d/* /opt/yum.repo.bak
#或者
#直接删除
rm -rf /etc/yum.repos.d/*
#拉取网络yum源
[root@openstack ~]# curl -o /etc/yum.repos.d/CentOS-Base.repo https://mirrors.aliyun.com/repo/Centos-7.repo
[root@openstack ~]# curl -o /etc/yum.repos.d/epel.repo https://mirrors.aliyun.com/repo/epel-7.repo
6、安装常用软件
#这些软件一般是默认安装的,可以安装确认一下
#bash-completion,指令自动补全
#yum-utils,这是一个与 yum 集成的实用程序集合,可以通过多种方式扩展其本机功能,从而使其更强大且更易于使用
[root@openstack ~]# yum -y install bash-completion yum-utils
7、安装OpenStack stein的yum库
[root@openstack ~]# yum -y install centos-release-openstack-stein
#安装后做一个做一个yum源备份
[root@openstack ~]# cp /etc/yum.repos.d/CentOS-OpenStack-stein.repo /etc/yum.repos.d/CentOS-OpenStack-stein.repo.bak
源文件内容已修改正常版本:
# CentOS-OpenStack-stein.repo
#
# Please see http://wiki.centos.org/SpecialInterestGroup/Cloud for more
# information
[centos-openstack-stein]
name=CentOS-7 - OpenStack stein
baseurl=https://mirrors.aliyun.com/centos/7/cloud/x86_64/openstack-stein/
#mirrorlist=http://mirrorlist.centos.org/?release=$releasever&arch=$basearch&repo=cloud-openstack-stein
gpgcheck=1
enabled=1
gpgkey=file:///etc/pki/rpm-gpg/RPM-GPG-KEY-CentOS-SIG-Cloud
exclude=sip,PyQt4
[centos-openstack-stein-test]
name=CentOS-7 - OpenStack stein Testing
baseurl=https://mirrors.aliyun.com/centos/7/cloud/$basearch/openstack-stein/
gpgcheck=0
enabled=0
exclude=sip,PyQt4
[centos-openstack-stein-debuginfo]
name=CentOS-7 - OpenStack stein - Debug
baseurl=http://mirrors.aliyun.com/centos/7/cloud/$basearch/
gpgcheck=1
enabled=0
gpgkey=file:///etc/pki/rpm-gpg/RPM-GPG-KEY-CentOS-SIG-Cloud
exclude=sip,PyQt4
[centos-openstack-stein-source]
name=CentOS-7 - OpenStack stein - Source
baseurl=http://vault.centos.org/centos/7/cloud/Source/openstack-stein/
gpgcheck=1
enabled=0
gpgkey=file:///etc/pki/rpm-gpg/RPM-GPG-KEY-CentOS-SIG-Cloud
exclude=sip,PyQt4
[rdo-trunk-stein-tested]
name=OpenStack stein Trunk Tested
baseurl=https://trunk.rdoproject.org/centos7-stein/current-passed-ci/
gpgcheck=0
enabled=0
确保/etc/yum.repos.d/目录下只有以下三个repo文件
[root@openstack yum.repos.d]# ls
CentOS-Base.repo CentOS-OpenStack-stein.repo epel.repo
#清理 YUM 缓存中的所有数据
[root@openstack ~]# yum clean all
#生成软件包的元数据缓存,这可以提升后续使用yum进行软件包安装、更新等操作的速度,因为系统可以直接访问本地的元数据缓存,而不是每次都从远程仓库下载
8、安装packstack软件包工具
[root@openstack ~]# yum -y install openstack-packstack
yum downgrade leatherman -y
yum -y install PackageKit-backend
yum -y install yum-utils
yum install -y qpid-proton-c-0.22.0-1.el7.x86_64
yum -y install openstack-keystone
yum -y install openstack-nova-compute-19.3.2-1.el7.noarch
yum install -y qemu-kvm-rhev 若yum找不到软件包,使用压缩文件中的qemu-kvm三个包进行本地安装
yum localinstall qemu-img-rhev-2.1.2-23.el7.fws_1.9.x86_64.rpm qemu-kvm-common-rhev-2.1.2-23.el7.fws_1.9.x86_64.rpm qemu-kvm-rhev-2.1.2-23.el7.fws_1.9.x86_64.rpm
9、快速运行Packstack
在终端中执行packstack --allinone命令以快速运行Packstack,安装OpenStack allinone,这将使用默认配置在服务器上部署All-in-One的OpenStack环境。Packstack将自动安装所有必需的组件并配置它们。完成安装后,可以通过浏览器访问OpenStack的控制面板
[root@openstack ~]# packstack --allinone
Welcome to the Packstack setup utility
The installation log file is available at: /var/tmp/packstack/20240619-085043-RWK76v/openstack-setup.log
Installing:
Clean Up [ DONE ]
Discovering ip protocol version [ DONE ]
Setting up ssh keys [ DONE ]
Preparing servers [ DONE ]
Pre installing Puppet and discovering hosts' details [ DONE ]
Preparing pre-install entries [ DONE ]
Setting up CACERT [ DONE ]
Preparing AMQP entries [ DONE ]
Preparing MariaDB entries [ DONE ]
Fixing Keystone LDAP config parameters to be undef if empty[ DONE ]
Preparing Keystone entries [ DONE ]
Preparing Glance entries [ DONE ]
Checking if the Cinder server has a cinder-volumes vg[ DONE ]
Preparing Cinder entries [ DONE ]
Preparing Nova API entries [ DONE ]
Creating ssh keys for Nova migration [ DONE ]
Gathering ssh host keys for Nova migration [ DONE ]
Preparing Nova Compute entries [ DONE ]
Preparing Nova Scheduler entries [ DONE ]
Preparing Nova VNC Proxy entries [ DONE ]
Preparing OpenStack Network-related Nova entries [ DONE ]
Preparing Nova Common entries [ DONE ]
Preparing Neutron LBaaS Agent entries [ DONE ]
Preparing Neutron API entries [ DONE ]
Preparing Neutron L3 entries [ DONE ]
Preparing Neutron L2 Agent entries [ DONE ]
Preparing Neutron DHCP Agent entries [ DONE ]
Preparing Neutron Metering Agent entries [ DONE ]
Checking if NetworkManager is enabled and running [ DONE ]
Preparing OpenStack Client entries [ DONE ]
Preparing Horizon entries [ DONE ]
Preparing Swift builder entries [ DONE ]
Preparing Swift proxy entries [ DONE ]
Preparing Swift storage entries [ DONE ]
Preparing Gnocchi entries [ DONE ]
Preparing Redis entries [ DONE ]
Preparing Ceilometer entries [ DONE ]
Preparing Aodh entries [ DONE ]
Preparing Puppet manifests [ DONE ]
Copying Puppet modules and manifests [ DONE ]
Applying 192.168.126.5_controller.pp
192.168.126.5_controller.pp: [ DONE ]
Applying 192.168.126.5_network.pp
192.168.126.5_network.pp: [ DONE ]
Applying 192.168.126.5_compute.pp
192.168.126.5_compute.pp: [ DONE ]
Applying Puppet manifests [ DONE ]
Finalizing [ DONE ]
**** Installation completed successfully ******
#这个说我们安装成功啦!
Additional information:
* Parameter CONFIG_NEUTRON_L2_AGENT: You have choosen OVN neutron backend. Note that this backend does not support LBaaS, VPNaaS or FWaaS services. Geneve will be used as encapsulation method for tenant networks
* A new answerfile was created in: /root/packstack-answers-20240619-085043.txt
* Time synchronization installation was skipped. Please note that unsynchronized time on server instances might be problem for some OpenStack components.
* File /root/keystonerc_admin has been created on OpenStack client host 192.168.126.5. To use the command line tools you need to source the file.
* To access the OpenStack Dashboard browse to http://192.168.126.5/dashboard .
Please, find your login credentials stored in the keystonerc_admin in your home directory.
* The installation log file is available at: /var/tmp/packstack/20240619-085043-RWK76v/openstack-setup.log
* The generated manifests are available at: /var/tmp/packstack/20240619-085043-RWK76v/manifests
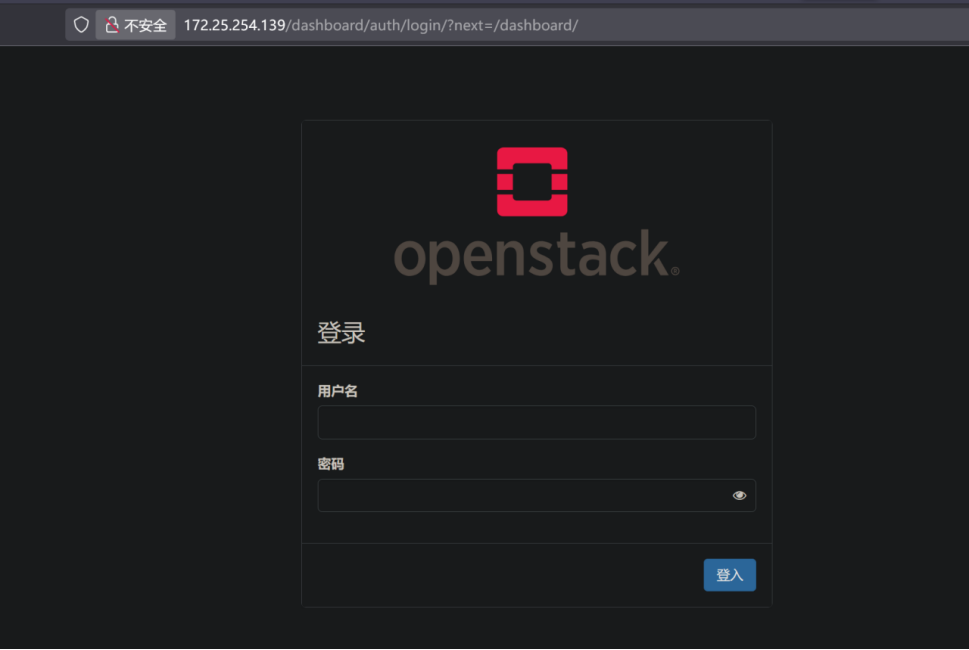
查看Dashboard web页面的登录账号和密码
http://172.25.254.139/dashboard为OpenStack的登录地址(根据自己主机IP访问)
/root/keystonerc_admin文件是存放登录用户名和密码。
#查看用户名和密码username、password
[root@openstack ~]# cat keystonerc_admin
unset OS_SERVICE_TOKEN
export OS_USERNAME=admin #Dashboard登录账号
export OS_PASSWORD='63d66fdb08cf4c5c' #Dashboard登录密码
export OS_REGION_NAME=RegionOne
export OS_AUTH_URL=http://192.168.126.5:5000/v3
export PS1='[\u@\h \W(keystone_admin)]\$ '
export OS_PROJECT_NAME=admin
export OS_USER_DOMAIN_NAME=Default
export OS_PROJECT_DOMAIN_NAME=Default
export OS_IDENTITY_API_VERSION=3
Dashboard web登录界面
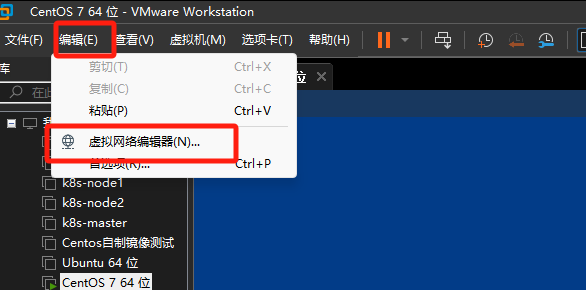
导入虚拟机到其它电脑
- 修改虚拟机网段方法
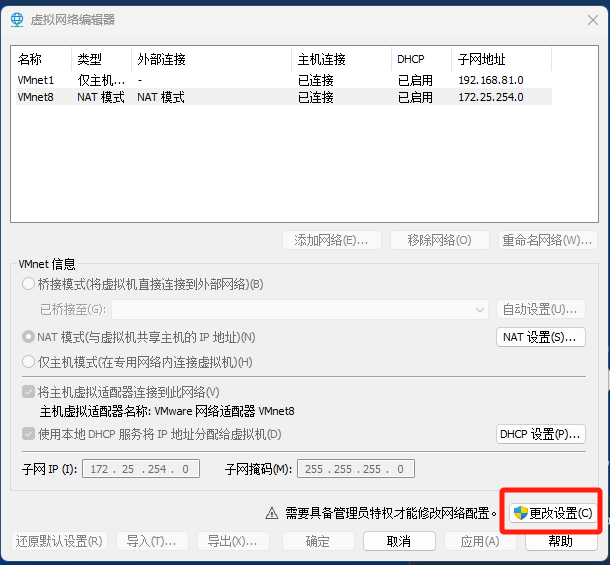
修改VMnet8子网网段

检查NAT设置
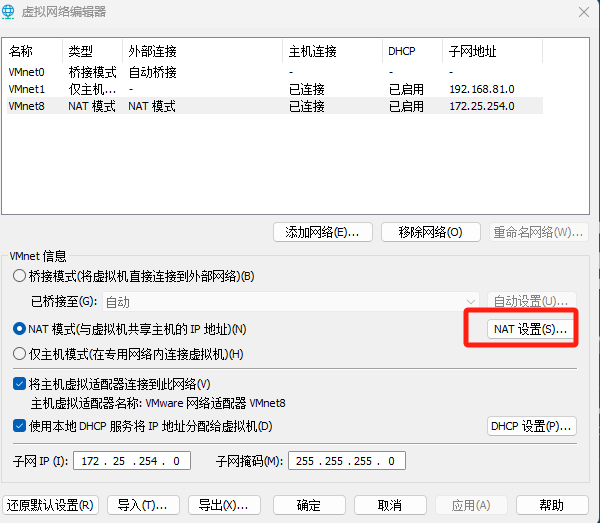
检查网关地址是否为前面修改的网段地址内的IP
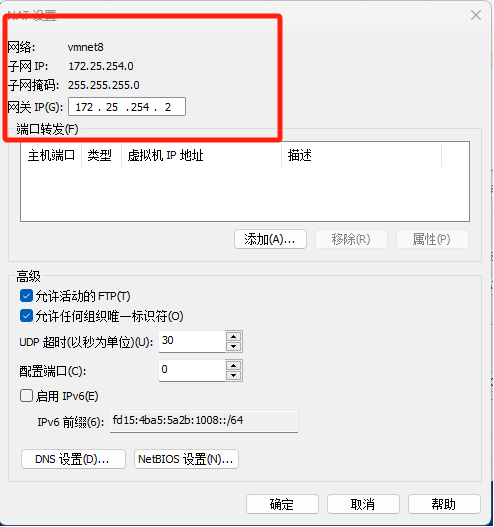
注意:虚拟机IP地址不可更改,只能修改虚拟机软件网段
二、Win11的Ubuntu虚拟机启动虚拟化,报错此平台不支持虚拟化的 Intel VT-x/EPT
因为openstack需要kvm支持,在虚拟机软件中需要在cpu中开启intel VT-x或ADM-V/RVI,如果勾选上后,虚拟机开机报错需要禁用Device guard
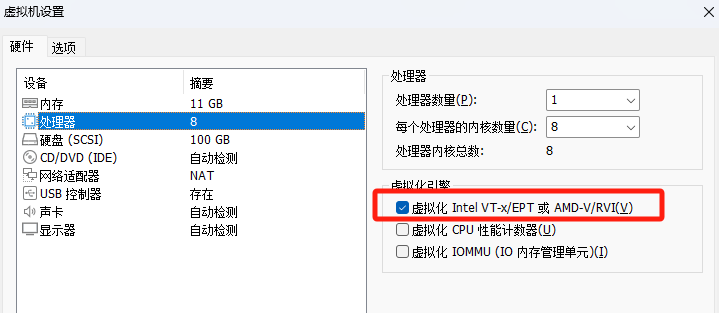
禁用Device guard
win+s搜索cmd,以管理员身份执行下列指令:
mountvol X: /s
copy %WINDIR%\System32\SecConfig.efi X:\EFI\Microsoft\Boot\SecConfig.efi /Y
bcdedit /create {0cb3b571-2f2e-4343-a879-d86a476d7215} /d "DebugTool" /application osloader
bcdedit /set {0cb3b571-2f2e-4343-a879-d86a476d7215} path "\EFI\Microsoft\Boot\SecConfig.efi"
bcdedit /set {bootmgr} bootsequence {0cb3b571-2f2e-4343-a879-d86a476d7215}
bcdedit /set {0cb3b571-2f2e-4343-a879-d86a476d7215} loadoptions DISABLE-LSA-ISO
bcdedit /set {0cb3b571-2f2e-4343-a879-d86a476d7215} device partition=X:
mountvol X: /d
重新启动,提示Press win or f3 to disable……, esc to skip this step。按win或者f3禁用就行
命令 bcdedit /set hypervisorlaunchtype off 会关闭 Hyper-V 自动加载, 其它依赖于 HV 主机服务的附加服务也不起作用了

 浙公网安备 33010602011771号