Mac php7(系统内置)+apach(系统内置)+nginx+mysql+php5.3.29(编译安装) 多版本PHP+Xdebug+nginx反向代理+https站点+redis
1,mac系统版本 mocos mojave 10.14.3 内置php版本7.1.23 内置apache版本2.4.34(apachectl -v查询)
2,之前安装了MAMP PRO破解版开发环境,安装前先关闭MAMP所有服务并退出,退出前可先将MAMP的数据库文件导出备份,配置完新mysql后直接导入到新mysql中
安装mysql
使用mysql官网dmg安装包安装,版本为5.7.25
下载地址:https://dev.mysql.com/downloads/mysql/5.7.html#downloads
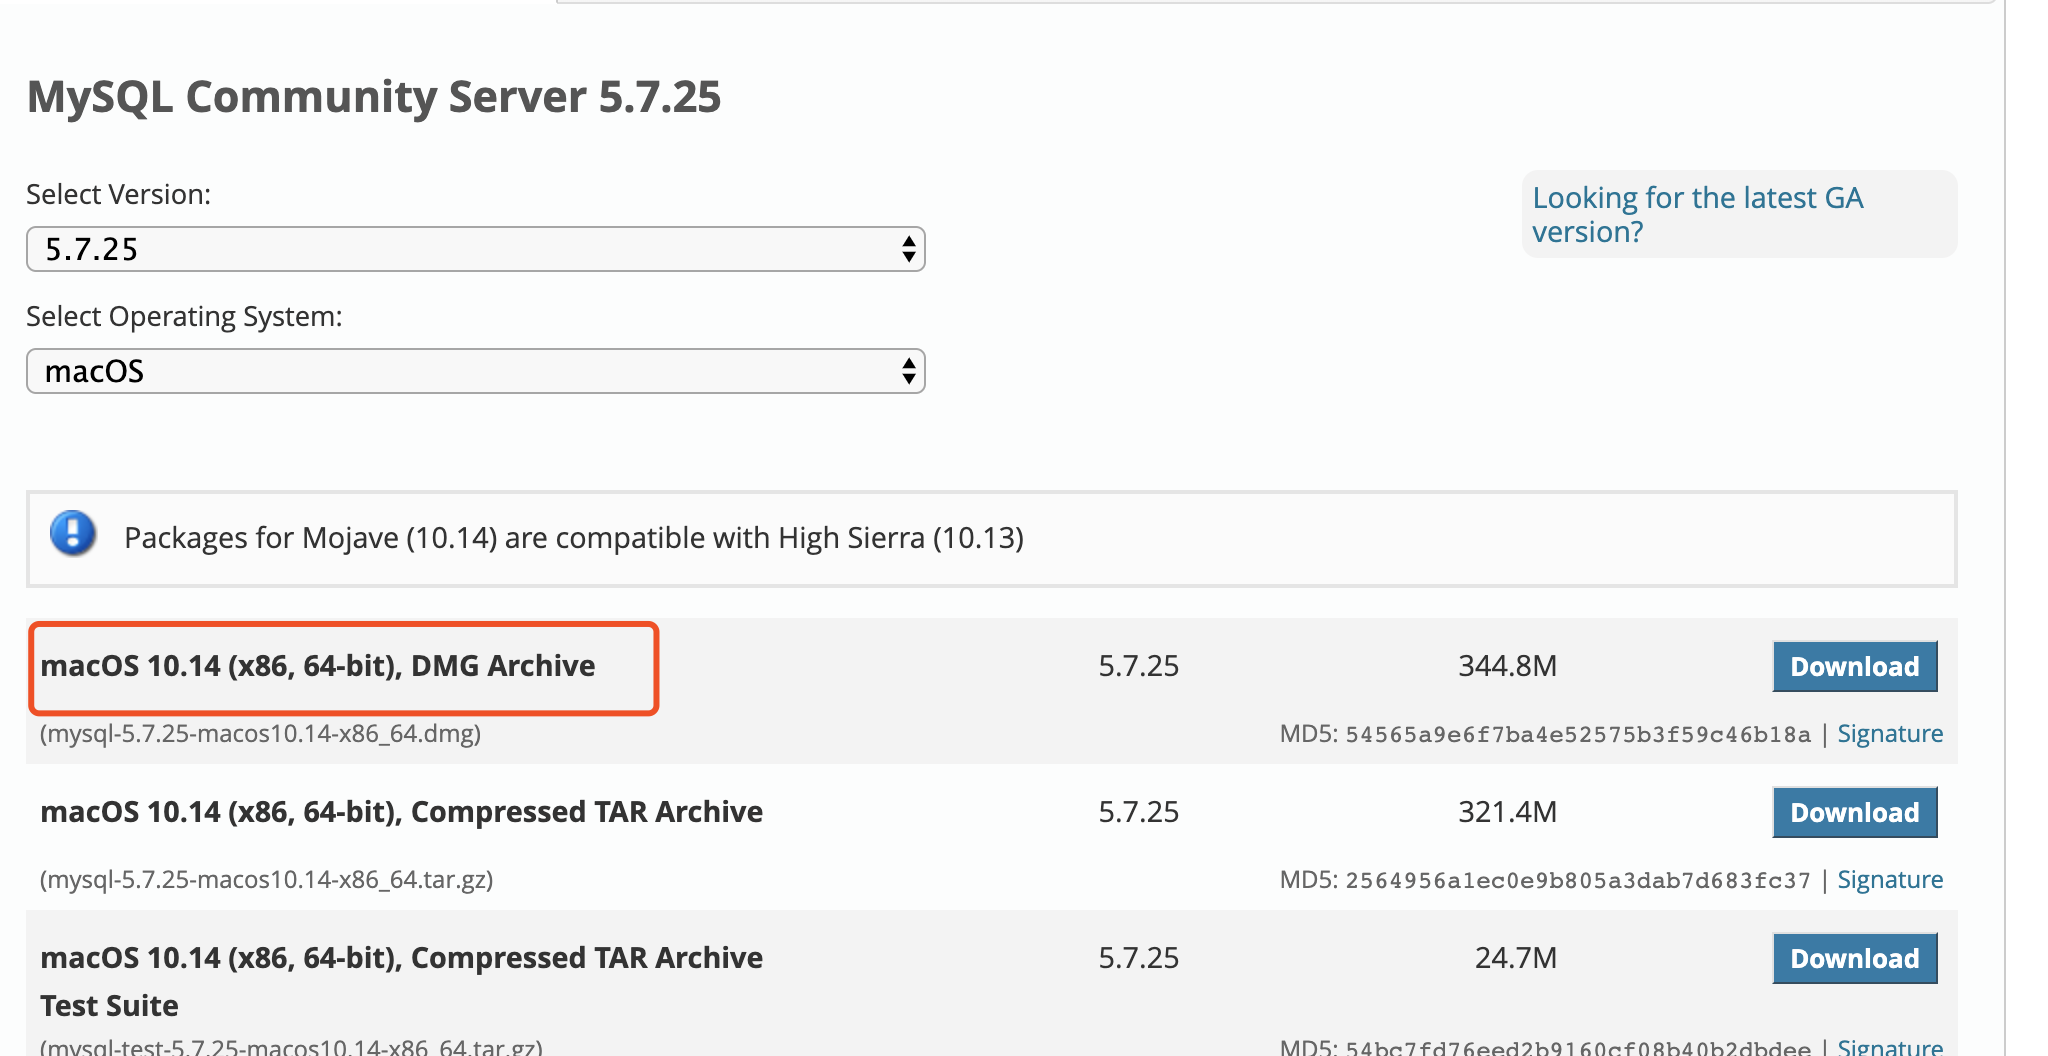
下载完成后直接点击安装,安装完成后会弹出一个对话框提示默认root密码
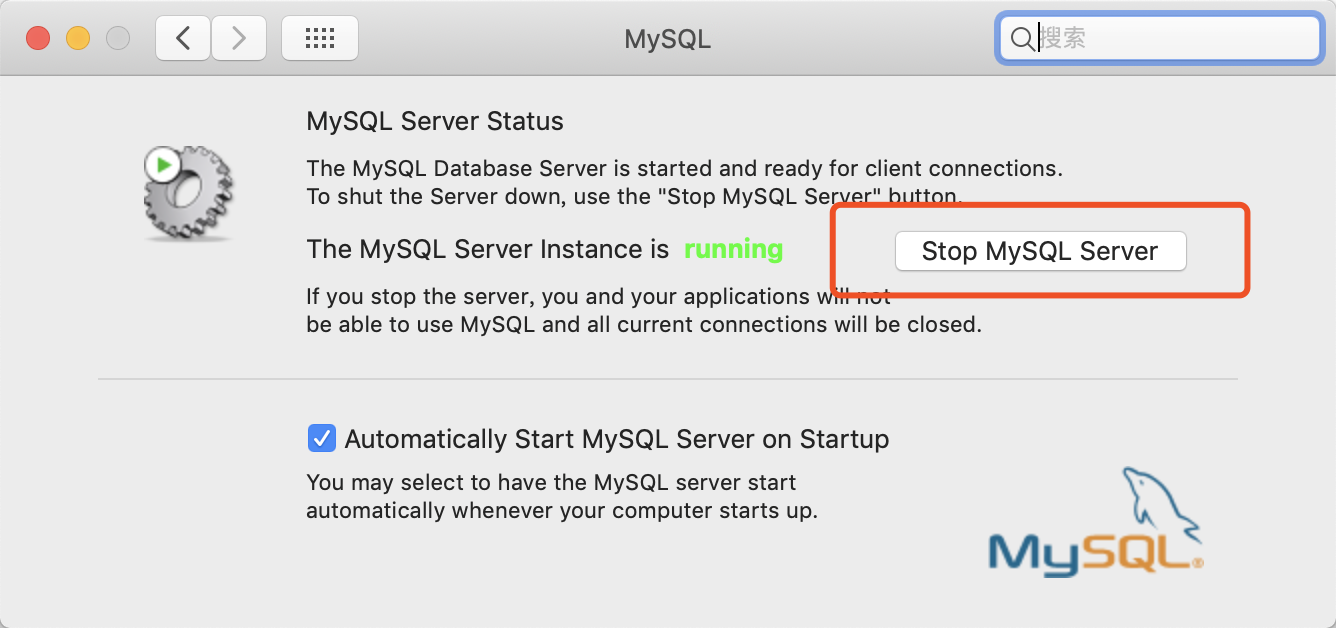
安装完成后在系统系统偏好设置中会多一个mysql设置选项

点击mysql设置可进行mysql启动关闭操作
mysql默认安装在/usr/local/mysql目录中,一个软链接
命令方式启动mysql server
/usr/local/mysql/support-files/mysql.server start
命令方式关闭mysql server
/usr/local/mysql/support-files/mysql.server stop
可将/usr/local/mysql/support-files/mysql.serve配置到/usr/local/bin目录中
mysql配置文件
新建/etc/my.cnf内容如下
# Example MySQL config file for medium systems.
#
# This is for a system with little memory (32M - 64M) where MySQL plays
# an important part, or systems up to 128M where MySQL is used together with
# other programs (such as a web server)
#
# MySQL programs look for option files in a set of
# locations which depend on the deployment platform.
# You can copy this option file to one of those
# locations. For information about these locations, see:
# http://dev.mysql.com/doc/mysql/en/option-files.html
#
# In this file, you can use all long options that a program supports.
# If you want to know which options a program supports, run the program
# with the "--help" option.
# The following options will be passed to all MySQL clients
[client]
default-character-set=utf8
#password   = your_password
port        = 3306
socket      = /tmp/mysql.sock
# Here follows entries for some specific programs
# The MySQL server
[mysqld]
#第一次连接mysql如果没记住密码可以通过以下引项设置关闭mysql权限验证,登录后个性密码再开启验证
#skip-grant-tables
character-set-server=utf8
init_connect='SET NAMES utf8
port        = 3306
socket      = /tmp/mysql.sock
skip-external-locking
key_buffer_size = 16M
max_allowed_packet = 1M
table_open_cache = 64
sort_buffer_size = 512K
net_buffer_length = 8K
read_buffer_size = 256K
read_rnd_buffer_size = 512K
myisam_sort_buffer_size = 8M
character-set-server=utf8
init_connect='SET NAMES utf8'
# Don't listen on a TCP/IP port at all. This can be a security enhancement,
# if all processes that need to connect to mysqld run on the same host.
# All interaction with mysqld must be made via Unix sockets or named pipes.
# Note that using this option without enabling named pipes on Windows
# (via the "enable-named-pipe" option) will render mysqld useless!
#
#skip-networking

# Replication Master Server (default)
# binary logging is required for replication
log-bin=mysql-bin

# binary logging format - mixed recommended
  binlog_format=mixed

# required unique id between 1 and 2^32 - 1
# defaults to 1 if master-host is not set
# but will not function as a master if omitted
  server-id   = 1

# Replication Slave (comment out master section to use this)
#
# To configure this host as a replication slave, you can choose between
# two methods :
#
# 1) Use the CHANGE MASTER TO command (fully described in our manual) -
#    the syntax is:
#
#    CHANGE MASTER TO MASTER_HOST=<host>, MASTER_PORT=<port>,
#    MASTER_USER=<user>, MASTER_PASSWORD=<password> ;
#
#    where you replace <host>, <user>, <password> by quoted strings and
#    <port> by the master's port number (3306 by default).
#
#    Example:
#
#    CHANGE MASTER TO MASTER_HOST='125.564.12.1', MASTER_PORT=3306,
#    MASTER_USER='joe', MASTER_PASSWORD='secret';
#
# OR
#
# 2) Set the variables below. However, in case you choose this method, then
#    start replication for the first time (even unsuccessfully, for example
#    if you mistyped the password in master-password and the slave fails to
#    connect), the slave will create a master.info file, and any later
#    change in this file to the variables' values below will be ignored and
#    overridden by the content of the master.info file, unless you shutdown
#    the slave server, delete master.info and restart the slaver server.
#    For that reason, you may want to leave the lines below untouched
#    (commented) and instead use CHANGE MASTER TO (see above)
#
# required unique id between 2 and 2^32 - 1
# (and different from the master)
# defaults to 2 if master-host is set
# but will not function as a slave if omitted
#server-id       = 2
#
# The replication master for this slave - required
#master-host     =   <hostname>
#
# The username the slave will use for authentication when connecting
# to the master - required
#master-user     =   <username>
#
# The password the slave will authenticate with when connecting to
# the master - required
#master-password =   <password>
#
# The port the master is listening on.
# optional - defaults to 3306
#master-port     =  <port>
#
# binary logging - not required for slaves, but recommended
#log-bin=mysql-bin

# Uncomment the following if you are using InnoDB tables
#innodb_data_home_dir = /usr/local/mysql/data
#innodb_data_file_path = ibdata1:10M:autoextend
#innodb_log_group_home_dir = /usr/local/mysql/data
# You can set .._buffer_pool_size up to 50 - 80 %
# of RAM but beware of setting memory usage too high
#innodb_buffer_pool_size = 16M
#innodb_additional_mem_pool_size = 2M
# Set .._log_file_size to 25 % of buffer pool size
#innodb_log_file_size = 5M
#innodb_log_buffer_size = 8M
#innodb_flush_log_at_trx_commit = 1
#innodb_lock_wait_timeout = 50

[mysqldump]
quick
max_allowed_packet = 16M

[mysql]
no-auto-rehash
# Remove the next comment character if you are not familiar with SQL
#safe-updates
default-character-set=utf8

[myisamchk]
key_buffer_size = 20M
sort_buffer_size = 20M
read_buffer = 2M
write_buffer = 2M

[mysqlhotcopy]
interactive-timeout
重启mysql,连接测试
mac默认没有mysql客户端命令,安装完成mysql.server后会同时安装mysql客户端命令,但不是系统可执行命令,
mysql客户端命令在/usr/local/mysql/bin目录中 拷贝到/usr/local/bin目录中
cp -a /usr/local/mysql/bin/mysql /usr/local/bin/
将安装之前从MAMP mysql导出的数据库备份文件导入到新安装的mysql中
配置mac内置apache
mac内置apache 开启/关闭方式
#sudo apachectl start/stop apache默认端口号80
开启apache后浏览器输入localhost 浏览 出现 it works表示apache启动成功
查找apache目录
# which apachectl 结果显示apachectl文件在/usr/sbin/目录中

# cd /etc; ls | grep apache //apache的配置目录都在/ect/apache2中

编辑/etc/apache2/httpd.conf可看到apache访问日志在/private/var/log/apache2/目录中

了解了mac内置apache目录之后开始配置apache
首先打开apache的php模块,删除行首的#号注释
![]()
查找rewrite_module 去掉行首#号
![]()
打开apache虚拟主要配置目录 http.conf文件中查找vhosts.conf 去掉行首#号注释

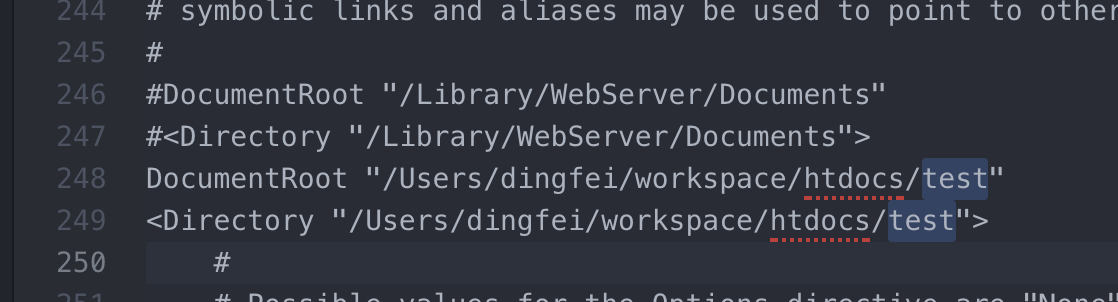
配置虚拟主机编辑 private/etc/apache2/extra/httpd-vhosts.conf
#文件中其它内容全部注释,只保留以下部分
<VirtualHost *:8080>
    DocumentRoot "/Users/dingfei/workspace/htdocs/test"
    ServerName test.dingfei.com
    ErrorLog "/private/var/log/apache2/test.dingfei.com-error_log"
    CustomLog "/private/var/log/apache2/test.dingfei.com-access_log" common
    <Directory />
                Options Indexes FollowSymLinks MultiViews
                AllowOverride None
                Order deny,allow
                Allow from all
      </Directory>
</VirtualHost>
必要时修改http.conf文件中的apache主目录
浏览器输入 test.dingfei.com:8080测试
安装nginx
nginx 采用brew 方式安装,之前已经安装好了homebrew 【MAC】 brew install XXX一直卡在Updating Homebrew…的解决办法
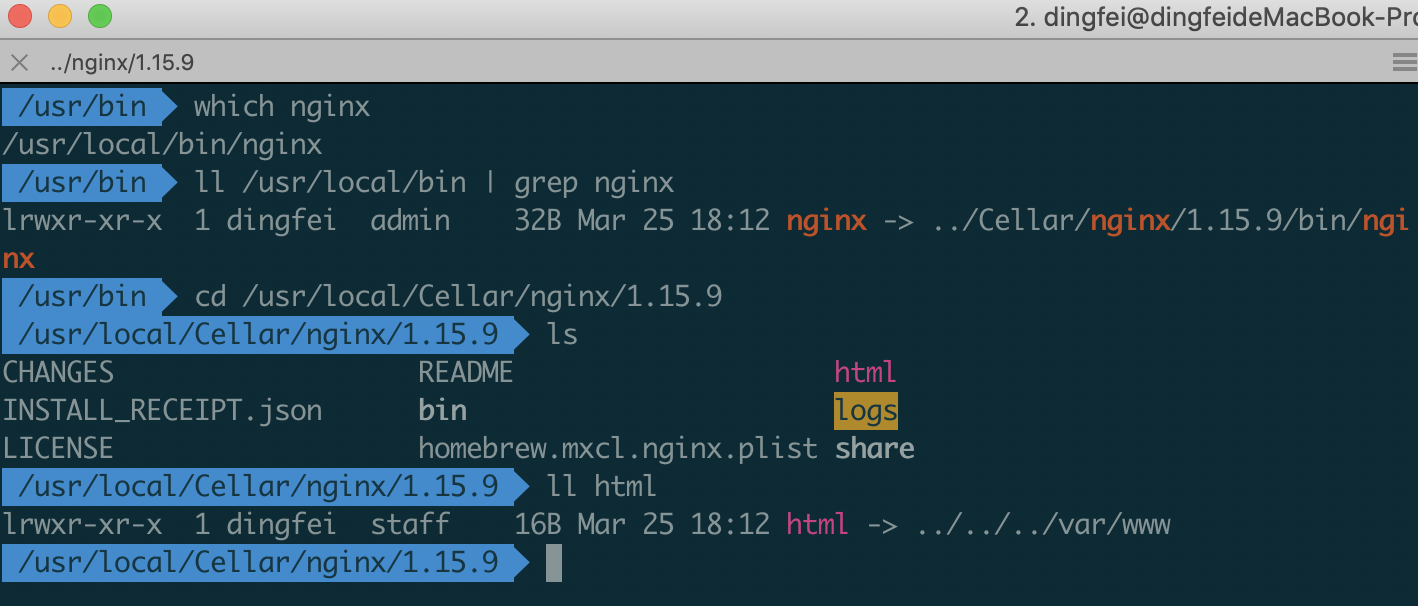
运行命令 #brew install nginx //一键安装nignx nginx安装在/usr/local目录中
nginx 启动命令
#sudo nginx //启动
#sudo nginx -s stop //关闭
#sudo nginx -s reload //重启
查找nginx命令位置发现在/usr/local/bin中,但是个软连接 连接到/usr/loca/Cellar/nginx/1.15.9/bin/nginx
/usr/loca/Cellar/nginx/1.15.9/ nginx可执行文件 日志等都在这个目录中
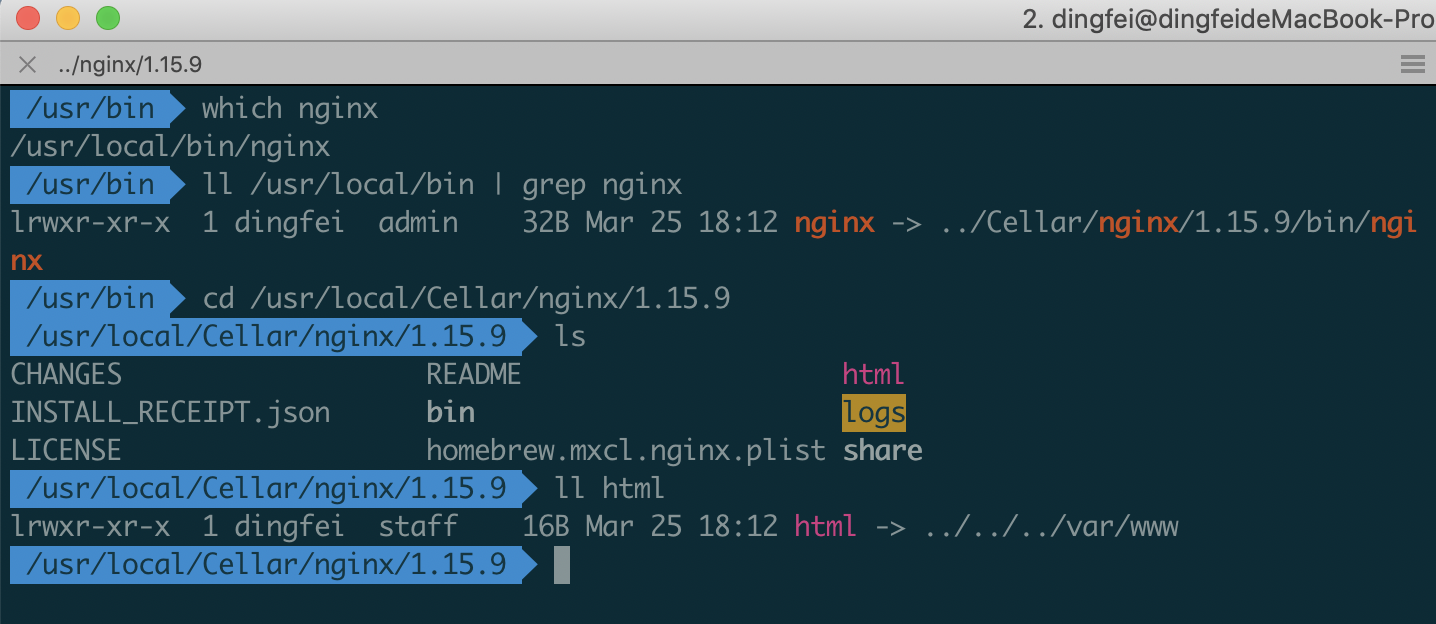
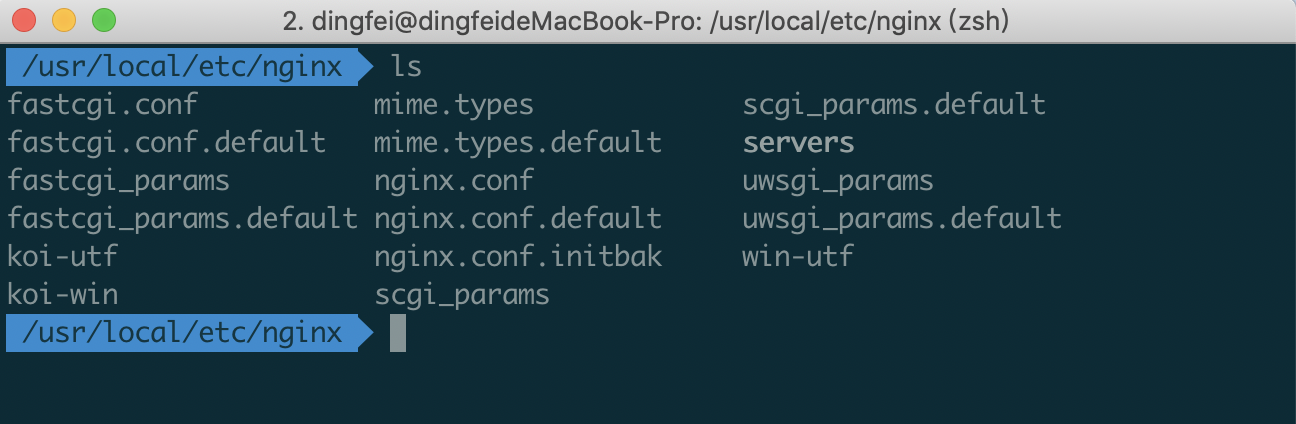
nginx配置文件目录在/usr/local/etc/nginx中
配置nginx
配置nginx虚似主机 nginx默认端口号为8080此处改为80
编辑/usr/local/etc/nignx/nginx.conf
文件末尾 #include /usr/local/etc/nginx/servers/*; 改为include /usr/local/etc/nginx/servers/*.conf;

在/usr/local/etc/nginx/servers目录中新建test.conf内容如下
server{
    listen	80;
    server_name test.dingfei.com;
    root /Users/dingfei/workspace/htdocs/test;
    location / {
	     index   index.php index.html index.htm;
       autoindex on;
	}
  location ~ \.php$ {
     include		  /usr/local/etc/nginx/fastcgi_params;
     include         /usr/local/etc/nginx/fastcgi.conf;
     try_files        $uri = 404;
     autoindex on;
     fastcgi_pass       127.0.0.1:9000;
     fastcgi_index      index.php;
     fastcgi_intercept_errors         on;

  }
}
Laravel项目配置内容:
server{
  2         listen  80;
  3         server_name lvtest.dingfei.com;
  4         root /Users/dingfei/workspace/htdocs/laraveltest/public;
  5         index index.php;
  6
  7         location / {
  8                 try_files $uri $uri/ /index.php?$query_string;
  9         }
 10
 11         location ~ \.php$ {
 12                 include           /usr/local/etc/nginx/fastcgi_params;
 13                 include         /usr/local/etc/nginx/fastcgi.conf;
 14                 fastcgi_pass       127.0.0.1:9000;
 15
 16          }
 17 }
浏览器中输入localhost 和test.dingfei.com测试
此时只能测试html文件,php暂不能解析。
Mac默认php配置
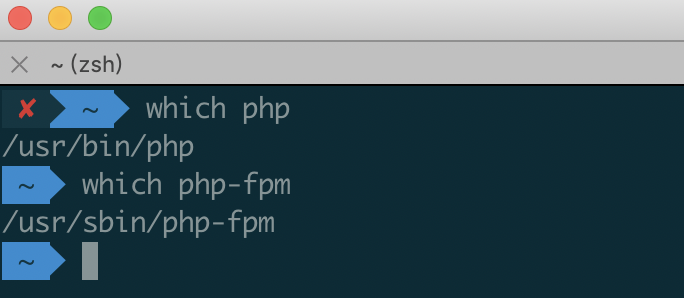
php执行文件在/usr/bin/php
php-fpm执行文件在/usr/sbin/php-fpm
启动php-fpm #sudo php-fpm 启动会报错,显示找不到的文件,创建缺少的文件
php-fpm.conf是/etc/php-fpm.conf
cp /etc/php-fpm.d/www.conf.default /etc/php-fpm.d/www.conf
mkdir /usr/var/log目录
重新启动php-fpm #sudo php-fpm 无报错信息后
在浏览器中访问test.dingfei.com/phpinfo.php查看php文件是否正常访问
创建 php.ini
#sudo cp -a /etc/php.ini.default /etc/php.ini
内置php开启xdebug
运行命令查找xdebug扩展位置
sudo find / -name xdebug.so

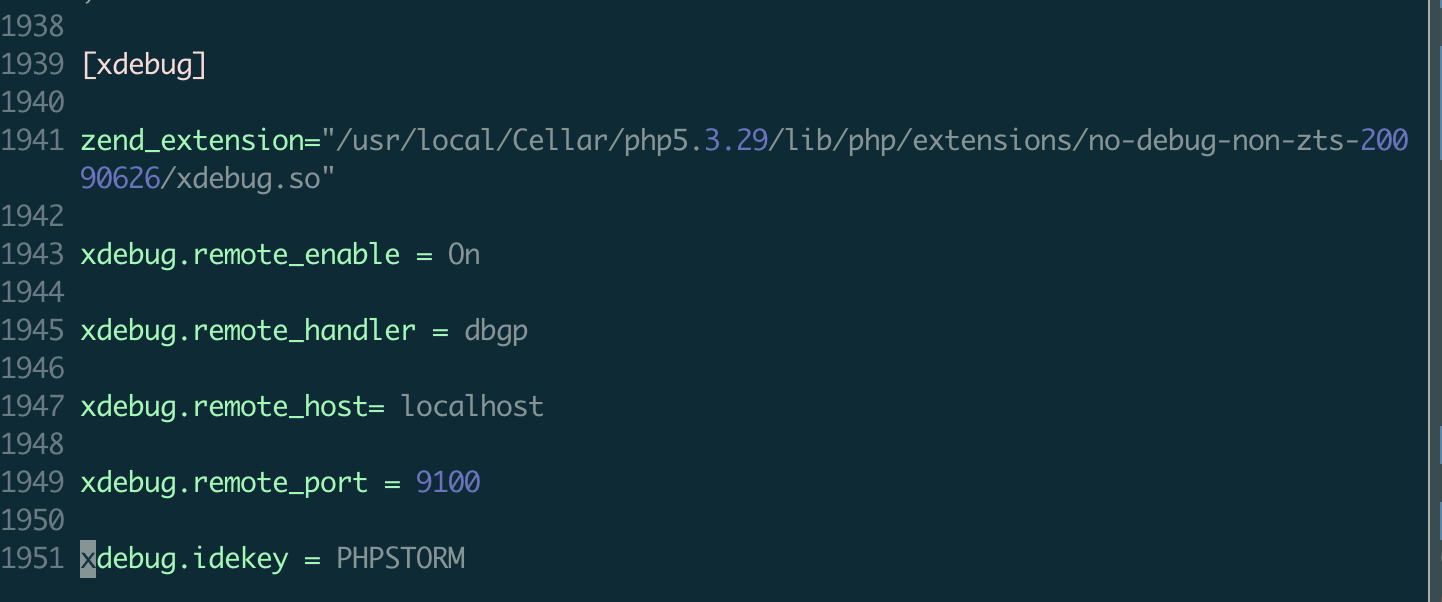
在/etc/php.ini 文件尾加入以下内容
[xdebug]
1941 zend_extension="/usr/lib/php/extensions/no-debug-non-zts-20160303/xdebug.so"
1943 xdebug.remote_enable = On
1945 xdebug.remote_handler = dbgp
1947 xdebug.remote_host= localhost
1949 xdebug.remote_port = 9100
1951 xdebug.idekey = PHPSTORM
修改phpstorm debug端口为9100
重启php-fpm及nginx debug测试
CLI模式开启xdebug 原连接https://www.jetbrains.com/help/phpstorm/debugging-a-php-cli-script.html
运行Php脚本前
mac/linux执行export XDEBUG_CONFIG="remote_enable=1 remote_mode=req remote_port=9100 remote_host=127.0.0.1 remote_connect_back=0"
windows执行set XDEBUG_CONFIG=remote_enable=1 remote_mode=req remote_port=9100 remote_host=127.0.0.1 remote_connect_back=0
编译安装多版本php php版本5.3.29
下载php5.3.29下载地址:http://cn2.php.net/get/php-5.3.29.tar.gz/from/this/mirror
下载后解压:tar zxvf php-5.3.29.tar.gz && Cd php-5.3.229
首先安装依赖 使用brew
安装的依赖全都安装在了/usr/loca/Cellar目录中,在./configure时要用到依赖路径,configure过程中可能会报其它依赖缺少,可以根据报错需求安装对应依赖
Brew install openssl;
Brew install libiconv;
Brew install zlib;
Brew install curl;
sudo brew install libjpeg;
Brew install libpng;
Brew install libpng-devel;
Brew install freetype;
brew install gettext;
运行configure
运行configure
./configure \
--prefix=/usr/local/Cellar/php5.3.29 \
--exec-prefix=/usr/local/Cellar/php5.3.29/exec \
--bindir=/usr/local/Cellar/php5.3.29/bin \
--sbindir=/usr/local/Cellar/php5.3.29/sbin \
--includedir=/usr/local/Cellar/php5.3.29/include \
--libdir=/usr/local/Cellar/php5.3.29/lib/php \
--mandir=/usr/local/Cellar/php5.3.29/man \
--with-config-file-path=/usr/local/Cellar/php5.3.29/etc \
--with-mysql-sock=/tmp/mysql.sock \
--with-mcrypt \
--with-mhash \
--with-openssl \
--with-openssl=/usr/local/Cellar/openssl/1.0.2r/ \
--with-mysql=mysqlnd \
--with-mysqli=mysqlnd \
--with-pdo-mysql=mysqlnd \
--with-gd \
--with-iconv=/usr/local/Cellar/libiconv/1.15 \
--with-zlib=/usr/local/Cellar/zlib/1.2.11  \
--enable-zip \
--enable-inline-optimization \
--disable-rpath \
--enable-shared \
--enable-xml \
--enable-bcmath \
--enable-mbregex \
--enable-mbstring \
--enable-ftp \
--enable-sockets \
--with-xmlrpc \
--enable-soap \
--without-pear \
--with-gettext=/usr/local/Cellar/gettext/0.19.8.1 \
--enable-session \
--with-curl=/usr/local/Cellar/curl/7.64.0 \
--with-jpeg-dir=/usr/local/Cellar/jpeg/9c \
--with-freetype-dir=/usr/local/Cellar/freetype/2.10.0 \
--enable-opcache \
--enable-fpm \
--enable-fastcgi \
--without-gdbm \
--with-fileinfo \
#--disable-fileinfo
#执行过程中注意是否有错误,如无错误进行下一步,如有错误解决错误。
执行make
编译出现错误:: symbol(s) not found for architecture x86_64”
在makefile中找到 EXTRA_LIBS = -lresolv -lmcrypt -lltdl -liconv-lm -lxml2 -lcurl -lssl -lcrypto 类似的一句话
删除其中的-lssl -lcrypto
在删除位置增加
/usr/local/Cellar/openssl/1.0.2r/lib/libssl.dylib /usr/local/Cellar/openssl/1.0.2r/lib/libcrypto.dylib /usr/local/Cellar/libiconv/1.15/lib/libiconv.dylib
其中具本位置是在brew安装依赖时确定的
错误解决参考连接:
https://blog.51cto.com/peterxu/1795036
https://segmentfault.com/q/1010000004137098?sort=created
执行 make test #时间很长,可跳过,而且还报错了,
报错内容暂时不研究,test执行完成后,直接执行make install 等待安装成功
安装成功后php5.3.29相关所有文件就安装到了目录 /usr/local/Cellar/php5.3.29中
5.3.29版本的php命令路径为/usr/local/Cellar/php5.3.29/php.dSYM
执行命令:/usr/local/Cellar/php5.3.29/bin/php.dSYM -v 可查看php版本为5.3.29
ln -s /usr/local/Cellar/php5.3.29/bin/php.dSYM /usr/local/bin/php53n //建立软连接,将php53n作为系统命令,注意不要直接用php,因为内置版本php7.1已经使用了这个名子
ln -s /usr/local/Cellar/php5.3.29/sbin/php-fpm.dSYM /usr/local/bin/php53n-fpm //建立软连接,将php53n-fpm作为系统命令,注意不要直接用php-fpm,因为内置版本php-fpm7.1已经使用了这个名子
运行命令 php53n -v 查看php版本
运行命令 php53n-fpm 启动5.3.29版本的php-fpm 会报错显示php-fpm.conf不存在
cp /usr/local/Cellar/php5.3.29/etc/php-fpm.conf.default /usr/local/Cellar/php5.3.29/etc/php-fpm.conf
vim /usr/local/Cellar/php5.3.29/etc/php-fpm.conf 查找配置文件中9000端口号改为9530 因为内置版本的php-fpm已经占用了9000端口
运行命令 php53n-fpm 启动 php5.3.29的php-fpm
运行 ps -ef | grep php53n查看php53n-fpm是否已经启动
配置nginx虚拟主机测试
vim /usr/local/etc/nignx/servers/testphp53n.conf
  1 server{
  2     listen      80;
  3     server_name testphp53n.dingfei.com;
  4     root /Users/dingfei/workspace/htdocs/testphp53n;
  5     location / {
  6              index   index.php index.html index.htm;
  7        autoindex on;
  8         }
  9 location = index.php{
 10 break;
 11 }
 12   location ~ \.php$ {
 13      include              /usr/local/etc/nginx/fastcgi_params;
 14      include         /usr/local/etc/nginx/fastcgi.conf;
 15      try_files        $uri = 404;
 16      autoindex on;
 17      fastcgi_pass       127.0.0.1:9530;
 18      fastcgi_index      index.php;
 19      fastcgi_intercept_errors         on;
 20
 21   }
 22 }
vim /Users/dingfei/workspace/htdocs/testphp53n/index.php
<?php
echo "index.php";
phpinfo();
重启nginx sudo nginx -s reload
浏览器中浏览testphp53n.dingfei.com 查看页面显示 phpinfo内容版本为5.3.29,大功告成!
多版本php安装方法和centos安装方法基本差不多,之前也写过centos安装php多版本的笔记https://www.cnblogs.com/dingfei/articles/10417013.html
Apache多版本php虚拟主机同时运行配置
apache加载php有多种方式,此处采用 prox_fcgi方式
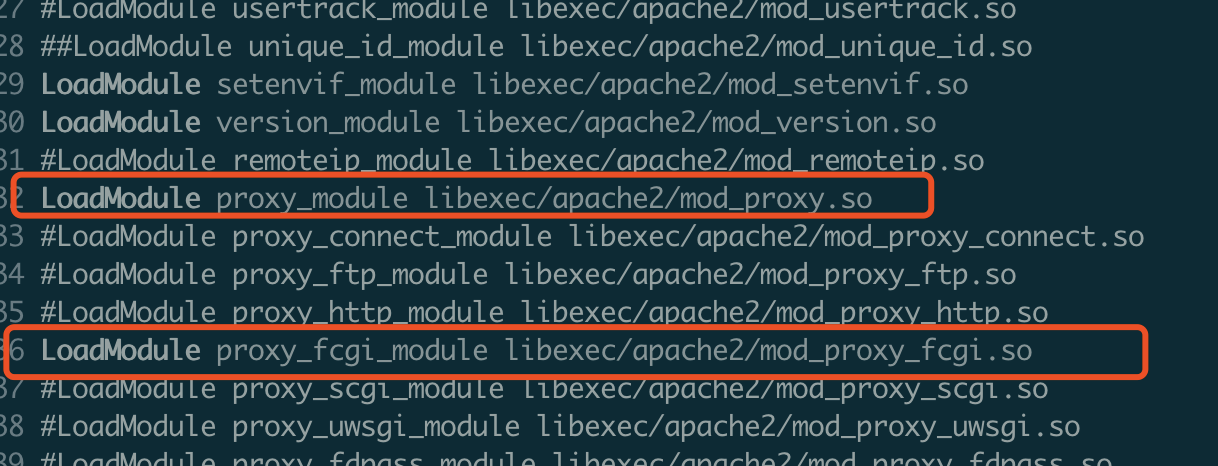
vim /etc/apache2/httpd.conf
找到图中两行,去掉行首的#号
vim /etc/apache2/extra/httpd-vhosts.conf 内容如下
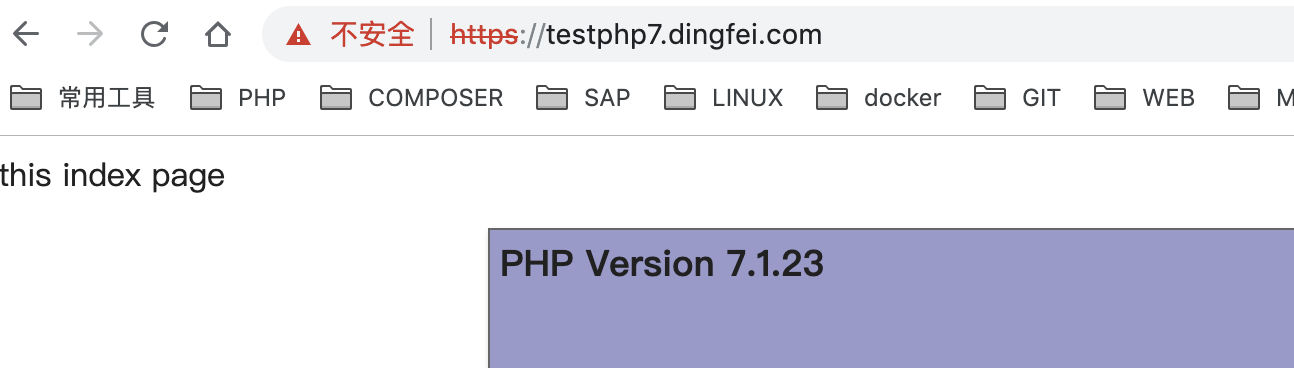
17 #apache php7.1
 18 <VirtualHost *:8080>
 19     DocumentRoot "/Users/dingfei/workspace/htdocs/testphp"
 20     ServerName testphp7.dingfei.com
 21 <FilesMatch "\.php$">
 22         SetHandler  "proxy:fcgi://127.0.0.1:9000"
 23     </FilesMatch>
 24     ErrorLog "/private/var/log/apache2/test.dingfei.com-error_log"
 25     CustomLog "/private/var/log/apache2/test.dingfei.com-access_log" common
 26     <Directory />
 27                 Options Indexes FollowSymLinks MultiViews
 28                 AllowOverride None
 29                 Order deny,allow
 30                 Allow from all
 31       </Directory>
 32 #以下三行为禁止http自动转向https,在httd-vhost.conf中配置需要开启rewriteModule
 33 #         RewriteEngine on
 34 #         RewriteCond %{SERVER_PORT} !^8443$
 35 #         RewriteRule ^/?(.*)$ https://%{SERVER_NAME}:8443/$1 [L,R]
 36 </VirtualHost>
 37
 38 #apache php5.3.29
 39 <VirtualHost *:8080>
 40     DocumentRoot "/Users/dingfei/workspace/htdocs/testphp"
 41     ServerName testphp53n.dingfei.com
 42 <FilesMatch "\.php$">
 43         SetHandler  "proxy:fcgi://127.0.0.1:9530"
 44     </FilesMatch>
 45     ErrorLog "/private/var/log/apache2/test.dingfei.com-error_log"
 46     CustomLog "/private/var/log/apache2/test.dingfei.com-access_log" common
 47     <Directory />
 48                 Options Indexes FollowSymLinks MultiViews
 49                 AllowOverride None
 50                 Order deny,allow
 51                 Allow from all
 52       </Directory>
 53 </VirtualHost>
 54
sudo apachectl restart #重启apache
浏览器顺访问testphp7.dingfei.com:8080/phpinfo.php和testphp53n.dingfei.com:8080/phpinfo.php 测试是否正常访问,并且显示不同版本的phpinfo信息
php5.3.29配置文件及xdebug
本次编译安装的php5.3.29默认没有php.ini
直接cp /etc/php.ini /usr/local/cellar/php5.3.29/etc/php.ini 将内置版本php.ini拷贝到5.3.29中
拷贝后杀死原php53n-fpm进程
重启:php53n-fpm -c /usr/local/cellar/php5.3.29/etc/php.ini
php.ini中是从内置版本php拷贝的,启动后发现php7的xdegub.so在此处不能用
经过查找,在之前安装的MAMP中有php5.3.29的xdebug.so
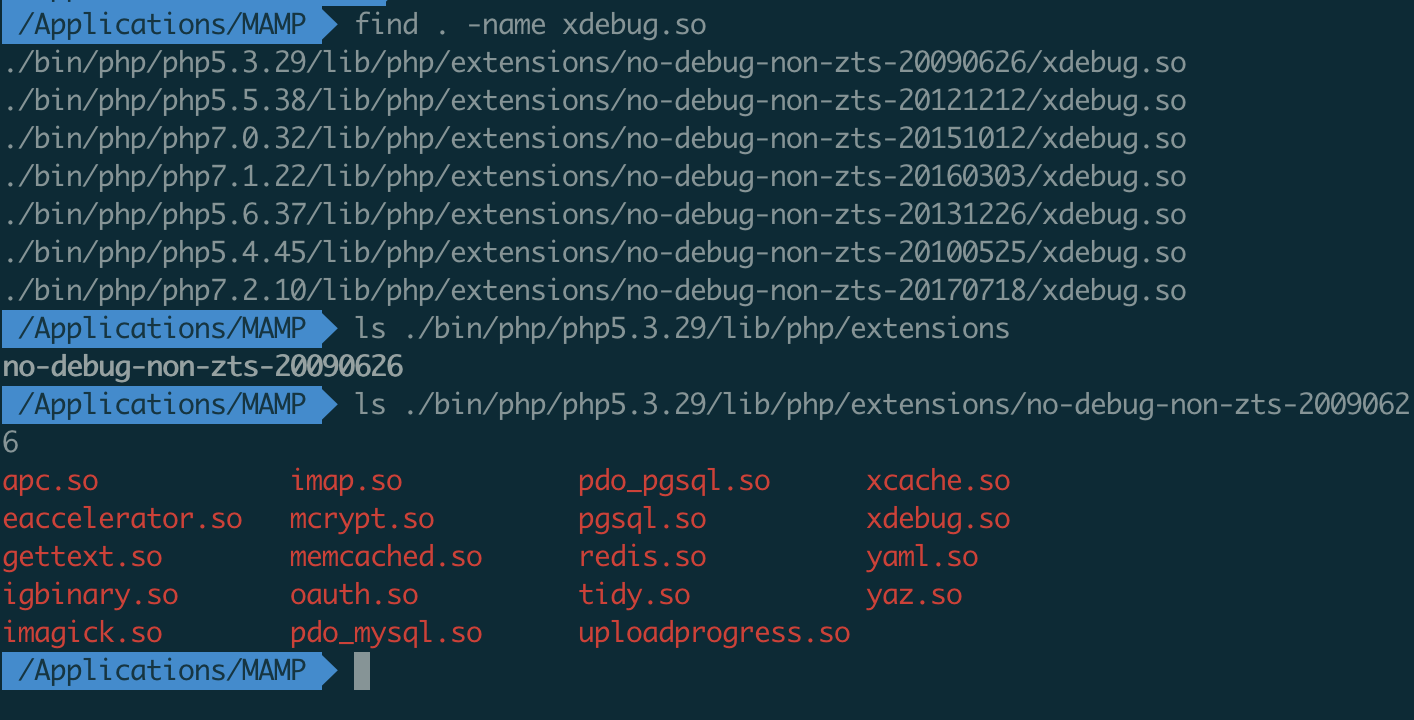
cp -a /Applications/MAMP/bin/php/php5.3.29/lib/php/extensions /usr/local/Cellar/php5.3.29/lib/php/
修改/usr/local/cellar/php5.3.29/etc/php.ini 其中xdebug_extension路径修改为图中路径
拷贝后杀死原php53n-fpm进程
重启:php53n-fpm -c /usr/local/cellar/php5.3.29/etc/php.ini
重启nginx
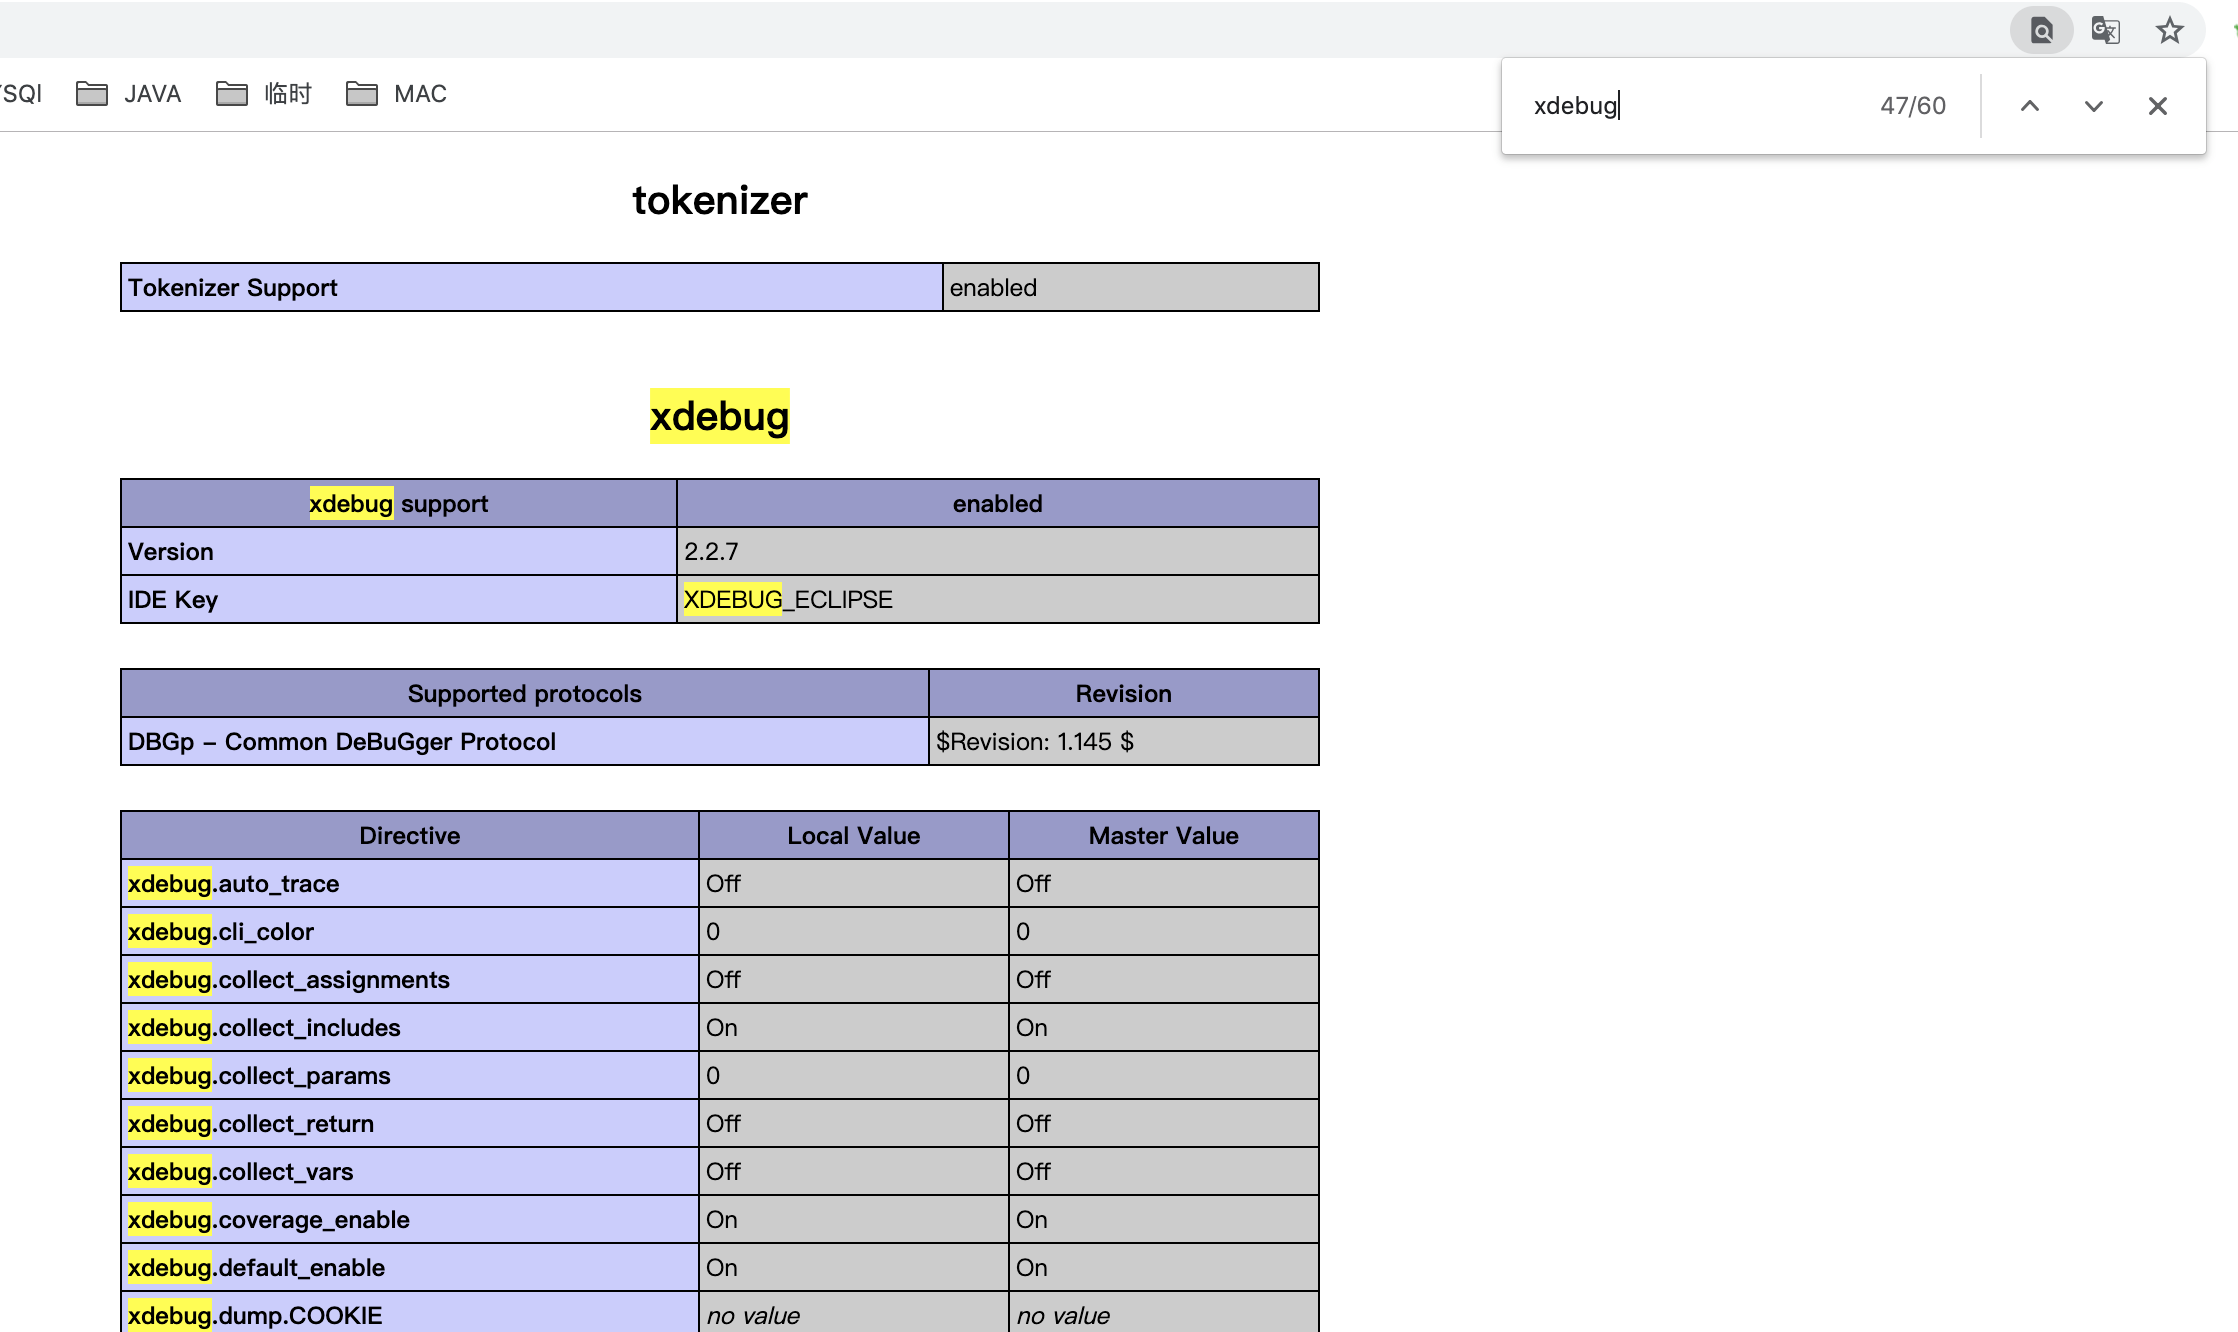
浏览器中浏览testphp53n.dingfei.com 查看页面显示 phpinfo,并显示xdebug配置,则成功!
在phpstorm -》preferences中 个性debug监听端口为9100
打断点测试是否能调试
nginx反向代理配置
配置很简单
vim /usr/etc/nginx/servers/testphp7.conf #内容如下
  1 server{
  2         listen  80;
  3         server_name testphp7.dingfei.com;
  4         root /Users/dingfei/workspace/htdocs/testphp;
  5         location / {
  6                 index   index.php index.html index.htm;
  7                 autoindex on;
  8         }
  9         location = index.php{
 10                 break;
 11         }
 12         location ~ \.php$ {
 13                 include           /usr/local/etc/nginx/fastcgi_params;
 14                 include         /usr/local/etc/nginx/fastcgi.conf;
 15                 try_files        $uri = 404;
 16                 autoindex on;
 17                 fastcgi_pass       127.0.0.1:9000;
 18                 fastcgi_index      index.php;
 19                 fastcgi_intercept_errors         on;
 20         }
 21         #proxy to apache http://testphp7.dingfei.com:8080/apache
 22         location /apache{
 23                  proxy_pass http://testphp7.dingfei.com:8080;
 24         }
 25 }
~
代码中红色部分是新增加的代理配置,意思是当访问nginx服务器的testphp7.dingfei.com/apache是使用反向代理,响应内容实际为apache服务器的testphp7.dingfei.com:8080/apache
https
开启https需要开启openssl等模块,正常情况下安装后Php,nginx,apache都会默认安装
首先生成证书文件,些处使用之前windows安装apache后自带的测试证书,apache默认安装后也带有测试证书
将测试证书拷贝到/usr/local/etc/nginx/servers-ssl/sslkeys目录中,当前目录内容如下图

nginx https站点配置
vim /usr/loca/etc/nginx/nginx.conf #在文件末尾增加一句include /usr/loca/etc/nginx/servers-ssl/*.conf

vim /usr/loca/etc/nginx/servers-ssl/testphp7.conf 内容如下
  1 server{
  2         listen  443 default ssl;
  3         #ssl on;  #nginx > 1.15 deprecated
  4         ssl_certificate "/usr/local/etc/nginx/servers-ssl/sslkeys/server.crt";
  5         ssl_certificate_key  "/usr/local/etc/nginx/servers-ssl/sslkeys/server.key";
  6
  7         server_name testphp7.dingfei.com;
  8         root /Users/dingfei/workspace/htdocs/testphp;
  9         location / {
 10                 index   index.php index.html index.htm;
 11                 autoindex on;
 12         }
 13         location = index.php{
 14                 break;
 15         }
 16         location ~ \.php$ {
 17                 include           /usr/local/etc/nginx/fastcgi_params;
 18                 include         /usr/local/etc/nginx/fastcgi.conf;
 19                 try_files        $uri = 404;
 20                 autoindex on;
 21                 fastcgi_pass       127.0.0.1:9000;
 22                 fastcgi_index      index.php;
 23                 fastcgi_intercept_errors         on;
 24         }
 25         #proxy to apache http://testphp7.dingfei.com:8080/apache
 26         location /apache{
 27                  proxy_pass http://testphp7.dingfei.com:8080;
 28         }
 29 }
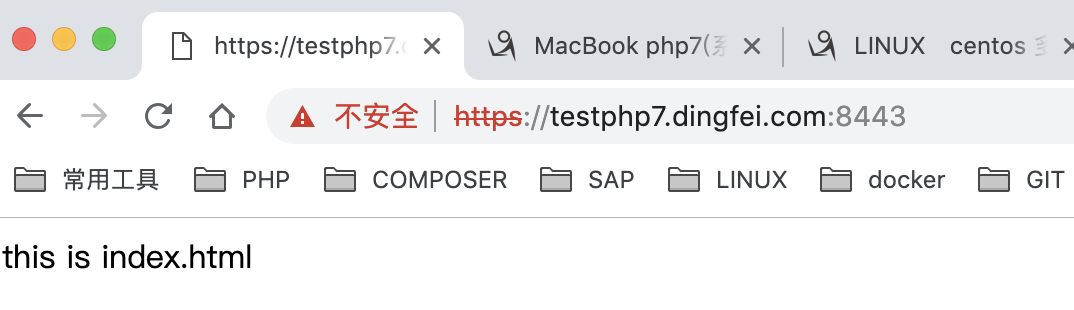
重启nginx;浏览器中输入https://testphp7.dingfei.com查看是否能正常访问https,因为测试证书,所有chrome报警网站不安全
apache 配置https站点
vim /etc/apache2/httpd.conf
查找httpd-ssl,找掉行首的#号
查找ssl_module,去掉行首#号

查找socache_shmcb_module 去掉行首#号
![]()
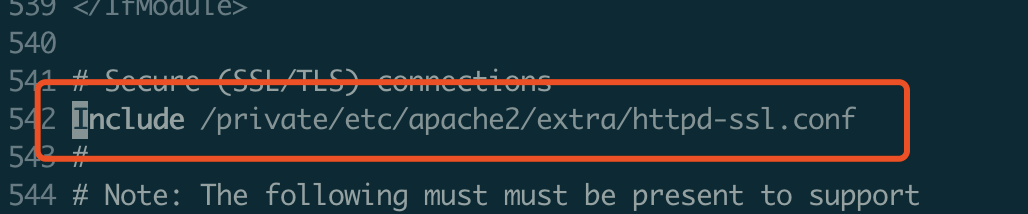
默认apache中已经有一个https站点配置文件,/private/etc/apache2/extra/httpd-ssl.conf,文件内容较多,先备份一个这个文件
cp /etc/apache2/extra/httpd-ssl.conf /etc/apache2/extra/httpd-ssl.conf.bak
sudo vim /etc/apache2/extra/httpd-ssl.conf内容如下
1 Listen 8443
  2 SSLPassPhraseDialog  builtin
  3 SSLSessionCache        "shmcb:/private/var/run/ssl_scache(512000)"
  4 SSLSessionCacheTimeout  300
  5 SSLCryptoDevice builtin
  6 SSLProtocol all  -SSLv3
  7 SSLProxyProtocol all -SSLv3
  8 SSLHonorCipherOrder on
  9 SSLCipherSuite HIGH:MEDIUM:!MD5:!RC4:!3DES
 10 SSLProxyCipherSuite HIGH:MEDIUM:!MD5:!RC4:!3DES
 11
 12 <VirtualHost _default_:8443>
 13         DocumentRoot "/Users/dingfei/workspace/htdocs/testphp"
 14         ServerName testphp7.dingfei.com
 15         <FilesMatch "\.php$">
 16                 SetHandler  "proxy:fcgi://127.0.0.1:9000"
 17         </FilesMatch>
 18         ErrorLog "/private/var/log/apache2/test.dingfei.com-error_log"
 19         TransferLog "/private/var/log/apache2/test.dingfei.com-access_log"
 20         LogLevel warn
 21         SSLEngine on
 22         SSLCertificateFile /usr/local/etc/nginx/servers-ssl/sslkeys/server.crt
 23         SSLCertificateKeyFile /usr/local/etc/nginx/servers-ssl/sslkeys/server.key
 24         #以下三行为禁止http自动转向https,在httd-vhost.conf中配置,需要开启rewriteModule
 25         #RewriteEngine on
 26         #RewriteCond %{SERVER_PORT} !^8443$
 27         #RewriteRule ^/?(.*)$ https://%{SERVER_NAME}/$1 [L,R]
 28  </VirtualHost>
保存后运行
sudo apachectl configtest
报错:
AH00526: Syntax error on line 3 of /private/etc/apache2/extra/httpd-ssl.conf:
SSLSessionCache: 'shmcb' session cache not supported (known names: ). Maybe you need to load the appropriate socache module (mod_socache_shmcb?).
原因是httpd.conf中socache_shmcb_module没有打开,打开后apachectl configtest成功
重启apache
访问:https://127.0.0.1:8443/ 成功!!!
Mac内置php7 安装redis扩展
下载php-redis
$ git clone https://github.com/phpredis/phpredis.git
$ cd ./phpredis
$ /usr/bin/phpize
问题:第一次执行命令/usr/bin/phpzie时可能会报错,报错内容如下
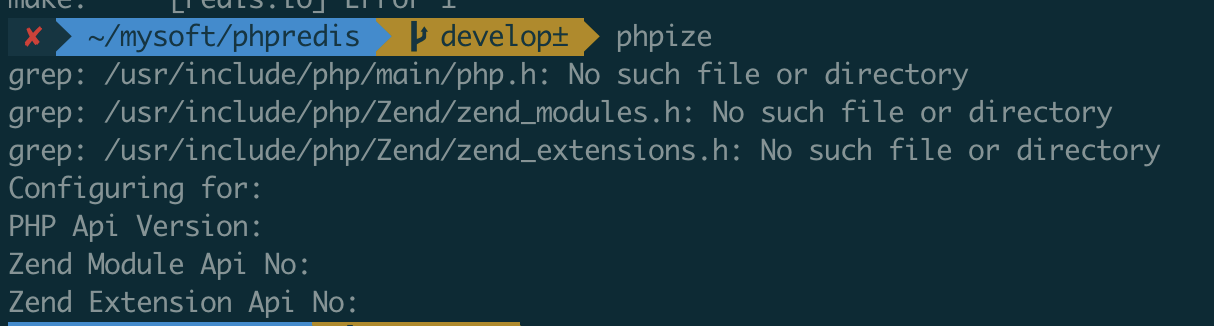
sudo ln -s /Applications/Xcode.app/Contents/Developer/Platforms/MacOSX.platform/Developer/SDKs/MacOSX10.13.sdk/usr/include /usr/include
编辑/etc/php.ini
增加如下内容
extension_dir = "/usr/lib/php/extensions/no-debug-non-zts-20160303"
extension=redis.so
重启Php-fpm
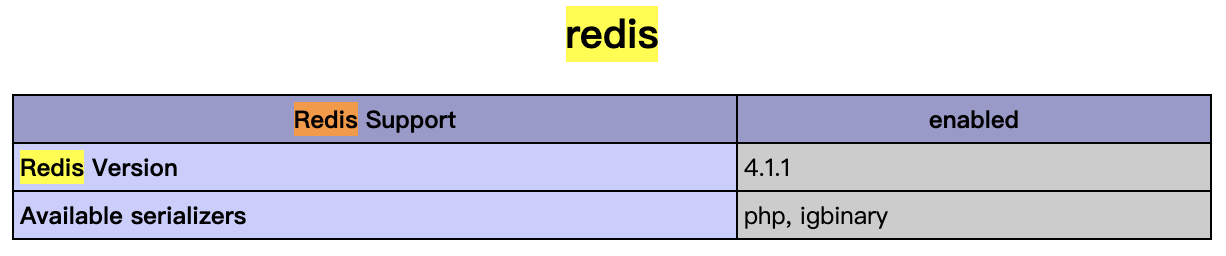
phpinfo 查找到redis扩展表示成功

php5.3.29安装redis扩展
php5.3.29使用php7同样的phpredis源码编译报错,没有找到对应版本的phpredis
本机原来安装过MAMP的集成环境,其中含有php5.3.29的redis扩展
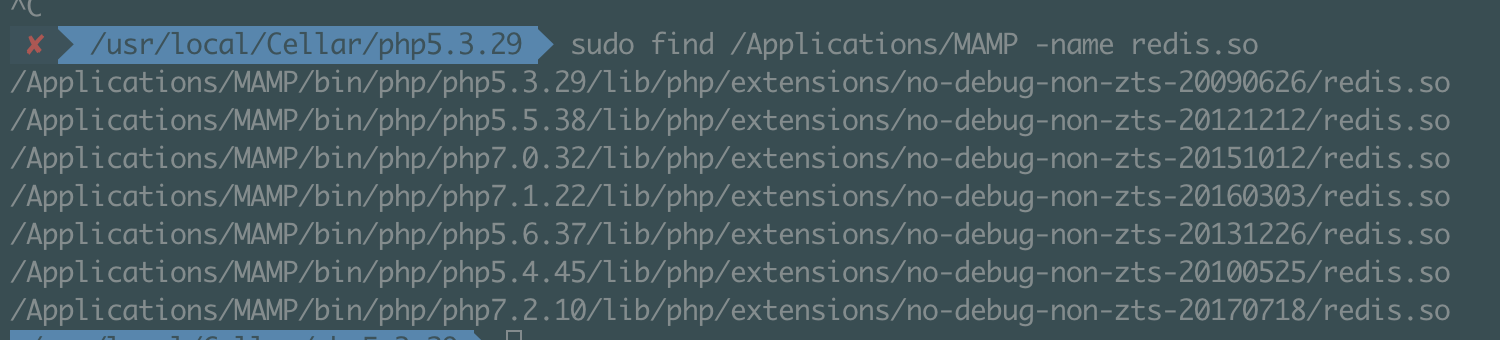
直接把MAMP 5.3.29的扩展拷贝到编译安装的php5.3.29
$ cp -a /Applications/MAMP/bin/php/php5.3.29/lib/php/extensions /usr/local/Cellar/php5.3.29/lib/php/
修改/usr/local/Cellar/php5.3.29/etc/php.ini
增加如下代码:
extension_dir = "/usr/local/Cellar/php5.3.29/lib/php/extensions/no-debug-non-zts-20090626"
extension=redis.so
extension=igbinary.so
#如果没有extension=igbinary.so这句重启php53n-fpm会报如下警告无法扩展redis

重启php53n-fpm
phpinfo 查找到redis扩展表示成功
ps:windows php-redis扩展下载连接:https://download.csdn.net/download/jason19905/10158248
php8 安装(失败)

 浙公网安备 33010602011771号