
Markdown入门基础
Markdown入门基础
最近准备开始强迫自己写博文,以治疗严重的拖延症,再不治疗就“病入骨髓,司命之所属,无奈何”了啊。正所谓“工欲善其事,必先利其器”,于是乎在写博文前,博主特地研究了下博文的写作方式,碰巧发现了Markdown这个神奇的东西。由于博主经常用Latex写东西,本身就对这类标记语言很有好感,再加上Markdown本身简单易学的特性,博主一下子就沉浸其中不能自拨了。作为一个准码农,写博文的方式怎么着也得跟编码有关,是不是?在网上找了几篇教程研究了下,发现这货虽然简单,但是文本编辑的基本功能都有,用它写个博客、记个笔记神马的完全够用。最重要的是,这货上手快啊,只需要个把小时就能把基本功能捋顺了。这里对Markdown的入门学习内容做一个简单地总结,也算是自己的第一篇博文了。另,文中如有不当乃至谬误,望不吝赐教。(ps 额,你肯定想到了,这篇博文正是用Markdown写的)
标题
Markdown的标题有Setext和Atx两种语法格式。
Setext形式中,在文本下面标注=表示最高级标题,在下面标注-表示第二级标题。
Atx形式中,用行首插入的1到6个#分别表示1到6级标题。相比来说,博主还是比较喜欢Atx形式,因为这种形式比较直观。
以下代码用Setext形式输出一级标题和二级标题
Headline 1
==========
Headline 2
----------
其显示效果如下:
Headline 1
Headline 2
以下代码用Atx形式输出各级标题:
# Headline 1
## Headline 2
### Headline 3
#### Headline 4
##### Headline 5
###### Headline 6
其显示结果如下:
Headline 1
Headline 2
Headline 3
Headline 4
Headline 5
Headline 6
当然了,如果你对这种只在行首标记、不在行尾闭合的语法格式不放心的话,也可以在行尾加上任意个#来闭合标题。
段落
Markdown中用空白行来分割段落,这一点与Latex相似。例如以下两段文本,只需要在两段之间加一行空行,Markdown就会为文本分段。
This module implements a number of iterator building blocks inspired by constructs from APL, Haskell, and SML. Each has been recast in a form suitable for Python.
The module standardizes a core set of fast, memory efficient tools that are useful by themselves or in combination. Together, they form an “iterator algebra” making it possible to construct specialized tools succinctly and efficiently in pure Python.
Markdown使用星号*或下划线_来标记需要强调的区段。其中,一对*或_包围的文字表示斜体显示,一对双星号**或双下划线__包围的文字表示加粗显示。
以下代码可起到区段文字强调的作用
Someofthesewords*areemphasized*.
Someofthesewords_areemphasizedalso_.
Usetwoasterisksfor**strongemphasis**.
Or,ifyouprefer,__usetwounderscoresinstead__.
其输出如下:
Some of these words are emphasized.
Some of these words are emphasized also.
Use two asterisks for strong emphasis.
Or, if you prefer, use two underscores instead.
字体
有人会问,这货能改变颜色麽?额,貌似Markdown基本语法不支持任意更改颜色的功能。Markdown的理念是——注重文本本身,特效神马的交给CSS搞定。当然了,既然这货支持HTML嵌套,我们可以利用HTML标记实现更改颜色的需求。
更改代码颜色代码如下:
Default Color
<font color='red'>Red Color</font>
<font color='blue'>Blue Color</font>
<font color='green'>Green Color</font>
<font color='yellow'>Yellow Color</font>
<font color='pink'>Pink Color</font>
<font color='purple'>Purple Color</font>
<font color='orange'>Orange Color</font>
其输出为:
Default Color
Red Color
Blue Color
Green Color
Yellow Color
Pink Color
Purple Color
Orange Color
既然可以换颜色了,那换字号、字体也可以用HTML轻松实现了。以下代码可显示换字号、字体功能。
<font size='-2'>Small Size</font>
Normal Size
<font size='+2'>Big Size</font>
<font size='+2' face='Times'>Time New Roman</font>
其输出如下:
Small Size
Normal Size
Big Size
Time New Roman
话说嵌入这些格式化字体的HTML标签后,整个文本显得臃肿了不少。这有悖于Markdown注重文本内容、精简格式化标签的理念,因此文本特效神马的,能不用就尽量不用,这些统统扔给CSS去解决,我们只关注文本内容。
引用
Markdown使用email的区块引用方式,即右尖括号>跟后面的引用内容。下面的代码为一个引用实例代码。
>Thismoduleimplementsanumberofiteratorbuildingblocksinspiredby
constructsfromAPL,Haskell,andSML.Eachhasbeenrecastinaformsuitable
forPython.

>Themodulestandardizesacoresetoffast,memoryefficienttoolsthatare
usefulbythemselvesorincombination.Together,theyforman"iterator
algebra"makingitpossibletoconstructspecializedtoolssuccinctlyand
efficientlyinpurePython.
其输出为:
This module implements a number of iterator building blocks inspired by
constructs from APL, Haskell, and SML. Each has been recast in a form suitable
for Python.The module standardizes a core set of fast, memory efficient tools that are
useful by themselves or in combination. Together, they form an “iterator
algebra” making it possible to construct specialized tools succinctly and
efficiently in pure Python.
列表
Markdown中使用星号*、加号+和减号-来表示无序列表,以下代码:
* Apple
* Orange
* Peach
* Banana
+ Apple
+ Orange
+ Peach
+ Banana
- Apple
- Orange
- Peach
- Banana
都可以实现如下功能:
- Apple
- Orange
- Peach
- Banana
有序列表使用数字加一个英文句点作为项目标记,以下代码是可以实现一个有序列表。
1. Apple
2. Orange
3. Peach
4. Banana
其输出如下:
- Apple
- Orange
- Peach
- Banana
同时,列表也可以嵌套列表。
1. Fruit
  * Apple
  * Orange
  * Peach
  * Banana
2. Vegetable
  + Potato
  + Cabbage
将输出:
- Fruit
- Apple
- Orange
- Peach
- Banana
- Vegetable
- Potato
- Cabbage
另外,列表也可以嵌套引用。
1.itertools

>Thismoduleimplementsanumberofiteratorbuildingblocksinspiredby
constructsfromAPL,Haskell,andSML.Eachhasbeenrecastinaformsuitable
forPython.
>Themodulestandardizesacoresetoffast,memoryefficienttoolsthatare
usefulbythemselvesorincombination.Together,theyforman“iterator
algebra”makingitpossibletoconstructspecializedtoolssuccinctlyand
efficientlyinpurePython.

2.re

>Thismoduleprovidesregularexpressionmatchingoperationssimilartothose
foundinPerl.
将输出:
-
itertools
This module implements a number of iterator building blocks inspired by
constructs from APL, Haskell, and SML. Each has been recast in a form suitable
for Python.
The module standardizes a core set of fast, memory efficient tools that are
useful by themselves or in combination. Together, they form an “iterator
algebra” making it possible to construct specialized tools succinctly and
efficiently in pure Python. -
re
This module provides regular expression matching operations similar to those
found in Perl.
链接
Markdown支持行内和参考两种形式的链接语法,两种都是使用中括号来把文字转成链接。
行内形式是中括号包围文字,后面紧跟圆括号包围的链接,其代码如下所示:
This is an [example link](http://example.com/).
其输出为:
This is an example link.
也可以选择性的给链接加上title属性
This is an [example link](http://example.com/ "With a Title").
效果如下:
This is an example link.
参考形式的链接可以在原文中为链接定义一个名称,然后你可以在文章的其他地方定义该链接的内容。
以下代码用于定义链接名称,语法格式为:[链接文本][链接名称]
Iget10timesmoretrafficfrom[Google][1]thanfrom
[Yahoo][2]or[MSN][3].
以下代码用于定义链接内容,语法格式为:[链接名称]:空白符 URL "title"
[1]: http://google.com/        "Google"
[2]: http://search.yahoo.com/  "Yahoo Search"
[3]: http://search.msn.com/    "MSN Search"
上面代码的效果如下:
I get 10 times more traffic from Google than from
Yahoo or MSN.
另外,使用<>包括的URL或邮箱地址会被自动转换成为超链接
<http://example.com/>

<user@example.com>
其效果如下:
http://example.com/
图片
图片的语法格式和链接类似,也分为行内形式和参考形式。
行内形式语法格式为:,alt text和title可以选择性加入。实例代码如下:

效果如下:

参考形式分为两部分:声明图片链接名称和定义图片链接。
其中,声明图片链接语法格式为:![alt text][id]。
定义图片链接内容的语法格式为:[id]:URL "title"。
代码
在一般段落文字中,可以使用反引号`标记代码区段。
Istronglyrecommendagainstusingany`<blink>`tags. IwishSmartyPantsusednamedentitieslike`—` insteadofdecimal-encodedentiteslike`—`.
其效果如下:
I strongly recommend against using any <blink> tags.
I wish SmartyPants used named entities like —
instead of decimal-encoded entites like —.
如果是代码块的话,那应该怎么插入呢?
在Markdown中,如果行的开头有4个空格,将被视为代码。但是这种方式不够直观,博主不推荐。博主推荐的方式是代码块的的首行用3个反引号```和编程语言名称(C、CS、Python等,甚至Markdown)标记代码块开始,代码块的结尾用3个反引号```闭合代码块。
例如,将一段Python代码插入到Markdown中,我们是这样做的,首行用```Python标记代码块,最后一行用```闭合代码块,插入代码如下:
```Python
x = linspace(-pi, pi, 400)
y1 = sin(x)
y2 = cos(x)
plot(x, y1, ‘r’, label=r’$y=\sin x$’)
plot(x, y2, ‘b’, label=r’$y=\cos x$’)
plot([-pi/2, -pi/2], [0, sin(-pi/2)], ‘r–‘)
plot([pi/2, pi/2], [0, sin(pi/2)], ‘r–‘)
xlim(-pi, pi)
legend(loc=’upper left’)
ax = gca()
ax.spines[‘right’].set_color(‘none’)
ax.spines[‘top’].set_color(‘none’)
ax.xaxis.set_ticks_position(‘bottom’)
ax.spines[‘bottom’].set_position((‘data’, 0))
ax.yaxis.set_ticks_position(‘left’)
ax.spines[‘left’].set_position((‘data’, 0))
xticks([-pi, -pi/2, 0, pi/2, pi],[r'$-\pi$', r'$-\frac{\pi}{2}$', 0, r'$\frac{\pi}{2}$', r'$\pi$'])
```
其显示结果为:
x = linspace(-pi, pi, 400)
y1 = sin(x)
y2 = cos(x)
plot(x, y1, 'r', label=r'$y=\sin x$')
plot(x, y2, 'b', label=r'$y=\cos x$')
plot([-pi/2, -pi/2], [0, sin(-pi/2)], 'r--')
plot([pi/2, pi/2], [0, sin(pi/2)], 'r--')
xlim(-pi, pi)
legend(loc='upper left')
ax = gca()
ax.spines['right'].set_color('none')
ax.spines['top'].set_color('none')
ax.xaxis.set_ticks_position('bottom')
ax.spines['bottom'].set_position(('data', 0))
ax.yaxis.set_ticks_position('left')
ax.spines['left'].set_position(('data', 0))
xticks([-pi, -pi/2, 0, pi/2, pi], [r'$-\pi$', r'$-\frac{\pi}{2}$', 0, r'$\frac{\pi}{2}$', r'$\pi$'])
额,忘说了,其实上面插入的正弦余弦图就是这段Python代码产生的。
喜闻乐见的Hello World来了!将C代码插入到Markdown的时候,首行用```C标记,最后一行用```闭合,插入代码如下:
```C
#include <stdio.h>
void main(int argc, char** argv)
{
printf(“Hello World”);
}
```
其效果为:
#include <stdio.h>
void main(int argc, char** argv)
{
    printf("Hello World");
}
额,还有C#的实现代码。将C#代码插入Markdown的时候,首行用```CS标记,最后一行用```闭合,插入代码如下:
```CS
using System;
class Program
{
static void Main(string[] args)
{
int argsLength = args.Length;
Console.WriteLine(“Hello World”));
}
}
```
其效果为:
usingSystem;
classProgram
{
staticvoidMain(string[]args)
{
intargsLength=args.Length;
Console.WriteLine("Hello World"));
}
}
数学公式
在网页中插入数学公式是一件很麻烦的事情,比较笨的做法是,在本地用MathType、Latex或者2007版本以后的Office编辑公式,然后截图,再插入到网页中。(当然了,你也可以手写公式,用相机拍照或者用扫描仪扫描图片,再插入到网页中。额,这种做法过于文艺范,不在我们的讨论范畴中。)比较高端的方法是,把Latex公式代码上传到网络上的Latex服务接口,将其转换成图片,然后插入到网页中。这种方法不用截图,不用处理图片,更不用拍照、扫描图片神马的,看起来已经够高大上了吧,但是,但是,我们还有更加高大上的神器。
当当当,接下来隆重地推出我们今天的明星组合:Markdown + MathJax。那么,后面这个新引入的MathJax是个何方神圣呢?
这里(http://mathjax-chinese-doc.readthedocs.org/en/latest/start.html)有一个MathJax的汉化入门指南,感兴趣的同学可以看看。
简而言之,MathJax允许你在你的网页中包含公式,无论使用$\LaTeX$、MathML或者AsciiMath符号,这些公式都会被javascript处理为HTML、SVG或者MathML符号。由于博主从事的职业需要经常跟$\LaTeX$打交道,所以博主选择了它编辑公式。
MathJax可以在线用,也可以离线使用。目前,很多Markdown编辑环境都集成了MathJax,比如博主用的IPython Notebook已经内嵌了MathJax;博主用的另一款神器Sublime Text,通过安装Markdown Preview插件可以实现语法高亮编辑Markdown文件,也可以实时查看渲染结果,把插件配置文件中的”enable_mathjax”属性设true,便可以用MathJax渲染数学公式。有了这些工具的背后支持,可以使我们只需要专注于文章内容本身,而不用去考虑内容具体是怎么格式化的,公式具体是怎么渲染的。
以下,通过几个$\LaTeX$公式例子讲解一下Markdown中如何插入数学公式。当然了,这里不会仔细讲解$\LaTeX$语法,这货不是一篇博文就能搞定的。
如果有对$\LaTeX$感兴趣的同学,这里(http://www.ctex.org/OnlineDocuments)有不少在线资料可以参考一下。
Markdown支持直接内嵌$\LaTeX$公式,例如以下代码可以插入行内公式:
正弦函数
$sin\,x$</code>在$\frac{\pi}{2}$点可以取得极大值点1,周期性使得极大值点有无数个,即正弦函数的极大值点为:$\sin(\frac{\pi}{2}+2n\pi)=1,\quad n=0,\pm1,\pm2, \dots$
其输出为:
正弦函数$sin\,x$在$\frac{\pi}{2}$点可以取得极大值点1,周期性使得极大值点有无数个,即正弦函数的极大值点为:$\sin
(\frac{\pi}{2}+2n\pi)=1,\quad n=0,\pm 1, \pm 2, \dots$
例如,以下代码可以给出一个行间公式:
$$g(x,y)=\frac{1}{2\pi\sigma^2}e^{-\frac{x^2+y^2}{2\sigma^2}}$$
其输出为:
$$g(x,y)=\frac{1}{2\pi\sigma^2}e^{-\frac{x^2+y^2}{2\sigma^2}}$$
例子
接下来,博主要展示几个写笔记的小例子,这些笔记都是用Markdown + MathJax + Latex + Python + matplotlib + IPython Notebook生成的。看完这些笔记的效果,相信大家会认识到Markdown与这些工具组合后的强大生产力。
例子一 正态分布
from pylab import *
x = linspace(-8, 8, 400)
sigma = 0.5
u = 0
y = 1/sqrt(2*pi*sigma)*exp(-(x-u)**2/(2*sigma))
plot(x, y, 'r', label=r'$\sigma^2=0.5\quad \mu=0$')
sigma = 1
y = 1/sqrt(2*pi*sigma)*exp(-(x-u)**2/(2*sigma))
plot(x, y, 'g', label=r'$\sigma^2=1\quad \mu=0$')
sigma = 5
y = 1/sqrt(2*pi*sigma)*exp(-(x-u)**2/(2*sigma))
plot(x, y, 'b', label=r'$\sigma^2=5\quad \mu=0$')
u = 2
sigma = 2
y = 1/sqrt(2*pi*sigma)*exp(-(x-u)**2/(2*sigma))
plot(x, y, 'k', label=r'$\sigma^2=1\quad \mu=0$')

legend(loc='upper left')
ax = gca()
ax.spines['right'].set_color('none')
ax.spines['top'].set_color('none')
ax.xaxis.set_ticks_position('bottom')
ax.spines['bottom'].set_position(('data', 0))
ax.yaxis.set_ticks_position('left')
ax.spines['left'].set_position(('data', 0))
将输出:
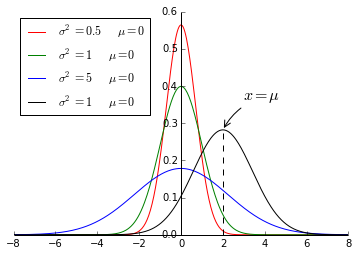
若随机变量$X$服从一个位置参数为$\mu$,尺度参数为$\sigma$的概率分布,可记为:
$$X \sim \mathcal{N}(\mu, \sigma^2)$$
其概率密度函数为:
$$f(x) = \frac{1}{\sqrt{2\pi}\sigma}e^{-\frac{(x-\mu)^2}{2\sigma^2}}$$
正态分布的数学期望值$\mu$等于位置参数,决定了分布的位置,其方差$\sigma^2$的开平方或标准差$\sigma$等于尺度参数,决定了分布的幅度。正态分布
的概率密度函数曲线如上上图所示。
例子二
from pylab import *
from mpl_toolkits.mplot3d import Axes3D
sigma = 5
fig = figure()
ax = Axes3D(fig)
r = linspace(0, 15, 50)
t = linspace(0, 2*pi, 30)
R, T = meshgrid(r, t)
X, Y = R*cos(T), R*sin(T)
Z = -((X*X + Y*Y-2*sigma**2)/(sigma**4))*exp(-(X*X + Y*Y)/(2*sigma**2))
ax.plot_surface(X, Y, Z, rstride=3, cstride=3, color='green')
将输出:
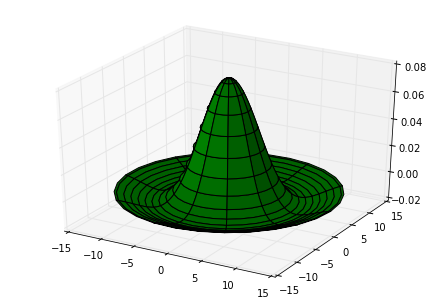
$$\triangledown^2 g(x,y)=\frac{x^2+y^2-\sigma^2}{\sigma^4}e^{-\frac{x^2+y^2}{2\sigma^2}}$$
其中
$$x=R\cos \theta,\;y=R\sin \theta \quad R\in[0,15],\;\theta\in[0, 2*\pi]$$
传说中的“墨西哥草帽”,相信做图像处理的同学应该不会陌生。
例子三 斐波那契数列和黄金分割
斐波那契数列是一个特殊的数列,它的当前项等于前两项之和,即$A_n=A_{n-1}+A_{n-2}$。那么,斐波那契数列又跟黄金分割有神马联系呢?经研究发现,前后相邻的两个斐波那契数的比值随着序号的增加而逐渐趋向于黄金分割比,即
$$\lim_{n\to \infty}\frac{A_{n-1}}{A_n}=\frac{\sqrt{5}-1}{2}.$$
以下代码首先产生一个斐波那契数列,然后求出数列中前后相邻两项的比值,最后描绘出相邻两项比值的变化趋势图。
from pylab import *
fib = [1, 1]
for i in range(40):
    fib.append(fib[-1]+fib[-2])
ratio = []
for i in range(1, len(fib)):
    ratio.append(float(fib[i-1])/fib[i])
plot(ratio, label='Fibonacci Ratio')
golden_ratio = (sqrt(5) - 1)/2
plot(range(len(fib)), [golden_ratio]*len(fib), 'r--', label='Golden Ratio')
ylim(0, 1.1)
legend()
annotate(r'$\frac{\sqrt{5}-1}{2}$', xy=(15, golden_ratio),  xycoords='data',
         xytext=(10, 50), textcoords='offset points', fontsize=16, color='red',
         arrowprops=dict(arrowstyle='->', connectionstyle='arc3,rad=.2', color='red'))
将输出:
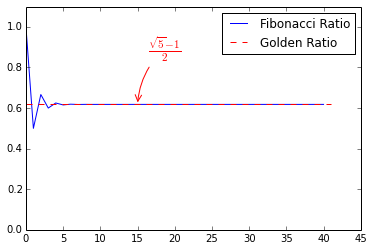
上图中,蓝线为斐波那契数列前项与后项的比值,红线表示黄金分割比的倒数。可以看出,随着斐波那契数列项数的不断增加,数列中前后两项的比值逐渐收敛到黄金分割比例。

 浙公网安备 33010602011771号