
在Swift中使用AutoLayout-VFL(AutoLayout-VFL笔记)
1.背景
iOS开发这几年, UI布局工具从frame到Masonry到SnapKit, sb和xib的AutoLayout也用过, 但是代码版本的AutoLayout倒是没用过, 最近一年, 频频发现一些三方UI组件布局的bug, 作为三方组件不可能去依赖另一个三方的kayout仓库, 所以只能通过代码的AutoLayout来解决. 好吧, 最近我忍不了了, 于是乎就开始学习代码版本的AutoLayout.
学习目标: 不追求用的多么熟练, 至少要会用, 能够看懂别人的布局代码是怎么回事, 能够找别人布局代码的问题出在哪里.
2.入门
首先需要知道, 在cocoa touch中, 有三种布局方式: Manual layout,Autoresizing,Autolayout, 这里要讲解的是第三个AutoLayout. 要想使用代码布局AutoLayout, 首先需要设置translatesAutoresizingMaskIntoConstraints=false, 原因见API注释:
/* By default, the autoresizing mask on a view gives rise to constraints that fully determine
     the view's position. This allows the auto layout system to track the frames of views whose
     layout is controlled manually (through -setFrame:, for example).
     When you elect to position the view using auto layout by adding your own constraints,
     you must set this property to NO. IB will do this for you.
     */
    @available(iOS 6.0, *)
    open var translatesAutoresizingMaskIntoConstraints: Bool // Default YES
如果不这样设置, 则在运行时候会得到如下的警告(没有编译警告):

3.第一种AutoLayout的实现方法
API中NSLayoutConstraint.init的方法如下定义如下所示:
/*
//NSLayoutConstraint初始化方法在API中的定义:
/* Create constraints explicitly.  Constraints are of the form "view1.attr1 = view2.attr2 * multiplier + constant"
     If your equation does not have a second view and attribute, use nil and NSLayoutAttributeNotAnAttribute.
     */
    public convenience init(item view1: Any, attribute attr1: NSLayoutAttribute, relatedBy relation: NSLayoutRelation, toItem view2: Any?, attribute attr2: NSLayoutAttribute, multiplier: CGFloat, constant c: CGFloat)

item:            指定约束左边的视图view1
attribute:      指定view1的属性attr1,具体见上述枚举值。
relatedBy:     指定左右两边的视图的关系relation,具体见上述枚举值。
toItem:         指定约束右边的视图view2 (可以设置为nil,则attribute=.attribute)
attribute:      指定view2的属性attr2,具体见上述枚举值。
multiplier:     指定一个与view2属性相乘的乘数multiplier
constant:      指定一个与view2属性相加的浮点数constant
*/


public enum NSLayoutRelation : Int {
    case lessThanOrEqual
    case equal
    case greaterThanOrEqual
}

public enum NSLayoutAttribute : Int {
    case left            //左边
    case right
    case top            //顶部
    case bottom
    case leading       //前面
    case trailing        //后面
    case width
    case height
    case centerX
    case centerY
    case lastBaseline
    @available(iOS 8.0, *)
    case firstBaseline
    @available(iOS 8.0, *)
    case leftMargin
    @available(iOS 8.0, *)
    case rightMargin
    @available(iOS 8.0, *)
    case topMargin
    @available(iOS 8.0, *)
    case bottomMargin
    @available(iOS 8.0, *)
    case leadingMargin
    @available(iOS 8.0, *)
    case trailingMargin
    @available(iOS 8.0, *)
    case centerXWithinMargins
    @available(iOS 8.0, *)
    case centerYWithinMargins
    case notAnAttribute
}
left和leading的不同之处, 详见stackoverflow: Difference between NSLayoutAttributeLeft vs NSLayoutAttributeLeading
**一个简单的,设置view约束的示例: **
let leftLayout = NSLayoutConstraint(item: blueView,
                                    attribute: .left,
                                    relatedBy: .equal,
                                    toItem: view,
                                    attribute: .left,
                                    multiplier: 1,
                                    constant: 20)
let topLayout = NSLayoutConstraint(item: blueView,
                                   attribute: .top,
                                   relatedBy: .equal,
                                   toItem: redView,
                                   attribute: .bottom,
                                   multiplier: 1,
                                   constant: 30)
let heightLayout = NSLayoutConstraint(item: blueView,
                                      attribute: .height,
                                      relatedBy: .equal,
                                      toItem: nil,
                                      attribute: .notAnAttribute,
                                      multiplier: 1,
                                      constant: 100)
let rightLayout = NSLayoutConstraint(item: blueView,
                                     attribute: .right,
                                     relatedBy: .equal,
                                     toItem: view,
                                     attribute: .right,
                                     multiplier: 1,
                                     constant: -10)
view.addConstraints([leftLayout, topLayout, heightLayout, rightLayout])
毋庸置疑, NSLayoutConstraint非常强大, 但是代码量也同样非常大, 简单一个view的约束就要写将近30行代码. 其实cocoa touch团队已经想到了这点, 他们为我们提供了另一种更简单的方法, 那就是VFL !
4.第二种实现AutoLayout的方法: VFL(Visual Format Language)
VFL是苹果公司为了简化autolayout的编码而推出的抽象语言。
4.1 了解VFL
VFL(Visual Format Language): “可视化格式语言”, 苹果公司为了简化autolayout的编码而推出的抽象语言.
基本语法表
| 功能 | 表达式 |
|---|---|
| 水平方向 | H: |
| 垂直方向 | V: |
| Views | [view] |
| 关系 | >=,==,<= |
| SuperView | | |
| 空间,间隙 - | - |
| 优先级 | @value |
举几个列子:
例子1: H:|-20-[view1(50)]-11-[view2]-20-|
设置水平方向的布局, view1距离superView左边20个单位, view1的宽度是50, view1的右边是view2, view1和view2的距离是11个单位长度, view2距离superView右边20个单位长度.
列子2:H:[wideView(>=60@700)]
wideView宽度大于等于60point,该约束条件优先级为700(优先级最大值为1000,优先级越高的约束条件越先被满足)
`例子3:V:|-20-[redBox(50)]-20-[yellowBox(==redBox)]``
垂直方向上, redBox距离上面20个单位, redBox的高度是50个单位, redBox右边20个单位之外是yellowBox, yellowBox的高度和redBox的高度相等.
4.2 代码示例
NSLayoutConstraint.constraints在API中的定义如下所示,
/* Create an array of constraints using an ASCII art-like visual format string.
     */
    open class func constraints(withVisualFormat format: String, options opts: NSLayoutFormatOptions = [], metrics: [String : Any]?, views: [String : Any]) -> [NSLayoutConstraint]

    /* This macro is a helper for making view dictionaries for +constraintsWithVisualFormat:options:metrics:views:.
     NSDictionaryOfVariableBindings(v1, v2, v3) is equivalent to [NSDictionary dictionaryWithObjectsAndKeys:v1, @"v1", v2, @"v2", v3, @"v3", nil];
     */


format:VFL语句
opts:约束类型
metrics:VFL语句中用到的具体数值
views:VFL语句中用到的控件

创建一个字典(内部包含VFL语句中用到的控件)的快捷宏定义
NSDictionaryOfVariableBindings(...)
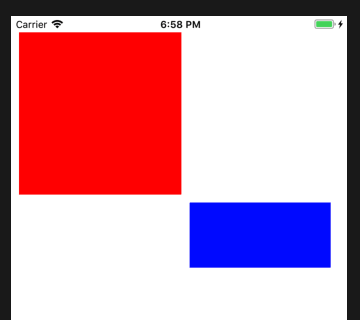
如下是设置redView和greenView的一个代码示例, VFL支持同时设置多个view的约束, 也支持设置相对约束.
let redView = UIView()
redView.backgroundColor = UIColor.red
redView.translatesAutoresizingMaskIntoConstraints = false
let blueView = UIView()
blueView.backgroundColor = UIColor.blue
blueView.translatesAutoresizingMaskIntoConstraints = false
view.addSubview(redView)
view.addSubview(blueView)

 //设置redView的constraints
view.addConstraints(NSLayoutConstraint.constraints(withVisualFormat: "H:|-10-[view(200)]",
                                                   options: NSLayoutFormatOptions(),
                                                   metrics: nil,
                                                   views: ["view": redView]))
view.addConstraints(NSLayoutConstraint.constraints(withVisualFormat: "V:|-20-[view(200)]",
                                                   options: NSLayoutFormatOptions(),
                                                   metrics: nil,
                                                   views: ["view": redView]))


//设置blueView的约束, 此时blueView的约束是相对于redView来设置
//实际上, 可以同时设置redView和blueView的约束, 这里拆开是为了测试VFL支持相对约束
let hMetrics = ["middleSpace": 10, "rightSpace": 20]
let hViews = ["redView": redView, "blueView": blueView]
let hVFL = "H:[redView]-middleSpace-[blueView]-rightSpace-|"
view.addConstraints(NSLayoutConstraint.constraints(withVisualFormat: hVFL,
                                                   options: NSLayoutFormatOptions()
                                                   metrics: hMetrics,
                                                   views: hViews))
let vMetrics = ["topSpace": 10, "height": 80]
let vViews = hViews
let vVFL = "V:[redView]-topSpace-[blueView(height)]"
view.addConstraints(NSLayoutConstraint.constraints(withVisualFormat: vVFL,
                                                   options: NSLayoutFormatOptions()
                                                   metrics: vMetrics,
                                                   views: vViews))
4.3 使用规则(来自网络)
|: 表示父视图
-:表示距离
V: :表示垂直
H: :表示水平


= :表示视图间距、宽度和高度必须大于或等于某个值
<= :表示视图间距、宽度和高度必须小宇或等于某个值
== :表示视图间距、宽度或者高度必须等于某个值
@ :>=、<=、== 限制 最大为 1000
|-[view]-|: 视图处在父视图的左右边缘内
|-[view] : 视图处在父视图的左边缘
|[view] : 视图和父视图左边对齐
-[view]- : 设置视图的宽度高度
|-30.0-[view]-30.0-|: 表示离父视图 左右间距 30
[view(200.0)] : 表示视图宽度为 200.0
|-[view(view1)]-[view1]-| :表示视图宽度一样,并且在父视图左右边缘内
V:|-[view(50.0)] : 视图高度为 50
V:|-(==padding)-[imageView]->=0-[button]-(==padding)-| : 表示离父视图的距离
为Padding,这两个视图间距必须大于或等于0并且距离底部父视图为 padding。
[wideView(>=60@700)] :视图的宽度为至少为60 不能超过 700
如果没有声明方向默认为 水平 V:
转载请注明出处!

 浙公网安备 33010602011771号