ceph object gateway 框架
ceph object gateway 部署
一、环境准备
| Hostname | IP | Service | Remark |
|---|---|---|---|
| ceph-node01 | public:192.168.8.11 | 1. centos7.7with Linux 3.10.0-1062.el7.x86_64;2. ceph version 12.2.13 luminous (stable),已部署3. ntp未部署;4. 禁用selinux;5. 禁用firewalld,rgw内嵌civetweb默认采用7480端口。更改成80端口 | |
| ceph-node02 | public:192.168.8.12 | 同上 | |
| ceph-node03 | public:192.168.8.13 | 同上 | |
| ceph-client | 192.168.0.11 |
二、部署Ceph RGW
1.安装ceph rgw
在主节点执行
[root@ceph-node1 ~]# cd /etc/ceph/
[root@ceph-node1 ceph]# ceph-deploy install --rgw ceph-node1 ceph-node2 ceph-node3

也可以在在各节点独立安装:ceph-radosgw
[root@ceph-node1 ceph]# yum -y install ceph-radosgw
2.创建对象网关实例
Ceph 对象存储使用 Ceph 对象网关守护进程( radosgw ,RGW),内嵌了Civetweb服务器与FastCGI 模块。
其中Civetweb服务器默认使用tcp 7480端口。
a.变更默认端口(option)
[root@ceph-node1 ceph]# vi ceph.conf
[client.rgw.ceph-node1]
rgw_frontends = "civetweb port=80"
[client.rgw.ceph-node2]
rgw_frontends = "civetweb port=80"
[client.rgw.ceph-node3]
rgw_frontends = "civetweb port=80"

主节点执行分发ceph.conf
[root@ceph-node1 ceph]# ceph-deploy --overwrite-conf config push ceph-node1 ceph-node2 ceph-node3
b.创建实例
[root@ceph-node1 ceph]# ceph-deploy rgw create ceph-node1 ceph-node2 ceph-node3
查看服务状态
[root@ceph-node1 ceph]# systemctl status ceph-radosgw@rgw.ceph-node1
● ceph-radosgw@rgw.ceph-node1.service - Ceph rados gateway
   Loaded: loaded (/usr/lib/systemd/system/ceph-radosgw@.service; enabled; vendor preset: disabled)
   Active: active (running) since Fri 2020-03-27 13:29:56 CST; 1min 30s ago
 Main PID: 4803 (radosgw)
   CGroup: /system.slice/system-ceph\x2dradosgw.slice/ceph-radosgw@rgw.ceph-node1.service
           └─4803 /usr/bin/radosgw -f --cluster ceph --name client.rgw.ceph-node1 --se...

Mar 27 13:29:56 ceph-node1 systemd[1]: Started Ceph rados gateway.
查看端口
[root@ceph-node1 ceph]# ss -tunlp |grep radosgw
tcp    LISTEN     0      128       *:80      *:*               users:(("radosgw",pid=4803,fd=40))
创建实例后,同时会创建默认的pool;查看Pool
[root@ceph-node1 ceph]# ceph osd lspools
1 .rgw.root,2 default.rgw.control,3 default.rgw.meta,4 default.rgw.log,
或者
[root@ceph-node1 ceph]# rados df
POOL_NAME           USED    OBJECTS CLONES COPIES MISSING_ON_PRIMARY UNFOUND DEGRADED RD_OPS RD      WR_OPS WR
.rgw.root           1.09KiB       4      0     12                  0       0        0     66   44KiB      4 4KiB
default.rgw.control      0B       8      0     24                  0       0        0      0      0B      0   0B
default.rgw.log          0B     175      0    525                  0       0        0   1575 1.37MiB   1050   0B
default.rgw.meta         0B       0      0      0                  0       0        0      0      0B      0   0B

total_objects    187
total_used       6.04GiB
total_avail      53.9GiB
total_space      60.0GiB
c.访问
如果网关实例正常运行,响应如下:
[root@ceph-node2 ceph]# curl http://192.168.8.11
<?xml version="1.0" encoding="UTF-8"?>
-<ListAllMyBucketsResult xmlns="http://s3.amazonaws.com/doc/2006-03-01/">
-<Owner>
<ID>anonymous</ID>
<DisplayName/>
</Owner>
<Buckets/>
</ListAllMyBucketsResult>
三、验证
使用REST接口验证,步骤如下:
- 首先创建适用于s3接口的ceph对象网关用户;
- 验证用户是否能访问网关
1.创建用户
a.创建用于S3访问的radosgw用户
[root@ceph-node1 ceph]# radosgw-admin user create --uid="objectuser" --display-name="Object Storage User"
{
    "user_id": "objectuser",
    "display_name": "Object Storage User",
    "email": "",
    "suspended": 0,
    "max_buckets": 1000,
    "auid": 0,
    "subusers": [],
    "keys": [
        {
            "user": "objectuser",
            "access_key": "IA73PG9P5W5HSNZHGKIL",
            "secret_key": "sWY86FWNnXxDzy3N8IeiJqK34wt99DxYIzf4JkSv"
        }
    ],
    "swift_keys": [],
    "caps": [],
    "op_mask": "read, write, delete",
    "default_placement": "",
    "placement_tags": [],
    "bucket_quota": {
        "enabled": false,
        "check_on_raw": false,
        "max_size": -1,
        "max_size_kb": 0,
        "max_objects": -1
    },
    "user_quota": {
        "enabled": false,
        "check_on_raw": false,
        "max_size": -1,
        "max_size_kb": 0,
        "max_objects": -1
    },
    "temp_url_keys": [],
    "type": "rgw"
}
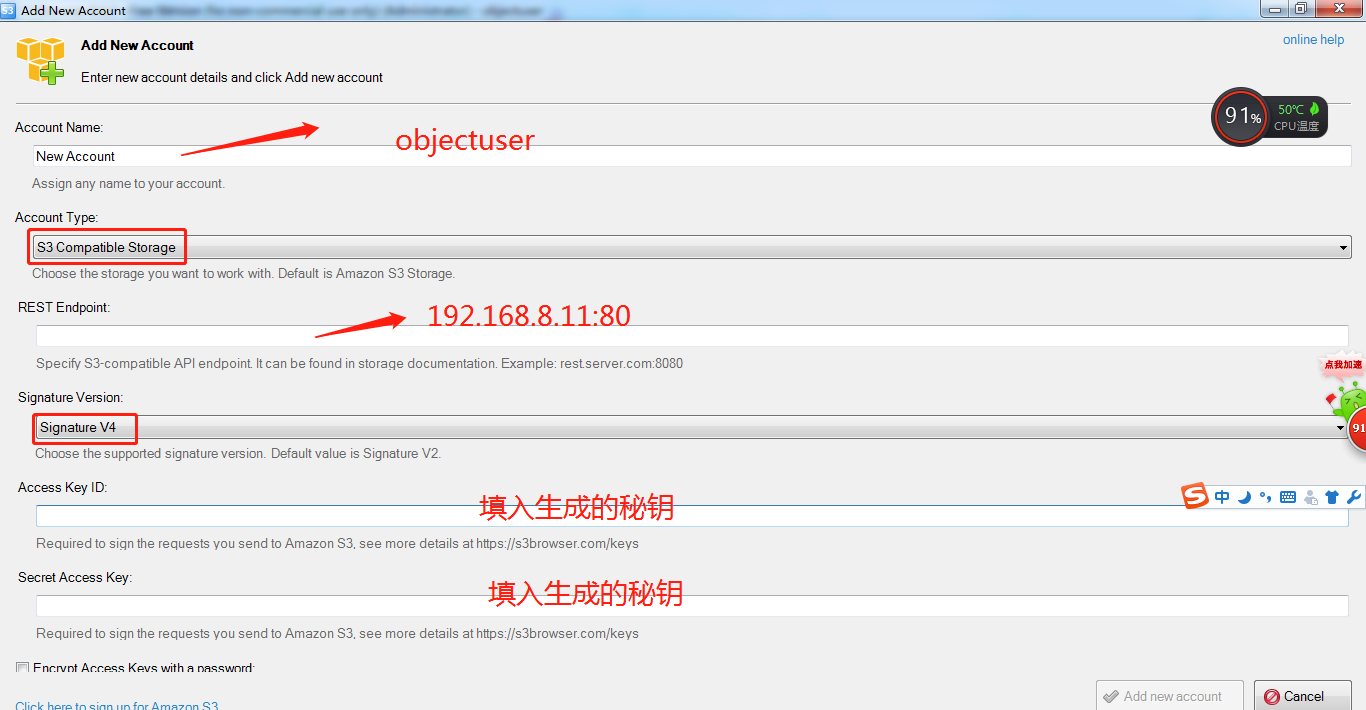
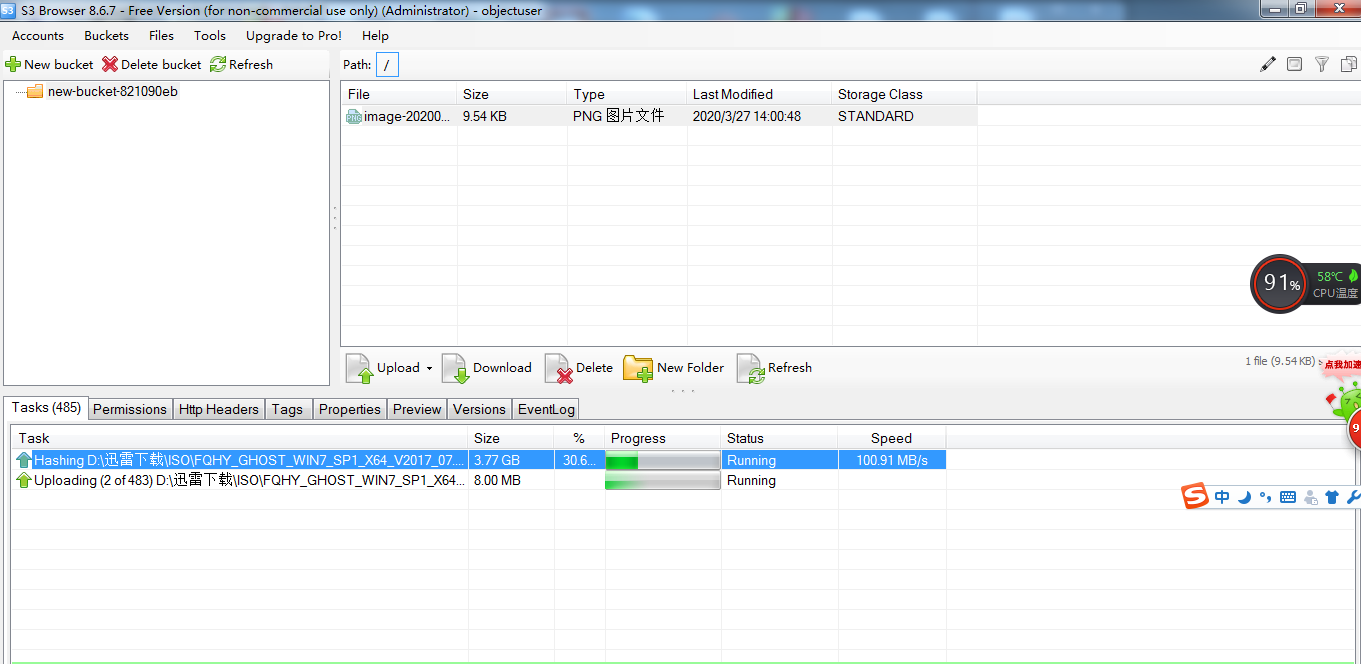
用S3 Browser 访问 (设置用户时,注意把最底部的Use secure transfer SSL/TSL的默认勾去掉)

 浙公网安备 33010602011771号