四、win32
4.1.C语言中的宽字符
1、常用函数
char		wchar_ t		//多字节字符类型 宽字符类型
printf		wprintf			//打印到控制台函数
strlen		wcslen			//获取长度
strcpy		wcscpy			//字符串复制
strcat		wcscat			//字符串拼接
strcmp		wcscmp			//字符串比较
strstr		wcsstr			//字符串查找
2、打印宽字符
#include <locale.h>
setlocale(LC_ALL,")			//使用控制台默认的编码
wchar_ t swzStr[]= L“中国";
wprint(L"%s\n",x1);
3、字符串长度
char szStr] = "中国";
wchar_ t swzStr[] = L"中国";
strlen(szStr);		//取得多字节字符串中字符长度,不包含00
wcslen(swzStr); 	//取得多字 节字符串中字符长度,不包含00 00
4.2.Win32 API中的宽字符
1、什么是Win32 API?有哪些?在哪里?
主要是存放在C:\WINDOWS\system32下面所有的dll
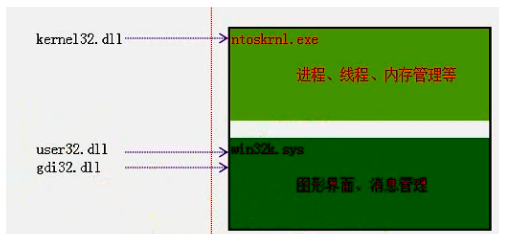
几个重要的DLL:
<1> Kernel32.dl:最核心的功能模块,比如管理内存、进程和线程相关的函数等。
<2> User32 dIl:是Windows用 户界面相关应用程序接口,如创建窗口和发送消息等。
<3> GDI32.dll:全称是Graphical Device Interface(图形设备接口),包含用于画图和显示文本的函数。
2、关于Win32的数据类型:
int MessageBox(
    HWND hWnd,			// handle to owner window
    LPCTSTR IpText, 	// text in message box
    LPCTSTR lpCaption,  //message box title
    UINT uType			//message box style
);
3、常用数据类型:
汇编:
byte	BYTE	PBYTE
word	WORD	PWORD
dword	DWORD	PDWORD
C语言:
char			CHAR	PCHAR
unsigned char	UCHAR	PUCHAR
short			SHORT	PSHORT
unsigned short	USHORT	PUSHORT
int				INT		PINT
unsigned int	UINT	PUINT
C++
bool BOOL
4、在Win32中使用字符串:
字符类型:
    CHAR szStr[]= “中国”;
    WCHAR swzStr[]= L“中国”;
    TCHAR stzSr[] = TEXT(“中国");    //win32推荐的方式
字符串指针:
    PSTR pszStr=“中国";
    PWSTR pwszStr= L“中国";
    PTSTR ptszStr = TEXT(“中国");		//win32推荐的方式
5、第一个win32 api的使用
#include<stdio.h>
#include<stdlib.h>
#include<windows.h>

void main()
{
	/*
	// ASSll编码
	int MessageBox(
		HWND hWnd,			//所有者窗口的句柄
		LPCTSTR IpText,		//消息框中的文本地址
		LPCTSTR IpCaption,	//消息框标题的地址
		UINT uType			//样式的消息框
	);
	*/

	/*
	//unicode编码
	CHAR szTitle[] = "Title";
	CHAR szContent[] = "hello world";
	MessageBoxA(0,szContent,szTitle,MB_OK);
	*/

	/*
	WCHAR swzTitle[] = L"Title";
	WCHAR swzContent[] = L"hello world";
	MessageBoxW(0,swzContent,swzTitle,MB_OK);
	*/

    //推荐的方式,编译器会自动选择编码方式
	TCHAR stzTitle[] = TEXT("Title");
	TCHAR stzContent[] = TEXT("hello world");
	MessageBox(0,stzContent,stzTitle,MB_OK);

	system("pause");
	return;
}
4.3.进程的创建过程
1、什么是进程?
进程提供程序所需的资源,如:数据、代码等等。
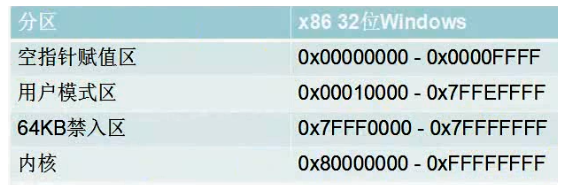
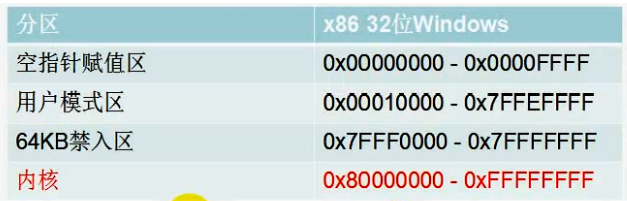
2、进程内存空间的地址划分
3、进程的创建
<1>任何进程都是别的进程创建的: CreateProcess()
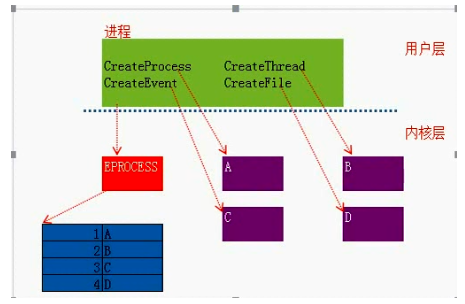
<2>进程的创建过程
1、映射EXE文件
2、创建内核对象EPROCESS
3、映射系统DLL(ntdll.dIl)
4、创建线程内核对象ETHREAD
5、系统启动线程
映射DLL(ntll.Ldrlnitialize Thunk)
线程开始执行
4.4.创建进程
进程的创建
进程的创建:
BOOL CreateProcess(
    LPCTSTR IpApplicationName,		// name of executable module
    LPTSTR lpCommandLine,			// command line string
    LPSECURITY_ ATTRIBUTES IpProcessAttributes, 	// SD
    LPSECURITY_ ATTRIBUTES IpThreadAttributes, 	// SD
    BOOL bInheritHandles,			//I handle inheritance option
    DWORD dwCreationFlags,			// creation flags
    LPVOID IpEnvironment,			// new environment block
    LPCTSTR IpCurrentDirectory,		// current directory name
    LPSTARTUPINFO IpStartupInfo,		// startup information
    LPPROCESS_ INFORMATION IpProcessInformation 		// process information
);
创建进程例子
#include<stdio.h>
#include<stdlib.h>
#include<windows.h>

BOOL CreateChildProcess(PTCHAR szChildProcessName,PTCHAR szCommandLine)
{
	STARTUPINFO si;
	PROCESS_INFORMATION pi;

	ZeroMemory(&pi,sizeof(pi));
	ZeroMemory(&si,sizeof(si));
	si.cb = sizeof(si);

    //创建子进程
	if(!CreateProcess(
		szChildProcessName,		//对象名称
		szCommandLine,			//命令行
		NULL,					//不继承进程句柄
		NULL,					//不继承线程句柄
		FALSE,					//不继承句柄
		0,						//没有创建标志
		NULL,					//使用父进程环境差变量
		NULL,					//使用父进程目录作为当前目录。可以自己设置目录
		&si,					//STARTUPINFO 结构体详细信息
		&pi)					//PROCESS_INFOMATION结构体进程信息
		)
	{
		printf("CreateChildProcess Error:%d \n",GetLastError());
		return FALSE;
	}
	//释放句柄
	CloseHandle(pi.hProcess);
	CloseHandle(pi.hThread);
	return TRUE;
};

void main(int argc,char* argv[])
{
	TCHAR szApplicationName[] = TEXT("C://Program Files//Tools//PE.exe");
	TCHAR szCommandLine[] = TEXT("1");
	CreateChildProcess(szApplicationName,szCommandLine);

	getchar();
	system("pause");
	return;
}
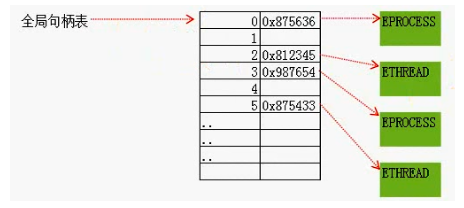
4.5.句柄表
1、什么是内核对象?
像进程、线程、文件、互斥体、事件等在内核都有一个对应的结构体,这些结构体由内核负责管理。我们管这样的对象叫做内核对象。
2、如何管理内核对象

3、每个进程都有一个句柄表
4、多进程共享一个内核对象
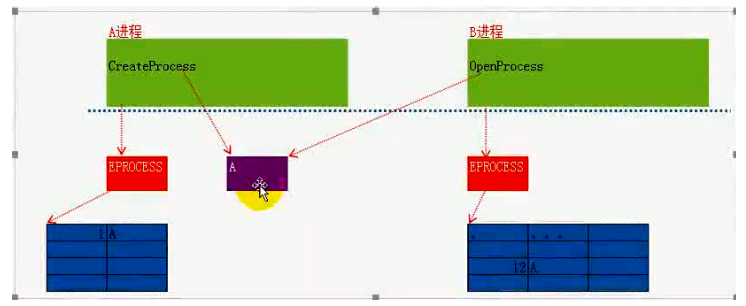
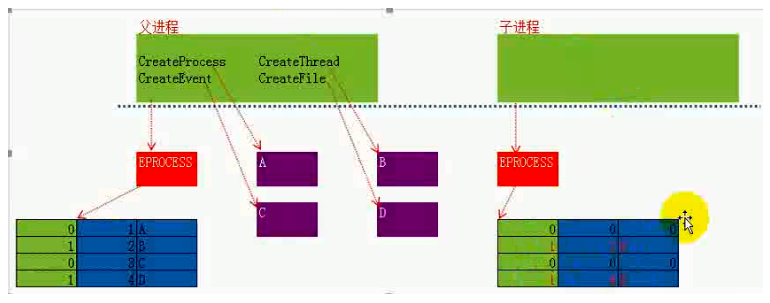
5、句柄可以被继承
4.6.进程相关API
1、ID与句柄
2、以挂起的形势创建进程
<1>任何进程都是别的进程创建的: CreateProcess()
<2>进程的创建过程
1、映射EXE文件
2、创建内核对象EPROCESS
3、映射系统LLLntll.dI)
4、创建线程内核对象ETHREAD
5、如果是挂起的方式创建的
6、恢复以后再继续执行
映射DLL(ntllI.Ldrlnitialize^ Thunk)
线程开始执行
挂起的方式创建进程
#include<stdio.h>
#include<stdlib.h>
#include<windows.h>

BOOL CreateChildProcess(PTCHAR szChildProcessName,PTCHAR szCommandLine)
{
	STARTUPINFO si;
	PROCESS_INFORMATION pi;

	ZeroMemory(&pi,sizeof(pi));
	ZeroMemory(&si,sizeof(si));
	si.cb = sizeof(si);

	if(!CreateProcess(
		szChildProcessName,
		szCommandLine,
		NULL,
		NULL,
		FALSE,
		CREATE_SUSPENDED,    //以挂起的方式创建线程
		NULL,
		NULL,
		&si,
		&pi)
		)
	{
		printf("CreateChildProcess Error:%d \n",GetLastError());
		return FALSE;
	}

	//SuspendThread(pi.hThread);   //暂停进程
	//ResumeThread(pi.hThread);	   //恢复进程
	//打印进程ID和进程句柄
	printf("PID:%X - process:%x \n",pi.dwProcessId,pi.hProcess);

    //在恢复进程前,需要做的操作代码
	for(int i=0;i<5;i++)
	{
		Sleep(1000);
		printf("========\n");
	}
    //恢复进程
	ResumeThread(pi.hThread);
	//关闭进程和线程
	CloseHandle(pi.hProcess);
	CloseHandle(pi.hThread);
	return TRUE;
};

void main(int argc,char* argv[])
{
	TCHAR szApplicationName[] = TEXT("C://Program Files//Tools//PE.exe");
	TCHAR szCommandLine[] = TEXT("1");
	CreateChildProcess(szApplicationName,szCommandLine);

	getchar();
	system("pause");
	return;
}
3、模块目录和工作目录
char strModule[256];
GetModuleFileName(NULL,strModule, 256); 	//模块目录
char strWork[1000];
int i=1000;
GetCurrentDirectory(1000,buf);				//工作目录

print("模块目录: %s\n工作目录: %s\n",strModule,strWork);
4、其它进程相关API
获取进程PID
GetCurrentProcessld
获取进程句柄
GetCurrentProcess
获取命令行
GetCommandL ine
获取启动信息
GetStartupInfo
遍历进程ID
EnumProcesses
快照
CreateToolhelp32Snapshot
4.7.创建线程
1、什么是线程?
<1>线程是附属在进程上的执行实体,是代码的执行流程。
<2>一个进程可以包含多个线程,但一个进程至少要包含一个线程。
2、创建线程
HANDLE CreateThread(
  LPSECURITY_ATTRIBUTES   lpThreadAttributes,
  SIZE_T                  dwStackSize,
  LPTHREAD_START_ROUTINE  lpStartAddress,
  LPVOID 				  lpParameter,
  DWORD                   dwCreationFlags,
  LPDWORD                 lpThreadId
);
实例
#include<stdio.h>
#include<stdlib.h>
#include<windows.h>

DWORD WINAPI ThreadProc(LPVOID lpParameter)
{
    //强转传递的参数的类型
	int* p = (int*)lpParameter;

	for(int i=0;i<*p;i++)
	{
		Sleep(500);
		printf("+++++%d \n",i);
	}
	return 0;
}
//参数
int n = 10;

void main(int argc,char* argv[])
{
	HANDLE hThread;
    //1.返回的是线程句柄
    //2.第三个参数是要执行的线程函数
    //3.第四个参数是要执行的线程函数的参数,类型为LPVOID
	hThread = CreateThread(NULL,0,ThreadProc,(LPVOID)&n,0,NULL);
	CloseHandle(hThread);

	for(int i=0;i<100;i++)
	{
		Sleep(500);
		printf("------%d\n",i);
	}

	system("pause");
	return;
}
4.8.线程控制
1、如何让线程停下来
让自己停下来:
	Sleep()
让别人停下来:
	SuspendThread()
线程恢复:
	ResumeThread()
挂起和恢复线程
#include<stdio.h>
#include<stdlib.h>
#include<windows.h>

DWORD WINAPI ThreadProc(LPVOID lpParameter)
{
	int* p = (int*)lpParameter;

	for(int i=0;i<*p;i++)
	{
		Sleep(500);
		printf("+++++%d \n",i);
	}
	return 0;
}

int n = 100;

void main(int argc,char* argv[])
{
	HANDLE hThread;
	hThread = CreateThread(NULL,0,ThreadProc,(LPVOID)&n,0,NULL);

	Sleep(5000);
	SuspendThread(hThread);    //挂起线程
	Sleep(5000);
	ResumeThread(hThread);	   //恢复线程

	getchar();
	CloseHandle(hThread);

	system("pause");
	return;
}
2、等待线程结束
<1> WaitForSingleObject();

<2> WaitForMultipleObjects();

<3> GetExitCodeThread();
单个线程WaitForSingleObject()
- 第一个参数是句柄,
- 第二个参数是等待时间,INFINITE表示等待线程执行结束
#include<stdio.h>
#include<stdlib.h>
#include<windows.h>

DWORD WINAPI ThreadProc(LPVOID lpParameter)
{
	int* p = (int*)lpParameter;

	for(int i=0;i<*p;i++)
	{
		Sleep(500);
		printf("+++++%d \n",i);
	}
	return 0;
}

int n = 20;

void main(int argc,char* argv[])
{
	HANDLE hThread;
	hThread = CreateThread(NULL,0,ThreadProc,(LPVOID)&n,0,NULL);

	WaitForSingleObject(hThread,INFINITE);  //等待线程结束,才会执行后面的代码
	printf("线程执行完毕\n");

	getchar();
	CloseHandle(hThread);

	system("pause");
	return;
}
多个线程WaitForMultipleObjects()
- 第一个参数:线程个数
- 第二个参数:线程句柄数组
- 第三个参数:是否等待所有线程结束
- 第四个参数:等待时间
#include<stdio.h>
#include<stdlib.h>
#include<windows.h>

DWORD WINAPI ThreadProc(LPVOID lpParameter)
{
	int* p = (int*)lpParameter;

	for(int i=0;i<*p;i++)
	{
		Sleep(500);
		printf("+++++%d \n",i);
	}
	return 0;
}

int n = 20;

void main(int argc,char* argv[])
{
	HANDLE arrThread[2];
	arrThread[0] = CreateThread(NULL,0,ThreadProc,(LPVOID)&n,0,NULL);
	arrThread[1] = CreateThread(NULL,0,ThreadProc,(LPVOID)&n,0,NULL);

	WaitForMultipleObjects(2,arrThread,TRUE,INFINITE);
	printf("线程执行完毕\n");

	getchar();
	CloseHandle(arrThread[0]);
    CloseHandle(arrThread[1]);

	system("pause");
	return;
}
获取线程返回结果值GetExitCodeThread()
#include<stdio.h>
#include<stdlib.h>
#include<windows.h>

DWORD WINAPI ThreadProc1(LPVOID lpParameter)
{
	int* p = (int*)lpParameter;

	for(int i=0;i<*p;i++)
	{
		Sleep(500);
		printf("+++++%d \n",i);
	}
	return 0;   //返回结果
}

DWORD WINAPI ThreadProc2(LPVOID lpParameter)
{
	int* p = (int*)lpParameter;

	for(int i=0;i<*p;i++)
	{
		Sleep(500);
		printf("+++++%d \n",i);
	}
	return 1;   //返回结果
}

int n = 20;

void main(int argc,char* argv[])
{
	HANDLE arrThread[2];
	DWORD dwResult1;
	DWORD dwResult2;
	arrThread[0] = CreateThread(NULL,0,ThreadProc1,(LPVOID)&n,0,NULL);
	arrThread[1] = CreateThread(NULL,0,ThreadProc2,(LPVOID)&n,0,NULL);

	WaitForMultipleObjects(2,arrThread,TRUE,INFINITE);
    //获取线程返回结果值
	GetExitCodeThread(arrThread[0],&dwResult1);
	GetExitCodeThread(arrThread[1],&dwResult2);

	printf("%d %d\n",dwResult1,dwResult2);   //0  1
	printf("线程执行完毕\n");

	getchar();
	CloseHandle(arrThread[0]);
	CloseHandle(arrThread[1]);

	system("pause");
	return;
}
3、获取和设置线程上下文
//获取
BOOL GetThreadContext(
	HANDLE hThread, 		// handle to thread with context
	LPCONTEXT IpContext 	// context structure
);

//设置
BOOL SetThreadContext(
	HANDLE hThread,	     	// handle to thread
	CONST CONTEXT *lpContext    //context structure
);
获取上下文
#include<stdio.h>
#include<stdlib.h>
#include<windows.h>

DWORD WINAPI ThreadProc1(LPVOID lpParameter)
{
	int* p = (int*)lpParameter;

	for(int i=0;i<*p;i++)
	{
		Sleep(500);
		printf("+++++%d \n",i);
	}
	return 0;   //返回结果
}

DWORD WINAPI ThreadProc2(LPVOID lpParameter)
{
	int* p = (int*)lpParameter;

	for(int i=0;i<*p;i++)
	{
		Sleep(500);
		printf("+++++%d \n",i);
	}
	return 1;   //返回结果
}

int n = 20;

void main(int argc,char* argv[])
{
	HANDLE arrThread[2];
	DWORD dwResult1;
	DWORD dwResult2;

	arrThread[0] = CreateThread(NULL,0,ThreadProc1,(LPVOID)&n,0,NULL);
	arrThread[1] = CreateThread(NULL,0,ThreadProc2,(LPVOID)&n,0,NULL);

	SuspendThread(arrThread[0]);
	CONTEXT context;
	context.ContextFlags = CONTEXT_INTEGER;
	GetThreadContext(arrThread[0],&context);     //获取上下文
	printf("%x %x\n",context.Eax,context.Ecx);
	ResumeThread(arrThread[0]);

	getchar();
	CloseHandle(arrThread[0]);
	CloseHandle(arrThread[1]);

	system("pause");
	return;
}
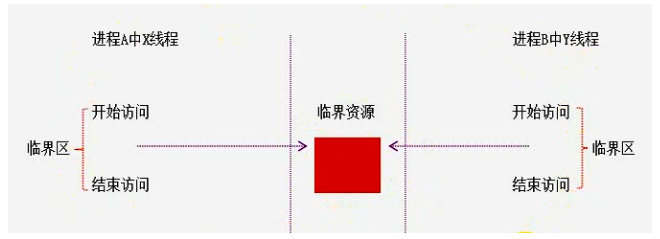
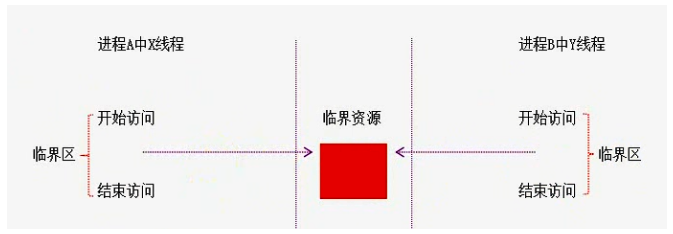
4.9.临界区
1、线程安全问题
每个线程都有自己的栈,而局部变量是存储在栈中的,这就意味着每个线程都有一份自己的“局部变量",如果线程仅仅使用“局部变量”那么就不存在线程安全问题。那如果多个线程共用-一个全局变量呢?
2、解决思路

3、临界区实现之线程锁
<1>创建全局变量
CRITICAL SECTION cs;
<2>初始化全局变量
InitializeCriticalSection(&cs);
<3>实现临界区
EnterCriticalSection(&cs);
使用临界资源
LeaveCriticalSection(&cs);
#include<stdio.h>
#include<stdlib.h>
#include<windows.h>

int g_dwTickets = 10;
CRITICAL_SECTION cs;   //创建全局变量

DWORD WINAPI MyFirstThreadProc(LPVOID lpParameter)
{
	EnterCriticalSection(&cs);     //实现临界区
	while(g_dwTickets>0)
	{
		EnterCriticalSection(&cs);
		printf("还有:%d张票\n",g_dwTickets);
		g_dwTickets--;
		printf("卖出一张,还有:%d张票\n",g_dwTickets);
		LeaveCriticalSection(&cs);    //使用临街资源
	}
	return 0;
}

void main(int argc,char* argv[])
{
	HANDLE arrThread[2];
	DWORD dwResult1;
	DWORD dwResult2;

	InitializeCriticalSection(&cs);   //初始化全局变量

	arrThread[0] = CreateThread(NULL,0,MyFirstThreadProc,NULL,0,NULL);
	arrThread[1] = CreateThread(NULL,0,MyFirstThreadProc,NULL,0,NULL);

	WaitForMultipleObjects(2,arrThread,TRUE,INFINITE);
	GetExitCodeThread(arrThread[0],&dwResult1);
	GetExitCodeThread(arrThread[0],&dwResult2);

	getchar();
	CloseHandle(arrThread[0]);
	CloseHandle(arrThread[1]);

	system("pause");
	return;
}
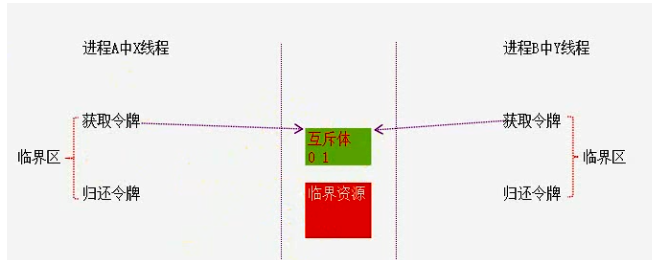
4.10.互斥体
1、内核级临街资源怎么办
2、互斥体的使用
互斥体例子
#include<stdio.h>
#include<stdlib.h>
#include<windows.h>

void main(int argc,char* argv[])
{
    //创建一个互斥体
	HANDLE g_hMutex = CreateMutex(NULL,FALSE,"test");  //第三个参数:随便起一个名字
	//获取令牌
	WaitForSingleObject(g_hMutex,INFINITE);

	for(int i=0;i<10;i++)
	{
		Sleep(1000);
		printf("%d\n",i);
	}
	//释放令牌
	ReleaseMutex(g_hMutex);

	getchar();

	system("pause");
	return;
}
3、互斥体与线程锁的区别
1、线程锁只能用于单个进程间的线程控制
2、互斥体可以设定等待超时,但线程锁不能
3、线程意外终结时,Mutex可以避免无限等待
4、Mutex效率没有线程锁高
4、通过互斥体防止程序多开
#include<stdio.h>
#include<stdlib.h>
#include<windows.h>

int main(int argc,char* argv[])
{
	HANDLE hMutex = CreateMutex(NULL,FALSE,"防止多开");
    //1.第一次打开程序的时候GetLastError()返回值为:0
    //2.第二次打开程序的时候GetLastError()返回为:ERROR_ALREADY_EXISTS
    //3.其它情况则是程序出错
	DWORD dwRet = GetLastError();
	if(hMutex)
	{
		if(ERROR_ALREADY_EXISTS == dwRet)    //如果是第二次打开程序,直接关闭进程
		{
			CloseHandle(hMutex);
			return 0;
		}
	}
	else
	{
		printf("创建失败,程序退出\n");
		CloseHandle(hMutex);
		return 0;
	}

	while(1)
	{
		Sleep(1000);
		printf("程序执行中.....\n");
	}

	getchar();
	system("pause");
	return 0;
}
4.11.事件
1、通知事件
HANDLE CreateEvent(
  LPSECURITY_ATTRIBUTES lpEventAttributes, // SD
  BOOL bManualReset,                       // reset type
  BOOL bInitialState,                      // initial state
  LPCTSTR lpName                           // object name
);
实例
#include<stdio.h>
#include<stdlib.h>
#include<windows.h>

HANDLE g_hEvent

DWORD WINAPI ThreadProc_1(LPVOID lpParameter)
{
	TCHAR szBuffer[10] = {0};
	//等待通知
	WaitForSingleObject(g_hEvent,INFINITE);

	printf("ThreadProc_1执行了\n");
	getchar();
	return 0;
}

DWORD WINAPI ThreadProc_2(LPVOID lpParameter)
{
	TCHAR szBuffer[10] = {0};
	//等待通知
	WaitForSingleObject(g_hEvent,INFINITE);

	printf("ThreadProc_2执行了\n");
	getchar();
	return 0;
}

int main(int argc,char* argv[])
{
    //创建事件
    //参数:1.默认安全属性;2.TRUE通知。FALSE互斥
    //参数:3.初始没信号;4.如果想其它进程用,进起个名字
	g_hEvent = CreateEvent(NULL,FALSE,FALSE,NULL);
	HANDLE hThread[2];
    //创建两个线程
	hThread[0] = CreateThread(NULL,0,ThreadProc_1,NULL,0,NULL);
	hThread[0] = CreateThread(NULL,0,ThreadProc_2,NULL,0,NULL);
	//设置事件为通知
	SetEvent(g_hEvent);
	WaitForMultipleObjects(2,hThread,TRUE,INFINITE);
	CloseHandle(hThread[0]);
	CloseHandle(hThread[1]);
	CloseHandle(g_hEvent);

	getchar();

	system("pause");
	return 0;
}
2、线程同步
<1>线程互斥:线程互斥是指对于共享的进程系统资源,在各单个线程访问时的排它性。当有若干个线程都要使用某一共享资源时, 任何时刻最多只允许一个线程去使用,其它要使用该资源的线程必须等待,直到占用资源者释放该资源。
<2>线程同步:线程同步是指线程之间所具有的一种制约关系,一个线程的执行依赖另一个线程的消息,当它没有得到另一个线程的消息时应等待,直到消息到达时才被唤醒。
同步=互斥+有序执行
3、同步的前提是互斥
4、生产者和消费者
#include<stdio.h>
#include<stdlib.h>
#include<windows.h>

HANDLE g_hSet,g_hClear;
int g_Max = 10;
int g_Numberr = 0;

DWORD WINAPI ThreadProduct(LPVOID pM)
{
	for (int i=0;i<g_Max;i++)
	{
		WaitForSingleObject(g_hSet,INFINITE);
		g_Numberr = 1;
		DWORD id = GetCurrentThreadId();
		printf("生产者%d将数据%d防入缓冲区\n",id,g_Numberr);
		SetEvent(g_hClear);
	}
	return 0;
}

DWORD WINAPI ThreadConsumer(LPVOID pM)
{
	for (int i=0;i<g_Max;i++)
	{
		WaitForSingleObject(g_hClear,INFINITE);
		g_Numberr = 0;
		DWORD id = GetCurrentThreadId();
		printf("消费者%d将数据%d防入缓冲区\n",id,g_Numberr);
		SetEvent(g_hSet);
	}
	return 0;
}

int main(int argc,char* argv[])
{
	HANDLE hThread[2];
	g_hSet = CreateEvent(NULL,FALSE,TRUE,NULL);      //生产者。第三个参数TRUE,默认有信号
	g_hClear = CreateEvent(NULL,FALSE,FALSE,NULL);	//消费者者。第三个参数FALSE,默认无信号

	hThread[0] = ::CreateThread(NULL,0,ThreadProduct,NULL,0,NULL);
	hThread[1] = ::CreateThread(NULL,0,ThreadConsumer,NULL,0,NULL);

	WaitForMultipleObjects(2,hThread,TRUE,INFINITE);
	CloseHandle(hThread[0]);
	CloseHandle(hThread[1]);
	CloseHandle(g_hSet);
	CloseHandle(g_hClear);

	system("pause");
	return 0;
}
4.12.窗口的本质
1、窗口的本质
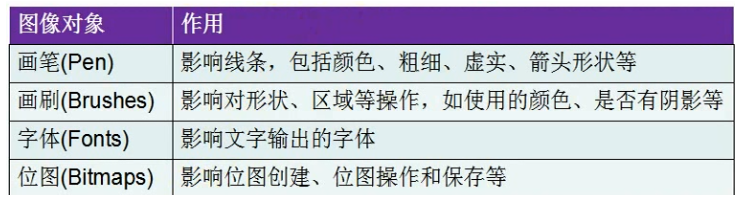
2、GDI图形设备接口(Graphics Device Interface)**
<1>设备对象(HWND)
<2> DC(设备上下文,Device Contexts)
<3>图形对象
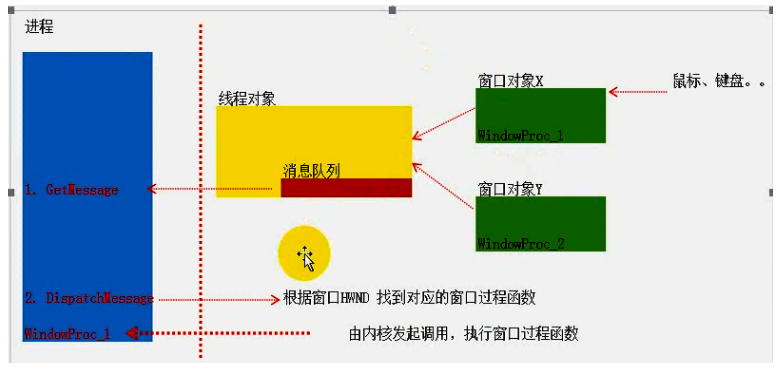
4.13.消息队列
1、什么是消息?
当我们点击鼠标的时候,或者当我们按下键盘的时候,操作系统都要把这些动作记录下来,存储到一个结构体中,这个结构体就是消息。
2、消息队列:每个线程只有一个消息队列
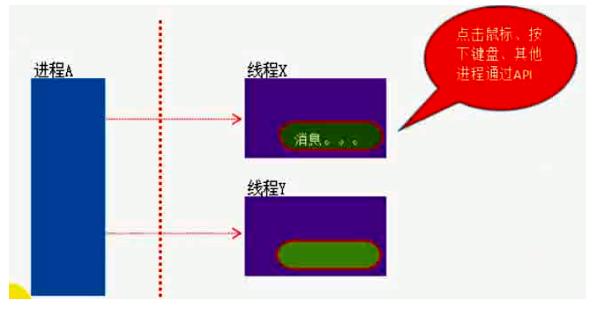
3、窗口与线程
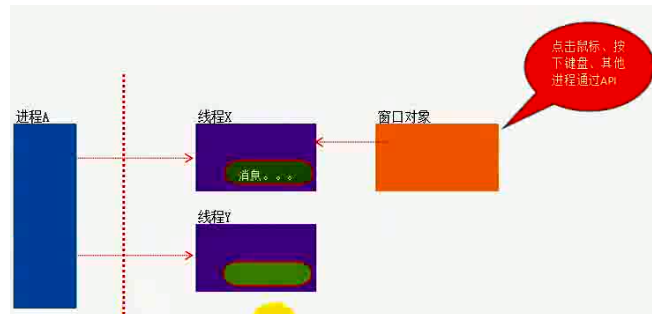
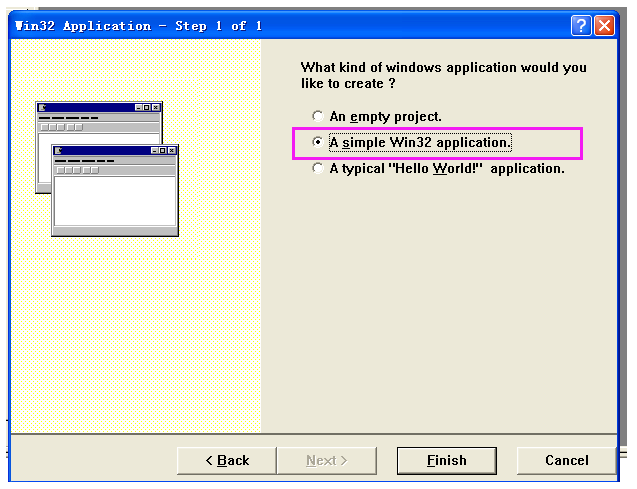
4.14.第一个Windows程序
1、创建win32应用程序
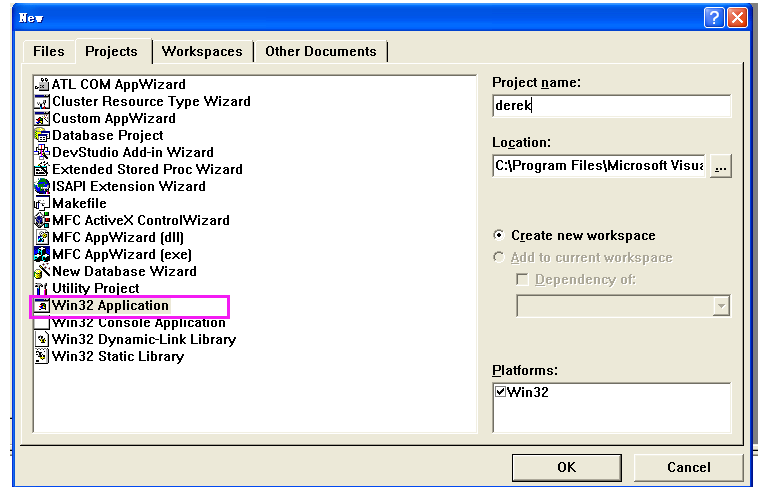
2、WinMain函数
int WINAPI WinMain(
  HINSTANCE hInstance,      // handle to current instance
  HINSTANCE hPrevInstance,  // handle to previous instance
  LPSTR lpCmdLine,          // command line
  int nCmdShow              // show state
);
3、调试信息的输出
char szOutBuff[0x80];
sprintf(szOutBuff,"Error: %d",GetLastError());
OutputDebugString(szOutBuff)
4、打印当前程序的入口地址
// derek.cpp : Defines the entry point for the application.
//

#include "stdafx.h"

int APIENTRY WinMain(HINSTANCE hInstance,
                     HINSTANCE hPrevInstance,
                     LPSTR     lpCmdLine,
                     int       nCmdShow)
{
	char szOutBuff[0x80];
	DWORD dwAddr = (DWORD)hInstance;
	sprintf(szOutBuff,"address: %x\n",dwAddr);
	OutputDebugString(szOutBuff);      //address:400000

	return 0;
}
5、创建一个window窗口程序过程

6、用到的API函数
typedef struct _WNDCLASS {
    UINT       style;
    WNDPROC    lpfnWndProc;
    int        cbClsExtra;
    int        cbWndExtra;
    HINSTANCE  hInstance;
    HICON      hIcon;
    HCURSOR    hCursor;
    HBRUSH     hbrBackground;
    LPCTSTR    lpszMenuName;
    LPCTSTR    lpszClassName;
} WNDCLASS, *PWNDCLASS;

LRESULT CALLBACK WindowProc(
  HWND hwnd,      // handle to window
  UINT uMsg,      // message identifier
  WPARAM wParam,  // first message parameter
  LPARAM lParam   // second message parameter
);

HWND CreateWindow(
  LPCTSTR lpClassName,  // registered class name
  LPCTSTR lpWindowName, // window name
  DWORD dwStyle,        // window style
  int x,                // horizontal position of window
  int y,                // vertical position of window
  int nWidth,           // window width
  int nHeight,          // window height
  HWND hWndParent,      // handle to parent or owner window
  HMENU hMenu,          // menu handle or child identifier
  HINSTANCE hInstance,  // handle to application instance
  LPVOID lpParam        // window-creation data
);

BOOL GetMessage(
  LPMSG lpMsg,         // message information
  HWND hWnd,           // handle to window
  UINT wMsgFilterMin,  // first message
  UINT wMsgFilterMax   // last message
);
7、实例
// derek.cpp : Defines the entry point for the application.
//

#include "stdafx.h"

LRESULT CALLBACK WindowProc(
  HWND hwnd,      // handle to window
  UINT uMsg,      // message identifier
  WPARAM wParam,  // first message parameter
  LPARAM lParam   // second message parameter
);

int APIENTRY WinMain(HINSTANCE hInstance,
                     HINSTANCE hPrevInstance,
                     LPSTR     lpCmdLine,
                     int       nCmdShow)
{
    //1.定义窗口的样子
	char szOutBuff[0x80];
	TCHAR className[] = TEXT("My first window");
	WNDCLASS wndclass = {0};
    //wndclass:主要是下面4个参数
	wndclass.hbrBackground = (HBRUSH)COLOR_BACKGROUND;
	wndclass.lpfnWndProc = WindowProc;
	wndclass.lpszClassName = className;
	wndclass.hInstance = hInstance;

	RegisterClass(&wndclass);   //注册窗口

    //2.创建窗口
	HWND hwnd = CreateWindow(
		className,
		TEXT("我的第一个窗口"),
		WS_OVERLAPPEDWINDOW,
		10,
		10,
		600,
		300,
		NULL,
		NULL,
		hInstance,
		NULL
		);
	//如果窗口没有创建成功,打印错误信息
	if(hwnd == NULL)
	{
		sprintf(szOutBuff,"Error: %d\n",GetLastError());
		OutputDebugString(szOutBuff);
		return 0;
	}
	//显示窗口
	ShowWindow(hwnd,SW_SHOW);

    //3.消息处理
	MSG msg;
	BOOL bRet;
	while( (bRet = GetMessage( &msg, NULL, 0, 0 )) != 0)
	{
		if (bRet == -1)
		{
			sprintf(szOutBuff,"Error: %d\n",GetLastError());
			OutputDebugString(szOutBuff);
		}
		else
		{
			//TranslateMessage(&msg);    //转换消息
			DispatchMessage(&msg);       //分发消息
		}
    };

	return 0;
};

LRESULT CALLBACK WindowProc(
  HWND hwnd,      // handle to window
  UINT uMsg,      // message identifier
  WPARAM wParam,  // first message parameter
  LPARAM lParam   // second message parameter
)
{
	return DefWindowProc(hwnd,uMsg,wParam,lParam);    //必须提供消息的处理方式,这里按默认方式
}
4.15.消息类型
1、消息产生与处理流程
2、消息类型
// derek.cpp : Defines the entry point for the application.
//

#include "stdafx.h"

LRESULT CALLBACK WindowProc(
  HWND hwnd,      // handle to window
  UINT uMsg,      // message identifier
  WPARAM wParam,  // first message parameter
  LPARAM lParam   // second message parameter
);

int APIENTRY WinMain(HINSTANCE hInstance,
                     HINSTANCE hPrevInstance,
                     LPSTR     lpCmdLine,
                     int       nCmdShow)
{
	char szOutBuff[0x80];
	TCHAR className[] = TEXT("My first window");
	WNDCLASS wndclass = {0};
	wndclass.hbrBackground = (HBRUSH)COLOR_BACKGROUND;
	wndclass.lpfnWndProc = WindowProc;
	wndclass.lpszClassName = className;
	wndclass.hInstance = hInstance;
	RegisterClass(&wndclass);

	HWND hwnd = CreateWindow(
		className,
		TEXT("我的第一个窗口"),
		WS_OVERLAPPEDWINDOW,
		10,
		10,
		600,
		300,
		NULL,
		NULL,
		hInstance,
		NULL
		);

	if(hwnd == NULL)
	{
		sprintf(szOutBuff,"Error: %d\n",GetLastError());
		OutputDebugString(szOutBuff);
		return 0;
	}

	ShowWindow(hwnd,SW_SHOW);

	MSG msg;
	BOOL bRet;
	while( (bRet = GetMessage( &msg, NULL, 0, 0 )) != 0)
	{
		if (bRet == -1)
		{
			sprintf(szOutBuff,"Error: %d\n",GetLastError());
			OutputDebugString(szOutBuff);
		}
		else
		{
			TranslateMessage(&msg);    //把键盘虚拟键码自动转换成对应字符
			DispatchMessage(&msg);
		}
    };

	return 0;
};

LRESULT CALLBACK WindowProc(
  HWND hwnd,      // handle to window
  UINT uMsg,      // message identifier
  WPARAM wParam,  // first message parameter
  LPARAM lParam   // second message parameter
)
{
	//WM_CREATE
	switch(uMsg)
	{
	case WM_DESTROY:    //窗口销毁message
		{
			PostQuitMessage(0);
			return 0;
		}
	case WM_CHAR:      //键盘按键消息
		{
			char szOutBuff[0x80];
			sprintf(szOutBuff,"消息:%c\n",wParam);   //获取按了键盘哪个键
			OutputDebugString(szOutBuff);
			return 0;
		}

	}

	return DefWindowProc(hwnd,uMsg,wParam,lParam);
}
4.16.子窗口控件
<1> WINDOWS提供了几个预定义的窗口类以方便我们的使用,我们一-般就它们叫做子窗口控件,简称控件。
<2>控件会自己处理消息,并在自己状态发生改变时通知父窗口。
<3>预定义的控件有:
按钮、复选框、编辑框、静态字符串标签和滚动条等
实例
// derek.cpp : Defines the entry point for the application.
//

#include "stdafx.h"
#define IDC_EDIT_1 0X100        //子窗口身份标识
#define IDC_BUTTON_1 0X101
#define IDC_BUTTON_2 0X102

HINSTANCE g_hInstance;         //定义全局的g_hInstance,子窗口可以获取到父窗口的hInstance

LRESULT CALLBACK WindowProc(
  HWND hwnd,      // handle to window
  UINT uMsg,      // message identifier
  WPARAM wParam,  // first message parameter
  LPARAM lParam   // second message parameter
);

int APIENTRY WinMain(HINSTANCE hInstance,
                     HINSTANCE hPrevInstance,
                     LPSTR     lpCmdLine,
                     int       nCmdShow)
{
	char szOutBuff[0x80];
	g_hInstance = hInstance;   //把父窗口的hInstance赋值给全局的g_hInstance,
	TCHAR className[] = TEXT("My first window");
	WNDCLASS wndclass = {0};
	wndclass.hbrBackground = (HBRUSH)COLOR_BACKGROUND;
	wndclass.lpfnWndProc = WindowProc;
	wndclass.lpszClassName = className;
	wndclass.hInstance = hInstance;
	RegisterClass(&wndclass);

	HWND hwnd = CreateWindow(
		className,
		TEXT("我的第一个窗口"),
		WS_OVERLAPPEDWINDOW,
		10,
		10,
		600,
		300,
		NULL,
		NULL,
		hInstance,
		NULL
		);

	if(hwnd == NULL)
	{
		sprintf(szOutBuff,"Error: %d\n",GetLastError());
		OutputDebugString(szOutBuff);
		return 0;
	}

	ShowWindow(hwnd,SW_SHOW);

	MSG msg;
	BOOL bRet;
	while( (bRet = GetMessage( &msg, NULL, 0, 0 )) != 0)
	{
		if (bRet == -1)
		{
			sprintf(szOutBuff,"Error: %d\n",GetLastError());
			OutputDebugString(szOutBuff);
		}
		else
		{
			TranslateMessage(&msg);
			DispatchMessage(&msg);
		}
    };

	return 0;
};

LRESULT CALLBACK WindowProc(
  HWND hwnd,      // handle to window
  UINT uMsg,      // message identifier
  WPARAM wParam,  // first message parameter
  LPARAM lParam   // second message parameter
)
{
	char szOutBuff[0x80];
	//sprintf(szOutBuff,"消息: %x\n",uMsg);   //查看消息类型
	//OutputDebugString(szOutBuff);
	//WM_CREATE
	switch(uMsg)
	{
	case WM_DESTROY:
		{
			PostQuitMessage(0);
			break;
		}

	case WM_COMMAND:
		{
			switch(LOWORD(wParam))          //低16位
			{
			case IDC_BUTTON_1:
				{
					SetDlgItemText(hwnd,IDC_EDIT_1,TEXT("测试"));
					break;
				}

			case IDC_BUTTON_2:
				{
					GetDlgItemText(hwnd,IDC_EDIT_1,szOutBuff,100);
					MessageBox(hwnd,szOutBuff,szOutBuff,MB_OK);
					break;
				}
			}

			break;
		}

	case WM_CREATE:
		{
			CreateWindow(
				"EDIT",
				"",
				WS_CHILD|WS_VISIBLE|WS_VSCROLL|ES_MULTILINE,    //子窗口通用style和特殊style
				0,
				0,
				500,
				300,
				hwnd,                    //父窗口
				(HMENU)IDC_EDIT_1,       //子窗口身份标识
				g_hInstance,
				NULL
				);
			CreateWindow(
				"BUTTON",
				"设置",
				WS_CHILD|WS_VISIBLE,
				520,
				180,
				60,
				30,
				hwnd,
				(HMENU)IDC_BUTTON_1,
				g_hInstance,
				NULL
				);
			CreateWindow(
				"BUTTON",
				"获取",
				WS_CHILD|WS_VISIBLE,
				520,
				220,
				60,
				30,
				hwnd,
				(HMENU)IDC_BUTTON_2,
				g_hInstance,
				NULL
				);
			break;
		}
	}
	return DefWindowProc(hwnd,uMsg,wParam,lParam);
};
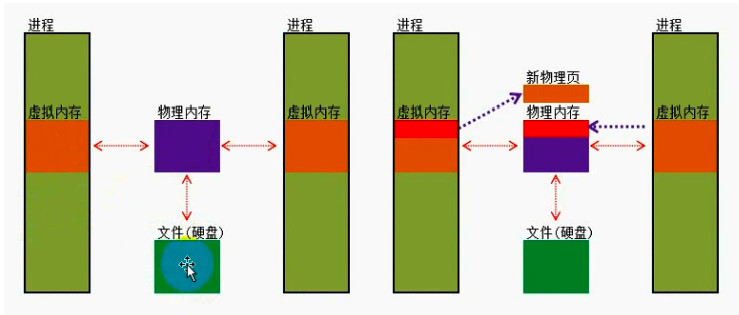
4.17.虚拟内存与物理内存
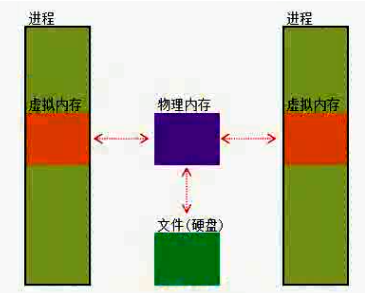
1、虚拟内存与物理内存
2、虚拟内存地址划分
3、物理内存
可供使用的物理内存:
MmNumberOfPhysicalPages* 4=物理内存
虛拟内存(硬盘)
能够识别的物理内存:
32位系统最多可以识别物理内存为64G,但由于操作系统的限制
比如XP,只能识别4G(Windows 2003服务器版本可以识别4G以上)
4.18.私有内存的申请释放
1、申请内存的两种方式
<1>通过VirtualAlloc/NirtualAllocEx申请的: Private Memory
<2>通过CreateFileMapping映射的: Mapped Memory
2.申请内存 VirtualAlloc
LPVOID VirtualAlloc(
  LPVOID lpAddress,        // region to reserve or commit
  SIZE_T dwSize,           // size of region
  DWORD flAllocationType,  // type of allocation
  DWORD flProtect          // type of access protection
);
#include<stdio.h>
#include<stdlib.h>
#include<windows.h>

int main(int argc,char* argv[])
{
	LPVOID p = VirtualAlloc(
		NULL,       		//要分配的内存区域的地址:通常都为NULL
		0x1000*2,   		//分配的大小:两页
		MEM_COMMIT, 		//分级的类型:MEM_COMMIT或者MEM_RESERVE
		PAGE_READWRITE      //该内存的初保护属性:PAGE_EXECUTE_READWRITE, PAGE_READWRITE等
	);

	system("pause");
	return 0;
}
3、释放内存
#include<stdio.h>
#include<stdlib.h>
#include<windows.h>

int main(int argc,char* argv[])
{
	LPVOID p = VirtualAlloc(
		NULL,
		0x1000*2,
		MEM_COMMIT,
		PAGE_READWRITE
	);

	VirtualFree(p,0,MEM_RELEASE);    //释放内存

	system("pause");
	return 0;
}
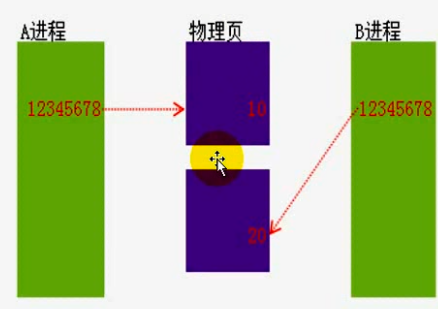
4.19.共享内存的申请释放
共享内存
HANDLE CreateFileMapping(
  HANDLE hFile,                       // handle to file
  LPSECURITY_ATTRIBUTES lpAttributes, // security
  DWORD flProtect,                    // protection
  DWORD dwMaximumSizeHigh,            // high-order DWORD of size
  DWORD dwMaximumSizeLow,             // low-order DWORD of size
  LPCTSTR lpName                      // object name
);

LPVOID MapViewOfFile(
  HANDLE hFileMappingObject,   // handle to file-mapping object
  DWORD dwDesiredAccess,       // access mode
  DWORD dwFileOffsetHigh,      // high-order DWORD of offset
  DWORD dwFileOffsetLow,       // low-order DWORD of offset
  SIZE_T dwNumberOfBytesToMap  // number of bytes to map
);
#include<stdio.h>
#include<stdlib.h>
#include<windows.h>

#define MapFileName "共享内存"
#define BUF_SIZE 0X1000

HANDLE g_hMapFile;
LPTSTR g_lpBuff;

int main(int argc,char* argv[])
{
    //内核对象,物理页
	g_hMapFile = CreateFileMapping(INVALID_HANDLE_VALUE,NULL,PAGE_READWRITE,0,BUF_SIZE,MapFileName);
	//将物理页与线性地址进行映射
	g_lpBuff = (LPTSTR)MapViewOfFile(g_hMapFile,FILE_MAP_WRITE,0,0,BUF_SIZE);
	//关闭映射
	UnmapViewOfFile(g_lpBuff);
    //关闭句柄
	CloseHandle(g_hMapFile);

	getchar();
	system("pause");
	return 0;
}
4.20.文件系统
1、文件系统
文件系统是操作系统用于管理磁盘上文件的方法和数据结构;简单点说就是
在磁盘上如何组织文件的方法。

2、卷相关API
<1>获取卷
GetLogicalDrives()
<2>获取一个所卷的盘符的字符串
GetLogicalDriveStrings()
<3>获取卷的类型
GetLogicalDriveType()
<4>获取卷信息
GetVolumeInformation()
3、目录相关API
<1>创建目录
CreateDirectory();
<2>删除目录
RemoveDirectory();
<3>修改目录名称
MoveFile();
<4>获取程序当前目录
GetCurrentDirectory( );
<5>设置程序当前目录
SetCurrentDirectory();
4、文件相关API
<1>创建文件
CreateFile();
<2>关闭文件的
CloseHandle();
<3>获取文件长度
GetFileSize();
<4>获取文件的属性和信息
GetFileAttributes()/GetFileAttributesEx();
<5>读/写/拷 贝/删除文件
ReadFile()witeFile()/CopyFile()/DeleteFile();
<6>查找文件
FindFirstFile()/FindNextFile();
4.21.内存映射文件
1、内存映射文件
#include<stdio.h>
#include<stdlib.h>
#include<windows.h>

#define MAPPINGNAME "共享内存"

DWORD MappingFile(LPSTR lpcFile)
{
	HANDLE hFile;
	HANDLE hMapFile;
	DWORD dwFileMapSize;
	LPVOID lpAddr;

    //1.得到文件句柄
	hFile = CreateFile(
		lpcFile,
		GENERIC_READ|GENERIC_WRITE,
		0,
		NULL,
		OPEN_EXISTING,
		FILE_ATTRIBUTE_NORMAL,
		NULL
		);
	if(hFile == INVALID_HANDLE_VALUE)
	{
		printf("CreateFIle 失败:%d \n",GetLastError());
		return 0;
	}

    //2.创建FileMapping对象
	hMapFile = CreateFileMapping(
		hFile,
		NULL,
		PAGE_READWRITE,
		0,
		0,
		MAPPINGNAME
		);

	if(hMapFile == NULL)
	{
		printf("CreateFileMapping 失败:%d \n",GetLastError());
		CloseHandle(hFile);
		return 0;
	}

    //3.映射到虚拟内存
	lpAddr = MapViewOfFile(
		hMapFile,
		FILE_MAP_COPY,
		0,
		0,
		0
		);

	if(lpAddr == NULL)
	{
		printf("MapViewOfFile 失败:%d \n",GetLastError());
		CloseHandle(hMapFile);
		CloseHandle(hFile);
		return 0;
	}

    //4.读取文件
	DWORD dwTest1 = *(PDWORD)lpAddr;
	printf("%x %x \n",dwTest1);

    //5.写入文件
	//*(PDWORD)lpAddr = 0x42424242;
    //强制更新缓存
	//FlushViewOfFile((PDWORD)lpAddr,4)

    //6.关闭资源
	UnmapViewOfFile(lpAddr);
	CloseHandle(hMapFile);
	CloseHandle(hFile);

}

int main(int argc,char* argv[])
{

	MappingFile("C:\\Program Files\\Tools\\PE.exe");


	system("pause");
	return 0;
}
2、内存映射文件之共享
4.22.静态链接库
1、静态链接库的使用
<1>将生成的.h与.lib文件复制到项目根目录,然后在代码中引用:
include "xxxx.h"
pragma comment(lib, "XxXx.lib")
<2>将xxxx.H与xxxx.LIB文件复制到VC6安装目录,与库文件放在-一起
C:\Program FilesMicrosoft Visual Studio\VC98\Include(xxxx.h)
C:\Program FilesMicrosoft Visual StudiolVC98\ixbxxx.ib)
然后在工程>设置->连接->对象/库模块中添加xxx.lib
2、静态链接库的缺点
<1>使用静态链接生成的可执行文件体积较大
<2>包含相同的公共代码,造成浪费
4.23.动态链接库
1、什么是动态链接库?
动态链接库(Dynamic Link Library,缩写为DLL),是微软公司在微软Windows操作系统中,实现共享函数库概念的一种方式。
这些库函数的扩展名是”.dll"、".ocx" (包含ActiveX控制的库)。
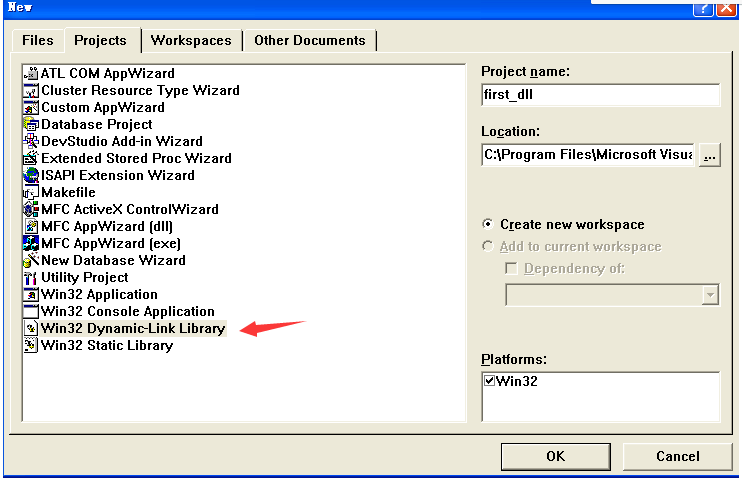
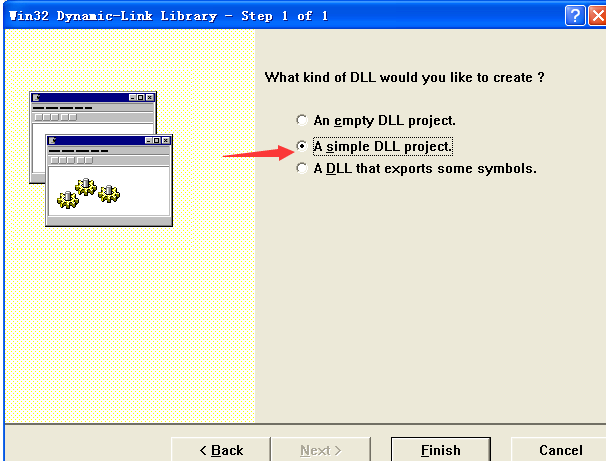
2、创建动态链接库
<1> extern "C" _declspec(dllexport) 调用约定 返回类型 函数名(参数列表);
<2>使用.def文件:
EXPORTS
函数名 @编号
函数名 @编号 NONAME
使用序号导出的好处:
名字是一段程序就精华的注释,通过名字可以直接猜测到函数的功能通过使用序号,可以达到隐藏的目的
3、dll的创建和使用
步骤1: :
//定义函数指针如:
typedef int (_stdcall *IpPlus)(int,int);
typedef int(_stdall *lpSub)(int,int);
步骤2:
//声明函数指针变量如:
IpPlus myPlus;
lpSub mySub.
步骤3:
//动态加载dll到内存中如:
HINSTANCE hModule = LoadLibrary("DIIDemo.dl);
步骤4:
//获取函数地址如:
myPlus = (lpPlus)GetProcAddress(hModule, "Plus");
mySub= (IpSub)GetProcAddress(hModue. (char*)0x10),
步骤5:
//调用函数如:
int a = myPlus(10,2);
int b = mySub(10,2);
步骤6:
//释放动态链接库如:
FreeLibrary(hModule);
创建mydll文件
mydll.h
// mydll.h: interface for the mydll class.
//
//////////////////////////////////////////////////////////////////////

#if !defined(AFX_MYDLL_H__2BDF500F_EC63_4907_A7B0_A7BA5F2EACC0__INCLUDED_)
#define AFX_MYDLL_H__2BDF500F_EC63_4907_A7B0_A7BA5F2EACC0__INCLUDED_

#if _MSC_VER > 1000
#pragma once
#endif // _MSC_VER > 1000

//extern "C" _declspec(dllexport) _stdcall int Plus(int x,int y);

//extern "C" _declspec(dllexport) _stdcall int Sub(int x,int y);

_stdcall int Plus(int x,int y);

_stdcall int Sub(int x,int y);

#endif // !defined(AFX_MYDLL_H__2BDF500F_EC63_4907_A7B0_A7BA5F2EACC0__INCLUDED_)
mydll.cpp
// mydll.h: interface for the mydll class.
//
//////////////////////////////////////////////////////////////////////

#if !defined(AFX_MYDLL_H__2BDF500F_EC63_4907_A7B0_A7BA5F2EACC0__INCLUDED_)
#define AFX_MYDLL_H__2BDF500F_EC63_4907_A7B0_A7BA5F2EACC0__INCLUDED_

#if _MSC_VER > 1000
#pragma once
#endif // _MSC_VER > 1000

//extern "C" _declspec(dllexport) _stdcall int Plus(int x,int y);

//extern "C" _declspec(dllexport) _stdcall int Sub(int x,int y);

_stdcall int Plus(int x,int y);

_stdcall int Sub(int x,int y);

#endif // !defined(AFX_MYDLL_H__2BDF500F_EC63_4907_A7B0_A7BA5F2EACC0__INCLUDED_)
创建first_dll.def文件
EXPORT

Plus @12
Sub @13 NONAME
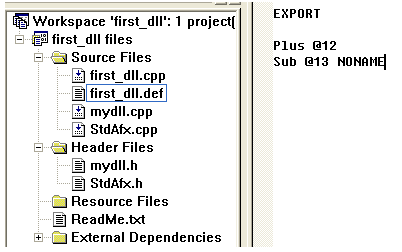
然后编译生产first_dll.dll.
其它程序使用dll,把first_dll.dll复制到程序目录下面
#include<stdio.h>
#include<stdlib.h>
#include<windows.h>

typedef int (_stdcall *lpPlus)(int,int);
typedef int (_stdcall *lpSub)(int,int);

lpPlus myPlus;
lpSub mySub;

int main(int argc,char* argv[])
{
	HINSTANCE hModule = LoadLibrary("first_dll.dll");

	myPlus = (lpPlus)GetProcAddress(hModule,"Plus");
	mySub = (lpSub)GetProcAddress(hModule,(char*)0xD);

	int a = myPlus(1,2);
	int b = mySub(5,3);

	FreeLibrary(hModule);

	system("pause");
	return 0;
}
4.24.隐式链接
1、隐式链接
步骤1:将*.dll *.lib 放到工程目录下面
步骤2:将#pragma comment(lib,"DLL名.ib)添加到调用文件中
步骤3:加入函数的声明
__declspec(dllimport) __stdcall int Plus (int x,int y);
__declspec(dllimport) __stdcall int Sub (int x,int y);
注意:
extern "C" _declspec(dllexport)调用约定 返回类型 函数名(参数列表);
extern "C" _declspec(llimport) 调用约定 返回类型 函数名(参数列表);
#include<stdio.h>
#include<stdlib.h>
#include<windows.h>

#pragma comment(lib,"first_dll.lib")

__declspec(dllimport) __stdcall int Plus(int x,int y);
__declspec(dllimport) __stdcall int Sub(int x,int y);


int main(int argc,char* argv[])
{
	int a = Plus(1,2);
	int b = Sub(4,1);

	system("pause");
	return 0;
}
2、dll的优点
4.25.远程线程
#include<stdio.h>
#include<stdlib.h>
#include<windows.h>


void fun()
{
	for(int i=1;i<10;i++)
	{
		Sleep(1000);
		printf("%d\n",i);
	}
}

DWORD WINAPI ThreadProc(LPVOID lpParameter)
{
	fun();
	return 0;
}

int main(int argc,char* argv[])
{
	HANDLE hThrad = CreateThread(NULL,0,ThreadProc,NULL,0,NULL);
	CloseHandle(hThrad);

	getchar();

	return 0;

}
远程线程
#include<stdio.h>
#include<stdlib.h>
#include<windows.h>

BOOL MyCreateRemoteThread(DWORD dwProcessID,DWORD dwProcAddr)
{
	HANDLE hProcess;
	HANDLE hThread;
	DWORD dwThreadID;
	hProcess = 0;
	dwThreadID = 0;
	//获取进程句柄
	hProcess = OpenProcess(PROCESS_ALL_ACCESS,FALSE,dwProcessID);
	if(hProcess == NULL)
	{
		OutputDebugString("OpenProcess Error \n");
		return FALSE;
	}
	//创建远程线程
	hThread = CreateRemoteThread(hProcess,NULL,0,(LPTHREAD_START_ROUTINE)dwProcAddr,NULL,0,&dwThreadID);
	if(hThread == NULL)
	{
		OutputDebugString("CreateRemoteThread Error \n");
		CloseHandle(hProcess);
		return FALSE;
	}

	CloseHandle(hThread);
	CloseHandle(hProcess);

	return true;
}


int main(int argc,char* argv[])
{
	MyCreateRemoteThread(940,0x4010C0);  //参数1:远程进程ID;参数2:远程线程函数地址

	return 0;

}
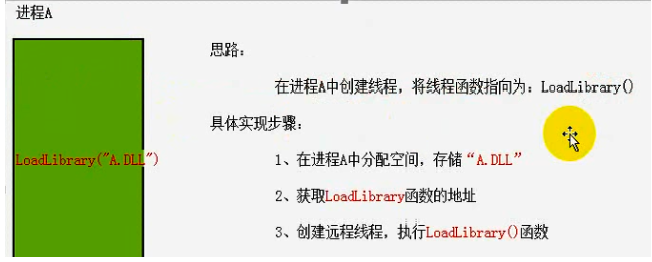
4.26.远程线程注入
1、什么是注入?
所谓注入就是在第三方进程不知道或者不允许的情况下将模块或者代码写入对方进程空间,并设法执行的技术。
在安全领域,“注入”是非常重要的一一种技术手段,注入与反注入也一直处于不断变化的,而且也愈来愈激烈的对抗当中。
己知的注入方式:
远程线程注入、APC注入、消息钩子注入、注册表注入、导入表注入、输入法注入等等。
2、远程注入的流程
3.创建dll
MyDll.h
// MyDll.h: interface for the MyDll class.
//
//////////////////////////////////////////////////////////////////////

#if !defined(AFX_MYDLL_H__91269728_7DE5_44BC_8EC0_9844FD01E838__INCLUDED_)
#define AFX_MYDLL_H__91269728_7DE5_44BC_8EC0_9844FD01E838__INCLUDED_

#if _MSC_VER > 1000
#pragma once
#endif // _MSC_VER > 1000

int Plus(int x,int y);

int Sub(int x,int y);

#endif // !defined(AFX_MYDLL_H__91269728_7DE5_44BC_8EC0_9844FD01E838__INCLUDED_)
MyDll.cpp
// MyDll.cpp: implementation of the MyDll class.
//
//////////////////////////////////////////////////////////////////////

#include "stdafx.h"
#include "MyDll.h"

//////////////////////////////////////////////////////////////////////
// Construction/Destruction
//////////////////////////////////////////////////////////////////////

int Plus(int x,int y)
{
	return x+y;
}

int Sub(int x,int y)
{
	return x-y;
}
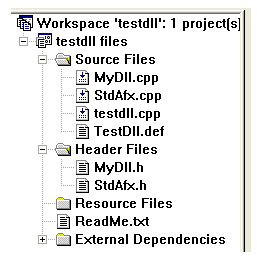
TestDll.def
EXPORTS

Plus	@1
Sub		@2
testdll.cpp
// testdll.cpp : Defines the entry point for the DLL application.
//
#include "stdafx.h"
DWORD WINAPI ThreadProc(LPVOID lpParameter)
{
for(;;)
{
Sleep(1000);
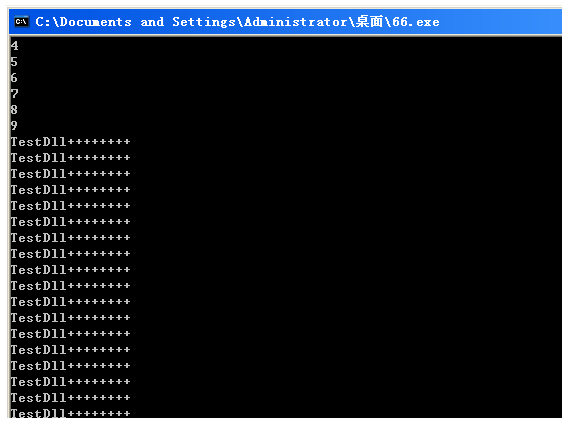
printf("TestDll++++++++\n");
}
return 0;
}
BOOL APIENTRY DllMain( HANDLE hModule,
DWORD ul_reason_for_call,
LPVOID lpReserved
)
{
switch(ul_reason_for_call)
{
case DLL_PROCESS_ATTACH:
{
CreateThread(NULL,0,(LPTHREAD_START_ROUTINE)ThreadProc,NULL,0,NULL);
break;
}
case DLL_THREAD_ATTACH:
break;
case DLL_THREAD_DETACH:
break;
case DLL_PROCESS_DETACH:
break;
}
return TRUE;
}
生产dll,把testdll.dll放到桌面test文件夹下面
4、远程注入dll
#include<stdio.h>
#include<stdlib.h>
#include<windows.h>

BOOL LoadDll(DWORD dwProcessID,char *szDllPathName)
{
	BOOL bRet;
	HANDLE hProcess;
	HANDLE hThread;
	DWORD dwLength;
	DWORD dwLoadAddr;
	LPVOID lpAllocAddr;
	DWORD dwThreadID;
	HMODULE hModule;

	bRet = 0;
	hProcess = 0;
	dwLoadAddr = 0;
	dwThreadID = 0;

    //1.获取进程句柄
	hProcess = OpenProcess(PROCESS_ALL_ACCESS,FALSE,dwProcessID);
	if(hProcess == NULL)
	{
		OutputDebugString("OpenProcess Error \n");
		return FALSE;
	}
	//2.计算DLL路径名字长度,并且要加上0结尾的长度
	dwLength = strlen(szDllPathName)+1;
	//3.在目标进程分配内存
	lpAllocAddr = VirtualAllocEx(hProcess,NULL,dwLength,MEM_COMMIT,PAGE_READWRITE);

	if(lpAllocAddr == NULL)
	{
		OutputDebugString("VirtualAllocEX Error \n");
		CloseHandle(hProcess);
		return FALSE;
	}
	//4.拷贝DLL路径名字到目标进程的内存
	bRet = WriteProcessMemory(hProcess,lpAllocAddr,szDllPathName,dwLength,NULL);
	if(!bRet)
	{
		OutputDebugString("WriteProcessMemory Error \n");
		CloseHandle(hProcess);
		return FALSE;
	}
	//5.获取模块地址
	hModule = GetModuleHandle("Kernel32.dll");
	if(!hModule)
	{
		OutputDebugString("GetModuleHandle Error \n");
		CloseHandle(hProcess);
		return FALSE;
	}
	//6.获取LoadLibraryA函数地址
	dwLoadAddr = (DWORD)GetProcAddress(hModule,"LoadLibraryA");
	if(!dwLoadAddr)
	{
		OutputDebugString("GetProcAddress Error \n");
		CloseHandle(hProcess);
		CloseHandle(hModule);
		return FALSE;
	}
	//7.创建远程线程,加载DLL
	hThread = CreateRemoteThread(hProcess,NULL,0,(LPTHREAD_START_ROUTINE)dwLoadAddr,lpAllocAddr,0,NULL);
	if(!hThread)
	{
		OutputDebugString("CreateRemoteThread Error \n");
		CloseHandle(hProcess);
		return FALSE;
	}
	//8.关闭进程句柄
	CloseHandle(hProcess);

	return true;
}

int main(int argc,char* argv[])
{
    //参数:进程ID和注入的dll路径
	LoadDll(208,"C:\\Documents and Settings\\Administrator\\桌面\\test\\testdll.dll");

	return 0;

}
4.27.模块隐藏
1、模块隐藏之断链
<1> TEB(Thread Environment Block ),它记录的相关线程的信息,每一个线程
都有自己的TEB,FS:[0]即是 当前线程的TEB。
mov eax,fs:[0]
<2> PEB(Process Environment Block,进程环境块)存放进程信息,每个进程都;
有自己的PEB信息,TEB偏移0x30即当前进程的PEB。
mov eax,fs:[0x30]
mov PEB, eax
<3>TEB与PEB都在用户空间
2、最好的隐藏
无模块注入,也就是代码注入
posted on 2021-04-11 21:29 zhang_derek 阅读(691) 评论(0) 收藏 举报

 浙公网安备 33010602011771号