SpringBoot 整合篇 笔记--Spring Boot与任务/安全
Spring Boot与任务
异步任务
在Java应用中,绝大多数情况下都是通过同步的方式来实现交互处理的;但是在处理与第三方系统交互的时候,容易造成响应迟缓的情况,之前大部分都是使用
多线程来完成此类任务,其实,在Spring 3.x之后,就已经内置了@Async来完美解决这个问题。
两个注解:
@EnableAysnc、@Aysnc


package com.example.testtask.service;

import org.springframework.scheduling.annotation.Async;
import org.springframework.stereotype.Service;

@Service
public class HelloService {
    @Async
    public void hello(){
        try {
            Thread.sleep(3000);
        } catch (InterruptedException e) {
            e.printStackTrace();
        }
        System.out.println("数据处理...");
    }
}
package com.example.testtask.controll;

import com.example.testtask.service.HelloService;
import org.springframework.beans.factory.annotation.Autowired;
import org.springframework.web.bind.annotation.GetMapping;
import org.springframework.web.bind.annotation.RestController;

@RestController
public class HelloControll {
    @Autowired
    HelloService helloService;
    @GetMapping("/hello")
    public String hello(){
        helloService.hello();
        return "success";
    }
}
package com.example.testtask;

import org.springframework.boot.SpringApplication;
import org.springframework.boot.autoconfigure.SpringBootApplication;
import org.springframework.scheduling.annotation.EnableAsync;

@EnableAsync //开启异步注解
@SpringBootApplication
public class TestTaskApplication {

    public static void main(String[] args) {
        SpringApplication.run(TestTaskApplication.class, args);
    }

}
定时任务
项目开发中经常需要执行一些定时任务,比如需要在每天凌晨时候,分析一次前一天的日志信息。
Spring为我们提供了异步执行任务调度的方式,提供TaskExecutor 、TaskScheduler 接口。
两个注解:@EnableScheduling、@Scheduled
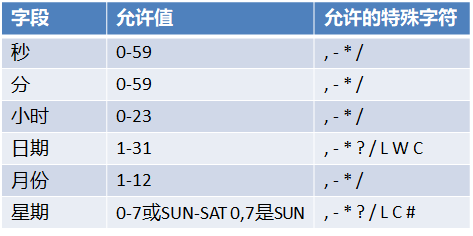
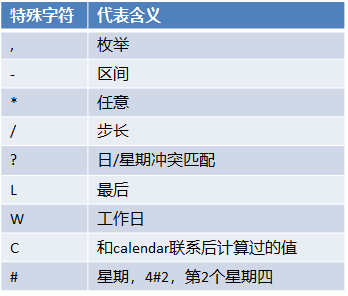
cron表达式:
代码实现:
1.启动类加入@EnableScheduling注解
2.@Scheduled(cron = "0/4 * * * * MON-SAT")
  /**
     * second(秒), minute(分), hour(时), day of month(日), month(月), day of week(周几).
     * 0 * * * * MON-FRI
     *  【0 0/5 14,18 * * ?】 每天14点整,和18点整,每隔5分钟执行一次
     *  【0 15 10 ? * 1-6】 每个月的周一至周六10:15分执行一次
     *  【0 0 2 ? * 6L】每个月的最后一个周六凌晨2点执行一次
     *  【0 0 2 LW * ?】每个月的最后一个工作日凌晨2点执行一次
     *  【0 0 2-4 ? * 1#1】每个月的第一个周一凌晨2点到4点期间,每个整点都执行一次;
     */
   // @Scheduled(cron = "0 * * * * MON-SAT")
    //@Scheduled(cron = "0,1,2,3,4 * * * * MON-SAT")
   // @Scheduled(cron = "0-4 * * * * MON-SAT")
    @Scheduled(cron = "0/4 * * * * MON-SAT")  //每4秒执行一次
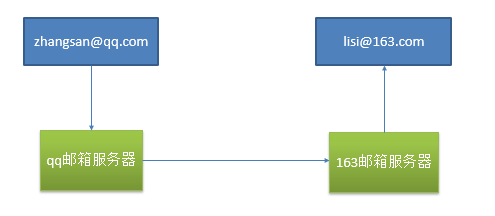
邮件任务
1.properties
spring.mail.password=dllhnjtiokipgeba
spring.mail.username=1464178558@qq.com
spring.mail.host=smtp.qq.com
spring.mail.properties.stmp.ssl.enable=true
2.原理
邮件发送需要引入spring-boot-starter-mail Spring Boot 自动配置MailSenderAutoConfiguration
定义MailProperties内容,配置在application.yml中 自动装配JavaMailSender
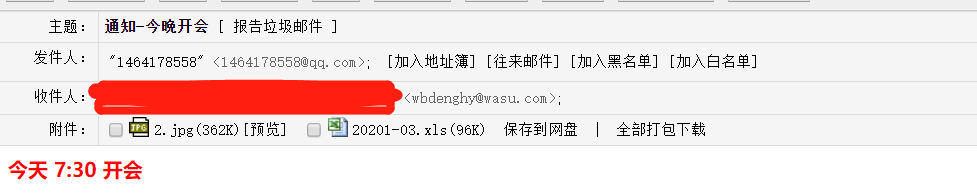
3.测试邮件发送
1.映入相关的启动器依赖:
org.springframework.boot

2.测试类
package com.example.testtask;

import org.junit.Test;
import org.junit.runner.RunWith;
import org.springframework.beans.factory.annotation.Autowired;
import org.springframework.boot.test.context.SpringBootTest;
import org.springframework.mail.SimpleMailMessage;
import org.springframework.mail.javamail.JavaMailSender;
import org.springframework.mail.javamail.JavaMailSenderImpl;
import org.springframework.mail.javamail.MimeMessageHelper;
import org.springframework.test.context.junit4.SpringRunner;

import javax.mail.internet.MimeMessage;
import java.io.File;

@RunWith(SpringRunner.class)
@SpringBootTest
public class TestTaskApplicationTests {
    @Autowired
    JavaMailSender javaMailSender;

    @Autowired
    JavaMailSenderImpl mailSender;
    @Test
    public void contextLoads() {
        SimpleMailMessage simpleMailMessage = new SimpleMailMessage();
        simpleMailMessage.setSubject("今晚行动");
        simpleMailMessage.setText("hello world");
        simpleMailMessage.setTo("wbdenghy@wasu.com");
        simpleMailMessage.setFrom("1464178558@qq.com");
        javaMailSender.send(simpleMailMessage);
    }
    @Test
    public void test02() throws  Exception{
        //1、创建一个复杂的消息邮件
        MimeMessage mimeMessage = mailSender.createMimeMessage();
        MimeMessageHelper helper = new MimeMessageHelper(mimeMessage, true);

        //邮件设置
        helper.setSubject("通知-今晚开会");
        helper.setText("<b style='color:red'>今天 7:30 开会</b>",true);

        helper.setTo("wbdenghy@wasu.com");
        helper.setFrom("1464178558@qq.com");

        //上传文件
        helper.addAttachment("20201-03.xls",new File("C:\\Users\\Administrator.SC-202003311630\\Desktop\\其他\\20201-03.xls"));
        helper.addAttachment("2.jpg",new File("C:\\Users\\Administrator.SC-202003311630\\Desktop\\其他\\2.jpg"));

        mailSender.send(mimeMessage);

    }
}
3.结果

Spring Boot与安全
安全
Spring Security是针对Spring项目的安全框架,也是Spring Boot底层安全模块默认的技术选型。他可以实现强大的web安全控制。对于安全控制,我们仅
需引入spring-boot-starter-security模块,进行少量的配置,即可实现强大的安全管理。
几个类:
WebSecurityConfigurerAdapter:自定义Security策略
AuthenticationManagerBuilder:自定义认证策略
@EnableWebSecurity:开启WebSecurity模式
• 应用程序的两个主要区域是“认证”和“授权”(或者访问控制)。这两个主要区域是Spring Security 的两个目标。
• “认证”(Authentication),是建立一个他声明的主体的过程(一个“主体”一般是指用户,设备或一些可以在你的应用程序中执行动
作的其他系统)。
• “授权”(Authorization)指确定一个主体是否允许在你的应用程序执行一个动作的过程。为了抵达需要授权的店,主体的身份已经有认
证过程建立。
• 这个概念是通用的而不只在Spring Security中。
Web&安全
1. 登陆/注销
–HttpSecurity配置登陆、注销功能
2. Thymeleaf提供的SpringSecurity标签支持
– 需要引入thymeleaf-extras-springsecurity4
– sec:authentication=“name”获得当前用户的用户名
– sec:authorize=“hasRole(‘ADMIN’)”当前用户必须拥有ADMIN权限时才会显示标签内容
3. remember me
–表单添加remember-me的checkbox
–配置启用remember-me功能
4. CSRF(Cross-site request forgery)跨站请求伪造
–HttpSecurity启用csrf功能,会为表单添加_csrf的值,提交携带来预防CSRF;
1.代码实现
package com.example.testspringsecutity.controller;

import org.springframework.stereotype.Controller;
import org.springframework.web.bind.annotation.GetMapping;
import org.springframework.web.bind.annotation.PathVariable;

@Controller
public class KungfuController {
    private final String PREFIX = "pages/";
    /**
     * 欢迎页
     * @return
     */
    @GetMapping("/")
    public String index() {
        return "welcome";
    }

    /**
     * 登陆页
     * @return
     */
    @GetMapping("/userlogin")
    public String loginPage() {
        return PREFIX+"login";
    }


    /**
     * level1页面映射
     * @param path
     * @return
     */
    @GetMapping("/level1/{path}")
    public String level1(@PathVariable("path")String path) {
        return PREFIX+"level1/"+path;
    }

    /**
     * level2页面映射
     * @param path
     * @return
     */
    @GetMapping("/level2/{path}")
    public String level2(@PathVariable("path")String path) {
        return PREFIX+"level2/"+path;
    }

    /**
     * level3页面映射
     * @param path
     * @return
     */
    @GetMapping("/level3/{path}")
    public String level3(@PathVariable("path")String path) {
        return PREFIX+"level3/"+path;
    }


}
<?xml version="1.0" encoding="UTF-8"?>
<project xmlns="http://maven.apache.org/POM/4.0.0" xmlns:xsi="http://www.w3.org/2001/XMLSchema-instance"
         xsi:schemaLocation="http://maven.apache.org/POM/4.0.0 https://maven.apache.org/xsd/maven-4.0.0.xsd">
    <modelVersion>4.0.0</modelVersion>
    <parent>
        <groupId>org.springframework.boot</groupId>
        <artifactId>spring-boot-starter-parent</artifactId>
        <version>2.0.0.RELEASE</version>
        <relativePath/> <!-- lookup parent from repository -->
    </parent>
    <groupId>com.example</groupId>
    <artifactId>test-springsecutity</artifactId>
    <version>0.0.1-SNAPSHOT</version>
    <name>test-springsecutity</name>
    <description>Demo project for Spring Boot</description>

    <properties>
        <project.build.sourceEncoding>UTF-8</project.build.sourceEncoding>
        <project.reporting.outputEncoding>UTF-8</project.reporting.outputEncoding>
        <java.version>1.8</java.version>
     </properties>

    <dependencies>
        <dependency>
            <groupId>org.springframework.boot</groupId>
            <artifactId>spring-boot-starter-thymeleaf</artifactId>
        </dependency>
        <dependency>
            <groupId>org.springframework.boot</groupId>
            <artifactId>spring-boot-starter-web</artifactId>
        </dependency>
        <dependency>
            <groupId>org.springframework.boot</groupId>
            <artifactId>spring-boot-starter-security</artifactId>
        </dependency>
        <dependency>
            <groupId>org.thymeleaf.extras</groupId>
            <artifactId>thymeleaf-extras-springsecurity4</artifactId>
        </dependency>
        <dependency>
            <groupId>org.springframework.boot</groupId>
            <artifactId>spring-boot-starter-test</artifactId>
            <scope>test</scope>
            <exclusions>
                <exclusion>
                    <groupId>org.junit.vintage</groupId>
                    <artifactId>junit-vintage-engine</artifactId>
                </exclusion>
            </exclusions>
        </dependency>
    </dependencies>

    <build>
        <plugins>
            <plugin>
                <groupId>org.springframework.boot</groupId>
                <artifactId>spring-boot-maven-plugin</artifactId>
            </plugin>
        </plugins>
    </build>

</project>
package com.example.testspringsecutity;

import org.springframework.boot.SpringApplication;
import org.springframework.boot.autoconfigure.SpringBootApplication;
/**
 * 1、引入SpringSecurity;
 * 2、编写SpringSecurity的配置类;
 *         @EnableWebSecurity extends WebSecurityConfigurerAdapter
 * 3、控制请求的访问权限:
 *         configure(HttpSecurity http) {
 *              http.authorizeRequests().antMatchers("/").permitAll()
 *                  .antMatchers("/level1/**").hasRole("VIP1")
 *         }
 * 4、定义认证规则:
 *         configure(AuthenticationManagerBuilder auth){
 *              auth.inMemoryAuthentication()
 *                  .withUser("zhangsan").password("123456").roles("VIP1","VIP2")
 *         }
 * 5、开启自动配置的登陆功能:
 *         configure(HttpSecurity http){
 *              http.formLogin();
 *         }
 * 6、注销:http.logout();
 * 7、记住我:Remeberme();
 * **/
@SpringBootApplication
public class TestSpringsecutityApplication {

    public static void main(String[] args) {
        SpringApplication.run(TestSpringsecutityApplication.class, args);
    }

}
2.自定义配置请求规则 和 定义认证规则(版本问题及解决方案)
@EnableWebSecurity
public class MySecurityConfig extends WebSecurityConfigurerAdapter
 //定制请求的授权规则
    @Override
    protected void configure(HttpSecurity http) throws Exception {
        //super.configure(http);
        //定制请求的授权规则
        http.authorizeRequests().antMatchers("/").permitAll()
                .antMatchers("/level1/**").hasRole("VIP1")
                .antMatchers("/level2/**").hasRole("VIP2")
                .antMatchers("/level3/**").hasRole("VIP3");
    }
  //定义认证规则
    @Override
    protected void configure(AuthenticationManagerBuilder auth) throws Exception {
        //super.configure(auth);

            /**      Spring Security 无法登陆,报错:There is no PasswordEncoder mapped for the id “null”
             * Spring security 5.0中新增了多种加密方式,
             * 也改变了密码的格式。
             * 内存获取——inMemoryAuthentication
             * **/
            auth.inMemoryAuthentication().passwordEncoder(
                    new BCryptPasswordEncoder()
            ).withUser("user1").password(
                    new BCryptPasswordEncoder().encode("123456")
            ).roles("VIP1","VIP2")
            .and()
            .passwordEncoder(  new BCryptPasswordEncoder()
            ).withUser("user2").password(
                new BCryptPasswordEncoder().encode("123456")
            ).roles("VIP2","VIP3")
            ;


            /**
            * Spring security 5.0 以下版本
            * 内存获取——inMemoryAuthentication
            * **/
        auth.inMemoryAuthentication()
                .withUser("zhangsan").password("123456").roles("VIP1","VIP2")
                .and()
                .withUser("lisi").password("123456").roles("VIP2","VIP3")
                .and()
                .withUser("wangwu").password("123456").roles("VIP1","VIP3");

    }
不同权限 访问到页面内容不一样
3.配置Security默认登陆页 和 Security自定义登陆页
     //开启自动配置的登陆功能,效果,如果没有登陆,没有权限就会来到登陆页面
        /** Security 默认的登陆页**/
//        http.formLogin();
        /** Security 配置自定义的登陆页**/
        http.formLogin().usernameParameter("user").passwordParameter("pwd")
                .loginPage("/userlogin");
        //1、/login来到登陆页
        //2、重定向到/login?error表示登陆失败
        //3、更多详细规定
        //4、默认post形式的 /login代表处理登陆
        //5、一但定制loginPage;那么 loginPage的post请求就是登陆
4.配置Security默认记住我功能 和 Security自定义记住我功能
        //开启记住我功能
        /** Security 默认开启  记住我功能**/
//        http.rememberMe();
        /** Security 配置自定义 记住我功能**/
        http.rememberMe().rememberMeParameter("remeber");
        //登陆成功以后,将cookie发给浏览器保存,以后访问页面带上这个cookie,只要通过检查就可以免登录
        //点击注销会删除cookie
5.配置Security默认注销功能 和 Security自定义注销功能
  //开启自动配置的注销功能。
        /** Security 默认注销 返回登陆页**/
//       http.logout()
        /** Security 配置 注销成功以后来到首页**/
        http.logout().logoutSuccessUrl("/");//注销成功以后来到首页
        //1、访问 /logout 表示用户注销,清空session
        //2、注销成功会返回 /login?logout 页面;
6.前端代码
<!DOCTYPE html>
<html xmlns:th="http://www.thymeleaf.org"
      xmlns:sec="http://www.thymeleaf.org/thymeleaf-extras-springsecurity4">
<head>
<meta http-equiv="Content-Type" content="text/html; charset=UTF-8">
<title>Insert title here</title>
</head>
<body>
<h1 align="center">欢迎光临武林秘籍管理系统</h1>
<div sec:authorize="!isAuthenticated()">
    <h2 align="center">游客您好,如果想查看武林秘籍 <a th:href="@{/userlogin}">请登录</a></h2>
</div>
<div sec:authorize="isAuthenticated()">
    <h2><span sec:authentication="name"></span>您好,您的角色有:
        <span sec:authentication="principal.authorities"></span></h2>
    <form th:action="@{/logout}" method="post">
        <input type="submit" value="注销"/>
    </form>
</div>

<hr>
<div sec:authorize="hasRole('VIP1')">
    <h3>普通武功秘籍</h3>
    <ul>
        <li><a th:href="@{/level1/1}">罗汉拳</a></li>
        <li><a th:href="@{/level1/2}">武当长拳</a></li>
        <li><a th:href="@{/level1/3}">全真剑法</a></li>
    </ul>

</div>

<div sec:authorize="hasRole('VIP2')">
    <h3>高级武功秘籍</h3>
    <ul>
        <li><a th:href="@{/level2/1}">太极拳</a></li>
        <li><a th:href="@{/level2/2}">七伤拳</a></li>
        <li><a th:href="@{/level2/3}">梯云纵</a></li>
    </ul>

</div>

<div sec:authorize="hasRole('VIP3')">
    <h3>绝世武功秘籍</h3>
    <ul>
        <li><a th:href="@{/level3/1}">葵花宝典</a></li>
        <li><a th:href="@{/level3/2}">龟派气功</a></li>
        <li><a th:href="@{/level3/3}">独孤九剑</a></li>
    </ul>
</div>

</body>
</html>
<!DOCTYPE html>
<html xmlns:th="http://www.thymeleaf.org">
<head>
<meta charset="UTF-8">
<title>Insert title here</title>
</head>
<body>
    <h1 align="center">欢迎登陆武林秘籍管理系统</h1>
    <hr>
    <div align="center">
        <form th:action="@{/userlogin}" method="post">
            用户名:<input name="user"/><br>
            密码:<input name="pwd"><br/>
            <input type="checkbox" name="remeber"/>记住我<br/>
            <input type="submit" value="登陆">
        </form>
    </div>
</body>
</html>

 浙公网安备 33010602011771号