

第七节:高可用的分布式配置中心(Spring Cloud Config)
一、基本架构
读了方老师的文章:第七篇: 高可用的分布式配置中心(Spring Cloud Config)(Finchley版本),确实很有收获,特别是架构图可以一目了然。上一篇只是单纯的让某个配置中心从GIT上获取配置文件,然后有一个客户端Client使用从GIT上的配置文件。但是随着服务的增多,如果都使用同一个配置中心,万一此配置中心挂了,那么依赖此配置中心的所有微服务系统就全部崩溃了。所以,为了避免这种情况的出现,那么就部署多个配置中心,防止某个配置中心节点故障导致的整个系统的崩溃的情况。因此,需要把配置中心与微服务Client 都注册到 注册中心中统一管理。
通读方老师的这篇文章,可以知道的是,将配置中心与微服务Client都作为Eureka的Client。但是如何将多个ServiceClient通过负载均衡技术,负载到不同的配置中心中,方老师并没有提及。其实方老师提供的是一种搭建高可用的分布式配置中心的思路,还是很值得借鉴的。当然了,如此高深的技术,博主肯定也不会啦o(╥﹏╥)o
二、搭建注册中心
在上一节的代码上,增加一个注册中心模块。
右击项目根目录,New--Module--选择左侧的Maven,点击next--输入新模块的名字eureka-server
2.1 导入依赖
    <dependencies>
        <dependency>
            <groupId>org.springframework.cloud</groupId>
            <artifactId>spring-cloud-starter-netflix-eureka-server</artifactId>
        </dependency>
        <dependency>
            <groupId>org.springframework.boot</groupId>
            <artifactId>spring-boot-starter-web</artifactId>
        </dependency>
        <dependency>
            <groupId>org.springframework.cloud</groupId>
            <artifactId>spring-cloud-config-server</artifactId>
        </dependency>

    </dependencies>
2.2 编写application.yml
我喜欢把注册中心放到8761端口。
server:
  port: 8761

eureka:
  instance:
    hostname: localhost
  client:
    registerWithEureka: false
    fetchRegistry: false
    serviceUrl:
      defaultZone: http://${eureka.instance.hostname}:${server.port}/eureka/
2.3 编写启动类
准确的说,搭建一个注册中心,与以前的步骤没有任何区别。
package com.safesoft.register;

import org.springframework.boot.SpringApplication;
import org.springframework.boot.autoconfigure.SpringBootApplication;
import org.springframework.cloud.netflix.eureka.server.EnableEurekaServer;

/**
 * @author jay.zhou
 * @date 2019/1/27
 * @time 16:05
 */
@EnableEurekaServer
@SpringBootApplication
public class ApplicationServer {
    public static void main(String[] args) {
        SpringApplication.run(ApplicationServer.class, args);
    }
}
三、改造配置中心
从第一节中的分析知道,为了搭建高可用的分布式配置中心,那么就需要把配置中心加入注册中心中统一管理。
其实思路很简单,就是把配置中心也当成一个Eureka-Client。
所以,我们得改造配置中心Config-Server项目
2.1 导入依赖
为配置中心Config-Server增加Eureka-Client依赖。
    <dependencies>
        <dependency>
            <groupId>org.springframework.boot</groupId>
            <artifactId>spring-boot-starter-web</artifactId>
        </dependency>
        <dependency>
            <groupId>org.springframework.cloud</groupId>
            <artifactId>spring-cloud-config-server</artifactId>
        </dependency>
        <dependency>
            <groupId>org.springframework.cloud</groupId>
            <artifactId>spring-cloud-starter-netflix-eureka-client</artifactId>
        </dependency>
    </dependencies>
2.2 修改application.yml配置文件
与第六节相比,只是多了第二段的配置,找到配置中心的位置,并把自己注册进去。完整的配置文件如下
#项目部署的端口
server:
  port: 8001


#配置注册中心的位置,并把自己注册进去
eureka:
  client:
    serviceUrl:
      defaultZone: http://localhost:8761/eureka/

spring:
  #当前项目的名字
  application:
    name: spring-cloud-config-server

  #配置中心的相关配置
  cloud:
    config:
      server:
        git:
          # 配置git仓库的URL地址
          uri: https://github.com/hairdryre/Study_SpringCloud
          # git仓库地址下的文件夹,可以配置多个,用“,”分割。
          search-paths: config/chapter6
          #公共仓库可不用配置帐号密码
          username:
          password:
2.3 在启动类上增加注解
在启动类上增加@EnableEurekaClient注解
package com.safesoft.server;

import org.springframework.boot.SpringApplication;
import org.springframework.boot.autoconfigure.SpringBootApplication;
import org.springframework.cloud.config.server.EnableConfigServer;
import org.springframework.cloud.netflix.eureka.EnableEurekaClient;

/**
 * @author jay.zhou
 * @date 2019/1/27
 * @time 14:09
 */
@SpringBootApplication
@EnableConfigServer
@EnableEurekaClient
public class ApplicationServer {
    public static void main(String[] args) {
        SpringApplication.run(ApplicationServer.class, args);
    }
}
四、改造Client端
4.1 导入依赖
配置中心被加入到了注册中心中,同理,那么Client端也要被加入到注册中心中。
        <dependency>
            <groupId>org.springframework.cloud</groupId>
            <artifactId>spring-cloud-starter-netflix-eureka-client</artifactId>
        </dependency>
4.2 修改bootstrap.properties配置文件
新增下面三段配置
#服务注册地址
eureka.client.serviceUrl.defaultZone=http://localhost:8761/eureka/
#从配置中心读取文件
spring.cloud.config.discovery.enabled=true
#配置中心的serviceId
spring.cloud.config.discovery.serviceId=SPRING-CLOUD-CONFIG-SERVER
完整的配置文件如下
#对应{application}部分
spring.cloud.config.name=jay-config
#对应{profile}部分。如果想使用别的配置,修改这里成
#spring.cloud.config.profile=test 或者 spring.cloud.config.profile=pro
spring.cloud.config.profile=pro
#配置中心的具体地址,即Server的端口
spring.cloud.config.uri=http://localhost:8001/
#git分支
spring.cloud.config.label=master
#服务注册地址
eureka.client.serviceUrl.defaultZone=http://localhost:8761/eureka/
#从配置中心读取文件
spring.cloud.config.discovery.enabled=true
#配置中心的serviceId
spring.cloud.config.discovery.serviceId=SPRING-CLOUD-CONFIG-SERVER
4.3 修改启动类
在启动类上增加@EnableEurekaClient即可
package com.safesoft.client;

import org.springframework.boot.SpringApplication;
import org.springframework.boot.autoconfigure.SpringBootApplication;
import org.springframework.cloud.netflix.eureka.EnableEurekaClient;

/**
 * @author jay.zhou
 * @date 2019/1/27
 * @time 14:18
 */
@SpringBootApplication
@EnableEurekaClient
public class ApplicationClient {
    public static void main(String[] args) {
        SpringApplication.run(ApplicationClient.class, args);
    }
}
4.4 测试
我部署了两个配置中心,分别部署在8001端口与8003端口。再部署Client客户端到8002端口。
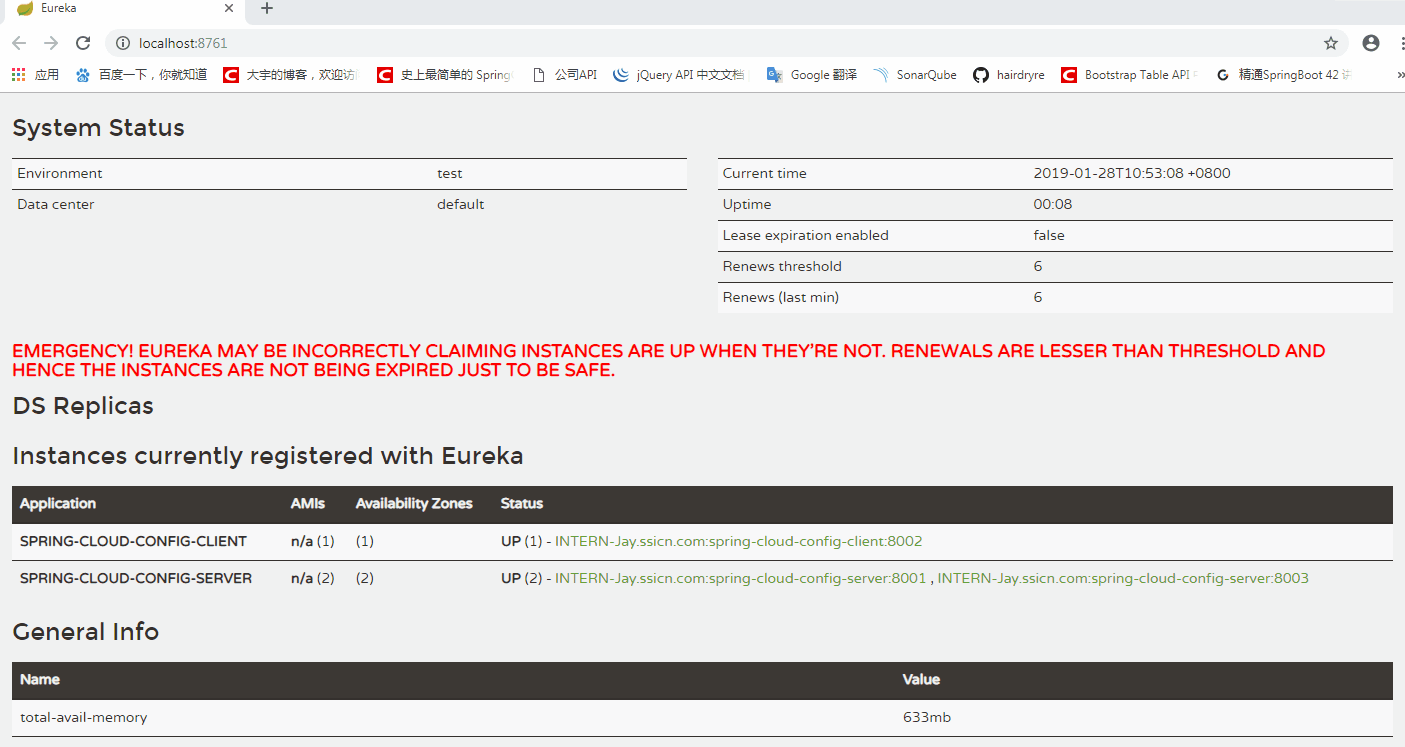
依次开启注册中心,配置中心,Client。访问http://localhost:8761/,查看注册中心中的服务器。我本机的效果如图。

在浏览器上尝试通过部署在8001端口的配置中心,读取GIT上的配置文件。
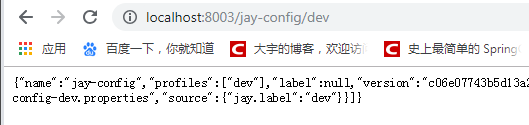
访问:http://localhost:8001/jay-config/dev效果如图所示。

同样,测试部署在8001端口的配置中心,看是否能够读取到配置文件。
访问:http://localhost:8003/jay-config/dev效果如图所示。
最后测试:先访问http://localhost:8002/hello,看是否能够获取到GIT上的配置。再随机挂掉一个配置中心,再尝试访问http://localhost:8002/hello,看看还是否能够获取到配置文件信息。
下面是我完整的测试流程GIF,刚开始有8001配置中心与8003配置中心。在8002端口的Client可以访问到数据。随机挂掉一个配置中心,再尝试在8002端口的Client获取GIt上的配置文件,仍然可以访问到。说明配置中心也可以集群部署。
点击下面的GIF动图可查看高清图片。
五、源码下载
https://github.com/hairdryre/Study_SpringCloud
参考文章:
史上最简单的SpringCloud教程 | 第七篇: 高可用的分布式配置中心(Spring Cloud Config)(Finchley版本)
springcloud(八):配置中心服务化和高可用 纯洁的微笑
----------------------------------------------------分割线-------------------------------------------------------
下一篇:第八节:消息总线
阅读更多

 浙公网安备 33010602011771号