知识整理一:idea搭建maven 的springmvc项目(将maven项目转变为web项目)
解释:
maven项目穿件springMVC项目:这是个百度都写烂了的项目笔记,哪里都有,这里写出来也只是用于自己回顾。
正文:
工具:IDEA
1、转换maven项目为web项目,如果已经是web项目,这一步省略
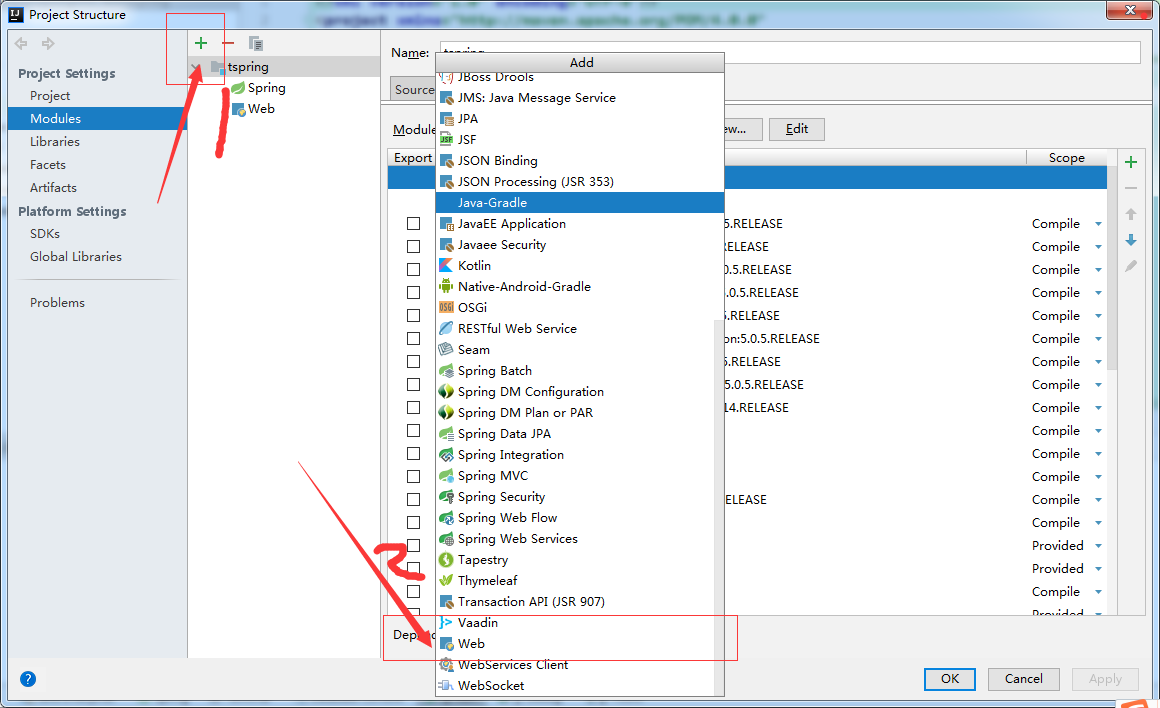
选择一个maven项目,找到下面的面板之后--》选择项目》点击 + 弹出右侧的Add面板,选择 》Web
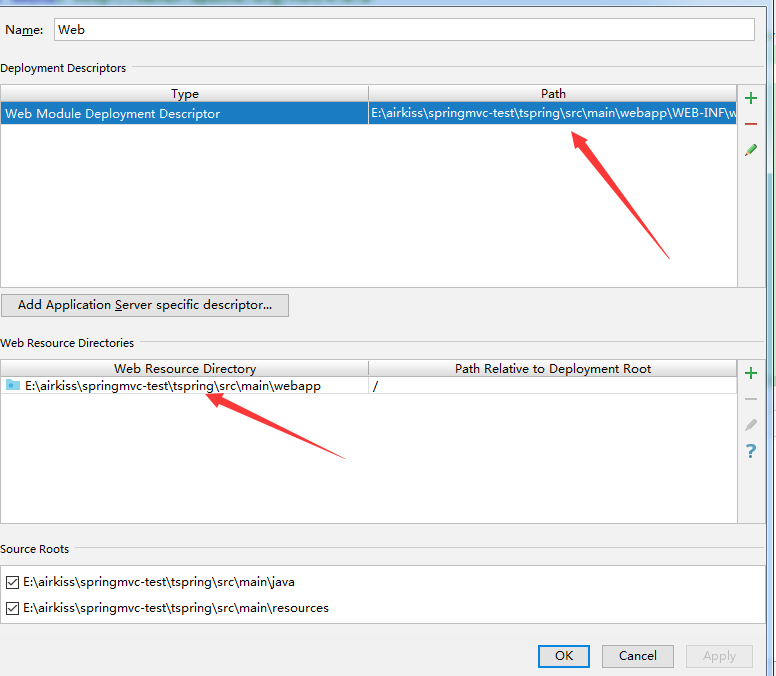
然后设置路径

设置好路径之后项目中就会自动创建一个web目录。
2、添加pom.xml中对应的web包
<?xml version="1.0" encoding="UTF-8"?>
<project xmlns="http://maven.apache.org/POM/4.0.0"
         xmlns:xsi="http://www.w3.org/2001/XMLSchema-instance"
         xsi:schemaLocation="http://maven.apache.org/POM/4.0.0 http://maven.apache.org/xsd/maven-4.0.0.xsd">
    <modelVersion>4.0.0</modelVersion>

    <groupId>com.dayu</groupId>
    <artifactId>tspring</artifactId>
    <version>0.0.1-SNAPSHOT</version>

    <packaging>war</packaging>

    <properties>
        <spring.version>5.0.5.RELEASE</spring.version>
        <jackson.version>2.9.8</jackson.version>
    </properties>
    <dependencies>
        <!--spring 核心包 start-->
        <dependency>
            <groupId>org.springframework</groupId>
            <artifactId>spring-core</artifactId>
            <version>${spring.version}</version>
        </dependency>

        <dependency>
            <groupId>org.springframework</groupId>
            <artifactId>spring-beans</artifactId>
            <version>${spring.version}</version>
        </dependency>

        <dependency>
            <groupId>org.springframework</groupId>
            <artifactId>spring-context</artifactId>
            <version>${spring.version}</version>
        </dependency>

        <dependency>
            <groupId>org.springframework</groupId>
            <artifactId>spring-expression</artifactId>
            <version>${spring.version}</version>
        </dependency>

        <!--spring web-->
        <dependency>
            <groupId>org.springframework</groupId>
            <artifactId>spring-web</artifactId>
            <version>${spring.version}</version>
        </dependency>
        <dependency>
            <groupId>org.springframework</groupId>
            <artifactId>spring-webmvc</artifactId>
            <version>${spring.version}</version>
        </dependency>

        <!--mysql-->
        <dependency>
            <groupId>org.springframework</groupId>
            <artifactId>spring-jdbc</artifactId>
            <version>4.3.14.RELEASE</version>
        </dependency>
        <dependency>
            <groupId>mysql</groupId>
            <artifactId>mysql-connector-java</artifactId>
            <version>5.1.47</version>
        </dependency>
        <dependency>
            <groupId>org.mybatis</groupId>
            <artifactId>mybatis</artifactId>
            <version>3.5.1</version>
        </dependency>
        <dependency>
            <groupId>org.mybatis</groupId>
            <artifactId>mybatis-spring</artifactId>
            <version>2.0.1</version>
        </dependency>

        <dependency>
            <groupId>org.springframework</groupId>
            <artifactId>spring-tx</artifactId>
            <version>${spring.version}</version>
        </dependency>

        <!-- https://mvnrepository.com/artifact/com.alibaba/druid -->
        <dependency>
            <groupId>com.alibaba</groupId>
            <artifactId>druid</artifactId>
            <version>1.1.18</version>
        </dependency>

        <dependency>
            <groupId>javax.servlet</groupId>
            <artifactId>javax.servlet-api</artifactId>
            <version>3.1.0</version>
            <scope>provided</scope>
        </dependency>
        <dependency>
            <groupId>javax.servlet.jsp</groupId>
            <artifactId>jsp-api</artifactId>
            <version>2.2</version>
            <scope>provided</scope>
        </dependency>
        <dependency>
            <groupId>javax.servlet</groupId>
            <artifactId>jstl</artifactId>
            <version>1.2</version>
        </dependency>

        <!-- https://mvnrepository.com/artifact/org.projectlombok/lombok -->
        <dependency>
            <groupId>org.projectlombok</groupId>
            <artifactId>lombok</artifactId>
            <version>1.18.8</version>
            <scope>provided</scope>
        </dependency>

        <dependency>
            <groupId>com.alibaba</groupId>
            <artifactId>fastjson</artifactId>
            <version>1.2.56</version>
        </dependency>

        <dependency>
            <groupId>com.fasterxml.jackson.core</groupId>
            <artifactId>jackson-core</artifactId>
            <version>${jackson.version}</version>
        </dependency>
        <dependency>
            <groupId>com.fasterxml.jackson.core</groupId>
            <artifactId>jackson-databind</artifactId>
            <version>${jackson.version}</version>
        </dependency>


        <!--swagger2 整合springmvc-->
        <dependency>
            <groupId>com.mangofactory</groupId>
            <artifactId>swagger-springmvc</artifactId>
            <version>1.0.2</version>
        </dependency>
        <dependency>
            <groupId>io.springfox</groupId>
            <artifactId>springfox-swagger2</artifactId>
            <version>2.6.1</version>
        </dependency>
        <dependency>
            <groupId>io.springfox</groupId>
            <artifactId>springfox-swagger-ui</artifactId>
            <version>2.6.1</version>
        </dependency>
    </dependencies>

    <build>
        <finalName>tspring</finalName>

        <resources>
            <resource>
                <directory>src/main/java</directory>
                <includes>
                    <include>**/*.xml</include>
                    <include>**/*.properties</include>
                </includes>
                <filtering>false</filtering>
            </resource>

            <resource>
                <directory>src/main/resources</directory>
                <includes>
                    <include>**/*.xml</include>
                    <include>**/*.properties</include>
                </includes>
                <filtering>false</filtering>
            </resource>
        </resources>
        <plugins>
            <plugin>
                <groupId>org.apache.tomcat.maven</groupId>
                <artifactId>tomcat7-maven-plugin</artifactId>
                <version>2.2</version>
                <configuration>
                    <uriEncoding>utf-8</uriEncoding>
                    <path>/</path>
                    <port>80</port>
                    <!--<url>http://localhost:8888/manager/text</url>-->
                </configuration>
            </plugin>
            <plugin>
                <groupId>org.apache.maven.plugins</groupId>
                <artifactId>maven-compiler-plugin</artifactId>
                <version>3.1</version>
                <configuration>
                    <source>1.8</source>
                    <target>1.8</target>
                    <encoding>utf-8</encoding>
                </configuration>
            </plugin>
        </plugins>
    </build>

</project>
3、配置文件web.xml
<?xml version="1.0" encoding="UTF-8"?>
<web-app version="3.0" xmlns="http://java.sun.com/xml/ns/javaee"
         xmlns:xsi="http://www.w3.org/2001/XMLSchema-instance"
         xsi:schemaLocation="http://java.sun.com/xml/ns/javaee http://java.sun.com/xml/ns/javaee/web-app_3_0.xsd">

  <!-- 在Spring框架中是如何解决从页面传来的字符串的编码问题的呢?
  下面我们来看看Spring框架给我们提供过滤器CharacterEncodingFilter
   这个过滤器就是针对于每次浏览器请求进行过滤的,然后再其之上添加了父类没有的功能即处理字符编码。
    其中encoding用来设置编码格式,forceEncoding用来设置是否理会 request.getCharacterEncoding()方法,设置为true则强制覆盖之前的编码格式。-->
  <filter>
    <filter-name>characterEncodingFilter</filter-name>
    <filter-class>org.springframework.web.filter.CharacterEncodingFilter</filter-class>
    <init-param>
      <param-name>encoding</param-name>
      <param-value>UTF-8</param-value>
    </init-param>
    <init-param>
      <param-name>forceEncoding</param-name>
      <param-value>true</param-value>
    </init-param>
  </filter>
  <filter-mapping>
    <filter-name>characterEncodingFilter</filter-name>
    <url-pattern>/*</url-pattern>
  </filter-mapping>
  <!-- 项目中使用Spring 时,applicationContext.xml配置文件中并没有BeanFactory,要想在业务层中的class 文件中直接引用Spring容器管理的bean可通过以下方式-->
  <!--1、在web.xml配置监听器ContextLoaderListener-->
  <!--ContextLoaderListener的作用就是启动Web容器时,自动装配ApplicationContext的配置信息。因为它实现了ServletContextListener这个接口,在web.xml配置这个监听器,启动容器时,就会默认执行它实现的方法。
  在ContextLoaderListener中关联了ContextLoader这个类,所以整个加载配置过程由ContextLoader来完成。
  它的API说明
  第一段说明ContextLoader可以由 ContextLoaderListener和ContextLoaderServlet生成。
  如果查看ContextLoaderServlet的API,可以看到它也关联了ContextLoader这个类而且它实现了HttpServlet这个接口
  第二段,ContextLoader创建的是 XmlWebApplicationContext这样一个类,它实现的接口是WebApplicationContext->ConfigurableWebApplicationContext->ApplicationContext->
  BeanFactory这样一来spring中的所有bean都由这个类来创建
   IUploaddatafileManager uploadmanager = (IUploaddatafileManager)    ContextLoaderListener.getCurrentWebApplicationContext().getBean("uploadManager");
   -->

  <!--2、部署applicationContext的xml文件-->
  <!--如果在web.xml中不写任何参数配置信息,默认的路径是"/WEB-INF/applicationContext.xml,
  在WEB-INF目录下创建的xml文件的名称必须是applicationContext.xml。
  如果是要自定义文件名可以在web.xml里加入contextConfigLocation这个context参数:
  在<param-value> </param-value>里指定相应的xml文件名,如果有多个xml文件,可以写在一起并以“,”号分隔。
  也可以这样applicationContext-*.xml采用通配符,比如这那个目录下有applicationContext-ibatis-base.xml,
  applicationContext-action.xml,applicationContext-ibatis-dao.xml等文件,都会一同被载入。
  在ContextLoaderListener中关联了ContextLoader这个类,所以整个加载配置过程由ContextLoader来完成。-->


  <!--使用Spring MVC,配置DispatcherServlet是第一步。DispatcherServlet是一个Servlet,,所以可以配置多个DispatcherServlet-->
  <!--DispatcherServlet是前置控制器,配置在web.xml文件中的。拦截匹配的请求,Servlet拦截匹配规则要自已定义,把拦截下来的请求,依据某某规则分发到目标Controller(我们写的Action)来处理。-->
  <servlet>
    <servlet-name>DispatcherServlet</servlet-name>
    <!--在DispatcherServlet的初始化过程中,框架会在web应用的 WEB-INF文件夹下寻找名为[servlet-name]-servlet.xml 的配置文件,生成文件中定义的bean。-->
    <servlet-class>org.springframework.web.servlet.DispatcherServlet</servlet-class>
    <!--指明了配置文件的文件名,不使用默认配置文件名,而使用dispatcher-servlet.xml配置文件。-->
    <init-param>
      <param-name>contextConfigLocation</param-name>
      <!--其中<param-value>**.xml</param-value> 这里可以使用多种写法-->
      <!--1、不写,使用默认值:/WEB-INF/<servlet-name>-servlet.xml-->
      <!--2、<param-value>/WEB-INF/classes/dispatcher-servlet.xml</param-value>-->
      <!--3、<param-value>classpath*:dispatcher-servlet.xml</param-value>-->
      <!--4、多个值用逗号分隔-->
      <param-value>classpath:/spring*.xml</param-value>
    </init-param>
    <load-on-startup>1</load-on-startup><!--是启动顺序,让这个Servlet随Servletp容器一起启动。-->
  </servlet>
  <servlet-mapping>
    <servlet-name>DispatcherServlet</servlet-name>
    <!--Servlet拦截匹配规则可以自已定义,当映射为@RequestMapping("/user/add")时,为例,拦截哪种URL合适?-->
    <!--1、拦截*.do、*.htm, 例如:/user/add.do,这是最传统的方式,最简单也最实用。不会导致静态文件(jpg,js,css)被拦截。-->
    <!--2、拦截/,例如:/user/add,可以实现现在很流行的REST风格。很多互联网类型的应用很喜欢这种风格的URL。弊端:会导致静态文件(jpg,js,css)被拦截后不能正常显示。 -->
    <url-pattern>/</url-pattern> <!--会拦截URL中带“/”的请求。-->
  </servlet-mapping>

</web-app>
4、mvc的配置文件xml
spring-jdbc.xml 这个文件中需要注入mysql信息单独写在一个文件中
jdbc-class=com.mysql.jdbc.Driver
jdbc-user=username
jdbc-pwd=password
jdbc-url=jdbc:mysql://localhost:3306/chatroom?useUnicode=true&characterEncoding=utf-8

#useUnicode=true&characterEncoding=utf-8&serverTimeZone=GMT%2B8
minIdle=10
#时间ms
maxWait=60000
connectionProperties=UTF-8
maxActive=20
<?xml version="1.0" encoding="UTF-8"?>
<beans xmlns="http://www.springframework.org/schema/beans"
       xmlns:xsi="http://www.w3.org/2001/XMLSchema-instance"
       xmlns:context="http://www.springframework.org/schema/context"
       xsi:schemaLocation="http://www.springframework.org/schema/beans
       http://www.springframework.org/schema/beans/spring-beans.xsd
       http://www.springframework.org/schema/context
       http://www.springframework.org/schema/context/spring-context.xsd">

    <context:property-placeholder location="classpath:*.properties"/>

    <bean id="dataSource" class="com.alibaba.druid.pool.DruidDataSource">
        <property name="driverClassName" value="${jdbc.driver}"/>
        <property name="url" value="${jdbc.url}"/>
        <property name="username" value="${jdbc.username}"/>
        <property name="password" value="${jdbc.password}"/>
    </bean>

    <bean id="factoryBean" class="org.mybatis.spring.SqlSessionFactoryBean">
        <property name="dataSource" ref="dataSource"/>
        <!--类别名-->
        <property name="typeAliasesPackage" value="com.dayu.pojo"/>
        <!--映射文件位置,mapper.xml文件是创建在java包下,如果创建在resources包下则是classpath:/resources包下包名/*.xml-->
        <property name="mapperLocations" value="classpath:/com/dayu/mapper/*.xml"/>
    </bean>

    <bean class="org.mybatis.spring.mapper.MapperScannerConfigurer">
        <property name="sqlSessionFactoryBeanName" value="factoryBean"/>
        <property name="basePackage" value="com.dayu.dao"/>
    </bean>

</beans>
spring-web.xml
<?xml version="1.0" encoding="UTF-8"?>
<beans xmlns="http://www.springframework.org/schema/beans"
       xmlns:xsi="http://www.w3.org/2001/XMLSchema-instance"
       xmlns:context="http://www.springframework.org/schema/context"
       xmlns:mvc="http://www.springframework.org/schema/mvc"
       xsi:schemaLocation="http://www.springframework.org/schema/beans http://www.springframework.org/schema/beans/spring-beans.xsd http://www.springframework.org/schema/context http://www.springframework.org/schema/context/spring-context.xsd http://www.springframework.org/schema/mvc http://www.springframework.org/schema/mvc/spring-mvc.xsd">
  <!--扫描controller -->
    <context:component-scan base-package="com.dayu.controller"/>
    <mvc:annotation-driven />

    <bean class="org.springframework.web.servlet.view.InternalResourceViewResolver">
        <property name="prefix" value="/WEB-INF/views/"/>
        <property name="suffix" value=".jsp"/>
    </bean>

    <mvc:view-controller path="/show" view-name="show"/>
</beans>
spring-service.xml 事物控制都在这个文件配置
<?xml version="1.0" encoding="UTF-8"?>
<beans xmlns="http://www.springframework.org/schema/beans"
       xmlns:xsi="http://www.w3.org/2001/XMLSchema-instance"
       xmlns:contxt="http://www.springframework.org/schema/context" xmlns:tx="http://www.springframework.org/schema/tx"
       xsi:schemaLocation="http://www.springframework.org/schema/beans
       http://www.springframework.org/schema/beans/spring-beans.xsd
       http://www.springframework.org/schema/context
       http://www.springframework.org/schema/context/spring-context.xsd http://www.springframework.org/schema/tx http://www.springframework.org/schema/tx/spring-tx.xsd">

    <contxt:component-scan base-package="com.dayu.service.impl"/>

    <bean id="transactionManager" class="org.springframework.jdbc.datasource.DataSourceTransactionManager">
        <property name="dataSource" ref="dataSource"/>
    </bean>

    <tx:annotation-driven transaction-manager="transactionManager"/>
</beans>
配置redis
redis.properties
redis.maxTotal=100
redis.maxIdl=10
redis.maxWaitMillis=3000
redis.blockWhenExhausted=true
redis.testOnBorrow=true
redis.xml
<?xml version="1.0" encoding="UTF-8"?>
<beans xmlns="http://www.springframework.org/schema/beans"
       xmlns:xsi="http://www.w3.org/2001/XMLSchema-instance" xmlns:util="http://www.springframework.org/schema/util"
       xmlns:context="http://www.springframework.org/schema/context"
       xsi:schemaLocation="http://www.springframework.org/schema/beans http://www.springframework.org/schema/beans/spring-beans.xsd http://www.springframework.org/schema/util http://www.springframework.org/schema/util/spring-util.xsd http://www.springframework.org/schema/context http://www.springframework.org/schema/context/spring-context.xsd">

    <context:property-placeholder location="classpath:redis.properties"/>

    <context:component-scan base-package="com.dayu.redis.dao"/>

    <bean id="hostAndPort1" class="redis.clients.jedis.HostAndPort">
        <constructor-arg name="host" value="192.168.120.111"/>
        <constructor-arg name="port" value="7001" />
    </bean>
    <bean id="hostAndPort2" class="redis.clients.jedis.HostAndPort">
        <constructor-arg name="host" value="192.168.120.111"/>
        <constructor-arg name="port" value="7002" />
    </bean>
    <bean id="hostAndPort3" class="redis.clients.jedis.HostAndPort">
        <constructor-arg name="host" value="192.168.120.111"/>
        <constructor-arg name="port" value="7003" />
    </bean>
    <bean id="hostAndPort4" class="redis.clients.jedis.HostAndPort">
        <constructor-arg name="host" value="192.168.120.111"/>
        <constructor-arg name="port" value="7004" />
    </bean>
    <bean id="hostAndPort5" class="redis.clients.jedis.HostAndPort">
        <constructor-arg name="host" value="192.168.120.111"/>
        <constructor-arg name="port" value="7005" />
    </bean>
    <bean id="hostAndPort6" class="redis.clients.jedis.HostAndPort">
        <constructor-arg name="host" value="192.168.120.111"/>
        <constructor-arg name="port" value="7006" />
    </bean>


    <bean id="poolConfig" class="redis.clients.jedis.JedisPoolConfig">
        <property name="maxTotal" value="${redis.maxTotal}"/>
        <property name="maxIdle" value="${redis.maxIdl}"/>
        <property name="maxWaitMillis" value="${redis.maxWaitMillis}"/>
        <property name="blockWhenExhausted" value="${redis.blockWhenExhausted}"/>
        <property name="testOnBorrow" value="${redis.testOnBorrow}"/>
    </bean>

    <bean id="jedisCluster" class="redis.clients.jedis.JedisCluster">
        <constructor-arg name="nodes">
            <set>
                <ref bean="hostAndPort1"/>
                <ref bean="hostAndPort2"/>
                <ref bean="hostAndPort3"/>
                <ref bean="hostAndPort4"/>
                <ref bean="hostAndPort5"/>
                <ref bean="hostAndPort6"/>
            </set>
        </constructor-arg>
        <constructor-arg name="timeout" value="6000"/>
        <constructor-arg name="poolConfig" ref="poolConfig"/>
    </bean>

</beans>
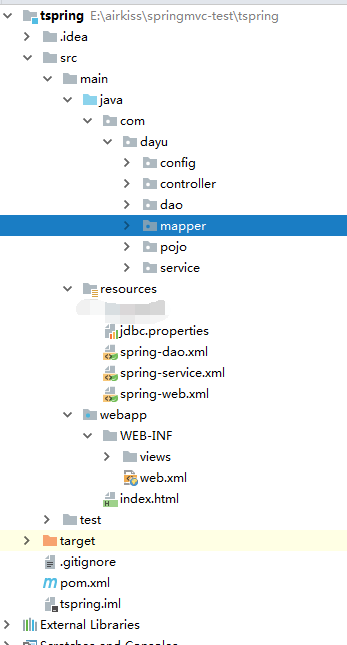
项目路径

这样整个配置就结束了


 浙公网安备 33010602011771号