oerv的pretask1
-
任务一:通过 QEMU 仿真 RISC-V 环境并启动 openEuler RISC-V 系统,设法输出 fastfetch 结果并截图提交
本人使用的运行qemu的主机是ubuntu24虚拟机
下载文件网址:https://www.openeuler.org/zh/download/#openEuler 25.03
很好的参考教程:https://www.openeuler.org/zh/blog/phoebe/2023-09-26-Run-openEuler-RISC-V-On-Qemu.html

#安装qemu相关的东西、解压软件
apt install -y qemu-system qemu-user qemu-user-static xz-utils
root@yyjeqhc:~/oe2503_qemu# ls
openEuler-25.03-riscv64.qcow2.xz  RISCV_VIRT_CODE.fd  RISCV_VIRT_VARS.fd  start_vm.sh
#解压是阻塞运行,没有输出,不是卡住了,需要一点时间
root@yyjeqhc:~/oe2503_qemu# unxz openEuler-25.03-riscv64.qcow2.xz
root@yyjeqhc:~/oe2503_qemu# ls
openEuler-25.03-riscv64.qcow2  RISCV_VIRT_CODE.fd  RISCV_VIRT_VARS.fd  start_vm.sh

#可以使用教程里面的使用写时复制的磁盘,也可以不用,直接启动就好
root@yyjeqhc:~/oe2503_qemu# qemu-img info openEuler-25.03-riscv64.qcow2
image: openEuler-25.03-riscv64.qcow2
file format: qcow2
virtual size: 40 GiB (42949672960 bytes)
disk size: 1.16 GiB
cluster_size: 65536
Format specific information:
    compat: 1.1
    compression type: zlib
    lazy refcounts: false
    refcount bits: 16
    corrupt: false
    extended l2: false
Child node '/file':
    filename: openEuler-25.03-riscv64.qcow2
    protocol type: file
    file length: 1.17 GiB (1258029056 bytes)
    disk size: 1.16 GiB
#但还是扩容比较好,虽然未必能使用这么多空间
root@yyjeqhc:~/oe2503_qemu# qemu-img resize openEuler-25.03-riscv64.qcow2 +100G
Image resized.

#启动,就很简单了,直接
chmod +x start_vm.sh
./start_vm.sh

#然后就可以顺利启动了。直接登录就好了
#用户名: root 或 openeuler
#默认密码: openEuler12#$
#登录以后,当然要改密码了。
passwd
然后就是对磁盘进行扩容,修复分区表
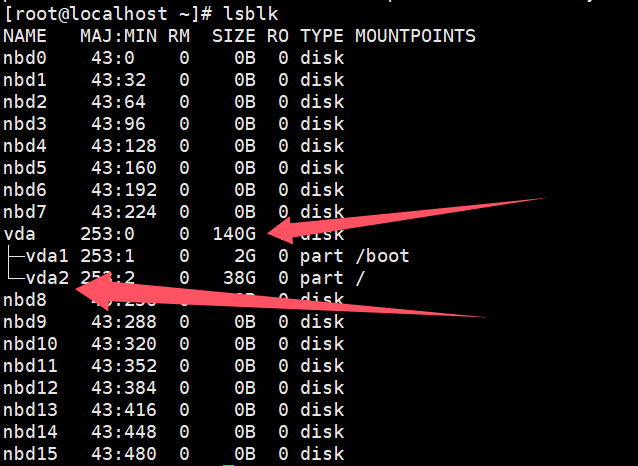
#可以看见,空间果然变大了。
[root@localhost ~]# fdisk -l
Disk /dev/vda: 140 GiB, 150323855360 bytes, 293601280 sectors
Units: sectors of 1 * 512 = 512 bytes
Sector size (logical/physical): 512 bytes / 512 bytes
I/O size (minimum/optimal): 512 bytes / 512 bytes
Disklabel type: dos
Disk identifier: 0xa0e8fffc

Device     Boot   Start      End  Sectors Size Id Type
/dev/vda1          2048  4194303  4192256   2G  e W95 FAT16 (LBA)
/dev/vda2       4194304 83886079 79691776  38G 83 Linux
#但是,磁盘的分区尺寸还是不对,所以需要进行调整
记住这个 /dev/vda 和/dev/vda2 然后就是使用fdisk调整
免责声明:这个操作仅适用于此教程,fdisk的随意使用会造成文件系统损坏,丢失重要文件信息,不能确定使用效果请不要使用,或提前做好备份。
fdisk的操作过程就很固定了,我直接使用之前运行的输出,和这次运行的输出也是没有区别的。
[root@localhost ~]# fdisk /dev/vda

Welcome to fdisk (util-linux 2.39.1).
Changes will remain in memory only, until you decide to write them.
Be careful before using the write command.

This disk is currently in use - repartitioning is probably a bad idea.
It's recommended to umount all file systems, and swapoff all swap
partitions on this disk.


Command (m for help): p

Disk /dev/vda: 140 GiB, 150323855360 bytes, 293601280 sectors
Units: sectors of 1 * 512 = 512 bytes
Sector size (logical/physical): 512 bytes / 512 bytes
I/O size (minimum/optimal): 512 bytes / 512 bytes
Disklabel type: dos
Disk identifier: 0xa0e8fffc

Device     Boot   Start      End  Sectors Size Id Type
/dev/vda1          2048  4194303  4192256   2G  e W95 FAT16 (LBA)
/dev/vda2       4194304 83886079 79691776  38G 83 Linux

Command (m for help): d
Partition number (1,2, default 2): 2

Partition 2 has been deleted.

Command (m for help): n
Partition type
   p   primary (1 primary, 0 extended, 3 free)
   e   extended (container for logical partitions)
Select (default p): p
Partition number (2-4, default 2): 2
First sector (4194304-293601279, default 4194304):
Last sector, +/-sectors or +/-size{K,M,G,T,P} (4194304-293601279, default 293601279):

Created a new partition 2 of type 'Linux' and of size 138 GiB.
Partition #2 contains a ext4 signature.

Do you want to remove the signature? [Y]es/[N]o: N

Command (m for help): p

Disk /dev/vda: 140 GiB, 150323855360 bytes, 293601280 sectors
Units: sectors of 1 * 512 = 512 bytes
Sector size (logical/physical): 512 bytes / 512 bytes
I/O size (minimum/optimal): 512 bytes / 512 bytes
Disklabel type: dos
Disk identifier: 0xa0e8fffc

Device     Boot   Start       End   Sectors  Size Id Type
/dev/vda1          2048   4194303   4192256    2G  e W95 FAT16 (LBA)
/dev/vda2       4194304 293601279 289406976  138G 83 Linux

Command (m for help): w
The partition table has been altered.
Syncing disks.
注:Disk identifier: 0xa0e8fffc。对照运行的话,只有这个标识有区别
最后,就是调整文件系统的大小了。
[root@localhost ~]# df -h
Filesystem      Size  Used Avail Use% Mounted on
/dev/vda2        38G  1.1G   35G   3% /
devtmpfs        4.0M     0  4.0M   0% /dev
tmpfs           3.8G     0  3.8G   0% /dev/shm
tmpfs           4.0M     0  4.0M   0% /sys/fs/cgroup
efivarfs        256K  2.6K  254K   1% /sys/firmware/efi/efivars
tmpfs           1.6G   17M  1.5G   2% /run
tmpfs           3.8G     0  3.8G   0% /tmp
/dev/vda1       2.0G  115M  1.9G   6% /boot
[root@localhost ~]# resize2fs /dev/vda2
resize2fs 1.47.0 (5-Feb-2023)
Filesystem at /dev/vda2 is mounted on /; on-line resizing required
old_desc_blocks = 5, new_desc_blocks = 18
The filesystem on /dev/vda2 is now 36175872 (4k) blocks long.

[root@localhost ~]# df -h
Filesystem      Size  Used Avail Use% Mounted on
/dev/vda2       136G  1.1G  129G   1% /
devtmpfs        4.0M     0  4.0M   0% /dev
tmpfs           3.8G     0  3.8G   0% /dev/shm
tmpfs           4.0M     0  4.0M   0% /sys/fs/cgroup
efivarfs        256K  2.6K  254K   1% /sys/firmware/efi/efivars
tmpfs           1.6G   17M  1.5G   2% /run
tmpfs           3.8G     0  3.8G   0% /tmp
/dev/vda1       2.0G  115M  1.9G   6% /boot
可见,不调整的话,磁盘可用容量还是那么少
接下来,系统安装完毕就是完成任务了:
不过,在直接完成任务之前需要先准备使用环境之类的,毕竟接下来还有其他任务呢。
[root@localhost ~]# date
Tue Mar 25 03:45:26 AM UTC 2025
#时间不对,会出问题,比如https连接失败
[root@localhost ~]# curl 4.ipw.cn
223.160.151.49[root@localhost ~]# wget 4.ipw.cn
-bash: wget: command not found
[root@localhost ~]# vim 1.txt
-bash: vim: command not found
[root@localhost ~]# git --version
-bash: git: command not found
#可见,缺少一些常用工具,还有其他任务需要使用的,这里也提前安装上吧。
dnf install -y net-tools osc build util-linux bind-utils cmake git gcc make pkg-config gcc-g++ vim wget chrony

#安装有点多,耐心等待即可
输出 fastfetch 结果:
可以使用neofetch(脚本)
#手机热点,随缘直连,有时候就是很快
git clone https://github.com/dylanaraps/neofetch --depth 1
Cloning into 'neofetch'...
remote: Enumerating objects: 12, done.
remote: Counting objects: 100% (12/12), done.
remote: Compressing objects: 100% (12/12), done.
remote: Total 12 (delta 1), reused 1 (delta 0), pack-reused 0 (from 0)
Receiving objects: 100% (12/12), 100.71 KiB | 373.00 KiB/s, done.
Resolving deltas: 100% (1/1), done.
[root@localhost git]# ls
neofetch
[root@localhost git]# cd neofetch/
[root@localhost neofetch]# ./neofetch
                 `.cc.`                    root@localhost.localdomain
             ``.cccccccc..`                --------------------------
          `.cccccccccccccccc.`             OS: openEuler 25.03 riscv64
      ``.cccccccccccccccccccccc.``         Host: riscv-virtio,qemu
   `..cccccccccccccccccccccccccccc..`      Kernel: 6.6.0-72.6.0.56.oe2503.riscv64
`.ccccccccccccccc/++/ccccccccccccccccc.`   Uptime: 15 mins
.cccccccccccccccmNMMNdo+oso+ccccccccccc.   Shell: bash 5.2.37
.cccccccccc/++odms+//+mMMMMm/:+syso/cccc   Resolution: 1280x800
.cccccccccyNNMMMs:::/::+o+/:cdMMMMMmcccc   Terminal: /dev/ttyS0
.ccccccc:+NmdyyhNNmNNNd:ccccc:oyyyo:cccc   CPU: (8)
.ccc:ohdmMs:cccc+mNMNmyccccccccccccccccc   Memory: 352MiB / 7682MiB
.cc/NMMMMMo////:c:///:cccccccccccccccccc
.cc:syysyNMNNNMNyccccccccccccccccccccccc
.cccccccc+MMMMMNyc:/+++/cccccccccccccccc
.cccccccccohhhs/comMMMMNhccccccccccccccc
.ccccccccccccccc:MMMMMMMM/cccccccccccccc
.ccccccccccccccccsNNNNNd+cccccccccccccc.
`..cccccccccccccccc/+/:cccccccccccccc..`
   ``.cccccccccccccccccccccccccccc.``
       `.cccccccccccccccccccccc.`
          ``.cccccccccccccc.``
              `.cccccccc.`
                 `....`

#因为是脚本,甚至不用安装,直接运行就可以。
#当然,安装也很简单 make install即可,然后切换到任意目录都可以运行
也可以使用fastfetch(编译安装)
git clone https://github.com/fastfetch-cli/fastfetch.git --depth 1
Cloning into 'fastfetch'...
remote: Enumerating objects: 1497, done.
remote: Counting objects: 100% (1497/1497), done.
remote: Compressing objects: 100% (1378/1378), done.
remote: Total 1497 (delta 175), reused 851 (delta 112), pack-reused 0 (from 0)
Receiving objects: 100% (1497/1497), 1.40 MiB | 1012.00 KiB/s, done.
Resolving deltas: 100% (175/175), done.
[root@localhost git]# cd fastfetch/
#https://github.com/fastfetch-cli/fastfetch/wiki/Building
#编译运行的话就要看一下官方教程了。
mkdir -p build
cd build
cmake ..
#这里要花一些时间,比较慢
......
......
-- Looking for glob.h - found
-- Looking for pthread_np.h
-- Looking for pthread_np.h - not found
-- Looking for pthread_timedjoin_np
-- Looking for pthread_timedjoin_np - found
-- Disabled package managers: WINGET
-- Configuring done (70.9s)
-- Generating done (0.5s)
-- Build files have been written to: /root/git/fastfetch/build
#完成会输出上面这几句,然后运行下面的即可,使用time计时,看看到底有多慢
#大概半小时左右吧,看机器性能,这个时间就不要盯着屏幕了,去做点其他的事情吧。
time cmake --build . --target fastfetch
比如设置下ssh登录之类的
ssh-keygen -t rsa -b 4096 -C "your_email@example.com"
Generating public/private rsa key pair.
Enter file in which to save the key (/root/.ssh/id_rsa): /root/.ssh/oe
Enter passphrase (empty for no passphrase):
Enter same passphrase again:
Your identification has been saved in /root/.ssh/oe
Your public key has been saved in /root/.ssh/oe.pub
The key fingerprint is:
SHA256:R3R0VULnZYiXR5EQwawX4AC9xDfHJpM5WA4nqBnIHrw your_email@example.com
The key's randomart image is:
+---[RSA 4096]----+
|  o .  .=++=X*B*@|
|   = . . *BX.O+*o|
|  . o + . +oO....|
|   E o   o . .   |
|        S . .    |
|         .       |
|                 |
|                 |
|                 |
+----[SHA256]-----+
root@yyjeqhc:~# ls ~/.ssh/oe*
/root/.ssh/oe  /root/.ssh/oe.pub
root@yyjeqhc:~# ssh-copy-id -i oe.pub -p 12055 root@localhost

/usr/bin/ssh-copy-id: ERROR: failed to open ID file 'oe.pub': No such file
root@yyjeqhc:~# ssh-copy-id -i ~/.ssh/oe.pub -p 12055 root@localhost
/usr/bin/ssh-copy-id: INFO: Source of key(s) to be installed: "/root/.ssh/oe.pub"
/usr/bin/ssh-copy-id: INFO: attempting to log in with the new key(s), to filter out any that are already installed
/usr/bin/ssh-copy-id: INFO: 1 key(s) remain to be installed -- if you are prompted now it is to install the new keys

Authorized users only. All activities may be monitored and reported.
root@localhost's password:

Number of key(s) added: 1

Now try logging into the machine, with:   "ssh -p 12055 'root@localhost'"
and check to make sure that only the key(s) you wanted were added.

#再使用ssh-copy-id复制公钥过去就好了,注意端口号和start_vm.sh中的一样
#最后,就是修改主机的~/.ssh/config文件了,只能vim进行编辑
#添加下面这段即可,可以根据需要进行修改
Host oe2503
  HostName localhost
  IdentityFile ~/.ssh/oe
  PreferredAuthentications publickey
  User root
  Port 12055

#主机新开窗口进行测试
root@yyjeqhc:~# ssh oe2503

Authorized users only. All activities may be monitored and reported.

Authorized users only. All activities may be monitored and reported.
Last login: Tue Mar 25 04:13:32 2025 from 10.0.2.2


Welcome to 6.6.0-72.6.0.56.oe2503.riscv64

System information as of time: 	2025年 03月 25日 星期二 04:23:19 UTC

System load: 	0.11
Memory used: 	2.1%
Swap used: 	0.0%
Usage On: 	2%
IP address: 	10.0.2.15
Users online: 	2
#可见,配置成功
回到任务:
[ 97%] Building C object CMakeFiles/libfastfetch.dir/src/util/binary_linux.c.o
[ 97%] Building CXX object CMakeFiles/libfastfetch.dir/src/detection/gpu/gpu_wsl.cpp.o
[ 98%] Building C object CMakeFiles/libfastfetch.dir/src/detection/gpu/gpu_nvidia.c.o
[ 98%] Building C object CMakeFiles/libfastfetch.dir/src/detection/gpu/gpu_mthreads.c.o
[100%] Building C object CMakeFiles/libfastfetch.dir/src/3rdparty/yyjson/yyjson.c.o
[100%] Built target libfastfetch
[100%] Building C object CMakeFiles/fastfetch.dir/src/fastfetch.c.o
[100%] Linking C executable fastfetch
[100%] Built target fastfetch

real	10m42.672s
user	18m8.930s
sys	1m59.247s
#其实也没有花多久
对比下主机的
[100%] Building C object CMakeFiles/libfastfetch.dir/src/3rdparty/yyjson/yyjson.c.o
[100%] Built target libfastfetch
[100%] Building C object CMakeFiles/fastfetch.dir/src/fastfetch.c.o
[100%] Linking C executable fastfetch
[100%] Built target fastfetch

real	0m36.140s
user	0m45.952s
sys	0m29.515s
构建完毕,运行即可
[root@localhost build]# ls
CMakeCache.txt	     CPackSourceConfig.cmake  fastfetch_datatext.h
CMakeFiles	     fastfetch		      logo_builtin.h
cmake_install.cmake  fastfetch.1	      Makefile
CPackConfig.cmake    fastfetch_config.h
[root@localhost build]# ./fastfetch
                 `.cc.`                     root@localhost
             ``.cccccccc..`                 --------------
          `.cccccccccccccccc.`              OS: openEuler 25.03 riscv64
      ``.cccccccccccccccccccccc.``          Host: riscv-virtio,qemu
   `..cccccccccccccccccccccccccccc..`       Kernel: Linux 6.6.0-72.6.0.56.oe2503.riscv64
`.ccccccccccccccc/++/ccccccccccccccccc.`    Uptime: 48 mins
.cccccccccccccccmNMMNdo+oso+ccccccccccc.    Shell: bash 5.2.37
.cccccccccc/++odms+//+mMMMMm/:+syso/cccc    Display (QEMU Monitor): 1280x800 @ 75 Hz in 15"
.cccccccccyNNMMMs:::/::+o+/:cdMMMMMmcccc    Cursor: Adwaita
.ccccccc:+NmdyyhNNmNNNd:ccccc:oyyyo:cccc    Terminal: vt220
.ccc:ohdmMs:cccc+mNMNmyccccccccccccccccc    CPU: rv64gch (8)
.cc/NMMMMMo////:c:///:cccccccccccccccccc    GPU: RedHat Device 1050 (VGA compatible)
.cc:syysyNMNNNMNyccccccccccccccccccccccc    Memory: 355.89 MiB / 7.50 GiB (5%)
.cccccccc+MMMMMNyc:/+++/cccccccccccccccc    Swap: Disabled
.cccccccccohhhs/comMMMMNhccccccccccccccc    Disk (/): 1.88 GiB / 135.53 GiB (1%) - ext4
.ccccccccccccccc:MMMMMMMM/cccccccccccccc    Local IP (eth0): 10.0.2.15/24
.ccccccccccccccccsNNNNNd+cccccccccccccc.    Locale: en_US.UTF-8
`..cccccccccccccccc/+/:cccccccccccccc..`
   ``.cccccccccccccccccccccccccccc.``
       `.cccccccccccccccccccccc.`
          ``.cccccccccccccc.``
              `.cccccccc.`
                 `....`


 浙公网安备 33010602011771号