iOS:分组的表格视图UITableView,可以折叠和展开
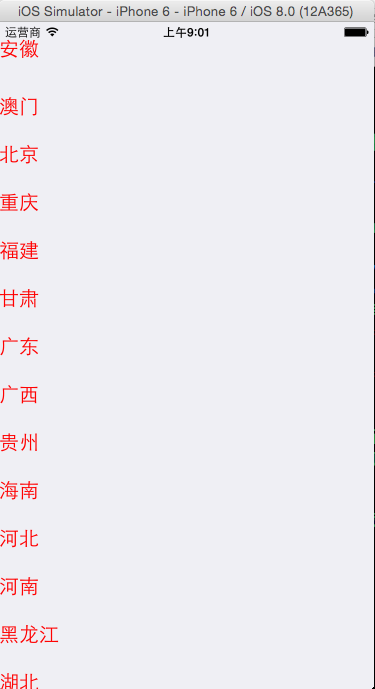
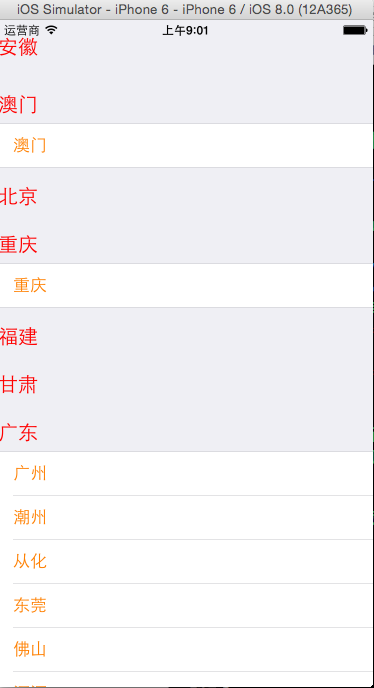
虽然表格视图可以分组,但是如果分组后,每一行的内容太多,往后翻看起来比较的麻烦。为了解决这个麻烦,可以将分组的行折叠和展开。折叠时,行内容就会隐藏起来;展开时,行内容就会显示出来。
折叠时: 展开后:


具体的代码如下:
  1 #import "ViewController.h"
  2
  3 @interface ViewController ()<UITableViewDataSource,UITableViewDelegate>
  4 @property (weak, nonatomic) IBOutlet UITableView *tableView;
  5 @property (strong,nonatomic)NSArray *provinces;
  6 @property (strong,nonatomic)NSDictionary *cities;
  7 @property (strong,nonatomic)NSMutableArray *Cellstates;
  8 @end
  9
 10 @implementation ViewController
 11
 12 - (void)viewDidLoad {
 13     [super viewDidLoad];
 14     //初始化
 15     self.provinces = [NSArray array];
 16     self.cities = [[NSDictionary alloc]init];
 17     self.Cellstates = [NSMutableArray arrayWithCapacity:self.provinces.count];
 18
 19     //加载数据
 20     NSString *path = [[NSBundle mainBundle]pathForResource:@"cities" ofType:@"plist"];
 21     NSDictionary *dic = [[NSDictionary alloc]initWithContentsOfFile:path];
 22
 23     if(dic)
 24     {
 25         //所有的省份
 26         self.provinces = [dic objectForKey:@"provinces"];
 27
 28         //所有的城市
 29         self.cities = [dic objectForKey:@"cities"];
 30     }
 31
 32     //默认每一个section都是折叠的
 33     for(int i=0; i<self.provinces.count; i++)
 34     {
 35         NSNumber *state = [NSNumber numberWithBool:NO];
 36         [self.Cellstates addObject:state];
 37     }
 38
 39     //设置数据源和代理
 40     self.tableView.dataSource = self;
 41     self.tableView.delegate = self;
 42
 43 }
 44
 45 #pragma mark -tableView的数据源方法
 46 //有多少个分组
 47 -(NSInteger)numberOfSectionsInTableView:(UITableView *)tableView
 48 {
 49     return self.provinces.count;
 50 }
 51 //每个分组有多少行
 52 -(NSInteger)tableView:(UITableView *)tableView numberOfRowsInSection:(NSInteger)section
 53 {
 54     if([self.Cellstates[section] boolValue]) //展开的
 55     {
 56         //取出所有的城市
 57         NSArray *cities = [self.cities objectForKey:self.provinces[section]];
 58         return cities.count;
 59     }
 60     else //折叠的
 61     {
 62         return 0;
 63     }
 64 }
 65 //设置每一个单元格的内容
 66 -(UITableViewCell *)tableView:(UITableView *)tableView cellForRowAtIndexPath:(NSIndexPath *)indexPath
 67 {
 68     //1.根据reuseIdentifier,先到对象池中去找重用的单元格对象
 69     static NSString *reuseIdentifier = @"citiesCell";
 70     UITableViewCell *cell = [self.tableView dequeueReusableCellWithIdentifier:reuseIdentifier];
 71     //2.如果没有找到,自己创建单元格对象
 72     if(cell == nil)
 73     {
 74         cell = [[UITableViewCell alloc]initWithStyle:UITableViewCellStyleDefault reuseIdentifier:reuseIdentifier];
 75     }
 76     //3.设置单元格对象的内容
 77     //取出所有的城市
 78     NSArray *cities = [self.cities objectForKey:self.provinces[indexPath.section]];
 79     cell.textLabel.text = cities[indexPath.row];
 80     //设置字体颜色
 81     cell.textLabel.textColor = [UIColor orangeColor];
 82
 83     return cell;
 84 }
 85 //设置头部标题
 86 -(NSString*)tableView:(UITableView *)tableView titleForHeaderInSection:(NSInteger)section
 87 {
 88     return self.provinces[section];
 89 }
 90 #pragma mark -tableView的代理方法
 91 -(UIView*)tableView:(UITableView *)tableView viewForHeaderInSection:(NSInteger)section
 92 {
 93     UIButton *button = [[UIButton alloc]init];
 94
 95     //设置标题
 96     [button setTitle:self.provinces[section] forState:UIControlStateNormal];
 97
 98     //设置颜色
 99     [button setTitleColor:[UIColor redColor] forState:UIControlStateNormal];
100
101     //设置对齐方式
102     button.contentHorizontalAlignment = UIControlContentHorizontalAlignmentLeft;
103
104     //设置字体大小
105     button.titleLabel.font = [UIFont systemFontOfSize:20];
106
107     //添加事件
108     [button addTarget:self action:@selector(buttonClicked:) forControlEvents:UIControlEventTouchUpInside];
109
110     //记住button的tag
111     button.tag = section;
112
113     return button;
114 }
115
116 #pragma mark -按钮的事件响应
117 -(void)buttonClicked:(UIButton*)sender
118 {
119     //1.取出旧状态
120     NSNumber *oldState = [self.Cellstates objectAtIndex:sender.tag];
121
122     //2.创建新状态
123     NSNumber *newState = [NSNumber numberWithDouble:![oldState boolValue]];
124
125     //3.删除旧状态
126     [self.Cellstates removeObjectAtIndex:sender.tag];
127
128     //4.添加新状态
129     [self.Cellstates insertObject:newState atIndex:sender.tag];
130
131     //刷新表格
132     [self.tableView reloadData];
133 }
134 @end
posted on 2015-10-27 23:31 ProgramBear 阅读(2507) 评论(0) 收藏 举报


 浙公网安备 33010602011771号