Spring的启动过程详解
首先搞清楚,Spring的启动过程说的其实也就是Spring容器的启动过程,这是一回事。
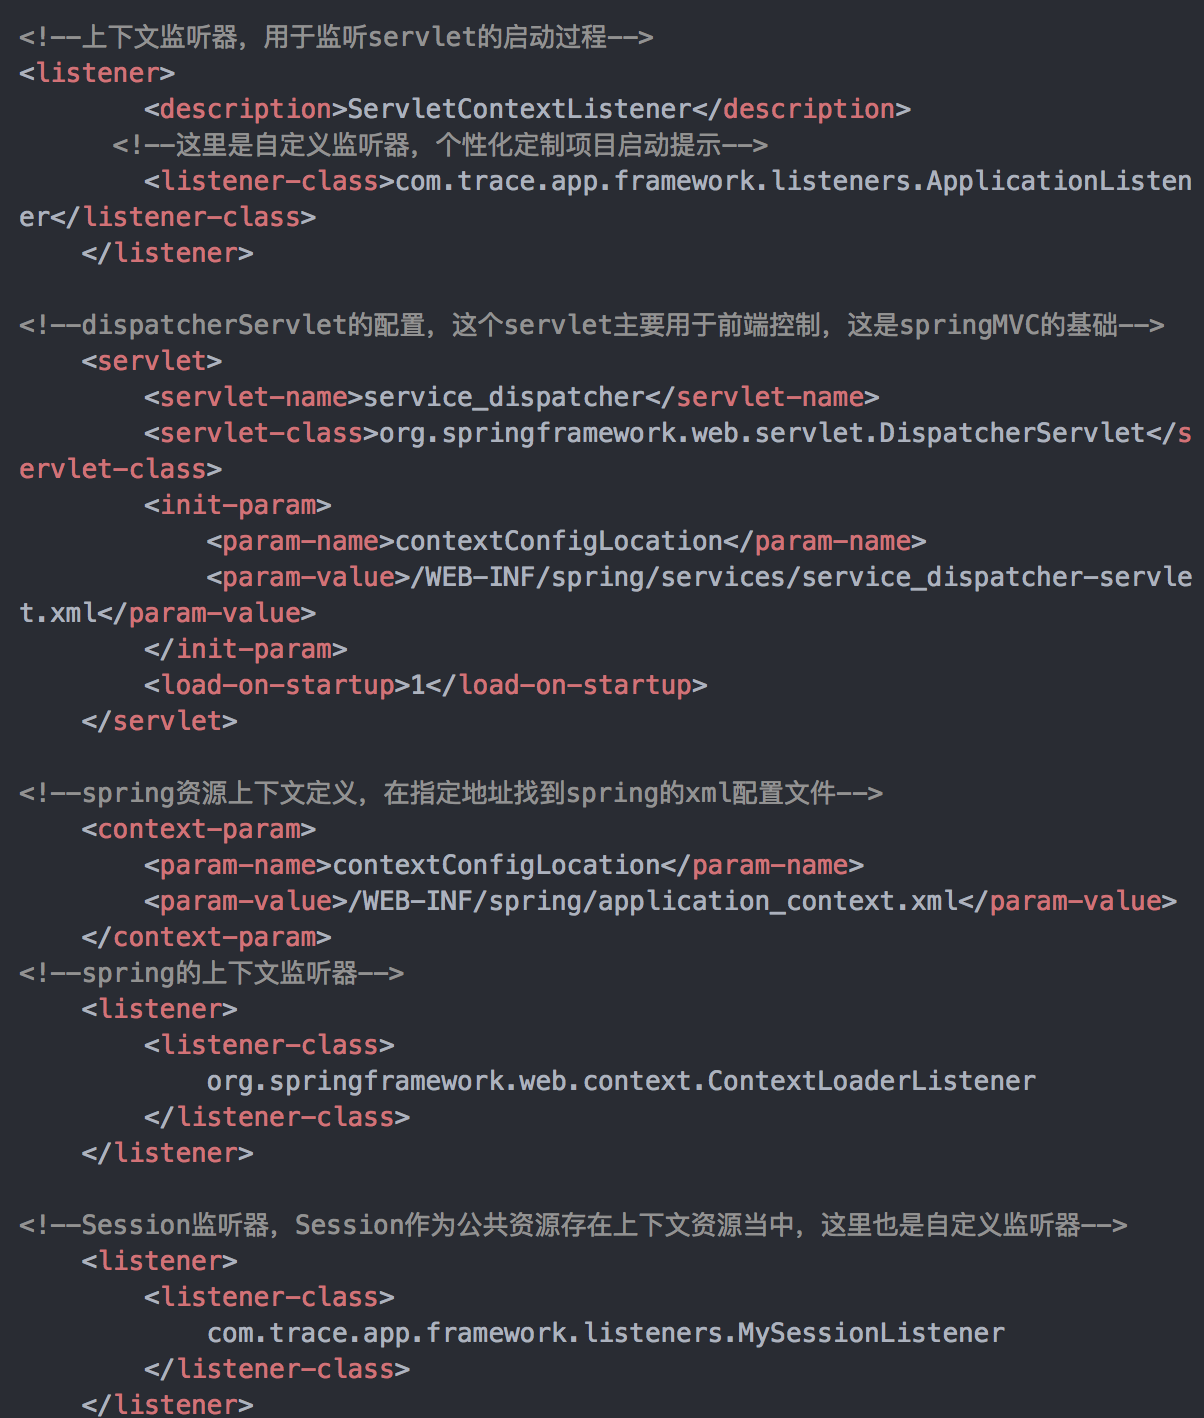
spring的启动是建筑在servlet容器之上的,所有web工程的初始位置就是web.xml,它配置了servlet的上下文(context)和监听器(Listener),下面就来看看web.xml里面的配置:
接下来就一点的来解析这样一个启动过程。
从spring的上下文监听器开始:
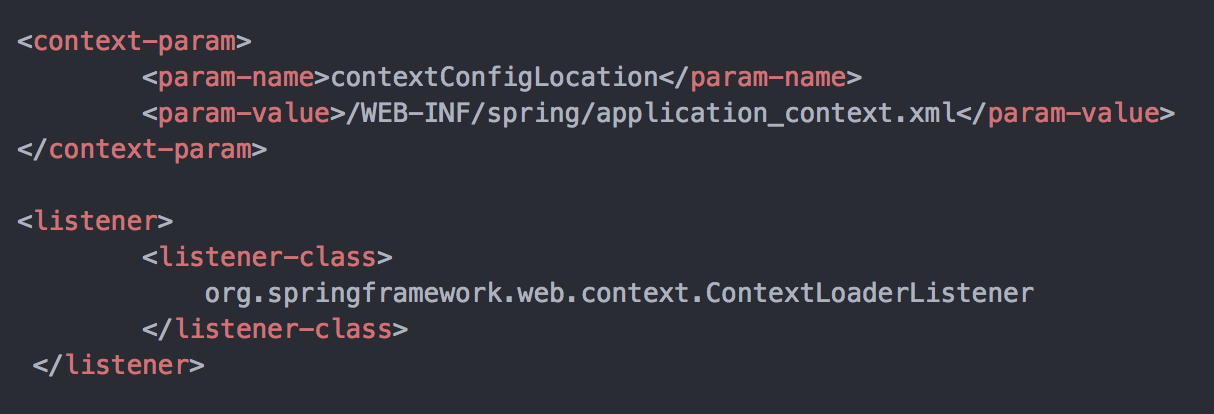
1、通过上述的第一段配置
<context-param>是初始化上下文,然后通过后一段的<listener>来加载配置文件,其中调用的spring包中的ContextLoaderListener这个上下文监听器,ContextLoaderListener是一个实现了ServletContextListener接口的监听器,他的父类是 ContextLoader,在启动项目时会触发contextInitialized上下文初始化方法。下面我们来看看这个方法: public void contextInitialized(ServletContextEvent event) {
initWebApplicationContext(event.getServletContext());
}
可以看到,这里是调用了父类
ContextLoader的initWebApplicationContext(event.getServletContext());方法,很显然,这是对ApplicationContext的初始化方法,也就是到这里 进入了springIoC的初始化。 2、接下来再来看看
initWebApplicationContext又做了什么工作,先看看代码 if (servletContext.getAttribute(WebApplicationContext.ROOT_WEB_APPLICATION_CONTEXT_ATTRIBUTE) != null) {
throw new IllegalStateException(
"Cannot initialize context because there is already a root application context present - " +
"check whether you have multiple ContextLoader* definitions in your web.xml!");
}
Log logger = LogFactory.getLog(ContextLoader.class);
servletContext.log("Initializing Spring root WebApplicationContext");
if (logger.isInfoEnabled()) {
logger.info("Root WebApplicationContext: initialization started");
}
long startTime = System.currentTimeMillis();
try {
// Store context in local instance variable, to guarantee that
// it is available on ServletContext shutdown.
if (this.context == null) {
this.context = createWebApplicationContext(servletContext);
}
if (this.context instanceof ConfigurableWebApplicationContext) {
ConfigurableWebApplicationContext cwac = (ConfigurableWebApplicationContext) this.context;
if (!cwac.isActive()) {
// The context has not yet been refreshed -> provide services such as
// setting the parent context, setting the application context id, etc
if (cwac.getParent() == null) {
// The context instance was injected without an explicit parent ->
// determine parent for root web application context, if any.
ApplicationContext parent = loadParentContext(servletContext);
cwac.setParent(parent);
}
configureAndRefreshWebApplicationContext(cwac, servletContext);
}
}
servletContext.setAttribute(WebApplicationContext.ROOT_WEB_APPLICATION_CONTEXT_ATTRIBUTE, this.context);
ClassLoader ccl = Thread.currentThread().getContextClassLoader();
if (ccl == ContextLoader.class.getClassLoader()) {
currentContext = this.context;
}
else if (ccl != null) {
currentContextPerThread.put(ccl, this.context);
}
if (logger.isDebugEnabled()) {
logger.debug("Published root WebApplicationContext as ServletContext attribute with name [" +
WebApplicationContext.ROOT_WEB_APPLICATION_CONTEXT_ATTRIBUTE + "]");
}
if (logger.isInfoEnabled()) {
long elapsedTime = System.currentTimeMillis() - startTime;
logger.info("Root WebApplicationContext: initialization completed in " + elapsedTime + " ms");
}
return this.context;
}
catch (RuntimeException ex) {
logger.error("Context initialization failed", ex);
servletContext.setAttribute(WebApplicationContext.ROOT_WEB_APPLICATION_CONTEXT_ATTRIBUTE, ex);
throw ex;
}
catch (Error err) {
logger.error("Context initialization failed", err);
servletContext.setAttribute(WebApplicationContext.ROOT_WEB_APPLICATION_CONTEXT_ATTRIBUTE, err);
throw err;
}
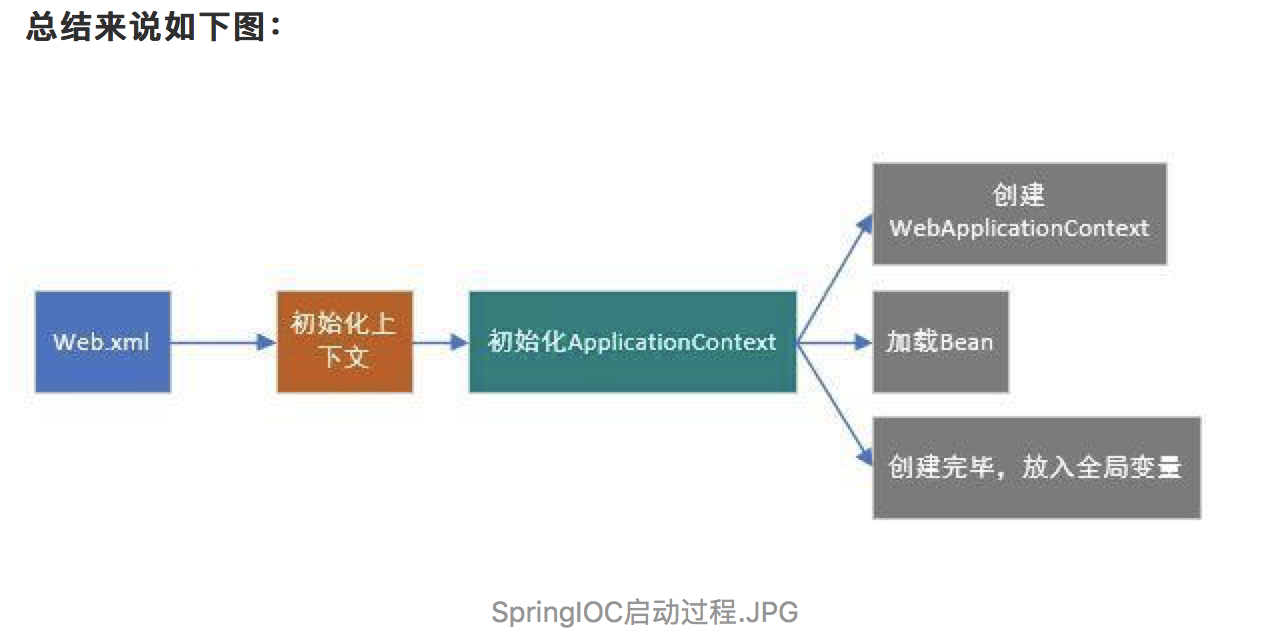
这个方法还是有点长的,其实仔细看看,出去异常错误处理,这个方法主要做了三件事:
- 创建WebApplicationContext:上述代码中
createWebApplicationContext(servletContext)方法即是完成创建WebApplicationContext工作,也就是说这个方法创建上下文对象,支持用户自定义上下文对象,但必须继承ConfigurableWebApplicationContext,而Spring MVC默认使用ConfigurableWebApplicationContext作为ApplicationContext(它仅仅是一个接口)的实现。 - 加载对应的spring配置文件中的Bean:再往下走,有一个方法
configureAndRefreshWebApplicationContext就是用来加载spring配置文件中的Bean实例的。这个方法于封装ApplicationContext数据并且初始化所有相关Bean对象。它会从web.xml中读取名为 contextConfigLocation的配置,这就是spring xml数据源设置,然后放到ApplicationContext中,最后调用传说中的refresh方法执行所有Java对象的创建。 - 将WebApplicationContext放入ServletContext(Java Web的全局变量)中:最后完成ApplicationContext创建之后就是将其放入ServletContext中,注意它存储的key值常量。
- 创建WebApplicationContext:上述代码中
servletContext.setAttribute(WebApplicationContext.ROOT_WEB_APPLICATION_CONTEXT_ATTRIBUTE, this.context);
作者:danielJinyu
本文版权归作者和博客园共有,欢迎转载,但未经作者同意请保留此段声明,请在文章页面明显位置给出原文连接
Github:https://github.com/DanielJinyu

 浙公网安备 33010602011771号