

Macbook m1 with conda-forge安装package报错和解决
- 1.以TensorFlow为例
- 2.以gensim为例
- 2.1报错:PackagesNotFoundError: The following packages are not available from current channels:
- 2.2 报错2: RuntimeError: Cython extensions are unavailable. Without them, this gensim functionality is disabled.
- 2.3报错3:ValueError: numpy.ndarray size changed, may indicate binary incompatibility. Expected 88 from C header, got 80 from PyObject
- 3.以Keras为例
- 4.以pytorch为例
持续更新~
1.以TensorFlow为例
1.1 报错1:zsh: illegal hardware instruction
实验环境:macOS Big Sur 11.5.1 + anaconda3 + python3.8
直接用 pip install tensorflow 安装,能够顺利安装tensorflow2.5.0,但是import tensorflow 的时候会报如上错误.
需要注意TensorFlow版本和Python版本的适配。
1.1.1 解决方案1:下载 安装miniforge3然后创建虚拟环境
苹果提供的tensorflow仅支持python 3.8+,而python官网只有3.9+版本支持ARM。
我们的做法是:选择通过ARM版conda创建python3.8虚拟环境,再使用创建的ARM python3.8安装tensorflow.
可参考:
MacBook m1芯片采用miniforge安装python3.9
macOS M1(Apple Silicon) 安装配置 Conda 环境
Step 1:下载ARM版Miniforge3:
选择最新的arm64版本;
https://github.com/conda-forge/miniforge/releases/latest/download/Miniforge3-MacOSX-arm64.sh
具体可以去GitHub看:
https://github.com/conda-forge/miniforge/#download
下载Miniforge3-MacOSX-arm64.sh到自己的Download目录里:
终端cd Downlaod/后,开始运行脚本:
bash Miniforge3-MacOSX-arm64.sh
这里安装开始,一定要慢慢回车,问题全部选择yes.
因为这里我就踩坑了,选了个No,但是没关系,可以重装Miniforge3:具体终端里删除相关文件就好了。具体操作如下:
rm -rf ~/miniforge3
rm -rf .conda
rm -rf .condarc
然后重新执行安装命令:
bash Miniforge3-MacOSX-arm64.sh
安装完成后重启终端,然后输入Python就可以看到Python 3.9了。
这样miniforge就安装好了。
Step2:创建虚拟环境
创建Python3.8虚拟环境并安装TensorFlow:
conda create -n py38 python=3.8
conda activate py38
进入虚拟环境后,直接conda install 就能安装TensorFlow库了。
漫长的等待各个库安装完毕即可。
最后进入Python来验证下能否import tensorflow.
1.2 报错2:NotImplementedError: Cannot convert a symbolic Tensor
实验环境
TensorFlow2.4.1(Macbook m1 with conda-forge)
报错:NotImplementedError: Cannot convert a symbolic Tensor (bidirectional/forward_lstm/strided_slice:0)
1.2.1 解决方案
numpy版本过高,conda安装指定版本的numpy 1.19.5即可解决问题。
conda search numpy
conda install numpy=1.19.5 -c conda-forge
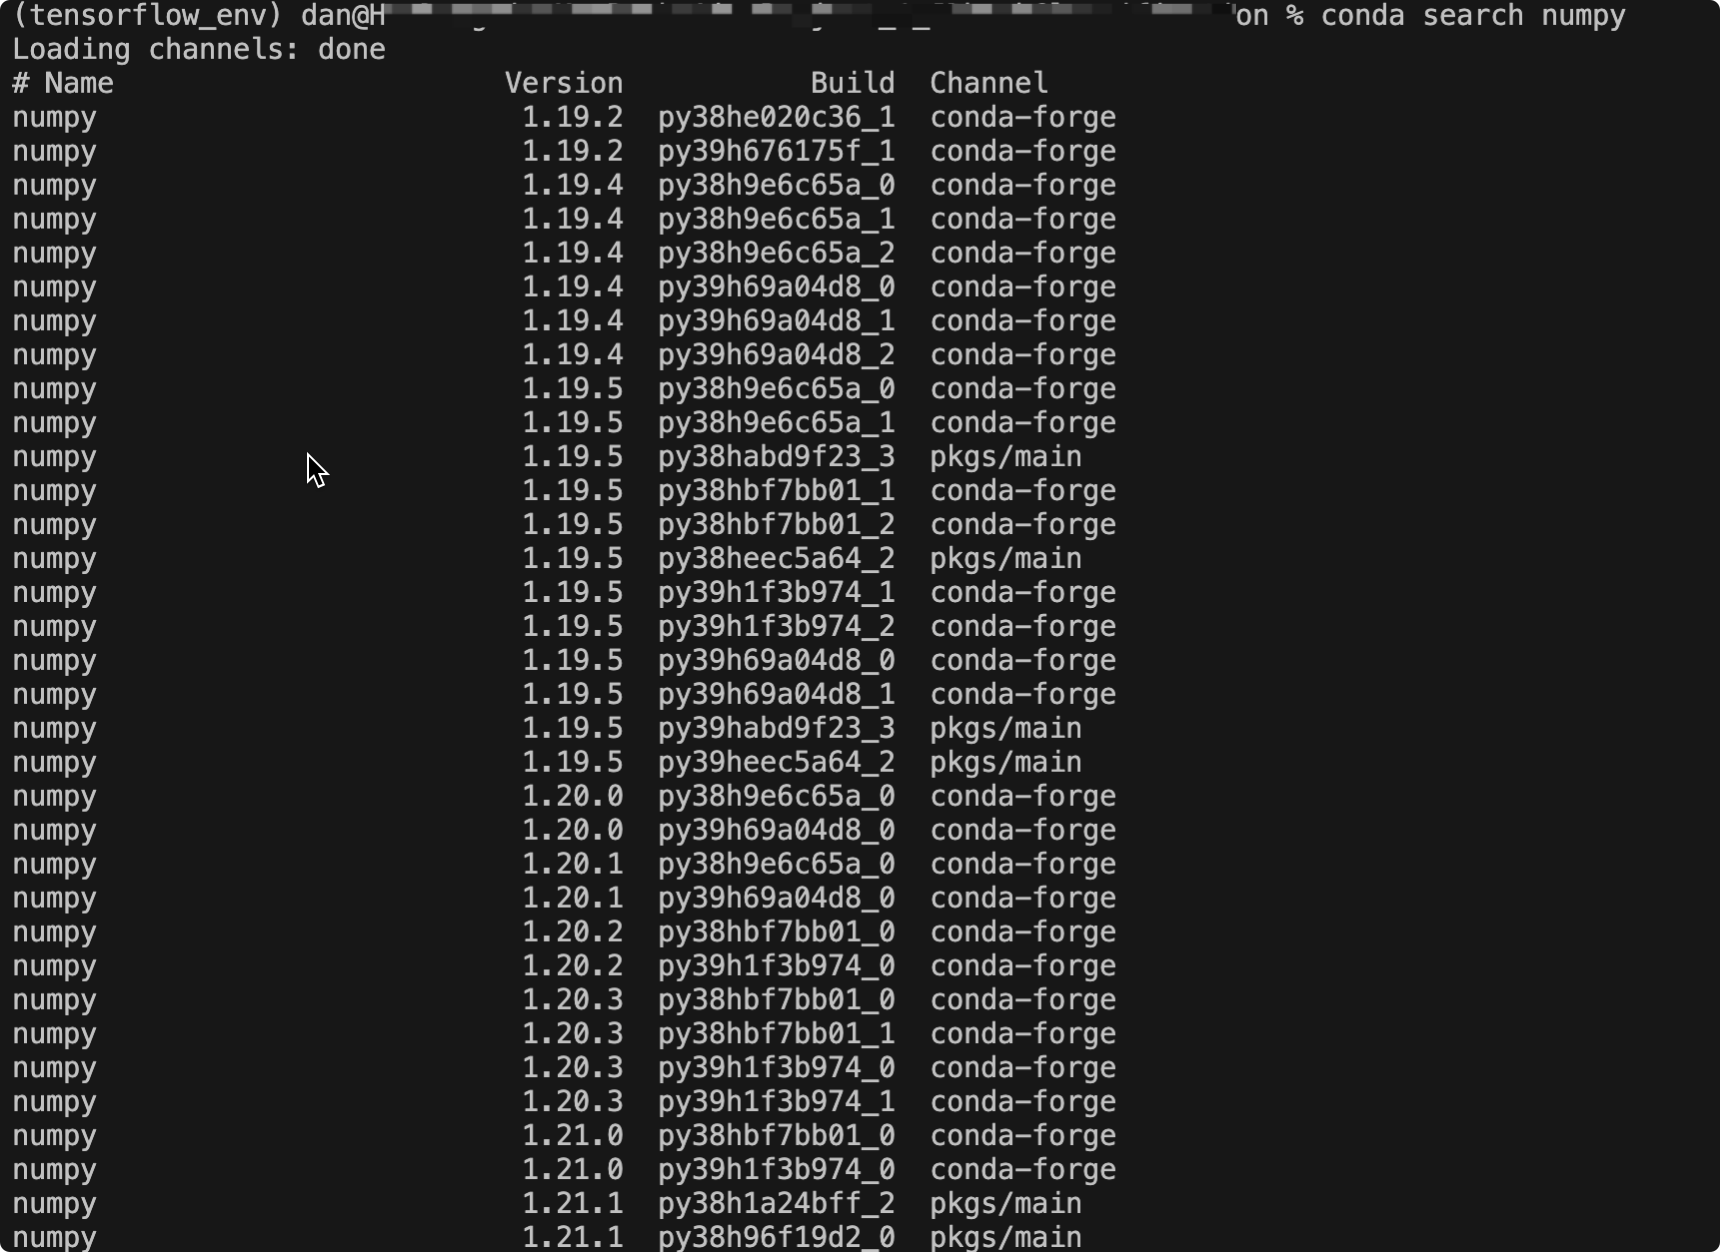
建议conda用户先切换到tensorflow所在的虚拟环境(conda activate tensorflow_env), 然后使用conda search --full --name numpy, 其中显示的numpy版本逐个尝试(建议先尝试1.19.X这个大版本)应该会解决问题.
2.以gensim为例
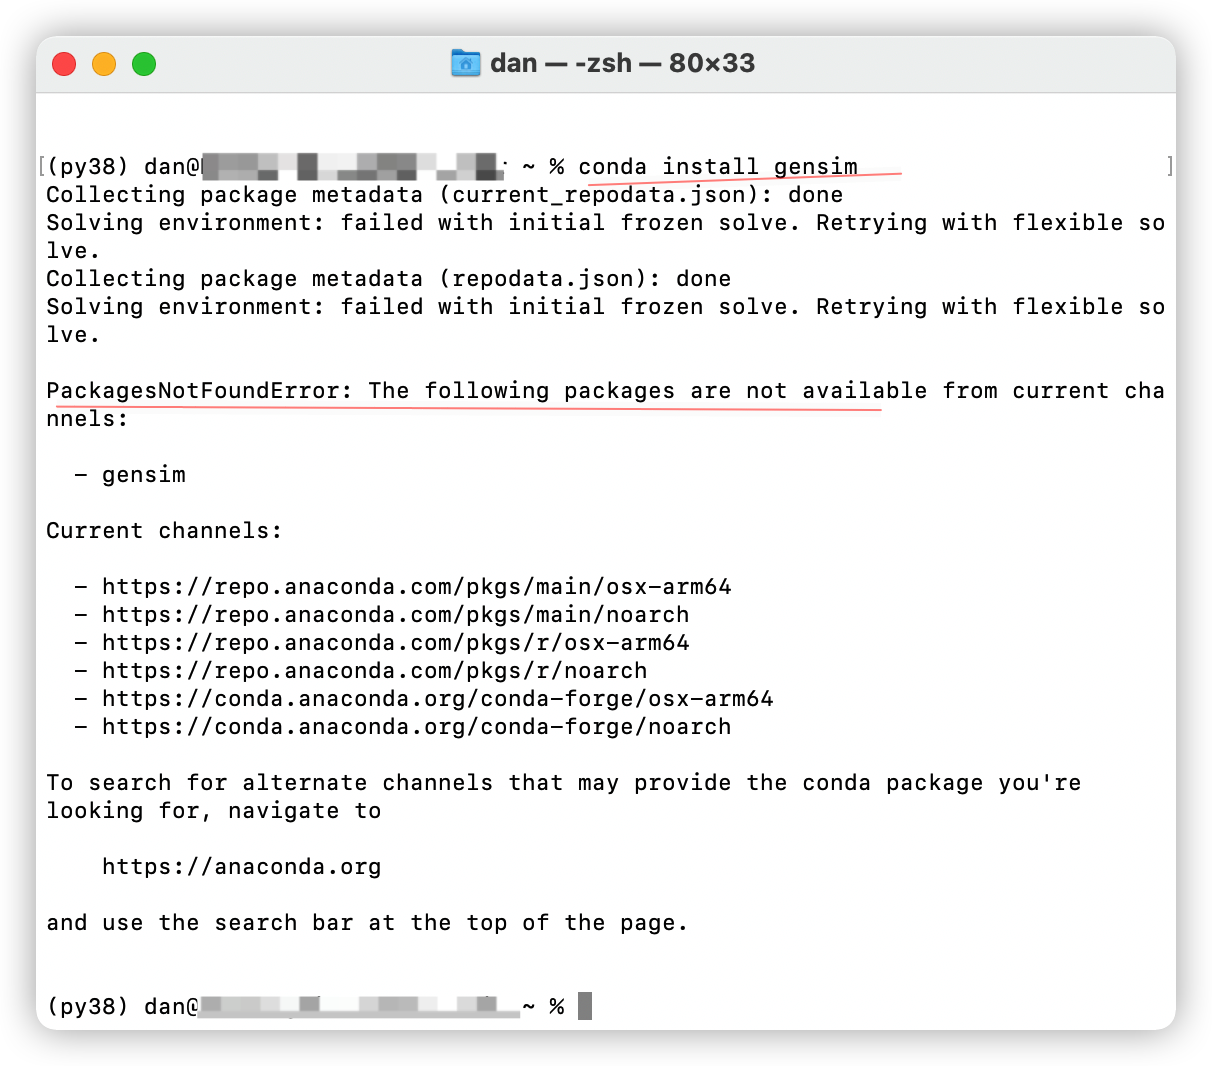
2.1报错:PackagesNotFoundError: The following packages are not available from current channels:
conda install X出现找不到X包问题,如下所示:默认的channels里找不到。
2.1.1 解决方案1:用pip install X 来安装X包,发现可以找到包并下载,然后等待能否successfully。
如果出现一直等待的Installing build dependencies ...
这里应该是缺少Python 依赖,可以尝试添加新镜像:
conda config --add channels https://mirrors.tuna.tsinghua.edu.cn/anaconda/cloud/conda-forge/
之后再试一下能否正常安装X包:Python是否可以import。
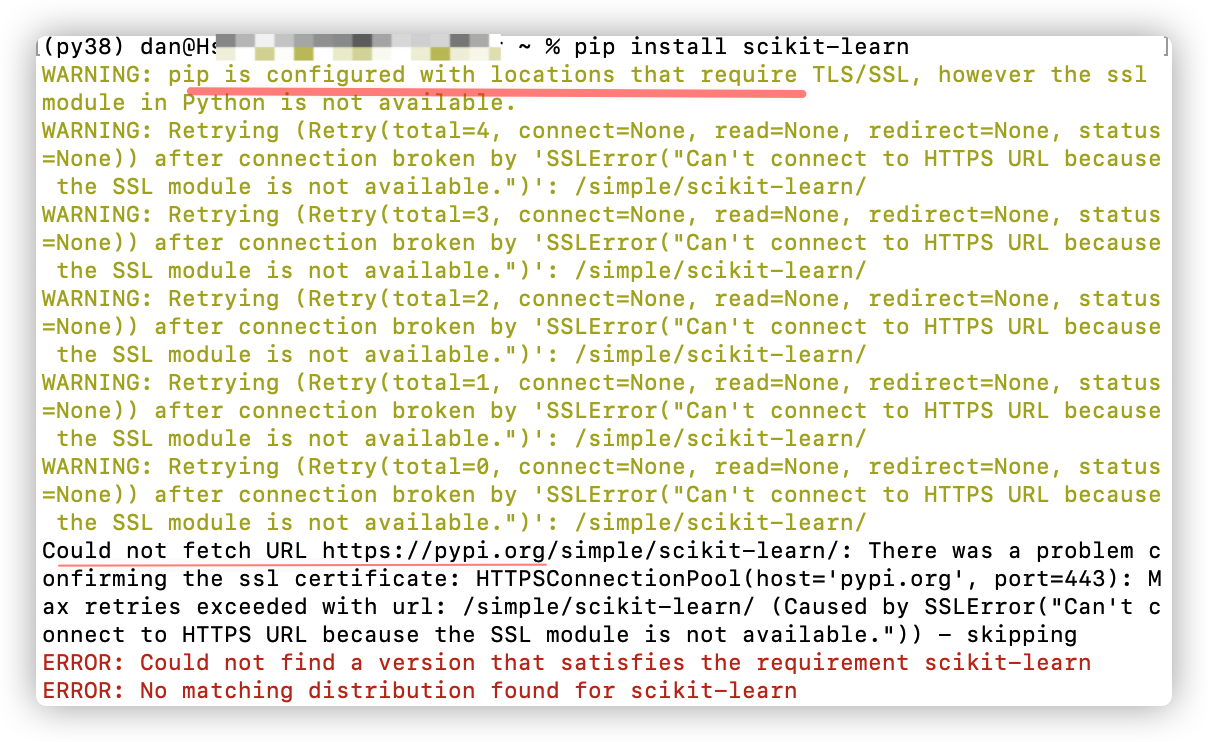
如果出现pip的warning:
WARNING: pip is configured with locations that require TLS/SSL, however the ssl module in Python is not available.
因为pip安装第三方库需要ssl模块,而python默认安装ssl功能是不可用的.
2.1.1.1 解决方法1-1:针对pip is configured with locations that require TLS/SSL问题:重新编译Python3安装文件,加上--with-ssl参数让pip3使用SSL功能。
# 重新编译安装
./configure --enable-optimizations --with-ssl
注意:可以参考:异常处理pip is configured with locations that require TLS/SSL
2.1.1.2 解决方法1-2:针对pip is configured with locations that require TLS/SSL问题:更换pip源,即添加国内镜像。
conda config --add channels https://mirrors.tuna.tsinghua.edu.cn/anaconda/pkgs/free/
conda config --add channels https://mirrors.tuna.tsinghua.edu.cn/anaconda/pkgs/main/
conda config --set show_channel_urls yes
国内一些常用的软件源如下:
阿里云:http://mirrors.aliyun.com/pypi/simple/
中国科技大学:https://pypi.mirrors.ustc.edu.cn/simple/
豆瓣:http://pypi.douban.com/simple/
清华大学:https://pypi.tuna.tsinghua.edu.cn/simple/
中国科学技术大学:http://pypi.mirrors.ustc.edu.cn/simple/
注意:添加这个国内镜像,可能会与你已经存在的来自conda-forge的包产生冲突,因为版本不统一,就造成import一个包(来自国内镜像)时,因为需要另几个包(可能来自conda-forge和Anaconda默认镜像)的支持,而引发导入错误,所以还是统一下。
个人还是推崇用default的,虽然下载比较慢,但是版本更新及时且很少有冲突。因为吃过清华源的亏。
如果嫌麻烦,安装了Anaconda的请看解决方案2.
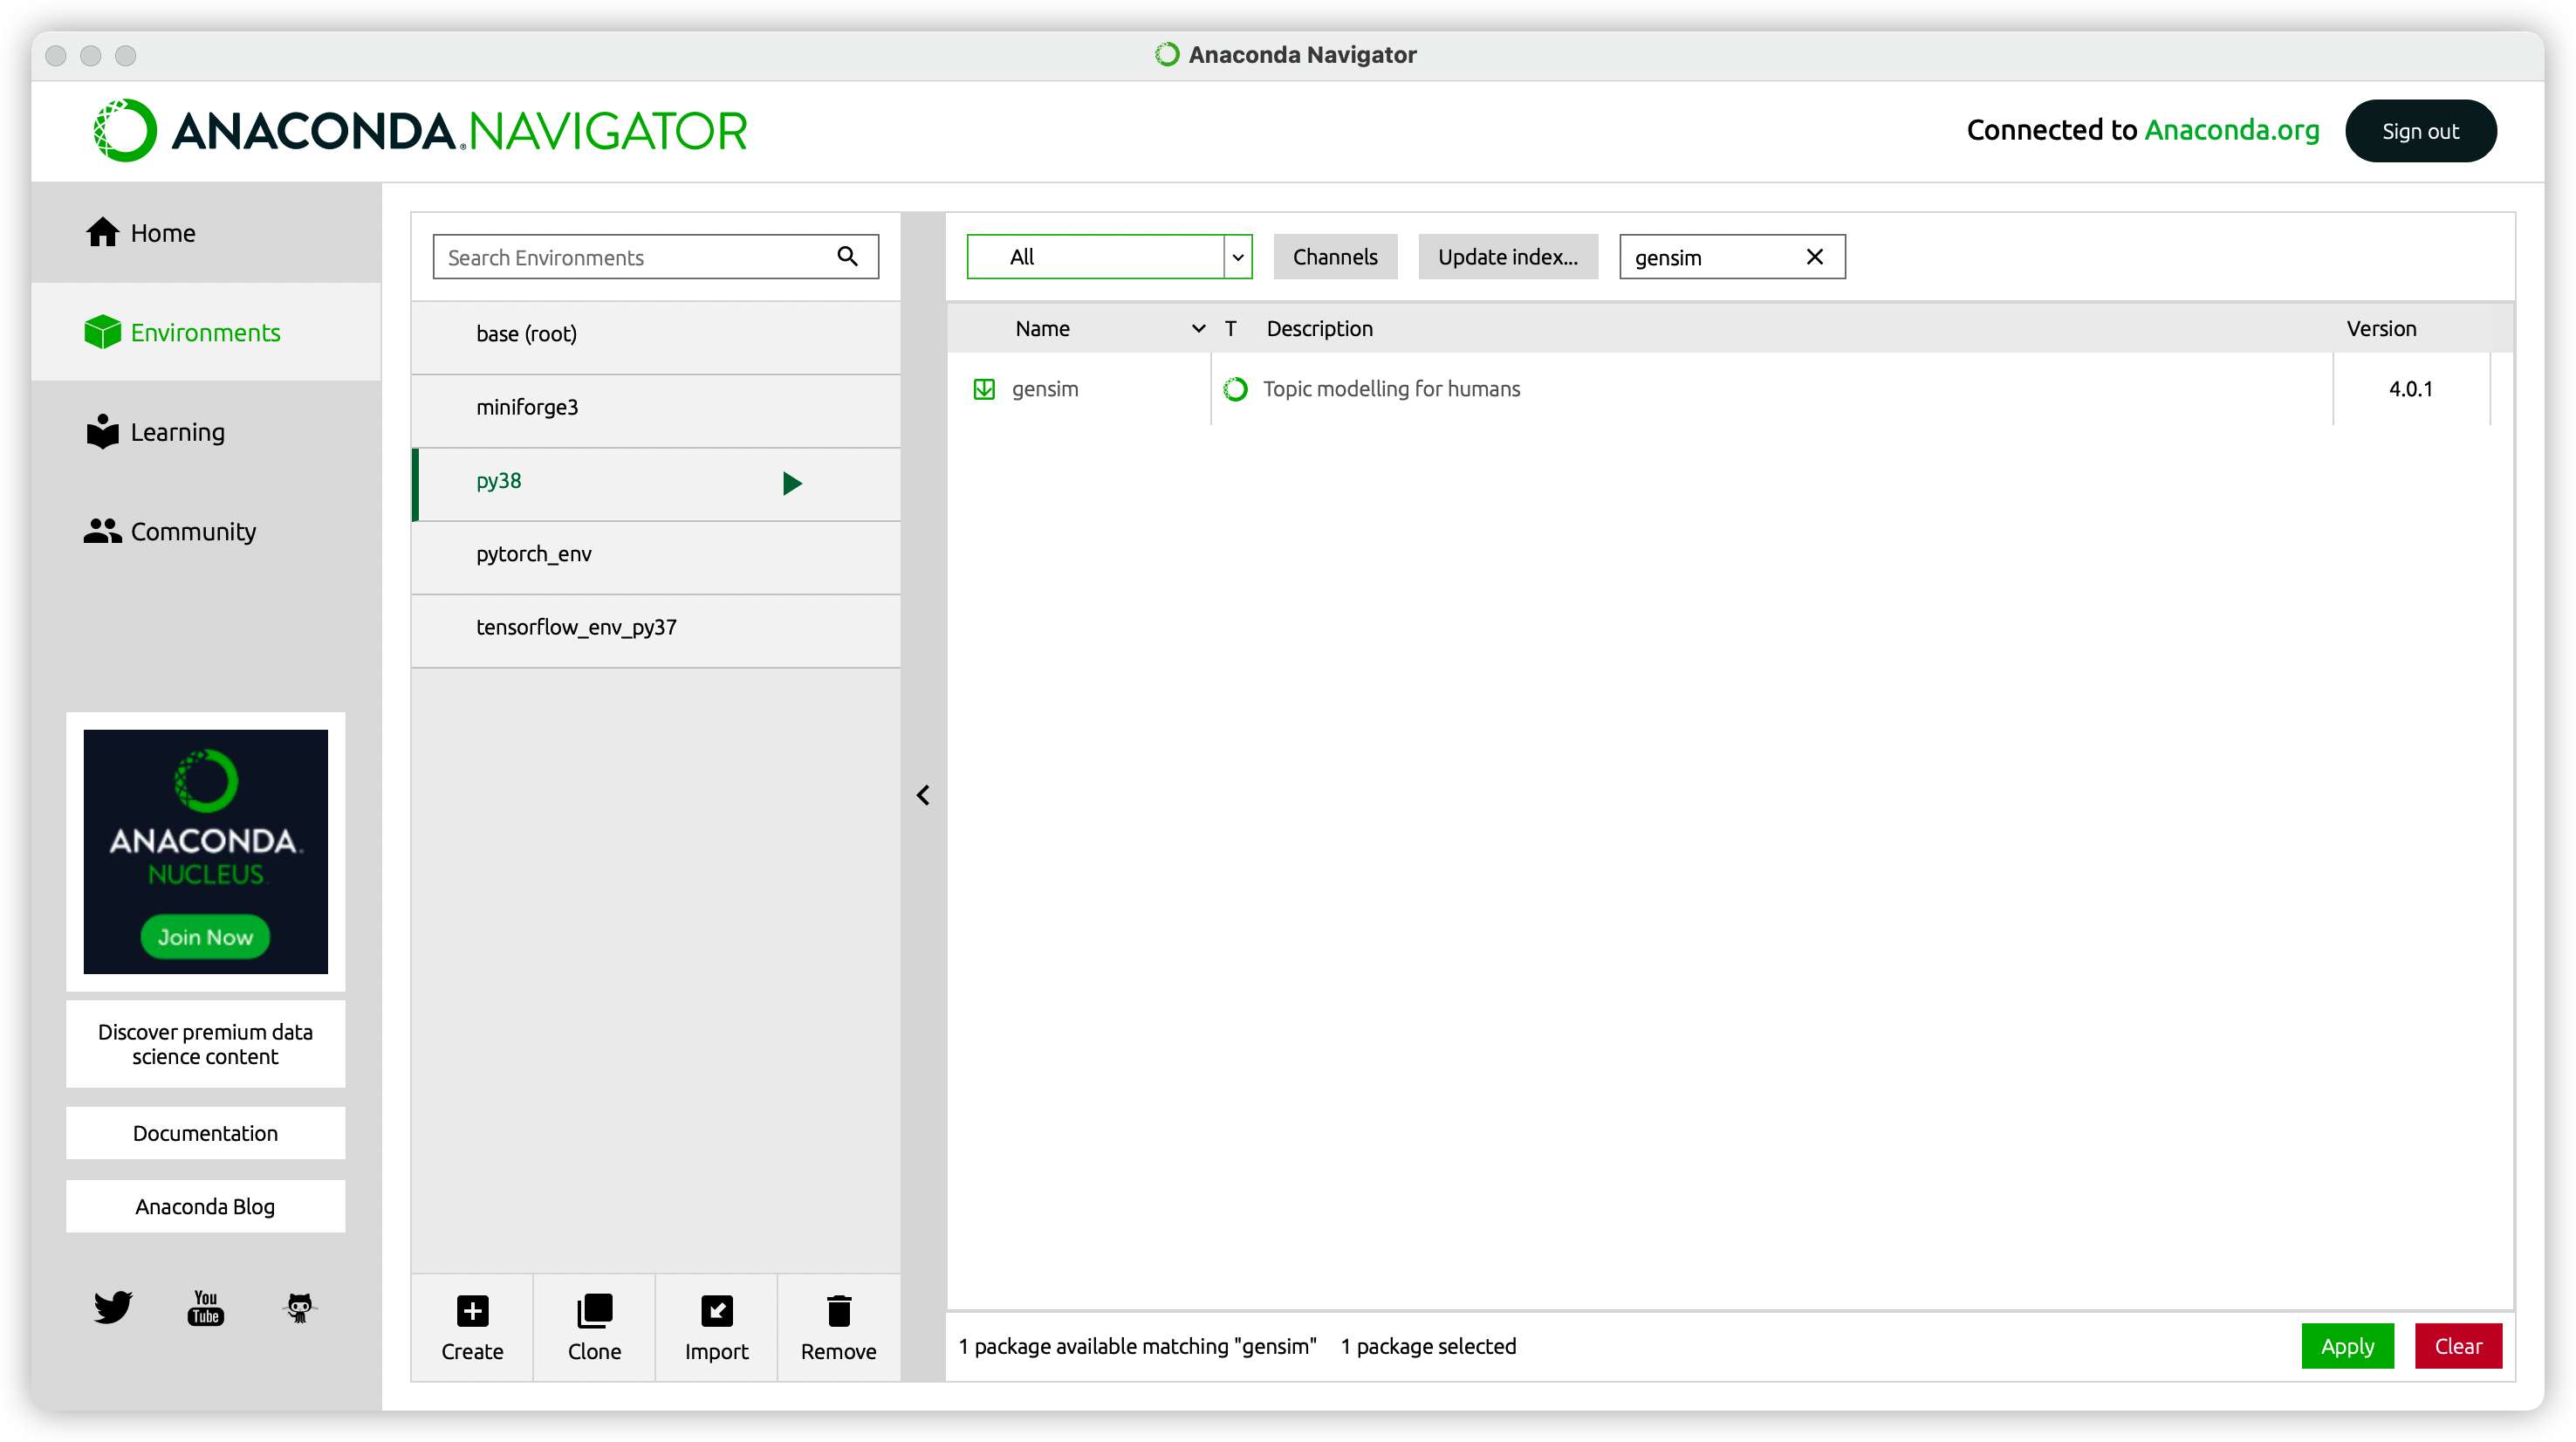
2.1.1.2 解决方案2:不要终端命令了,直接使用Anaconda Navigator界面Environments里手动添加吧。
如果安装成功,检查下Python里能否import了,如果import不成功,又出幺蛾子了,那就继续修行。可以看异常2了。
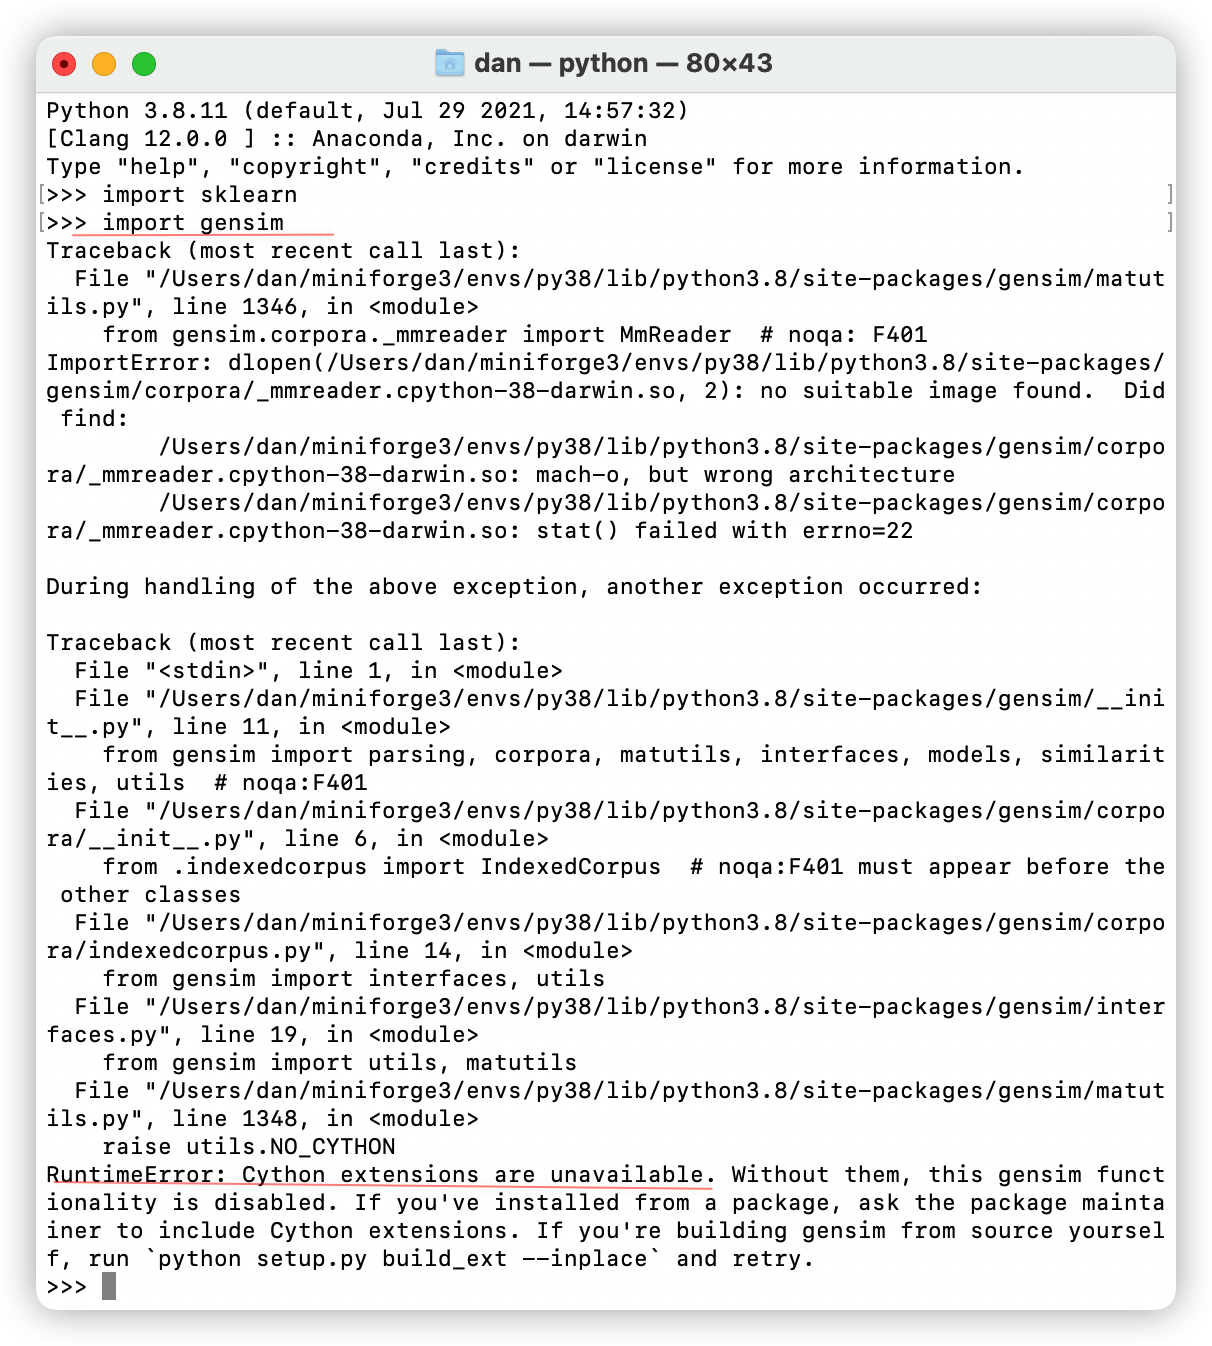
2.2 报错2: RuntimeError: Cython extensions are unavailable. Without them, this gensim functionality is disabled.
这个是我在安装gensim时出错,这个之前在Windows上就经常安装报错,这次在macOS M1芯片上依旧坑了。
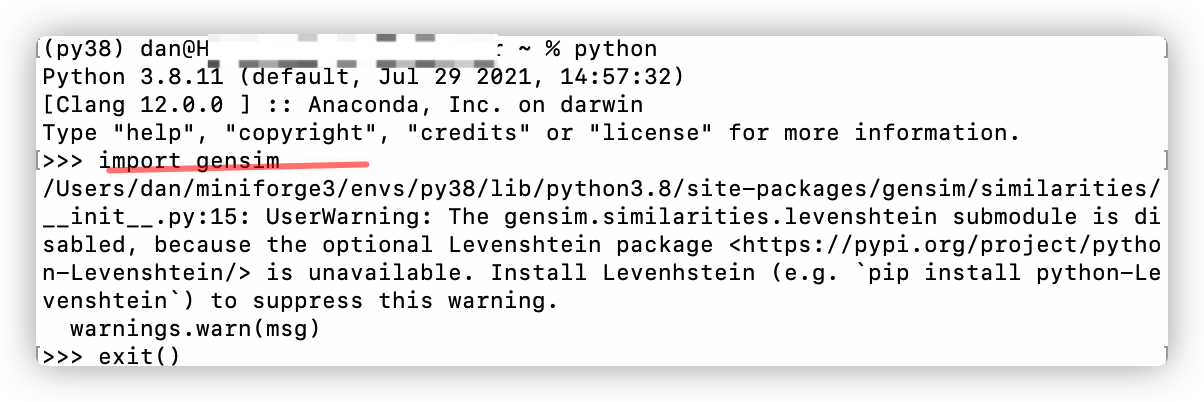
利用miniforge3创建的conda环境(base) [/Users/dan/miniforge3/bin/python]是可以通过pip install gensim安装成功且可以import的。如下所示。
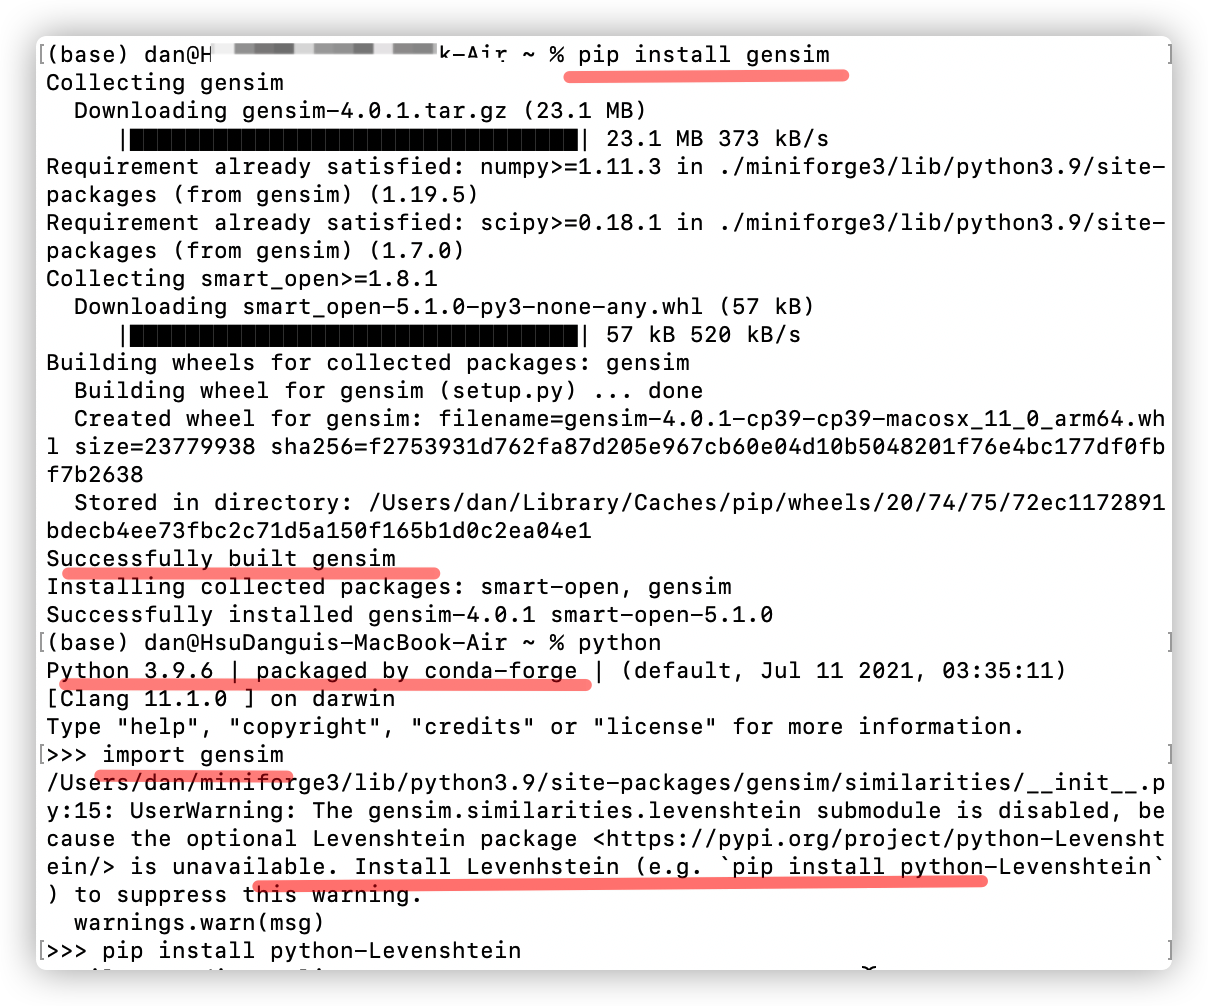
但是在自己创建的虚拟环境(py38)[/Users/dan/miniforge3/envs/py38/bin/python]下就报错了。
Anaconda上显示安装成功,但是import时就不行了。
然后卸了,重新pip install gensim 装下。就出现异常1-1中的warning以及Could not fetch URL https://pypi.org/simple/gensim/。
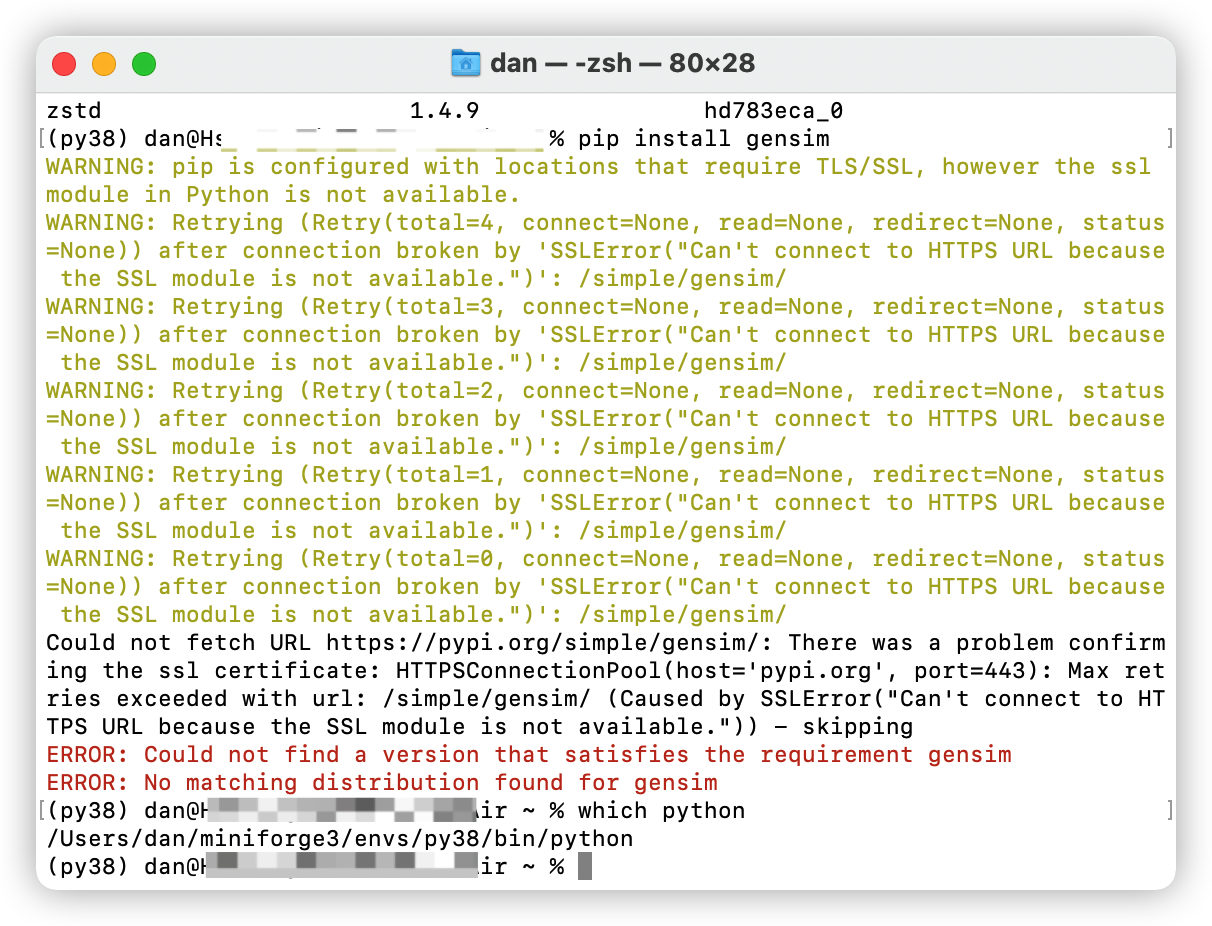
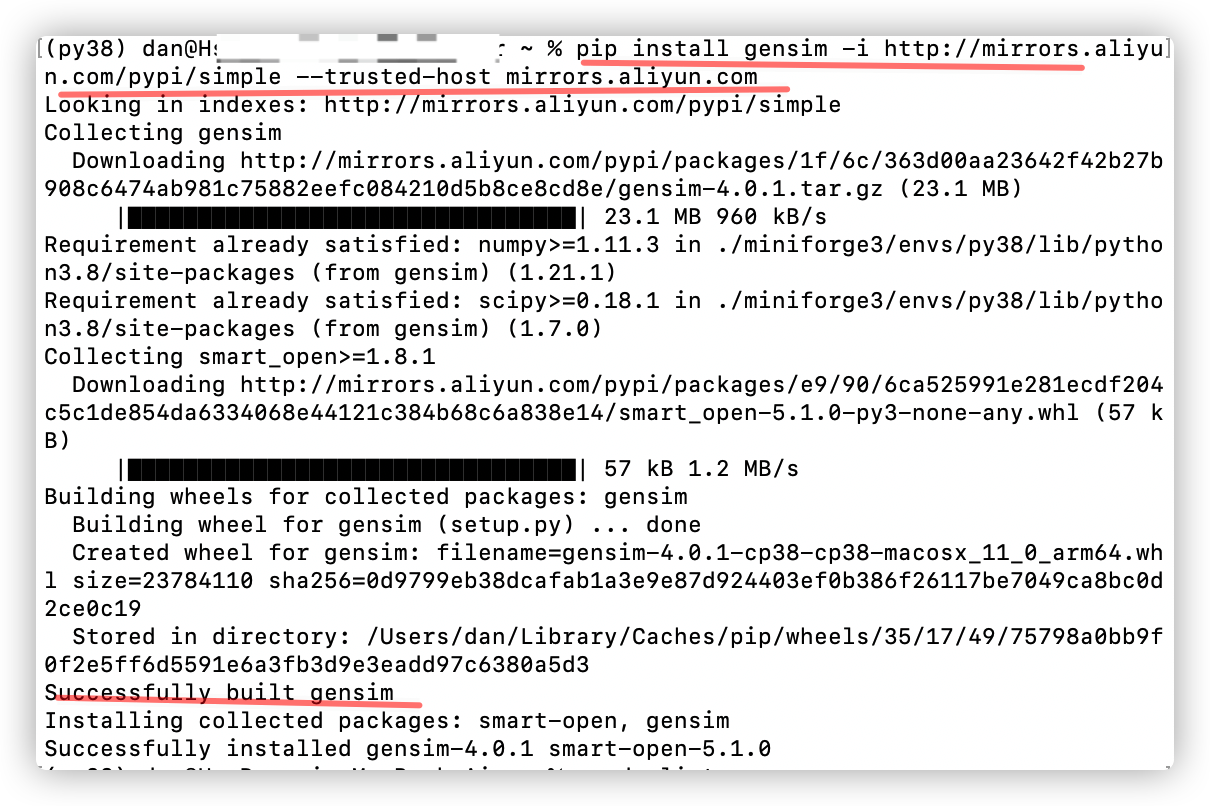
看起来貌似是证书的错误,后面又好像是URL来源的问题,那就换成国内的pip源试一试。默认的是:

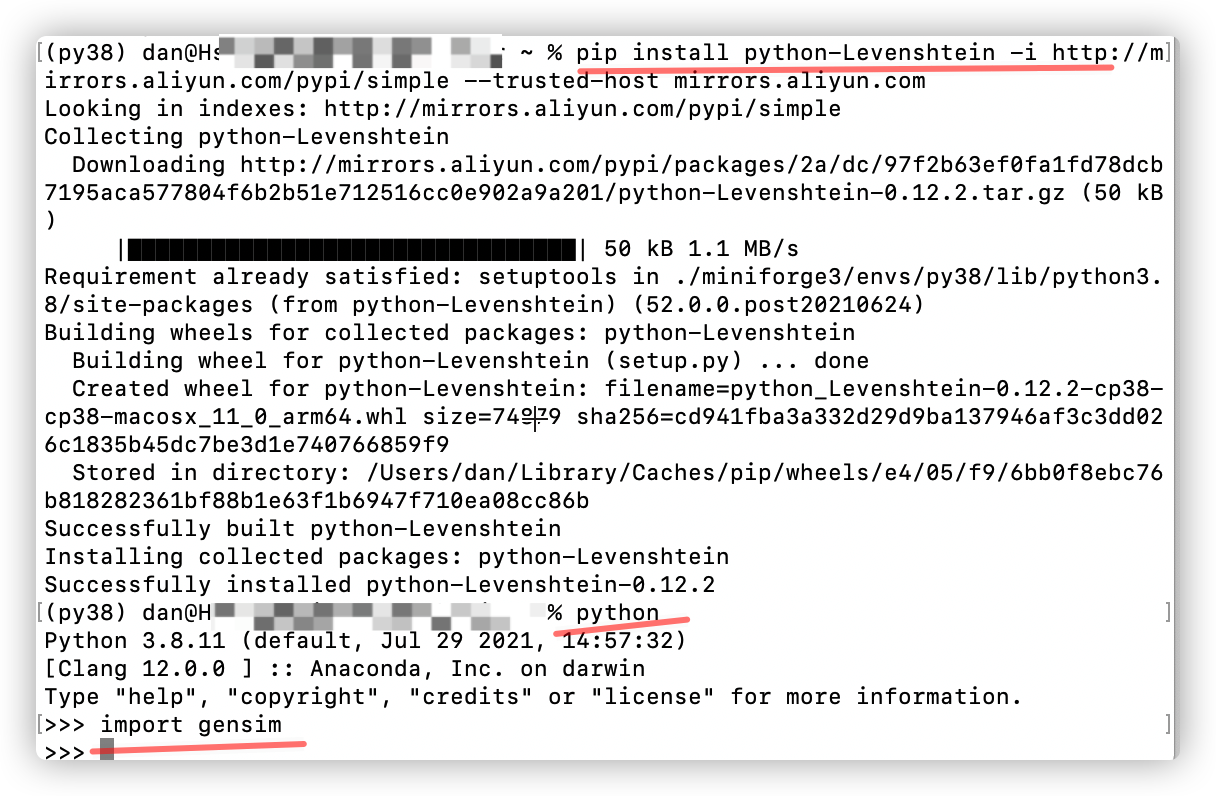
pip install gensim -i http://mirrors.aliyun.com/pypi/simple --trusted-host mirrors.aliyun.com
然后就成功了。
然后验证下吧。
有个小warning,根据提示再把这个安装下就好了。
2.3报错3:ValueError: numpy.ndarray size changed, may indicate binary incompatibility. Expected 88 from C header, got 80 from PyObject
实验环境:TensorFlow2.6.0, numpy 1.19.5
报错:NotImplementedError: Cannot convert a symbolic Tensor (sequential/simple_rnn/strided_slice:0) to a numpy array. This error may indicate that you’re trying to pass a Tensor to a NumPy call, which is not supported
问题:发现是numpy的版本问题,出错时numpy版本是1.19.5,因为安装了TensorFlow2.6.0版本,将原来的numpy 2.0.5版本降级到了1.19.5.之后在from gensim import models时出现了这个问题。
解决:考虑卸载gensim,重装。
3.以Keras为例
3.1 报错1:ImportError: Keras requires TensorFlow 2.2 or higher. Install TensorFlow via pip install tensorflow
实验环境:
tensorflow_env:
TensorFlow目前的版本是2.4.1,Keras目前版本是2.4.3,Python 3.8.6 (Macbook m1 with conda-forge)
解决:
Keras版本太高,通过降低版本到2.2来解决。
根据https://docs.floydhub.com/guides/environments/里列出的TensorFlow与Keras的版本对应关系,选择合适的版本:
3.2 报错2:TypeError: ('Keyword argument not understood:', 'input')
这是Keras版本的问题,keras 2.4.3中Model的参数设置:inputs, outputs
class Model(tensorflow.python.keras.engine.base_layer.Layer, tensorflow.python.keras.utils.version_utils.ModelVersionSelector)
| Model(*args, **kwargs)
|
|
Modelgroups layers into an object with training and inference features.|
| Arguments:
| inputs: The input(s) of the model: a
keras.Inputobject or list of|
keras.Inputobjects.| outputs: The output(s) of the model. See Functional API example below.
| name: String, the name of the model.
|
将self.encoder = Model(input=inp, output=encoder_output)改为
self.encoder = Model(inputs=inp, outputs=encoder_output)即可。
4.以pytorch为例
如果安装Pytorch,进入官网https://pytorch.org/get-started/locally/选择版本:官网给出了各种安装方法。
在前面安装好miniforge3的基础上,在Anaconda上的可以安装Pytorch1.8.0版本。
conda install pytorch torchvision -c pytorch

 浙公网安备 33010602011771号