


自动化运维工具-Ansible基础及Ansible Ad-Hoc
1.2)Ansible可以完成哪些功能呢?
1.3)Ansible特点
2.1)ansible安装三、Ansible Inventory
4.4)使用ad-hoc执行一次远程命令,注意观察返回结果的颜色
1、Ansible基础概述
Ansible是一个IT自动化的配置管理工具,自动化主要体现在Ansible集成了丰富模块,丰富的功能的组件,可以通过一个命令行完成一系列的操作。进而能减少我们重复性的工作和降低维护成本(降低出错率),以提高工作的效率。

1.2)Ansible可以完成哪些功能呢?
1)批量执行远程命令,可以对N多台主机同时进行命令的执行。
2)批量配置软件服务,可以以自动化的方式进行配置和管理服务。
3)实现软件开发功能,jumpserver底层使用ansible来实现自动化管理。
4)编排高级的IT任务,Ansible的Playbook是一门编程语言,可以用来描绘一套IT架构。
5)事件驱动
通过Ansible的模块,对服务进行不同的事件驱动
比如:
1)修改配置后重启
2)只修改配置文件,不重启
3)修改配置文件后,重新加载
4)远程启停服管理
6)管理公有云
通过API接口的方式管理公有云,不过这方面做的不如saltstack。saltstack本身可以通过saltcloud管理各大云厂商的云平台。
7)二次开发
因为语法是Python,所以便于运维进行二次开阿发。
8)任务编排
可以通过playbook的方式来统一管理服务,并且可以使用一条命令,实现一套架构的部署。
跨平台、跨系统
几乎不受到平台和系统的限制,比如安装apache和启动服务。
在Ubuntu上安装apache服务名字叫apache2
在CentOS安装apache服务名字叫httpd
在CentOS6上启动服务器使用命令:/etc/init.d/nginx start
在CentOS7上启动服务器使用命令:systemctl start nginx
1.3)Ansible特点
1)容易学习,无代理模式,不像saltstack既要学客户端与服务端,还要学客户端与服务端中间通讯协议;
2)操作灵活,体现在Ansible有较多的模块,提供了丰富的功能,playbook则提供类似于编程语言的复杂功能;
3)简单易用,体现在Ansible一个命令可以完成很多事情;
4)安全可靠,因为Ansible使用了SSH协议进行通讯,既稳定又安全;
5)移植性高,可以将写好的playbook拷贝至任意机器进行执行。
1.4)Ansible基础架构(有必要了解,是知识要点)
Ansible的架构中的控制节点,被控制节点,inventroy、ad-hoc、playbook、连接协议这些是什么?
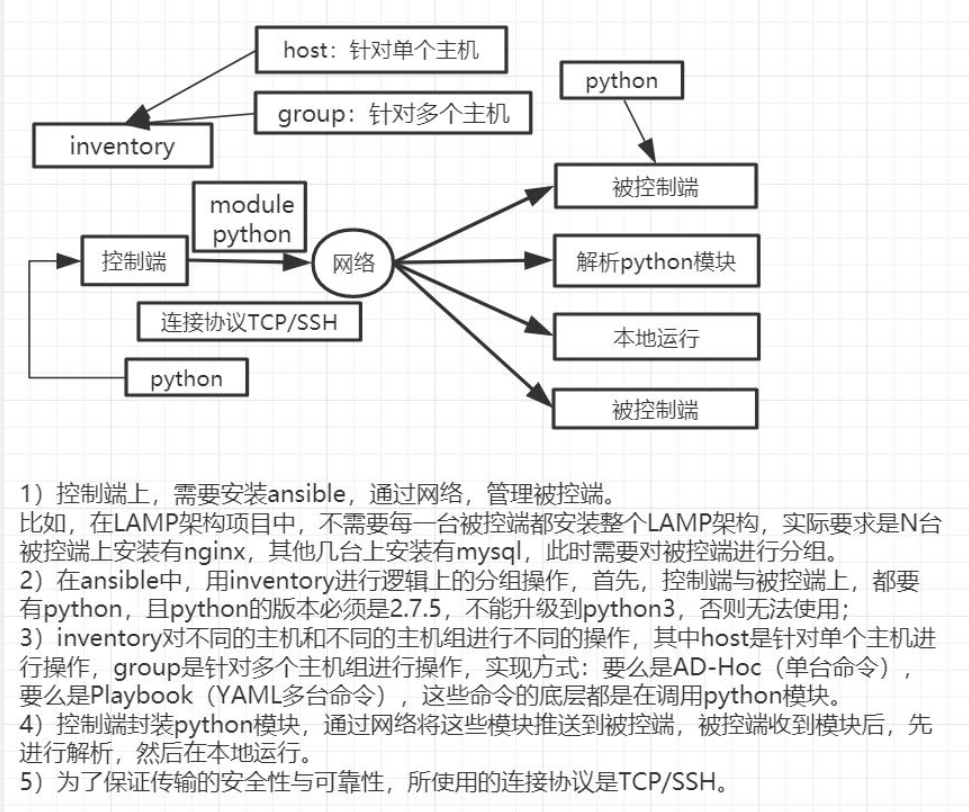
Ansible的执行流程
1、Ansible读取playbook剧本,剧本中会记录对哪些主机执行哪些任务。
2、首先Ansible通过主机清单找到要执行的主机,然后调用具体的模块。
3、其次Ansible会通过连接插件连接对应的主机并推送对应的任务列表。
4、最后被管理的主机会将Ansible发送过来的任务解析为本地Shell命令执行。
二、ansible安装
2.1)ansible安装
#安装ansible的前提是要有epel源
[root@m01 ~]# vim /etc/yum.repos.d/epel.repo
[root@m01 ~]# yum install ansible
#检查ansible版本
[root@m01 ~]# ansible --version
ansible 2.8.4
config file = /etc/ansible/ansible.cfg
configured module search path = [u'/root/.ansible/plugins/modules', u'/usr/share/ansible/plugins/modules']
ansible python module location = /usr/lib/python2.7/site-packages/ansible
executable location = /usr/bin/ansible
python version = 2.7.5 (default, Oct 30 2018, 23:45:53) [GCC 4.8.5 20150623 (Red Hat 4.8.5-36)]
ansible配置文件存在优先级的问题
# nearly all parameters can be overridden in ansible-playbook
# or with command line flags. ansible will read ANSIBLE_CONFIG,
# ansible.cfg in the current working directory, .ansible.cfg in
# the home directory or /etc/ansible/ansible.cfg, whichever it
# finds first
[root@m01 ~]# rpm -ql ansible
[root@m01 ~]# zcat /usr/share/man/man1/ansible-config.1.gz
#要查看完整列表,请访问https://docs.ansible.com/或使用ansible-config命令。
For a full list check \fI\%https://docs.ansible.com/\fP\&. or use the \fIansible\-config\fP command.
#/etc/ansible/ansible.cfg配置文件,如果存在则使用。
/etc/ansible/ansible.cfg \-\- Config file, used if present
#~/.ansible.cfg用户配置文件,覆盖默认配置(如果存在)
~/.ansible.cfg \-\- User config file, overrides the default config if present
#\&./ansible.cfg本地配置文件(在当前工作目录中)假定为(aqproject specific)(aq,如果存在,则重写其余文件)。
\&./ansible.cfg \-\- Local config file (in current working directory) assumed to be \(aqproject specific\(aq and overrides the rest if present.
#入上所述,ANSIBLE_CONFIG环境变量将覆盖所有其他环境变量。
As mentioned above, the ANSIBLE_CONFIG environment variable will override all others.
1)ANSIBLE_CONFIG
2)ansible.cfg                 #当前项目目录
3).ansible.cfg                #当前用户的家目录
4)/etc/ansible/ansible.cfg    #如果都没有,则读取/etc/ansible/ansible.cfg,它优先级最低
ansible配置文件详解
[root@m01 ~]# cat /etc/ansible/ansible.cfg
#inventory = /etc/ansible/hosts #主机列表配置文件
#library = /usr/share/my_modules/ #库文件存放目录
#remote_tmp = ~/.ansible/tmp #临时py文件存放在远程主机目录
#local_tmp = ~/.ansible/tmp #本机的临时执行目录
#forks = 5 #默认并发数
#sudo_user = root #默认sudo用户
#ask_sudo_pass = True #每次执行是否询问sudo的ssh密码
#ask_pass = True #每次执行是否询问ssh密码
#remote_port = 22 #远程主机端口
host_key_checking = False #跳过检查主机指纹
log_path = /var/log/ansible.log #ansible日志
[privilege_escalation] #如果是普通用户则需要配置提权
#become=True
#become_method=sudo
#become_user=root
#become_ask_pass=False
三、Ansible Inventory
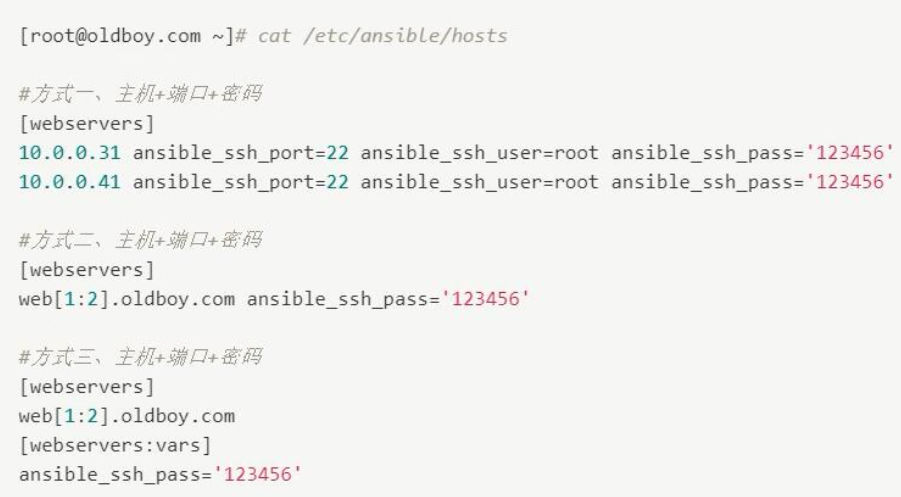
Inventory文件中填写需要被管理主机与主机组信息(逻辑上定义)。默认Inventory文件在/etc/ansible/hosts。当然也可以自定义,然后使用-i指定Inventory文件位置。下面通过几个场景演示如何配置Inventory文件。
3.1)场景一:基于密码连接
3.2、场景二:基于密钥连接,需要先创建公钥和私钥,并下发公钥至被控端
1)ansible管理机下发公钥
[root@m01 ~]# ssh-copy-id -i ~/.ssh/id_rsa.pub root@172.16.1.7
[root@m01 ~]# ssh-copy-id -i ~/.ssh/id_rsa.pub root@172.16.1.8
#检查是否存在公钥,若已存在则不必更新了
[root@m01 ~]# ssh-keygen
Generating public/private rsa key pair.
Enter file in which to save the key (/root/.ssh/id_rsa):
Created directory '/root/.ssh'.
Enter passphrase (empty for no passphrase):
Enter same passphrase again:
Your identification has been saved in /root/.ssh/id_rsa.
Your public key has been saved in /root/.ssh/id_rsa.pub.
The key fingerprint is:
SHA256:KPOcbRCXTz7GXhjysaEJXaABJpZKSI+7xfQaPtjiJVY root@m01
The key's randomart image is:
+---[RSA 2048]----+
|o.o.o.. ... |
|.o+o + o |
|.o o + = = |
|. + . = X * |
| . Eo.o S X . |
| B o= + o o |
| * * + o . |
|o + . . |
| . |
+----[SHA256]-----+
#表示公钥已存在
[root@m01 ~]# ls ~/.ssh/
id_rsa id_rsa.pub
#ansible管理机下发公钥至web01
[root@m01 ~]# ssh-copy-id -i ~/.ssh/id_rsa.pub root@172.16.1.7
/usr/bin/ssh-copy-id: INFO: Source of key(s) to be installed: "/root/.ssh/id_rsa.pub"
/usr/bin/ssh-copy-id: INFO: attempting to log in with the new key(s), to filter out any that are already installed
/usr/bin/ssh-copy-id: INFO: 1 key(s) remain to be installed -- if you are prompted now it is to install the new keys
Number of key(s) added: 1
Now try logging into the machine, with: "ssh 'root@172.16.1.7'"
and check to make sure that only the key(s) you wanted were added.
#通过公钥方式连接一下web02,连接成功后使用exit命令断开连接
[root@m01 ~]# ssh 'root@172.16.1.8'
[root@m01 ~]# ssh-copy-id -i ~/.ssh/id_rsa.pub root@172.16.1.8
/usr/bin/ssh-copy-id: INFO: Source of key(s) to be installed: "/root/.ssh/id_rsa.pub"
/usr/bin/ssh-copy-id: INFO: attempting to log in with the new key(s), to filter out any that are already installed
/usr/bin/ssh-copy-id: INFO: 1 key(s) remain to be installed -- if you are prompted now it is to install the new keys
Number of key(s) added: 1
Now try logging into the machine, with: "ssh 'root@172.16.1.8'"
and check to make sure that only the key(s) you wanted were added.
#方式1:主机+端口+密钥
#创建主机目录
[root@m01 ~]# mkdir project1/
[root@m01 ~]# cd project1/
#在project1目录下创建并配置hosts主机清单
[root@m01 project1]# vim hosts
[oldboy]
172.16.1.7
172.16.1.8
保存并退出
[root@m01 project1]# ansible oldboy -m ping -i hosts
#配置成功
172.16.1.7 | SUCCESS => {
"ansible_facts": {
"discovered_interpreter_python": "/usr/bin/python"
},
"changed": false,
"ping": "pong"
}
172.16.1.8 | SUCCESS => {
"ansible_facts": {
"discovered_interpreter_python": "/usr/bin/python"
},
"changed": false,
"ping": "pong"
}
=====================================================
##方式2:别名+主机+端口+密钥
#在project1目录下创建并配置hosts主机清单
[root@m01 project1]# vim hosts
[oldboy]
web01 ansible_ssh_host=172.16.1.7
web02 ansible_ssh_host=172.16.1.8
[root@m01 project1]# ansible oldboy -m ping -i hosts
#配置成功
web02 | SUCCESS => {
"ansible_facts": {
"discovered_interpreter_python": "/usr/bin/python"
},
"changed": false,
"ping": "pong"
}
web01 | SUCCESS => {
"ansible_facts": {
"discovered_interpreter_python": "/usr/bin/python"
},
"changed": false,
"ping": "pong"
}
3)列出每个主机组下面的主机情况
[root@m01 project1]# ansible oldboy -i hosts --list-hosts
hosts (2):
172.16.1.7
172.16.1.8
生产案例1、如果控制端和被控制端第一次通讯,需要确认指纹信息,如果机器特别多少的情况下怎么办?
将 Ansible 配置文件中的 host_key_checking = False 参数注释打开即可。 但要注意ansible.cfg文件的读取顺序。
[root@m01 project1]# vim /etc/ansible/ansible.cfg
将 Ansible 配置文件中的 host_key_checking = False 参数注释打开
#确保读的是如下的配置文件
[root@m01 project1]# ansible --version
ansible 2.8.4
config file = /etc/ansible/ansible.cfg
configured module search path = [u'/root/.ansible/plugins/modules', u'/usr/share/ansible/plugins/modules']
ansible python module location = /usr/lib/python2.7/site-packages/ansible
executable location = /usr/bin/ansible
python version = 2.7.5 (default, Oct 30 2018, 23:45:53) [GCC 4.8.5 20150623 (Red Hat 4.8.5-36)]
四、Ansible Ad-Hoc
4.1)什么是ad-hoc
ad-hoc简而言之就是“临时命令”,执行完即结束,并不会保存。
4.2)ad-hoc模式的使用场景
比如在多台机器上查看某个进程是否启动,或拷贝指定文件到本地等等。
4.3)ad-hoc模式的命令使用,ansible 'oldboy' -m command -a 'df-h',含义如下图

4.4)使用ad-hoc执行一次远程命令,注意观察返回结果的颜色
绿色:代表被管理端主机没有被修改
黄色:代表被管理端主机发生变更
红色:代表出现了故障,注意查看提示
#打印两台主机的磁盘状态信息
[root@m01 project1]# ansible oldboy -m command -a "df -h" -i hosts
172.16.1.8 | CHANGED | rc=0 >>
Filesystem Size Used Avail Use% Mounted on
/dev/sda3 18G 1.3G 17G 8% /
devtmpfs 476M 0 476M 0% /dev
tmpfs 487M 0 487M 0% /dev/shm
tmpfs 487M 7.7M 479M 2% /run
tmpfs 487M 0 487M 0% /sys/fs/cgroup
/dev/sda1 1014M 127M 888M 13% /boot
tmpfs 98M 0 98M 0% /run/user/0
172.16.1.7 | CHANGED | rc=0 >>
Filesystem Size Used Avail Use% Mounted on
/dev/sda3 18G 1.3G 17G 8% /
devtmpfs 476M 0 476M 0% /dev
tmpfs 487M 0 487M 0% /dev/shm
tmpfs 487M 7.7M 479M 2% /run
tmpfs 487M 0 487M 0% /sys/fs/cgroup
/dev/sda1 1014M 127M 888M 13% /boot
tmpfs 98M 0 98M 0% /run/user/0
4.5)Ansible Ad-Hoc常用模块
| 模块类型 | 模块内容 |
|---|---|
| 命令模块 | command(默认)、shell模块、scripts模块 |
| 安装模块 | yum |
| 配置模块 | copy、file、get_url |
| 启动模块 | service、systemd |
| 用户模块 | user、group |
| 任务模块 | cron |
| 挂载模块 | mount |
| 防火墙模块 | firewall、selinux |
4.5.1)ad-hoc模式的常用模块有如下:
command          #执行shell命令(不支持管道等特殊字符)
shell            #执行shell命令
scripts          #执行shell命令
yum_repository   #配置yum仓库
yum              #安装软件
copy             #变更配置文件
file             #建立目录或文件
service          #启动与停止服务
mount            #挂载设备
cron             #定时任务
firewalld        #防火墙
get_url          #下载软件
4.5.1.1)使用过程中需要先了解ansible-doc帮助手册
[root@m01 project1]# ansible-doc -l #查看所有模块说明
[root@m01 project1]# ansible-doc copy #表示指定模块方法
[root@m01 project1]# ansible-doc -s copy #表示指定模块参数
#查看yum命令的帮助手册
[root@m01 ~]# ansible-doc yum
推荐直接看EXAMPLES示例
4.5.2)ansible常用模块
1)command
[root@m01 project1]# ansible oldboy -m command -a "ps aux|grep nginx" -i hosts
172.16.1.8 | FAILED | rc=1 >>
error: unsupported option (BSD syntax)
Usage:
ps [options]
Try 'ps --help <simple|list|output|threads|misc|all>'
or 'ps --help <s|l|o|t|m|a>'
for additional help text.
For more details see ps(1).non-zero return code
172.16.1.7 | FAILED | rc=1 >>
error: unsupported option (BSD syntax)
Usage:
ps [options]
Try 'ps --help <simple|list|output|threads|misc|all>'
or 'ps --help <s|l|o|t|m|a>'
for additional help text.
For more details see ps(1).non-zero return code
2)shell
[root@m01 project1]# ansible oldboy -m shell -a "ps aux|grep nginx" -i hosts
172.16.1.7 | CHANGED | rc=0 >>
root 11433 0.0 0.1 113176 1220 pts/0 S+ 19:53 0:00 /bin/sh -c ps aux|grep nginx
root 11435 0.0 0.0 112708 968 pts/0 S+ 19:53 0:00 grep nginx
172.16.1.8 | CHANGED | rc=0 >>
root 9650 0.0 0.2 47084 2048 ? Ss 07:46 0:00 nginx: master process /usr/sbin/nginx -c /etc/nginx/nginx.conf
www 9751 0.0 0.2 47088 2192 ? S 07:56 0:00 nginx: worker process
root 11599 0.0 0.1 113176 1220 pts/0 S+ 19:53 0:00 /bin/sh -c ps aux|grep nginx
root 11601 0.0 0.0 112708 968 pts/0 S+ 19:53 0:00 grep nginx
command不支持管道技术
shell支持管道技术
不指定-m 默认使用的是command模块
3)script
[root@m01 ~]# vim vsftpd.sh
#!/usr/bin/bash
mkdir /tmp/zls
[root@m01 ~]# ansible 'web01' -m script -a '/root/vsftpd.sh'
[root@m01 ~]# ansible 'web01' -m shell -a 'ls -l /tmp'
4)安装---yum模块(安装present 卸载absent 升级latest 排除exclude 指定仓库enablerepo)
[root@m01 ~]# ansible 'web_group' -m yum -a 'name=vsftpd state=present'
#相当于:yum install -y vsftpd
[root@m01 ~]# ansible 'web_group' -m yum -a 'name=https://mirrors.aliyun.com/zabbix/zabbix/4.0/rhel/7/x86_64/zabbix-agent-4.0.0-2.el7.x86_64.rpm state=present'
#相当于:yum install -y https://mirrors.aliyun.com/zabbix/zabbix/4.0/rhel/7/x86_64/zabbix-agent-4.0.0-2.el7.x86_64.rpm
[root@m01 ~]# ansible 'web_group' -m yum -a 'name=file:///root/nagios-4.4.3-1.el7.x86_64.rpm state=present'
#相当于:yum localinstall -y nagios-4.4.3-1.el7.x86_64.rpm
[root@m01 ~]# ansible 'web_group' -m yum -a 'name=vsftpd state=absent'
#相当于:yum remove -y vsftpd
name
httpd #指定要安装的软件包名称
file:// #指定本地安装路径(yum localinstall 本地rpm包)
http:// #指定yum源(从远程仓库获取rpm包)
state #指定使用yum的方法
installed,present #安装软件包
removed,absent #移除软件包
latest #安装最新软件包
EXAMPLES:安装最新版本的Apache
- name: install the latest version of Apache
yum:
name: httpd
state: latest
EXAMPLES:删除Apache
- name: remove the Apache package
yum:
name: httpd
state: absent
EXAMPLES:从testing仓库中安装最新版本的Apache(present正常安装)
- name: install the latest version of Apache from the testing repo
yum:
name: httpd
enablerepo: testing
state: present
EXAMPLES:安装指定版本的Apache
- name: install one specific version of Apache
yum:
name: httpd-2.2.29-1.4.amzn1
state: present
EXAMPLES:更新所有的软件包
- name: upgrade all packages
yum:
name: '*'
state: latest
EXAMPLES: 更新所有的软件包,但排除所有内核包及foo包
- name: upgrade all packages, excluding kernel & foo related packages
yum:
name: '*'
state: latest
exclude: kernel*,foo*
EXAMPLES: 从远程的仓库中安装nginx
- name: install the nginx rpm from a remote repo
yum:
name: http://nginx.org/packages/centos/6/noarch/RPMS/nginx-release-centos-6-0.el6.
state: present
EXAMPLES: 从本地的仓库中安装nginx
- name: install nginx rpm from a local file
yum:
name: /usr/local/src/nginx-release-centos-6-0.el6.ngx.noarch.rpm
state: present
EXAMPLES: 安装组包
- name: install the 'Development tools' package group
yum:
name: "@Development tools"
state: present
#示例一、安装当前最新的Apache软件,如果存在则更新
[root@m01 project1]# ansible oldboy -m yum -a "name=httpd state=latest" -i hosts
#示例二、安装当前最新的Apache软件,通过epel仓库安装
[root@m01 project1]# ansible oldboy -m yum -a "name=httpd state=latest enablerepo=epel" -i hosts
#示例三、通过公网URL安装rpm软件
[root@m01 project1]# ansible oldboy -m yum -a "name=https://mirrors.aliyun.com/zabbix/zabbix/4.2/rhel/7/x86_64/zabbix-agent-4.2.3-2.el7.x86_64.rpm state=latest" -i hosts
#示例五、更新所有的软件包,但排除和kernel相关的
[root@m01 project1]# ansible oldboy -m yum -a "name=* state=latest exclude=kernel*,foo*" -i hosts
#示例六、删除Apache软件
[root@m01 project1]# ansible oldboy -m yum -a "name=httpd state=absent" -i hosts
5)yum_repository
- name: Add repository
yum_repository:
name: epel
description: EPEL YUM repo
baseurl: https://download.fedoraproject.org/pub/epel/$releasever/$basearch/
#添加yum仓库
ansible 'web_group' -m yum_repository -a 'name=zls_epel,zls_base description=EPEL baseurl=https://download.fedoraproject.org/pub/epel/$releasever/$basearch/ gpgcheck=no enabled=yes file=zls_epel'
#添加mirrorlist
ansible 'web_group' -m yum_repository -a 'name=zls_epel description=EPEL baseurl=https://download.fedoraproject.org/pub/epel/$releasever/$basearch/ gpgcheck=no enabled=yes file=epel mirrorlist=http://mirrorlist.repoforge.org/el7/mirrors-rpmforge'
#删除yum仓库
ansible 'web_group' -m yum_repository -a 'name=zls_epel,zls_base file=zls_epel state=absent'
#修改yum仓库
ansible 'web_group' -m yum_repository -a 'name=epel description=EPEL baseurl=https://download.fedoraproject.org/pub/epel/$releasever/$basearch/ gpgcheck=no enabled=no file=epel'
name #指定仓库名字
description #添加描述(repo文件中的name)
baseurl #指定yum仓库的地址
gpgcheck #是否开启校验
yes
no
enabled #是否启用yum仓库
yes
no
file #指定仓库文件名
state
absent #删除yum仓库
present #创建yum仓库
ansible 'web_group' -m yum_repository -a 'name=zls_yum description=EPEL baseurl=http://www.driverzeng.com gpgcheck=no enabled=no file=zls'
4.5.3)ansible文件管理
1)copy
- name: Copy file with owner and permissions
copy:
src: /srv/myfiles/foo.conf
dest: /etc/foo.conf
owner: foo
group: foo
mode: '0644'
#推送文件
[root@m01 ~]# ansible 'web_group' -m copy -a 'src=/root/index.html dest=/var/www/html owner=root group=root mode=0644'
#推送文件并备份
[root@m01 ~]# ansible 'web_group' -m copy -a 'src=/root/index.html dest=/var/www/html owner=root group=root mode=0644 backup=yes'
#编辑nfs配置文件
[root@m01 ~]# ansible 'web_group' -m copy -a 'content="/data 172.16.1.0/24(rw,sync,all_squash,anonuid=666,anongid=666)" dest=/etc/exports'
src #指定推送的源文件
dest #指定推送的目标位置
owner #指定属主
group #指定属组
mode #指定权限(数字方式)
content #在指定文件中添加内容
backup #是否备份(注意:控制端和被控端,内容不一致才会备份)
yes
no
EXAMPLES: 拷贝文件
- name: Copy file with owner and permissions
copy:
src: /srv/myfiles/foo.conf #拷贝的内容
dest: /etc/foo.conf #拷贝到目标机器上哪个位置
owner: foo #属主
group: foo #属组
mode: '0644' #其权限
2)file
- name: Create an insecure file
file:
path: /work
owner: root
group: root
mode: 0755
#创建目录 mkdir
[root@m01 ~]# ansible 'web_group' -m file -a 'path=/backup state=directory owner=adm group=adm mode=0700'
#递归创建目录并授权chown -R chmod -R
[root@m01 ~]# ansible 'web_group' -m file -a 'path=/zls/mysql/db01 state=directory owner=adm group=adm mode=0700 recurse=yes'
#创建文件(前提条件,上级目录必须存在) touch
[root@m01 ~]# ansible 'web_group' -m file -a 'path=/root/zls.txt state=touch'
#删除目录 rm -fr
[root@m01 ~]# ansible 'web_group' -m file -a 'path=/backup state=absent'
#做软链接 ln -s
[root@m01 ~]# ansible 'web_group' -m file -a 'src=/root/zls.txt dest=/root/zls.txt.ori state=link'
src #指定软链接的源文件
dest #指定软连接的目标文件
path #指定创建目录或文件
state
touch #创建文件
directory #创建目录
absent #删除目录或文件
link #做软链接
owner #指定属主
group #指定属组
mode #指定权限
recurse #递归授权
yes
no
3)get_url
- name: Download foo.conf
get_url:
url: http://example.com/path/file.conf
dest: /etc/foo.conf
mode: '0440'
#下载worldpress代码
[root@m01 ~]# ansible 'web_group' -m get_url -a 'url=http://test.driverzeng.com/Nginx_Code/wordpress-5.0.3-zh_CN.tar.gz dest=/root mode=0777'
#下载并校验MD5
[root@m01 ~]# ansible 'web_group' -m get_url -a 'url=http://test.driverzeng.com/Nginx_Code/test.txt dest=/root mode=0777 checksum=md5:ba1f2511fc30423bdbb183fe33f3dd0f'
url #指定下载文件的url
dest #指定下载的位置
mode #指定下载后的权限
checksum #校验
md5 #md5校验
sha256 #sha256校验
4.5.4)ansible服务管理模块
1)service,systemd
[root@m01 ~]# ansible 'web_group' -m systemd -a 'name=httpd state=stopped enabled=yes'
[root@m01 ~]# ansible 'web_group' -m systemd -a 'name=httpd state=started enabled=yes'
[root@m01 ~]# ansible 'web_group' -m systemd -a 'name=httpd state=restarted enabled=yes'
[root@m01 ~]# ansible 'web_group' -m systemd -a 'name=httpd state=reloaded enabled=yes'
name #指定服务名称
state
started #启动
stopped #停止
restarted #重启
reloaded #重载
enabled #是否开机自启
yes
no
4.5.5)ansible用户管理模块
1)group
- name: Ensure group "somegroup" exists
group:
name: somegroup
state: present
#创建组
[root@m01 ~]# ansible 'web_group' -m group -a 'name=www gid=666 state=present'
#删除组
[root@m01 ~]# ansible 'web_group' -m group -a 'name=www gid=666 state=absent'
name #指定组名
gid #指定gid
state
present #创建
absent #删除
2)user
- name: Create a 2048-bit SSH key for user jsmith in ~jsmith/.ssh/id_rsa
user:
name: jsmith
generate_ssh_key: yes
ssh_key_bits: 2048
ssh_key_file: .ssh/id_rsa
#创建用户
[root@m01 ~]# ansible 'web_group' -m user -a 'name=www uid=666 group=www state=present shell=/sbin/nologin create_home=false'
#删除用户
[root@m01 ~]# ansible 'web_group' -m user -a 'name=www uid=666 state=absent'
#创建用户的同时创建密钥对
[root@m01 ~]# ansible 'web_group' -m user -a 'name=zls generate_ssh_key=yes ssh_key_bits=2048 ssh_key_file=.ssh/id_rsa'
name #指定用户名
uid #指定uid
group #指定属组
groups #指定附加组
state
present #创建用户
absent #删除用户
shell #指定用户登录的shell
/bin/bash
/sbin/nologin
create_home #是否创建家目录
true
false
comment #添加注释
generate_ssh_key #创建密钥对
ssh_key_bits #指定密钥对长度
ssh_key_file #指定密钥文件

 浙公网安备 33010602011771号