
 异步全双工
异步全双工
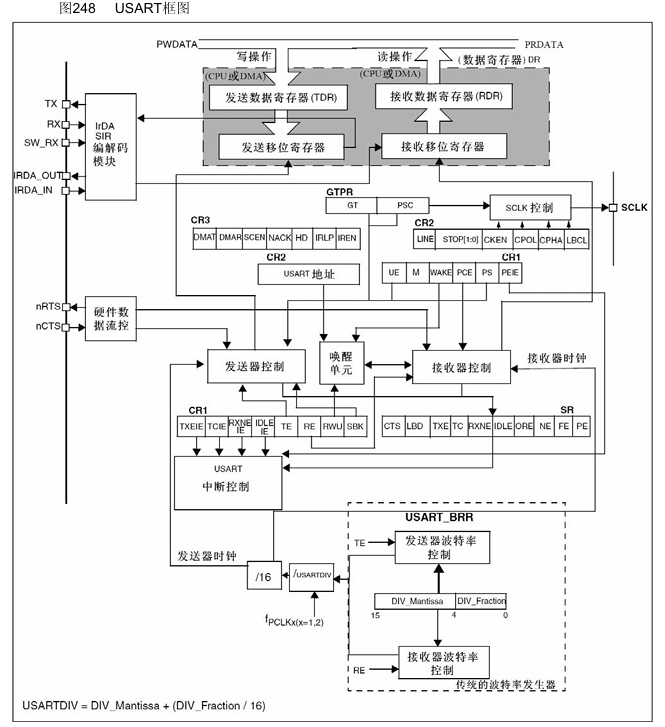
USART可以理解为设备,也可以理解为协议;
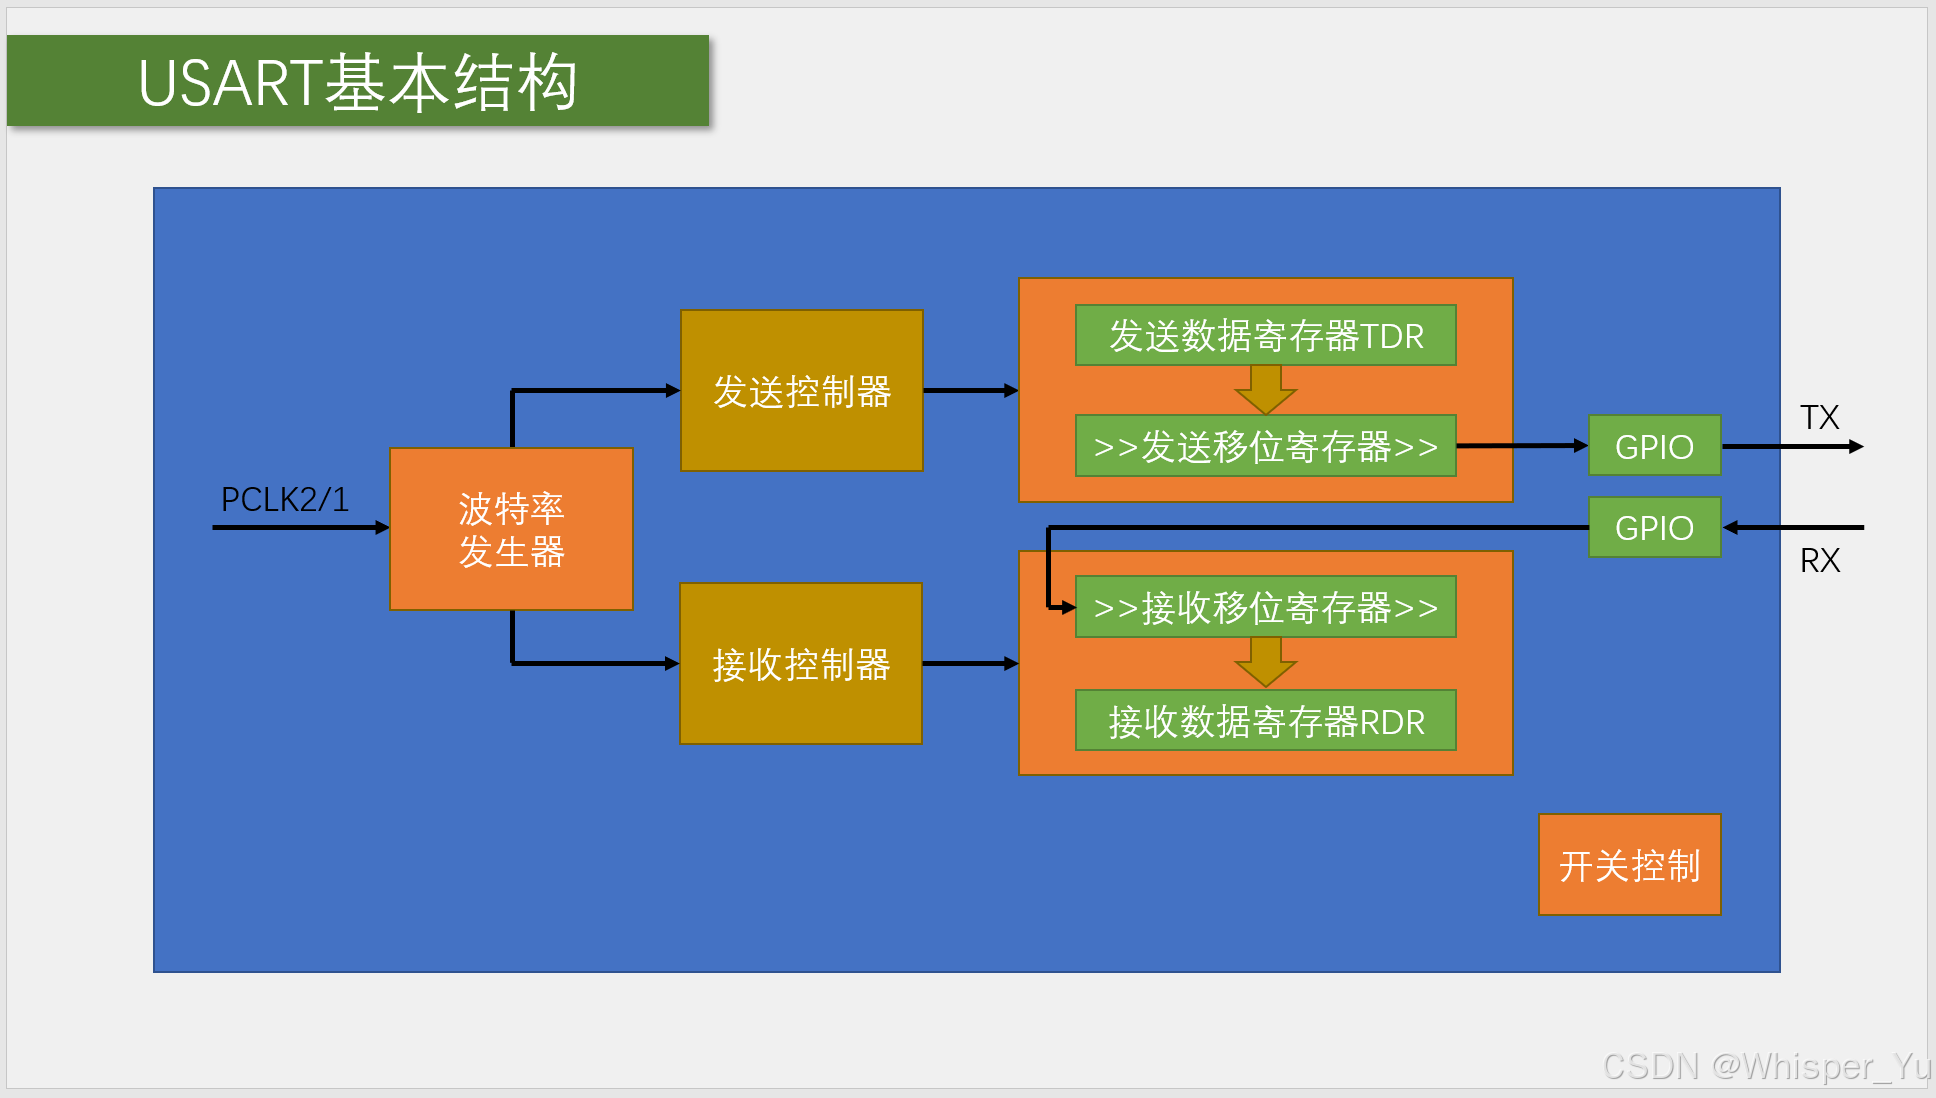
(1)理解为设备时,USART是集成在STM32芯片内的硬件设备(独立于STM32内核),USART设备在STM32中的作用:
① 将数据寄存器中字节数据自动生成数据帧时序,从TX引脚发送出去;自动接收RX引脚中的数据帧时序,拼接成字节数据,保存到数据寄存器中;
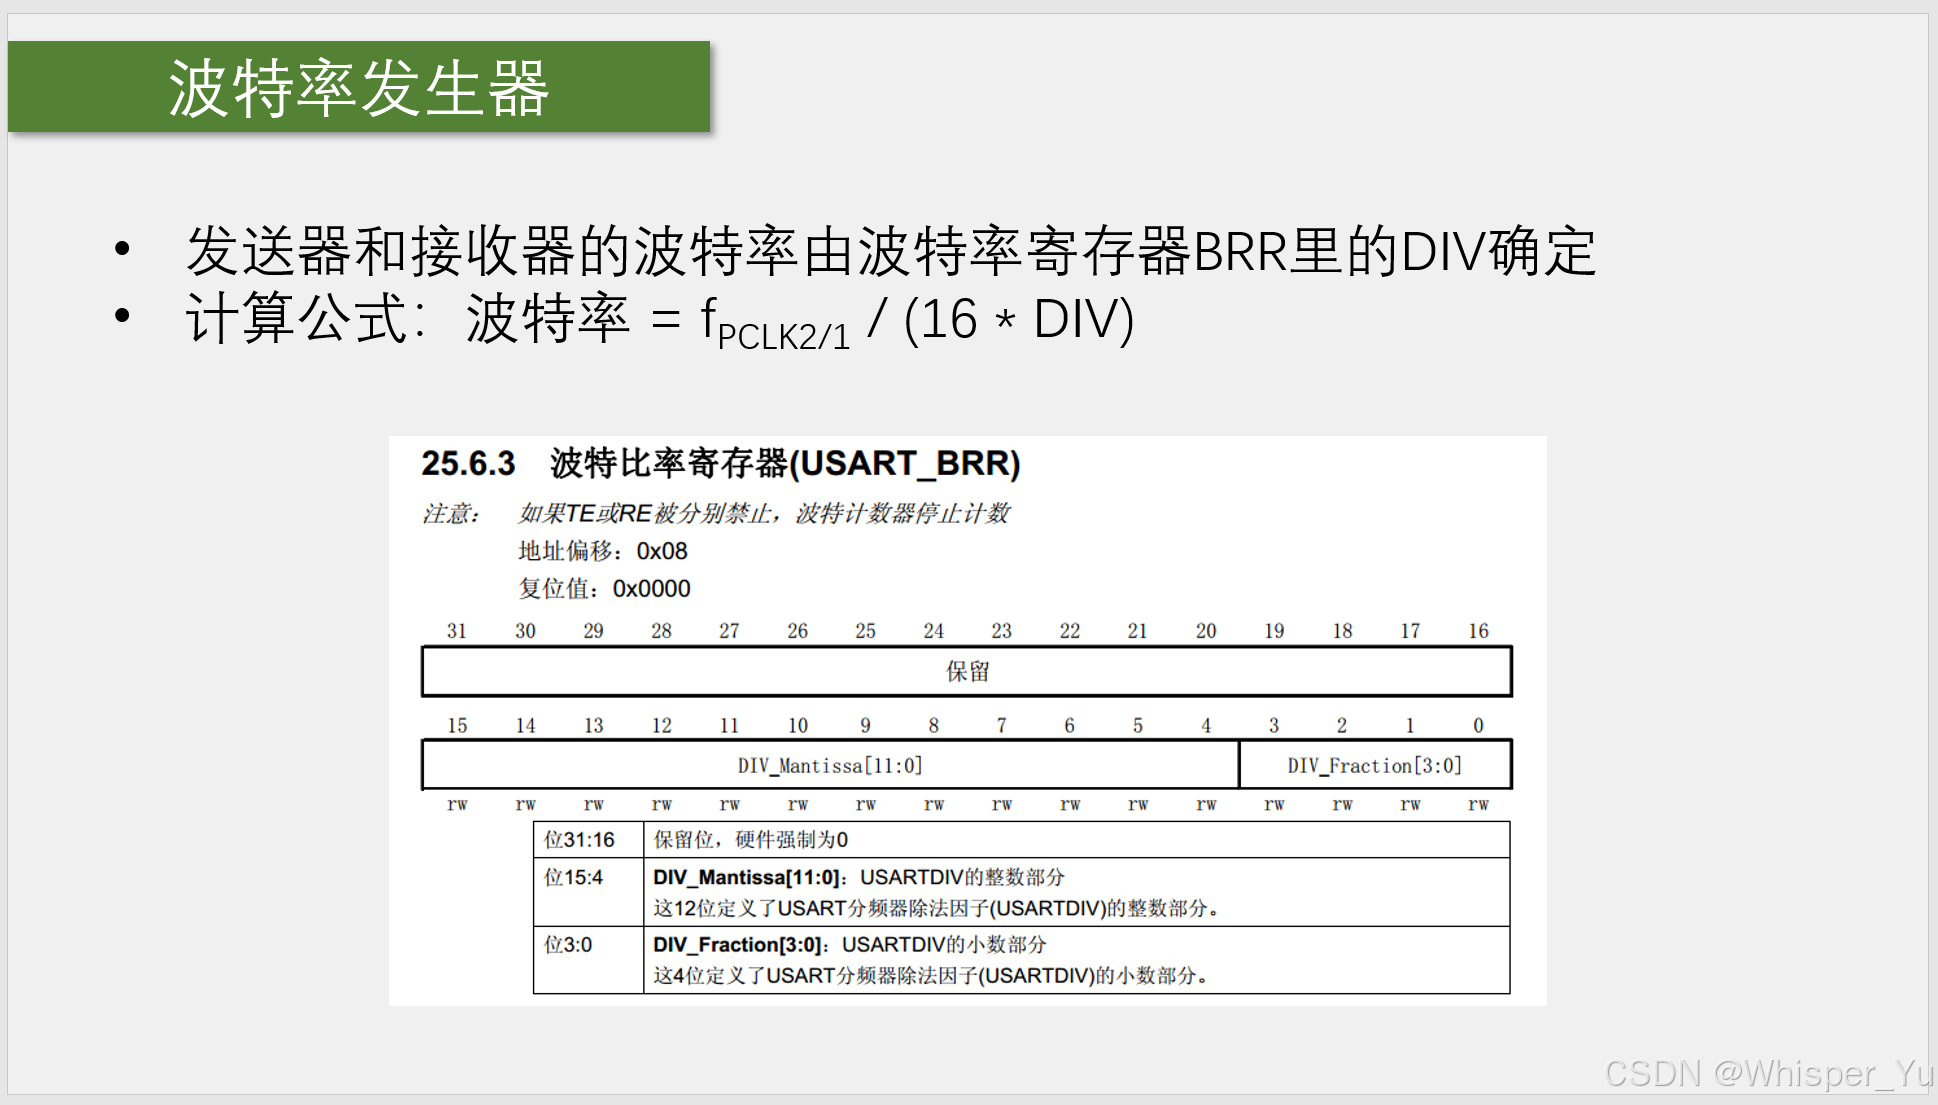
② 控制数据传输波特率(常用的波特率包括9600、19200、38400、115200等);
③ 配置数据帧的格式(起始位、数据位、可选的校验位和停止位)
④ 硬件流控制(RTS和CTS)
⑤ 中断控制,状态管理;
⑥ 通信模式(同步通信/异步通信)
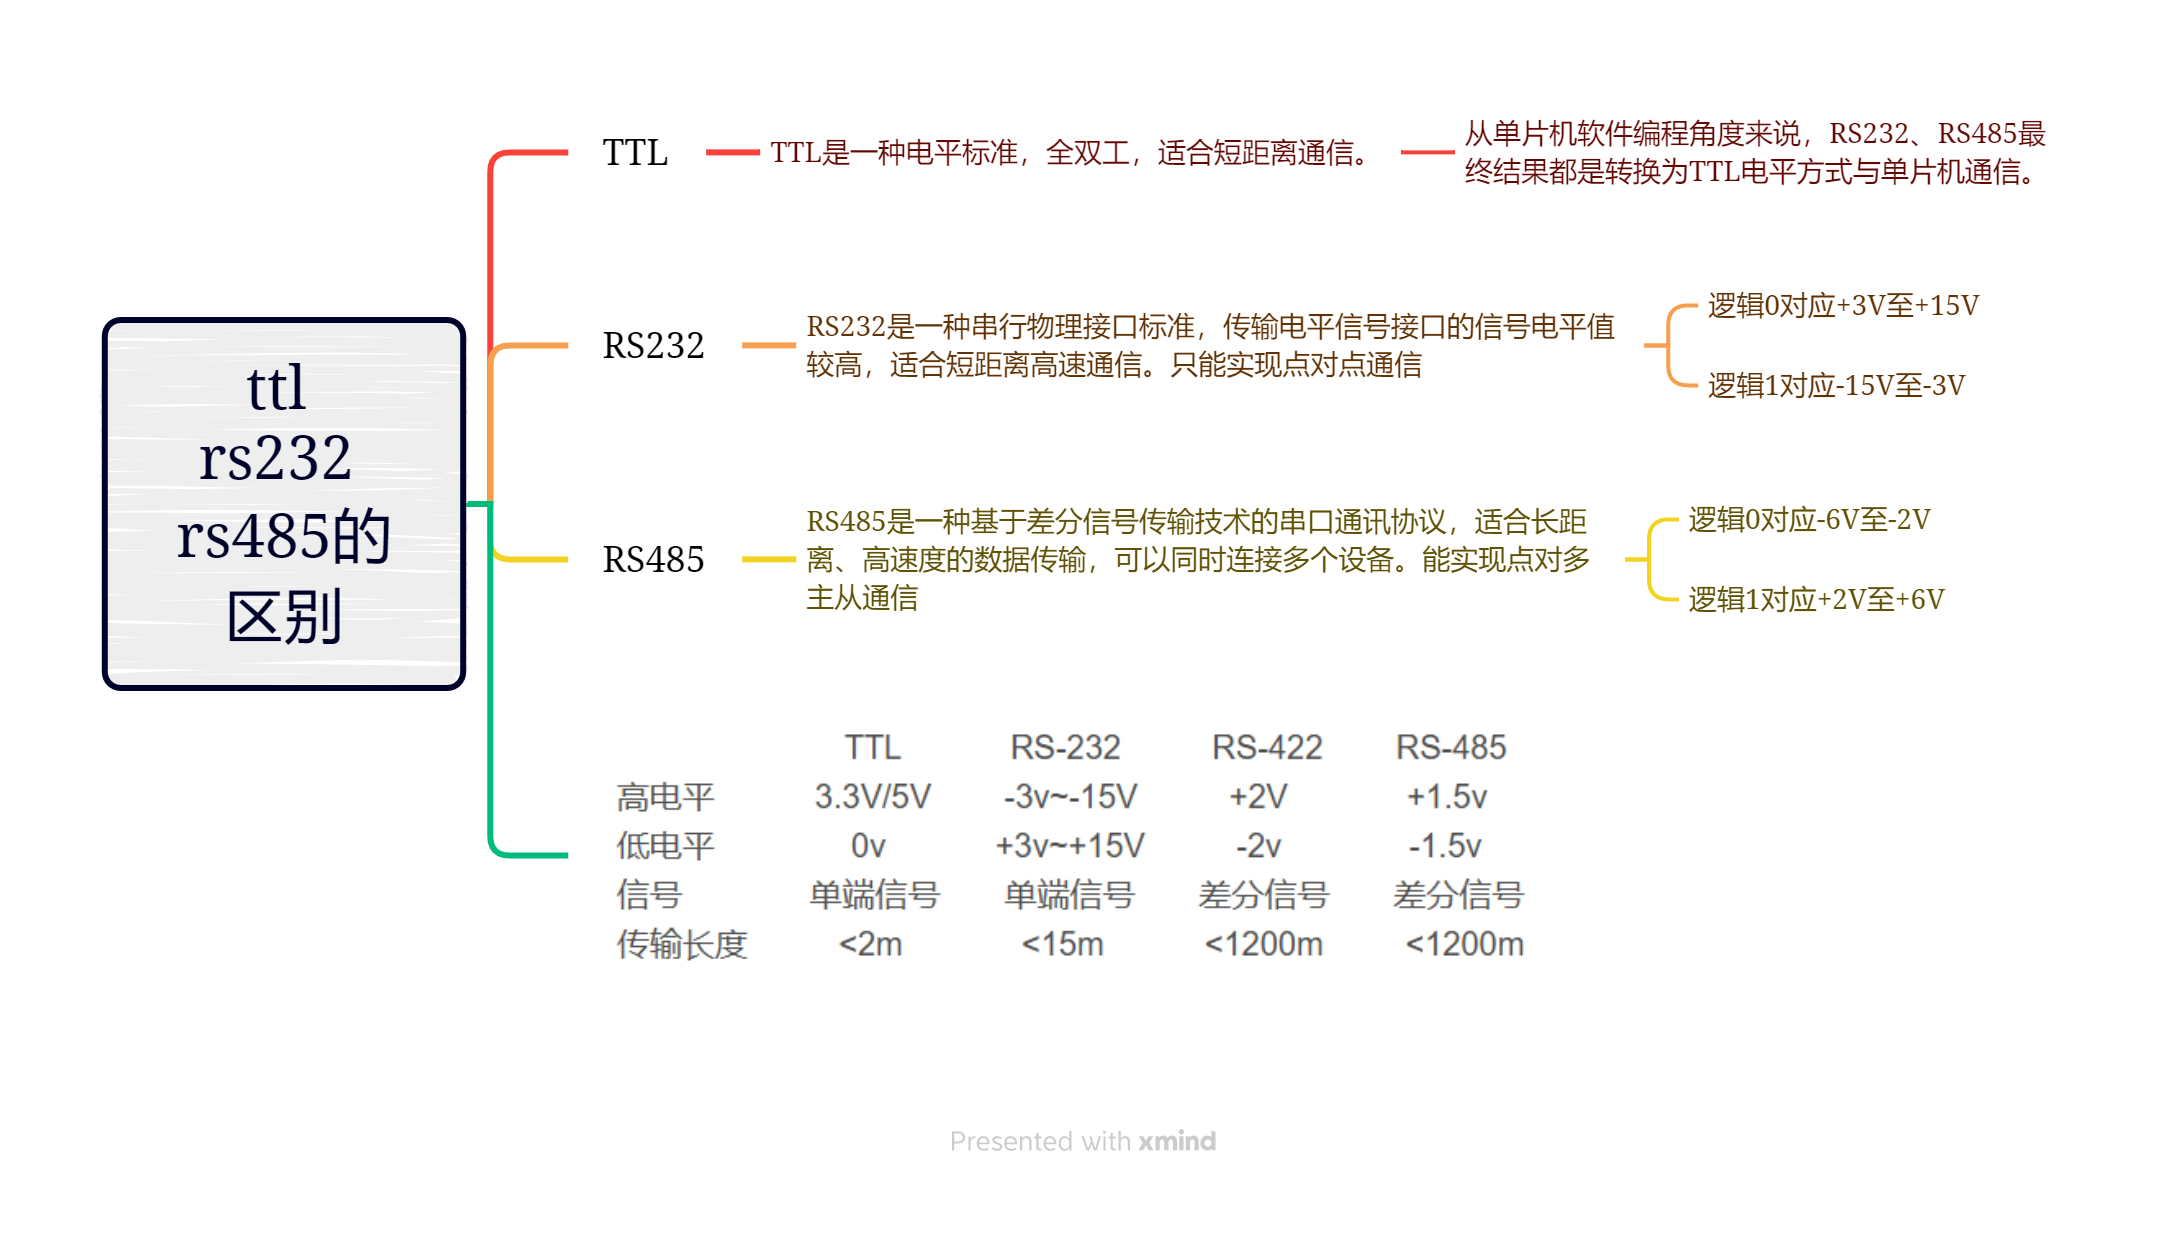
① TTL电平串口线:适用于短距离、低功耗的嵌入式系统
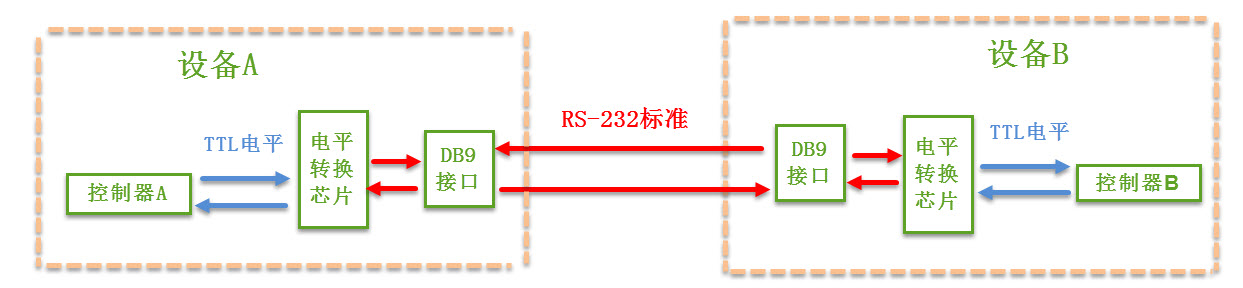
② RS-232电平串口线:适用于长距离通信,具有较强的抗干扰能力
③ USB转TTL串口线:用于开发板与计算机之间的通信,芯片包括CH340、CP2102等
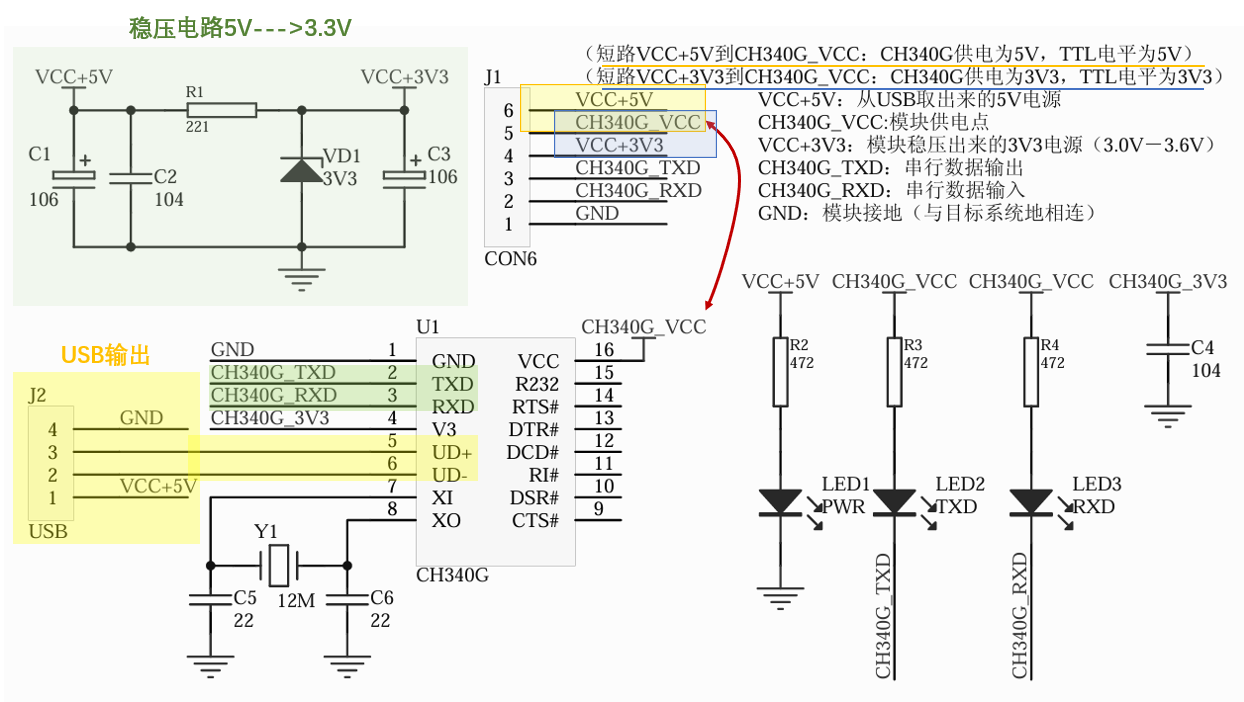
CH340G芯片:

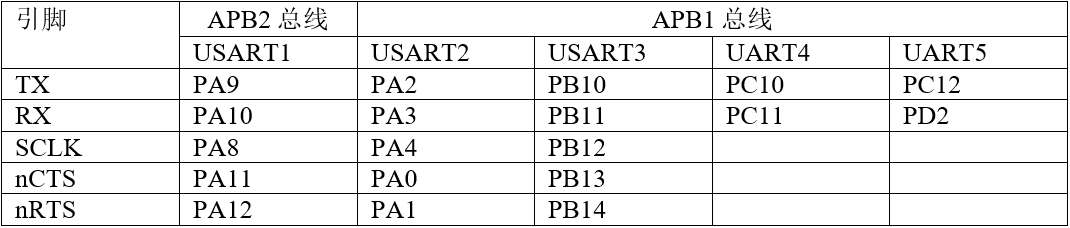
6、USART的引脚关系图
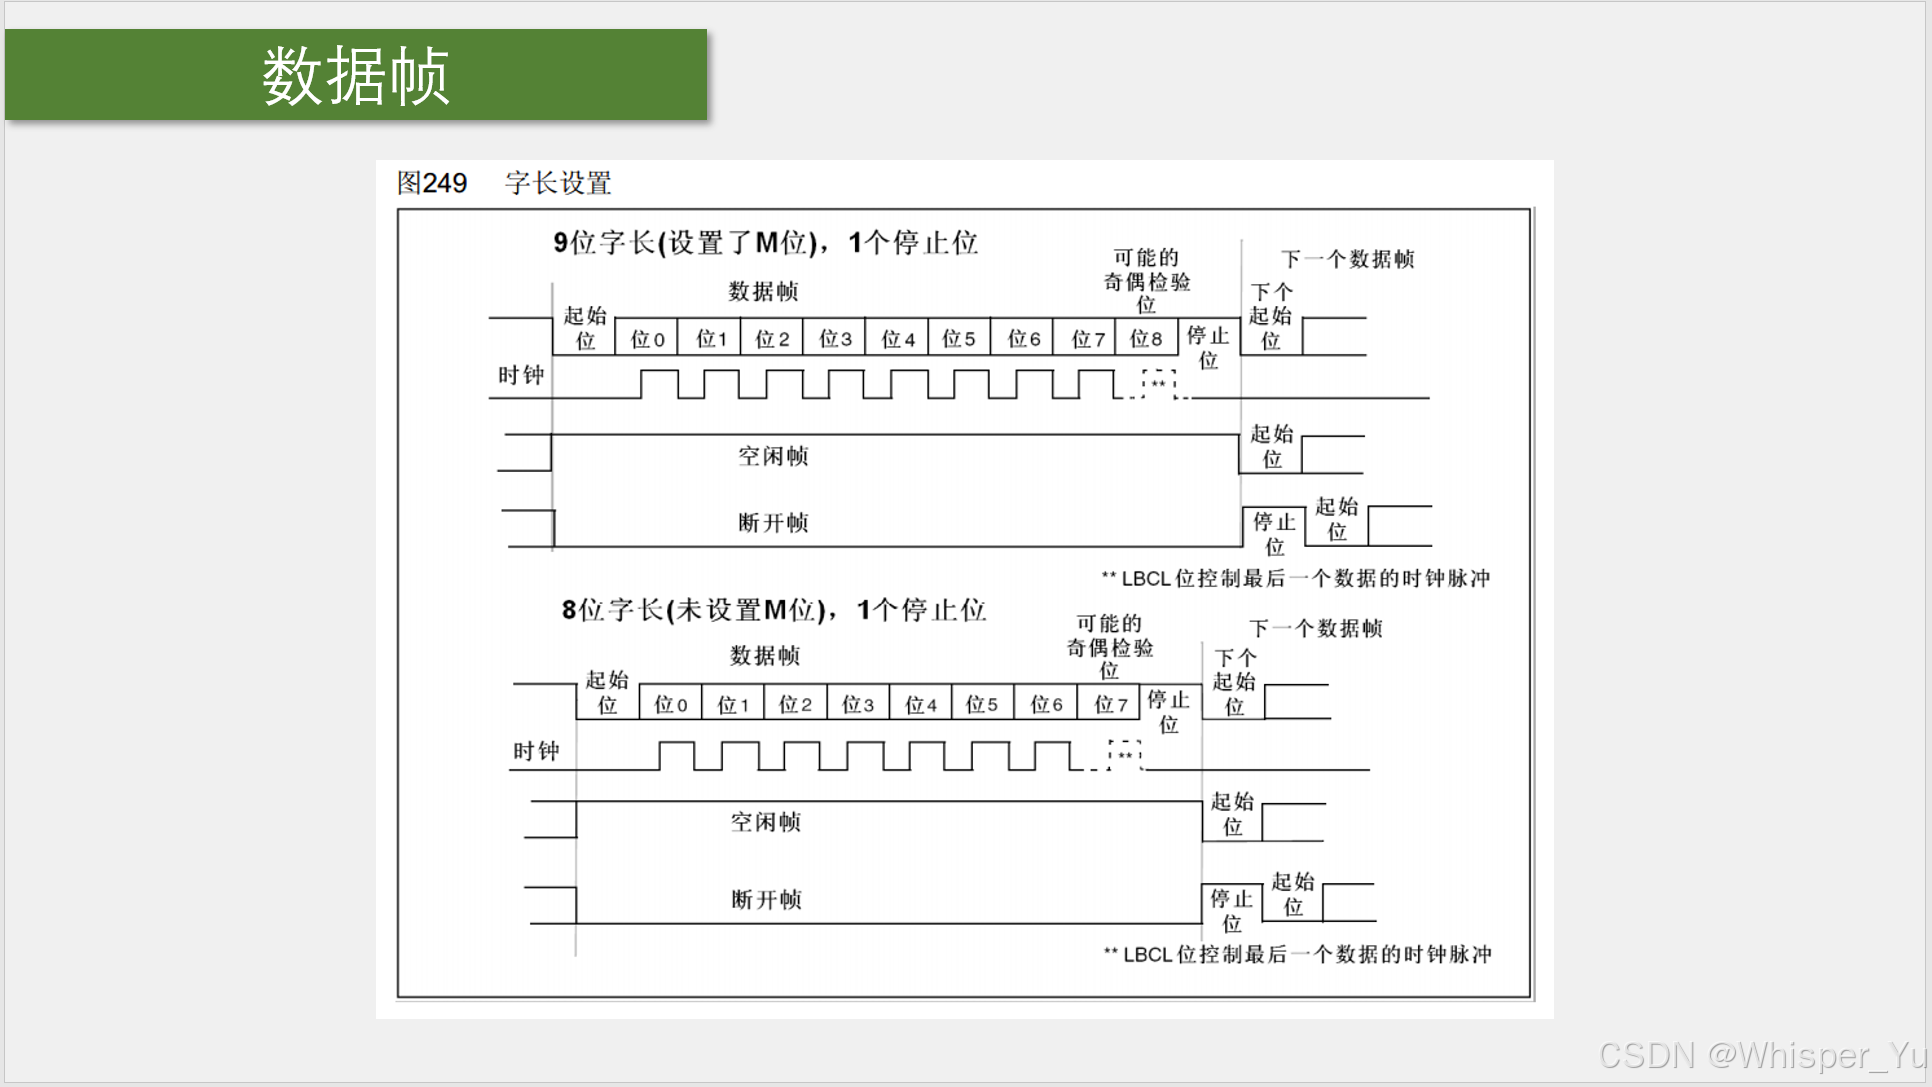
7、数据帧结构
8、波特率发生器
1、USART串口发送消息实验
2、USART初始化步骤:
(1)开启USART外设和GPIO引脚时钟
(2)初始化GPIO引脚,设置为复用推挽输出
(3)配置USART结构体
(4)打开USART开关
3、模块代码
serial.c 文件
#include "stm32f10x.h"                  // Device header
#include <stdio.h>
#include <stdarg.h>

void Serial_Init(void)
{
	RCC_APB2PeriphClockCmd(RCC_APB2Periph_USART1, ENABLE);
	RCC_APB2PeriphClockCmd(RCC_APB2Periph_GPIOA, ENABLE);

	GPIO_InitTypeDef GPIO_InitStructure;
	GPIO_InitStructure.GPIO_Mode = GPIO_Mode_AF_PP;
	GPIO_InitStructure.GPIO_Pin = GPIO_Pin_9;
	GPIO_InitStructure.GPIO_Speed = GPIO_Speed_50MHz;
	GPIO_Init(GPIOA, &GPIO_InitStructure);

	USART_InitTypeDef USART_InitStructure;
	USART_InitStructure.USART_BaudRate = 9600;
	USART_InitStructure.USART_HardwareFlowControl = USART_HardwareFlowControl_None;
	USART_InitStructure.USART_Mode = USART_Mode_Tx;
	USART_InitStructure.USART_Parity = USART_Parity_No;
	USART_InitStructure.USART_StopBits = USART_StopBits_1;
	USART_InitStructure.USART_WordLength = USART_WordLength_8b;
	USART_Init(USART1, &USART_InitStructure);

	USART_Cmd(USART1, ENABLE);
}

void Serial_SendByte(uint8_t Byte)
{
	USART_SendData(USART1, Byte);
	while (USART_GetFlagStatus(USART1, USART_FLAG_TXE) == RESET);
}

void Serial_SendArray(uint8_t *Array, uint16_t Length)
{
	uint16_t i;
	for (i = 0; i < Length; i ++)
	{
		Serial_SendByte(Array[i]);
	}
}

void Serial_SendString(char *String)
{
	uint8_t i;
	for (i = 0; String[i] != '\0'; i ++)
	{
		Serial_SendByte(String[i]);
	}
}

uint32_t Serial_Pow(uint32_t X, uint32_t Y)
{
	uint32_t Result = 1;
	while (Y --)
	{
		Result *= X;
	}
	return Result;
}

void Serial_SendNumber(uint32_t Number, uint8_t Length)
{
	uint8_t i;
	for (i = 0; i < Length; i ++)
	{
		Serial_SendByte(Number / Serial_Pow(10, Length - i - 1) % 10 + '0');
	}
}

int fputc(int ch, FILE *f)
{
	Serial_SendByte(ch);
	return ch;
}

void Serial_Printf(char *format, ...)
{
	char String[100];
	va_list arg;
	va_start(arg, format);
	vsprintf(String, format, arg);
	va_end(arg);
	Serial_SendString(String);
}
main.c文件
#include "stm32f10x.h"                  // Device header
#include "Delay.h"
#include "OLED.h"
#include "Serial.h"

int main(void)
{
	OLED_Init();

	Serial_Init();

	Serial_SendByte(0x41);

	uint8_t MyArray[] = {0x42, 0x43, 0x44, 0x45};
	Serial_SendArray(MyArray, 4);

	Serial_SendString("\r\nNum1=");

	Serial_SendNumber(111, 3);

	printf("\r\nNum2=%d", 222);

	char String[100];
	sprintf(String, "\r\nNum3=%d", 333);
	Serial_SendString(String);

	Serial_Printf("\r\nNum4=%d", 444);
	Serial_Printf("\r\n");

	while (1)
	{

	}
}

 浙公网安备 33010602011771号